Dreamy Blue Painted Dresser


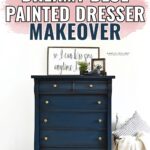
Have you been searching for the perfect way to give your bedroom furniture a beautiful transformation? Look no further than this DIY dreamy blue painted dresser makeover! With just a few simple steps, you can transform a basic painted dresser into an eye catching navy blue chalk paint dresser that is sure to be the envy of your friends.
So let’s dive into the world of blue painted furniture ideas and get started on creating your own painted dresser in beautiful and dreamy blue!
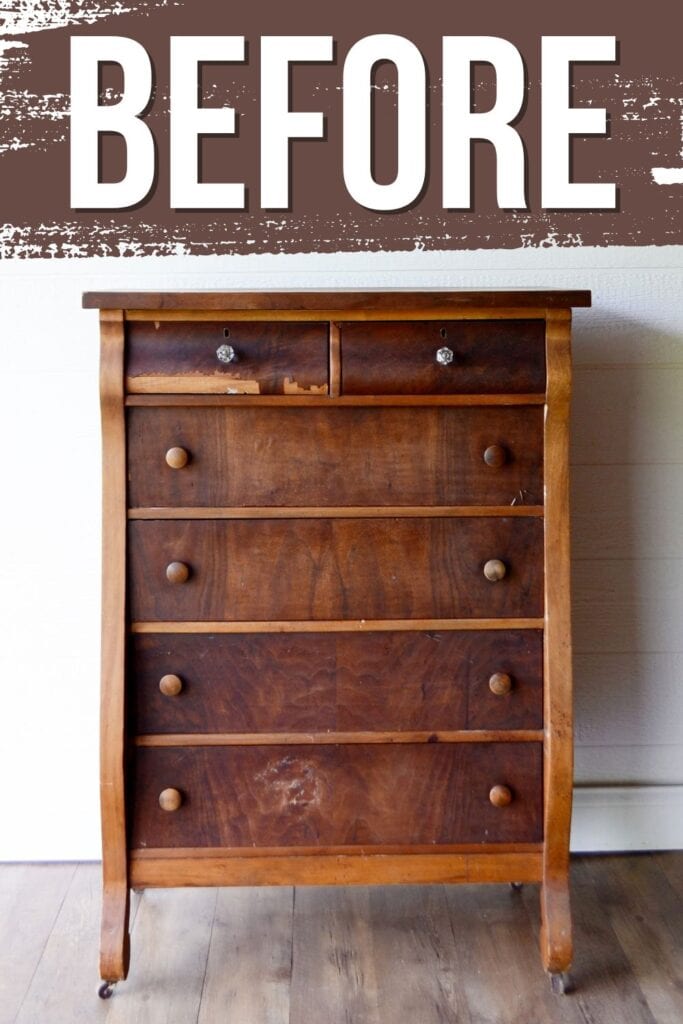
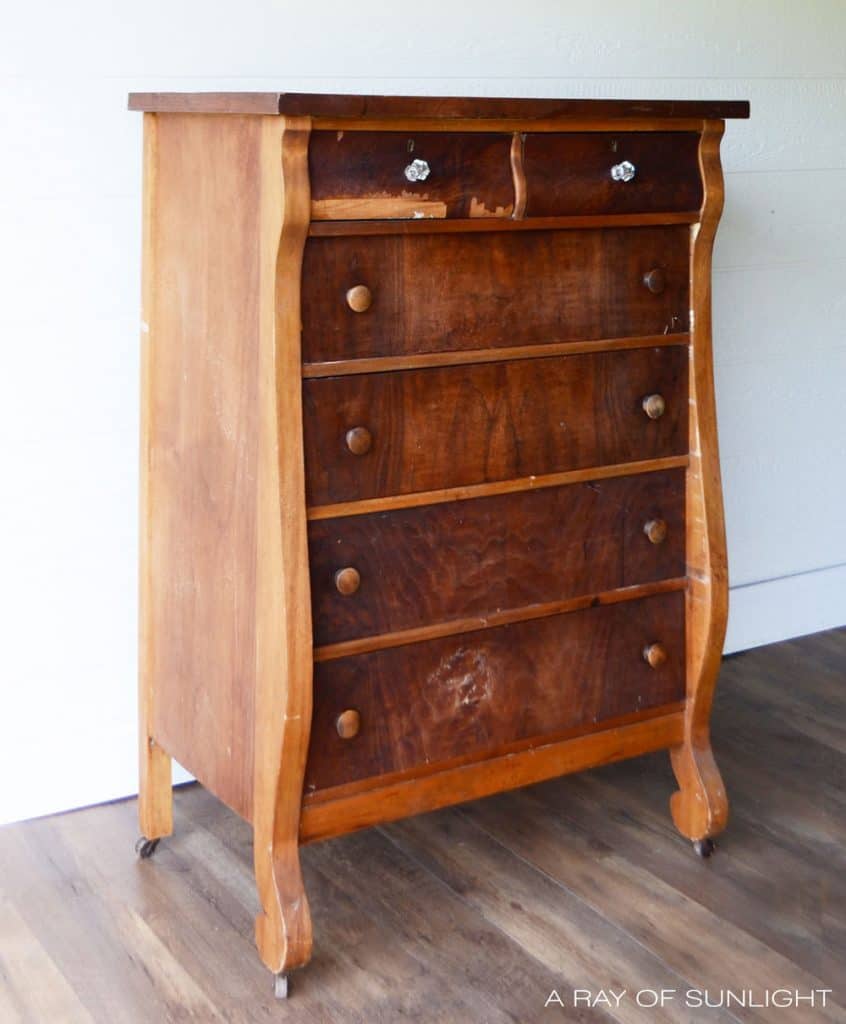
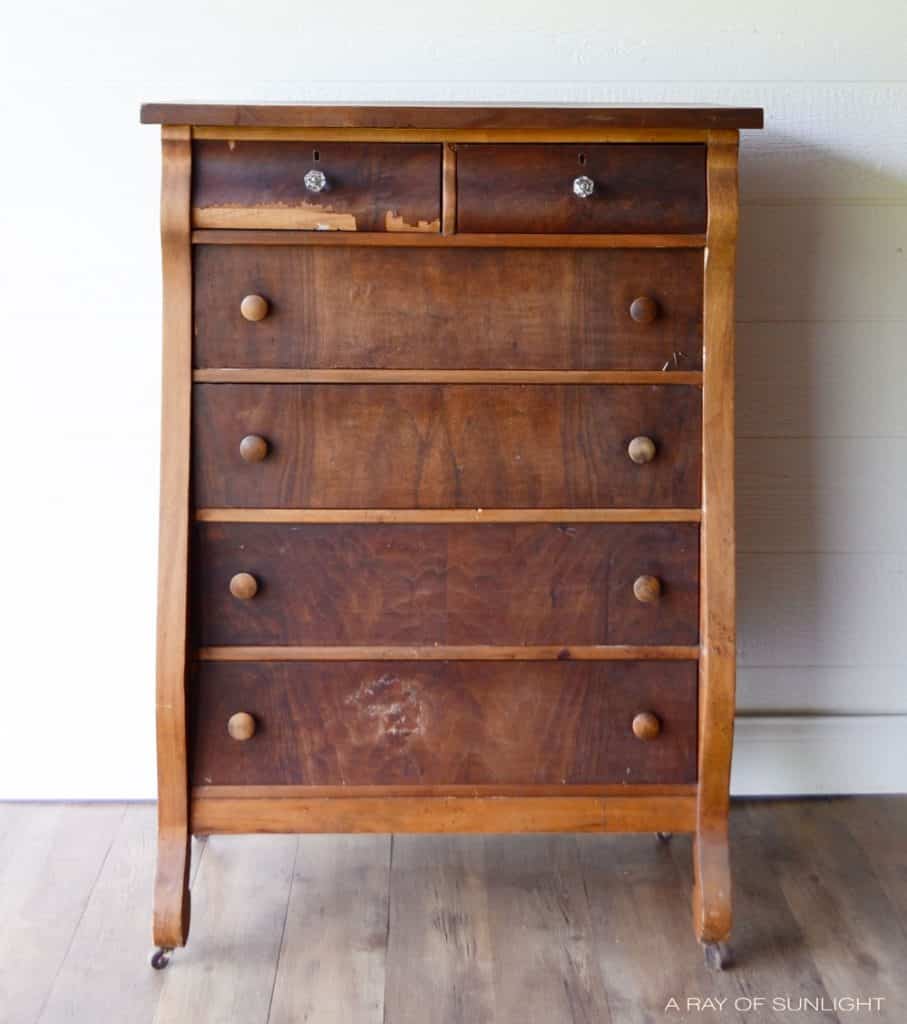
Can you believe that we picked this dresser up for free from Facebook Marketplace? It was in rough condition when we picked it up, but these are my favorite makeovers! It’s always amazing to see the transformation from old and worn to new and beautiful.

Using chalk paint, we turned this old dresser into a stunning piece that is not only functional but also adds a pop of color to our bedroom. And the best part was it was incredibly easy and budget friendly!
If you’re new to using chalk paint, this dresser makeover should introduce you to this type of paint. We also have a step by step tutorial on how to chalk paint furniture here, especially for beginners. For now let’s get updating and transforming this old dresser into a dreamy blue masterpiece!

Supplies Used for Blue Painted Dresser
As an Amazon Associate, I earn from qualifying purchases. I also may earn from other qualifying purchases with other companies or get free product to review and use. All opinions are my own.
- Vintage Empire Dresser
- Sandpaper to prep for paint
- Clear Shellac to prep for paint
- Paint Sprayer or Paint Brush
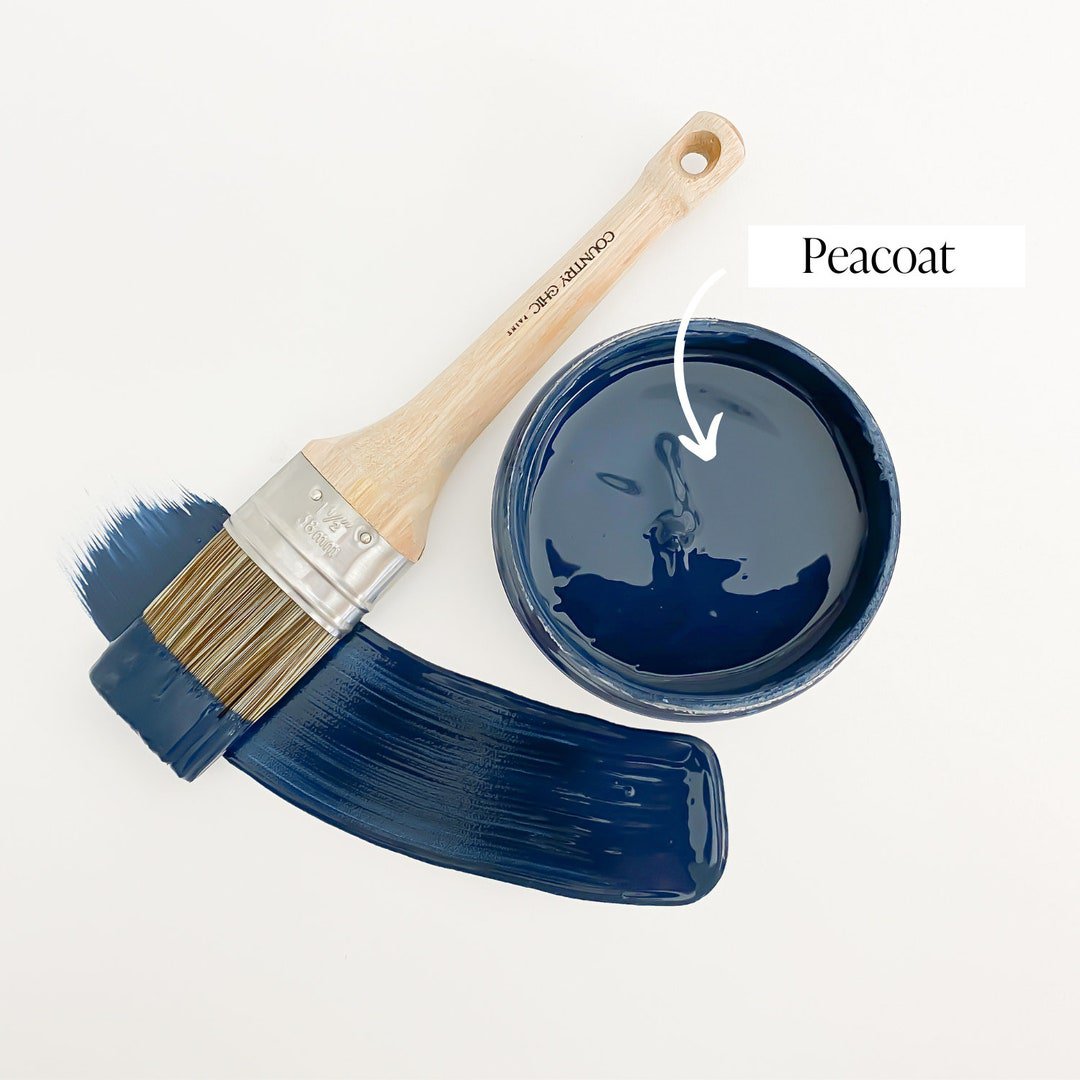
- Country Chic Paint in Peacoat
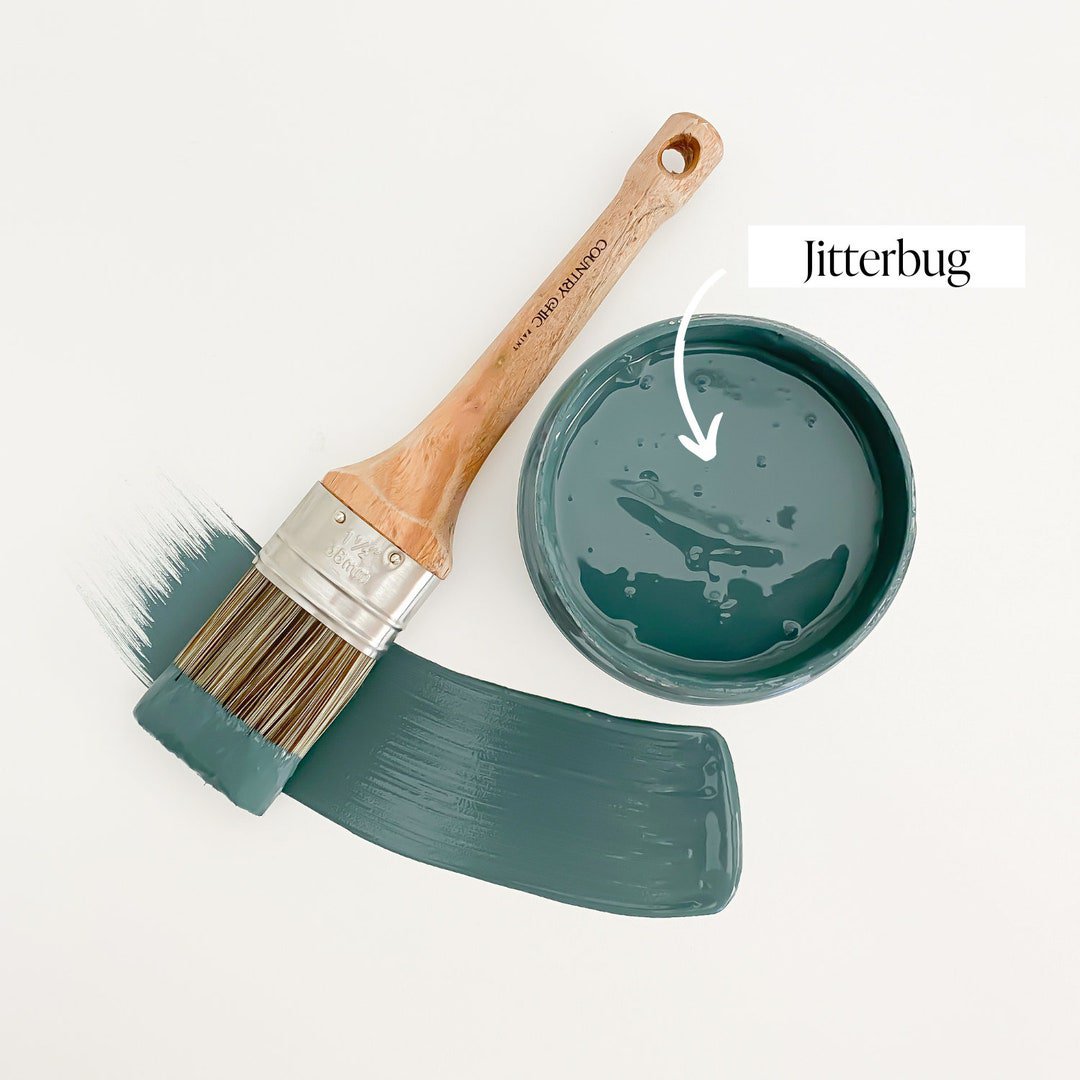
- Country Chic Paint in Jitterbug
- My Favorite Polyurethane
- Country Chic Paint Graphite Glaze
- Cheap Paint Brush for glaze
- Vinyl Gloves for glaze
- Baby Wipes for glaze
Check out my list of 10 must have painting furniture supplies here so you’re always ready for your next project!
How Much Paint Do You Need?
You can paint a dresser about this size with less than one pint of paint. I don’t think that the sample sizes would be enough, even when you use both colors.
You shouldn’t need any more than a sample size of the glaze though! (Glaze goes very far!) One can of shellac should be enough as well.
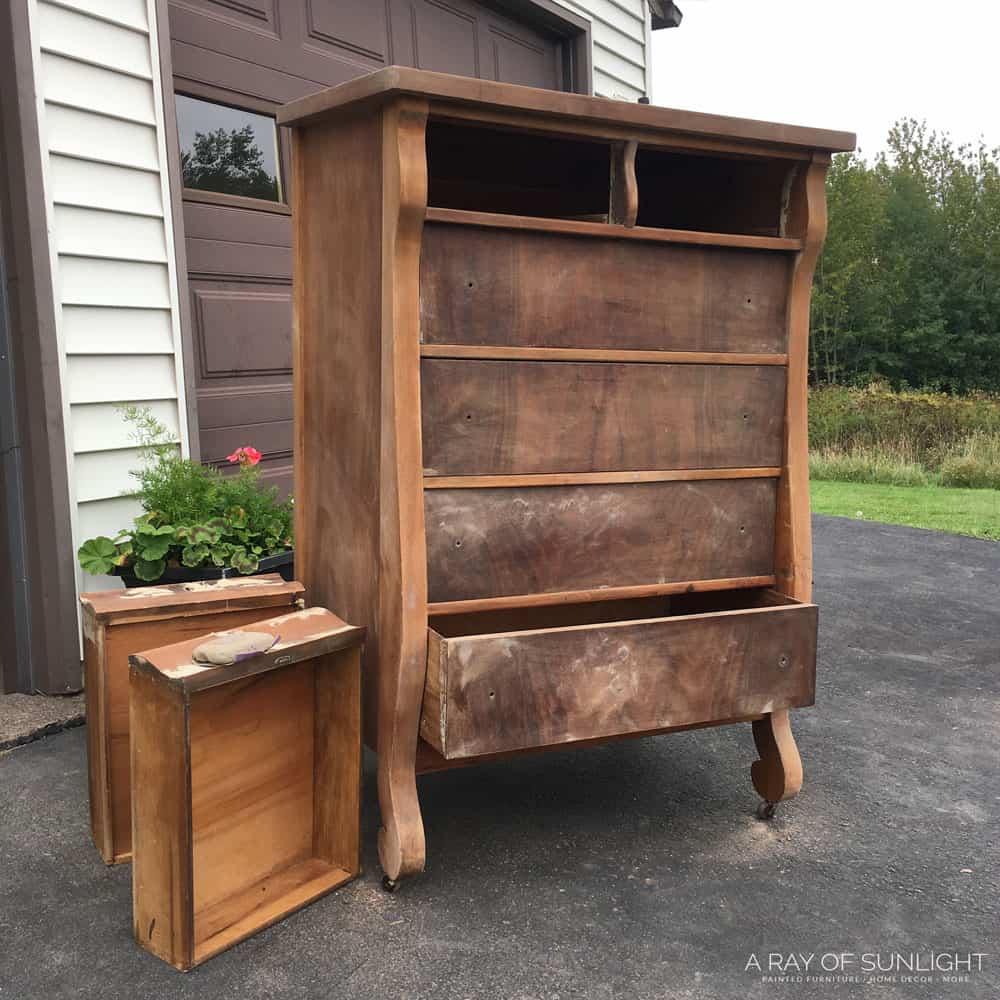
Repairing Damaged Veneer
This dresser needed a lot of extra attention before I could start painting! Look at that top left drawer!
The veneer had to be removed on the top drawers. And then filled in, in other areas. Want to repair without painting furniture? Learn how to repair chipped veneer furniture here. We also love this technique for wood stain repairs where you don’t need to restain the whole surface after you fix the damage.
Get Our Secrets!
Grab this super convenient How to Repair Furniture Ebook with all of our secrets on how to repair furniture for only $14.
You can print it out and have instant access whenever you come across damaged furniture, and know exactly how to fix it!
Click on the picture of the book to purchase!

If you have to remove the veneer, learn how to remove veneer here. If your furniture has chipped veneer that needs filled in, this is the best way to fix chipped veneer!
Prepping Dresser for Blue Paint
I know this is the step that always gets skipped over. But it’s honestly super important, even if you use chalk paint! Even though most chalk paint says that it will adhere to anything. Trust me, and don’t believe it.
Spend ten to fifteen minutes on a little bit of prep work so your newly painted furniture can last a long time! Read more about how to prepare furniture for painting here!
First, clean your furniture with a grease / oil cutting cleaner. I like to use Krud Kutter. Check out other options for cleaning furniture before painting here!
If your furniture has any slickness or shine to it, it MUST be scuff sanded (this should only take a few minutes) so then your paint has something to hold onto. Otherwise, the paint can easily scratch off, or even peel off!
Simply scuff sand with 220 grit sandpaper (this sandpaper is the BEST kind!). Find other great sandpaper for furniture painting options here. Rub it all over the dresser, making sure that it removes all of the shine. Check out this post to learn more about the importance of sanding before painting furniture and why you shouldn’t skip it.
If you don’t want to scuff sand by hand, here are the best sanders for furniture. Then remove the dust with a vacuum hose attachment and/or a damp lint-free rag. For the best dust removal, I like to use these tack cloths! They pick up all the dust and don’t leave any lint behind!
I know chalk paint says that you don’t need to prime. But, they don’t tell you about bleed-through issues you will most likely have if you don’t. Bleed through is a nasty bugger that shows up as little stains in your paint. No matter how many coats of paint you put on, they will just keep showing up.
And when you seal your chalk paint, they get even worse! (Just when you think you’re done with your project!) So I always give my furniture two coats of clear shellac to combat that mess. Check out the best primers for painting furniture (and how to choose the right one) here.
*Bonus! Shellac will help your chalk paint adhere even better!!
*Bonus 2.0! Since it’s clear, you can distress your painted furniture and not see ugly white primer underneath! Learn these distressing furniture techniques you can do to give your furniture that rustic worn look.
Spraying clear shellac is also one of the tricks on how to get rid of smoke smell in furniture and other unpleasant odors, especially if you got your piece from a thrift store. Learn more about how to get rid of bleed-through and how to stop stains from coming through paint here!
If you’re painting laminate furniture, you need to use a specific primer to really make sure that your paint will stick. Check out how to paint laminate furniture here.
How to Paint a Dresser Navy Blue
Okay, finally, we can move on to the paint! I mixed two colors to get this stunning blue chalk paint! Mix 2 parts Jitterbug chalk paint to 1 part Peacoat chalk paint. Check out this makeover on painting furniture navy blue, using Peacoat without mixing it with Jitterbug. Check out more dark blue painted furniture ideas here.
For more blue paint options, check out our list of best blue paint for furniture.
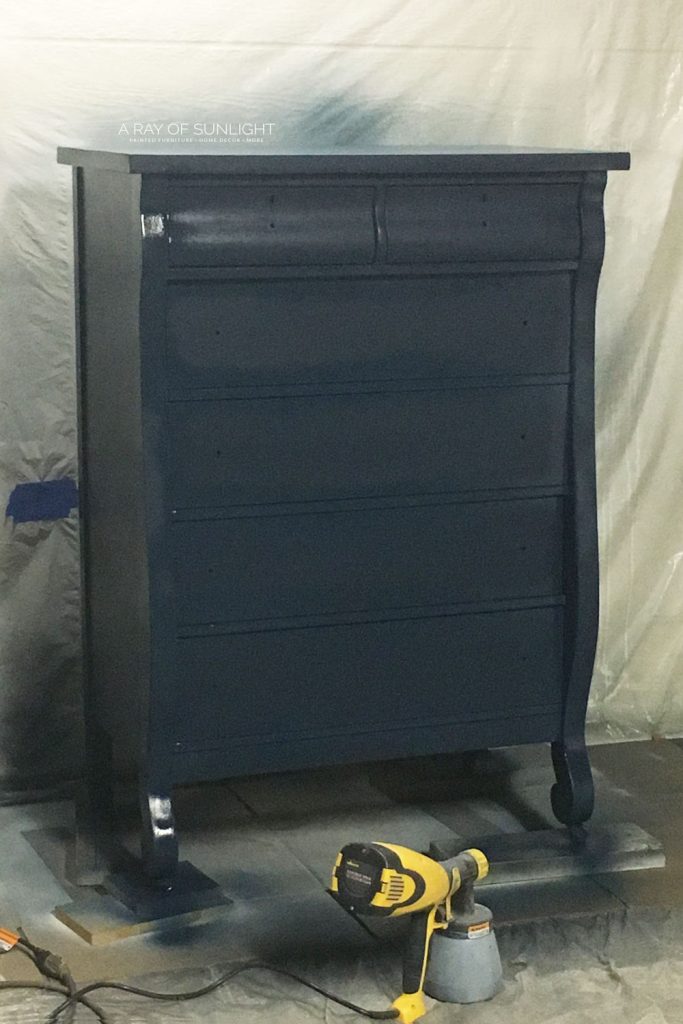
I used my cheap little Wagner Double Duty paint sprayer to paint on 2 coats. You can learn how to spray paint a dresser with chalk paint here if you haven’t tried before.
Note: The Double Duty sprayer has been discontinued, and the Wagner Control Spray 250 sprayer is its newer model. This one does not come with 2 containers or the viscosity cup though but both are still very similar. If you’re curious about this model, check out our Wagner Control Spray 250 review here!
But you can also use a paintbrush! If I have to use a paintbrush, I choose from this list of the best paint brushes for painting furniture. And check out this tips on how to paint furniture without brush marks to help you get a smooth finish when painting with a brush.
Would you like to save this?
One amazing thing about chalk paint is how fast it dries! Make sure to let your paint dry between coats. This is what it looked like after the paint was dry. (And a couple of coats of poly!)
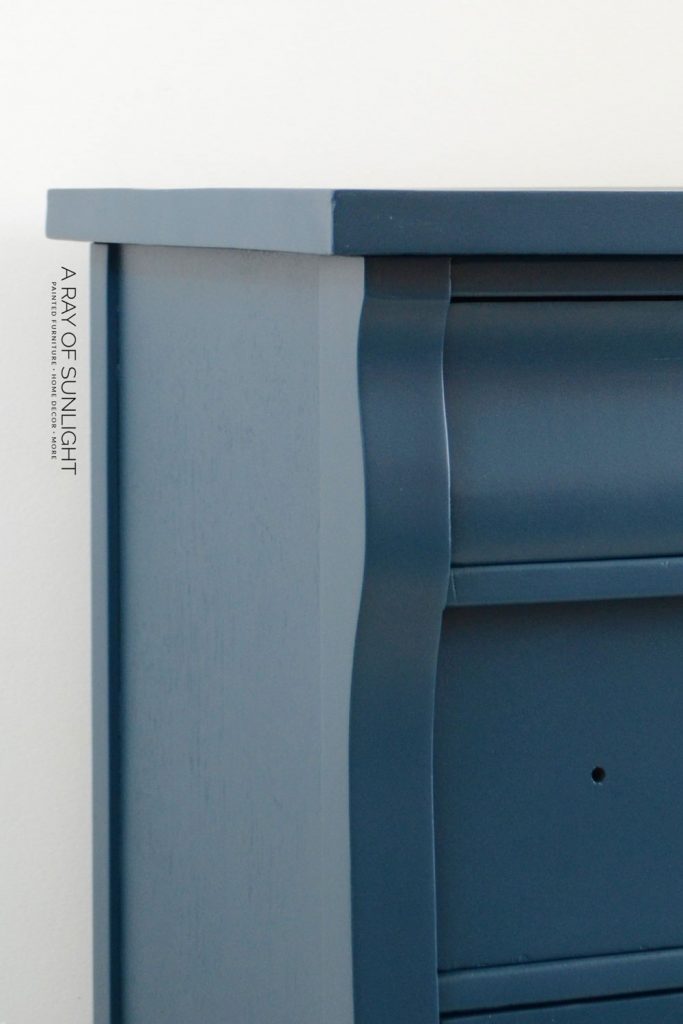
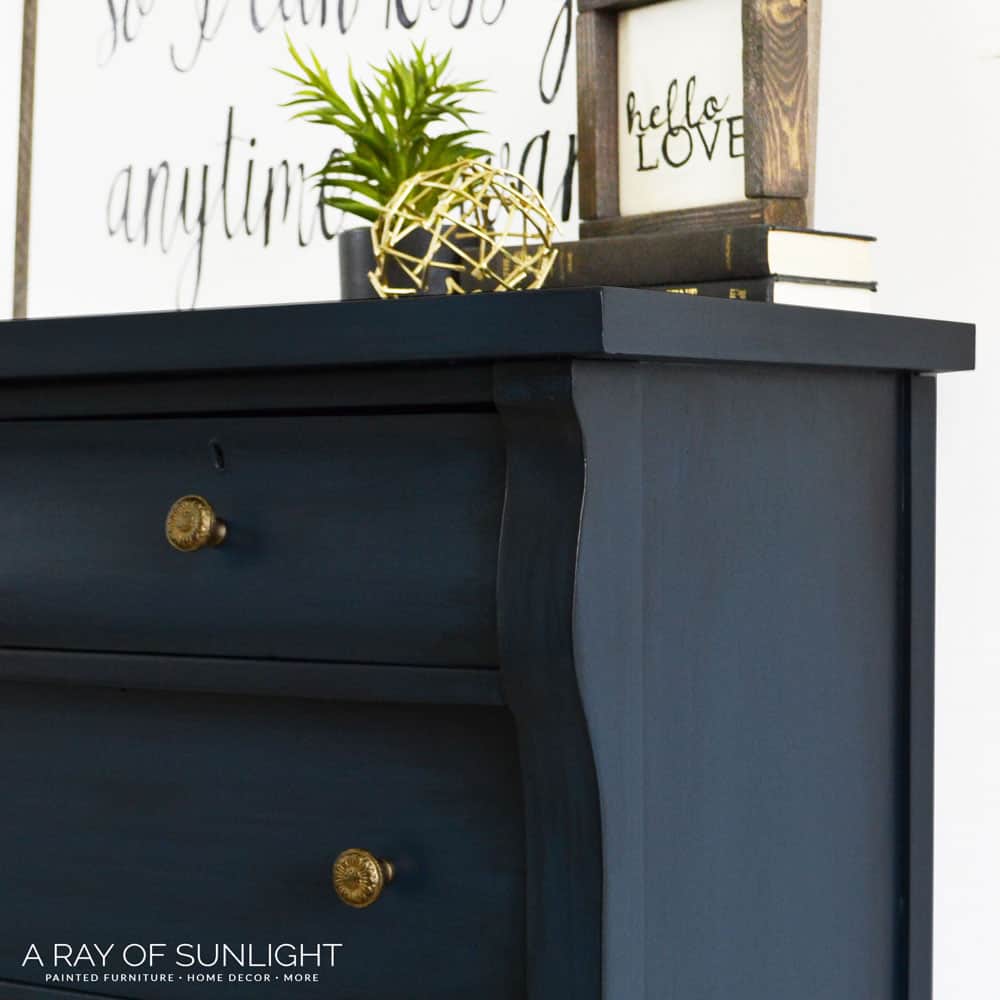
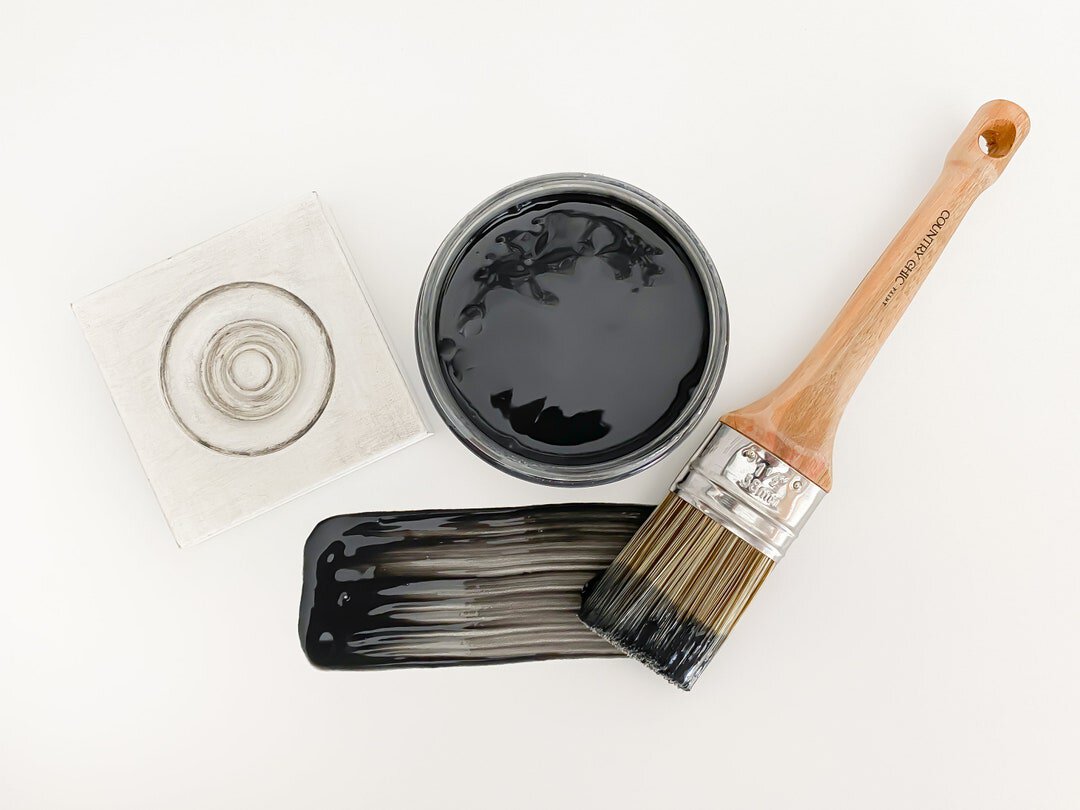
There’s something missing huh? Yep! I put a black glaze over the chalk paint!
How to Glaze Over Chalk Paint
Now onto the big question, how to glaze over chalk paint? Need to SEE how to glaze? Check out this video on how I glaze over chalk paint.
Chalk paint is very porous, so the second you put a glaze right on top of the chalk paint, the glaze will soak right in. Trust me, it’s not pretty! You need to be able to move the glaze around to create this look!
The trick to glazing is to seal the chalk paint with poly beforehand. Waterbased polyurethane creates a surface that is perfect for glaze! Get more tips on how to paint and glaze furniture in this post.
How to Seal Chalk Painted Dresser
The first step is to seal the chalk paint with one to two coats of water-based poly (the best stuff!) You need to make sure you completely cover the chalk paint so the glaze doesn’t soak into the chalk paint. Then, you need to let the polyurethane dry for at least 24 hours.
Otherwise, all the moisture from the glaze and wiping it around will lift up the chalk paint and make it very easy to scratch off. Learn all about different topcoats for painted furniture here!
How to Glaze Painted Furniture
I like to apply two coats of glaze.
- First, the base coat. Basically, I like to get a nice even layer all over.
- After the first coat is completely dry, I add extra glaze in the corners to create some shadowing.
I also like mixing a little water into my glaze so it doesn’t dry as fast. (I don’t measure how much water, but it’s not much.)
Simply brush the glaze all over with a cheap paint brush. Make sure to really get it in any details, corners, and crevices. Work in small sections (like one drawer, or side of the dresser). I like to brush it on thicker so it doesn’t dry as fast. I also don’t let the glaze sit for more than 20-30 seconds.
Use baby wipes to wipe off the glaze. Wipe in long passes that go the same direction as the wood grain did. And try to make it not look streaky. Learn more about how to glaze over chalk paint here. Remember, you can easily add more glaze, but you can’t remove it once it’s dry. (You’ll need to paint over it, and basically start over.)
Every single time I start glazing a piece of furniture, it takes me a little bit to get back into the groove of it. But it gets easier as you go! When you’re happy with the base layer, let it dry completely! (Brushing on more glaze while the first coat of glaze is wet will lift up the first coat of glaze.)
For the second coat, I find myself “dry brushing” the glaze on. I get a teeny tiny amount of glaze onto the tip of my brush then I dab it onto a paper towel to get rid of excess paint. Then, I lightly brush the glaze on in the corners and feather it out a bit.

If I put too much on, I quickly wipe it off and try again. If I don’t put enough on, I get a little bit more glaze and dry brush a little bit more in that area. When you’re happy with it, let it dry completely.
We have a detailed guide on how to glaze over chalk paint here to guide you on this step, and you can also check out our comparison between glaze vs wax over chalk paint to see different finishes you can create with these products.
How to Seal Glaze
After the glaze, I spray three more coats of my favorite waterbased poly. The poly helps protect the paint and glaze from getting scratched and helps give it a sheen (so you can easily wipe down the dresser).
Learn ALL of my tips and tricks on how to spray polyurethane here! You can also brush the poly on if you don’t have a sprayer. Here are the best paint brushes for polyurethane you can use! We compare spray polyurethane vs brush on polyurethane here if you’re still unsure which way to go.


Glazed Furniture Makeovers
Want more ideas for glazed furniture? Here are more of our furniture makeovers that have glaze on them! You’re sure to find something that gives you the inspiration you’re looking for.
- Grey Painted Dressers
- DIY Emerald Green Dresser
- Teal Blue Tall Dresser
- How to Create a Weathered Wood Gray Finish
- How to Turn a Dresser to TV Stand
- French Provincial Nightstands Makeover
- Antiqued Blue Farmhouse Buffet
- Painting Furniture Gold
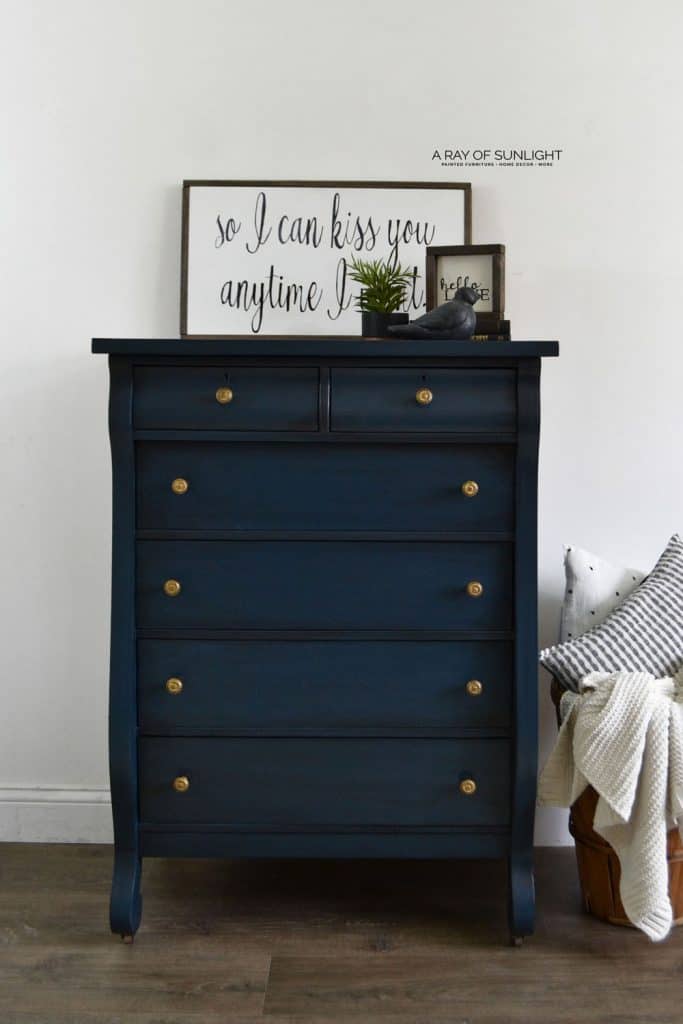
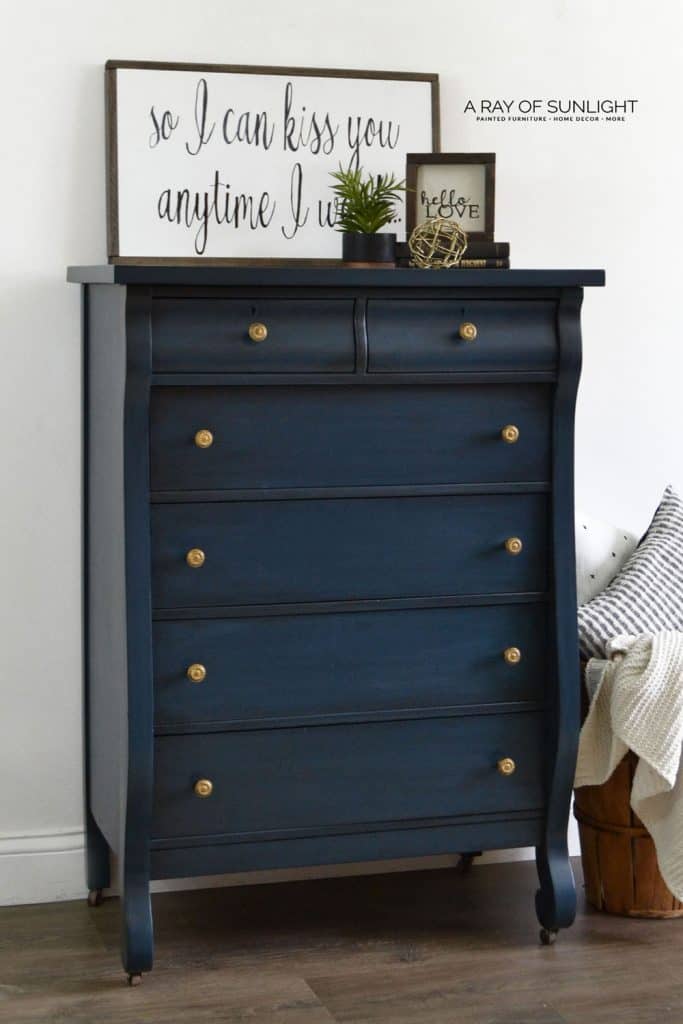
Now, here’s the after of this dreamy blue dresser makeover in its full glory. What do you think?? If you have antique pieces, get inspired by these chalk painted antique furniture ideas.
More Before and After Makeovers
See All >
Click any of these “before” photos below to view the “after” of that makeover.


Here are bedroom dresser ideas and boys dresser ideas for more inspiration in updating your bedroom pieces. And check out these tall dresser ideas if you have tall pieces that need updating, too.


Navy Blue Dresser Chalk Paint Makeover
Give life to your old dresser with chalk paint and some glaze. Here are the steps for this dreamy blue painted dresser.
Materials
Instructions
- Check your dresser for any damaged and chipped veneers and repair them. Remove any hardware, clean the dresser with Krud Kutter, and if your furniture has any slickness or shine to it, scuff scand it so your paint has something to hold onto. Remove all the dust with a vacuum and tack cloth.
- To avoid bleed through issues, prime the dresser with 2 coats of clear shellac.
- Get your blue chalk paint of choice and apply 2 coats. Make sure to let your paint dry between coats.
- Now, seal the chalk painted dresser with 1-2 coats of water based polyurethane. Make sure to completely cover the chalk paint so the glaze you're going to apply next doesn’t soak into the chalk paint. Let the polyurethane dry for at least 24 hours.
- Apply a base coat of glaze all over the dresser. After the first coat is completely dry, add extra glaze in the corners to create some shadowing. Don’t let the glaze sit for more than 20-30 seconds and use baby wipes to wipe off the glaze.
- Let the glaze dry completely before sealing it with 3 more coats of water based poly.
- Add hardware back to the dresser.
Recommended Products
As an Amazon Associate and member of other affiliate programs, I earn from qualifying purchases.
More Blue Furniture Makeovers
- Blue Chalk Paint Coffee Table
- Turning a Dresser into a TV Stand
- Antique Desk Makeover
- Corner Cabinet Makeover
- DIY Painted Hallway Cabinet
Learn the Art of Updating Furniture!
If painting furniture feels overwhelming or your past attempts didn’t go as planned, this course will guide you step by step.

Follow us on YouTube to get more tips for painting furniture. Or share your project with us on our Facebook Group and be part of our community. See you there!
Do you have to thin out the paint with water if you are using a paint brush instead of spraying it on? I noticed you do this in the video and was wondering if it was only because you are using a sprayer. And about how much water do you add? Thanks!
I would still thin it with water if I brush it on. I honestly don’t measure though. Just thin it out so it goes on without dripping, and without brush marks.
Hi, this piece is beautiful. Can you tell me, did you fill the places where the veneer was missing with anything and if so, what product did you use?
Thanks so much!
Annie
This is my favorite way to fill in chipped veneer. Repairing Veneer with Wood Filler
You are a MASTER! Enjoy your work so much!
You mention a Qg something paint sprayer that you LOVE and in the video it looks as if it might be connected to an air compressor (the hose). However when I click on supplies the sprayer is a Wagner. I would love a link or name of the sprayer you actually used in this video. I have an air compressor but had no luck painting with it. I could only get about 2” of coverage and I’m sure the problem is the sprayer. And……btw I absolutely LOVED your video. So informative. Thank you.
Hey Amy!
It’s the Fuji Q4, linked is my review of it. Was your problem with the sprayer or with the air compressor? You have to have a large air compressor to use a sprayer with it.
I tried to do this technique, but after applying the poly, the paint crackled (I have a picture if you’d like). We sanded and repainted with Sherwin Williams. Very frustrating.
Oh no! I’m sorry to hear that! My guess is that the paint didn’t dry long enough before you topcoated it. I have had paint crackle when I topcoated it within a couple of hours. But man, all that work for it to not turn out. I’m sorry to hear about it!
Natalie, this dreamy blue is stunning on the dresser. You guys do such lovely work.
Thank you so much for sharing with Sweet Tea & Friend’s September link up dear friend.
Aww thanks so much Paula!