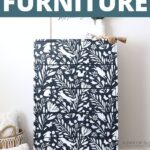
Stenciling Furniture


Painting furniture is a great way to revamp and renew an old piece of furniture, but adding patterns and designs with a stencil can transform it into something truly special. Stenciling furniture is one of the easy and cost effective painting techniques for furniture to spruce up anything from dressers to cabinets while also allowing you to customize the look just the way you want it.
In this blog post, we’ll show you everything you need to know about how to stencil furniture and provide tips and tricks for getting beautiful results every time.
Stenciling furniture is a great option if you’re looking for something that packs a lot of impact but doesn’t require much skill or time. There are many stencil design options available, so you can easily find one that matches your style and desired look.

Depending on the type of paint used, stencils can be applied over existing paint or even directly to the wood, making them highly versatile and adaptable. With the right tools and techniques, you’ll have your furniture looking stylish in no time! So let’s dive into stenciling furniture with this stenciled dresser makeover.
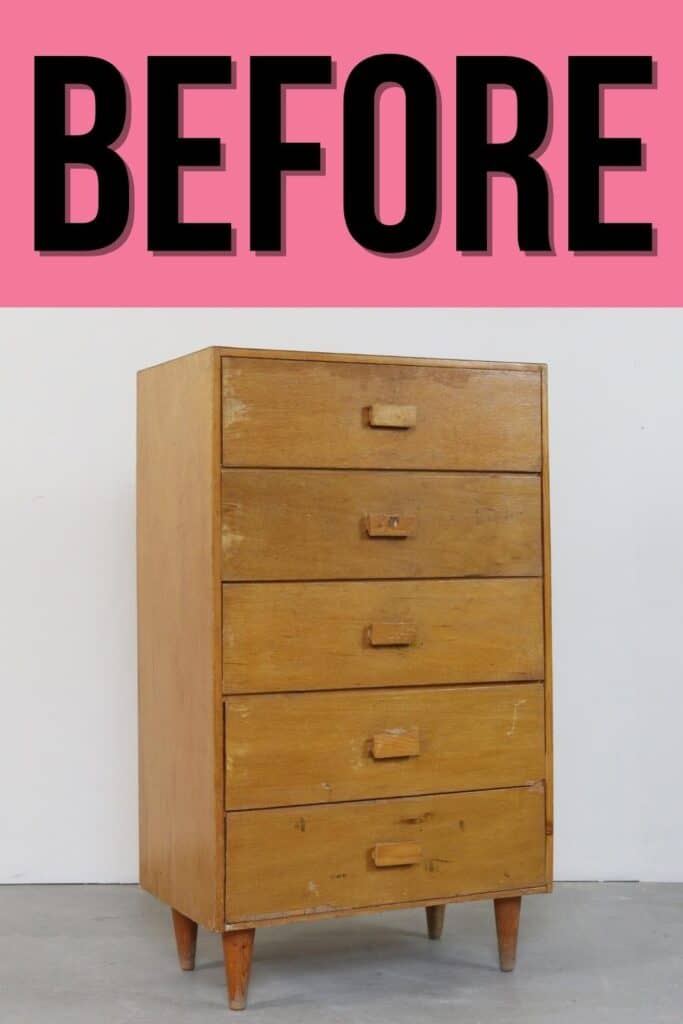
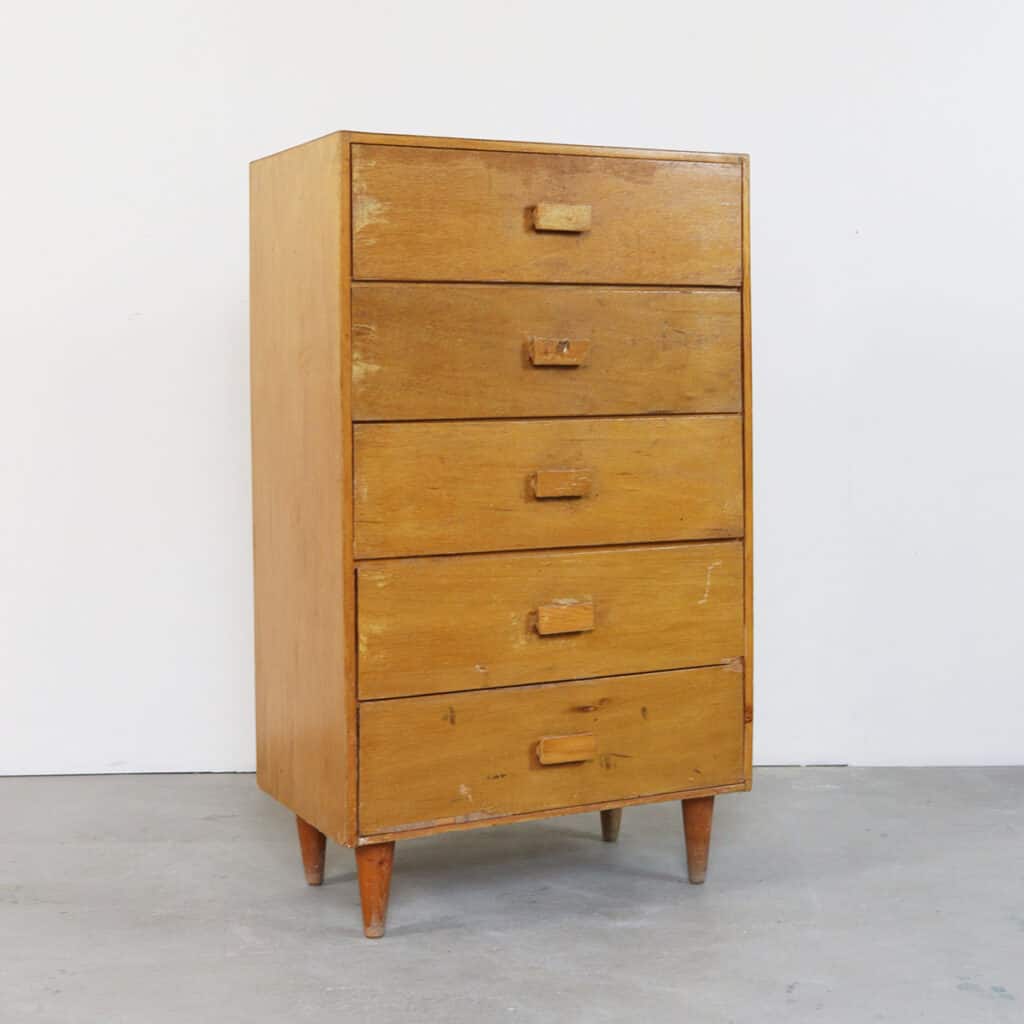
This worn-out and damaged $25 thrifted dresser is about to get one of the coolest makeovers I’ve ever done. If you look at it closely, there was so much damage to this dresser! Loose pieces, broken corners, chipped veneer on the side… It was ready for the dump.

Supplies Used for Stenciling Furniture
As an Amazon Associate, I earn from qualifying purchases. I also may earn from other qualifying purchases with other companies or get free product to review and use. All opinions are my own.
- Electric Screwdriver
- Krud Kutter and an Old Rag
- Wood Filler
- Bondo
- 220 Grit Sandpaper
- Electric Sander
- Clear Shellac
- Painters Tape
- Pre-Taped Plastic
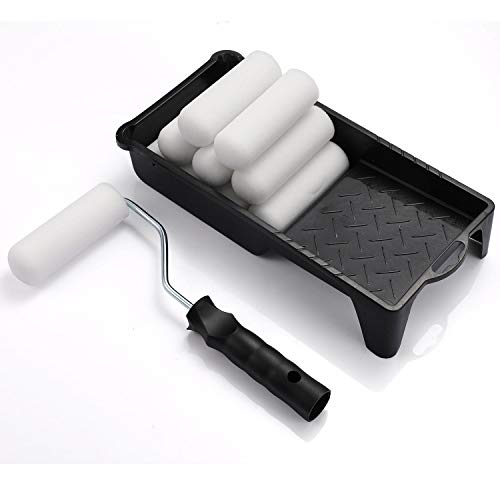
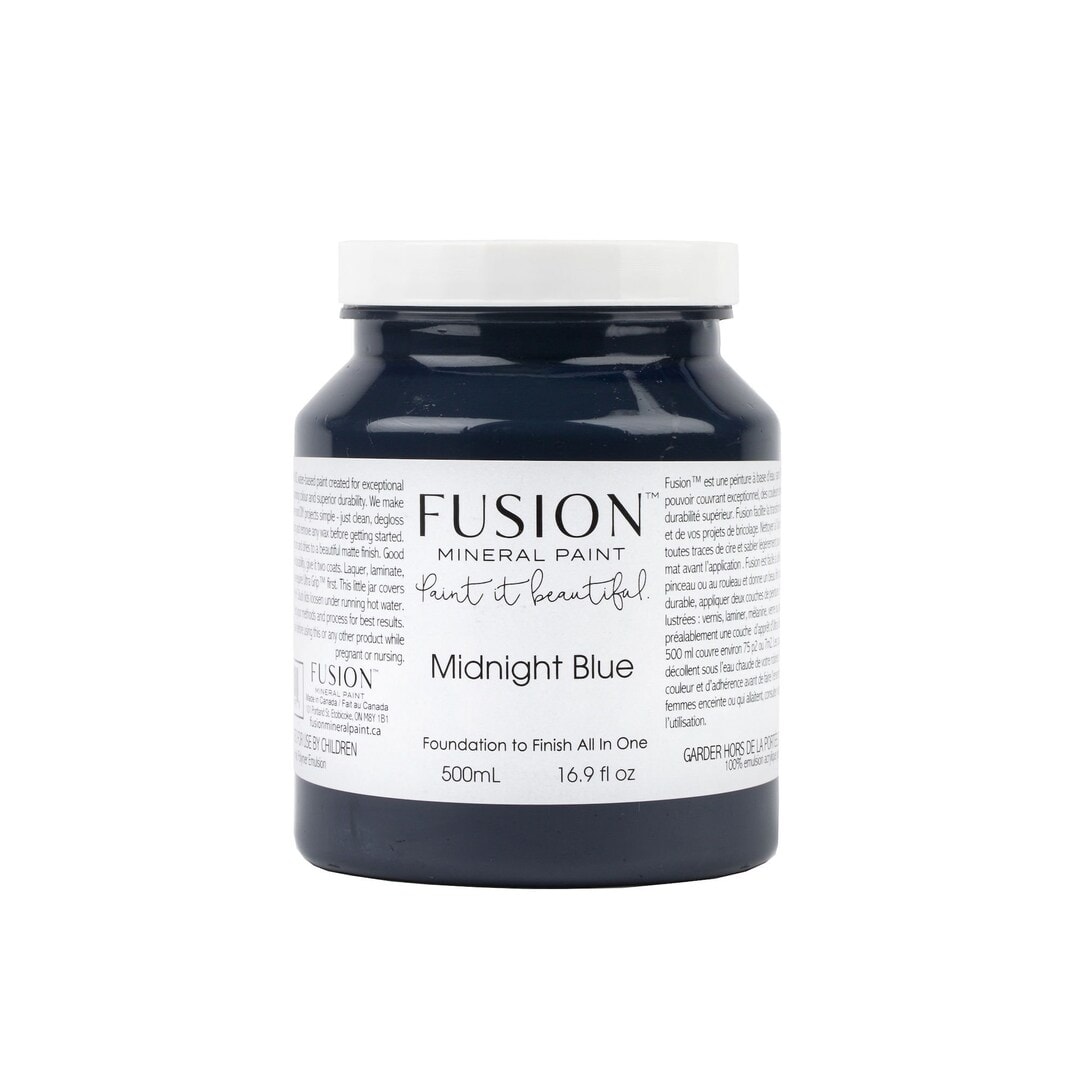
- Fusion Mineral Paint in Midnight Blue, Bayberry, and Casement
- Paint Sprayer
- Paint Filters
- Respirator
- Shop Vac
- Tack Cloth
- Stencil
- Stencil Paint Brush
- Temporary Spray Adhesive
- Paint Tray
- Roller
- Yellow Frog Tape
- Artist Paint Brush
- Waterbased Polyurethane
Get our list of 10 must have painting furniture supplies here so you’re always ready for your next painting project!
How to Stencil Furniture
Now, let’s break down the process, from start to finish so you can stencil your furniture. I’ll add some questions and answers at the bottom as well to help you with your project.
Prepping Furniture for Paint
First, up, prepping the furniture for paint. We started with removing the old wood hardware with our electric screwdriver. It was just screwed on from inside. And then there was a nail in each one holding it in place.
Then, like always, we cleaned the dresser with Krud Kutter to remove any grease, grime, or dirt from the surface. Learn exactly how to clean furniture before painting here.
Then we fixed the damage that was all over the dresser. Check out how to fix chipped wood furniture here, and how to fix a chipped wood corner here.
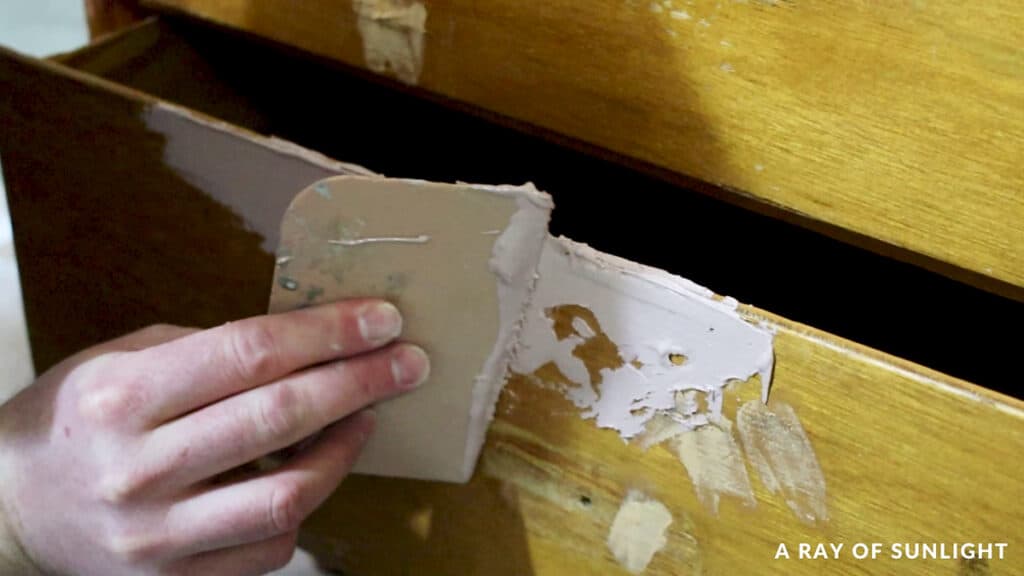
I’m not going to go into all of the repairs here, but check out those posts on repairing furniture to learn more about how he did it.
Get Our Secrets!
Grab this super convenient How to Repair Furniture Ebook with all of our secrets on how to repair furniture for only $14.
You can print it out and have instant access whenever you come across damaged furniture, and know exactly how to fix it!
Click on the picture of the book to purchase!

If you want to change your hardware to new hardware, now is also the time to fill in the old holes. Here’s the step by step information on filling holes when replacing cabinet or furniture hardware and how to change hardware on a dresser.
So, with all of the repairs out of the way, he primed the dresser with 2 coats of clear shellac. Learn about the best primers for painting furniture for your project, including clear shellac, here.
The purpose of the primer was to 1, help the paint stick, and 2, prevent stop stains from coming through the paint, from the wood. It’s a common problem when painting with water-based paints, so we like to prevent it from happening before it becomes an issue. Learn more ways on how to stop stains from coming through paint in this post.
After that, we let it dry overnight so it could start to cure, and have a better ability to block stains.
Painting Base Coat
The next day we were ready to paint! We started with a base coat in a mixture of Midnight Blue and Bayberry from Fusion Mineral Paint. Read our honest Fusion Mineral Paint review to learn more about this brand.
(This was my attempt to use up the small amount of Bayberry that was left in the container.)
Here are some great options to use for the paint:
- The Best Paint for Furniture
- Best Paints for Furniture Without Sanding
- Best All-in-One Paints for Furniture
- Best Paint for Laminate Furniture
The photos from the stencil listing showed me that I wanted a dark color as the base coat. This was just a personal preference. I could have painted a light color first.
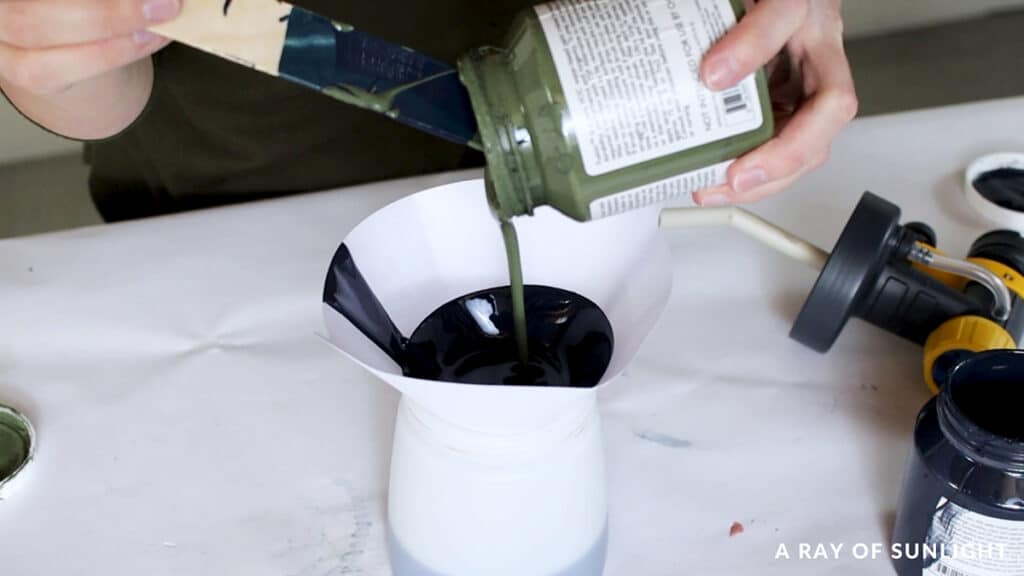
I poured the paint into my sprayer through this little cone mesh filter that filters out any pieces of dried paint or debris. And I poured in some water to thin out the paint a little bit, so the paint would spray out like a mist. Learn more about how to thin paint for Wagner sprayer here.
Just like always, I tested the spray on some cardboard before I sprayed on the dresser. My fluid setting was a little less than halfway, I think. And the air power setting was at 4.

Check out my honest Wagner 3500 paint sprayer review here to learn about the sprayer we used. Learn everything you need to know about painting furniture with a sprayer here, and if you’re looking for the best paint sprayers for furniture, check out this list.
Of course, if you want to brush or roll the paint on, you can do that too! Here are the best paint brushes for painting furniture and here are the best rollers for painting furniture. And if brush marks and texture in your paint drives you crazy, here is how to paint furniture without brush marks.
And of course I wore my respirator. Not going to lie, I used to never wear this thing. But then I found myself coughing more and more… and yeah… I wear a respirator now. haha
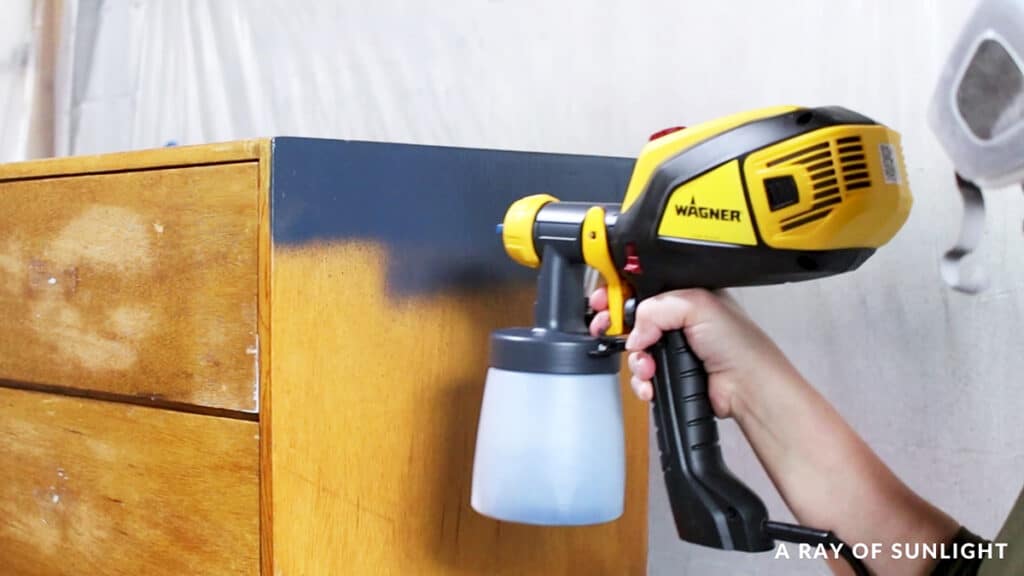
Anyway, I painted that one coat of paint, and let it dry.
Fixing Problems with Base Coat
But, when I came back to check the paint a couple of hours later, I could see a bunch of splotchy areas.
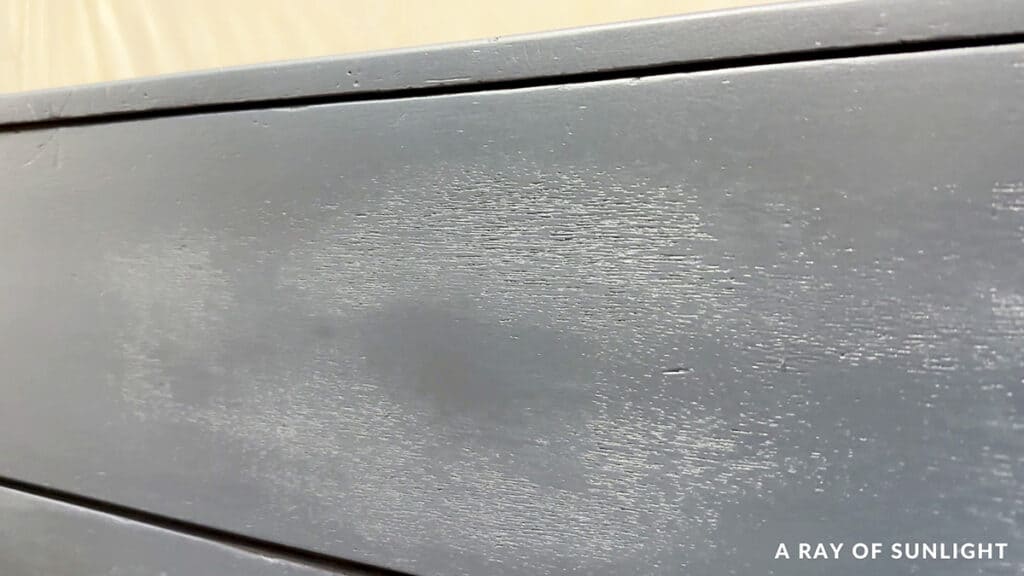
Up close, I could tell that those splotchy areas were from where my husband sanded through the old finish, so it opened up the wood grain. I don’t mind the look of wood grain, but when it looks splotchy like this… it has to go. So, I filled in the wood grain with this technique found in our post on how to hide wood grain when painting.
And then I had to prime again because the bleedthrough stains LOVE coming through after I fill wood grain! After priming, I painted another 2 coats of paint on the dresser, and look how much better it looks now!!

Before moving on, I made sure the paint was all dry.
Stencils for Furniture
I was shocked when I opened the box that had the stencil in it… it was huge! And it was perfect!

The bigger the stencil, the easier it is to stencil large furniture because you don’t have to reposition it as many times. So, when I search for a stencil, I look for a wall stencil or a large stencil. Though, if you have a lot of small details you need to get into, a smaller stencil might be easier.
Stenciling on Furniture
Now for the moment, we’ve been waiting for, the fun part!
Note: I made sure the paint was fully dry, and that there was full coverage of the base coat before grabbing the stencil.

How To Position Stencil On Furniture Surface
The easiest way to position a stencil on furniture is to lay the furniture on its back. That way, you’re not fighting gravity, and you can just lay the stencil on top of the furniture.
Would you like to save this?
To position the stencil, I lined it up with the top edge and side edge of the dresser, and then I taped it in place on the other sides. Check out what is the best painters tape and what’s the best painters tape that doesn’t bleed to get the right one for your next project.
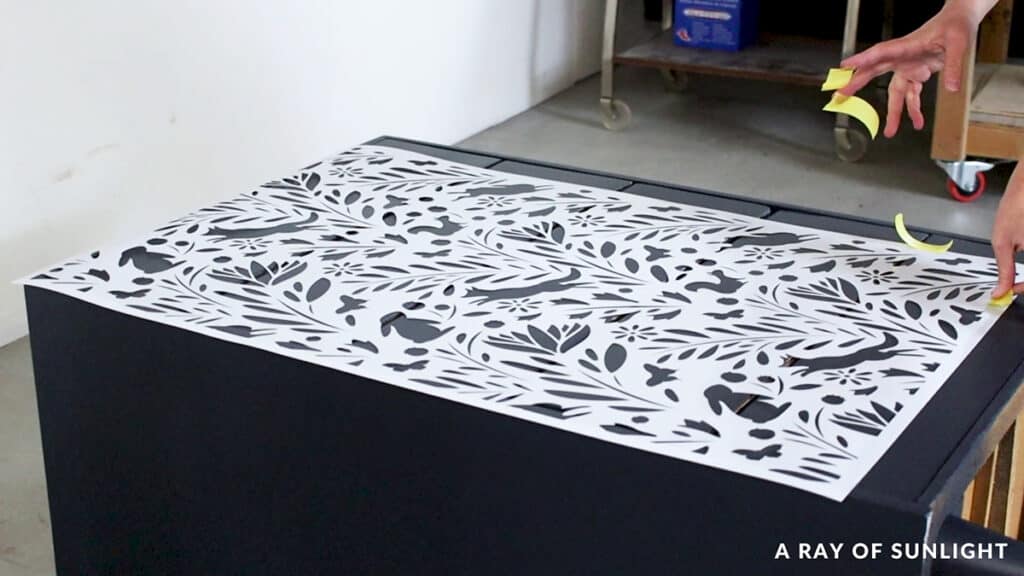
If your stencil has less going on, your furniture is larger, or your stencil is smaller, it would be better to find the center of the furniture and the center of the stencil, and then work your way out to the edges. I got lucky here and it didn’t matter as much if mine was centered because there is so much going on in the design.
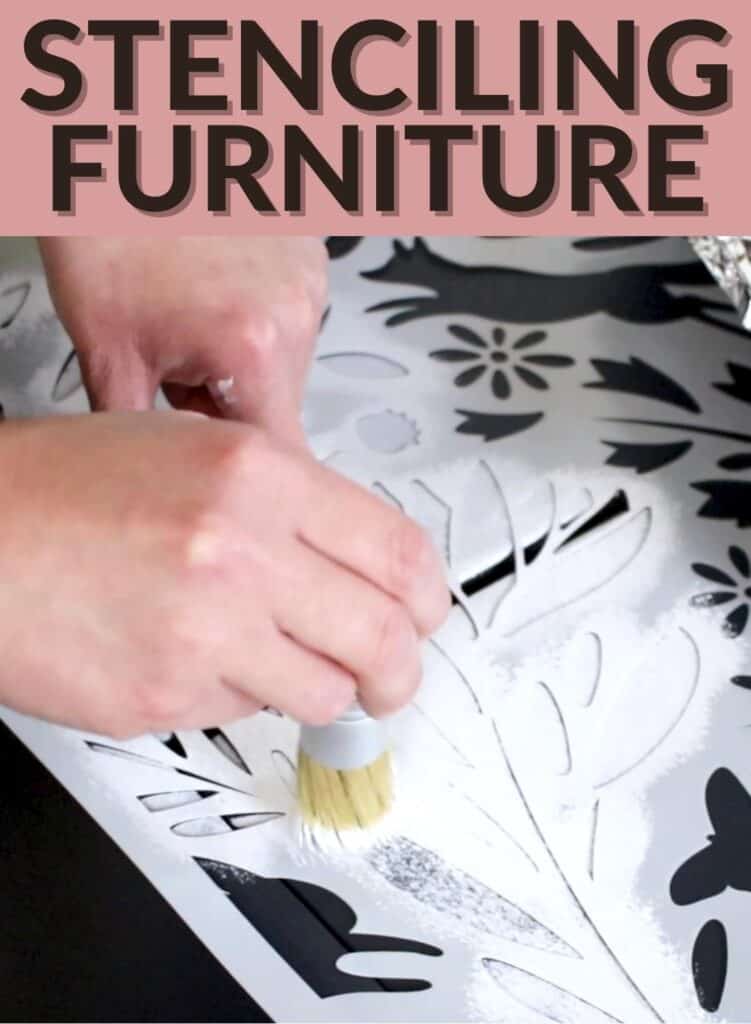
How to Paint Stencils
I used this Fusion Mineral paint in the color Casement and poured it into a paint tray to give me a surface to dab the paint off onto before putting it on the stencil.
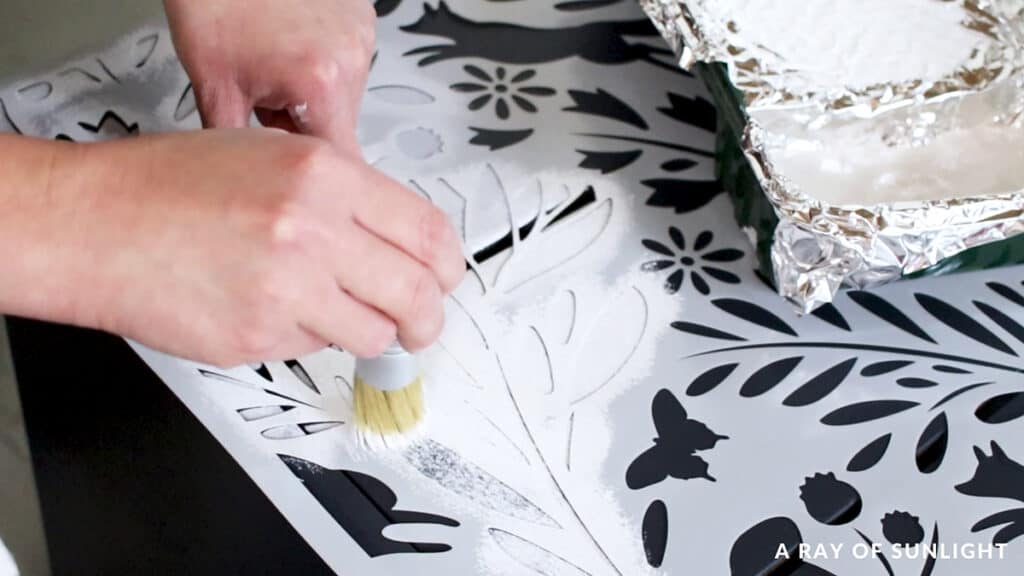
I got a little bit of paint onto the end of a stencil brush, then, dabbed some of it off onto a paper towel, and lightly stippled the paint onto the stencil… It worked okay… but man it took a long time. So then I got smarter and used a mini foam roller to roll a small amount of paint onto the stencil instead.
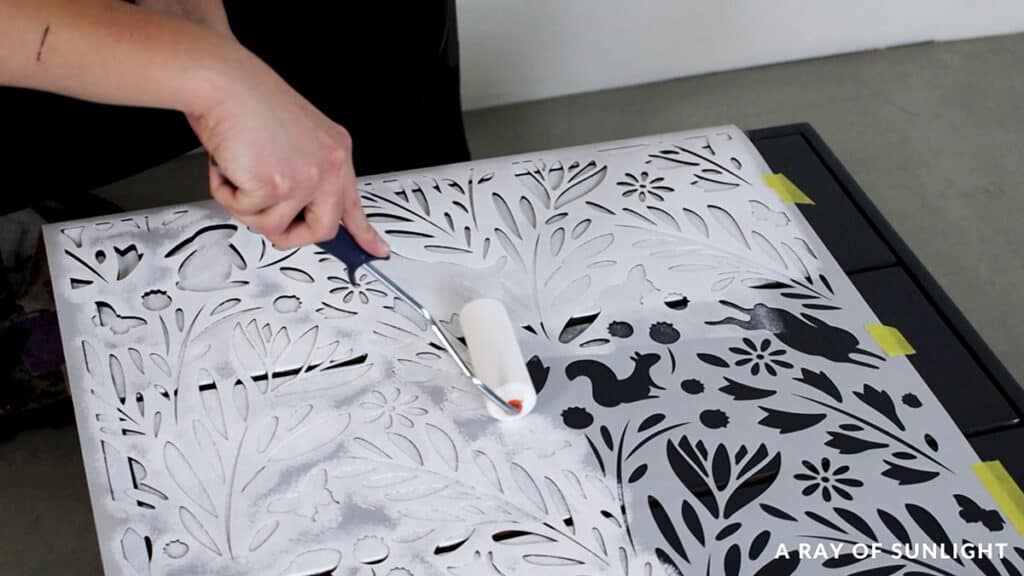
Holy moly the roller went so much faster, and I feel like it didn’t bleed under the stencil as much as the brush did.
Honestly, I should have sprayed some temporary adhesive onto the back of the stencil and asked my husband to help me lay it in the right position, but he was busy with the kids and I didn’t want to wait. It would have helped keep the stencil down and helped the paint not bleed under the stencil. But, you live and you learn right? Learn more about how to stencil without bleeding here.
When the first section was done, I very carefully removed the stencil, laid the stencil down on some brown paper, and let the paint dry on the dresser and the stencil.
If you reposition the stencil before the paint is dry, you’re likely to smudge the paint. So this step is really important. Just wait. This paint dries quickly though, so after maybe 5 minutes, I moved on.
I lined up the design and taped the stencil in place. I made sure to use the yellow frog tape so it wouldn’t peel up my fresh paint. And then I just kept moving around the dresser, one section at a time.
I did stand the dresser up though, which made the sides harder, but I didn’t want to lay it down on the dirty concrete and scuff up the paint.
Finishing Touches & Clean-Up Tips
I also used a small artist paint brush to dab some paint on the corners where it was hard to get with the stencil and roller…
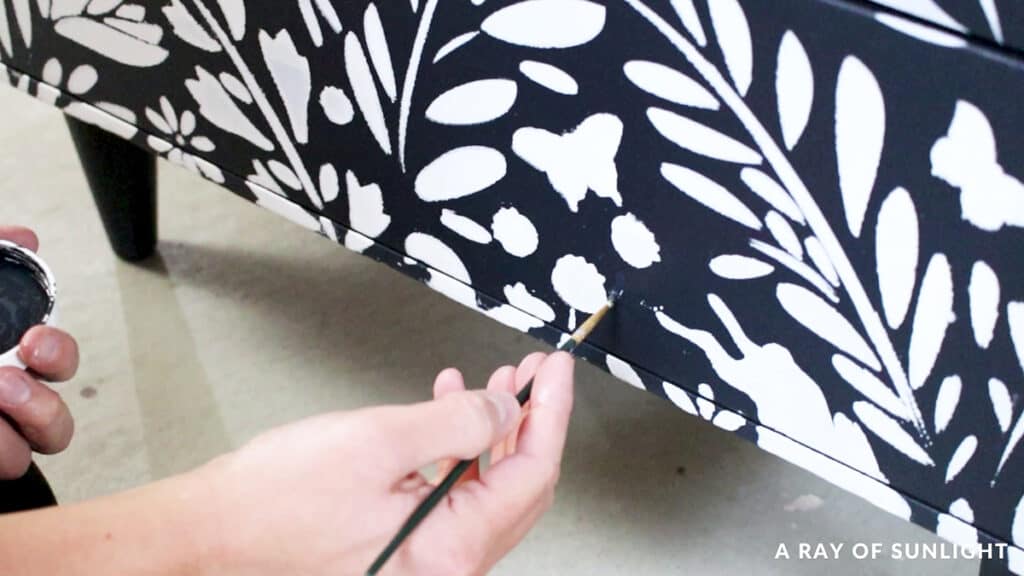
And when everything was painted, I went back with some of the blue paint and a small paint brush to paint over some of the white smudges.
I let the paint dry for a couple of hours, and then I sprayed some waterbased polyurethane all over to help protect the paint, make it more durable, and give it some sheen… Have I ever told you I don’t care for matte paint because it gets dirty easily?? Haha Cuz it’s true.
Here’s how to apply polycrylic to painted furniture. If you have the paint sprayer, you can learn how to spray polyurethane here. It’s so much easier and better looking than brushing or wiping on the topcoat.
There are some other types of topcoat for painting furniture too. There are some tips for applying polyurethane by hand in that topcoat blog post as well.
Watch the video of this makeover here:
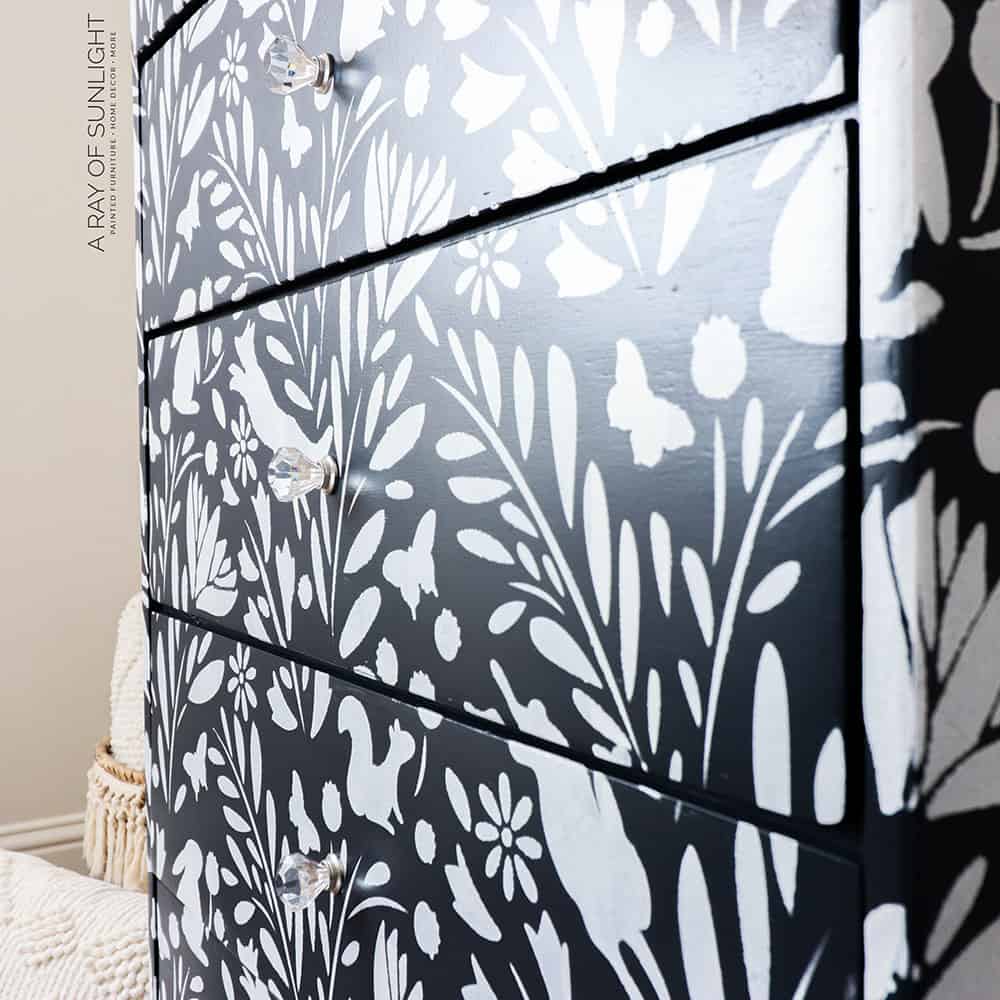
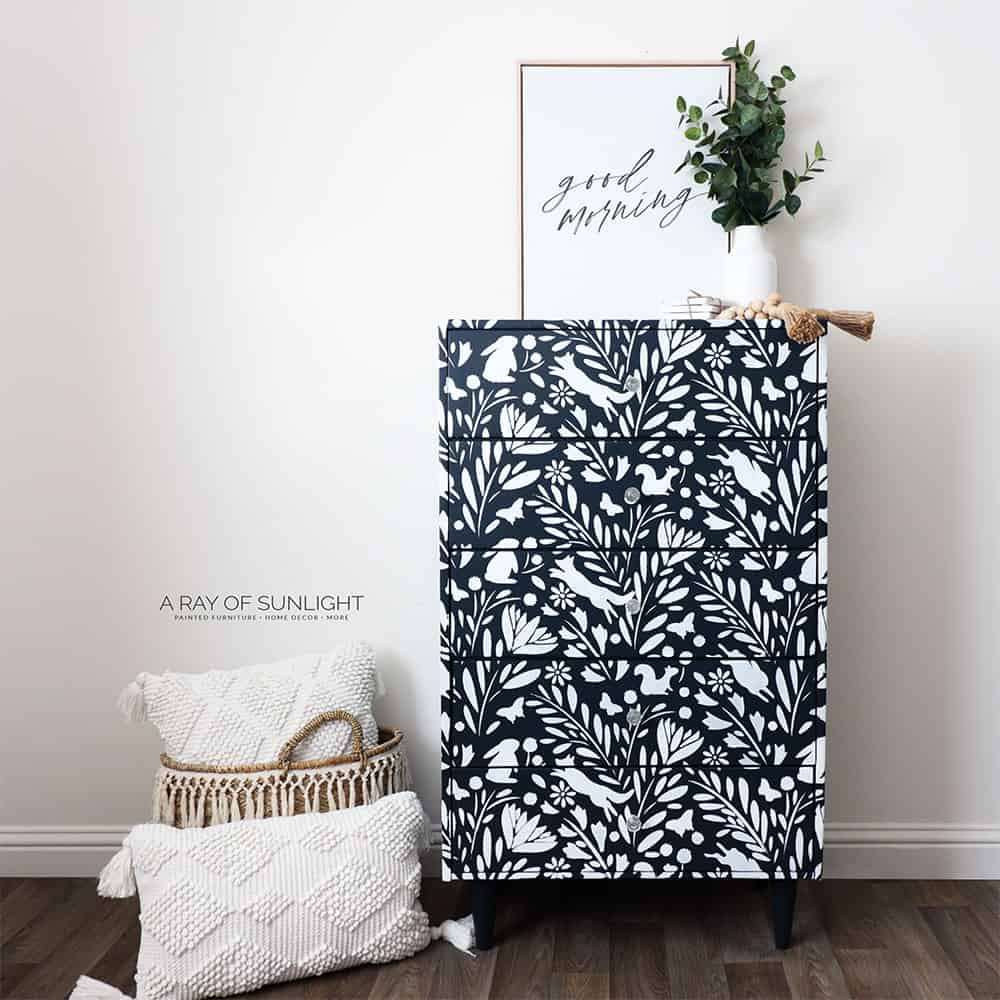
I added some new acrylic knobs to the drawers, and here’s what it looks like now!! Ahhh I LOVE it! I told my husband that it’s one of my all time favorite makeovers.
More Before and After Makeovers
See All >
Click any of these “before” photos below to view the “after” of that makeover.


I can see this stencil in a little kids room… but it also screams anthropology to me, and I love the funkiness of it. It’s hard to see, but I added some clear knobs that wouldn’t take away from the stencil.
Whatcha think of the new look?? Would you use something like this in your own home?? Do you have any tips for me on how to better use a stencil when painting furniture?
If you want more stenciled furniture, check out our list of dresser stencil ideas! For more unique and creative dresser makeovers, here’s our list of fun dresser paint ideas.


How to Paint With Stencils Without Bleeding
If you don’t want your paint to bleed under the stencil, there are some tricks you can do to stop the paint.
- Apply a VERY thin layer of paint.
- Apply very little pressure when painting.
- Use a mini roller instead of a brush for more control and less risk of bleeding.
- Secure the edges of the stencil very well with yellow frog tape to keep the stencil from moving.
- Use temporary spray adhesive on the back of your stencil to secure the stencil to your surface. This will help all the smell details stick to the surface, preventing most of the bleedthrough.
- Let the stencil dry completely before repositioning it.
All of these tricks combined will give you the best chance of a perfect stencil job! You can also use stencil to make raised texture on your furniture and make it stand out even more! Check out this DIY navy chest of drawers for more on this idea.
How to Fix Stencil Bleed
But, what do you do if you already have bleed issues… well… there are a few things you can do.
First, you can stop, let the paint dry, sand it off with 220 grit sandpaper and start over. Or, you can also let the paint dry, and lightly sand the gloppy edges if it’s only a few spots. Then use a small artist brush to touch those areas up.
You can also wait for the paint to dry, then use the base coat color and a small artist brush to cover up the bleed. Then, try again, being more careful, and using the ideas above to prevent the bleed from happening.
Top Furniture Stencils
Deciding on the perfect stencil for your furniture makeover is sometimes the hardest part. So, here are some of my top picks of stencils for furniture.


More Stencil on Furniture Ideas
If you’re looking for more ways to incorporate stencils into your furniture makeovers, we have some great ideas for you! One idea is to use multiple smaller stencils to create patterns on different parts of a piece, like drawers or shelves.
Another fun idea is to use a stencil as a border or trim around the edges of a piece. You can also consider using stencils on unexpected surfaces like the sides or legs of a piece of furniture. This adds a more unique touch and adds extra detail to a simple piece of furniture.
You can also paint these stencils in a contrasting color for an even more dramatic effect. Just make sure the colors don’t clash too much and that the stencil design is still visible against the base color. You can also use the same color as the base for a more subtle look.
And don’t limit yourself to traditional stencils! You can also use letter or number stencils to add personalization or fun messages on your furniture. This is a great way to make a piece truly one of a kind and reflect your personality in your home decor.


Stenciling Furniture
Spruce up anything from dressers to cabinets with stencils. Here are the steps for stenciling furniture.
Materials
- Krud Kutter
- Old Rag
- Wood Filler
- Bondo
- 220 Grit Sandpaper
- Clear Shellac
- Painters Tape
- Pre-Taped Plastic
- Fusion Mineral Paint in Midnight Blue
- Fusion Mineral Paint in Bayberry
- Fusion Mineral Paint in Casement
- Paint Filters
- Tack Cloth
- Stencil
- Temporary Spray Adhesive
- Yellow Frog Tape
- Waterbased Polyurethane
Tools
Instructions
- Remove old hardware from your furniture, then clean with a degreaser, fix any damage, and prime with 2 coats of clear shellac. Let furniture dry overnight.
- Pour paint into sprayer through paint filter then pour in some water to thin out the paint a little bit. Apply 3 coats of paint on furniture for the base coat.
- Make sure the paint is fully dry then lay the furniture on its back to position the stencil easily. To position the stencil, line it up with the top edge and side edge of the furniture then tape it in place. You can spray some temporary adhesive onto the back of the stencil so it won't budge.
- Apply some paint onto the stencil with a roller. Once done, carefully remove the stencil and let the paint dry before moving to another section of the furniture.
- Touch up any smudges and spots where it was hard to get with the stencil and roller with a small artist paint brush.
- Let the paint dry for a couple of hours, and then spray some waterbased polyurethane all over to help protect the paint.
- Add hardware to your painted and stenciled furniture!
Recommended Products
As an Amazon Associate and member of other affiliate programs, I earn from qualifying purchases.


More Stenciled Furniture Makeovers
- Embossing Furniture
- How to Stencil Painted Furniture
- DIY Raised Stencil on Furniture
- Navy Dresser with Textured Drawers
- Stenciled Furniture

Follow us on YouTube to get more tips for painting furniture. Or share your project with us on our Facebook Group and be part of our community. See you there!
Gaaaaaah! I LOVE THIS, Natalie! I can’t take my eyes off of it. Way to take a plain ole dresser and make it over the top. 😍 pinned
xo Do
I didn’t see you use the stencil adhesive. Why did you list it? I would think it may leave residue on the paint
I didn’t use it on this one, but I’ve used it before. It doesn’t leave residue on the paint. It just makes the stencil sticky to help it stay close to the furniture and prevent the paint from bleeding under the stencil. You don’t have to use it if you don’t want to.
This is a fun project. I love stenciling furniture. I love the look of this piece!
Natalie, I love the results of your creativity and hard work! Here’s a question for you that I’ve often wondered about….What do you do when a dresser you love has drawers that smell old and musty? Do you pass it by? Thanks, Patti
You can spray the inside of the drawers with clear shellac to seal in the smell. It’s the only method that I know will work.
That is quite the transformation! What a beautiful, functional art piece now.
I really enjoy seeing all of your work, but this is one of my favorites! It is absolutely stunning and you did an amazing job. Do you have the name of the company that sells this stencil?
Thank you so much! The link to this stencil is in our supply list. IT was on Amazon, but I can’t remember the exact company. Enjoy!
It’s very nice, but a little too busy for me. Love your re-do’s.
I totally get! But thank you! I’m so glad you do!