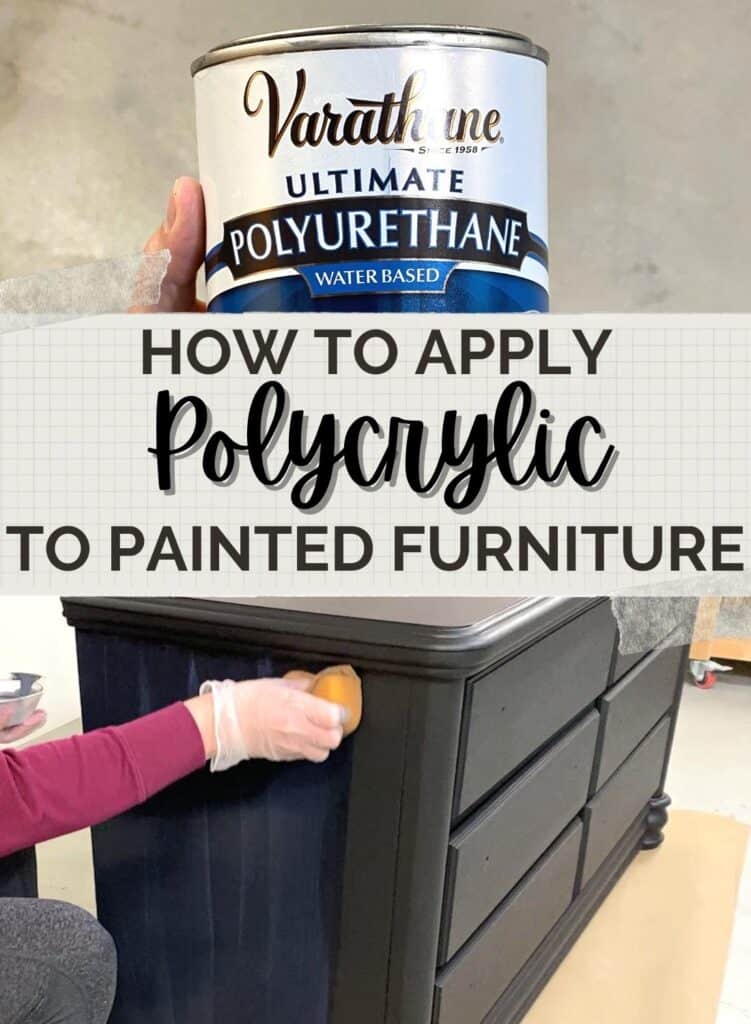
How to Apply Polycrylic to Painted Furniture


Not only does a clear topcoat offer an extra layer of protection, but it also gives painted furniture a beautiful, finish that is easier to clean. In this blog post, we’ll walk you through how to apply polycrylic to painted furniture including all the steps needed to successfully topcoat painted furniture.
These painting furniture ideas will help you get a professional and flawless finish on your furniture makeovers – we’ll cover everything from choosing the right topcoat to the secrets to making it look perfect. Let’s dive in!
Painting furniture is a great way to update your space. But a lot of paints require a clear topcoat to make the paint durable. The topcoat works by protecting the paint from scratches, stains and general wear and tear. Plus, topcoats can add a sheen that can bring out the beauty of your furniture even more.

One popular topcoat option is polycrylic – it’s waterbased polyurethane that is known for its durability and easy application. Not only does it provide protection, but it also dries clear and doesn’t yellow over time.
If you’re here, I’m guessing that applying a polycrylic topcoat is intimidating to you, but with the right tips and tricks, it’s actually quite simple and it will turn out beautifully. Follow along as we guide you through the process of applying polycrylic to painted furniture!
Supplies Used to Apply Polycrylic to Painted Furniture
As an Amazon Associate, I earn from qualifying purchases. I also may earn from other qualifying purchases with other companies or get free product to review and use. All opinions are my own.
- Waterbased Polycrylic
- Foam Sponge
- Gloves
- Nylon Stocking or Pantyhose (Optional)
- 400 Grit Sandpaper or 220 Grit Sandpaper
- Tack Cloth
Does Paint Need a Topcoat?
Not all paint needs a topcoat. But if you are using chalk paint, mineral paint, acrylic paint, or milk paint on your furniture, then you’ll need a topcoat. Here’s our list of the best topcoat for chalk paint and how to seal chalk paint for chalk painted furniture, and here are the 3 ways to seal milk paint for milk painted furniture.
If you are using these all-in-one paints for furniture, you might not need a topcoat… depending on the sheen of the paint, and what sheen you want your furniture to have.
Note: Enamel paint, alkyd paint, and oil paint don’t need a top coat. Actually, you should NOT apply a topcoat to them! Learn all about the best paint for furniture here!
What are the Benefits of Topcoat?
The biggest benefit of a clear topcoat on painted furniture is that it creates a durable layer on top of the paint that will help protect it from getting damaged, scratched, or chipped.
But, clear topcoats can also change the sheen of your paint. If you use chalk paint, that is matte and chalky feeling, then you can topcoat it with a satin sheen to make it slightly shiny. You can also apply a glossy topcoat to it to make the paint look even shinier. You can even make a glossy paint look matte with a matte topcoat.
The other big benefit of applying polycrylic to your painted furniture is to make it easier to clean. Matte paint collects dust like nobody’s business. Even if you touch dark matte paint with clean hands, you’ll see some residue sticking to the paint.
Once you topcoat the matte paint, it won’t get dirty as easily! Plus, a good poly topcoat makes it easier to wipe off the furniture if you spill something on it. Read this post for more topcoats for painting furniture.
What happens if you don’t clear coat paint?
If you don’t clear coat paint that needs a topcoat, then the paint will scratch off easier, and it will chip easier. If you use matte paint, it will look dirty easily, and anything that gets on it will be near impossible to get off. Things will easily stain the paint.
If you want your paint to last a long time, it’s best to topcoat the paint. But not with just any topcoat!
Best Topcoat for Painted Furniture
The best type of topcoat for painted furniture is waterbased polyurethane (also known as polycrylic, or poly!) Water-based polyurethane is very durable, but unlike oil based polyurethane, it won’t make your paint have a yellow tint to it. You can learn more about the differences between polycrylic vs polyurethane here.
Check out your options for the best polyurethane for furniture here and the best clear coat spray paint for wood here.
Applying Polycrylic Over Paint
Alright, now let’s get into the actual process of applying polycrylic to painted furniture.
Make sure your paint is completely dry. If the paint doesn’t dry completely before applying the polycrylic then your paint might crackle, or rub off easily. Dry time varies depending on the type of paint you use, but at least 2 hours of drying is needed before putting the polycrylic on. 4-6 hours would be better if you’re worried about it.
Then make sure you mix your waterbased polycrylic really well with a stir stick. This will mix everything together and make the topcoat work properly. Trust me.. you can have very bad results if you don’t mix it first like I did in this post on five furniture makeover mistakes to avoid.
Mixing Polycrylic With Paint
One of the best tricks to topcoating dark paint with waterbased polyurethane is to mix some of the paint into the polycrylic.
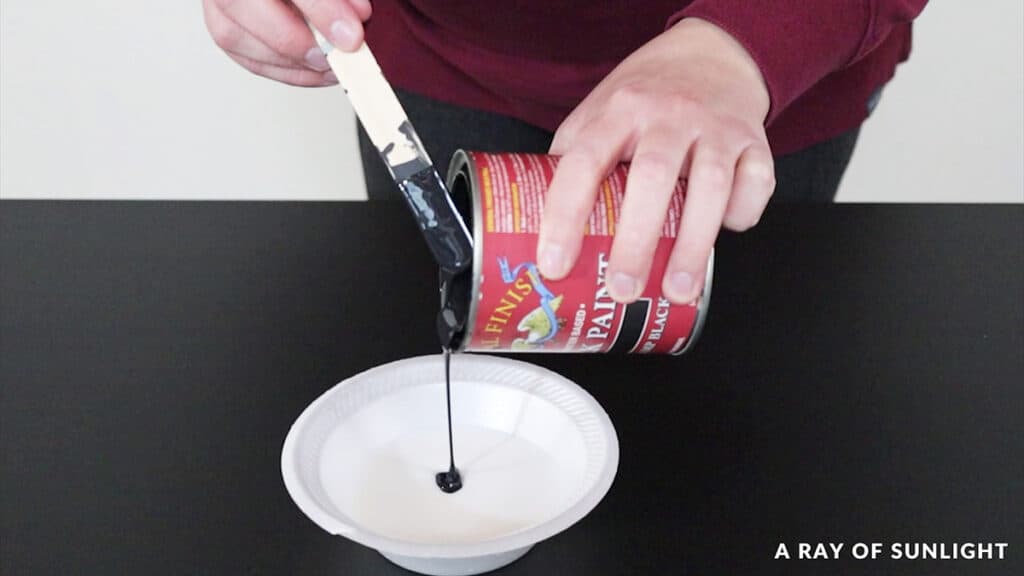
Adding some of the paint to the topcoat will help hide streaks that can occur when you apply it by hand or brush. You don’t need a lot of paint, just enough to slightly tint it.
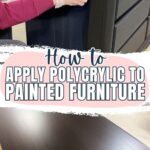
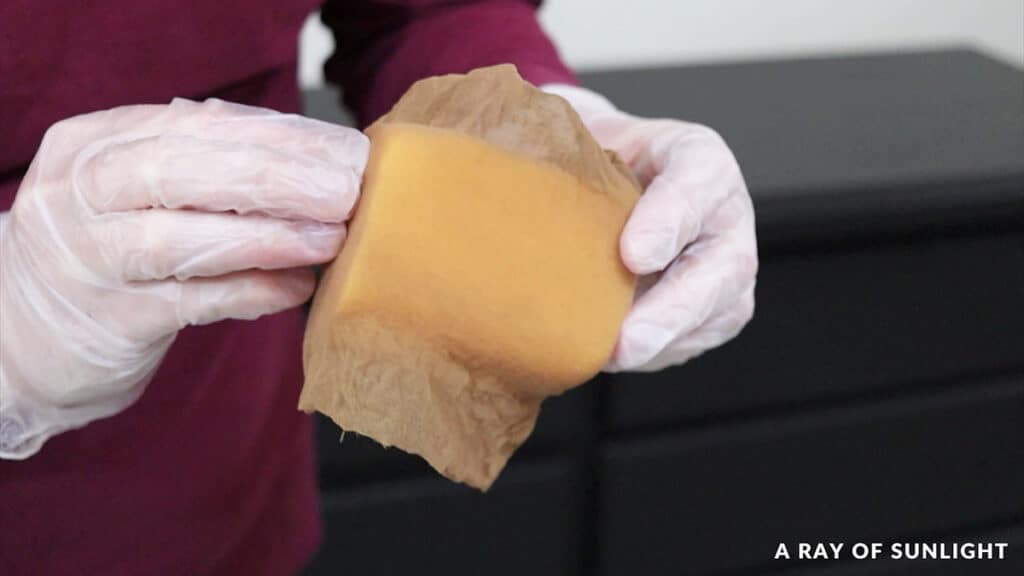
How to Apply Polycrylic With a Sponge
Then, I like to use a foam sponge to apply my poly topcoat.
Would you like to save this?
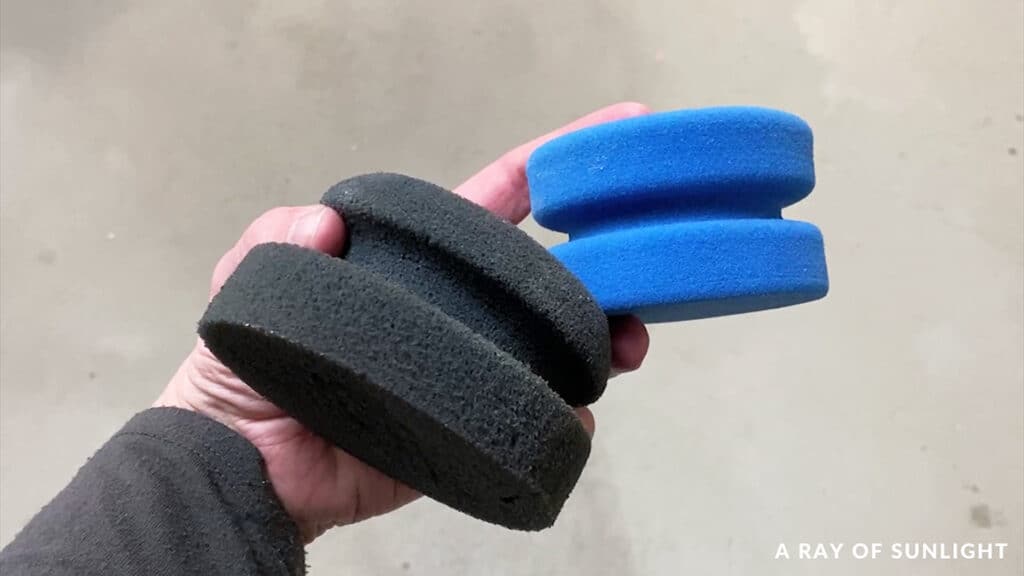
There are more expensive foam sponges from a bunch of different paint companies. But you can also use a cheap tile grout sponge. Someone suggested putting a nylon stocking or pantyhose over the sponge, and it does actually make it go on a little better.
I don’t know what changes, but the finish does look better.
How to Apply Polycrylic Over Paint
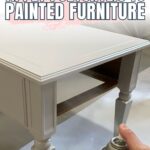
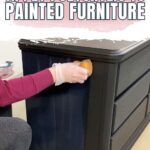
Then get a little bit of the tinted polycrylic onto the sponge, but not too much! Then wipe it on. I try to wipe it on in the direction of the wood grain.
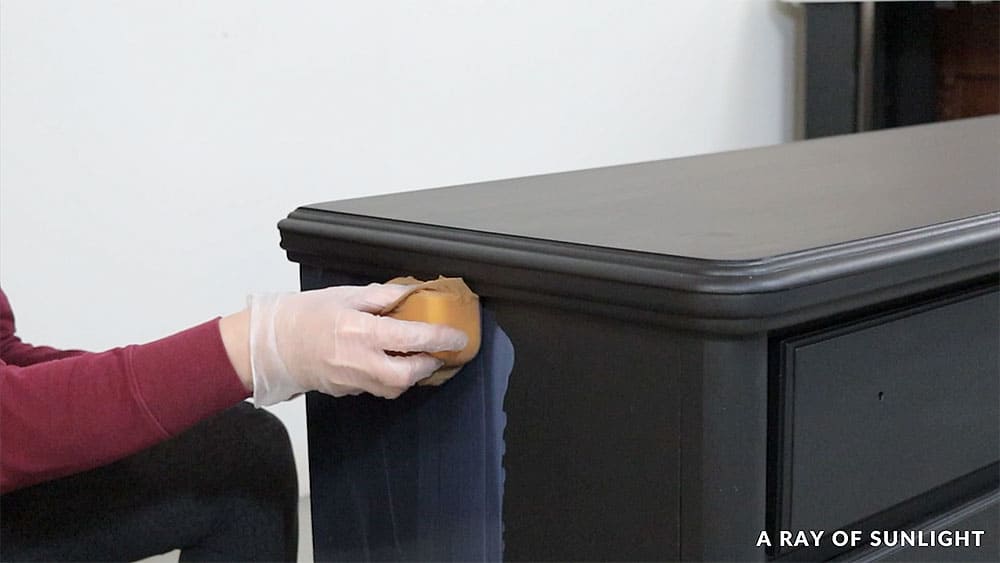
And I try not to go back over it more than a time or two. I like to wipe it on the edges of a small section, then wipe down the middle of that section, trying not to leave a bunch behind on the edges.
For the drawers, it works best when I wipe it on the edges first, with a sponge that doesn’t have much polycrylic on it. I didn’t want too much polycrylic in all of those grooves.
And then I put more polycrylic on the sponge, and wipe it across the drawer, going off each side. For the top, I work from side to side, in long strokes.
How Long Between Coats of Polycrylic
Then let the polycrylic dry for a couple of hours. I wrap my plastic glove around the foam to keep it from drying out while I wait for the first coat to dry.
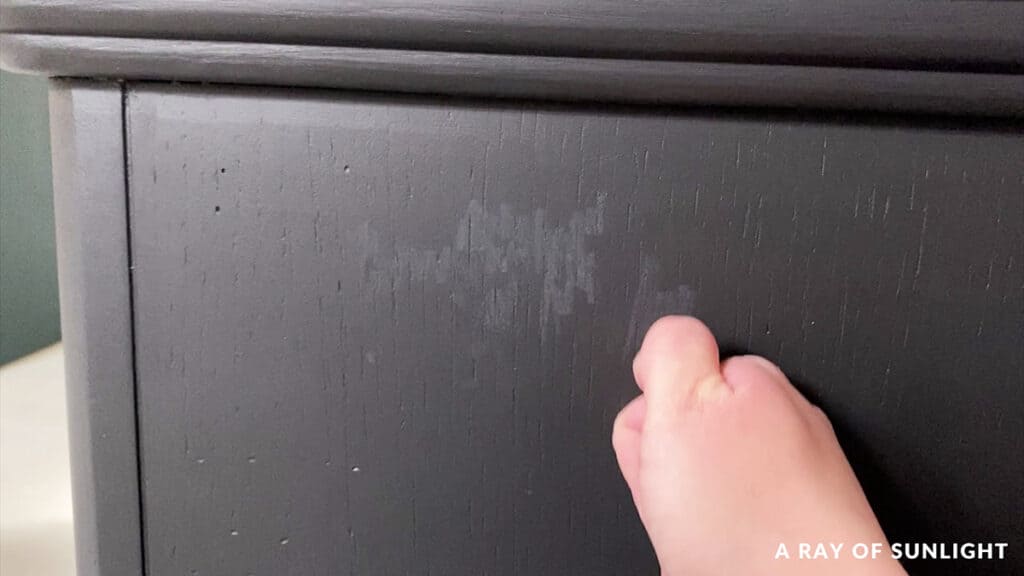
If there are any drips, runs, or places where there is too much polycrylic, let it dry completely and then sand it away with either 400 grit sandpaper or 220 grit sandpaper before working on the next coat.
Learn more about the best sandpaper for furniture painting here. Make sure to clean up any dust you created also. I like to use a tack cloth to get all of the dust.
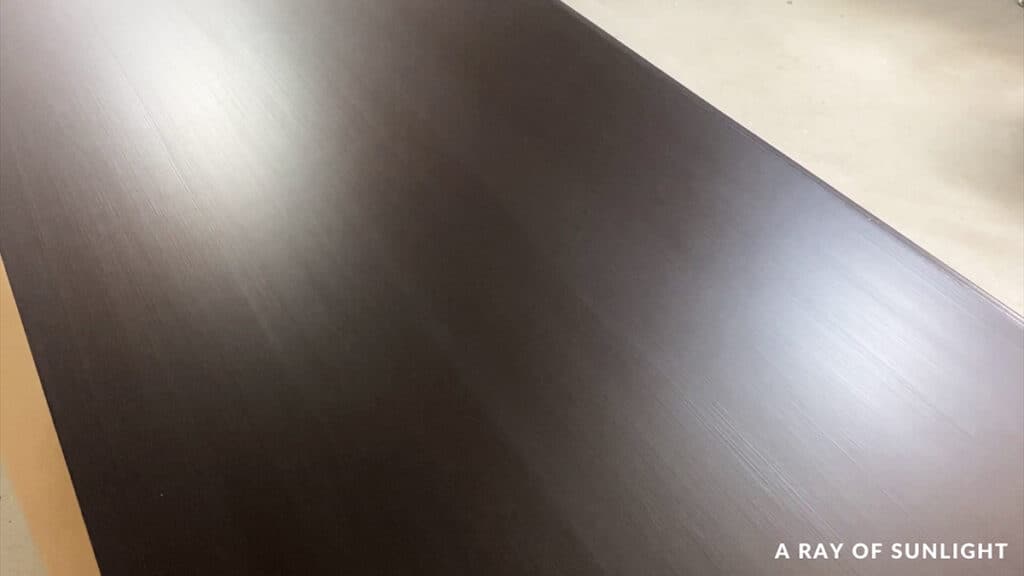
Here’s what the first coat looks like after it’s dry.
Then apply another coat of polycrylic just like the first coat.
How Many Coats of Polycrylic Over Paint
I did 2 coats of polycrylic, and 2 coats would be enough. If it’s a high use piece like a dining table, you might want to do an extra coat for added protection. So for most furniture pieces, 2-3 coats of polycrylic will do the trick.
Make sure to let each coat of polycrylic dry completely before applying the next one, and you can even do a light sanding in between coats for a smoother finish. And don’t forget to clean up any dust or debris before adding the next coat.
How to Apply Polycrylic Without Streaks or Brush Marks
Applying polycrylic by hand can leave behind some streaks and “brush marks.” That’s just the way it is. You most likely won’t notice them if you are topcoating light or white painted furniture. But on dark painted furniture, the topcoat is easily seen.
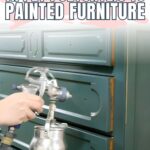
You can also use these best paint brushes for polyurethane. But if you really want a brush free, perfect looking finish on your painted furniture, you’ll need to spray the polycrylic on. My favorite way is with a paint sprayer.


It’s more cost effective if you are painting a lot of furniture. Learn how to spray polyurethane with a paint sprayer here. Here are the best HVLP paint sprayers for furniture.
But if you only paint a piece of furniture here or there, the best way to spray polycrylic is with a spray can. The best spray can waterbased polycrylic and the best clear polyurethane spray for wood is Minwax Polycrylic Spray. Learn more about the features, and pros and cons of the Minwax Polycrylic Spray here.
Minwax Polycrylic Over Paint
If you want to know how to spray Minwax Polycrylic on painted wood, here’s an overview of the process.
First, shake the can for around 2 minutes so the contents are mixed well. Then hold the can about 6-12 inches away from the surface and spray in thin, even coats. Make sure to move in a sweeping motion to evenly apply the polycrylic.
Three coats would do for maximum durability, and again, if you want a smoother finish, lightly sand the topcoated surface between coats. After the final coat, let your furniture dry for 24 hours so there’s much time for the finish to cure and harden. It’s that easy!
Now that you know how to apply polycrylic to painted furniture, there’s no need to be overwhelmed by it! Grab your polycrylic, a sponge and some gloves and topcoat your painted furniture!

How to Use Polycrylic on Painted Furniture
Learn how to use polycrylic on painted furniture for a smooth, durable finish that's easy to clean and maintain over time.
Materials
- Water-Based Polycrylic
- Foam Sponge
- Gloves
- Nylon Stocking or Pantyhose (Optional)
- 400-Grit Sandpaper
- 220-Grit Sandpaper
- Tack Cloth
Instructions
- Make sure your paint is completely dry. If the paint doesn’t dry completely before applying the polycrylic then your paint might crackle, or rub off easily.
- Mix the waterbased polycrylic really well with a stir stick. You can also mix some paint with the poly, specially if you used dark paint. You don’t need a lot of paint, just enough to slightly tint it.
- Get your foam sponge and you can also put a nylon stocking or pantyhose over it. Then get a little bit of the tinted polycrylic onto the sponge, but not too much! Then wipe it on the painted furniture in the direction of the wood grain.
- Then let the polycrylic dry for a couple of hours. Wrap your plastic glove around the foam sponge to keep it from drying out while waiting for the first coat to dry.
- If there are any drips, runs, or places where there is too much polycrylic, let it dry completely and then sand it away with either 400-grit sandpaper or 220-grit sandpaper before working on the next coat. Clean up all the dust from sanding with a tack cloth.
- Apply another coat of the polycrylic to the painted furniture.
Recommended Products
As an Amazon Associate and member of other affiliate programs, I earn from qualifying purchases.


More Painting Furniture Resources
- Furniture Painting Tools And Supplies
- Best Sanders for Furniture
- Best Primers for Painting Furniture
- Wax VS Polyurethane
- Spray Polyurethane vs Brush On Polyurethane
Learn the Art of Updating Furniture!
If painting furniture feels overwhelming or your past attempts didn’t go as planned, this course will guide you step by step.

Follow us on YouTube to get more tips for painting furniture. Or share your project with us on our Facebook Group and be part of our community. See you there!

I was searching on how to apply polycrylic over chalk paint and I found your page with so many interesting things about painting. I’m delightful with I have read so far.
Thank you for very detailed instructions. I’ve mastered painting without streaks, but the polyurethane I’m using is always a nightmare.‘I have a sprayer, but nowhere to spray at the moment as it’s winter in Australia. Do you have a FB page?
Oh bummer! Keep trying, you’ll figure it out. Here is our A Ray of Sunlight Facebook Page.
In your note about enamel paint, you say it doesn’t need a topcoat. In the next sentence you say it should get a topcoat. Can you clarify, please?
Sorry about that. To clarify, enamel paint should not be topcoated.