Painting Furniture with Enamel Paint


Enamel paint is one of the types of paint for furniture that is ideal for painting furniture because it can withstand wear and tear and is easy to clean. If you want to use this paint, here’s everything you need to know about painting furniture with enamel paint!
We’ll cover the process of using enamel paint for furniture, from preparing the piece to applying the paint. We’ll also go over some helpful tips and tricks so your newly enamel painted furniture looks professional and lasts for years to come.
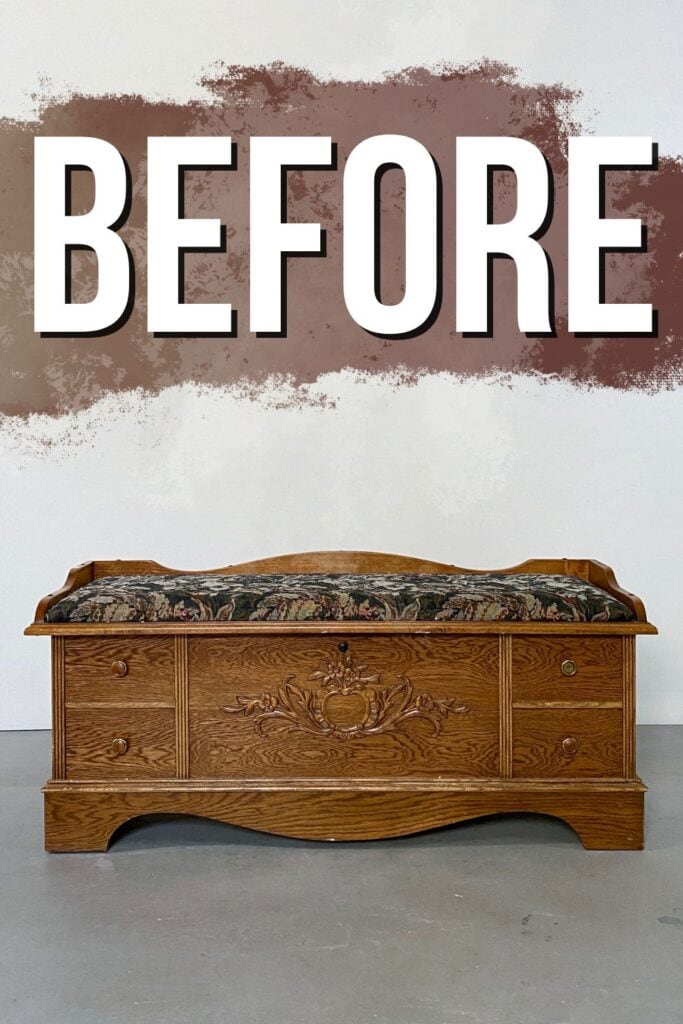
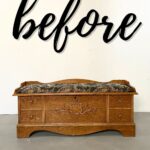
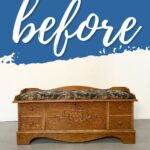
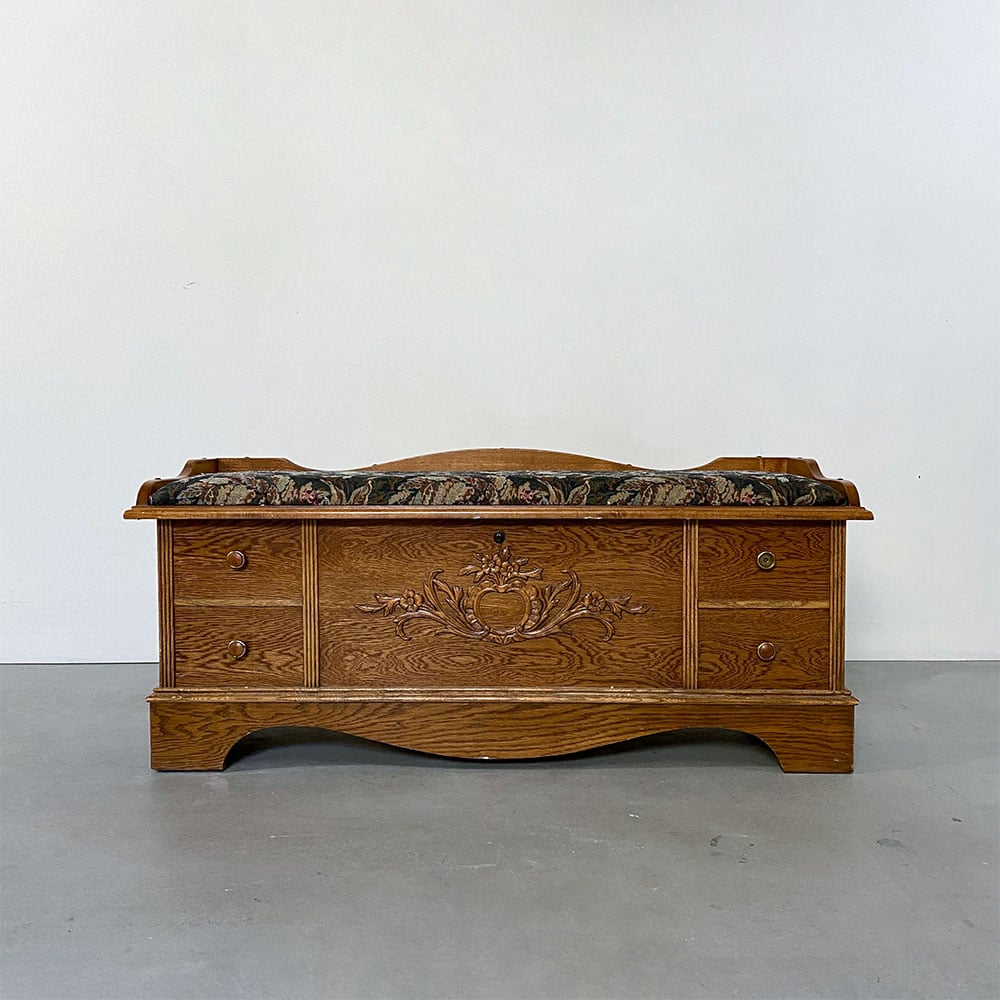
Here’s the piece of furniture we painted with enamel paint. We bought this Lane cedar chest for a whopping $75 from the thrift store. It’s a bit too frilly and 90’s for me though.

Again, we’ll be using enamel paint for this project, and you’ll see the process from start to finish. We’ll transform this cedar chest into a charming red piece that will fit perfectly in any modern or farmhouse style home.
If you haven’t tried enamel paint before and you want to try it for your furniture, this guide should help you out. We’ll also get into more detail on what enamel paint is and the benefits of using it for your furniture. Let’s dive in!

Supplies Used For Painting Furniture With Enamel Paint
As an Amazon Associate, I earn from qualifying purchases. I also may earn from other qualifying purchases with other companies or get free product to review and use. All opinions are my own.
- Electric Screwdriver
- Power Drill and Drill Bit Set
- Metal Scraper
- KwikWood
- DAP Plastic Wood Filler
- Festool Sander
- Shop Vacuum
- Festool Hose
- 220 Grit Sanding Screens (Use code RAY10 to get 10% off your order)
- Painters Tape
- BIN Shellac Based Primer
- Mohair Roller
- Zibra Round Brush
- Fine Grit Foam Sponge (Use code RAY10 to get 10% off your order)
- Sherwin Williams Emerald Urethane Trim Enamel in Sommelier
Get our list of the best painting furniture supplies that we use on every makeover here.
Preparing Furniture for Enamel Paint
No matter what, we always have to get the furniture ready for paint by cleaning it, repairing damage, and scuff sanding to help the paint stick. Learn all you need to know about how to prepare furniture for painting here.
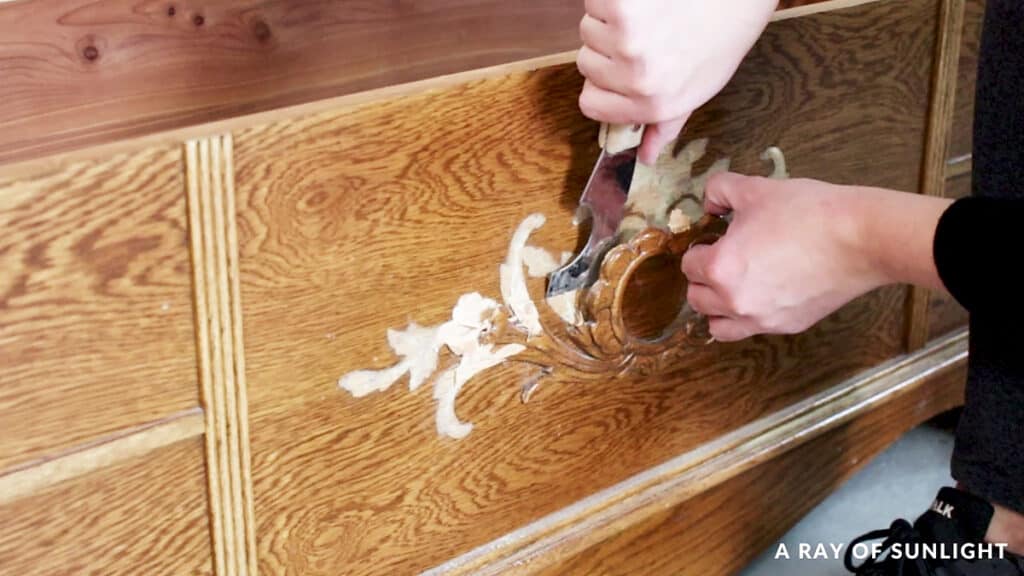
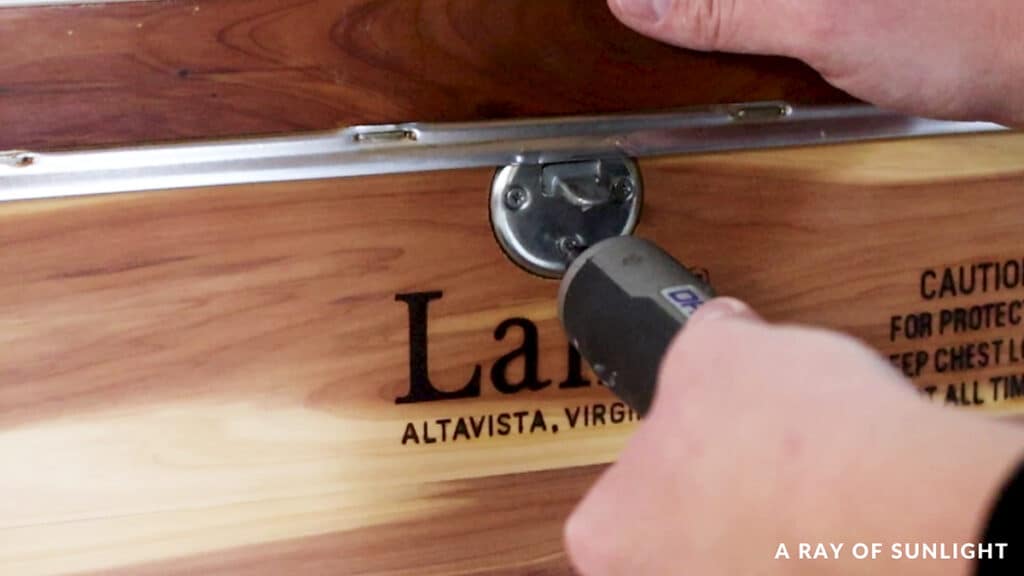
In this case, I wanted to change the look of the cedar chest first. So we removed the old cushion and wood on the top. And we removed the old hardware and the scrolly detail on the front.
And last but not least, we removed the recalled Lane cedar chest lock. These locks were all recalled years ago because of kids locking themselves in the cedar chests. And they just aren’t safe, especially if you have little kids. So we always remove them.
We also should have cleaned the cedar chest before doing anything else, but I honestly forgot in the excitement of taking all the frilly stuff off. Learn how to clean furniture before painting here.
Repairing Damaged Furniture
Now for the fun part… repairing the damage. We sanded the wood under the scrolly detail smooth. Then I had to fill in allllll of the holes. We filled the big screw holes with my favorite KwikWood filler since it’s the best at bigger repairs. Learn more about how to use KwikWood here.

See how KwikWood compares to others in this comparison of ways of filling holes when replacing cabinet or furniture hardware.
And then I used the DAP plastic wood to fill in the small pin nails. Check out the best wood fillers for painting furniture here, including these 2 products we’ve used.
Sanding Before Painting Furniture
We waited for them to dry, and then we sanded the wood filler flush with the surface around it. And then we scuff sanded the cedar chest to help the primer and enamel paint stick to it.
I love my SurfPrep sander with foam sanding sponges for scuff sanding, but if you are only painting one of two pieces of furniture, you can sand by hand with 220 grit sandpaper. Learn more about sandpaper for furniture painting here, and learn all about sanding before painting furniture here.
Check out my honest SurfPrep vs Festool Sander review here. Here’s a more in-depth Festool RTS 400 REQ Sander review.
Then we cleaned up all of the dust, and I taped off the edges of the cedar chest so I wouldn’t get paint inside of it. Check out this post to learn how to prevent paint bleed through painter’s tape. And here’s what is the best painters tape you can use on your furniture makeovers.
Does Enamel Paint Need Primer on Wood?
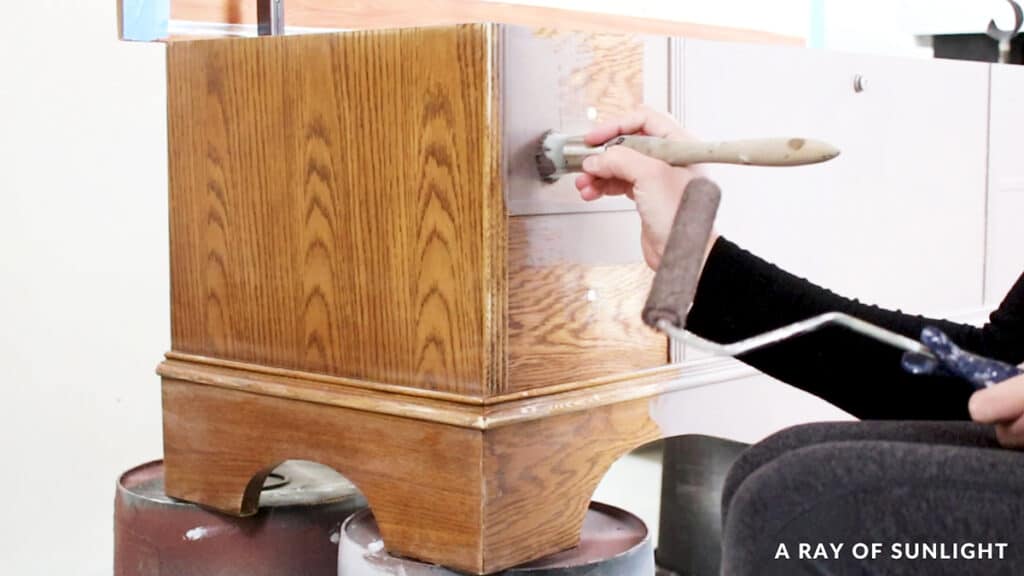
Yes! For best results, prime your furniture before painting with enamel paint. We rolled on 2 coats of BIN shellac-based primer that we had tinted in this grey color. I used my favorite Mohair roller from Sherwin Williams and a Zibra paint brush.
I chose this primer for this piece because I wanted to create a base for the paint that would block bleedthrough stains from the raw wood, but also make it so the paint would have even coverage.
You can also check out how to stop stains from coming through paint and how to stop wood knots from bleeding through paint to get more information.
Oh, and since it was tinted in a medium shade of grey instead of white, I wouldn’t have to paint as many coats of my darker paint on top of it to get full coverage. Check out the best primers for painting furniture (and how to choose the right one) here.
I rolled it on so the primer would get pushed into the oak wood grain, especially where it was down to the bare wood. If painted wood grain bothers you, check out this post on how to hide wood grain when painting.
Then we let the primer dry, and I sanded all of the primer with a fine grit foam pad to smooth out the texture that was left behind because of rolling it on.
How to Paint Furniture With Enamel Paint
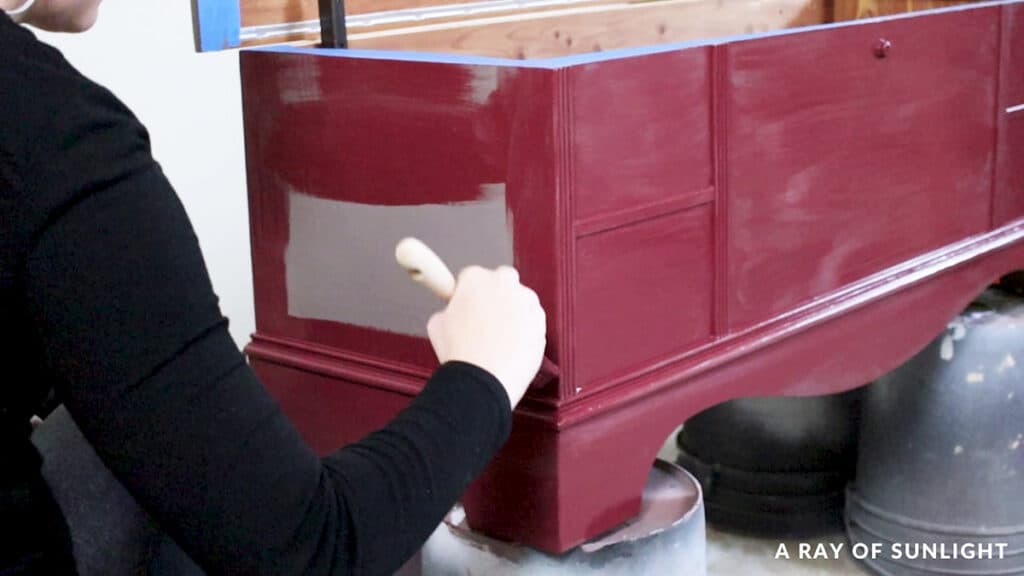
For this furniture makeover, we used Sherwin Williams Emerald Urethane Trim enamel in this deep red called Sommelier. If you’re yet to try this paint, check out my honest Sherwin Williams Emerald Urethane Trim enamel review here. Check out our blog post about how to repaint furniture where we also used this paint.
And if you’re curious about this brand and paint, here’s the best Sherwin Williams paint for furniture to learn more about it and if it’s worth considering for your next furniture project.
Anyway, I brushed it on with a Zibra round paint brush so you could see how well this paint levels out when you brush it on with a budget friendly, quality paint brush. The first coat was soooo thin and streaky looking. But that’s not surprising with red paint.
We let it dry overnight, and then I found some paint drips, so I sanded those out, and then I sanded everything else with a fine grit foam pad to make it feel nice and smooth.
I cleaned up the dust again and painted on 2 more coats, letting them dry for at least 4 hours between coats.
Check out this post on painting furniture white and this painted armoire to see more makeovers with Sherwin Williams Emerald Urethane Trim enamel. Here’s how to refinish a cedar chest for another way to transform your cedar chest!
Before I show off the new look, let’s chat a little more about enamel paint so you know what to expect when you paint furniture with enamel paint.
What is Enamel paint?
Enamel paint is durable and can usually be used on both indoor and outdoor surfaces. It dries hard and doesn’t need to be top coated.
Most enamel paints on the market today are waterborne or alkyd paints instead of oil-based, so they don’t have as strong of fumes, and they can be cleaned up with soap and water.
How many coats of enamel paint?
How many coats of enamel furniture paint you’ll need depends on a few things. First, consider the color you are working with. Lighter colors like white may need more coats for full coverage compared to darker colors like red.
Would you like to save this?
But it also depends on what the color of the furniture is to begin with. If it’s already white, you won’t need as many coats to paint it white compared to painting it a darker color. Alternatively, if you paint a dark piece with a light color, you will likely need several coats to fully cover it.
Typically, it’s a good idea to put on at least 2 coats of enamel paint to get good coverage and durability. With red, you’ll probably need more than 2 since it’s a color that doesn’t have much coverage and needs multiple coats of paint.
But if you end up with any drips like we did with this project, you may need to sand them out before applying more coats. And if there are any imperfections in the surface or texture that bother you, sanding between coats can really help smooth them out.
Ultimately, the number of coats you need really comes down to personal preference. Some people are happy with 2 coats, while others might go for a third to get a little more coverage. When in doubt, it’s always a good idea to play it safe and add another coat!
What are the benefits of Enamel Paint on Furniture?
A lot of furniture gets used and abused every day, so it’s great to paint furniture in a paint that will dry hard and into a durable finish.
For instance, when painting a dining set, you can ensure that it will withstand daily wear and tear, maintaining its beauty for years to come. Check out this painting a dining table black with enamel paint.
How to get a professional finish when painting furniture with enamel paint, even if you’re a beginner painter?
To get a professional finish when painting furniture with enamel paint, it’s important to start with a clean and smooth surface. Make sure to sand your furniture piece thoroughly before priming and painting.
You should also use quality brushes and paint rollers for applying your enamel paint to make sure that you get an even, smooth finish. Here are our lists of the best paint rollers and the best paint brushes for painting furniture.
Another important tip is to brush it on in thin coats so you don’t leave paint drips and brush marks behind. Here are our best tips on how to paint furniture without brush marks.
If you’re worried about getting brush strokes or uneven paint coverage, you may want to consider spraying it on with a paint sprayer. Check out the best HVLP paint sprayers for furniture here. This will give you a more uniform finish and make it easier to get professional results, even if you’re a beginner painter.
Finally, be sure to let your paint dry completely before handling or putting your furniture piece back into use.
Emerald Urethane Trim Enamel Dry Time
Sherwin Williams Emerald Urethane Trim Enamel typically dries in 2-4 hours, depending on the humidity levels and temperature in your area.
Emerald Urethane Trim Enamel Recoat Time
After 4 hours of drying time, it should be ready for another coat of paint. To get the best results when painting furniture with enamel paint, be sure to follow all of the manufacturer’s recommended application and drying times carefully.
Emerald Urethane Trim Enamel Cure Time
It will be cured in about 30 days. Darker colors can take longer to cure because of the larger amount of pigments in the paint. The humidity levels and temperature in your area can also prolong the cure time.
Do you need to seal enamel paint?
No. Enamel paint doesn’t need to be sealed. Actually, it shouldn’t be top coated in most cases. Specifically, this Sherwin Williams Emerald Urethane Trim enamel paint can be ruined if you topcoat it. It’s an alkyd paint, so once it is dry, it is very similar to an oil-based paint.
If you topcoat it with water-based paint before it has cured or even after it has cured, you may end up with a crackled finish. Enamel paint is durable on its own and doesn’t need a topcoat.
But if you actually like a crackled look on your furniture, there’s a right way to do it. Check out this post on crackle painted furniture for ideas.


Best Enamel Paint for Furniture
I know, Emerald Urethane Trim enamel isn’t the only enamel paint out there! So here are the enamel furniture paints that I’ve used and recommend!
Sherwin Williams Emerald Urethane Trim Enamel: It self-levels really well, so you can brush it, roll it, or spray it and get a professional finish! It dries relatively quickly and dries hard. It is also the best paint for dining room table since it can withstand all the activities happening on the dining table.
Check out this furniture makeover using Sherwin Williams Emerald Urethane Trim enamel.
Rustoleum Protective Enamel: Now this stuff is the real deal. Though it’s oil-based, so there are a lot more fumes, and clean up is harder. But it really levels out beautifully, and it dries to the most durable finish. Recoat time is 24 hours though. Ouch!
Check out this post on how to paint furniture high gloss with Rustoleum protective enamel.
Wise Owl One Hour Enamel: Just like the name suggests, it dries in an hour. It boasts that it is cured in an hour, but I’ve yet to see that. Since it dries so quickly, it doesn’t have a chance to level out as well. But you can spray it on to get a professional finish! Once cured, it’s very durable.
Here’s my Wise Owl One Hour Enamel review to learn more about the pros and cons of this paint. And check out this post on painting a china cabinet with Wise Owl One Hour enamel.
Benjamin Moore Advance: Okay, I’m not 100% sure it’s technically an enamel, but I think it fits. You can brush, roll, or spray it on, and it levels out beautifully. (Apparently, don’t thin it out because it won’t dry as hard as it should.)
Recoat time is 16 hours, though. But once dry, it’s very durable. Check out this post on painting furniture with Benjamin Moore Advance Paint.
Here’s our post featuring the best enamel paint for furniture where you can learn more about their features and help you decide which one to go for.
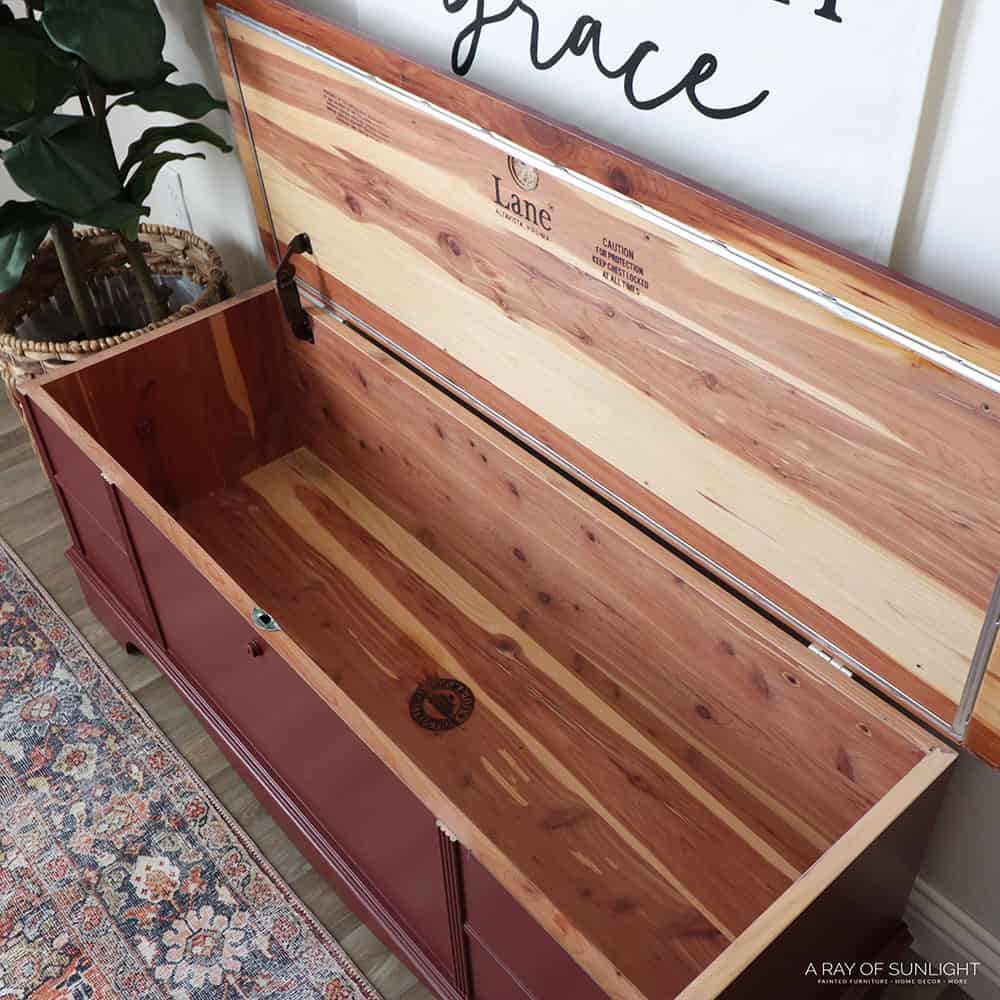
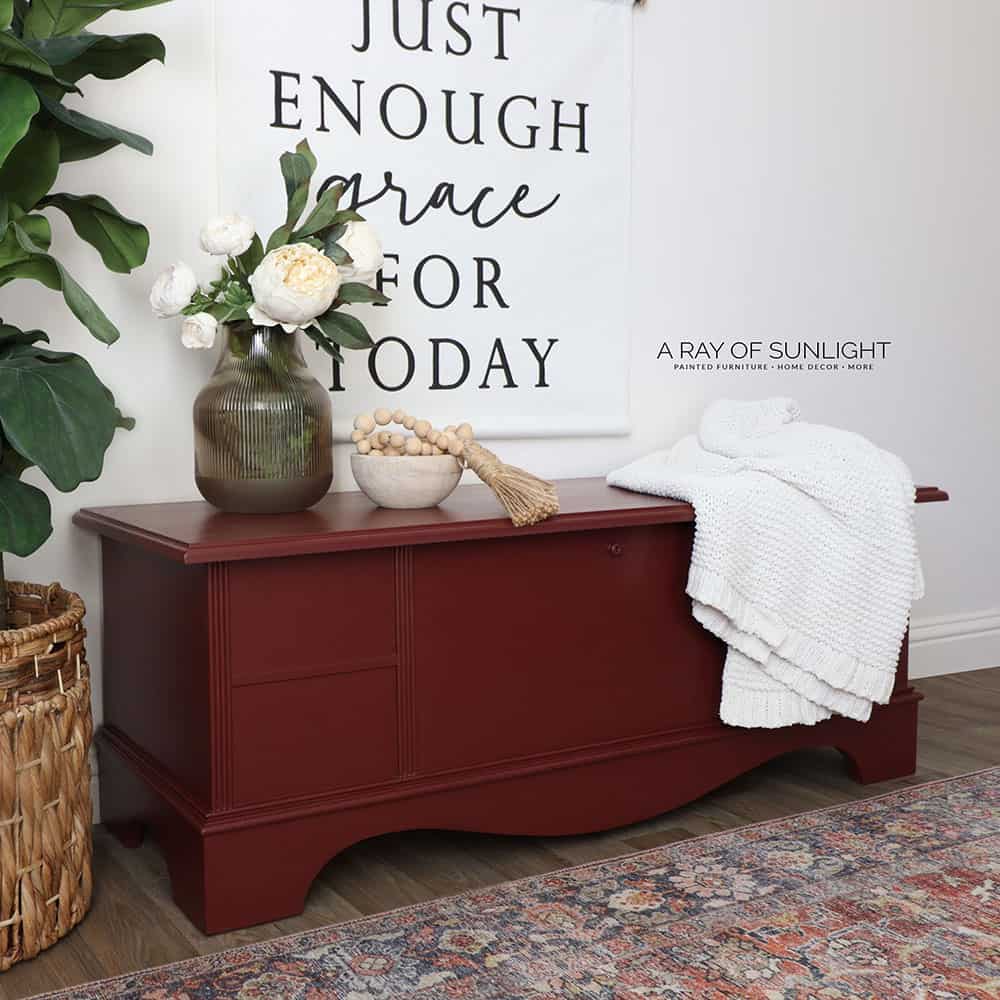
And finally, now that you know all you need to know about enamel paint, here is the after of the cedar chest makeover! You can also watch the makeover on our YouTube video below:
I’m in love, and I don’t care who knows it! It’s so warm and cozy now. What do you think of the new look? Can you see any brush marks?

More Before and After Makeovers
See All >
Click any of these “before” photos below to view the “after” of that makeover.


Hopefully, this guide has helped you understand everything you need to know about using enamel paint for furniture. So if you’re planning a furniture makeover soon, why not give enamel paint a try? It’s durable, easy to use, and can give you professional results.


Painting Furniture with Enamel Paint
Enamel paint is great for furniture painting because of its durability. Here are the steps for painting furniture with enamel paint.
Materials
Tools
Instructions
- Prep the furniture for paint by cleaning it, repairing damage, and filling in holes. Wait for the wood filler to dry then sand it flush with the surface around it. And then scuff sand everything to help the primer and enamel paint stick to it.
- Clean up all the dust from sanding and tape off the edges of the furniture so paint wouldn't get inside of it.Prime with 2 coats of primer, once dry, sand to smooth out any texture.
- Roll 2 coats of primer onto the furniture then let it dry. Sand all of the primer with a fine grit foam pad to smooth out the texture that was left behind from rolling.
- Paint a few coats of enamel paint onto your furniture, letting them dry for at least 4 hours in between coats. For any paint drips, sand those out, then sand everything else with a fine grit foam pad to make it feel nice and smooth. Clean up the dust from sanding.
- Finally, be sure to let your paint dry completely before handling or putting your furniture piece back into use!
Recommended Products
As an Amazon Associate and member of other affiliate programs, I earn from qualifying purchases.


More Painted Furniture Makeovers
- DIY Cedar Chest Makeover
- Painted Cedar Chest Makeover
- Vintage Cedar Chest Makeover
- Painting a Cedar Chest
Learn the Art of Updating Furniture!
If painting furniture feels overwhelming or your past attempts didn’t go as planned, this course will guide you step by step.

Follow us on YouTube to get more tips for painting furniture. Or share your project with us on our Facebook Group and be part of our community. See you there!
Looks like burgundy, wine color. I love it!
Looks Gorgeous!
Thanks so much Nicole!
I really like how this red cedar chest turned out. Good decision removing the pieces on top and the decorative piece/knobs on the front. Thanks, as always, for sharing your tips and the links to more information and how-tos.it’s all so helpful.
I’m so glad to know you love it! Thank you for your kinds words. It means a lot to know our posts have been helpful for you!!