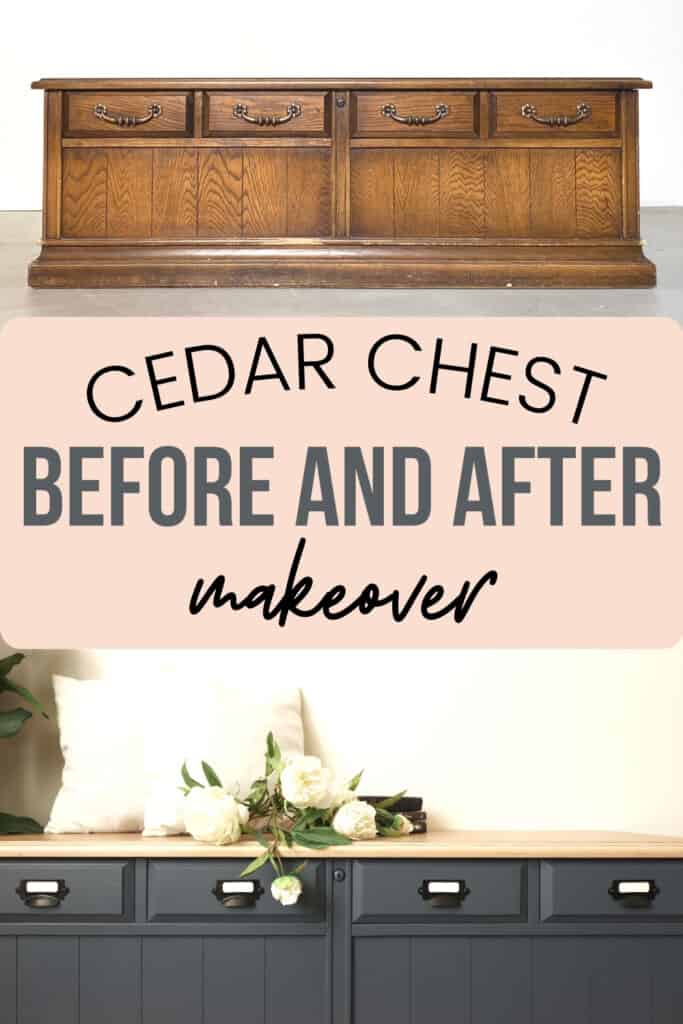
DIY Cedar Chest Makeover with General Finishes Milk Paint


Today, I’m sharing one of the best ways to paint furniture without brush marks on this lane cedar chest. Plus we’re adding in a little extra something for the top and legs! Let’s dive into this DIY cedar chest makeover!
It’s satisfying how these furniture makeover ideas can completely transform a piece into something new and beautiful. I’ll walk you through step by step how to give it an updated look with General Finishes Milk Paint. So keep reading and get ready to be inspired!

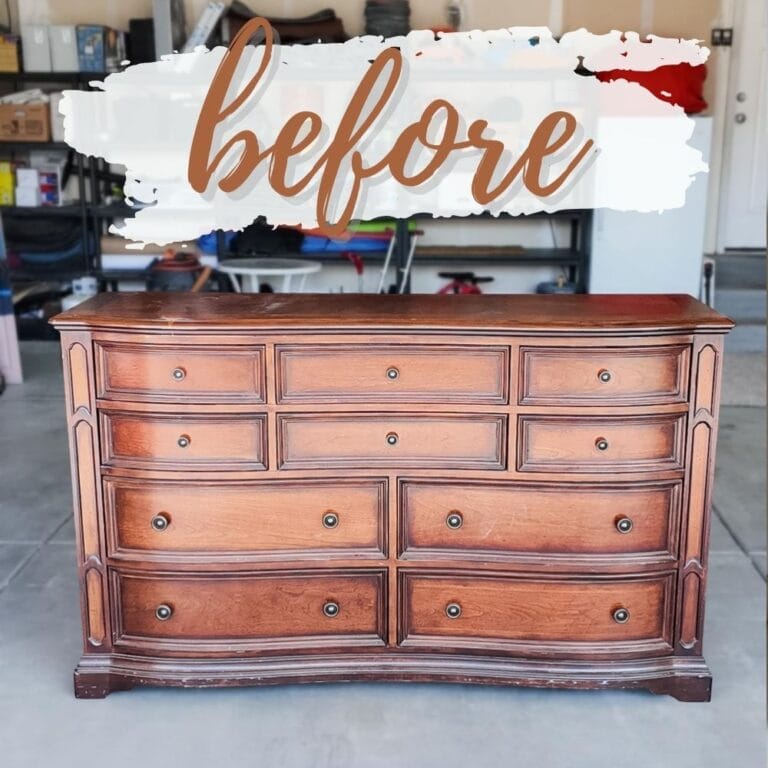
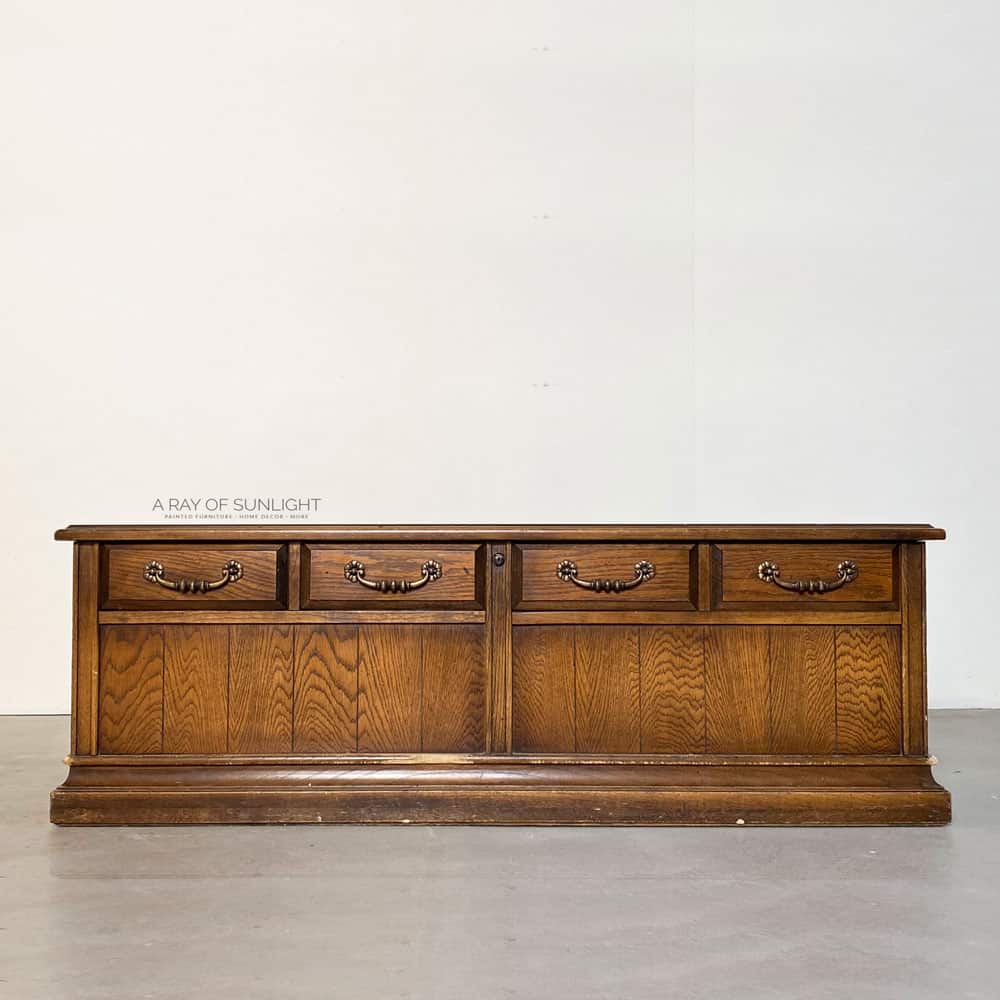
This was what the cedar chest looked like before. First, we added legs to the bottom. You can see the process of adding legs to a cedar chest here! So here’s what it looks like with cute little bun feet!


Now, it’s time to flip and update it! As we mentioned, we’ll be using General Finishes Milk Paint, and we’ll be showing you how to use it without getting any brush marks. This will give your piece a smooth, professional looking finish.
So, let’s get started on this DIY cedar chest makeover!

Supplies Used for this DIY cedar chest makeover
As an Amazon Associate, I earn from qualifying purchases. I also may earn from other qualifying purchases with other companies or get free product to review and use. All opinions are my own.
- Electric Screwdriver to remove hardware
- KwikWood to fill in hardware holes
- Disposable Vinyl Gloves
- Wood Filler
- 3×4 Vacuum Compatible SurfPrep Sander (Use code RAY10 to get 10% off your order)
- Foam Sanding Pads (Use code RAY10 to get 10% off your order)
- Krud Kutter Cleaner Degreaser
- Shop Vac
- Tack Cloth
- Clear Shellac
- General Finishes Milk Paint – China Blue and Driftwood
- Zibra Round Brush
- Paintable Caulking
- Varathane Waterbased Polyurethane
- Fuji Q4 Paint Sprayer
- Card Catalog Pulls
- Screws for Card Catalog Pulls
Grab our list of 10 must have painting furniture supplies, too, so you can create beautiful, professional looking pieces any time you want!
Prep for DIY Makeover
I started by removing the hardware and filling in the hardware holes so I could put new hardware on the fake drawers.

NOTE: The lock on lane cedar chests is recalled, so we removed the latch on the top before we did anything! Then we ordered a new latch through their recall website.
This Kwikwood epoxy is the easiest and best stuff to use to fill in hardware holes because it dries super hard in an hour, and it doesn’t shrink, crack, or have air bubbles in it. Learn more about this best way of filling holes when replacing cabinet or furniture hardware here.

So you fill the holes once, sand the Kwikwood down, and then you can’t even tell there used to be holes there! I also filled the little indentations that were left by the outline of the old hardware with some basic wood filler. Read more about the best wood fillers here!
Repairing Chewed Up Corners
I also used the Kwikwood to repair the chewed-up corners that were worn down. Check out this other method we have used to fix a chipped wood corner here! Here’s another guide on how to fix dog chewed wood trim.
I just formed the Kwikwood with my fingers to the shape of what the corner should have been. And then, I let the Kwikwood and wood filler dry for an hour. Learn more about how to use KwikWood here.
Then, I used my SurfPrep sander to sand the wood filler and Kwikwood down to be flush with the wood. And I used these foam sanding pads on my sander to help shape the repaired corners.
Get Our Secrets!
Grab this super convenient How to Repair Furniture Ebook with all of our secrets on how to repair furniture for only $14.
You can print it out and have instant access whenever you come across damaged furniture, and know exactly how to fix it!
Click on the picture of the book to purchase!

I also taped off the inside so I wouldn’t accidentally get any coating on it. Learn more about how to prevent overspray when painting furniture here!
Cleaning and Sanding Cedar Chest
At this point, I realized that I forgot to clean the piece before working on it, so before I did anything else, I busted out my favorite cleaner, Krud Kutter, and an old damp rag to clean all the dirt and grime off. Learn all about how to clean furniture before painting here.

Once the piece was dry, I scuff sanded it with my favorite little SurfPrep sander. Scuff sanding not only helped with adhesion, but it gave me a chance to smooth out anything that was a little chewed up on the edges.
Read more here about the importance of sanding before painting furniture.
Last year, I invested in this SurfPrep sander to make sanding furniture go so much faster! It has these foam pads, so I can easily sand the details and trim. It’s also small and square, so it fits in smaller areas and gets nicely into corners. Here’s what you need to get started with a SurfPrep Sander!
When I got to the top of the piece, I went a little crazy, and I ended up sanding the entire top down to bare wood! The top WAS in pretty rough shape, so I’m really glad I just sanded it down to remove a lot of the scratches and damaged finish. It was totally worth the extra work!

Then I used my shop vac to suck up all of the dust left behind and wiped it all down with a tack cloth to get off the remaining dust.
Priming a Cedar Chest
The last thing I like to do before giving any piece a new look is to prime it in some sort of way. Not necessarily to help the finish stick (though it definitely does) but to prevent the wood from staining the final look.
It’s called bleed through and it doesn’t ALWAYS happen, but when it does happen, it’s SO frustrating! So I always prime to prevent bleedthrough from happening. Check out more tips and tricks on how to stop stains from coming through paint here.
This time, since I wasn’t sure if I was going to distress or not, I used clear shellac in a spray can. If you want the distressed look, here are the best distressing furniture techniques you can do.

Learn more about priming wood for painting and all your options for the the best primers for painting furniture (and how to choose the right one) here.
DIY Cedar Chest Makeover with General Finishes Milk Paint
I wanted to update this without using my sprayer this time to show that it is possible to get a professional finish even if you don’t have one! Keep reading below to discover some of the tricks we used to not get brush marks in the final finish!
How to Paint Without Brush Marks
So, the trick to getting a brush free finish is using a self leveling paint. Yeah, you can get a smooth finish with other products, too, but the easiest way ever is to start with the right kind. Read more about the best paint for furniture options in this post!

Would you like to save this?
And to have a good brush. Check out our recommendations for the best paint brushes for painting furniture here.
General Finishes Milk Paint is definitely self leveling, and it’s actually made for furniture and cabinets. It’s acrylic and waterbased, so it’s easy to clean up with soap and water.
It’s also self sealing, so on any surface that isn’t high traffic, you can technically get away without top coating it. Check out my in-depth General Finishes Milk Paint review here, and here’s everything you need to know about painting furniture with acrylic paint.
But let’s be honest, I still always seal it with a waterbased topcoat to make sure it’s as durable as possible. And with kids around, what isn’t a high-trafficked surface right?! Learn all about the pros and cons of different topcoats for painting furniture here!
I wasn’t absolutely loving any of the colors I had on hand, so I mixed up 2 of their colors in about a 1-to-1 ratio. I mixed 1 part China Blue with 1 part Driftwood, and it made the prettiest warm slate blue!

Using Zibra Round Paintbrush
Then, I used my very favorite round paintbrush from Zibra to apply the General Finishes Milk Paint all over. Zibra’s brushes are high quality, but they don’t break the bank! I also love that they come in different shapes to help you get into details easier.
The round brush is my favorite, though, because it gets into curves and details super easy. Seriously, if you try a Zibra round brush, you won’t ever want to go back to a regular flat brush!

While I was working on it, I tried my best to tackle small sections at a time, and then, before I moved on to the next section, I brushed from edge to edge in the direction that the wood grain goes.
Doing longer brushstrokes that are all even really helps create a brush free finish, too, and if you do end up with any brush strokes, it just looks like the wood grain! Learn more about how to paint furniture without brush marks here.
Before I left it to dry for a couple of hours, I walked around and made sure I didn’t have any drips in my or areas where the finish was thick enough to create a drip while it was drying. And then, I wrapped my brush with some plastic wrap to keep it wet while the piece dried.
After it was dry, I filled in some horrible looking lines. I used caulking to fill them in, and I wiped the excess caulking off with a damp rag. This stuff is paintable after only 20 minutes, so I was back to applying a second coat pretty fast!
General Finishes has really good coverage so I really only needed two coats total to get full coverage. After the second coat, I let it all dry for another 2 hours.
Whitewash Cedar Chest Top and Legs
While I waited for the final coat to dry, I worked on the top and the legs. I wanted to go for a raw wood, whitewashed type finish, but the top was really rustic and I intentionally had left some of the old dark stain in the corners.

So, I needed to make the legs look the same. And then whitewash both. Check out this how to whitewash furniture post for the whole detailed process!
You can also read through this post for more tips on how to whitewash wood. And check out more whitewashed furniture ideas here!
Topcoat Painted Cedar Chest
To finish it all off, I sprayed everything with 3 coats of my favorite waterbased poly topcoat.

Technically, I could have just top coated the whitewashed wood because you don’t HAVE to seal General Finishes Milk Paint when it’s not a high traffic surface. But I love the added durability of the topcoat, and my sprayer makes it easy to topcoat everything!
Check out this post to learn how to spray polyurethane! It seriously is my favorite way to apply a topcoat to finished pieces! Here are the best sprayer for polyurethane options if you need recommendations.
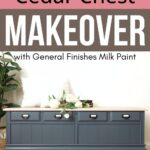
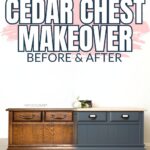
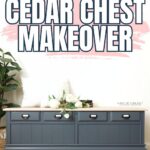
And here’s how the DIY cedar chest makeover turned out!


More Before and After Makeovers
See All >
Click any of these “before” photos below to view the “after” of that makeover.


There are honestly NO brush marks with this! I tried to get some shots for you with the sunlight so you could see how smooth the finish is. I also love the whitewashed little feet and the top! And the little card catalog pulls on the fake drawers are some of my very favorite hardware to use!
You might be wondering is two-toned furniture in style? – check out this makeover guide to find out!
Refinished Cedar Chest Ideas
You can also try refinishing! This process brings out the wood’s natural beauty by removing any finish and applying a new one. You can learn how to remove wood stain and how to remove paint from wood furniture in these guides! Here are the best wood stain removers and best sanders to remove paint you can use to get the job done.
Once your piece is stripped down to its natural wood and doing the necessary prep work, you can choose from various finishes, from dark to light, to suit your decor style. Check out how to refinish a cedar chest, plus this post on the steps to refinishing furniture to guide you.
If you want some inspiration, you can browse through these furniture refinishing ideas to see how others have transformed their old pieces. Yes, you can also use other techniques like staining for an updated look!


And there you have it – a complete DIY makeover for your old cedar chest using General Finishes Milk Paint! It’s versatile and durable, perfect for transforming any piece of furniture without the unsightly brush marks.


DIY Cedar Chest Makeover with General Finishes Milk Paint
This step by step makeover uses general finishes milk paint and a whitewash to create a stunning DIY cedar chest makeover that even beginners can do!
Materials
Instructions
- Start by removing old hardware from the cedar chest. Fill in the holes and repair any damages with KwikWood. Let the wood filler dry and sand it down to be flush with the wood.
- Now, use Krud Kutter and an old damp rag to clean all the dirt and grime off of the cedar chest. Once it dries, scuff sand the entire chest. Then clean up all the dust with the vacuum and tack cloth.
- Apply a few coats of clear shellac onto the cedar chest to prime it and prevent bleedthrough.
- Apply paint onto the cedar chest using long brushstrokes in the direction of the wood grain. After the paint dries and there are lines that look horrible, fill them in with paintable caulking then wipe the excess off with a damp rag. After the second coat of paint, let it all dry for another 2 hours.
- While waiting for the paint to dry, work on the top and legs of the cedar chest and whitewash them.
- To finish it all off, spray whole cedar chest with 3 coats of water-based polyurethane topcoat.
- Add in your new hardware.
Recommended Products
As an Amazon Associate and member of other affiliate programs, I earn from qualifying purchases.


More Cedar Chest Makeovers
- Painting a Cedar Chest
- Painted Cedar Chest Makeover
- Painting Furniture Black
- Waterfall Cedar Chest Makeover
- Painting Furniture with Enamel Paint
Follow us on YouTube to get more tips for painting furniture. Or share your project with us on our Facebook Group and be part of our community. See you there!
Hi. What do you condition the inside of your ceder chests??????? I’m refinishing my grandpa’s chest! The whole thing smells old….would love to bring out the ceder smell again!!
I just wipe it out with a damp rag and it brings back the smell of the cedar.
How do you know when to use the shellac and when to use the bin primer?
shellac if you want to distress the paint, bin for everything. Dark paint colors over BIN are harder though, so I opt for clear shellac on dark colors. I have only tested clear shellac extensively with chalk, mineral and acrylic paints.
You can do that, but you can also just wipe the cedar with a damp rag and the smell will come back.
I love the green color. I am going to repaint the bottom.of my kitchen island. This is the color I have been looking for. Could you share the name and brand please.
Best wishes,
Donya
Hey Donya! I’m so glad you love the color, but I’m not sure what green color you’re talking about. This cedar chest is a blue, so I’m a bit confused. Would love to help though! Please let me know!
I really admire how you brought this old cedar chest back to life!
Thank you SO much! I’m glad you like this cedar chest makeover!!