Painted Cedar Chest Makeover


One of my favorite things to do with furniture is to transform it into something that looks completely different. This painted cedar chest makeover is exactly that, and it fed my soul. The project took a few different turns until I finally landed on something that I absolutely love.
This green painted cedar chest is the perfect blend of modern and vintage, making it a versatile piece that can fit into any home decor style. If you’re looking for some green painted furniture ideas to spruce up your home, then keep reading!
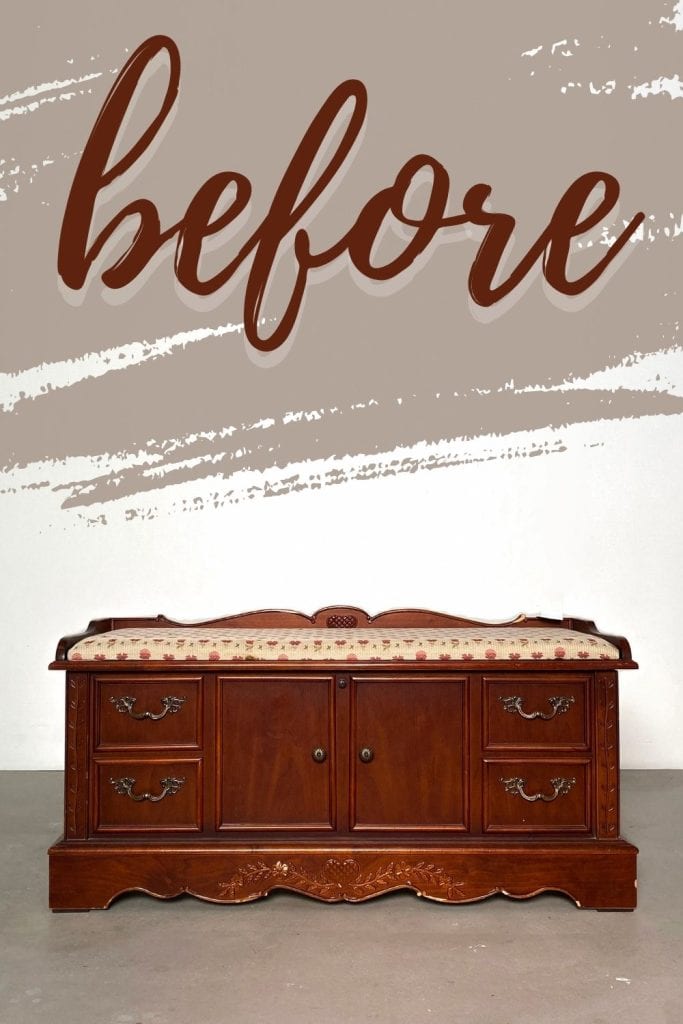
You can see above what this cedar chest looked like before. Outdated, with an absolutely dirty cushion… But I thought that it still had some good bones! And it’s nothing that a fresh coat of paint can’t fix.

Different shades of green give off different vibes, and this green gives off a dramatic but subtle vibe. It’s not too bright or overwhelming but still adds color to any room. Plus, green works for modern and vintage styles, so you’re not limited in your home decor choices.
Follow along as I take you through the steps of this painted cedar chest makeover! We’ll cover everything from prepping the piece to painting it with chalk paint and sealing it for durability. Let’s get started!

Supplies Used for painted cedar chest makeover
As an Amazon Associate, I earn from qualifying purchases. I also may earn from other qualifying purchases with other companies or get free product to review and use. All opinions are my own.
- Power Drill
- Putty Knife
- Hammer
- KwikWood
- Krud Kutter
- SurfPrep Sander (Use code RAY10 to get 10% off your order)
- 150 Grit Sandpaper (Use code RAY10 to get 10% off your order)
- Foam Sanding Pad for the Sander (Use code RAY10 to get 10% off your order)
- Shop Vacuum
- Tack Cloth
- Wood Filler
- Clear Shellac
- House and Canvas Paint in Underground
- Round Zibra Paint Brush (My fav brush!)
- Varathane Polyurethane in Satin
- Minwax Polycrylic in the Spray Can
- 400 Grit Sandpaper
- Turned Legs
- Furniture Leg Hardware
- ½” Drill Bit
Take the Cedar Chest Apart
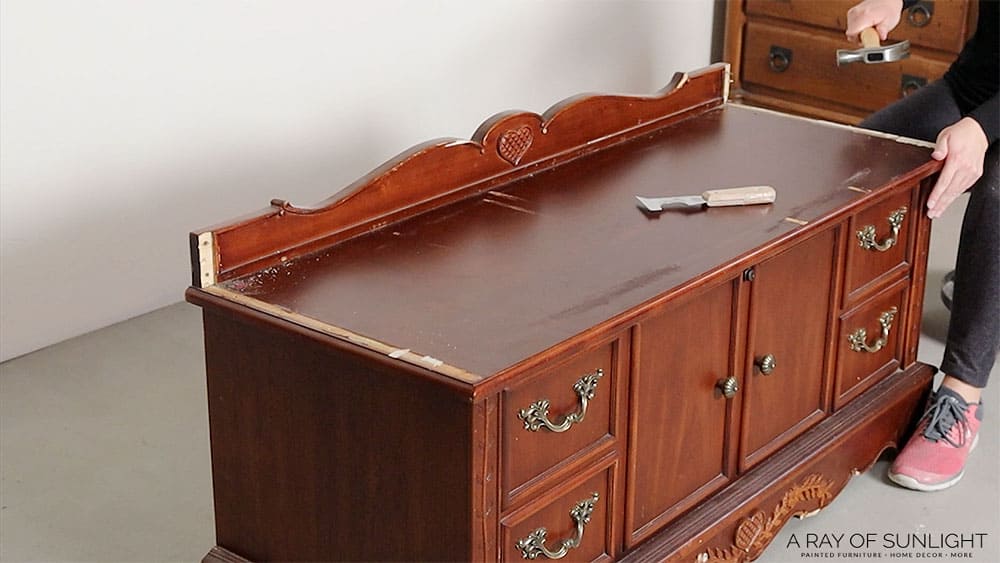
First things first… I took it all apart. Okay, not all the way apart, but I removed a lot of things.
I threw the pad in the trash and busted the trim stuff off of the lid. I thought it was going to be easy… just unscrew the screws under the lid. But they were glued on too. So after I unscrewed all the screws, I had to pry them off of the lid.
For some reason, I love doing stuff like this. I love seeing something completely change in a matter of minutes.
Lane Cedar Chest Lock Replacement
I’ll also note here that I removed the lock from this Lane cedar chest the minute that we brought it home. Unfortunately, these automatic locks have resulted in some major tragedies, so if you have a cedar chest, specifically a Lane cedar chest, those locks really need to be removed.
Removing the Base of a Cedar Chest
After the stuff on the top was gone, I flipped it over and removed the bottom. I removed the screws that held it onto the cedar chest… just to find out that it was also glued on! Haha so I used a hammer to pound them off. And guess what I found??
You know how people always talk about how amazing Lane cedar chests are? Well, I got jipped. This one was made mostly of MDF with very thin wood veneer wrapped around it. See that stuff that looks like compressed cardboard?
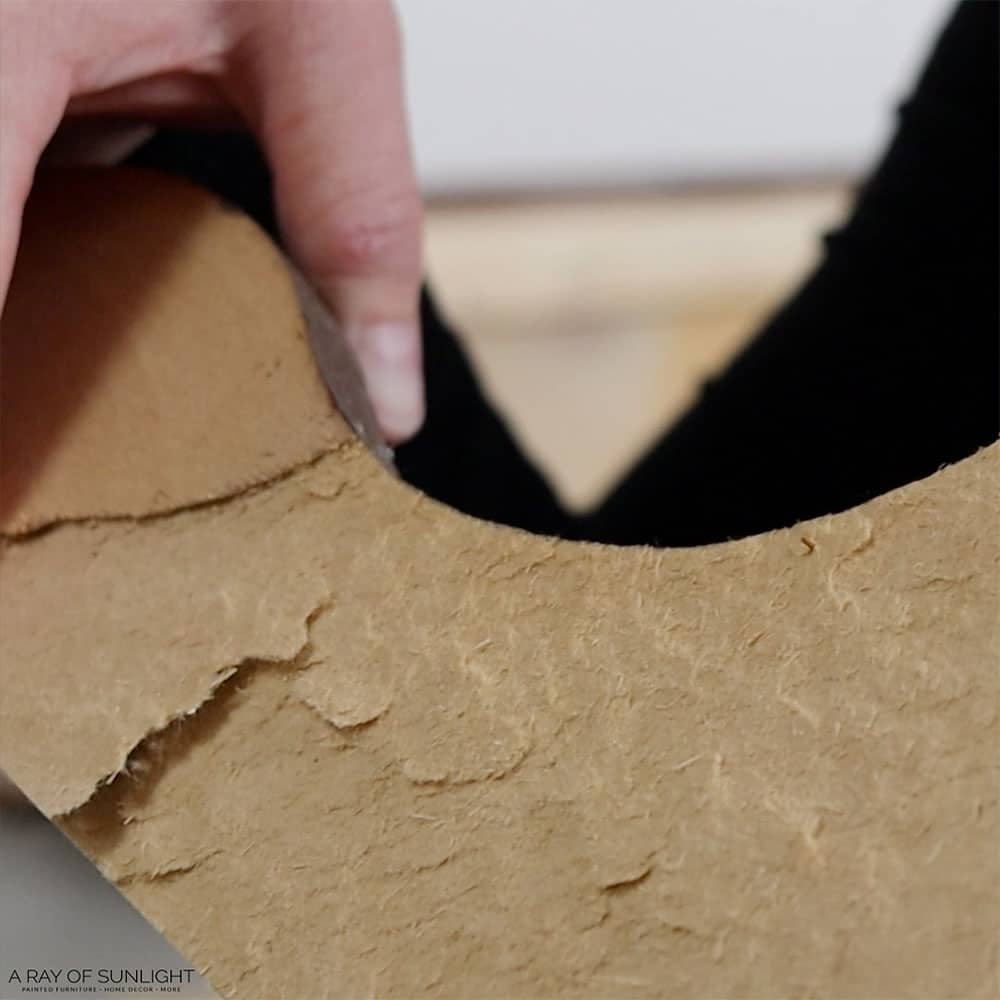
After this, I inspected the cedar chest more and found more MDF and more veneer. Even the cedar is just a thin veneer. Haha
Remove Hardware and Trim on Cedar Chest
Anyway, after I removed the bottom, I removed the hardware on the fake drawers. And I removed the trim that looked like a vine for those leaves. Here’s what it looked like after I removed all those things. Down to bare bones!
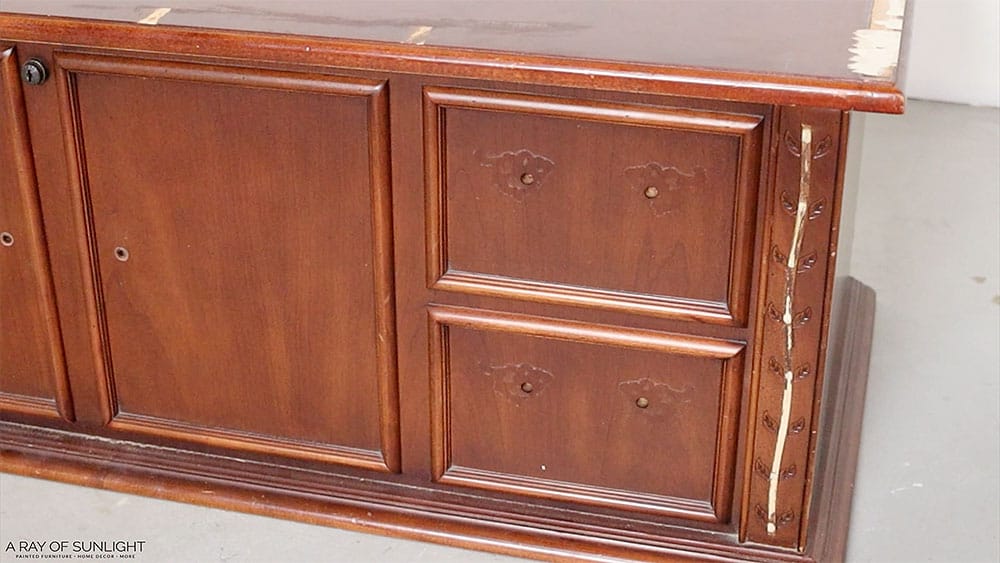
Fill Damage and Holes
Except now, I had to fill in all of the holes, damage, and the leaves. I just filled everything in with my favorite wood filler, KwikWood. It’s my favorite way to fill hardware holes, so I started there. Check out this post to see why KwikWood is so much better than these other methods of filling holes when replacing cabinet or furniture hardware!
Typically, I would have filled in the damaged veneer on top with Bondo like we did with this dresser in this how to fix damaged wood furniture before painting post… and probably would have filled the leaves with Bondo too.
But I already had the KwikWood out, and it was cold outside. I really don’t like using Bondo inside because it’s SO stinky! Check out my honest Bondo wood filler review here for more about this product. If you find some nicks on the furniture and don’t know how to fix them, learn how to fix nicks in wood furniture here!
Clean and Sand Cedar Chest
And then I realized that I never cleaned it. So I cleaned it all off to make sure there weren’t oils or gunk that would make my paint not stick. Learn more about how to clean furniture before painting here!
After an hour, the KwikWood was dry, hard as a rock. So I sanded it all down flush with the wood with 150 grit sandpaper and my favorite SurfPrep sander. Read this post to learn more about the best sanders for furniture, including the SurfPrep sander.
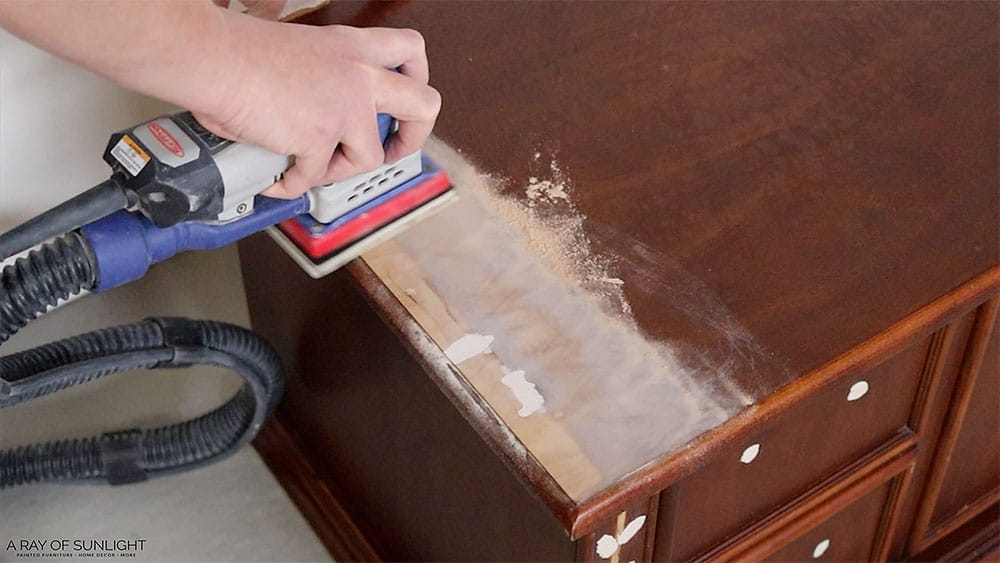
The leaves were a challenge, but I cut a foam sanding pad in half to fit it into that trim piece and sanded away. I also took this opportunity to sand everything lightly with 220 grit to help the paint stick. Learn more about the importance of scuff sanding before painting furniture here!
Then, I cleaned up all of the dust. But there were a few spots where I didn’t fill very well, so I put a light coat of wood filler on to fill in those little areas, especially on the leaves. I sanded it back down when it was dry and cleaned the dust again. It looked pretty good to me, so I moved on to my next step.
Priming Before Painting a Cedar Chest
The primer! Yay! Haha One step closer to the paint! I sprayed 2 coats of clear shellac all over the outside, letting it dry between coats for at least an hour and then overnight after the 2nd coat.
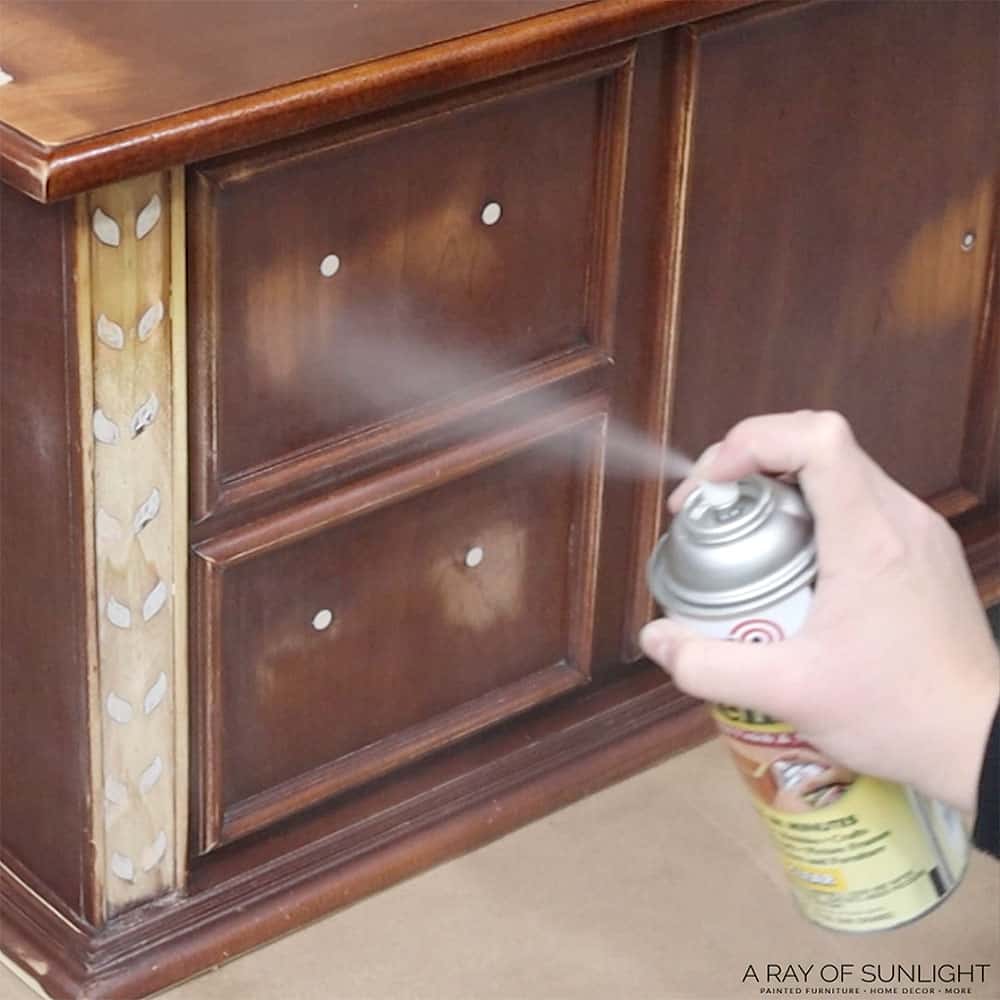
You all know that I love to spray clear shellac before I paint. It prevents stains from the wood from ruining the paint job, and it helps the paint stick… it’s a magical product. Learn more about how to stop stains from coming through paint here.
Paint Cedar Chest with Chalk Paint
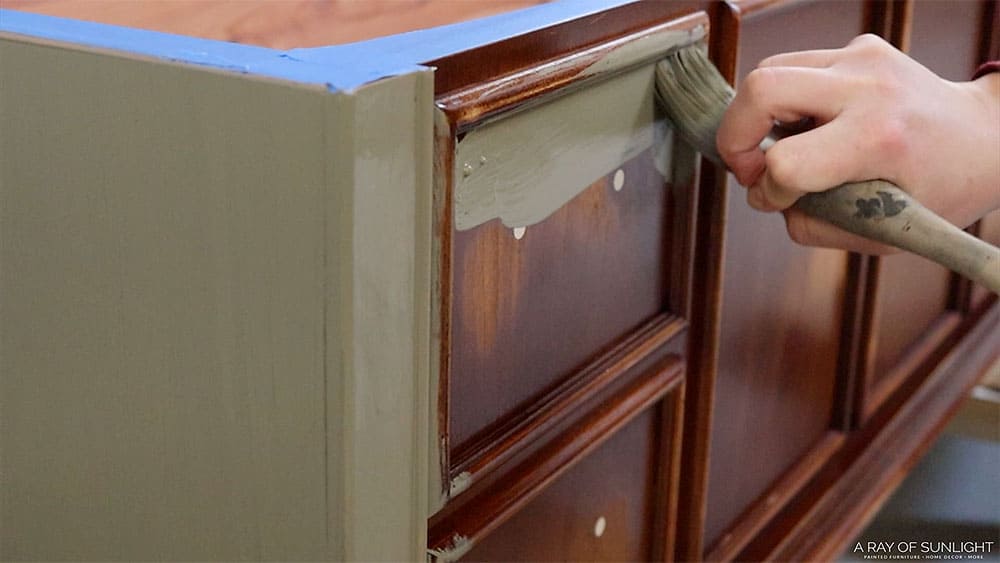
The next day, I was ready to paint! I tried out House and Canvas chalk-style paint in the color Underground. I’ve heard great things about it from Katie Scott, so here we are. Do you follow her? If you don’t, you really should. Her furniture makeovers are so inspiring!
Anywho, I brushed it on with my favorite $10 Zibra round paintbrush straight out of the can because I have heard that it is self-leveling. So, I didn’t add any water to it like I usually do to paint. It’s definitely less thick than regular chalk paint, and I love that it isn’t as thick.
This round brush made painting around all of the trim so much easier than using a regular paintbrush.
It still blows my mind how a round brush makes it so much easier to paint furniture. Read all about the best paintbrushes for painting furniture in this post!
I love this color of paint! Check out my list of the best green chalk paint for furniture, including Underground, this House and Canvas paint we used.
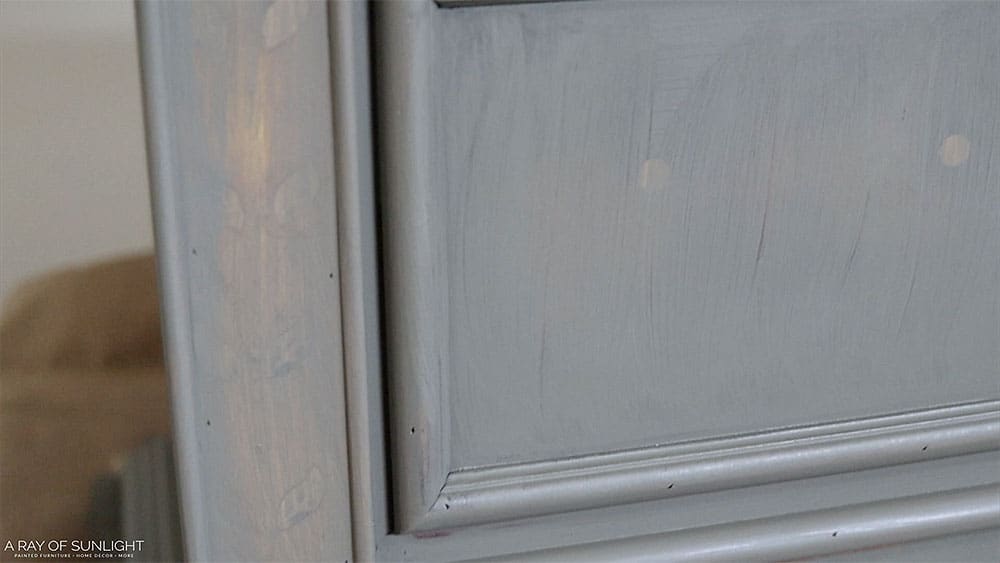
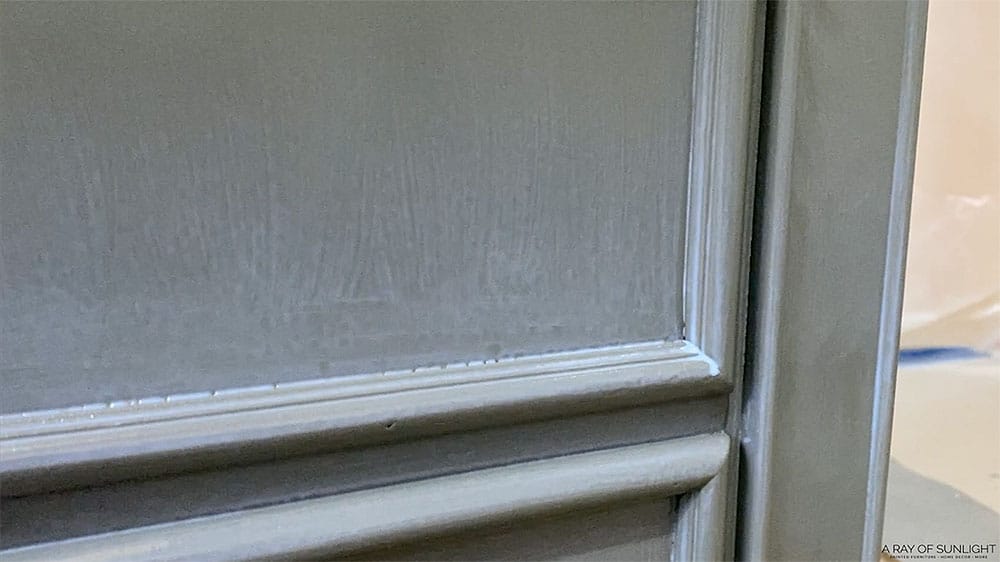
Here’s what it looked like after the 1st coat was dry.
Fill in Nail Holes
And this is when I realized there were a bunch of nail holes on all of the trim… And I just couldn’t let them stay like that. So, I filled them all in with some wood filler, let the wood filler dry, and sanded the wood filler down.
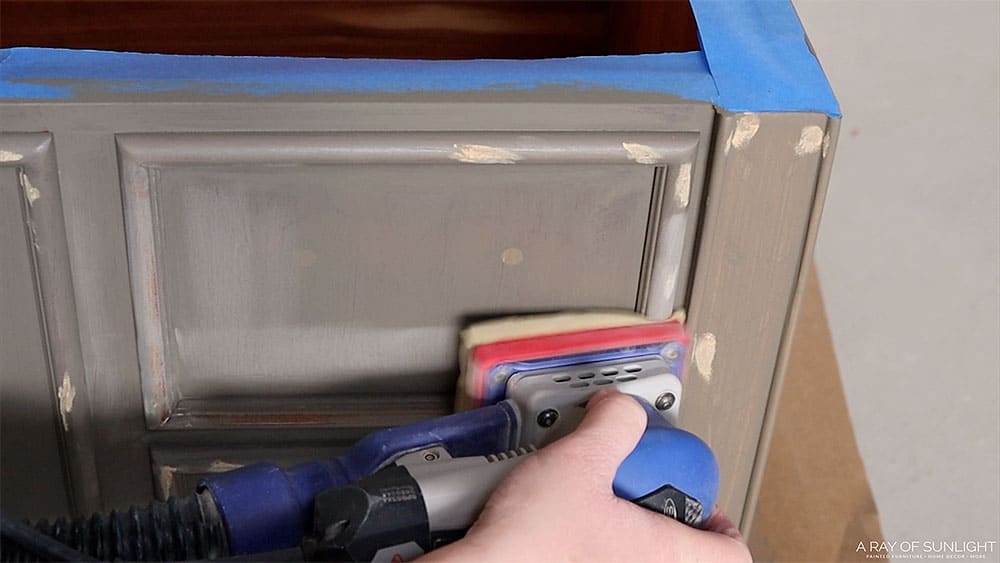
While I had the sander out again, I sanded everything down. You know that I hate brush marks in my paint… and there were more brush marks than I wanted. Check out these cool ways how to paint furniture without brush marks!
So, I took the chance to sand those down. And then I had to clean all the dust off again with my shop vacuum and a tack cloth. And since I sanded a lot of places back down to the wood, I sprayed another coat of clear shellac, and let it dry overnight.
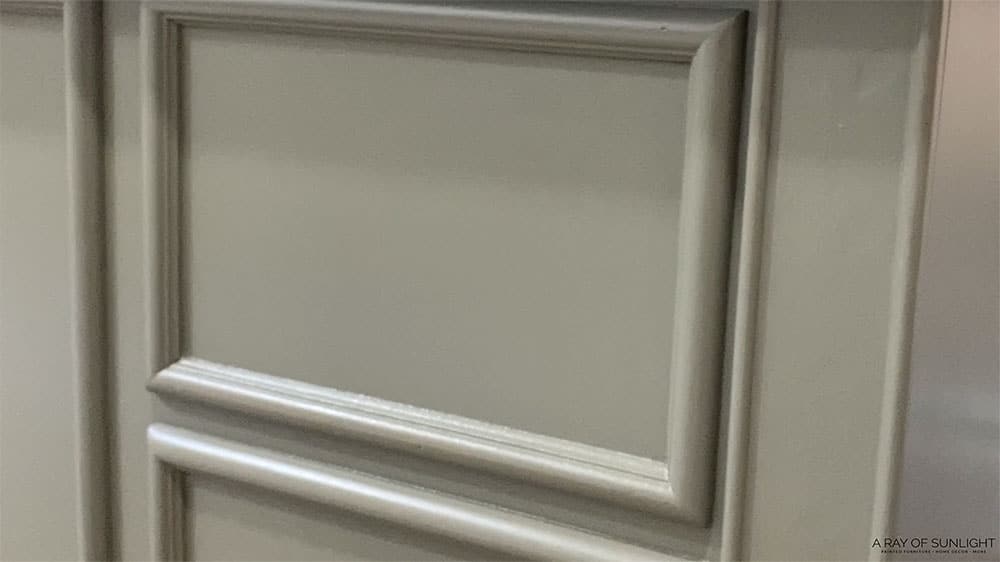
And then I painted the second coat on. And I may or may not have painted a third coat on the top because it didn’t have full coverage where I sanded too far.
Topcoat Painted Cedar Chest
But after that coat of paint was dry, I moved on to the topcoat. This paint is a chalk-style paint, so it’s very porous and matte. So, a topcoat is required. Learn more about all the different options of topcoats for furniture here! This Varathane Polyurethane is my favorite and is always my go-to.
And the easiest way to make it look good is to spray it on. Since I have a paint sprayer, I put it in there. But, for beginners or those who only want to paint 1 or 2 things, Minwax Polycrylic in a spray can might be for you. That’s my favorite spray can topcoat! Learn more about the features and pros and cons of the Minwax Polycrylic Spray here.
How to Fix Polyurethane Drips
So, I sprayed on a coat of water-based poly… and even though I tested the spray before, I sprayed too much! Can you see how white the surface looks? That’s when you know there’s too much, and it will drip.
Would you like to save this?
Instead of letting it drip all over and dry like that, I grabbed a small paintbrush and brushed the excess off. It still left a little bit of topcoat behind and a few brush marks too, but it sure beats trying to fix dried drips, right??
Here’s what it looked like after the poly had dried.
Then, I lightly sanded it all with 400 grit sandpaper and a fine foam sponge. I did it by hand so I wouldn’t sand past the paint. And I really just wanted to make the poly feel smooth everywhere. Then I cleaned up the dust again…
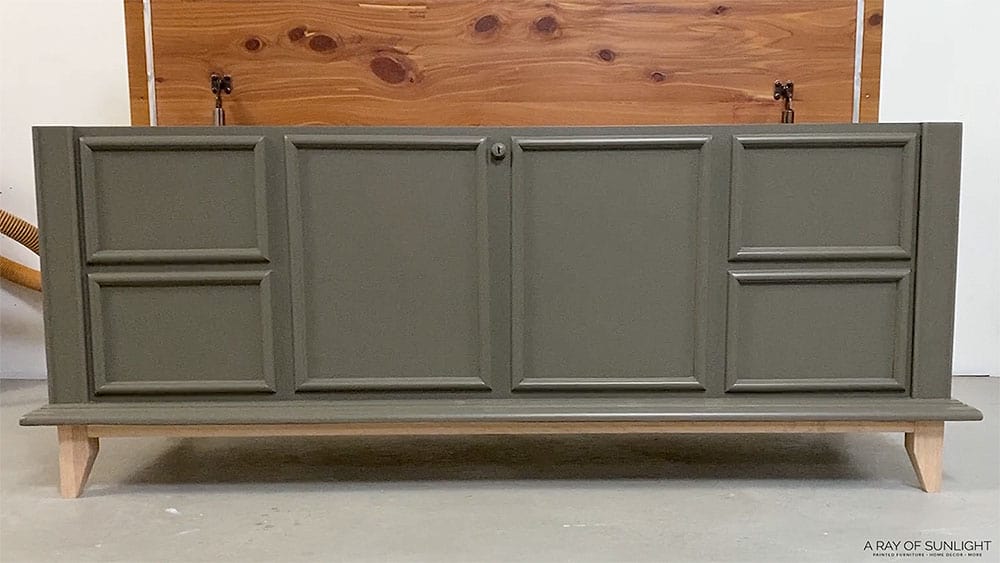
And I sprayed 2 more coats of polyurethane, letting each coat dry completely between each coat. I finished the cedar chest… but I needed to replace the base.
So I thought that I would make a new, trendy oak base for it like I did for this DIY slatted wood dresser. I tried a different design, using 2″ by 2″ oak for the legs, and 1″ x 2″ oak for the supports. But when I got it all put together, I hated it. It looked so tiny and just… not right at all.
I went back and forth about whether I should buy more oak and try the design that I see most people do, or if I should do bun feet like I usually do in this how to easily add legs to dressers post. It was going to be about the same cost…
New Legs for Painted Lane Cedar chest
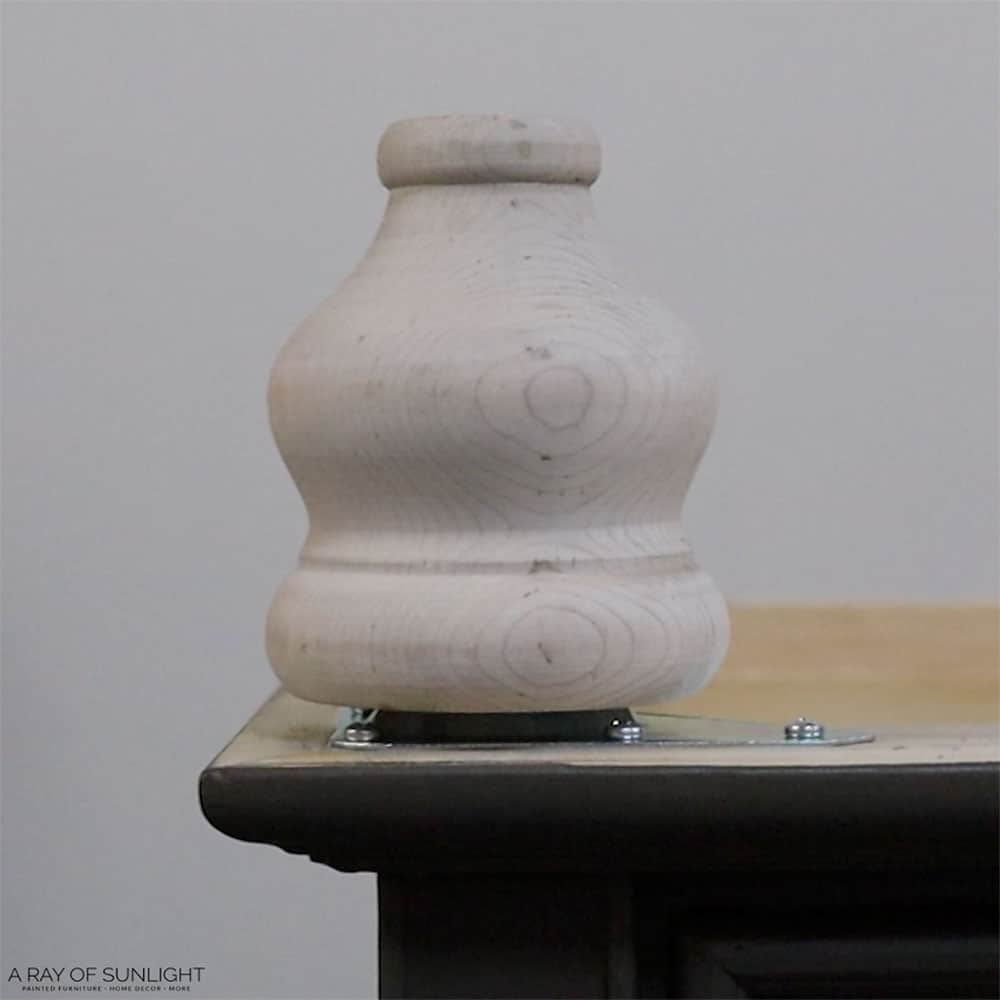
So, I decided just to do what I knew. I went to Lowes and bought a few different kinds of feet. Brought them home and tested them out. I even took some pictures and asked for your opinion. I feel like the majority thought straight legs would be the best.
But my heart just loves the turned legs. So I went with the turned legs. There are many more legs to choose from, so I’ve listed the best wood legs to add to furniture here to help you find the perfect one for your project.
I attached some leg plates I have used countless times on other furniture flips. I got them all on and tested them out with the turned legs.
And I remembered, really remembered, my biggest issue with them. Since they have this bump on them, the legs end up sitting almost an inch away from the bottom of the furniture. And if you have them close to the front or side of the piece, you can see the gap.
So, I went on a scavenger hunt online and found the hardware that I’ve used once before to attach legs. And I impatiently waited almost a week for them to get to me.
Paint and Attach New Legs to Cedar Chest
In the meantime, I went back and forth about whether I should paint the legs or not… And in the end, I decided to paint them. So, I painted them like I painted the cedar chest. Clear shellac, brushed on paint and sprayed on the polyurethane.
Finally, the new hardware came, so I attached those. They were just as easy to attach as the other ones. I used a ½” drill bit to drill the hole in the middle. And then, I drilled pilot holes for the screws to attach to the cedar chest.
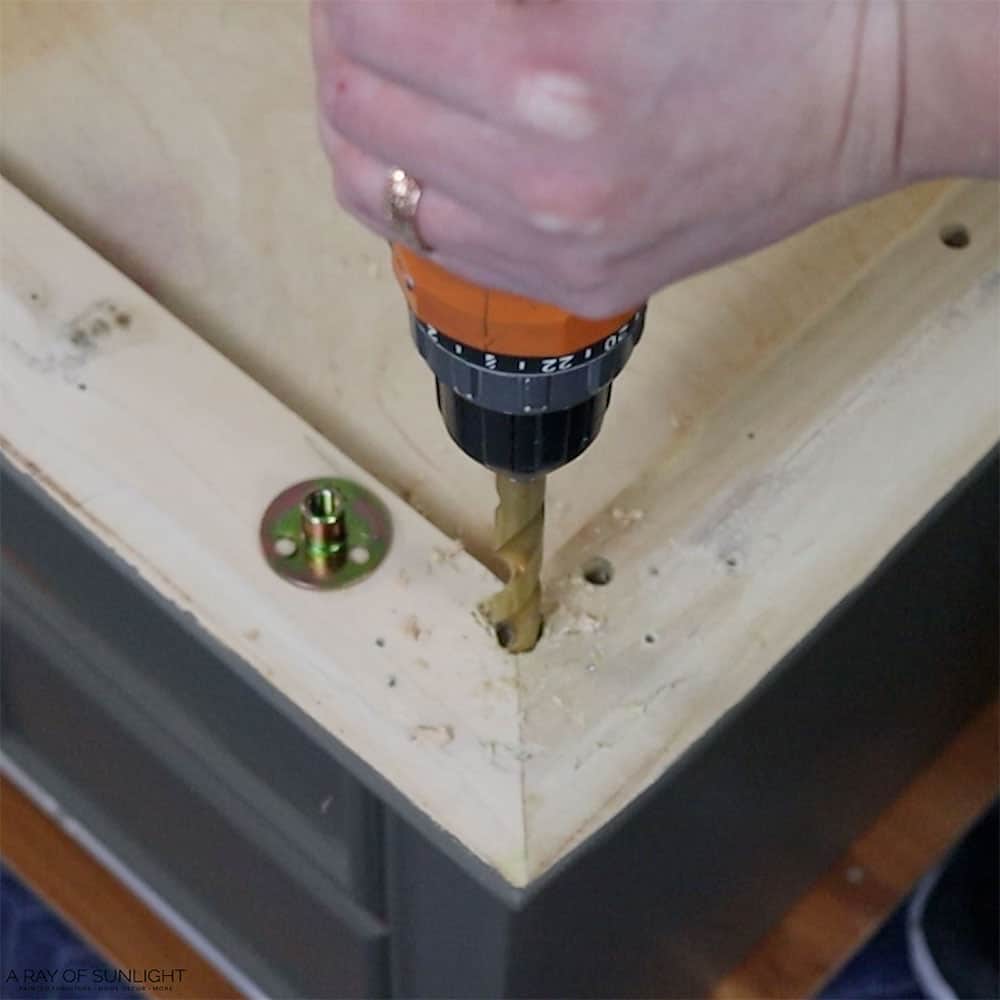
This hardware doesn’t create a big gap between the furniture and the legs. Soooo much better than the others if you have a suitable surface to attach it to. But if you don’t have the right surface to use this hardware style, you can also try what we did in this post on adding legs to a nightstand!
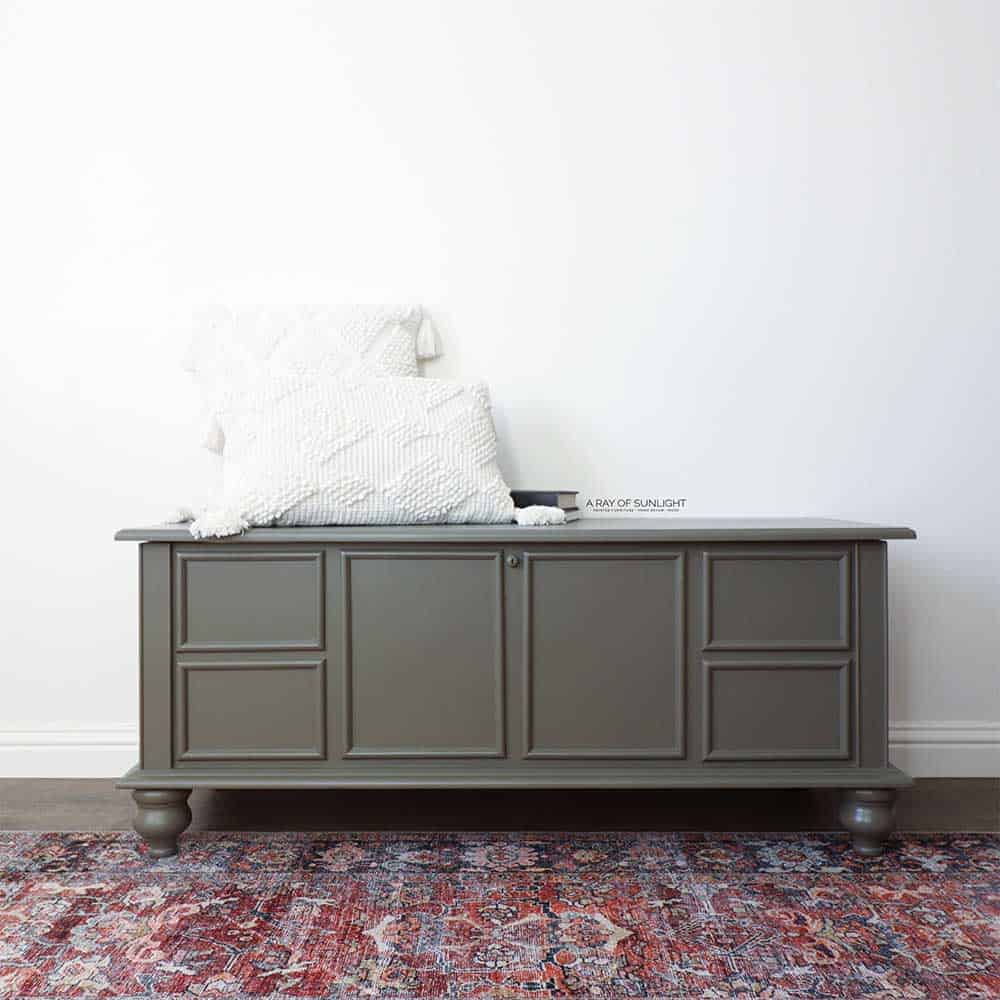
You can watch the full makeover on our YouTube video, or scroll down for the after photos to see what it looks like now!!
More Before and After Makeovers
See All >
Click any of these “before” photos below to view the “after” of that makeover.


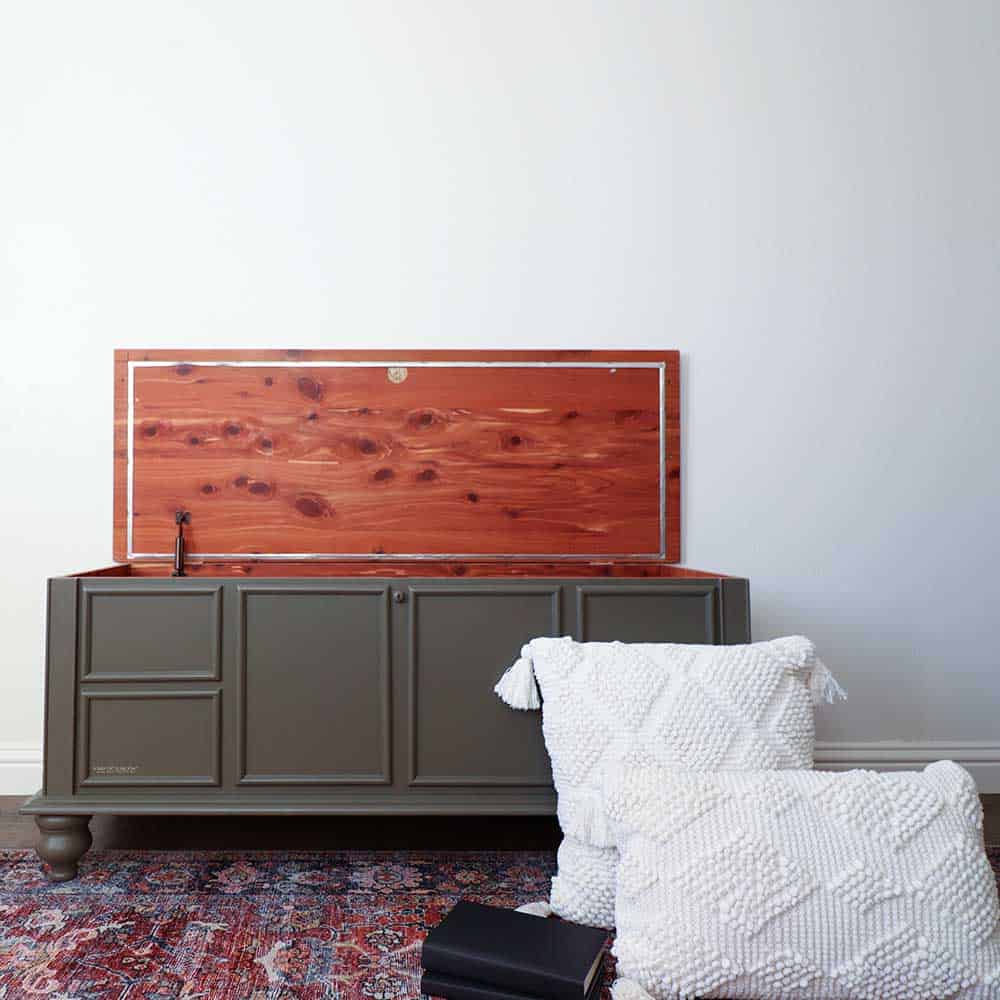
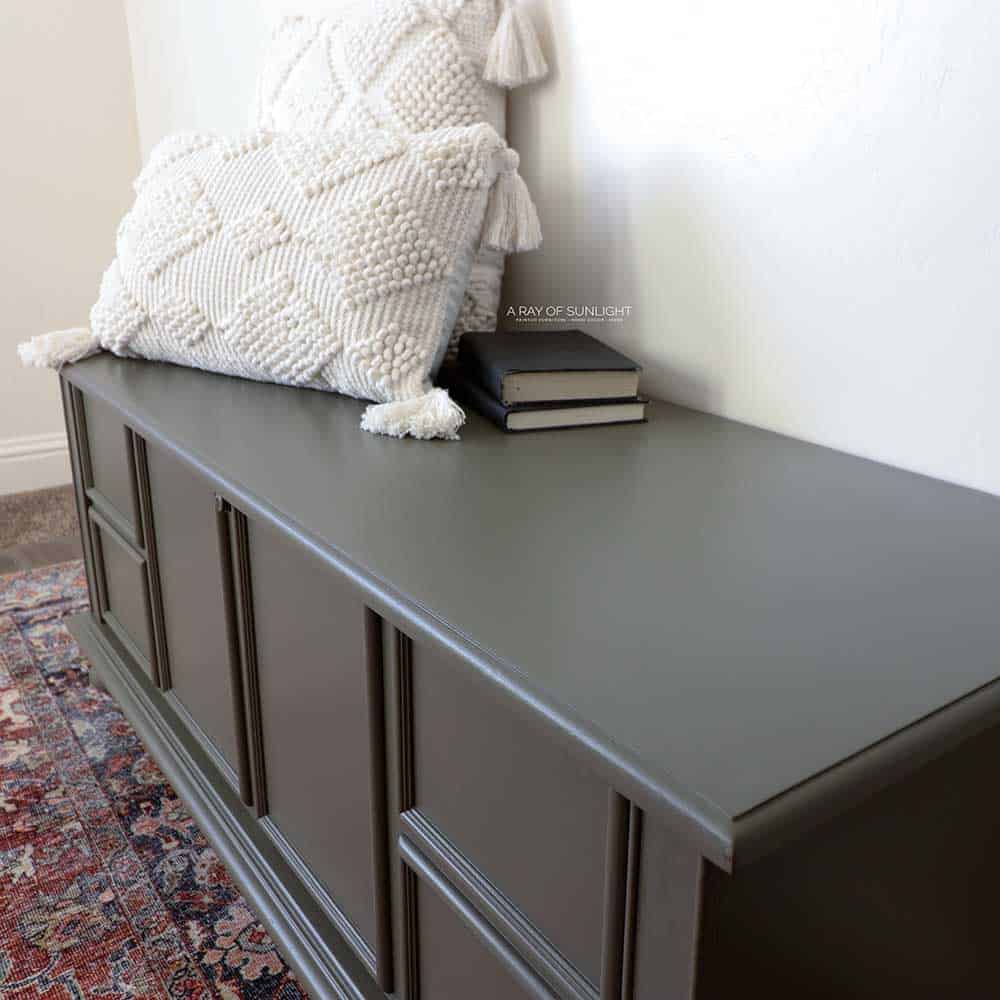
Is it even the same cedar chest?? It’s not perfect by any means, but I’m trying to be less OCD about every little detail. I just want to create and stop worrying about every little thing being perfect.
Even still, it makes my heart happy to see the transformation! I keep staring at the before and after photos. Haha
House and Canvas Chalk Paint Review
This paint color is so good! The paint was good too, definitely better than some chalk paints, but I don’t know if I would say that it’s the best out there. The paint did self-level somewhat, but not as good as General Finishes or Paint Couture. Check out my comparison between chalk paint vs acrylic paint here.
Their color line is absolutely gorgeous though! And it seems to be very durable as well!
How to use Cedar Chest Ideas
You can use old cedar chests as a bench in a mudroom or hallway, or a bench at the end of your bed. You can put some clothes you don’t wear much in, or it can be a blanket or linen storage. Fun fact: there are certain things to not put into your cedar chest. Did you know you shouldn’t put photos in them?


Can You Paint a Cedar Chest?
You won’t go to jail for painting a cedar chest. It’s wood. People all over the world, of all ages, have painted wood. Not all cedar chests are cedar on the inside and out. Check if yours has a veneer or a different type of wood on the outside.
And even if yours is cedar on the outside, you can still paint it. Painting the outside will not affect the cedar and its amazingness on the inside.
Cedar is a little trickier to paint, as you will likely have problems with bleedthrough if you don’t prime correctly. Shellac primers can definitely block the stains, so prime with at least 2 coats of a shellac-based primer before you paint.
Do not use synthetic shellac based primer, though. Oil based primers can block bleed through stains as well. Learn more about the best primers for painting furniture here, and check out the best primers to stop tannin bleed here.
How to Clean a Cedar Chest
First, vacuum or sweep out any debris from your cedar chest. Then, amazingly enough, plain ole water can bring back the smell of cedar. Get a clean rag damp with water. Then, wipe all of the cedar down. If there is a musty odor, mix white vinegar and water and wipe that on the cedar.
You can also lightly sand the cedar with fine grit sandpaper to help bring out the cedar smell again.
How to Refinish Cedar Chest
Aside from painting, refinishing a cedar chest can also be done to change up its look. This process highlights the natural beauty of the wood, and you can choose to stain it light or dark depending on your preference.
If your cedar chest has an existing finish, you will need to remove it before refinishing. This can be done by stripping the finish with a chemical stripper or sanding it off. Here’s how to remove paint from wood furniture for a more detailed guide.
After the finish is removed, sand down the cedar chest with fine grit sandpaper to smooth out any imperfections. Make sure to also sand with the grain of the wood for a better result. Once sanded, remove any dust.
Next, choose your desired stain – there are oil based stains, waterbased stains, and gel stains. Check out the best wood stains for refinishing furniture here if you’re unsure where to start. And if you want the rustic style for your cedar chest, here’s the best stain for weathered wood look.
When applying stain, you can use a brush, cloth, or rag, and wipe it in the direction of the grain. Let it sit for a few minutes, then wipe off any excess. For a darker color, you can leave the stain for longer or add more coats. If you decide to use a brush, check out these best brushes for staining wood!
Lastly, seal your newly stained cedar chest with a clear topcoat to protect it. And just like that, you have a beautifully refinished cedar chest! For a more detailed guide, here’s how to refinish a cedar chest.
So, if your old cedar chest is looking a little worn out, give it a makeover by painting or even refinishing! They’re fun and easy ways to update your furniture without having to spend a lot of money. Plus, it’s always satisfying to see the transformation from old to new.


Painted Cedar Chest Makeover
Transform your old furniture into something that looks completely different. Here are the steps for this painted cedar chest makeover.
Materials
Tools
- Power Drill
- Putty Knife
- Hammer
- Power Sander
- Shop Vac
- Round Zibra Paint Brush
- ½” Drill Bit
Instructions
- Take the cedar chest apart by removing the lid and the base. Remove hardware and trim as well. Then fill in any damage and holes with KwikWood.
- Clean the cedar chest with a degreaser, then sand the dried wood filler flush with the wood. Scuff sand the entire chest to help the paint stick. Clean up all the dust from sanding.
- Now, prime the cedar chest with 2 coats of clear shellac all over, letting it dry between coats for at least an hour, and then overnight after the 2nd coat.
- Brush chalk paint onto the chest. Sand down the brush marks then clean all of the dust off again. Spray another coat of clear shellac, and let it dry overnight. Then paint the 2nd to 3rd coats.
- Topcoat with waterbased polyurethane and after it dries, lightly sand it all smooth. Spray 2 more coats of poly, letting each coat dry completely between each coat.
- Paint the new legs the same way you painted the cedar chest. Attach the leg hardware, then the new legs.
Recommended Products
As an Amazon Associate and member of other affiliate programs, I earn from qualifying purchases.


More Painted Cedar Chest Makeover Ideas
- DIY Cedar Chest Makeover
- Cedar Chest Makeover – Painting Furniture with Enamel Paint
- Painting a Cedar Chest with Redesign Decor Moulds
- Waterfall Cedar Chest Makeover
Learn the Art of Updating Furniture!
If painting furniture feels overwhelming or your past attempts didn’t go as planned, this course will guide you step by step.

Follow us on YouTube to get more tips for painting furniture. Or share your project with us on our Facebook Group and be part of our community. See you there!
This cedar chest make over is amazing.
Wondering if you used anything on the inside of the cedar chest to make it look fresh like a cedar wood moisturizer and if you did would you share the name of your product you used.
All I do inside is wipe the cedar with a damp rag to make the cedar smell come out again.
So pretty! I love the feet you chose. I’ve been following you a while and I’ve learned so much, so thank you! One thing I have not tried is the spray can polycrylic. You noted 3 coats on this cedar chest. Did one can provide 3 coats or did it take more? I have a cedar chest and want to try it out.
Hey Tammy! So glad you’re here!
I can’t remember for sure, but I believe one can will be enough for a cedar chest.