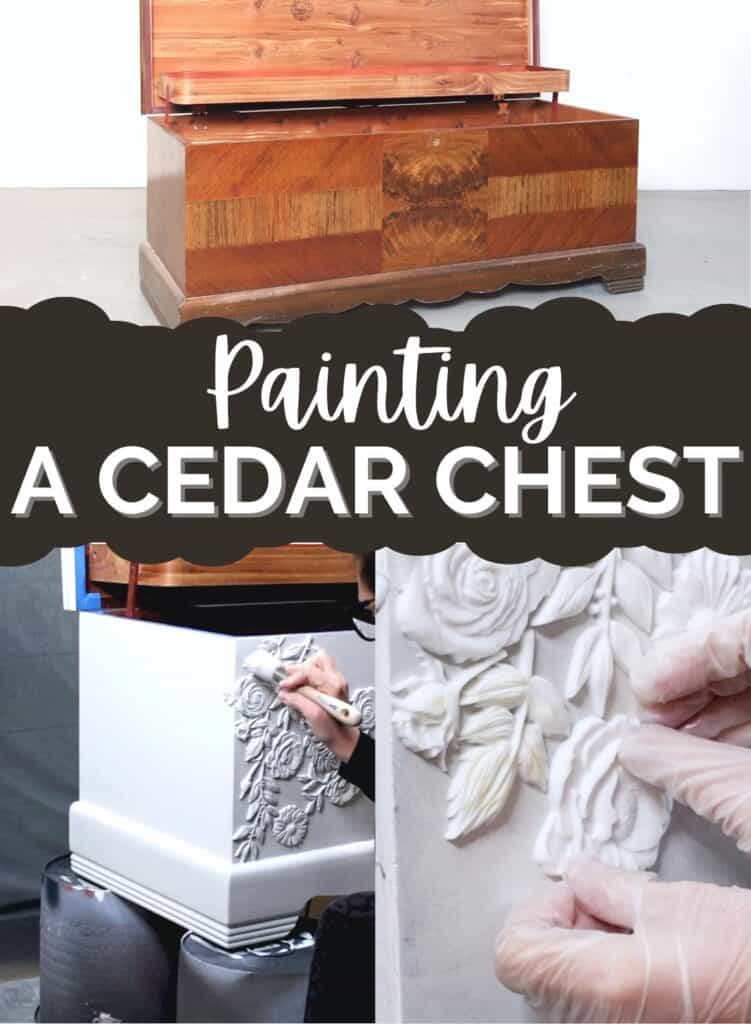
Painting a Cedar Chest

Have you ever wanted to give your old furniture a makeover? Whether you want to add some color or simply give it a new coat of paint, painting a cedar chest is an easy and inexpensive way to get creative with your furniture.
With just a few simple steps, you can give an outdated cedar chest a new look. So keep reading for one of these gray painted furniture ideas and learn how to transform your old chest into a stylish updated piece.
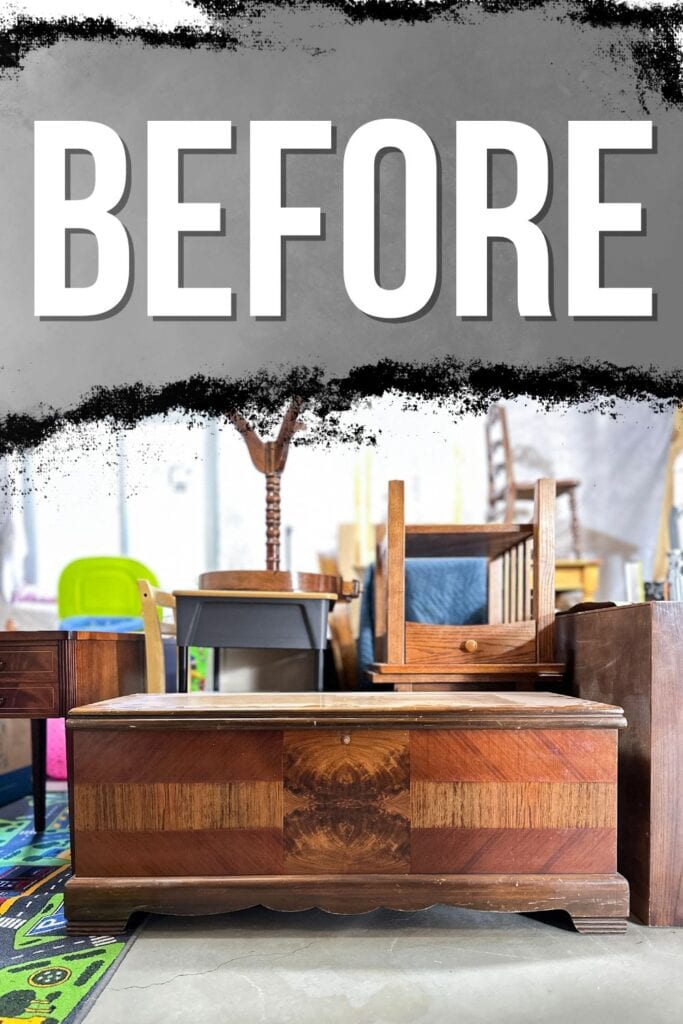
We bought this cedar chest from a neighbor for $75. I love updating cedar chests, and this one is no exception! I think it’s my favorite cedar chest makeover yet!! If you want look for furniture to paint, here are the best places to get good furniture for cheap.

Painting furniture is not only a fun and easy DIY project, but it’s also a great way to personalize your piece. With different paint colors and techniques, you can create a unique look that reflects your personal style. Plus, it’s an affordable alternative to buying new furniture.
We’re transforming our cedar chest with a beautiful gray finish, and you can do the same with your chest or any furniture you have. Follow these simple steps and have fun giving your old piece a new life!

Supplies Used for Painting a Cedar Chest
As an Amazon Associate, I earn from qualifying purchases. I also may earn from other qualifying purchases with other companies or get free product to review and use. All opinions are my own.
- Electric Screwdriver
- Krud Kutter
- Wood Filler
- Festool Sander
- 100 Grit, 150 Grit, and 220 Grit Sandpaper (Use code RAY10 to get 10% off your order)
- Fine Grit Pro Foam Sponge (Use code RAY10 to get 10% off your order)
- Shop Vac
- Tack Cloth
- Painters Tape
- BIN Shellac Based Primer
- Roller
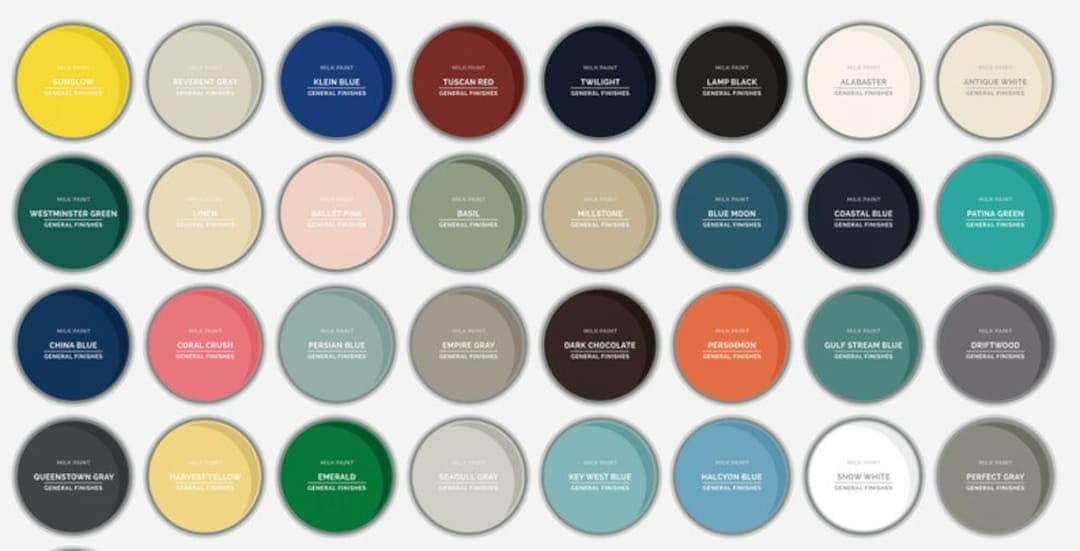
- General Finishes Milk Paint in Seagull Grey
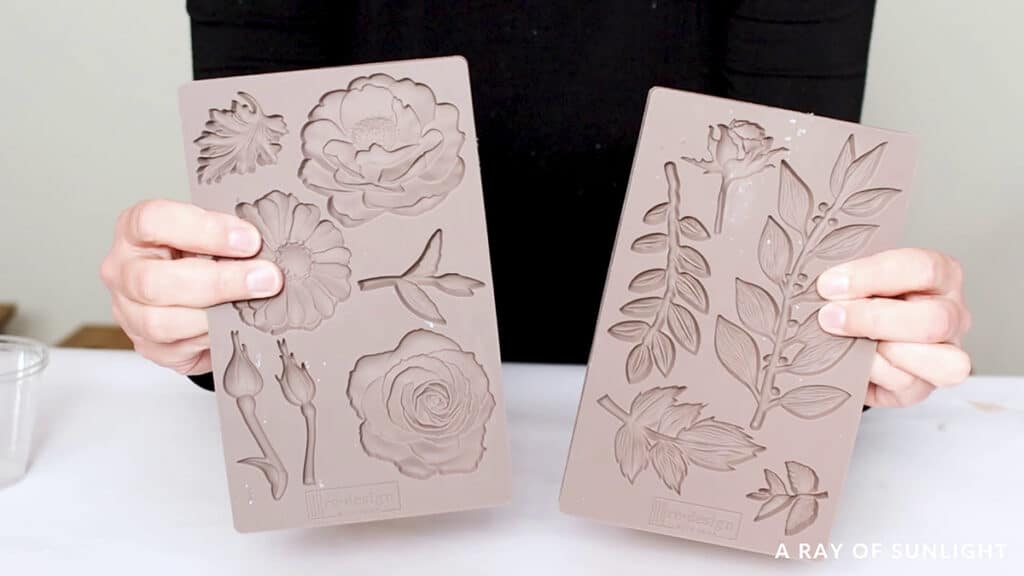
- Redesign Decor Moulds – In the Garden
- Redesign Decor Moulds – Leafy Blossoms
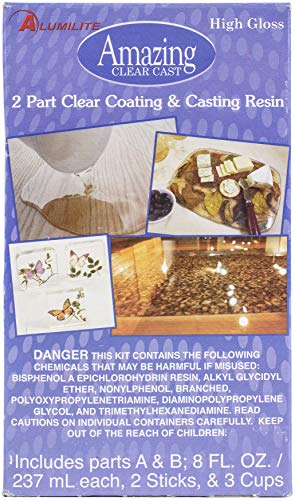
- Casting Resin
- Instant Super Glue
- Zibra Round Paint Brush
- Waterbased Polyurethane
- Wagner FLEXiO 3500
Grab our list of 10 must have painting furniture supplies too! Now let’s get into the details so you can paint a cedar chest too!
Preparing Cedar Chest for Paint
Alright, first things first, we removed the lock from the cedar chest. (Did you know that these locks aren’t safe if you have kids around?) Then my husband cleaned it with Krud Kutter to remove any grease, oils, or grime from the surface. Learn exactly how to clean furniture before painting here.
Then I filled in a few small dings on the top of the cedar chest with some wood filler and let it dry. Here’s my list of the best wood fillers for furniture.
The top had quite a few scratches in it, so my husband sanded it down to bare wood with our Festool sander once the wood filler was dry. Check out my Festool RTS 400 REQ sander review here. Even though most of the scratches were light, I knew that if we didn’t do anything about them, we would still see them in the end.
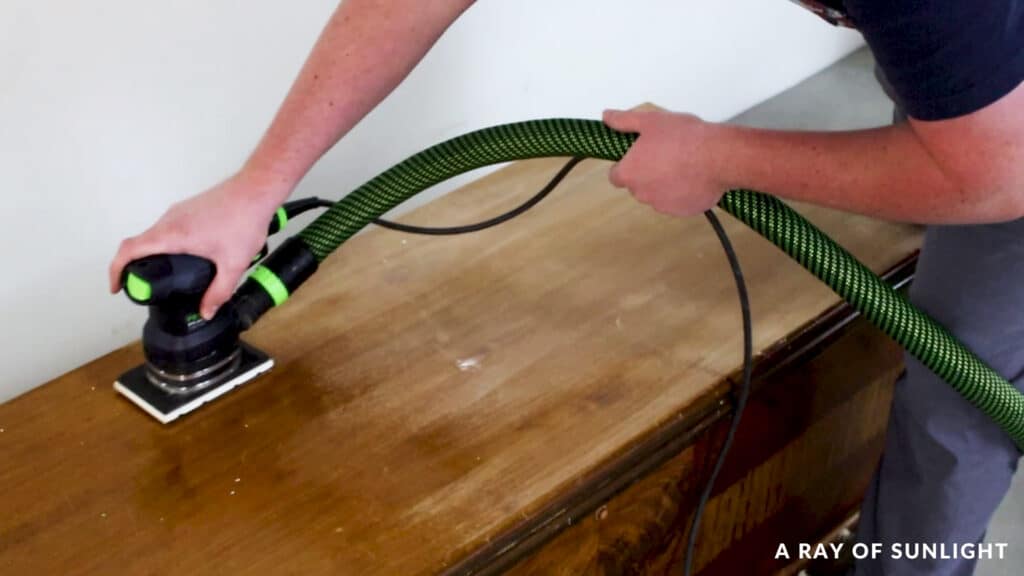
He used 100 grit sandpaper to get most of the finish off and then used 150 grit and ended with 220 grit sandpaper to end with a smooth surface. Then he sanded the rest of the cedar chest with 220 grit sandpaper and a fine grit pro foam sponge for the curved edges.
This step is called scuff sanding and it helps the paint adhere to the finished wood. Learn about the best sandpaper for furniture painting here.
See how it looks all foggy now without any sheen? That’s what we want it to look like. Learn more about the importance of sanding before painting furniture here.
He cleaned up all of the dust, which there was honestly very little of because this sander was hooked to the shop vac, and the sander has some suction of its own to help keep the dust down. Learn about the best sanders for furniture here (yep, this one is on the list!). Check out my SurfPrep Vacuum POV-8 review to learn more about this tool.
Priming Before Painting Cedar Chest
We moved it into our paint booth and he taped the edges off for me so I didn’t get any paint on the inside. Find out what is the best painters tape here for your next DIY project!
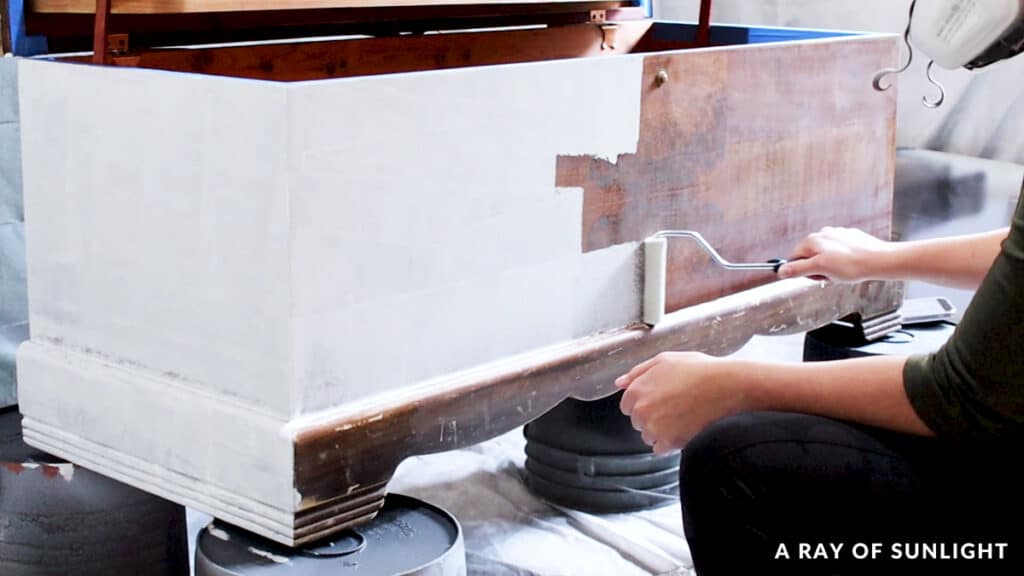
We wanted to use a lighter color for this makeover, so I rolled on some white tinted BIN shellac based primer.
It’s the best primer for painting furniture especially when painting furniture a lighter color. It’s one of the ways how to stop stains from coming through the paint, and it helps the paint stick really well.
Check out this post on how to paint laminate furniture to see how BIN shellac primer compares to how well other primers stick. Or check out this post on the best primers for painting furniture (and how to choose the right one) to see how it compares to others.
I used to hate rolling this primer on, because I don’t like roller texture, but when I used this specific roller, I don’t get as much texture. Check out our list of the best rollers for painting furniture too.
On the top, where Taylor sanded down to the bare wood, I made sure to push the primer into the wood grain and fill in it so I didn’t have a bunch of dark spots all over the top.
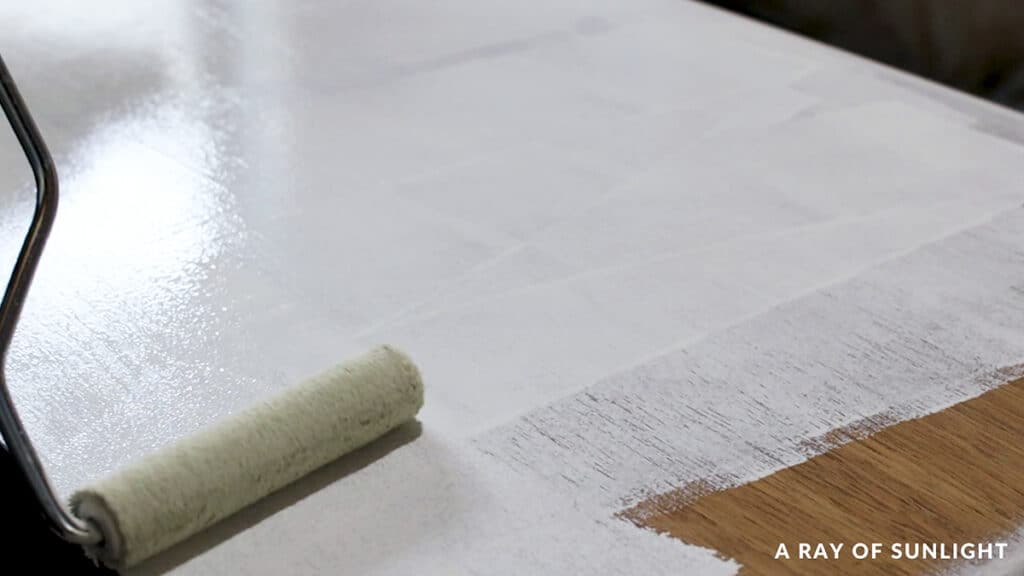
I could have also used this technique to hide wood grain if the grain was super deep. I rolled on 2 coats of primer and let it dry overnight. Here’s more on how to hide wood grain when painting if your wood furniture has a deep wood grain.
Sanding Primed Cedar Chest
Then Taylor sanded the primer by hand with 220 grit sandpaper and a fine grit sanding sponge to smooth out any texture that was left by the roller. We didn’t want to use the sander for this part because we wanted most of the primer to stay. The sanders are so powerful that even on their lowest settings, they sand too much primer off.
Then he cleaned up the dust with the shop vacuum and a tack cloth… this time there was a lot more dust to clean up.
Decorating with Redesign Decor Moulds
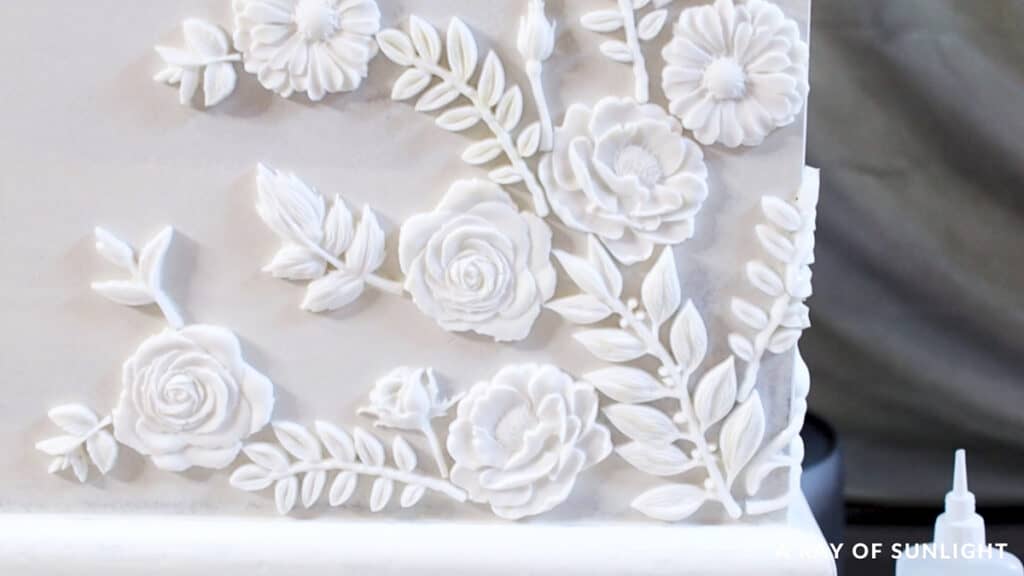
While he was working on that, I was working on the fun part! I used these redesign décor moulds (In the Garden and Leafy Blossoms) and casting resin to create flowers and leaves to decorate the cedar chest with.
I was a little nervous about this part since it was my first time, but it was actually REALLY easy! Just mix 2 equal parts of resin together and pour it into the mould slowly.
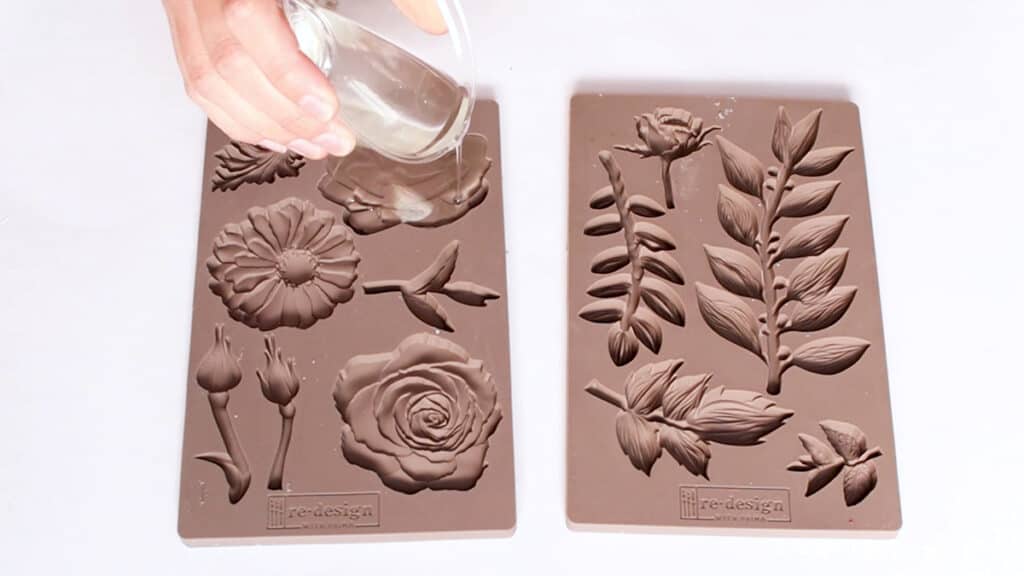
Within 15 minutes a batch of flowers and stems were done and I popped them out to make more. I think I made like 5 or 6 batches and went through a little more than 1 package of casting resin.
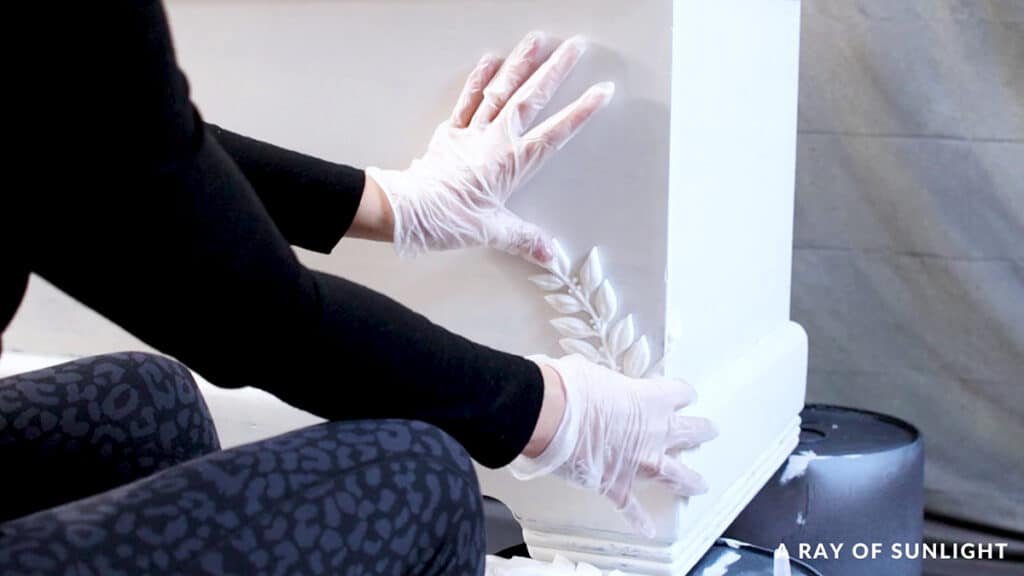
Then, I laid them out how I thought I might want them to go. The ones that were fresh could bend around the corner of the cedar chest!
Gluing On Redesign Decor Moulds
I used my favorite instant super glue to glue everything in place. Put the glue on the piece and spray the activator on the cedar chest, quickly stick it in place and within seconds the glue was dry.
Would you like to save this?
Honestly, I studied quite a few other makeovers from other furniture painters to learn how to place these to look natural. Check out this dresser makeover with these flower moulds from Ship’s Furniture Flips on Instagram. Pretty Distressed has a super cute dresser with decor moulds as well.
That was the part that I struggled with the most. But, I basically started with the largest pieces, making the leaves touch the flowers in the grooves. And then have more leaves touching the flower on the other side and going in a different direction.
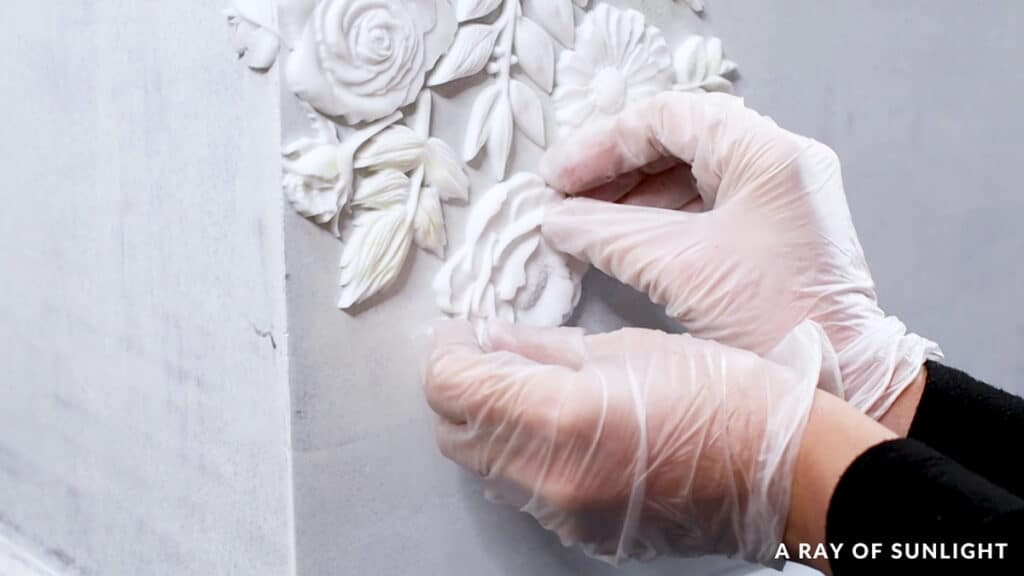
It feels weird when working with each individual piece to put it all together, but once it was all together and I stepped back, it all came together and looked so good!
Another super cute idea would be stenciling furniture or applying furniture transfers instead of these decor molds. Check out our guides on stenciling furniture and how to apply furniture transfers if you need help with these techniques.
You can also use wallpaper for unique designs on furniture. Check out these wallpaper dresser ideas and these dresser drawer liner ideas!
How to Paint a Cedar Chest
After they were all glued in place, I brushed and rolled on the paint. Check out my list of the best paint brushes for painting furniture here.
This time I used this gorgeous light grey called Seagull Grey from General Finishes Milk Paint line. For more neutral shades like Seagull Grey, here’s our list of neutral furniture paint colors!
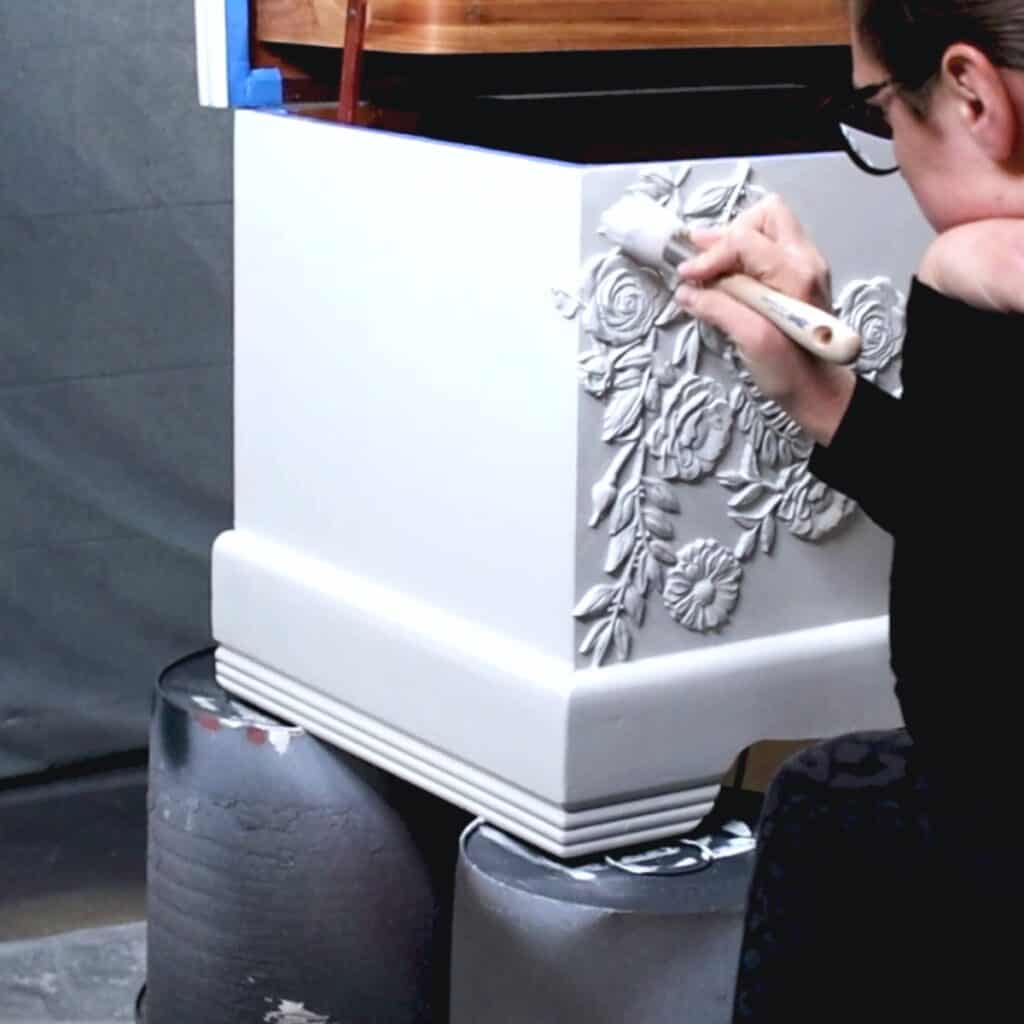
I love General Finishes Milk Paint. It levels out really well so you aren’t left with brush marks or roller marks everywhere. It dries hard and honestly probably doesn’t REALLY need a topcoat because it’s pretty durable. Here’s my detailed General Finishes milk paint review to learn more about this paint.
Check out this makeover, painting with General Finishes milk paint to see it in action. Here’s everything you need to know about painting furniture with acrylic paint.
I let it dry for an hour or two between coats of paint. When the second coat was dry, I saw in better light that there was some glue that made some bad texture in the flowers.

I could also still see the white primer underneath in some spots between the flowers. This paint was at full strength too, I didn’t add any water this time. So, I sanded off the texture and painted 2 more coats to get full coverage.
Not sure about using General Finishes Milk Paint? Here are the best paints for wood furniture. And if you aren’t a fan of sanding, here are the best paints for furniture without sanding.
Topcoating Painted Cedar Chest
We finished up by spraying some waterbased polyurethane on to protect the paint. Learn how to spray polyurethane here. I wouldn’t be surprised if whoever buys this will sit on it, and I want to make sure the top is as durable as possible.
If I didn’t have a paint sprayer to spray the polyurethane, I would have used Minwax’s polycrylic in a spray can. Learn more about how to apply polycrylic to painted furniture here. After 24 hours, the polyurethane was dry enough to lightly use the cedar chest.
If you don’t want to topcoat your paint, here are the best all-in-one paints for furniture that mostly don’t need a topcoat.
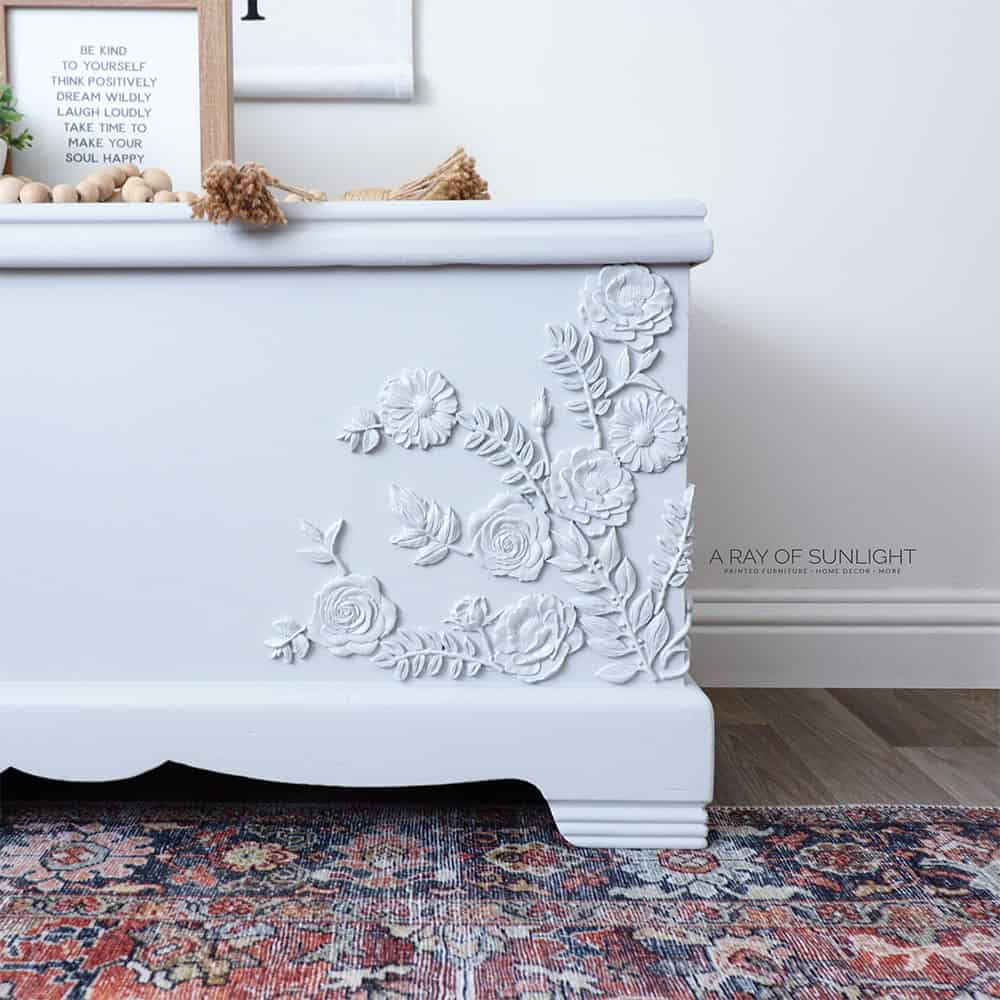
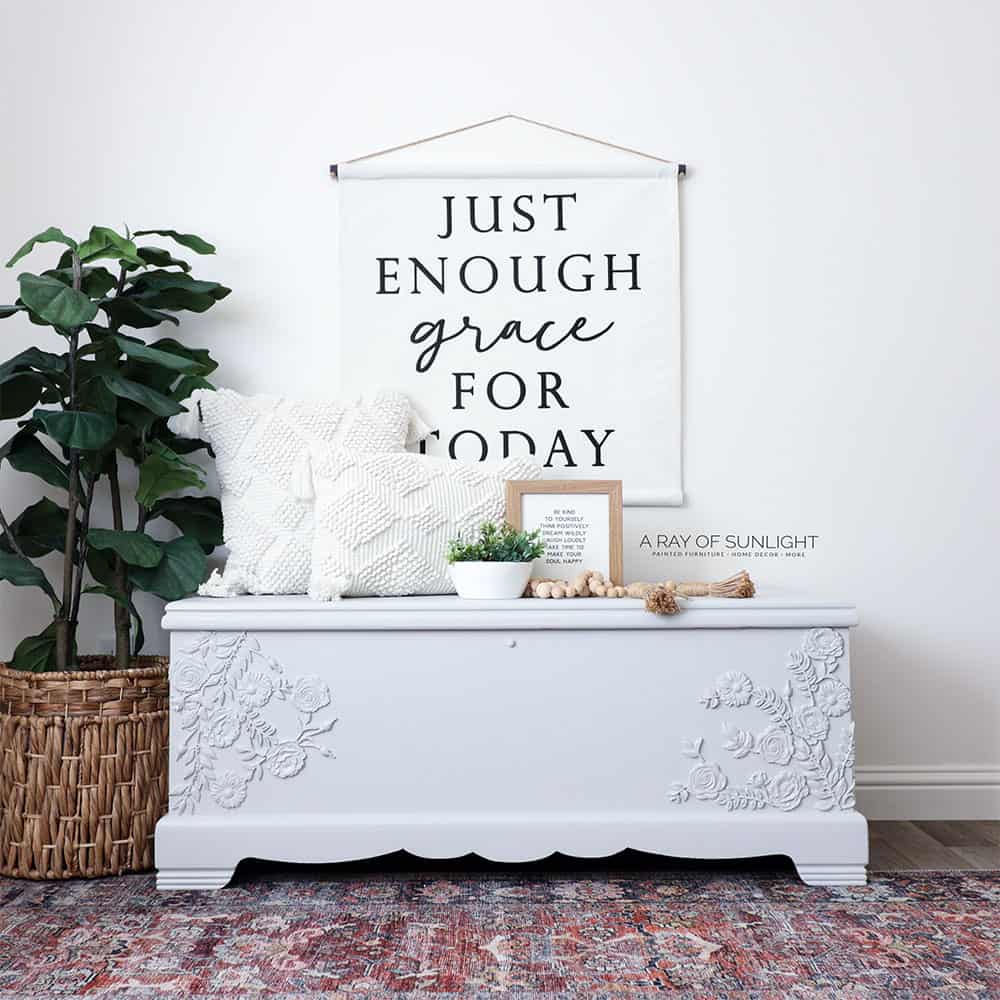
And here’s what it looks like now! If you want more amazing furniture makeover ideas, check out this post for a collection of fun and easy-to-follow makeovers that’ll bring personality to your home.
More Before and After Makeovers
See All >
Click any of these “before” photos below to view the “after” of that makeover.


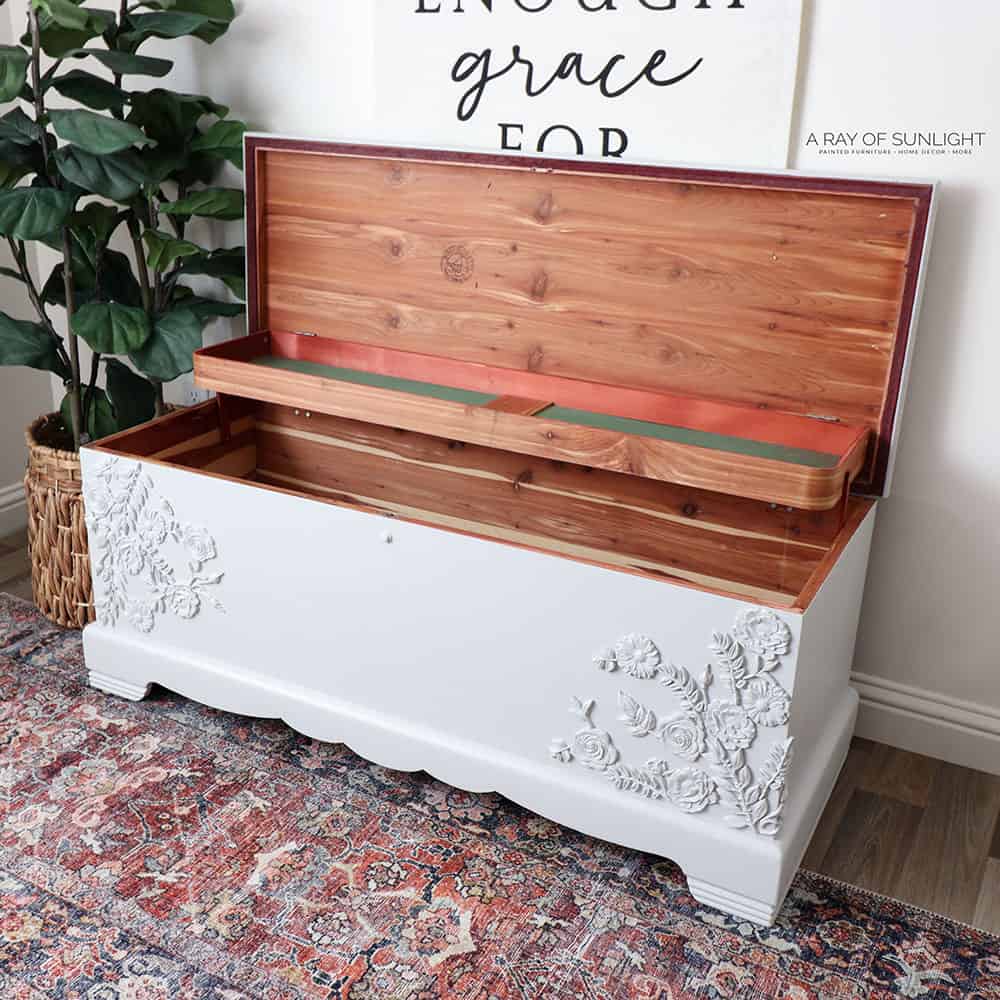
Okay, I absolutely love this makeover. I was nervous about the placement of the flowers, but I think it looks so good!!
I love the light grey to lighten it up and it just looks so cute now! And that paint… it looks SO good brushed and rolled! I honestly don’t notice any brush or roller texture, and that’s saying something! What do you think?? Let me know in the comments!
Cedar Chest Paint Ideas
Looking for more inspiration to paint your cedar chest? We still got some more great ideas for you! One idea is to use a bold and vibrant color, such as navy blue or yellow, to make a statement with your cedar chest. This can be especially eye catching if the rest of the room has more neutral tones. Check out your options for bold furniture paint colors here.
Another way is to use a soft pastel color, like mint green or blush pink, for a more subtle or feminine touch. This can be a great option for a bedroom, dressing room or nursery.
Why not try a two toned look? You can paint the top and bottom of your cedar chest in different colors for a unique and fun update. But is two-toned furniture in style? – read this post to find out! You can check out these two tone dresser ideas too to see how it can work for your cedar chest.
On top of these painted cedar chest ideas, you can also add height to your cedar chest by adding legs or feet. You can choose from different styles and materials for legs depending on the look you want. Here’s our guide on adding legs to a cedar chest if you want to try it out. If you want another way to update your cedar chest, here’s how to refinish a cedar chest!
So we just walked you through painting a cedar chest grey with General Finishes Milk Paint and decorating it with beautiful flower moulds. We hope this post inspired you to give your old cedar chest a unique and beautiful update!


Painting a Cedar Chest
Make your old cedar chest beautiful and new again! Here are the steps for painting a cedar chest.
Materials
- Krud Kutter
- Wood Filler
- 100 Grit, 150 Grit, and 220 Grit Sandpaper
- Fine Grit Pro Foam Sponge
- Tack Cloth
- Painters Tape
- BIN Shellac Based Primer
- General Finishes Milk Paint in Seagull Grey
- Redesing Decor Moulds - In the Garden
- Redesing Decor Moulds - Leafy Blossoms
- Casting Resin
- Instant Super Glue
- Waterbased Polyurethane
Instructions
- Clean your cedar chest with Krud Kutter, then fill in any small dings with some wood filler and let it dry. Scuff sand the cedar chest and clean up all the dust from sanding.
- Roll on 2 coats of white tinted BIN shellac based primer and let it dry overnight. Once the primer has dried, sand the primer by hand to smooth out any texture that was left by the roller. Vacuum and wipe all the dust as well.
- Now, to decorate the cedar chest, create flowers and leaves with redesign decor moulds. Mix 2 equal parts of the casting resin and pour it into the mould slowly. Let the resin set for about 15 minutes.
- Once you decide where you want to place the resin moulds, put glue on a piece then spray the activator on the cedar chest and quickly stick it in place.
- After the moulds are glued into place, you can now apply a couple of coats of paint, letting it dry for an hour or two between coats. For any bad texture, sand them off then paint more coats to get full coverage.
- Seal the painted cedar chest with waterbased polyurethane.
Recommended Products
As an Amazon Associate and member of other affiliate programs, I earn from qualifying purchases.

More Cedar Chest Makeovers
Learn the Art of Updating Furniture!
If painting furniture feels overwhelming or your past attempts didn’t go as planned, this course will guide you step by step.

Follow us on YouTube to get more tips for painting furniture. Or share your project with us on our Facebook Group and be part of our community. See you there!

Beautiful,I would have never thought of painting my mother’s old cedar chest!
This is the best cedar chest redo you’ve done. I love the details! I have one I’m in the middle of, and I may add these to mine too. Love it.
This is absolutely amazing, love the flower detail, its stunning,
Thank you for sharing your links with us at #274 SSPS Linky. See you again next week.
How pretty, love the resin molds too! Pinned.
Glad you experimented. Beautiful result!
Wow Natalie!
What a beauty you created.
I would be a mess trying to do something like this. lol
I have molds, I have resin . . . maybe I could try a small project.
pinned!
gail
I absolutely love this makeover!💗 I have a cedar chest that I gave to my daughter when she was 16. She is now 47 and she gave it back to me last year. I’ve been waiting for an inspiration to redo it and this it what I’ve been waiting for. Thank you so much😘
Oh, that’s awesome! Thank you so much as well! Glad you love the makeover!