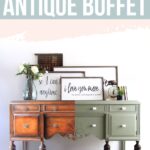
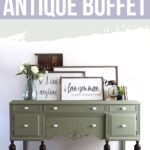
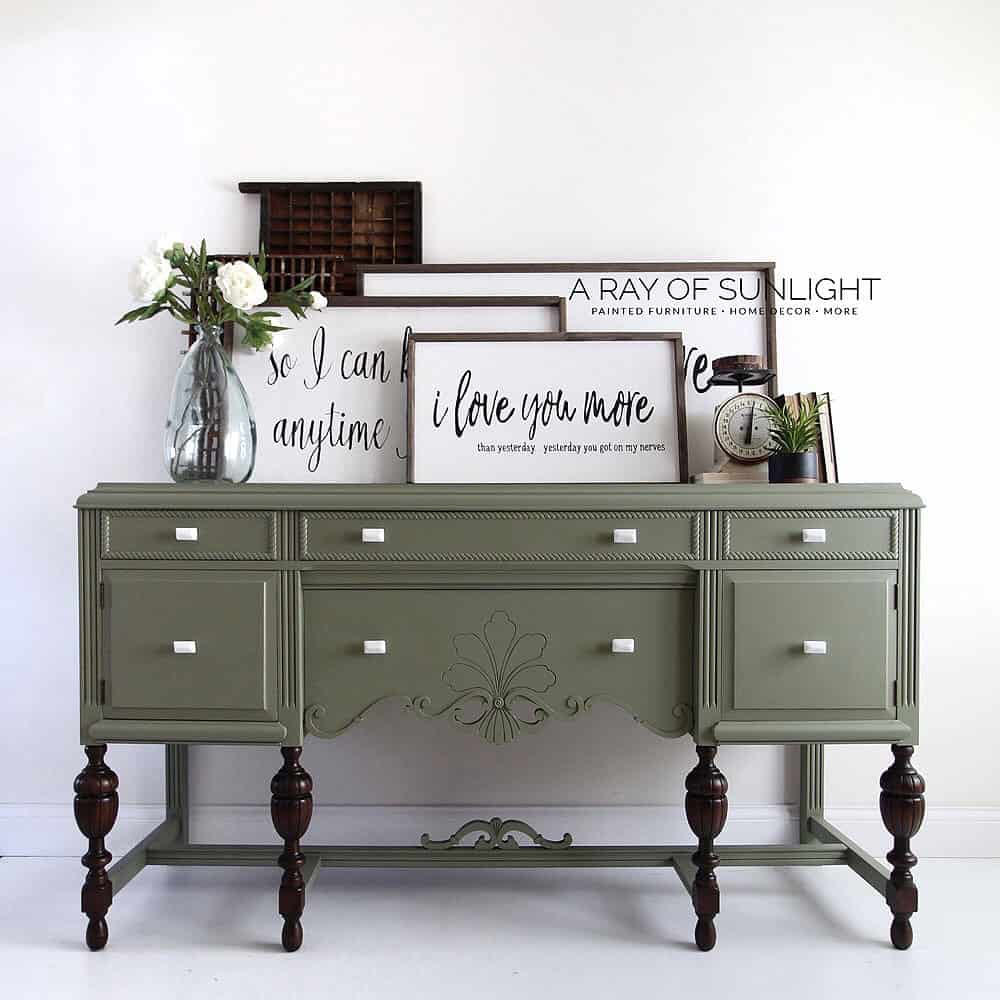
Olive Green Painted Antique Buffet


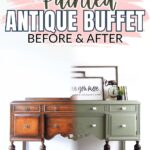
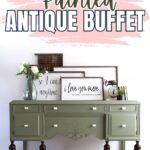
When I saw this antique buffet on Facebook Marketplace, I knew I could give it a fresh new look with a little bit of paint. This olive green painted antique buffet makeover I had in mind was inspired by some of these best green painted furniture ideas.
I was excited to get started and see the transformation of this piece. So keep reading to see how this old buffet became a beautiful and stunning green statement piece!

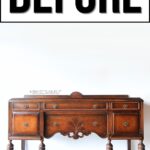
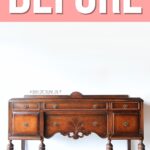
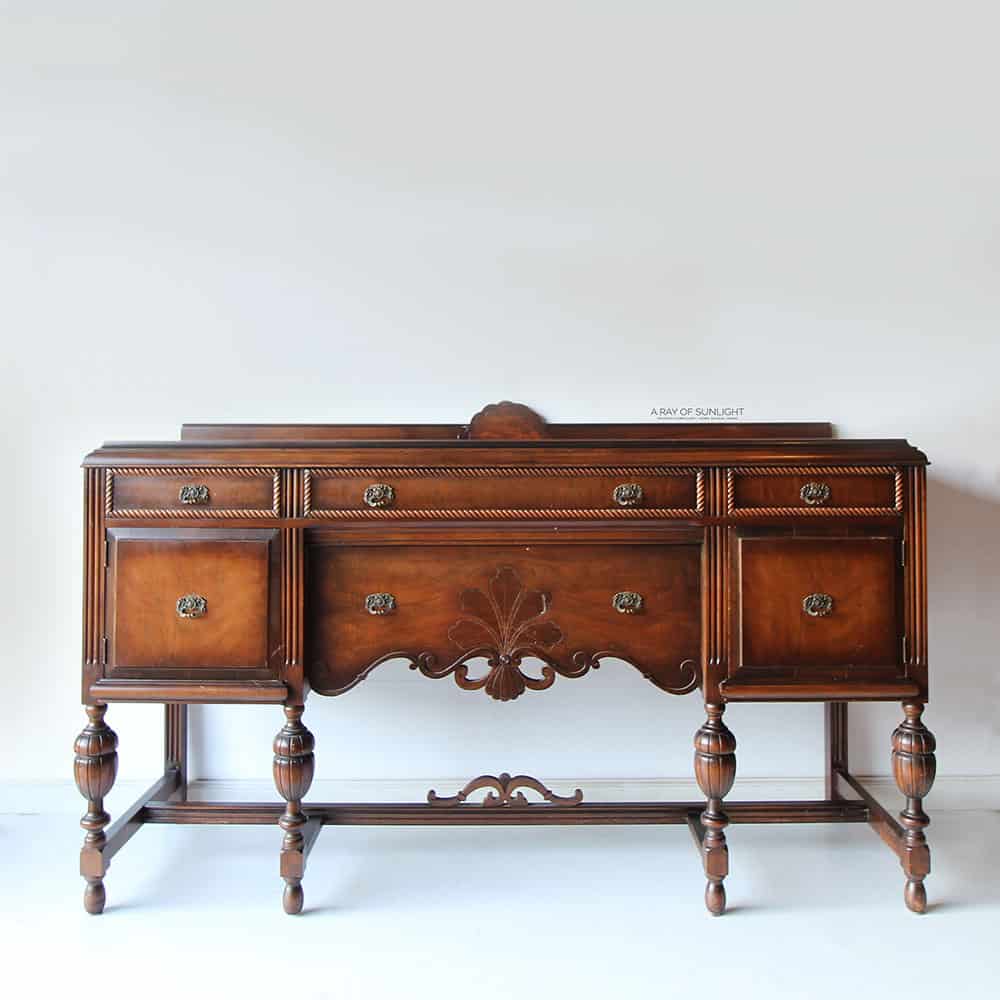
Isn’t this buffet stunning?? Living in Duluth, MN, we found a lot of cool antiques that were pretty budget-friendly. This one was $175 I believe. What a steal! If you want to know the best places to get good furniture for cheap, read through this post to find out.

But, you know me, I’m in the business of painting furniture, so let’s make it over! Green is a trendy color for furniture right now and olive green is such a beautiful and unique shade. I thought it would be perfect for this antique buffet because it would add a touch of modern while still keeping its vintage charm.
(While it’s gorgeous before, take a closer look. There are definitely scratches all over… it wasn’t in pristine condition.)

Supplies Used for Olive Green Painted Antique Buffet Makeover
As an Amazon Associate, I earn from qualifying purchases. I also may earn from other qualifying purchases with other companies or get free product to review and use. All opinions are my own.
- Painters Tape
- Pre-Taped Plastic
- Krud Kutter
- Wood Filler
- 220 Grit Sandpaper
- Shop Vac and Tack Cloth to Clean
- Clear Shellac (Used as a primer here)
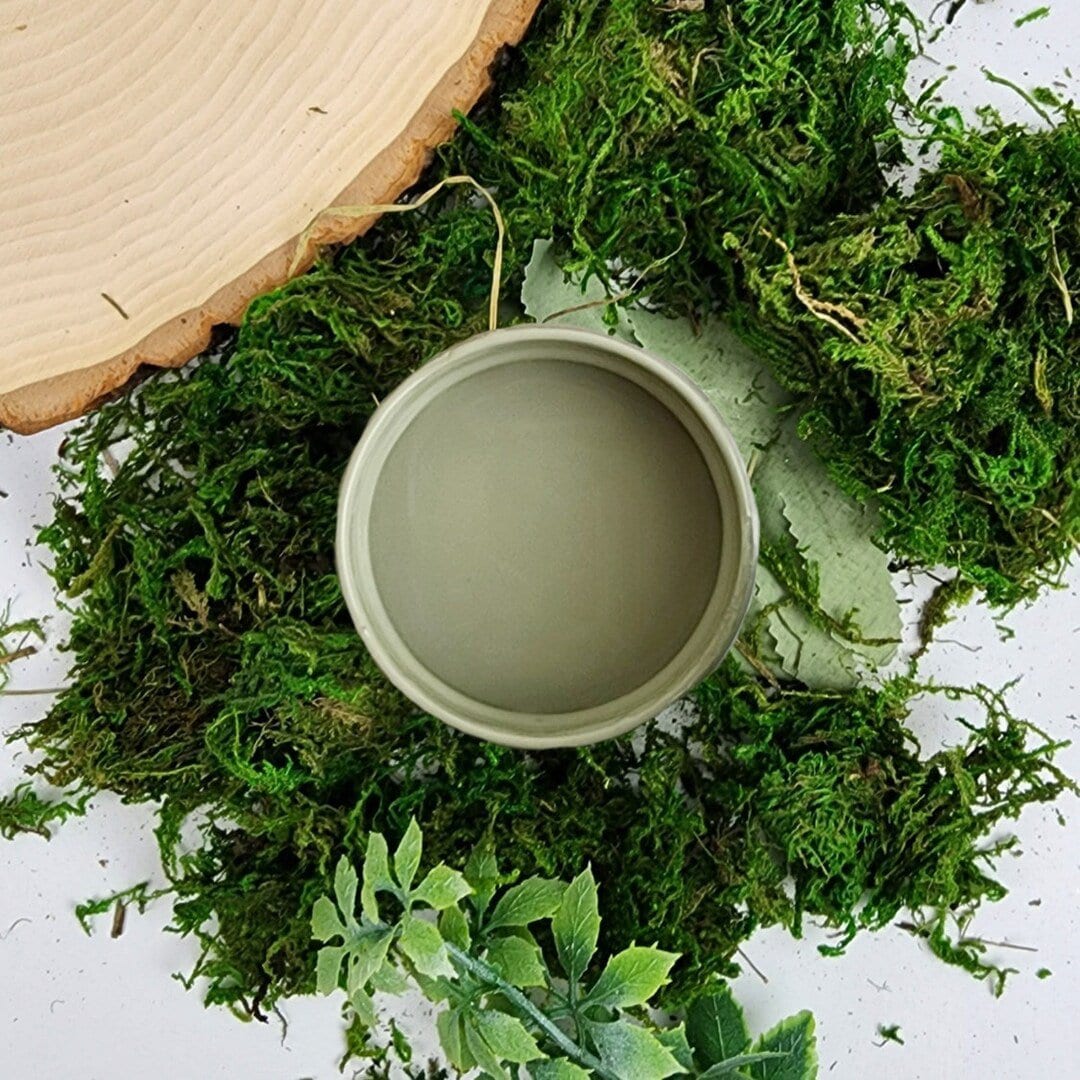
- Vintage Moss Paint by Paint Couture Paint
- Fuji Paint Sprayer
- Respirator
- Paint Filter to filter paint into the sprayer
- My Favorite Waterbased Topcoat
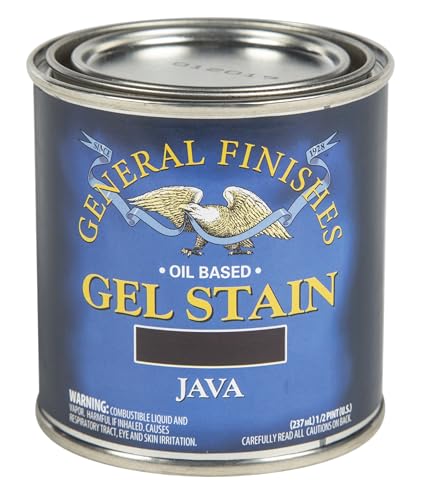
- Java Gel Stain
- Lint Free Rags
- Gloves
- New Knobs
Grab our list of the best painting furniture supplies too!
Prep Antique Buffet For Paint
Every good paint job starts with prepping the furniture. Including cleaning, taping, fixing damage, sanding, and of course cleaning again. Check out this post for everything you need to know about how to prepare furniture for painting.
If your beloved piece is damaged, head on over to this post to learn more on how to repair cracks in antique wood furniture.
Clean Antique Buffet
So first, we cleaned the buffet to get all of the dirt, oils, and grime off of it. This one wasn’t bad at all. But, every piece of furniture has the potential to have oils or something that will hinder the paint from sticking to it.
So, we sprayed Krud Kutter all over it and scrubbed it with an old damp rag. I specifically really like Krud Kutter because it cuts through grease and oils really easily, but it’s not harmful to the furniture either. Learn more on how to clean furniture before painting here.
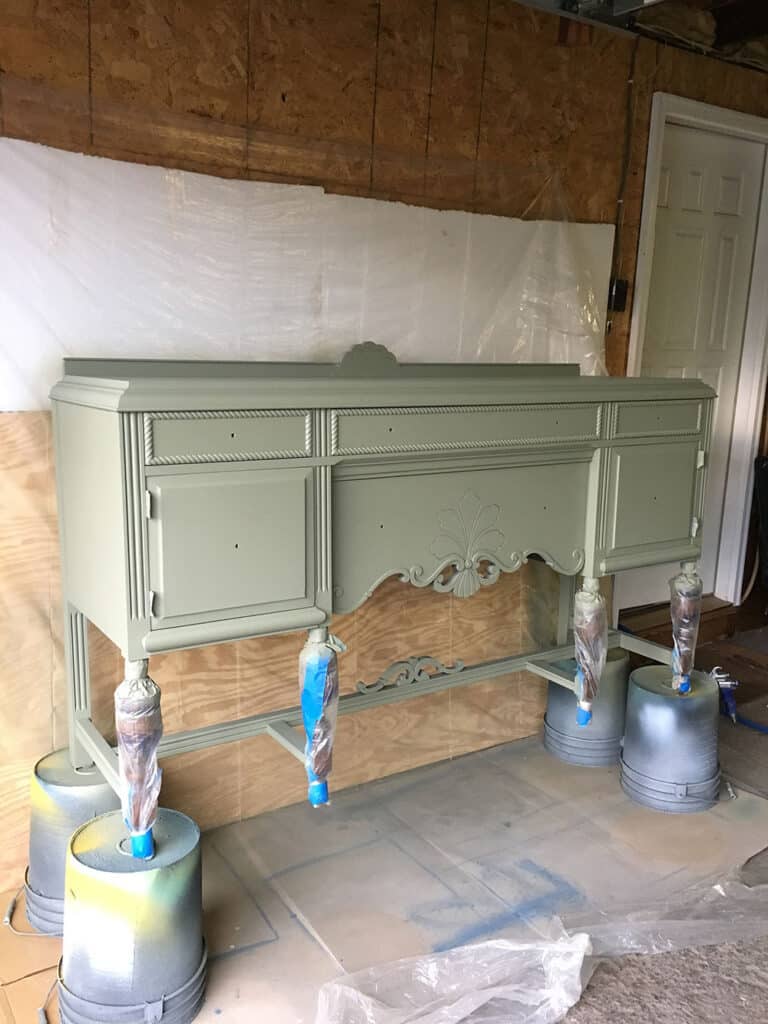
Tape Off Buffet Legs and Hinges
Then I taped off the legs with some painter’s tape and some 24″ pre-taped plastic, to protect them from getting any paint on them. I wanted these legs to stay a dark-stained wood. Here’s our list of what is the best painters tape to help you decide which is the right kind of painters tape to use for your project.

But if you want to replace or add new legs, here’s a guide on how to add legs to a buffet.
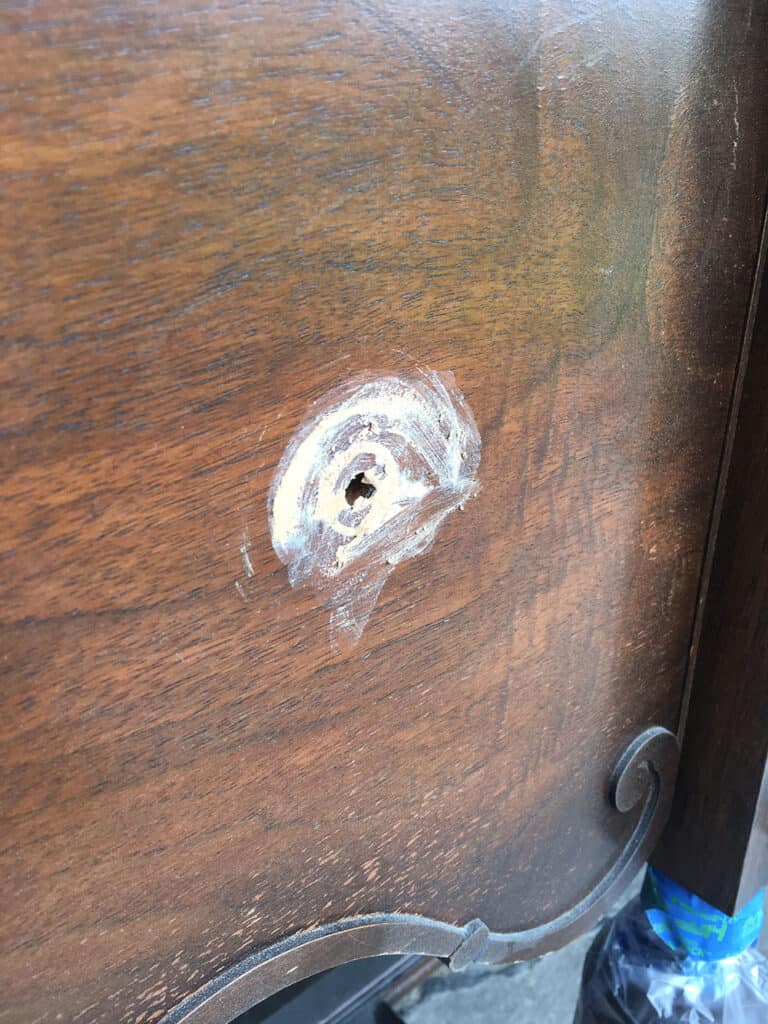
Fill In Holes and Dents with Wood Filler
The old hardware had dug into the wood right around it, so I filled those dents in with some basic wood filler and then let it dry. Learn more about filling holes when replacing furniture hardware here.
Sand Buffet and Wood Filler
Actually, while I was waiting for it to dry, I scuff-sanded the rest of the buffet with 220 grit sandpaper. A light sanding with 220 grit sandpaper makes a huge difference in the paint sticking and being durable. Learn more about the importance of sanding before painting furniture here.
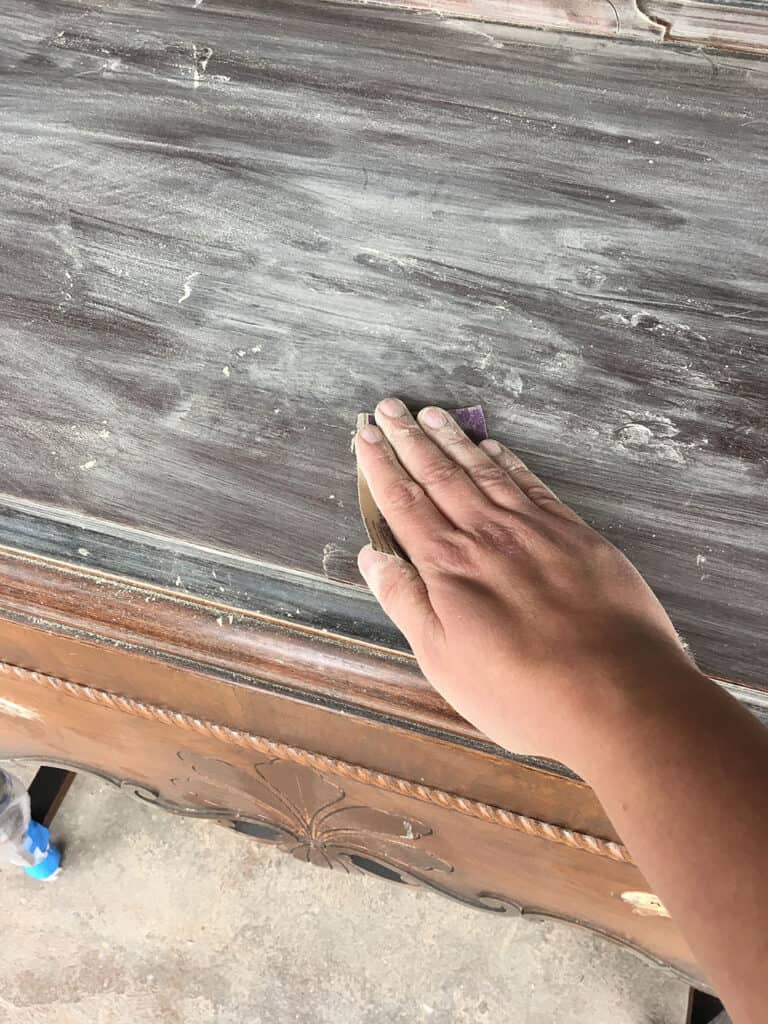
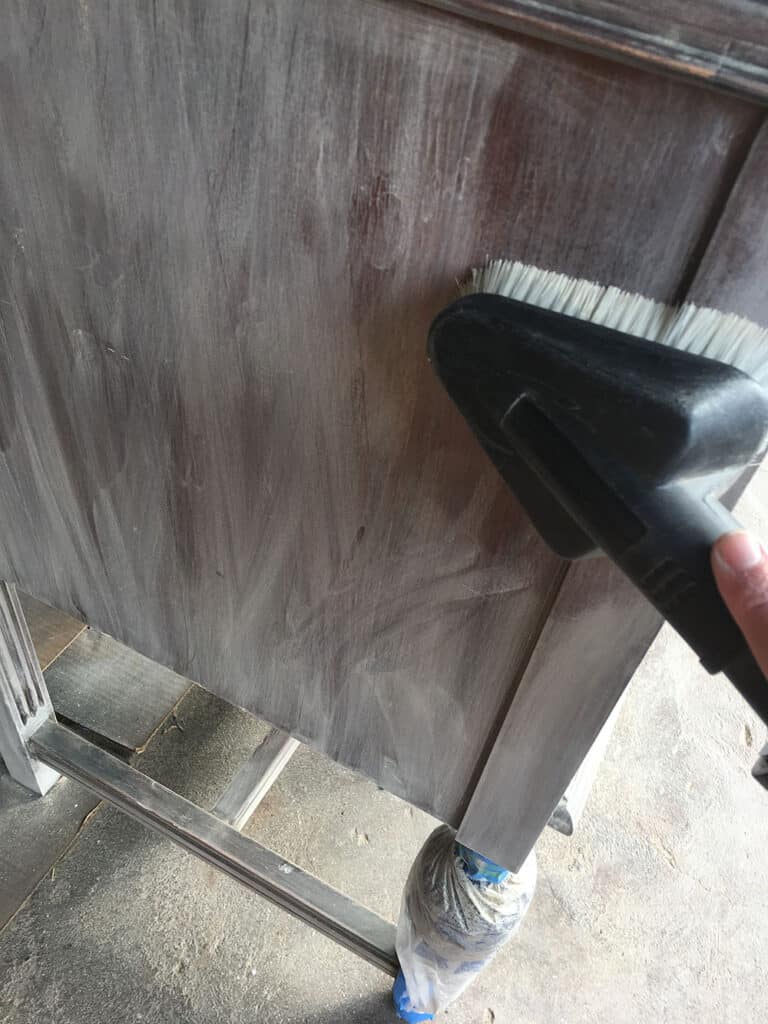
After the wood filler was dry (about 20 minutes later) I sanded the wood filler down so it was all flush with the wood around it. Then I used my shop vac to suck up the dust, and a tack cloth to finish getting the little specs of dust off.
And last but not least, I didn’t want to take off the doors (because they can be a pain to get back on correctly), so I just taped off the hinges with some more painter’s tape.
Prime Antique Buffet Before Paint
Then, before I painted, I sprayed 2 coats of clear shellac on the buffet.
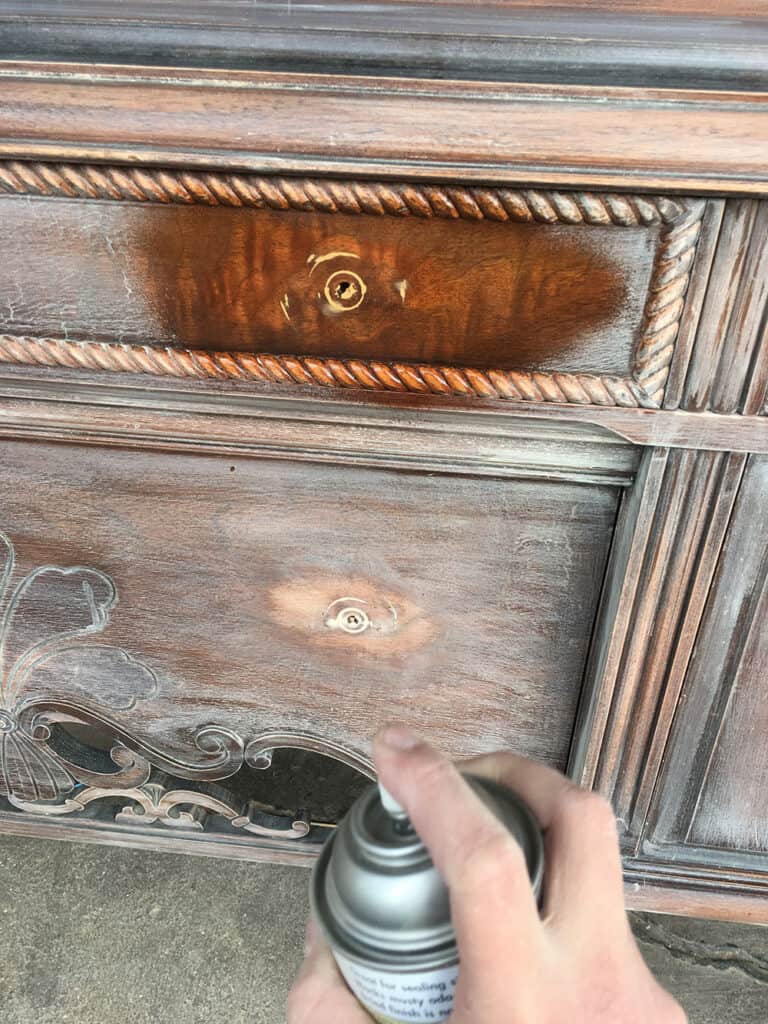
Clear shellac helps block bleedthrough from the wood, preventing stains from coming through the paint, (you can’t get the stains to go away unless you cover them with shellac or oil based products. Here’s more on how to stop stains from coming through paint.)
I’ve also learned that shellac helps paint stick. (It’s weird, I know!) So that’s a huge plus too! Check out the best primers for painting furniture (and how to choose the right one) here.
Then, I let the shellac dry overnight, to give it the best chance at blocking the stains. (Some stains are stubborn!!)
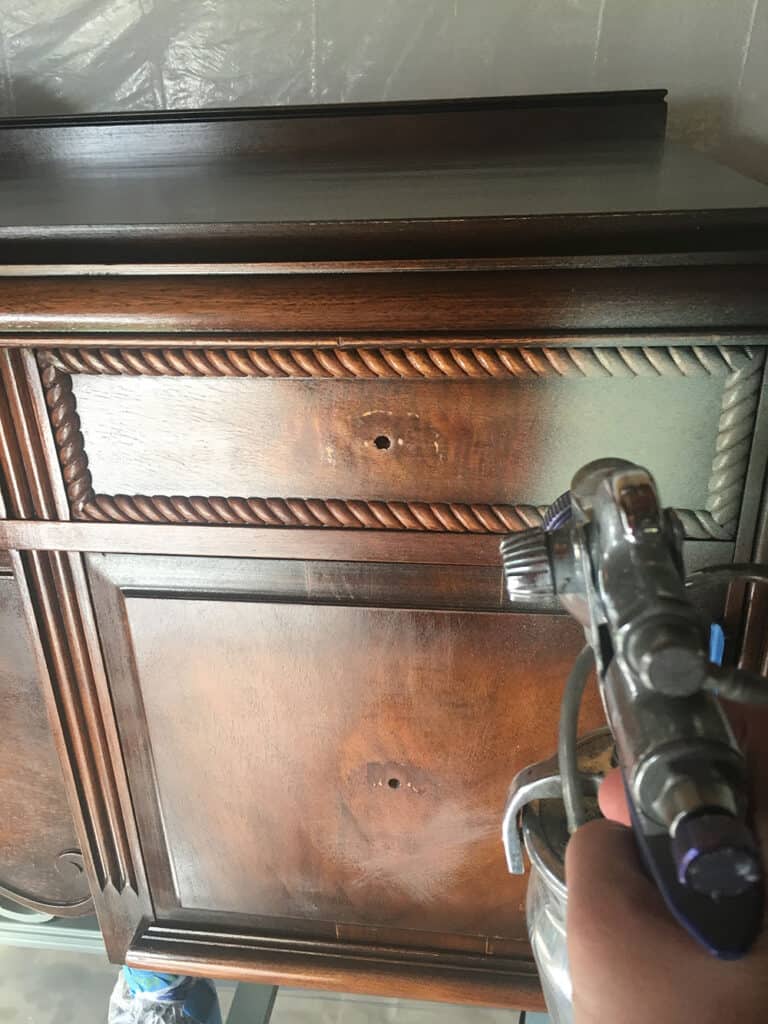
Paint Buffet Olive Green
The next day, I put my Vintage Moss paint into my Fuji paint sprayer, using the paint filter to filter the paint before it went into the sprayer (I don’t want anything to clog the sprayer!). If you want to use chalk paint, check out my list of the best green chalk paint for furniture here.
Would you like to save this?
Check out this post on how to use the Fuji Q4 Platinum paint sprayer to learn all about my Fuji paint sprayer. OR check out my list of the best HVLP paint sprayers for furniture for beginners and why I love them (and don’t like them. haha)
I also added some water (maybe 10%) to thin out the paint, so it would spray into a very fine, perfect finish. Here’s how to thin paint for a sprayer and how to thin paint for a Wagner sprayer to guide you with the paint thinning process.
I sprayed 2 coats everywhere. But since I had left the doors on, it took me 4 times of spraying to get everywhere. This paint is absolutely AMAZING! It is truly a self-leveling paint, and the finish it created is absolutely amazing!
I need to use Paint Couture paint more often!
Topcoat Olive Green Buffet
After the paint was dry for at least 2 hours, I sprayed 3 coats of my favorite water-based polyurethane on it. Here’s a great post with all my tips on how to spray polyurethane.
Restain Antique Painted Buffet Legs
Then I took off the plastic and tape from the legs. These legs were in really great shape to begin with, so I didn’t feel like I needed to remove the old finish. Read through this post to learn how to restain wood furniture. Check out how to remove wood stain like these legs here.
I scuff sanded the legs with more 220 grit sandpaper to help the gel stain to stick.
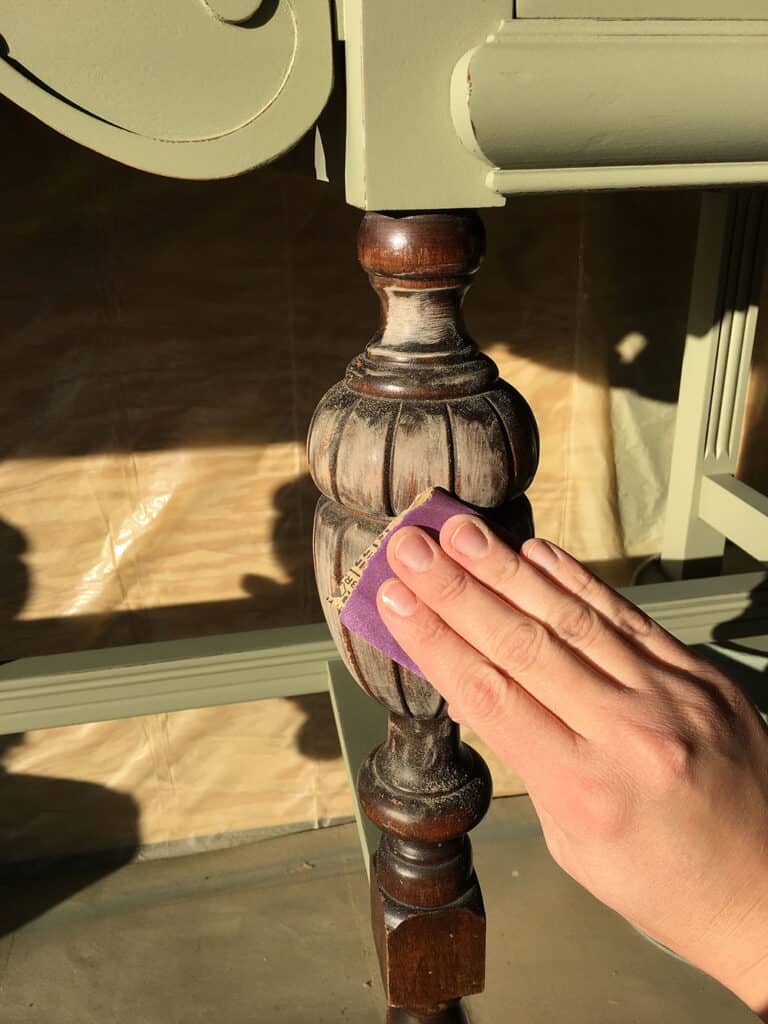
Then I cleaned up all of the dust.
Stain Buffet Legs with Gel Stain
Then, I mixed up the Java gel stain, dipped a lint-free disposable rag into it, and wiped the gel stain on, all over the leg. (Working one leg at a time!)

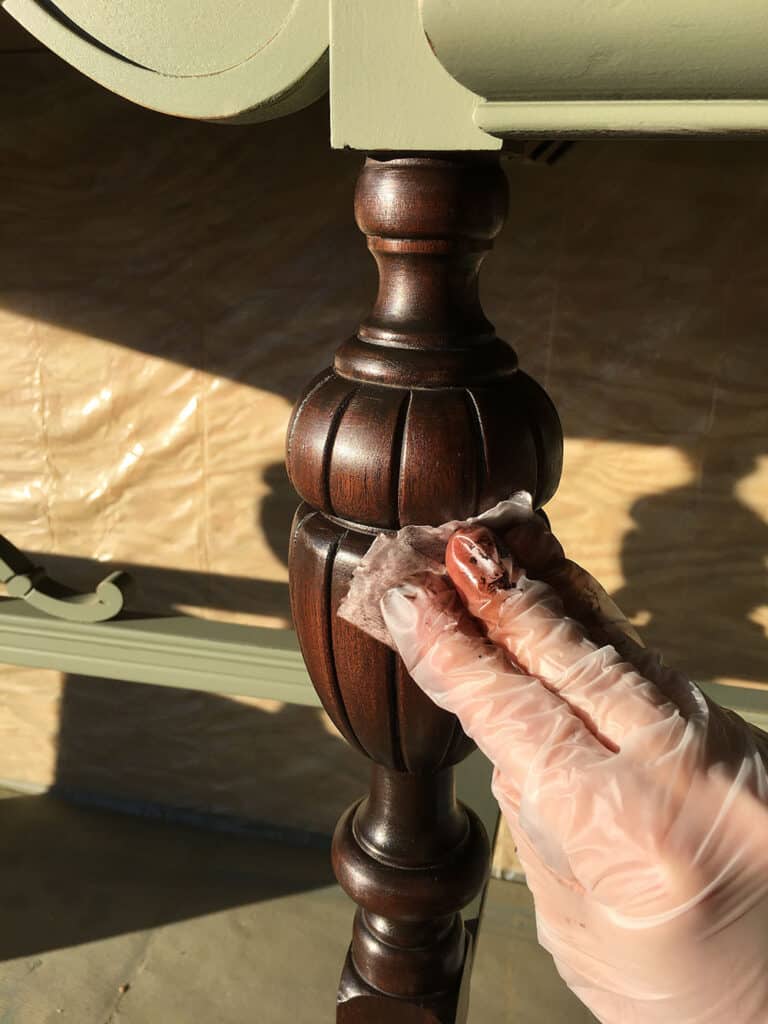
Before the gel stain dried I wiped the excess back off with a clean lint-free rag. Look at how they shine now!! The gel stain just gave them a fresh new look and filled in any dings and scratches. Check out more of the best wood stains for refinishing furniture here.
Topcoat Stained Buffet Legs
I didn’t actually topcoat these legs, but I probably should have wiped some oil-based wipe on polyurethane on them to give them extra protection. Learn more about topcoat for painting furniture options here!
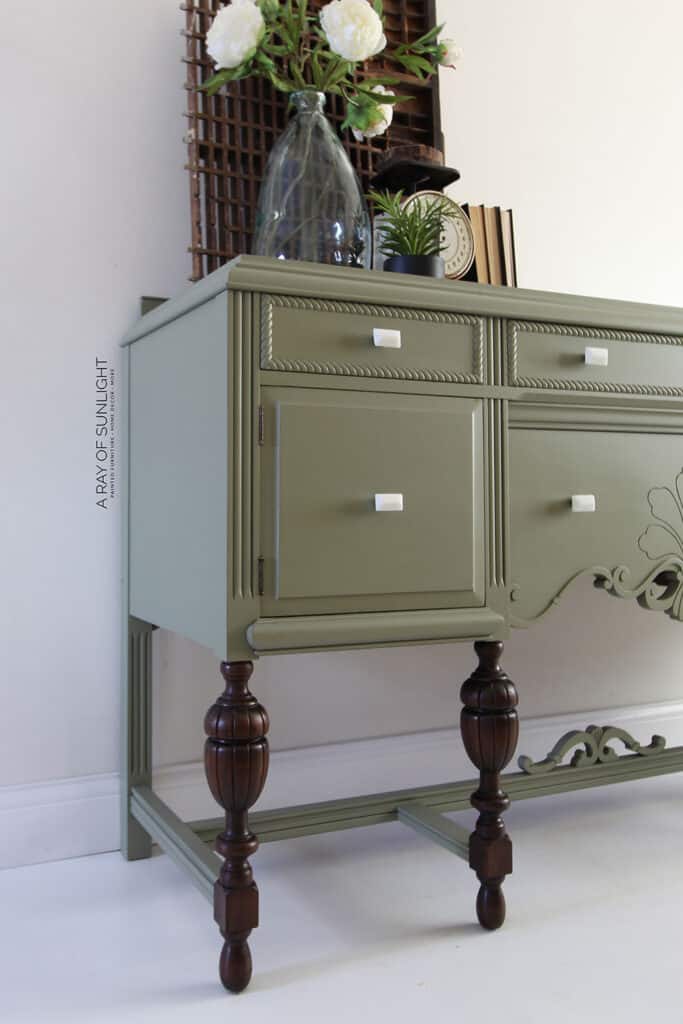
And here’s what the buffet looks like now!! Isn’t it pretty!?! Get more painted buffet ideas like this here! And if you’re wondering “is two-toned furniture in style?”, check out this post to find out.
More Before and After Makeovers
See All >
Click any of these “before” photos below to view the “after” of that makeover.


A customer snatched it up pretty quickly, and we shipped it off to its new home. Learn about how to make money painting furniture here and check out my handy furniture painting price list to guide you in pricing your painted furniture.
Also, here’s how to offer free shipping and still make money. To make sure you can cater to clients everywhere, learn how to ship furniture across the country here.
Painted Antique Buffet Ideas
If you have another antique buffet you want to update as well, here are some more antique buffet painting ideas for inspiration. You can stick with the two-toned look like I did and paint the top a different color, or you can go fully monochromatic by painting the entire piece one color.
If you like the green color, you can check out other beautiful shades from our list of the best green furniture paint here! You can also check out these best painted furniture colors if you want to explore more color options.
Another idea is to add some stencil or decal designs on the drawers for a unique touch. These stencils can be easily found online or at your local craft store so you can customize your antique buffet to your liking. Here’s how to stencil painted furniture for more tips and ideas!
And if you’re feeling extra creative, why not mix and match different paint colors on different parts of the buffet? For example, you can use one of these bold furniture paint colors like red or blue on the drawers and stick with these neutral furniture paint colors for the rest of the piece. This will create a fun statement piece that you can only find in your home!
As long as your painted buffet reflects your personal style and complements your home, the possibilities are endless. Check out these painted antique buffet ideas and painted buffet ideas for similar makeovers!


Olive Green Painted Antique Buffet
Give your antique furniture a fresh new look with a little bit of paint. Here are the steps for this olive green painted antique buffet makeover.
Materials
Instructions
- Clean the buffet to get all of the dirt, oils, and grime off of it. Tape off the legs with painter’s tape and pre-taped plastic, to protect them from getting any paint. Fill in any old hardware holes, dents, and damages with wood filler then let dry. Sand the dresser and dried wood filler.
- Spray 2 coats of clear shellac on the buffet. Let the shellac dry overnight.
- Use the paint filter for the olive green paint before putting it into the sprayer. Spray 2-4 coats of paint onto the buffet.
- After the paint dries for at least 2 hours, spray 3 coats of water-based polyurethane.
- Now, take off the plastic and tape from the legs and scuff sand with sandpaper. Clean up all the dust from sanding.
- Wipe some gel stain all over the legs with a lint free rag. Before the gel stain dries, wipe the excess back off with a clean lint-free rag.
- Topcoat the legs with oil-based wipe on polyurethane.
- Add new hardware and enjoy your olive green painted antique furniture!
Recommended Products
As an Amazon Associate and member of other affiliate programs, I earn from qualifying purchases.

More Painted Buffet Makeovers
- Black Painted Antique Buffet
- Dark Green Buffet Makeover
- Antiqued Blue Farmhouse Buffet
- How to Chalk Paint Furniture White
- Buffet Turned Into Bathroom Vanity
Follow us on YouTube to get more tips for painting furniture. Or share your project with us on our Facebook Group and be part of our community. See you there!
Love everything about the makeover especially the stained legs EXCEPT the drawer knobs. You’re usually so spot on adding hardware that enhances the piece. Not so much this time. Those large white chiclets knobs are very distracting.
I purchased this piece for my kitchen and absolutely love it! It is perfect piece that ties my 1820 farmhouse with my love of MCM design together. The key are those little knobs which creates such a nice transition between antique and contemporary throughout the house.
Thank you for the love!!
I’m with Vicky, I love the green and the stained legs but the knobs are too bright for me. My mother has a similar buffet and her pulls are wood and brass so maybe I am just used to the originals. Either way, our opinion doesn’t really matter because
it sold quickly and the purchaser is thrilled!
That’s fair enough! I get where you’re coming from. 🙂
Stunning!!!!!!!!!!!!!!!!!!!!!!!!!!!!!!!!!!!!!!!!!!!
Thank you so much!!