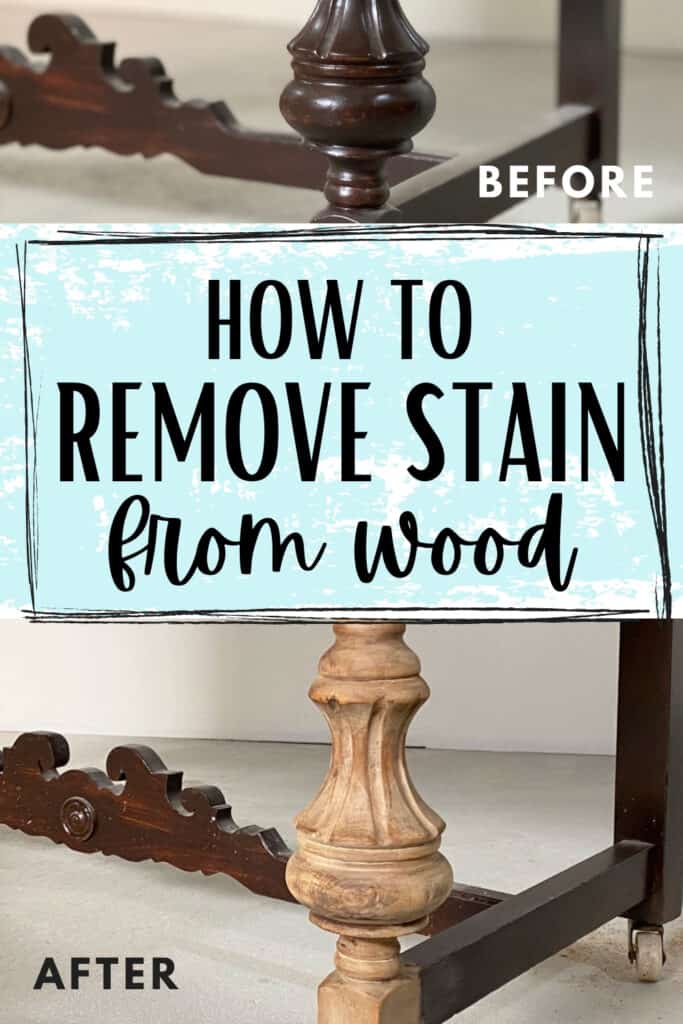
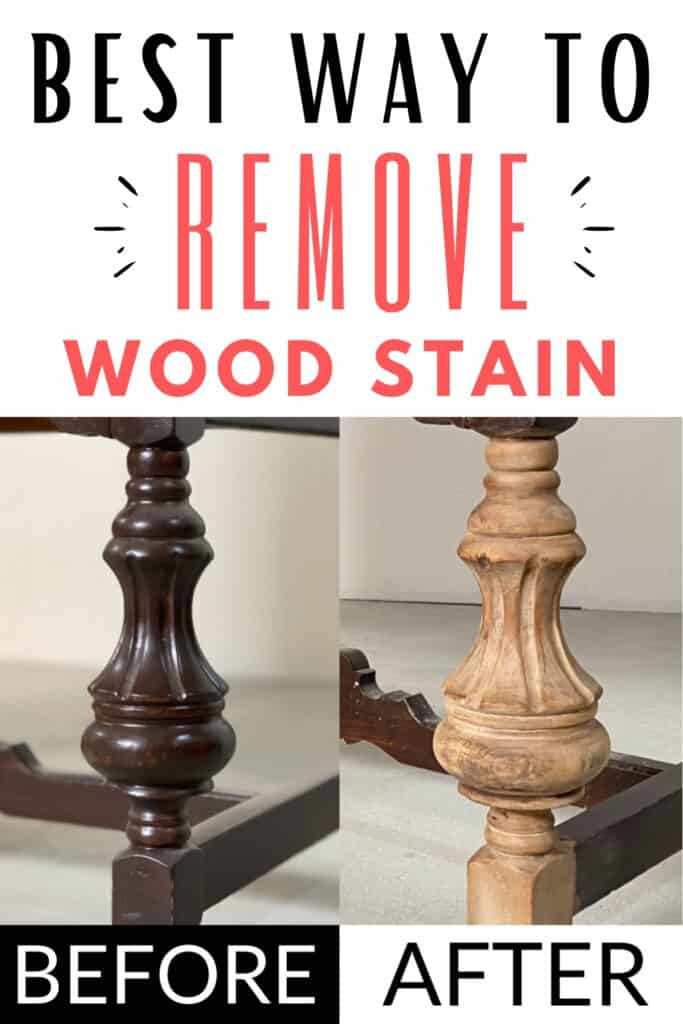
How to Remove Wood Stain


Removing wood stain from furniture can be tricky if not done properly. In this blog post, we’ll provide step by step instructions on how to remove wood stain in a safe and effective way without damaging your furniture.
There’s nothing like revealing raw wood from underneath old wood stain, whether you’re looking to refinish your furniture or leave the furniture in a raw wood style finish. So let’s dive in and discuss the best refinishing furniture techniques and tools to use for quickly and effectively removing wood stain.

I’m not going to sugarcoat it, removing wood stain from furniture is not for the faint of heart. Sometimes the wood stain comes off really easily, and it’s a pretty quick process. And other times, not so much.

If you want to remove one layer of wood stain from a flat surface, it should be a decently quick and painless project. But if you want to take on stripping a piece of furniture down to raw wood, it can be a pretty long process. Especially if there are multiple layers of stain/paint!
Before you start your project, no matter how big or small though, here are the best tips and tricks for removing wood stain from furniture! And, of course, the step by step process on how to remove wood stain.
Supplies Used for Removing Wood Stain
As an Amazon Associate, I earn from qualifying purchases. I also may earn from other qualifying purchases with other companies or get free product to review and use. All opinions are my own.
- Citristrip Stripping Gel
- Cheap Paint Brush
- Gloves
- Mineral Spirits
- 0000 Steel Wool
- Toothbrush / Wire Brush
- Toothpicks
- Putty Knife (for flat surfaces!)
Here are some other best tools for removing paint (or stain) from wood. With these tools, you can easily and efficiently strip off old paint or stain from any wooden surface and get started with refinishing or painting furniture sooner.
How to Remove Stain from Wood Furniture
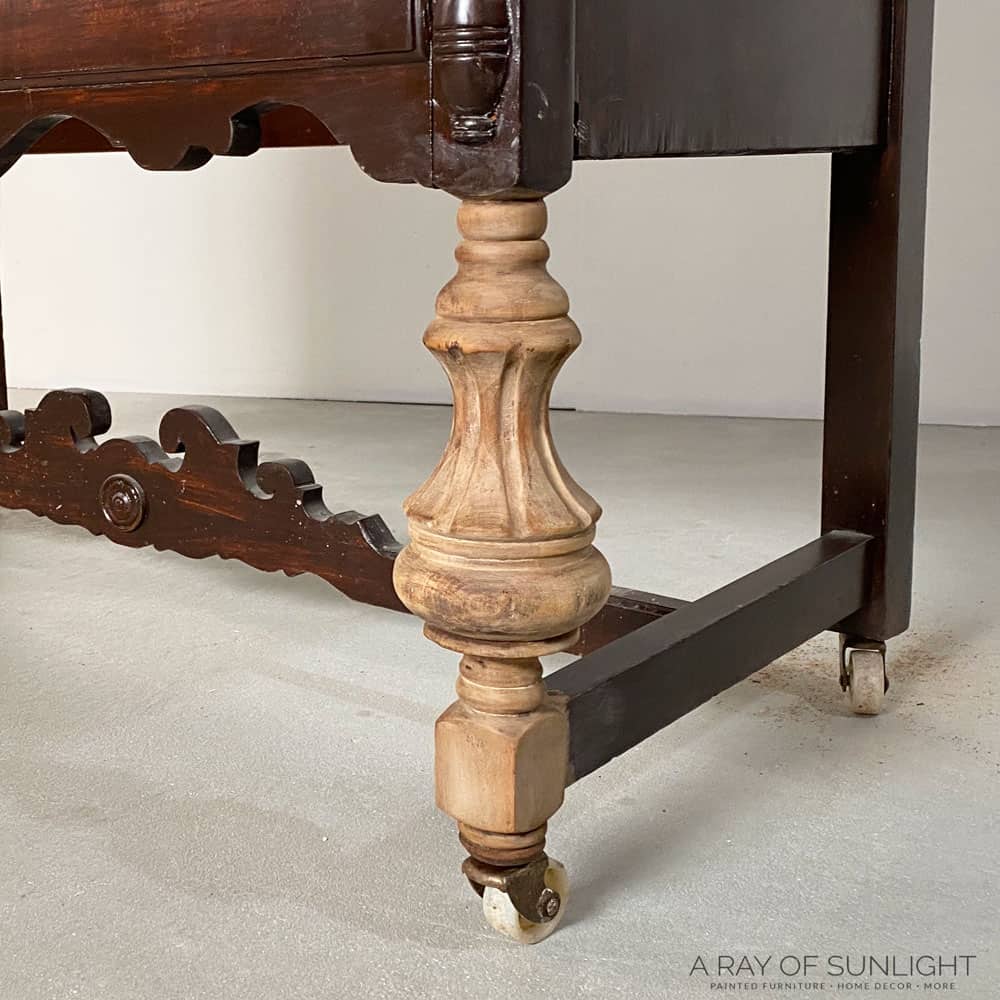
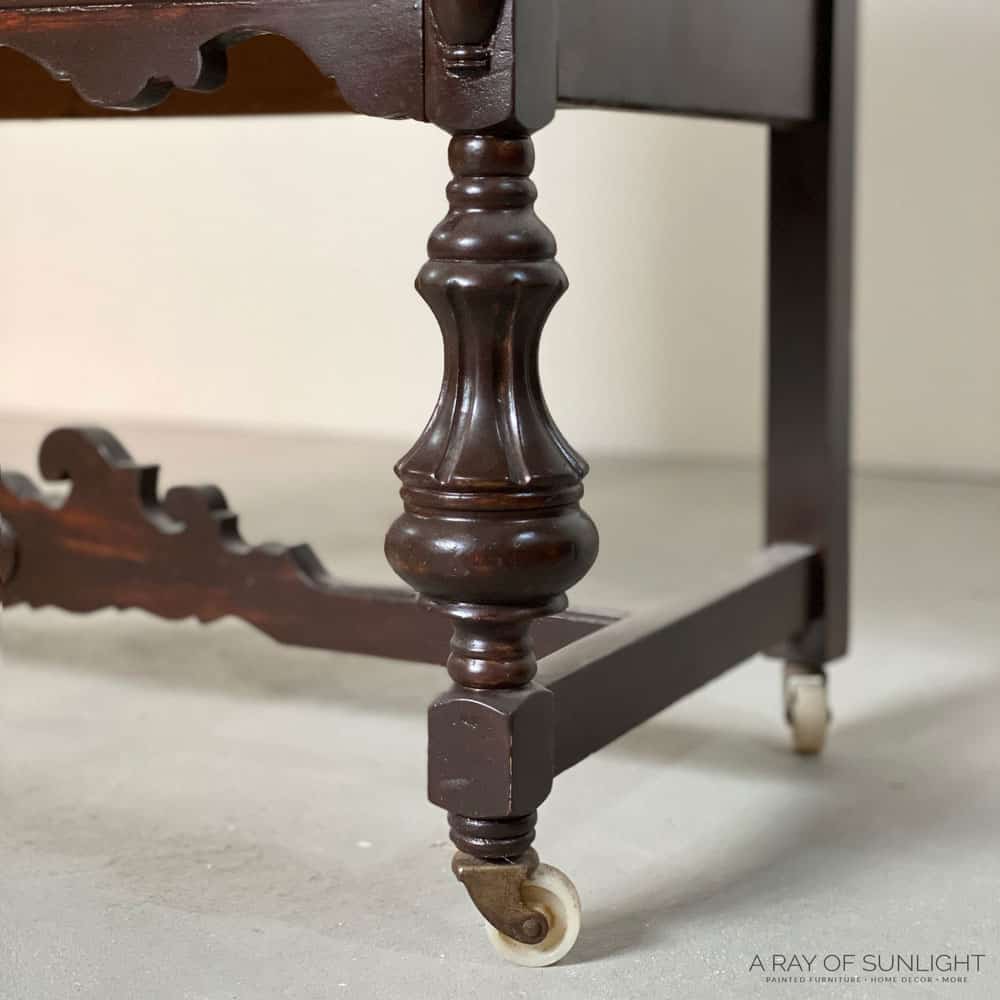
Let’s dive into how to remove stain from detailed wood like the legs on this mini buffet! This technique can be used on stain or paint. Actually, this piece had a layer of paint and 2 layers of stain that we had to remove to get it down to bare wood. I’m sure it had some polyurethane topcoat on it as well.
Protect Yourself and Your Work Area
First, setup your area. Work in a well ventilated area if possible. Citristrip doesn’t have a really harsh smell like most other strippers, but for your health, it’s still smart to work in a ventilated area. I also like to wear my respirator to protect my lungs.
Then lay down some cardboard under the project so you don’t get stripper and stain all over the floor. Here are more great ideas to protect your furniture and floor (It was written to share about how to prevent overspray when painting furniture, but they are great ideas to protect furniture and area from the mess of the stripper.)
How to Strip Stain From Wood
Put on your chemical resistant gloves. Then pour some stripper onto the paper plate and use the brush to brush the stripper all over. Brush it on as thick as you can!!
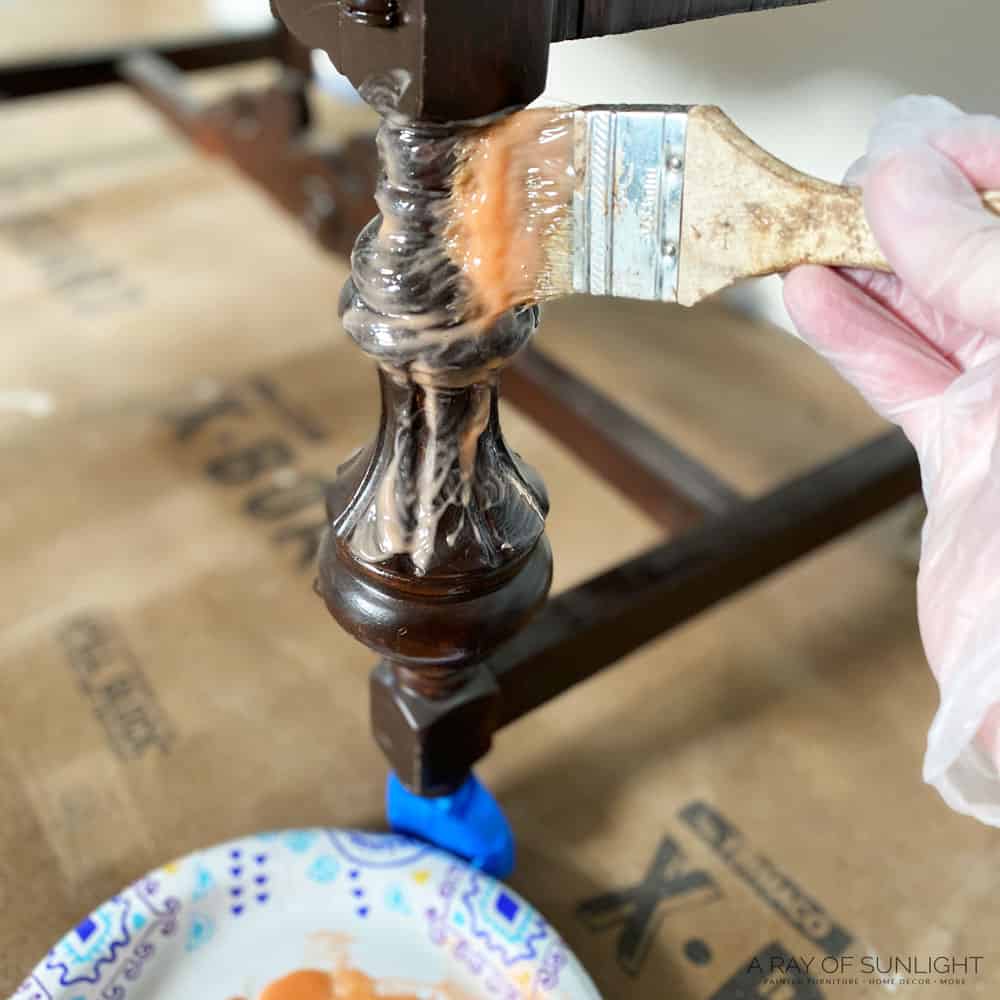
If you have a lot of stain to remove, work in small areas at a time. Trust me, you don’t want to put stripper all over the entire piece and try to work on it all at one time. It’s a huge project to undertake! So only put stripper on a small area first. (Like one leg, or the top, or side of your furniture.) Once that area is stripped down to raw wood, move onto the next area.
I recently tried a new chemical stripper that I love even more than this method. Check out my Stripwell QCS review to see why I like it! Check out our blog post about the best wood stain removers including Citristrip and Stripwell to learn more about the pros and cons of each product.
Our post on how to remove stain from wood without sanding also tackles more on using chemical strippers instead of sandpaper.
Cover and Let Citristrip Sit
Once you have the stripper all over, grab some plastic wrap and cover the stripper. The plastic wrap will help keep the stripper from drying out, making the stripper work longer. Once the stripper dries out, it won’t be able to eat through the stain anymore.
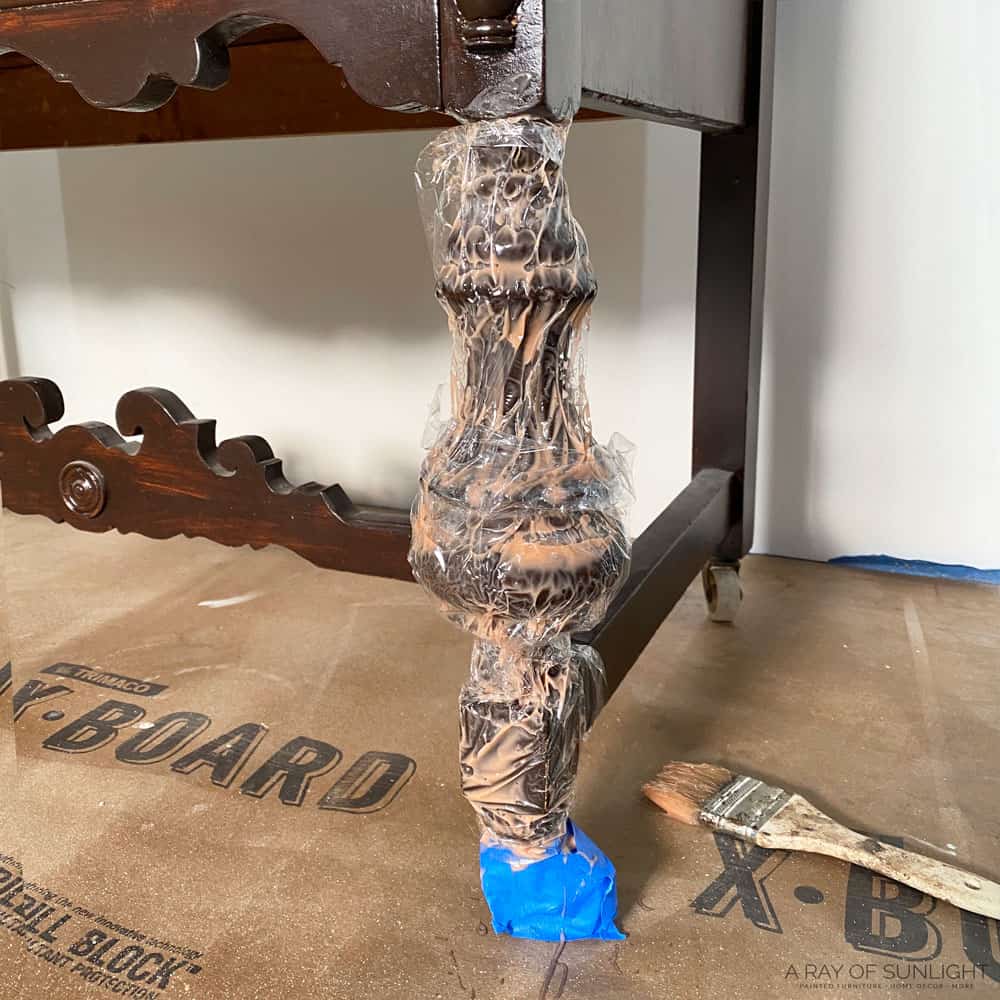
Then, sit back relax, and let the stripper go to work! I like to let the stripper sit there for about 8-12 hours, but no more than 24 hours. The bottle recommends waiting at least 30 minutes, but I haven’t ever seen the stripper work fast enough on stain to be ready after only 30 minutes.
You can check on it here and there by pulling off the plastic just a little bit to see if the stain is starting to lift off, bubble, or get really gooey. If it’s gooey, bubbled up or lifting off with the plastic, you’re ready to start removing the stain! If you can’t see any of those things, and it hasn’t been 8 hours, leave it alone for a little while longer.
Remove Citristrip and Stain
When it’s ready to strip, put on your gloves, and remove the plastic from a small area. Dip your steel wool or scrubbing pad into the mineral spirits and start scrubbing the stripper and stain away.
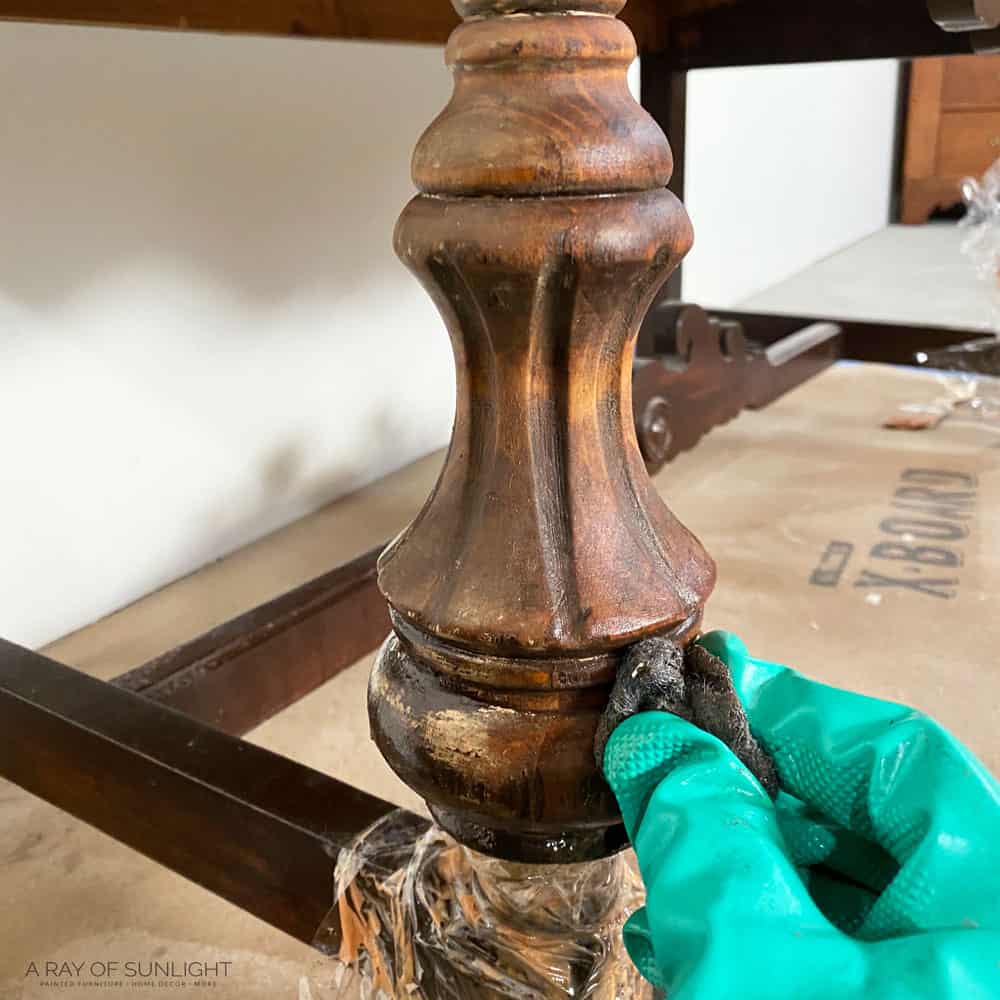
If you have a flat surface, you can remove most of the gunk first with a flat plastic scraper. But these legs didn’t leave me much room to use a scraper, so I dove in with the steel wool first. Check out this other post on how to remove stain from detailed wood for more tips on tackling intricate surfaces.
How to Remove Citristrip Residue from Wood
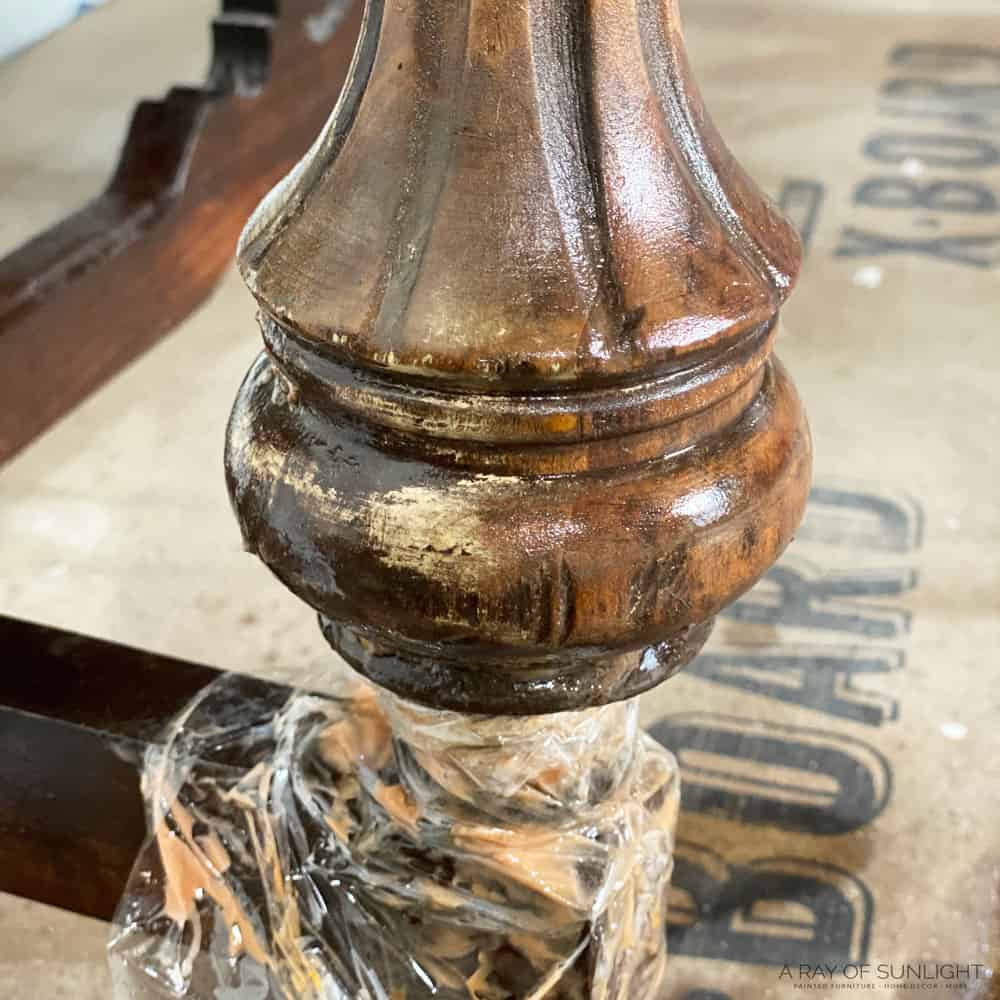
The mineral spirits helps to remove the residue of the stripper and it also helps to soften any stain that the stripper didn’t lift up. Once the steel wool is fully caked with gunk, grab a new piece of steel wool and dip it into more mineral spirits.
Removing Multiple Layers of Stain/Paint
Usually, if there is just one layer of stain, the stain comes off pretty easily, without much scrubbing. But, once I started getting into this project, I could tell that someone had painted the whole piece with a cream color paint and then put a gel stain on top of it.
So, instead of just one layer of stain to get through, I had 2 layers of stain and one layer of paint to get through. Which made the project take a bit more elbow grease than I planned on.
**But, that’s why I recommend to only apply Citristrip to a small area at a time!**
If you end up finding multiple layers of paint, it will take longer to strip than if there are one or two different layers of paint.
So, I just kept scrubbing away with the steel wool and mineral spirits until I could tell that I was down to raw wood. It was also easier to scrub all of the layers off when the mineral spirits had sat there for a little bit. It took an hour to scrub one leg down completely.
Would you like to save this?
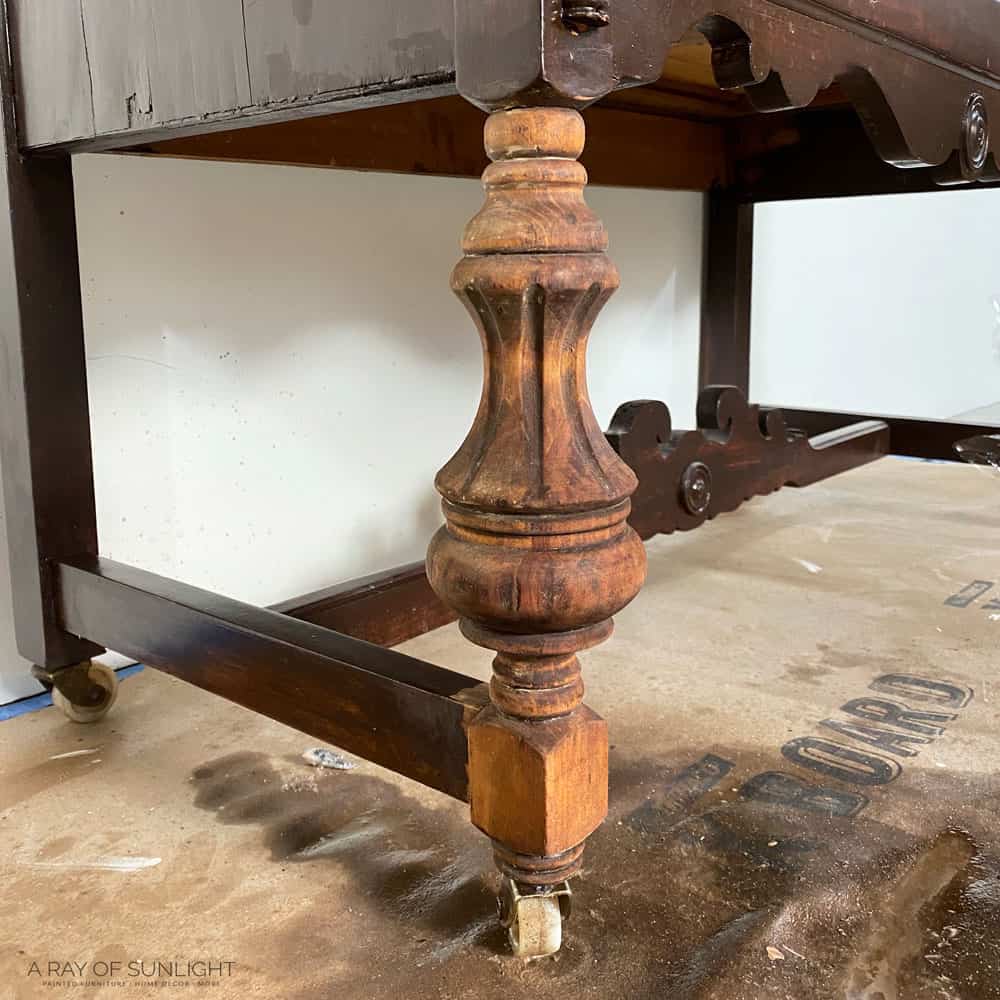
After they were both completely stripped, I let them dry for a day or two. The wood was really saturated and wet, so I let it dry completely.
Sanding Off Leftover Stripper and Stain
Here’s what they looked like a couple of days later.
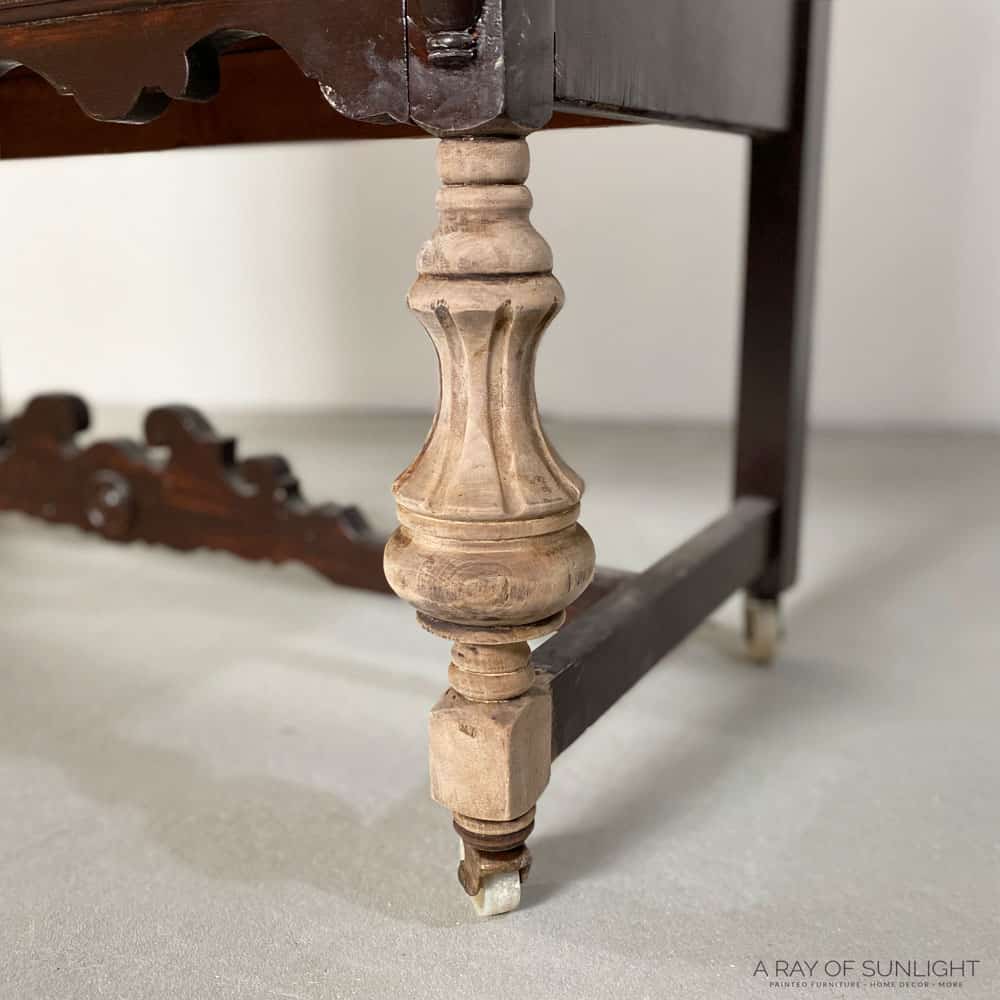
There were a couple of spots that I had missed when scrubbing, so I took some 220 grit sandpaper and foam sanding pads to those areas and sanded those spots down to wood. Learn more on how to sand down wood here, and check out the best sandpaper for furniture painting you can use on your project.
I also sanded the rest of the legs down to get any leftover stripper residue off. For sanding spindles, here’s our detailed guide on the easy way to sand spindles!
If you’re a visual learner, check out our full video tutorial on how to remove wood stain here!
Now they’re ready to refinish with some stain, dark wax or even paint! Here are the best wood stains for refinishing furniture, and you can learn more about how to refinish wood furniture here.If you don’t have the time to remove old stain, check out my guide for painting over oil based stain.
Projects That Used This Wood Stain Removal Process
Check out this Behr chalk paint review to see the rest of this buffet makeover! But here are some other projects where we used Citristrip and this whole process to remove stain.
- How To Strip A Kitchen Table
- Painting A Dresser White
- Black Painted Antique Buffet
- Refinishing An Old Dresser
- Painting Furniture Gold
Best Wood Stain Remover
Citristrip stripper is my favorite to use because it isn’t harsh like other strippers, and you can use it indoors! I also love that the smell isn’t super strong. But, I still like to wear a mask to protect my lungs from the smaller amount of fumes.
Plus, it really does work! But, you have to let it sit for a while so it can eat through the stain. Seriously, 30 minutes is not enough time to let it work.
How Much Citristrip Do I Need?
I used about half of a 1/2 gallon size of Citristrip stripping gel for these legs. Obviously, if you have a lot more to remove, you’ll want more stripper. For a small 3 drawer dresser, I have used about 1 and a half 1/2 gallons of Citristrip stripping gel.
What Happens if Citristrip is Left on Too Long?
Honestly, the only thing I have really noticed is that the stripper just dries out. You can use a putty knife to remove the dried out Citristrip. If you’re lucky, you’ll remove the stain with the dried Citristrip. If not, just brush more Citristrip on the entire area you were working on and repeat the above steps.
I really don’t recommend letting it sit too long, but it shouldn’t be the end of the world if you do let it sit too long. 🙂
How to Restain over Stain
If you don’t want to go through this whole process, you might be able to get away with using a gel stain instead. Gel stain sits on top of old stain finishes, so you can leave your old finish on there.
Check out this painted antique buffet makeover or these posts on how to restain wood furniture and how to stain wood darker to see how we use gel stain to add a stain over stain (without stripping!) Get more tips from my guide on how to restain furniture for beginners here.
How to Sand Off Old Stain
If you don’t want to strip stain from wood, another option is to sand it off. This is a more labor intensive process, unless you use a power sander, but it can be a good option if you’re dealing with a smaller piece of furniture or don’t want to deal with chemicals.
Use these best sandpaper for removing paint (or stain) from wood to get the job done effectively. Start with a coarse grit sandpaper, such 80 grit, to remove the bulk of the old stain. Then work your way up to a finer grit, such as 120 or 220 grit, to smooth out the wood.
For smaller or intricate areas on your furniture, you can use sanding contour grips to help you reach those tight spots. If you’re using a sander, a foam sanding pad can be helpful for getting into corners and curves. Check out foam sanding pads for electric sanders to learn more about this combo.
Once you’ve removed all of the old stain by sanding, remember to vacuum up all of the dust and wipe down the surface with a tack cloth before applying new stain. You want to make sure the wood is clean and ready to take on a fresh coat of stain.

So that’s our guide on removing stain from wood furniture! We have the best way to strip stain from wood with Citristrip, including tips on how to use it effectively and remove it properly. And if you’re not up for stripping or dealing with chemicals, we also have some tips on sanding off old stain. Choose the method that works best for you!

Removing Wood Stain From Furniture
Learn the steps and secrets for removing wood stain from furniture easily, so you can reveal beautiful raw wood and refinish old furniture.
Materials
- Citristrip
- Cheap Paint Brush
- Gloves
- Mineral Spirits
- 0000 Steel Wool
- Toothbrush / Wire Brush
- Toothpicks
- Putty Knife
Instructions
- Protect yourself and your work area. Work in a well-ventilated area and lay down some cardboard under the furniture so you don’t get stripper and stain all over the floor.
- Put on your gloves then brush on the stripper as thickly as you can. If you have a lot of stain to remove, work in small areas at a time.
- Once you have the stripper all over, grab some plastic wrap and cover the stripper. The plastic wrap will help keep the stripper from drying out, making the stripper work longer. Let the stripper on the furniture sit for about 8-12 hours.
- When it’s ready to strip, put on your gloves, and remove the plastic from a small area. Dip your steel wool or scrubbing pad into the mineral spirits and start scrubbing the stripper and stain away. Once the steel wool is fully caked with gunk, grab a new piece of steel wool and dip it into more mineral spirits to remove stripper residue.
- After the wood's been completely stripped, let it dry for a day or two.
- Sand the spots you missed when scrubbing with some sandpaper.
- Now you can refinish with some stain, dark wax, or even paint!
Recommended Products
As an Amazon Associate and member of other affiliate programs, I earn from qualifying purchases.


More Refinishing Furniture Resources
- How to Strip Paint from Wood Furniture
- Staining a Dresser Darker
- How to Paint a Stained Dresser
- Furniture Refinishing Tools
- How to Refinish a Dresser
Learn the Art of Updating Furniture!
If painting furniture feels overwhelming or your past attempts didn’t go as planned, this course will guide you step by step.

Follow us on YouTube to get more tips for painting furniture. Or share your project with us on our Facebook Group and be part of our community. See you there!
Thnaks for the great instructions. I have some pieces that would require all these steps to get to the raw wood and you have explained the proceedure clearly. This should make people appreciate all the time and effort folks go through to repurpose furniture. I have used Citristrip to remove some hideous paint from a dresser that I still use. It did a super job removing about three layers of paint.
Your videos are great! I am going to try to remove a thin coat of veneer from a chair following your directions. i have 2 questions.
Could a steamer be used rather than an iron?
On another topic, is there a reason to remove stain from a piece rather than just sanding it well before painting?
Thank you
Singleton S
I don’t think a steamer would work but you could try it! If you do, I’d love to know what you think.
The only reason I see to remove stain before painting is if it’s really flaky. If it easily scratches off, then your paint will also easily scratch off. Honestly though that doesn’t happen very often with stained pieces.
Best of luck!
Awesome thank you . I have a old Dixie dresser I’m going to try the stripping and the sanding with the steel wool. I’m excited?
Hey there! If I thought I got all of the stain but still have some left over, rather than trying to sand, would it be ok to redo the steps?
Yep! You can repeat the process again. Best of luck!
I’m stripping a mahogany dresser. The Zinsser product to bleach is. I longer available. Would the 2 products in this post work ok. I’m not opposed to slight pink and I really think the wood has more of a brown cast than pink. I’m hoping a white wax may be the ticket. Thanks
I’ve used regular bleach to bleach wood
Hi, thank you for all that information. I’m new to woodworking and let’s just say that my imagination is much more talented than my ability. I’m making a bench for my niece out of an old twin bed frame. I started to sand everything after I got it all framed. But as I got into it I found I was loosing the groves. With 12 spindles to strip stain and polyurethane from I was getting nervous about how it was going to look. Unless you have another recommendation, I’m going to try the stripping method.
Kerry