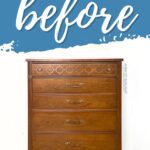
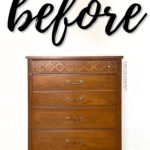
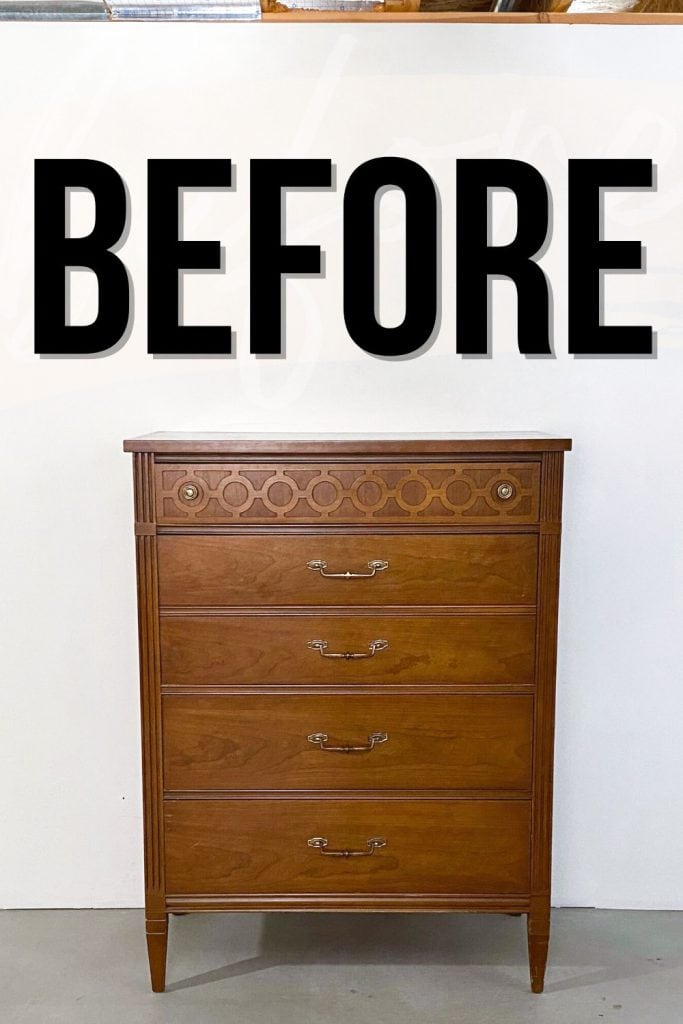
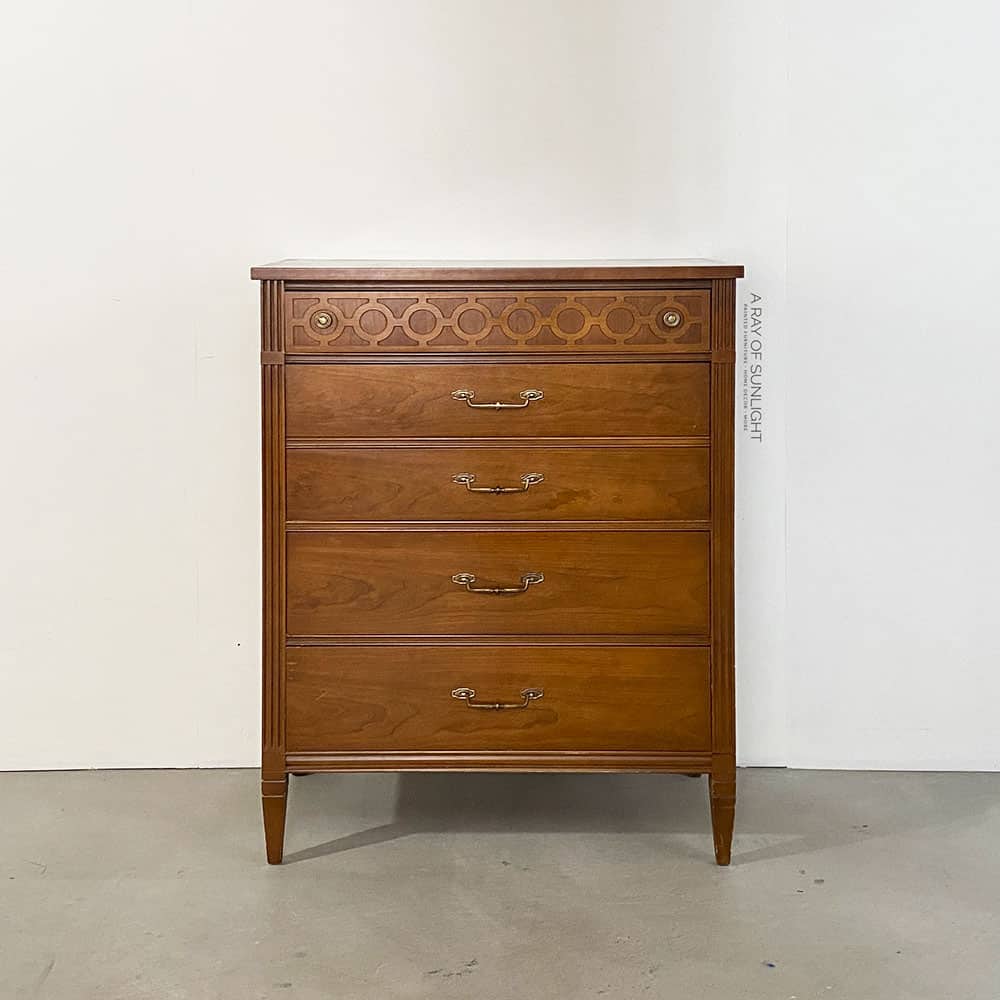
Painting a Dresser White


If you’re looking for some DIY dresser makeover ideas to give your old piece a fresh look, painting a dresser white can be pretty easy as long as you use a good primer and the right paint! So, check out this simple way to get a durable and professional finish!
A white dresser works for both modern and vintage styles and can instantly brighten up any room. If you want to give yours a clean and sleek look, you’re in the right place!
If you haven’t tried white paint yet, consider this your sign! Not only does it create a clean and fresh appearance, but it also allows you to easily incorporate it into any room decor. Plus, it’s a classic color that never goes out of style!

So, we found a set of dressers… and thought it would be fun to have a little friendly competition between my wife and me. Now it’s my turn to work on this tall one, and you get to decide who did it better!
Follow along for the whole process of painting a dresser white! We have a few tips and tricks to make this project as smooth as possible. We did leave the drawers natural for a beautiful contrast. Keep reading to see the transformation!

Supplies Used for Painting a Dresser White
As an Amazon Associate, I earn from qualifying purchases. I also may earn from other qualifying purchases with other companies or get free product to review and use. All opinions are my own.
- Electric Screwdriver
- Flexible Drill Bit Extension
- Cordless Drill
- Wood Glue
- Clamp
- Krud Kutter and a Damp Rag
- Shop Vac
- Wood Filler
- 220 Grit Sandpaper
- Tack Cloth
- Painters Tape
- Pre Taped Plastic
- Citristrip
- Plastic Wrap
- Cheap Paintbrush (for the stripper)
- Sponge or Steel Wool
- Mineral Spirits
- Lint Free Rags
- BIN Shellac Based Primer
- SurfPrep Sander (Use code RAY10 to get 10% off your order!)
- Fine Grit Foam Sanding Pad (Use code RAY10 to get 10% off your order!)
- General Finishes White Enduro Poly
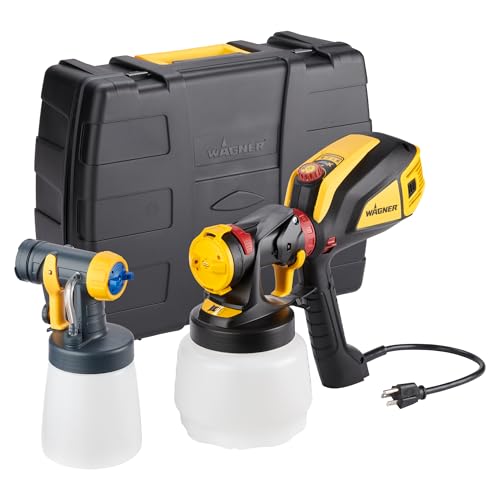
- Paint Sprayer
- Respirator
- Polyurethane Topcoat
- Tile Grout Sponge and Pantyhose
- Small Detail Paintbrush
- DIY Leather Pulls
Grab our list of 10 must have painting furniture supplies here, too!
Prep Before Painting a Dresser White
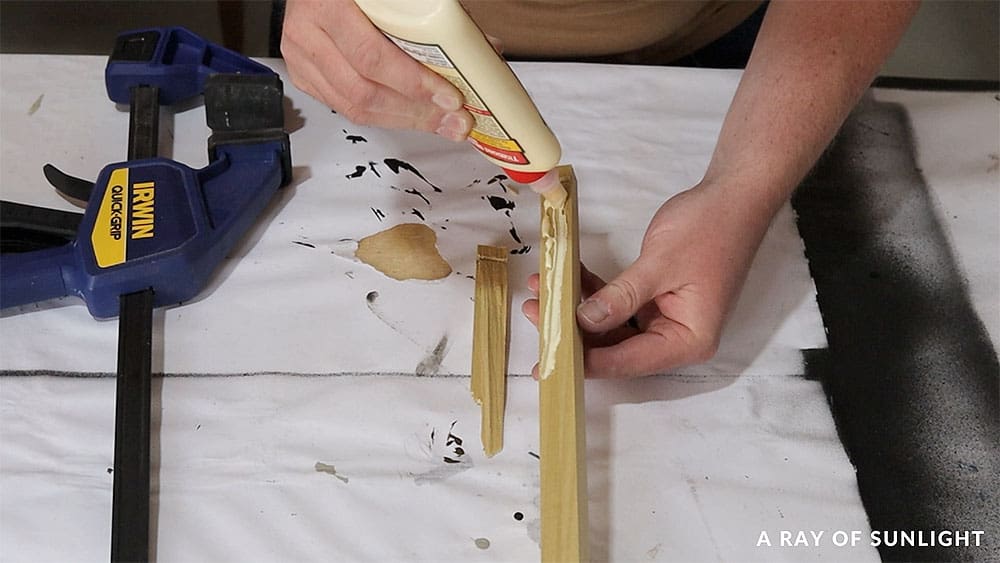
Just like any makeover, we had to do the prep work. Here’s exactly how to prepare furniture for painting. I got started by removing the old hardware and then fixing the drawer.
The top drawer track was cracked, so I glued it back together and clamped it. When the glue was dry, I screwed the track back. Here are other broken dresser ideas to inspire you to fix and transform your old pieces.
It was a really tight spot, and my small screwdriver wouldn’t fit in the back, so I used a handy little flexible drill bit attachment to screw it back in back there.
Then, I used some Krud Kutter and a damp rag to remove all the nasty dirt and grime. I also took some time to vacuum out the drawers and the inside of the dresser. Check out our guide on how to clean furniture before painting here.
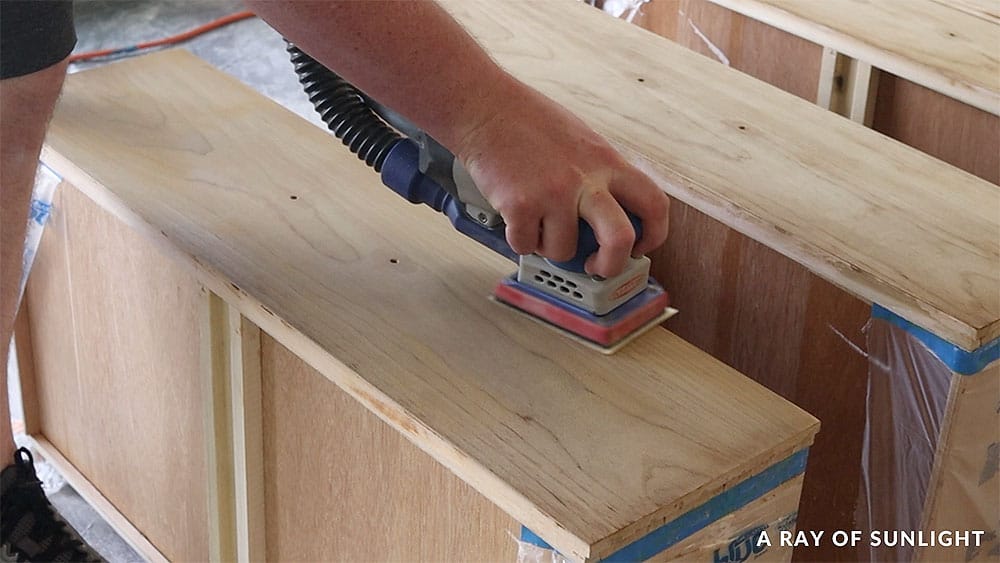
There were also a few minor dings and scratches that I filled in with a little wood filler. When it was dry, I sanded the areas that I filled, and I scuff sanded the rest of the piece with 220 grit sandpaper. Check out the best wood fillers here and learn the importance of sanding before painting furniture here.
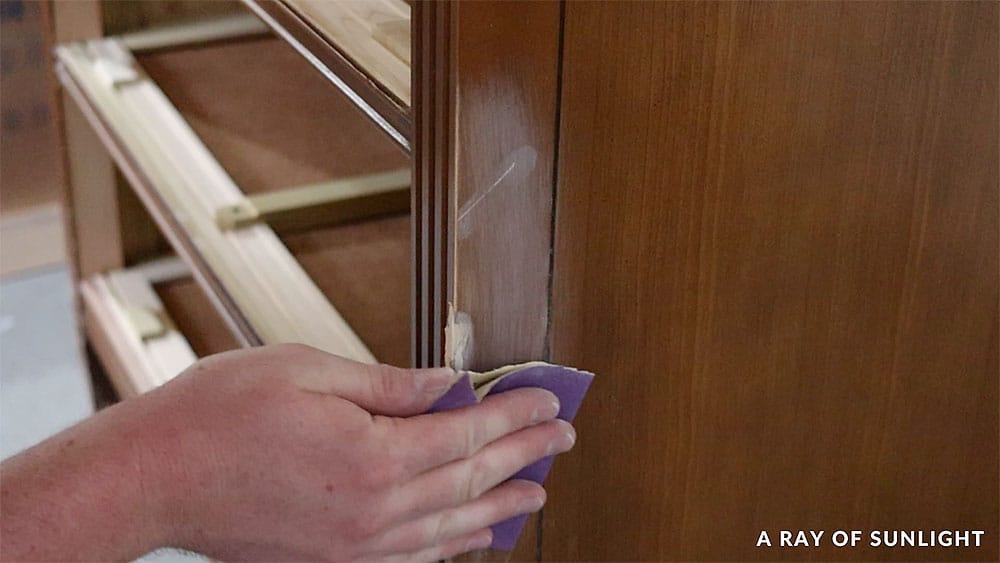
Then, I vacuumed off the dust and wiped off any remaining residue with a tack cloth.
Removing Wood Stain
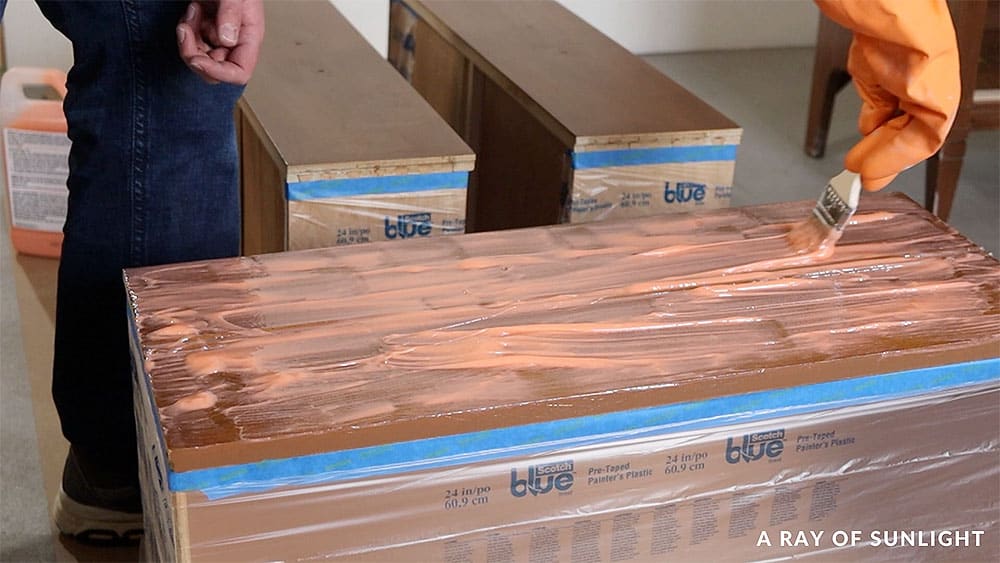
To get the 3 bottom drawers ready to be stripped, I put small pieces of tape on the inside of the hardware holes to help keep the stripper from dripping into the drawers. And then, I wrapped the drawers with pre taped plastic.
Now, I was ready to generously apply Citristrip on the drawer fronts. We love this stuff because it doesn’t have the harsh smell that some other strippers do!
One trick that Natalie has taught me is to cover the stripper with plastic wrap and let it sit overnight. This keeps it from drying out too fast and lets it work its magic on the wood a little bit longer. The next day, I removed the plastic wrap and scraped the stripper off the drawers.
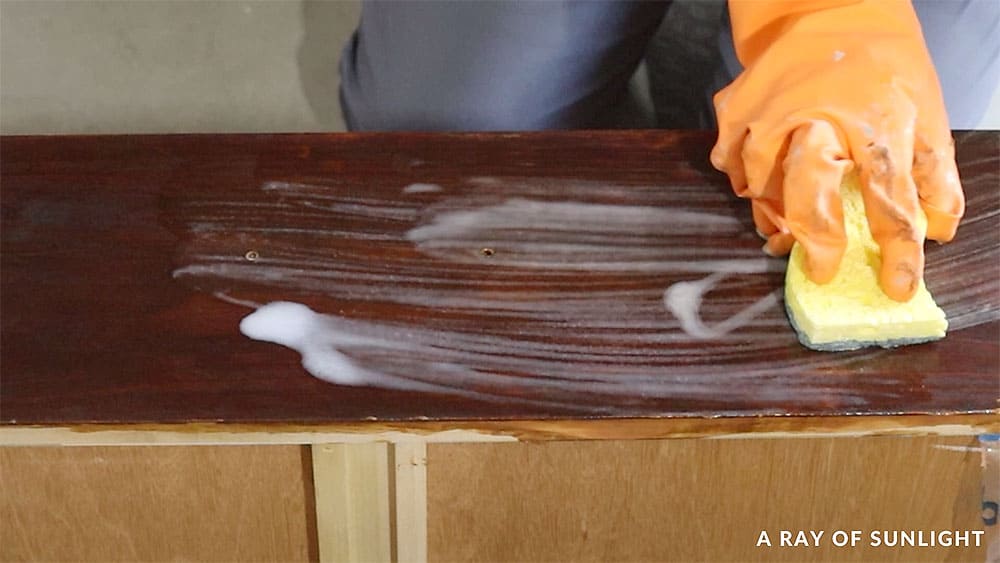
Then, I used a sponge and some mineral spirits to scrub the drawer fronts to remove the stripper residue. We usually use steel wool for this part, but we didn’t have any, so I made a sponge work.
Learn more tips and tricks on how to remove wood stain here, and check out the best tools for removing paint or stain from wood here.
It took a few days for the wood grain to dry out to see how the drawers looked, so we went back to work on the rest of the piece and moved it outside to prime it.
Priming Dresser Before Painting
I sprayed 2 coats of BIN shellac based primer all over, letting it dry for 30 minutes between coats. Check out this painted armoire makeover where we also used BIN shellac.
Not only does primer help with adhesion, but it also helps with coverage. This specific primer helps stop stains from coming through paint…especially with white like I planned to use with this piece! Learn more about how to choose the best primer for painting furniture here.
When the second coat was dry, we moved the dresser back into the garage, and I lightly sanded down all of the primed surface to make it nice and smooth.
I personally have a fear of sanding primer too far and having to redo it again and again, so I did it pretty lightly. Check out the best sanders for furniture to invest in here!
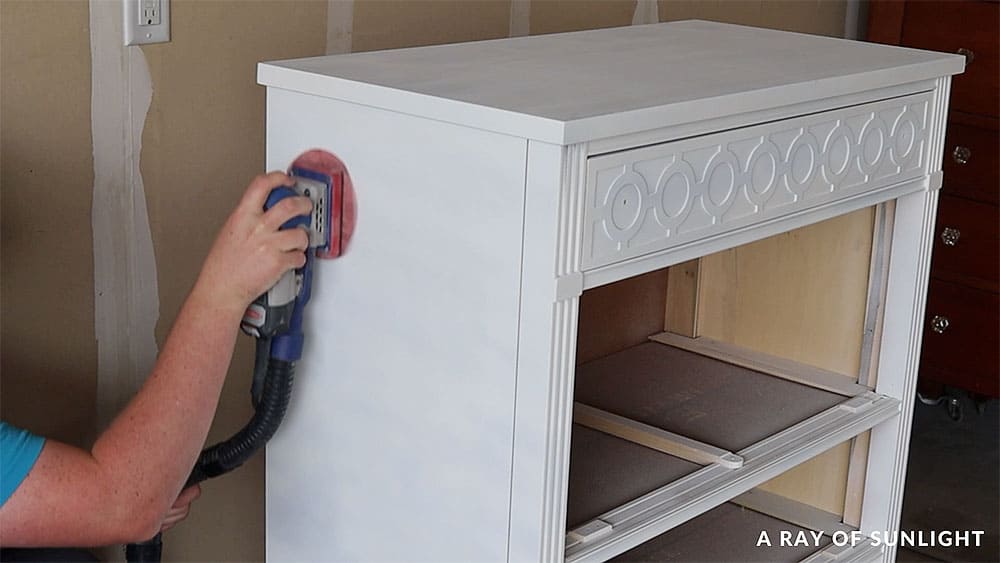
And, of course, I cleaned off all that dust I created while sanding with a vacuum and tack cloth again.
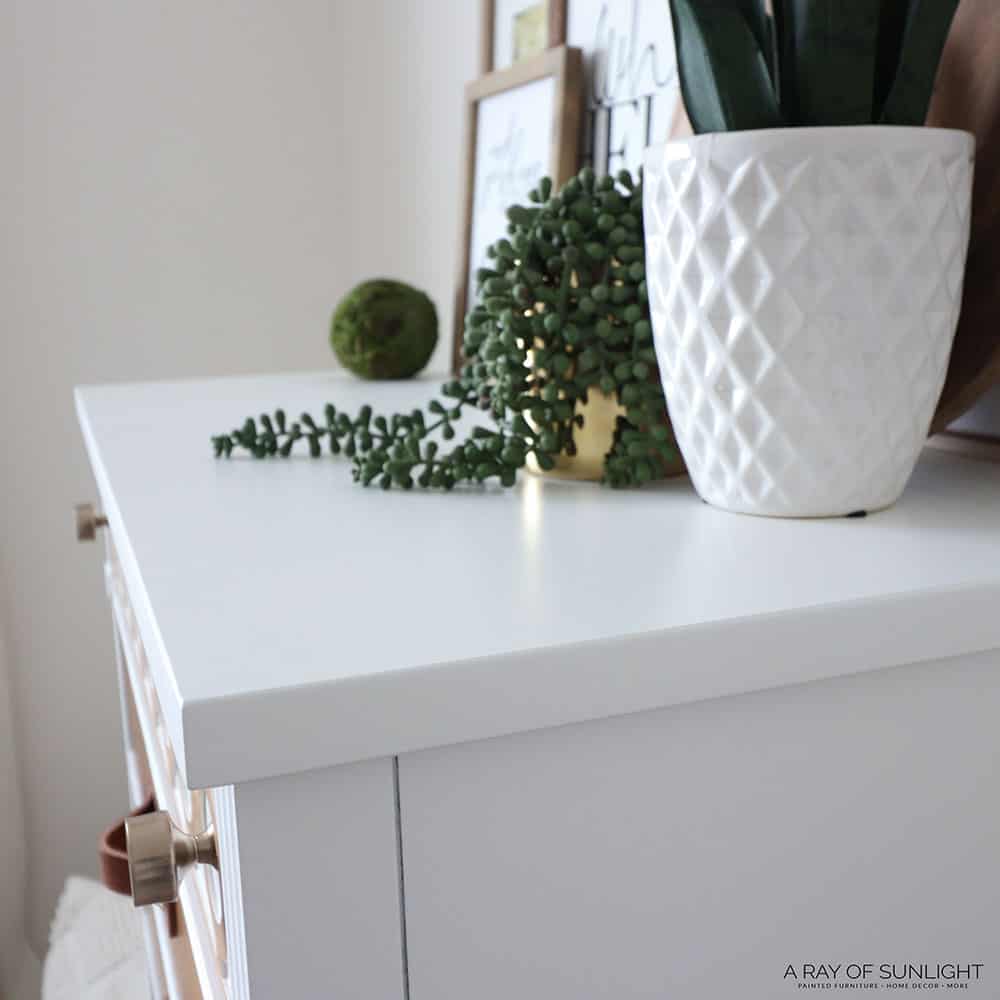
Painting Dresser White
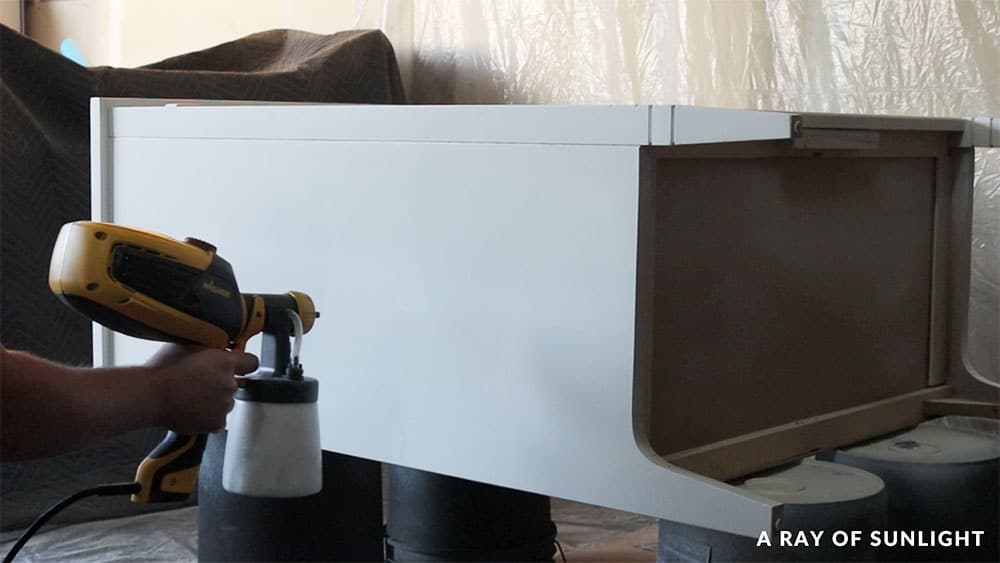
For this dresser, I used General Finishes White Enduro Poly and mixed it really good. It doesn’t need a topcoat, and it’s already thin, so you don’t have to thin it before putting it in the sprayer, which makes my life as a beginner so much easier.
Here are more best white paint for furniture options for you! Check out the best paints for wood furniture and the best HVLP paint sprayers for furniture here. You can also see how I used Black Enduro Poly in painting a dresser black!
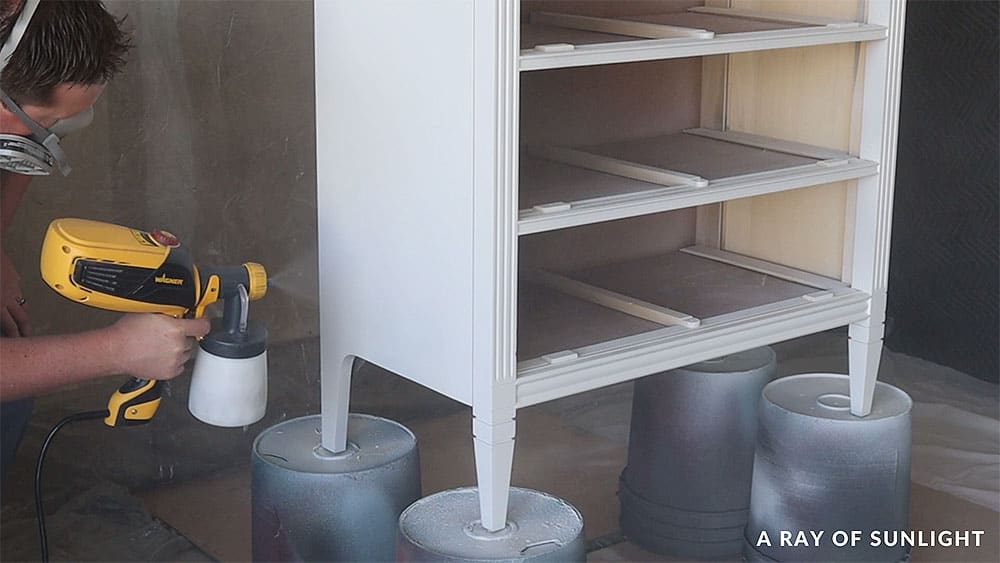
I was pretty happy with how well it sprayed on…until I looked a little closer and saw a nice drip on the side by the leg. So, I rubbed it out with my finger as much as I could while it was wet, and then I sanded it down smooth after it dried.
Would you like to save this?
The rest of the piece felt a little more textured than I prefer, so I also did a quick hand sanding job with a fine grit foam pad. Then I cleaned all the dust off and sprayed a second coat…and whoopsie!!!! I thought the first coat dripped badly, but the second one had some pretty thick drips and runs.
So, I brushed those drips out the best that I could, waited for them to dry, and sanded them back down smoothly. Check out my guide on how to fix spray paint drips here to learn more about this process.
Then, I figured that, I better test out the sprayer and lower the amount of coating that came out. After that, I sprayed the third coat, and it went on so much better with no drips!
The finish felt pretty good after 3 coats, but I did rub a brown paper bag all over just to smooth it out a little bit more. The top also still felt a bit rough from the overspray that settled on it.
So, we laid the piece on its back and sprayed the top and sides with a 4th coat, hoping it would be smoother as it dried vertically instead of horizontally…and it worked! Get more tips and tricks on how to paint a dresser for a stress free makeover.
Refinishing Dresser Drawers
There were a few spots where the finish on the drawers didn’t come off all of the way. So, I sanded that off with 220 grit sandpaper.
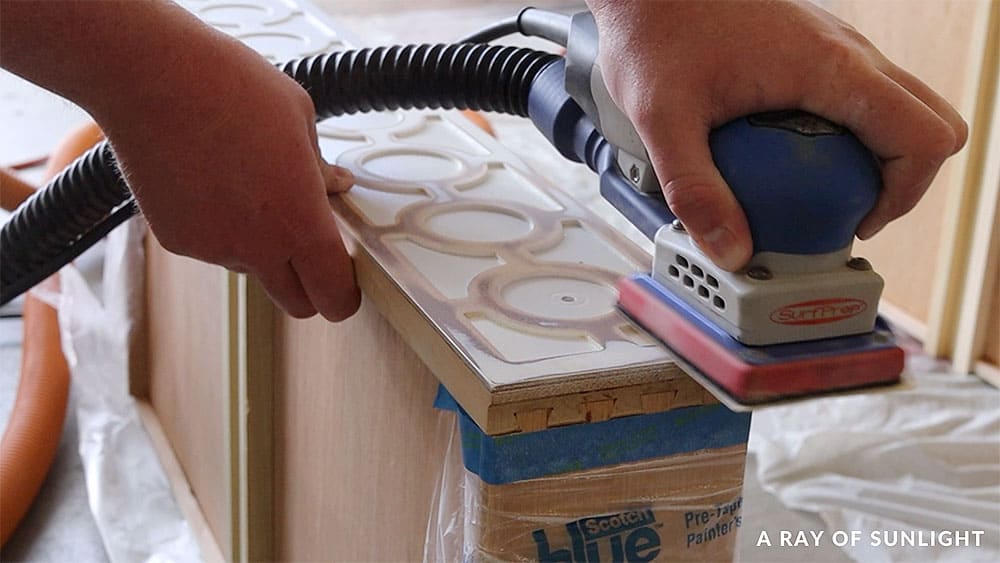
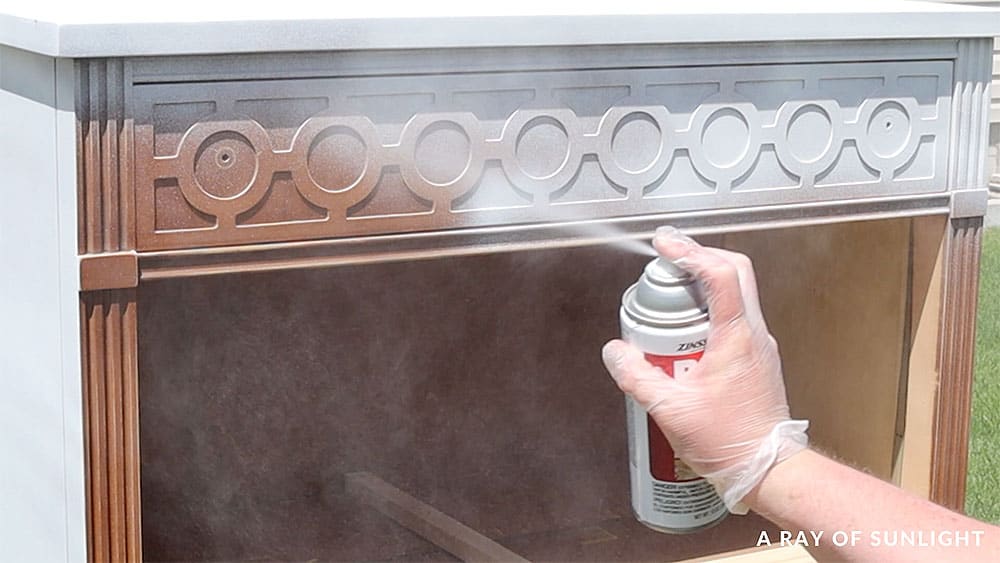
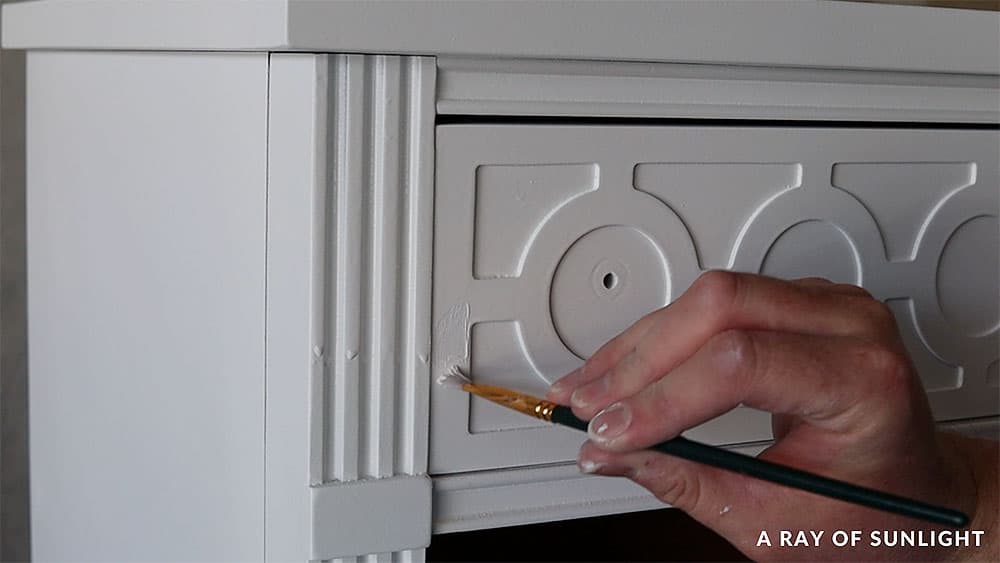
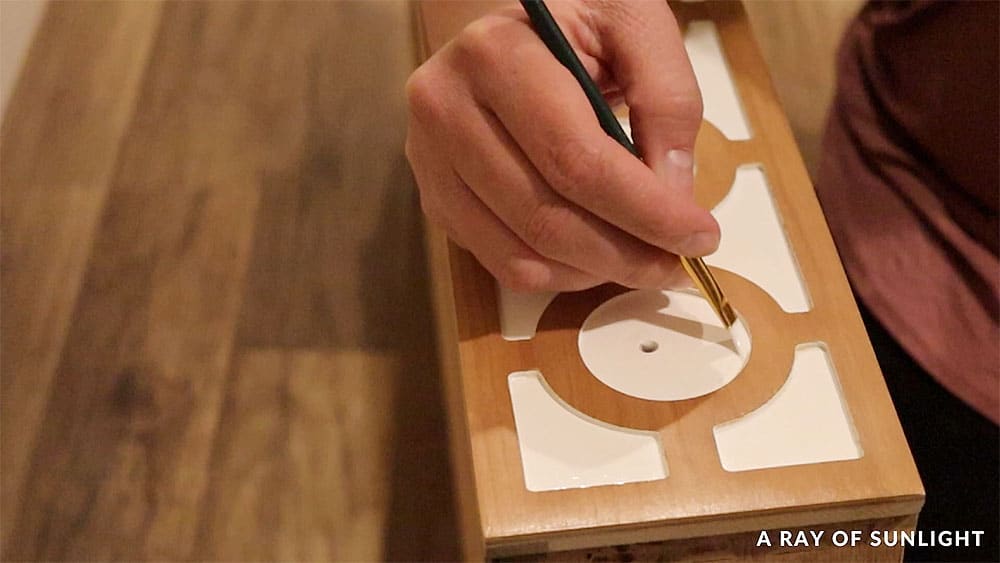
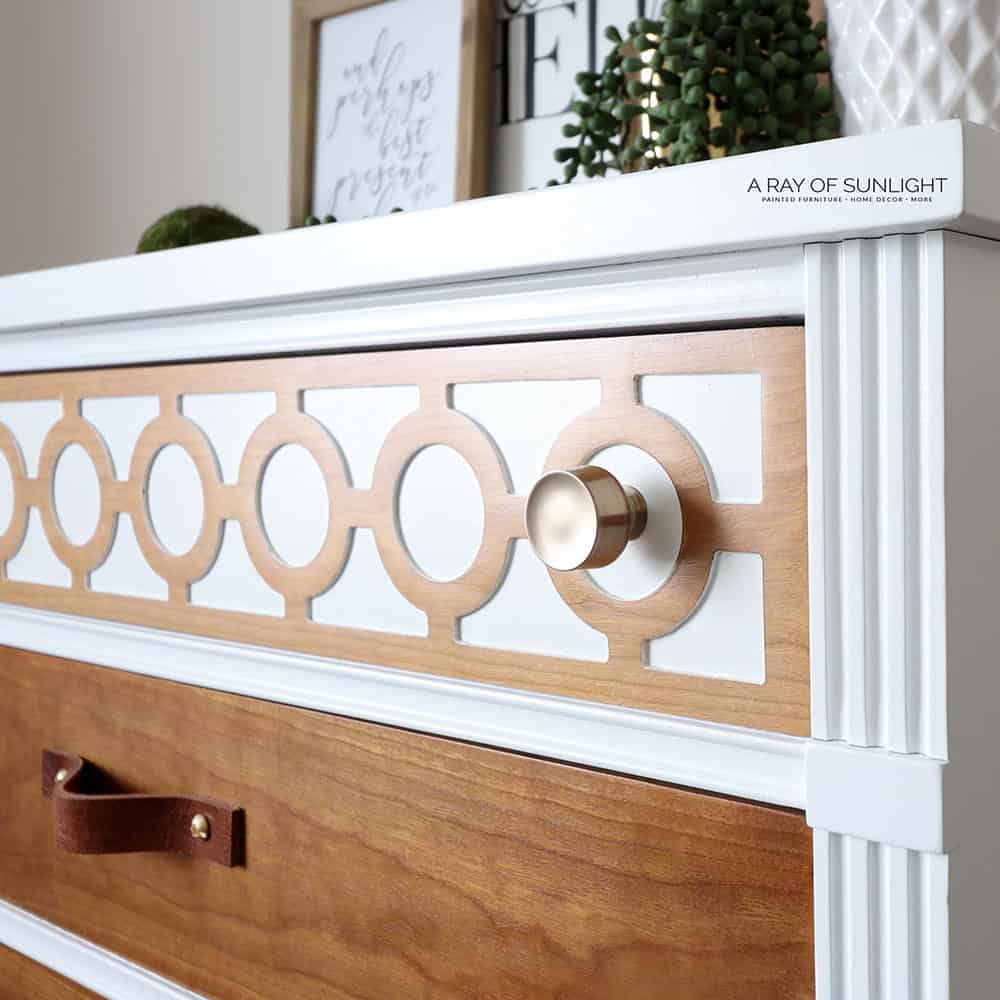
Oh, and remember this top drawer with all the detail on it that we coated white!? Well, I stole Natalie’s idea to sand the raised part bare and leave the white in the recessed areas. Here are the best sanders to remove paint you can use.
Then I cleaned all the drawers off and gave them 3 coats of Varathane polyurethane for a topcoat… Learn all about the best polyurethane for furniture here and how to apply polycrylic to painted furniture here.
But when I wiped the poly over the wood detail on the top drawer, I accidentally got poly on some of the white areas, too. And the poly had somehow picked up the dust from the wood, so it wasn’t clear anymore.
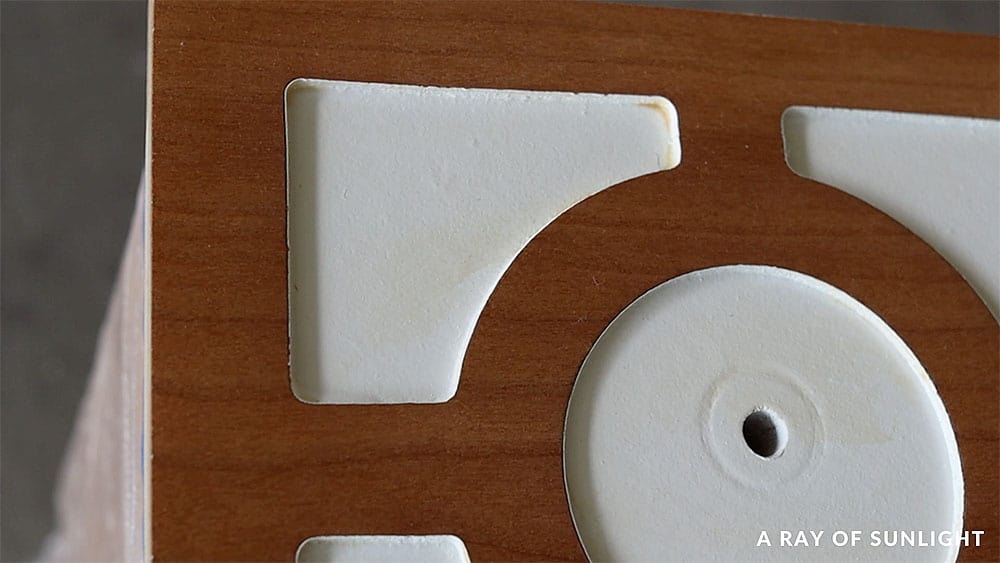
And since Natalie has a much steadier hand than me, she offered to fix my mistake and touch up the white parts for me. And I think it looks so much better now!
Adding DIY Leather Pulls
All this piece needed now was some new hardware! I wanted to try these leather pulls that you might have seen Natalie use on some of her other makeovers.
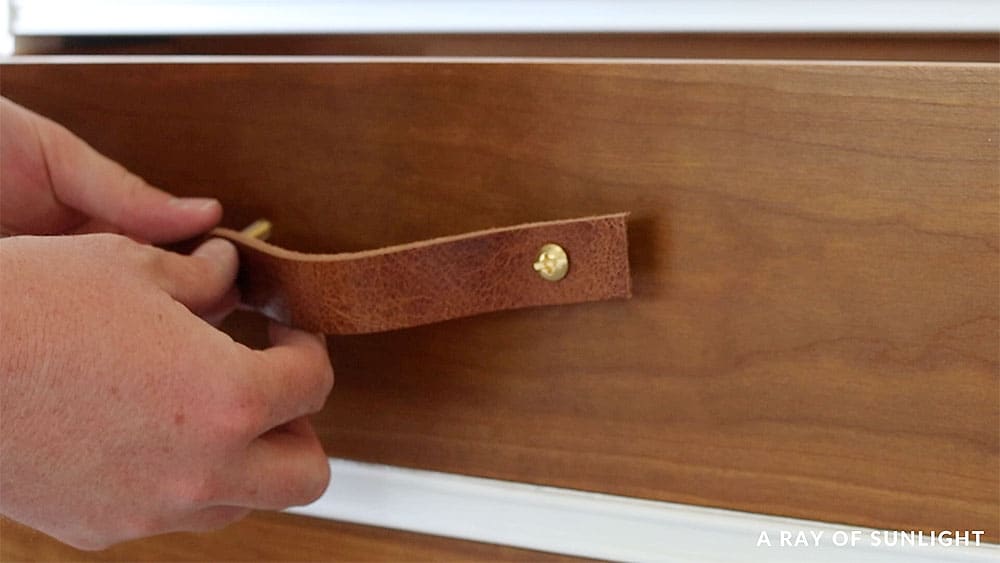
The bolts were a little big for the existing hardware holes, so I used a drill bit to make the holes slightly bigger. Learn how to make these DIY leather pulls here!
Watch the full makeover in our YouTube video below, or scroll down to see what it looks like now!

More Before and After Makeovers
See All >
Click any of these “before” photos below to view the “after” of that makeover.


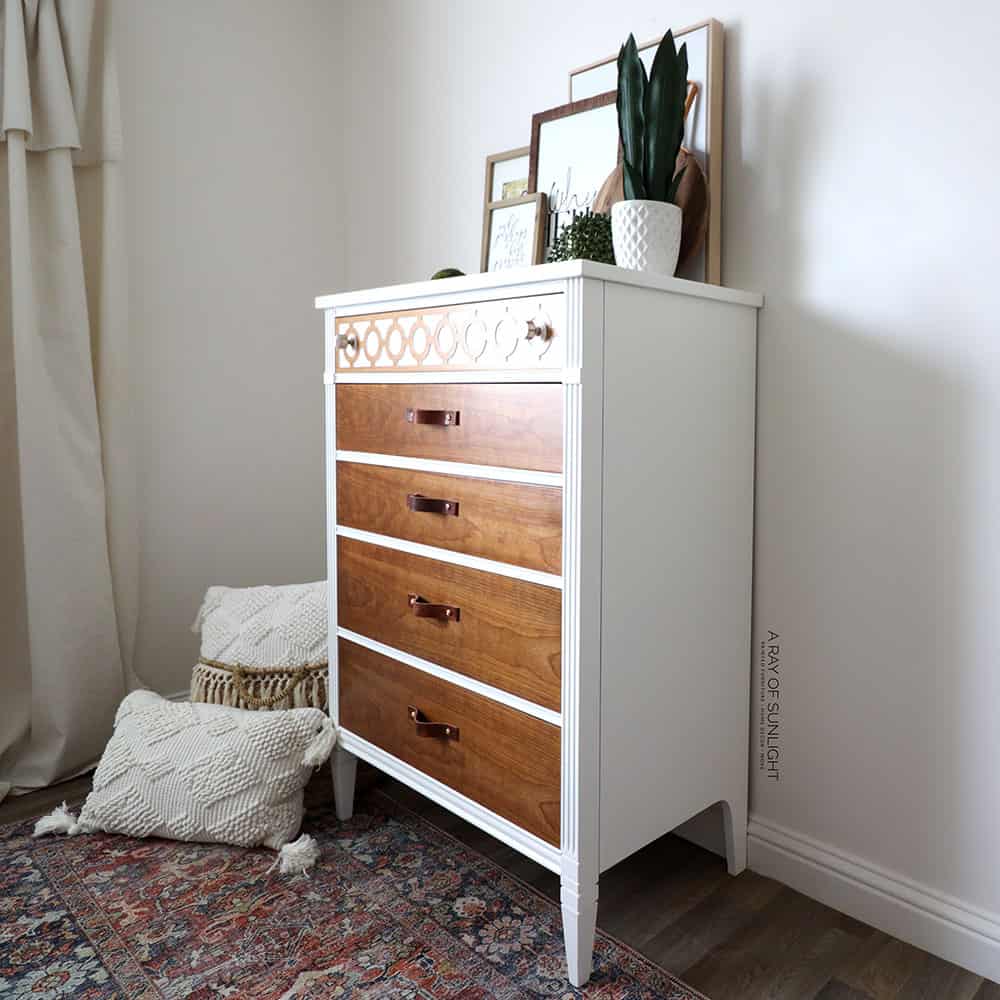
I personally love the white with the contrast of the natural drawers and the leather pulls. I think this is my favorite makeover I have done yet…even though it’s only my third one! For another two toned makeover here’s two toned painted and stained furniture.
If you’re wondering is two toned furniture in style, check out this post to learn more. Here’s our list of dresser drawer painting ideas to make these compartments pop.
Get more white painted dresser ideas here, and if you want more unique and colorful pieces, check out these creative dresser ideas and ombre chalk painted furniture.


Do I need to prime wood before painting white?
You might want to get the project done faster and be tempted to skip priming. After all, it’s just an extra step that can seem unnecessary. But trust me, priming is an important step that you don’t want to skip when painting wood furniture white.
Like we mentioned above, priming helps with adhesion and coverage. Without it, the coating may not stick as well to the surface, and you could end up with a patchy or streaky finish. And let’s be honest, that’s not a look anyone wants.
But most importantly, priming prevents any tannins or stains from appearing through the finish. This matters even more with lighter colors since any discoloration will stand out. You’ll want to put up a barrier to keep them from ruining all your hard work.
So make sure to invest in a good quality primer, and don’t skip this step – it will save you time and frustration in the long run. Here’s more on why is yellow coming through white paint and how to stop it from happening. Learn all about priming wood for painting in this post.
But the real question is… do you like my dresser or Natalie’s better (see hers in this painting a dresser post)!?

Painting a Dresser White
Here are the steps for painting a dresser white with a durable and professional finish.
Materials
- Wood Glue
- Krud Kutter
- Damp Rag
- Wood Filler
- 220 Grit Sandpaper
- Tack Cloth
- Painters Tape
- Pre Taped Plastic
- Citristrip
- Plastic Wrap
- Cheap Paintbrush
- Sponge
- Steel Wool
- Mineral Spirits
- Lint Free Rags
- BIN Shellac Based Primer
- Fine Grit Foam Sanding Pad (Use code RAY10 to get 10% off your order!)
- General Finishes White Enduro Poly
- Polyurethane Topcoat
- Tile Grout Sponge
- DIY Leather Pulls
Tools
Instructions
- Prep your furniture for paint by removing old hardware and making necessary repairs. Clean inside and out of the dresser using Krud Kutter, a damp rag, and the vacuum. Fill in any scratches with wood filler then sand/scuff sand the dresser with sandpaper.
- Get the drawers ready to be stripped by wrapping them with pre-taped plastic and putting tape inside of hardware holes. Apply Citristrip and leave overnight. Remove the plastic wrap and scrape the stripper off. Scrub off stripper residue with a sponge and mineral spirits.
- Apply 2 coats of BIN Shellac Based Primer on the dresser, letting it dry for 30 minutes between coats. Lightly sand primed surface to make it nice and smooth.
- Mix General Finishes White Enduro Poly and spray 3-4 coats to the dresser. Watch out for paint drips. If there are any, brush those drips out, wait for them to dry, and sand them back down smooth.
- Sand and clean drawers, then seal with 3 coats of polyurethane.
- Attach the DIY leather pulls to your white painted dresser.
Recommended Products
As an Amazon Associate and member of other affiliate programs, I earn from qualifying purchases.


More White Painted Furniture Makeovers
- How to Paint a Dresser White
- Painting Furniture White
- DIY Whitewash Dresser
- How to Paint Furniture High Gloss
- How to Chalk Paint Furniture White
Learn the Art of Updating Furniture!
If painting furniture feels overwhelming or your past attempts didn’t go as planned, this course will guide you step by step.

Follow us on YouTube to get more tips for painting furniture. Or share your project with us on our Facebook Group and be part of our community. See you there!
TOTALLY, LOVE THE WHITE & NATURAL WOOD.
BEAUTIFUL!!!
PRESERVED THE BEAUTIFUL OF THE ORIGINAL VINTAGE PIECE; ADDING, A TOUCH OF CLASS💝
Thank you so much for the love Rose! I agree with you completely on this one. <3
Both the dresser and the chest of drawers came out wonderfully, but being asked to choose, I choose the chest of drawers. It really shines!
Thanks for the love on our makeovers Susan!!