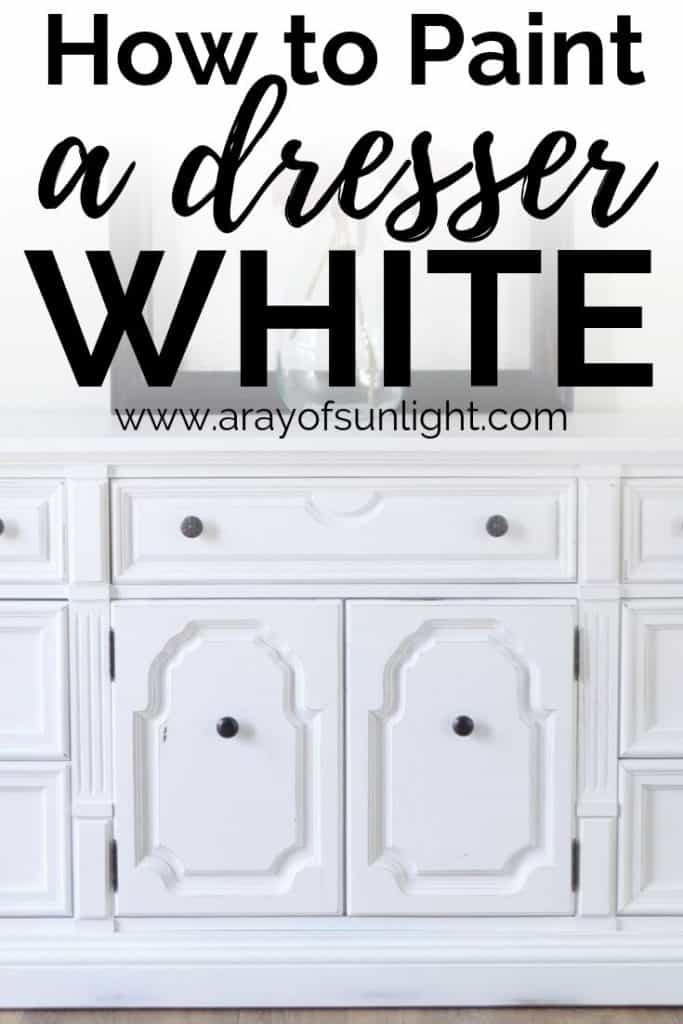
How to Paint a Dresser White


Are you tired of your old ugly furniture and want a painted white piece instead? Learn how to paint a dresser white with this easy makeover! A fresh light coat can give your dresser a new look and bring a bright, refreshing vibe to your room.
These DIY dresser makeover ideas can work for both shabby chic and modern styles, so if you’re looking to update your dresser, painting it white is the way to go!

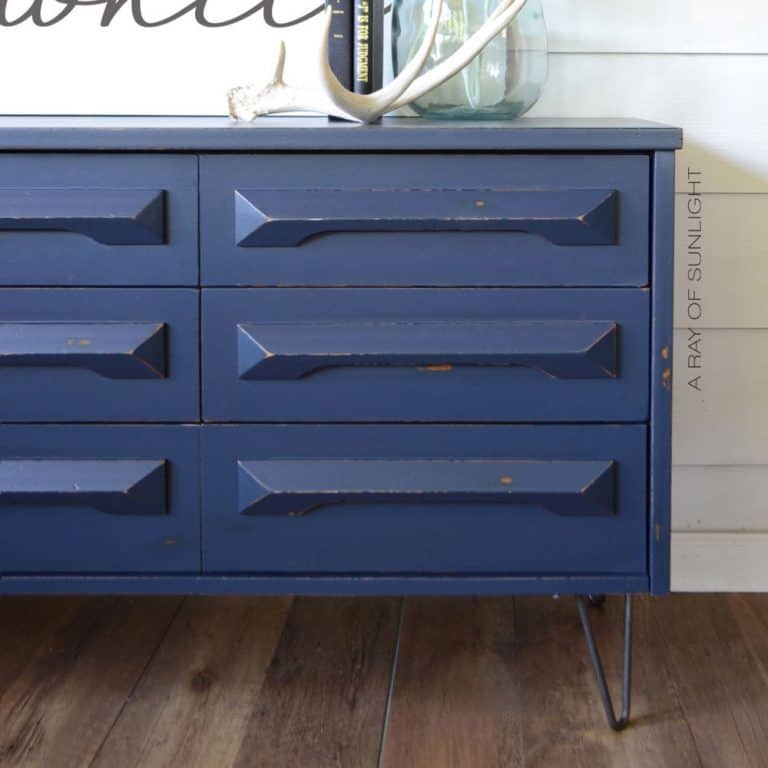
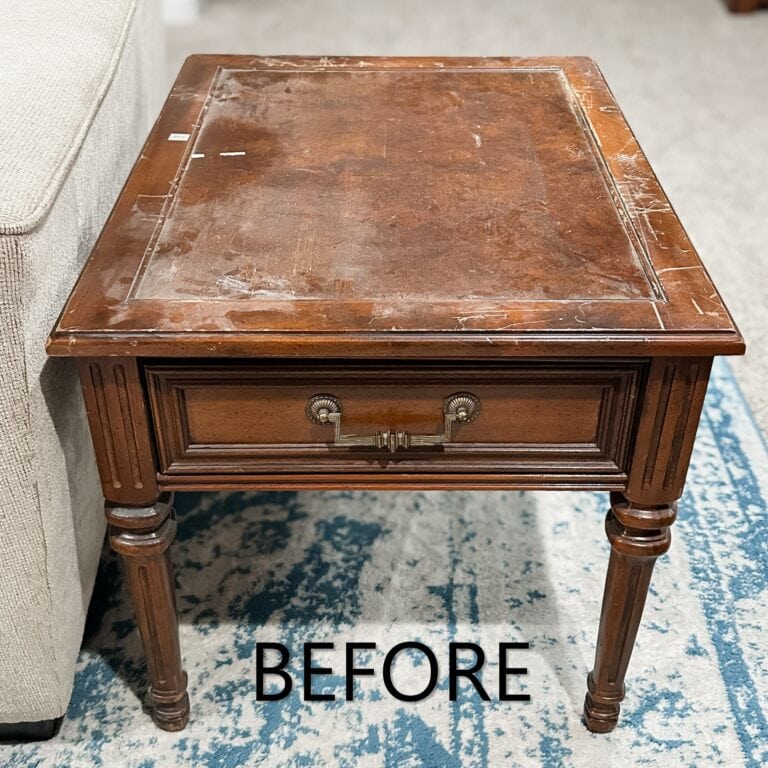
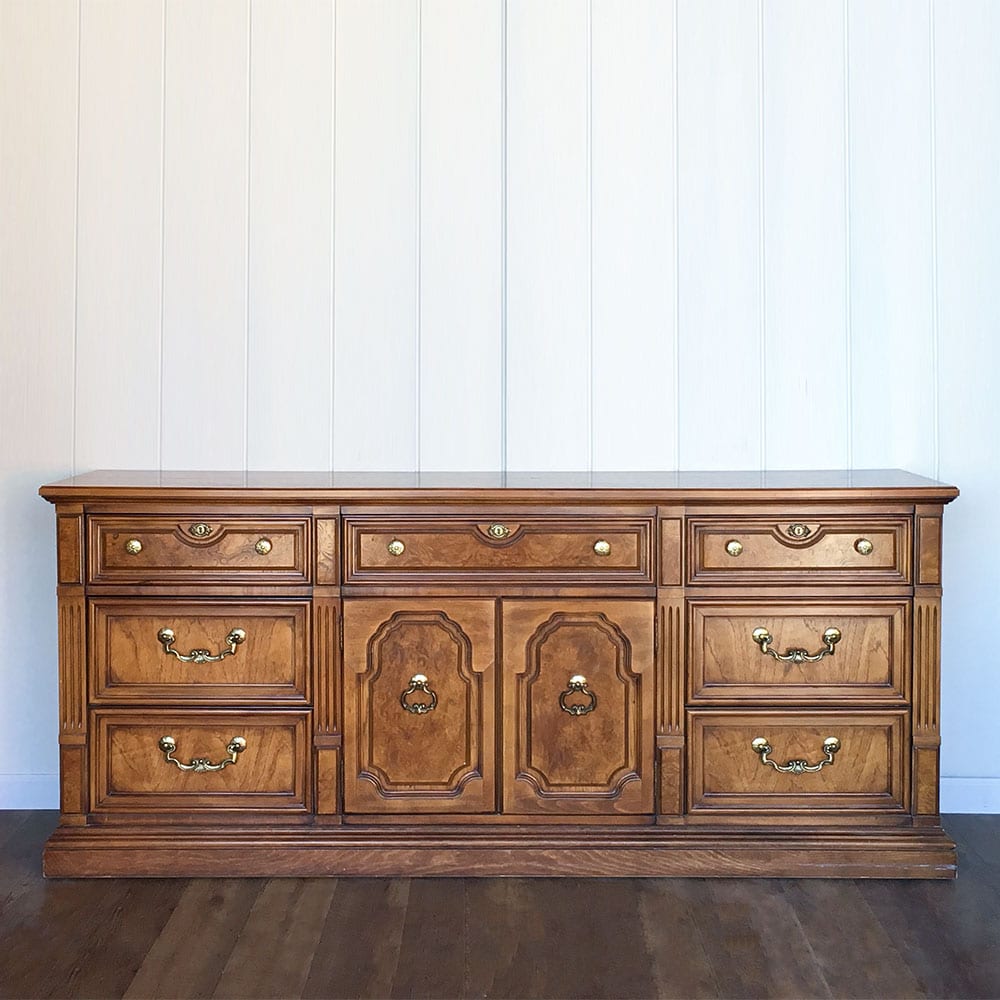
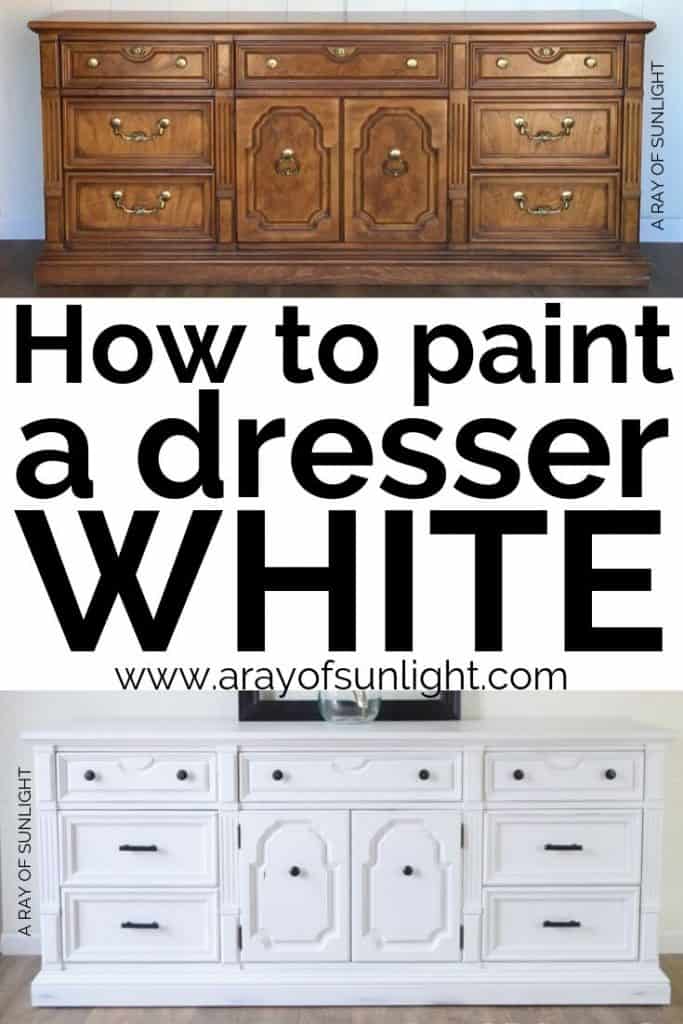
Above is what the piece looked like before the makeover. We recently refinished this stunning Thomasville Dresser that we had for 6 months! I can’t believe we waited that long to bring it back to life because it sure didn’t disappoint in this light shade!
It was solid, super well built, and in excellent condition. The only problem was the old and outdated orangey wood finish. The wood grain was pretty, but the vintage Thomasville drawer pulls were a little bit much for me. Look at how big and ornate they are!!


White is just so fresh, and I knew this piece was going to look fantastic in this bright shade. Plus, this color is versatile and can easily match with any decor style. So, let’s dive into how to paint a dresser white and give it a beautiful makeover!

Supplies Used to Paint a Dresser White
As an Amazon Associate, I earn from qualifying purchases. I also may earn from other qualifying purchases with other companies or get free product to review and use. All opinions are my own.
- Krud Kutter
- 220 Grit Sandpaper
- Shop Vac
- BIN Shellac Based Primer
- Wagner Paint Sprayer
- Behr Latex Paint
- Calcium Carbonate Powder
- Waterbased Polyurethane
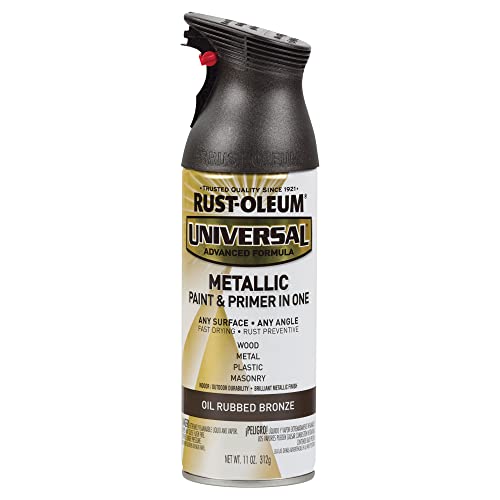
- Rustoleum Metallic Spray Paint
Grab our list of 10 best painting furniture supplies you must have so you’re fully prepared for your next DIY project!
Prepping For New Coat
Start by removing the hardware. Then, you’ll want to clean off the dresser really well with something that will remove grease, grime, and build up. I use Krud Kutter for this because it cuts through all of these things so easily. Read this post to learn more about how to clean furniture before painting.

Then, fill in the old hardware holes (more about the best way of filling holes when replacing cabinet or furniture hardware here.) Once the filler is dry, sand down the filler with 220 grit sandpaper until it is smooth and flush with the rest of the surface.
To help the finish stick to the wood, lightly sand everything by hand with 220-grit sandpaper. You don’t need to go down to bare wood by any means. But you do need to scuff up the surface so the new coat has something to hold onto.
Learn all about sanding before painting furniture here and sandpaper for furniture painting here. And learn more about how to prepare furniture for painting here!
Vacuum off all of the dust and wipe it down with a clean, damp rag afterward.
How to Remove Drawers from Thomasville Dresser
A quick little sidenote: If you’re specifically working with one, you may be having a hard time with the drawers. On this piece and another one I have worked on, the drawers seemed stuck. But they really just needed a good straight pull to get them out.
Before trying to put all your muscle into pulling these drawers out, double and triple check that there isn’t a latch or lever on the underside of the drawer or even on the side drawer slides (depending on your drawers).
If your drawers are still giving you trouble, here’s a guide on how to repair worn drawer runners because the runners may be the reason.
How to Prevent Bleed Through
The last step in prepping is to prevent bleedthrough, AND it’s the most important step to a light colored makeover.
What?? If you skip this step, your white coating will end up with yellow, pink, or brown splotches or stains all over. Sometimes, you won’t notice it until after it is completely done! Here’s why is yellow coming through white paint to know the reasons behind this common problem.
And then you have to start all over to get these stains to go away, and no matter how many coats you do, these stains will just keep reappearing. Unless you take this step to prevent it!
This step is really simple, though! Grab a can or two of this BIN shellac based primer. Then apply at least 2 coats of it, all over. Wait a few hours in between each coat, and then, for best results, wait overnight after the second coat.

It works the very best if it has a chance to really dry! Here’s Cover Stain VS BIN Shellac Primer for a comparison with another primer and to learn more about the similarities and differences between these two primers.
Check out more options for the best primers for painting furniture (and how to choose the right one) here, and learn more about how to stop stains from coming through paint in this guide.
Using a Paint Sprayer
After a couple of years doing DIY projects, I invested in this cheap Wagner sprayer. I can’t believe I waited so long to get one!

(The Double Duty sprayer has been discontinued, but there’s a newer and similar model, the Wagner Control Spray 250 sprayer.)
Not only does it make the process faster, but it also provides a smooth, brush free, even finish on all of my pieces! Plus those dreaded chairs or super detailed pieces are a breeze!
You NEED to have it in your life if you’re doing DIY projects very often. It’s cheap and doesn’t need an air compressor. It basically pays for itself, even if you’re doing just one or two large projects!
Learn how to use a paint sprayer on furniture here, and check out more of the best HVLP paint sprayers for furniture here. But don’t worry if you don’t have an HVLP gun because you can also get a brush free finish with just a brush – learn how to paint furniture without brush marks in this post.
Using Homemade Chalk Paint
One of my go-to is this homemade chalk paint recipe made with Behr paint and calcium carbonate powder. Because I use Behr, my color options are endless, like these dark navy blue nightstands from this painting furniture with latex paint makeover.

Would you like to save this?
But for this project, I went with the plain and simple “Pure White”. Yep, I just walked up and grabbed a can of flat interior paint in Ultra Pure White at Home Depot, and continued on with my shopping. Check out my lists of the best white chalk paint for furniture here and the best white paint for furniture here for more options.
No need to tint it – it’s already a great shade, plus I hate when the line is so long just to get one can tinted.
When using my Wagner sprayer, no matter the exact paint, I thin it out, but it’s super simple and beats using a brush on a huge project. Learn how to thin paint for a Wagner sprayer in this post.

You can use any brand in the sprayer, too! I just always stick to waterbased products for easy cleanup. In this painting a dresser white makeover, we painted it with General Finishes White Enduro Poly. In this painting furniture white post, we used Sherwin Williams Emerald Urethane Trim Enamel.
Spray Painting Dresser White
We took the dresser and drawers outside to our favorite work area. It’s in the rocks in a wide-open area, so I don’t get overspray on anything that shouldn’t get coated. Learn more about how to prevent overspray when painting furniture here!
We laid down a few cheap dollar tree shower curtains with wood blocks on each corner to keep the plastic from blowing away and put the pieces up on 5-gallon buckets and a box. I like to have them up a bit, and those 5-gallon buckets do the trick.
I’ve used the same ones for many years now, and they are still holding up! The best part is that I got them for free from a paint company after a project. Check out more spray paint tools you need here.
Spray about 3-4 thin coats to prevent any dripping. White paint is notorious for having bad coverage. Thankfully, the BIN primer used to prevent bleedthrough also helps with getting full coverage!

Once all the coats are dry, grab more 220 grit sandpaper and lightly sand along all the edges and flat surfaces to provide an even smoother finish as well as create a distressed look. Learn more about the 6 best distressing furniture techniques here, including sanding! Vacuum off the dust and wipe it away.

Topcoating White Dresser
Chalk paint is very porous and needs to be sealed with something. My very favorite and the most durable product is 3 coats of Varathane polyurethane.
For the best looking finish, I spray the waterbased polyurethane on. Learn ALL of my tips and tricks on how to spray polyurethane here! Here’s can you put polycrylic over chalk paint to learn more about polycrylic as a topcoat. You can check out your other options for topcoats for painting furniture here.

Last but not least, update the old vintage hardware with new modern hardware. I opted to reuse the original knobs, so I sprayed all of the hardware with Rustoleum Metallic Spray in Oil Rubbed Bronze before attaching it all back. Here’s our guide on how to paint drawer pulls!
The contrast between the hardware and the dresser looks so good! I couldn’t believe how it went from being an okay piece to being a completely stunning item that sold within a few hours of being listed for sale.
For the farmhouse lover, add a weathered wood look to the top! We’ve done this on these farmhouse end tables (in this post about how to create a weathered wood gray finish) and on a white painted coffee table!


More Before and After Makeovers
See All >
Click any of these “before” photos below to view the “after” of that makeover.


Get more white painted dresser and white painted furniture ideas here. For more classic colors, here are black and white dresser ideas and black and white painted furniture ideas.
Check out some more DIY 9 drawer dressers here for inspiration, or some of our favorite chalk style makeovers with these chalk paint dresser ideas.
How to Repaint a Dresser White
You should first assess the current condition of the finished piece. If the coating is peeling or scratching easily, you should remove it first. This will make the new coat adhere properly and create a smooth finish.
You can remove the old finish by using a chemical stripper, sandpaper, or a combination of both methods. You can learn all about how to remove paint from wood furniture here.
If the old piece is in good condition and does not scratch easily, you can skip the step of removing it. But make sure to lightly sand the surface with 220 grit sandpaper. This will roughen up the surface a bit for the new coat to stick better.
Do the prep work as usual, from cleaning to priming. Then, you may need four or more coats for full coverage, especially if you are going from a dark color to light. If you’re working with a light colored piece, two to three coats may be enough.
Don’t forget to protect the new finish with a topcoat! Learn more about sealing painted furniture in this post. And if you want to try a different color, check out our dresser paint color ideas for inspiration. Here are more chalk painted bedroom furniture ideas you can recreate!


White furniture is a classic and timeless look that can easily brighten up any room. Whether you’re beginning with a bare wood piece or refreshing an existing color, following these steps on how to paint a dresser white will help you create a beautiful and durable finish.


How to Paint a Dresser White
Give your old ugly furniture a fresh and new look with easy and simple steps. Here's how to paint a dresser white.
Materials
Tools
Instructions
- Remove old hardware and clean the dresser with a degreaser to remove any dirt, grime or gunk.
- Fill in the hardware holes with wood filler then once the filler is dry, sand it down until it is smooth and flush with the rest of the surface.
- To help your paint stick to the wood dresser, lightly sand the rest of the dresser by hand. Vacuum and wipe off the dust.
- Paint 2 coats of primer to prevent bleedthrough. Wait a few hours in between each coat, and then for best results, wait overnight after the second coat.
- Mix up latex paint with some calcium carbonate powder to make homemade chalk paint.
- Paint 3-4 coats of white chalk paint onto the dresser. Once all the paint is dry, grab more sandpaper and lightly sand along all the edges and flat surfaces to provide an even smoother finish as well as create a distressed look.
- Seal the white chalk painted dresser with 3 coats of waterbased polyurethane.
- Paint the hardware and attach it to the dresser.
Recommended Products
As an Amazon Associate and member of other affiliate programs, I earn from qualifying purchases.


More Dresser Makeovers
- Grey Painted Dressers
- DIY Emerald Green Dresser
- DIY Pink Dresser
- DIY Modern Grey Dresser
- DIY Navy Blue Bedroom Dresser
Follow us on YouTube to get more tips for painting furniture. Or share your project with us on our Facebook Group and be part of our community. See you there!
Love your projects! Would love to know more details about how you thin your paint and get it ready for the sprayer. Your "recipe" of paint to water, how much conditioner, do you strain the paint, etc
Hey Heather!
You'll be happy to know we have some blog posts coming up very soon with that info! Make sure you're subscribed to our blog so you don't miss it.
Thanks!
Natalie
Can you spray paint the primer or do you have to use a brush? What is better?
I prefer to spray paint the primer. Actually, I prefer to buy the primer in the spray paint cans so I don’t have to clean it out of my sprayer. I only like to put water based products in my sprayer.
i have arthritis in my hands. can you recommend a sander for scuff sanding furniture?
The SurfPrep Sander is amazing. It comes with foam pads that make it possible to scuff sand furniture that isn’t flat. My hands get cramped really easily and it has really helped. You can learn more about it here. (It’s an investment, but there is a cheaper alternative too!) http://www.arayofsunlight.com/surfprep-sander
Natalie, I love your work! For cramps in your hands try eating a bag of potato chips, and also eating bananas helps with that. Make sure to eat salty potato chips.
Oh interesting! Good to know. Thanks for sharing!