DIY Sideboard Buffet


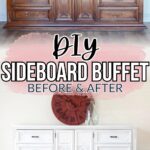
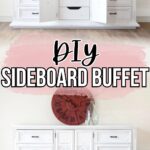
Welcome to our tutorial on how to create a stunning DIY sideboard buffet using homemade chalk paint! If you’re looking for some creative chalk paint furniture ideas and want to add a unique touch to your home, then this is for you!
We’re adding a little extra flair with some raised stenciling, too, and if you haven’t tried this technique before, don’t worry – we’ll walk you through every step. So, if you’re feeling adventurous and want to take your DIY game to the next level, keep reading!

Welcome to Furniture Fixer Upper day, where we join 4 of our talented furniture friends and bring you brand new makeovers! I’ll link to my friend’s makeovers after our after photos at the bottom of this post! Don’t forget to check out their masterpieces!! Okay, back to our makeover!

Who doesn’t love a little extra storage space? We sure do, and old furniture can be easily repurposed to help with that. And you can make any piece not only functional but also stylish with the right materials and techniques.
We’ll be using chalk paint for this project, and we’ll be creating our own using simple ingredients. It’s a budget friendly option, and you can customize the color to fit your home decor perfectly. Not to mention, it’s easy to make and use, even for beginners!
But we’re not stopping at just painting this DIY sideboard buffet. We’ll also be using a raised stenciling technique to add some texture and dimension to it. It’s a simple yet effective way to make your piece stand out and add a personal touch.

Supplies Used for DIY Sideboard Buffet
As an Amazon Associate, I earn from qualifying purchases. I also may earn from other qualifying purchases with other companies or get free product to review and use. All opinions are my own.
- Electric Screwdriver
- Krud Kutter
- Bondo Wood Filler
- Dewalt Orbital Sander
- 220 Grit Diablo Sanding Discs
- 220 Grit Sandpaper
- Pre-Taped Plastic and Painters Tape
- Clear Shellac
- Behr Pure White Latex Paint
- Calcium Carbonate Powder
- Paint Sprayer
- Varathane Waterbased Polyurethane in Satin
- Drill
- New Drawer Pulls/Handles
- Round Floral Stencil
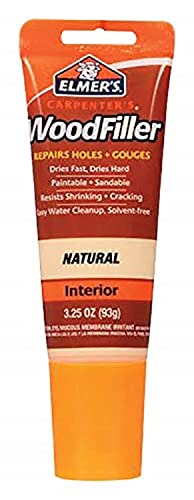
- Elmer’s Natural Color Wood Filler
- Brown Paint
- Small Artist Brush
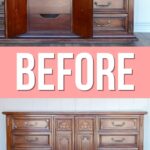
Prep Sideboard Buffet for DIY Makeover
First, we took the hardware and doors off to give us easier access for the makeover. Next, we gave the whole piece a good cleaning using our go-to Krud Kutter. Here’s everything you need to know about how to clean furniture before painting!

After that, we used Bondo wood filler to fill in the hardware holes and flower details on the doors we didn’t really like. We then sanded them down smooth with our Dewalt Orbital Sander and 220 grit Diablo sanding discs. Our Bondo Wood Filler review, which includes our thoughts on the product, can guide you through the process of using it.

We hand sanded the rest of the piece using 220 grit sandpaper, just enough to scuff up the surface and improve the adhesion of the new coat and color. Once we were satisfied with the prep work, we cleaned off any dust with a vacuum and damp rag before moving on to the next step.
Apply Primer to Prevent Bleedthrough
We wanted to make sure our final piece looked flawless, so we took the extra step of applying a primer. This not only helped with adhesion but also prevented any potential bleedthrough issues.
But before that, we taped off the inside of the drawers with pre-taped plastic and painters tape to protect them from overspray. We then took the piece out to the backyard, laid down some plastic on the ground, and propped it up on 5-gallon buckets to make it easier to work on.

Once we had everything set up, we grabbed our clear shellac spray and coated the entire piece with two coats, letting the shellac dry between coats of course. Shellac is one of the best primer for chalk paint options, and it dries quickly. Plus, using a spray made the process even faster and more efficient.

Check out how to stop stains from coming through paint here to also learn more on how to use clear shellac to prevent bleed through.
Paint and Distress DIY Sideboard Buffet
We were so excited to finally start adding some color! But first, we mixed up Behr pure white latex paint and calcium carbonate powder, following our homemade chalk paint recipe.
We chose a white paint color because we wanted a fresh and clean look, but you can use any color that you want! Then, we poured the mixture into our Wagner sprayer (This was an older project, but now we would actually recommend the Vonforn or FLEXiO 3500, too!)
Since we were painting white over dark wood, it took us about 4-5 coats to get the coverage we wanted. We made sure to do thin and even coats, using long, steady strokes. If you’re new to using a HVLP paint gun, here’s how to use a paint sprayer. And check out our recommendations for the best paint sprayers for beginners here!

Would you like to save this?
After everything was dry, we were ready to do some distressing for that worn look. We lightly sanded the edges of the details and the trim using 220 grit sandpaper. You can learn more ways how to distress chalk paint in this post!
Once we were happy with the level of distressing, we cleaned off the dust. We want the piece clean before adding a topcoat – here’s how to clean wood after sanding for more tips.
Seal with Topcoat and Add New Hardware
To protect our hard work, we sealed it with another go-to product – Varathane waterbased polyurethane in satin. We chose this because it provides a durable and smooth finish while also adding a slight sheen to the piece. It also creates a protective surface that makes the piece easier to clean and maintain.

We applied three coats with the sprayer, making sure to wait for each coat to dry before applying the next one. After the final coat, we let the surface of our new piece cure for at least 24 hours before handling or moving it.
Then, we drilled new holes for the new drawer pulls and attached them. This simple switch of hardware can make a huge difference in the overall look and feel of furniture. You can learn more about how to change hardware on a dresser and how to drill new hardware holes in these posts.

Add Stencil to DIY Sideboard Buffet
But we weren’t quite done with this piece yet…there were these empty squares on the doors after I filled in the details that we didn’t really like the look of. So, we decided to add a little something extra with a round floral stencil that we had on hand.
We carefully placed the design onto the surface and spread Elmer’s natural color wood filler over it, creating a raised stencil effect. After letting it dry, we realized that we didn’t like the natural wood look since we were going to distress it.

So, we lined up the stencil again and applied brown paint over the wood filler to match the dresser’s original dark stain. Then, we went in with a small artist brush to hand paint the raised flowers. We let everything dry before distressing and adding a topcoat to match the rest of the piece.
And our DIY sideboard buffet transformation was complete! The new white color plus the beautiful subtle detail brought this piece new life and charm. Yes, you can also get creative and try new techniques, like stenciling or changing hardware to make the furniture your own. For a similar project, here’s a before and after buffet makeover.


More Before and After Makeovers
See All >
Click any of these “before” photos below to view the “after” of that makeover.


Don’t forget to check out these other awesome before and after furniture makeovers from my Furniture friends!! (Click the links below the photos!)

- Antique Estate Sale Dresser from Confessions of a Serial DIYer
- Accent Table Makeover from Petticoat Junktion
- Chest Of Drawers Makeover from Salvaged Inspirations
- Waterfall Dresser Makeover from My Repurposed Life


DIY Sideboard Buffet
Check out our tutorial on how to create a stunning DIY sideboard buffet using homemade chalk paint and adding raised stenciling.
Materials
- Krud Kutter
- Bondo Wood Filler
- 220 Grit Diablo Sanding Discs
- 220 Grit Sandpaper
- Pre-Taped Plastic
- Painters Tape
- Clear Shellac
- Behr Pure White Latex Paint
- Calcium Carbonate Powder
- Varathane Waterbased Polyurethane in Satin
- New Drawer Pulls/Handles
- Round Floral Stencil
- Elmer's Natural Color Wood Filler
- Brown Paint
Instructions
- Prepare the surface by removing hardware and doors to get them out of the way, then give the entire furniture a good cleaning with Krud Kutter.
- Fill in any holes or imperfections with a wood filler, and sand them down with Dewalt Orbital Sander and 220 grit Diablo sanding discs.
- Hand sand the rest of the piece with 220 grit sandpaper just enough to scuff up the surface and improve adhesion, then clean off any dust before moving on to painting.
- Protect the drawers with plastic and painters tape, take the piece outside and prop it up on buckets for easier access.
- Apply two coats of clear shellac spray to the entire piece, allowing it to dry completely between each coat. This will help with adhesion and prevent any potential bleedthrough.
- Mix your latex paint with calcium carbonate powder to create homemade chalk paint.
- Pour the mixture into a paint sprayer and begin applying several thin coats, making sure to cover all surfaces evenly.
- Once dry, lightly sand the edges and details with 220 grit sandpaper. The distressed look adds character and charm to the piece. Clean off any dust after sanding.
- Seal the piece with three coats of waterbased polyurethane for a durable and smooth finish. Make sure to let each coat dry completely before applying the next one, and let the last coat cure for 24 hours before handling.
- Drill new holes for the drawer pulls and attach them for a quick and easy hardware update. This simple change can completely transform the look of furniture.
- Add a unique touch by stenciling a design onto the piece using wood filler and paint, then distress and seal as usual.
- Step back and admire your beautiful DIY sideboard buffet, now with a fresh new look and extra special touches.
Recommended Products
As an Amazon Associate and member of other affiliate programs, I earn from qualifying purchases.


More Painted Furniture Makeovers
- Chalk Painted Coffee Table
- Painting Rustic Furniture
- Chalk Paint and Cherry Blossoms – A Dresser Makeover
- Painting Mahogany Furniture with Chalk Paint
- White Chalk Painted Dresser
Follow us on YouTube to get more tips for painting furniture. Or share your project with us on our Facebook Group and be part of our community. See you there!

This is a beast of a dresser and you turned her so pretty Natalie! I love the raised stencil design and the ‘airy-bright’ feel it has now! Pinned XOXO
Aww thank you so much Denise!
Natalie,
It’s hard to believe it’s the same piece of furniture! Lovely makeover!
Pinned!
gail
Ahh thank you so much Gail!
So fresh and updated now! XOXO
Yay! Thanks Christy!
Beautiful makeover. I was so excited to see someone use and love Krud Kutter as much as I do! I wash all of my items with it before I begin to makeover.
We have found Krud Kutter with a dash of Power Dawn, and warm water will dissolve any crud in our world. I even use it in our Calphalon One pots and pans to soak some mean burns and stickies. No damage ever!
I will be adding you to my list of people to check on.
Thank you so much! Krud Kutter really is a game changer, isn’t it? 😍 I love the idea of mixing it with Power Dawn! Thanks for sharing your tips, and I’m honored to make your list! 💛
Wow. A huge dresser for sure !!
She looks so much lighter and refreshed now.
Great job – and great tutorial 🙂
Ahh thank you so much!
well done!
Would love to have sen some gold accents!
Thank you! And I hear ya! I can see how some gold accents would have been a nice touch as well.
You revealed it very well!
Aww thanks!