Painting Rustic Furniture

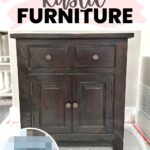
Are you a fan of painting rustic furniture? We sure are! There’s something so satisfying about taking an old, worn piece and transforming it into a beautiful, unique statement for your home. If you need more painting furniture ideas for your rustic piece, this makeover is for you!
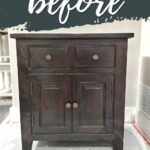
We cant wait to show you how we transformed this thrifted rustic accent table with milk paint and some new hardware! So keep reading for some tips and tricks on how to bring new life to your own rustic furniture.

Welcome to Furniture Fixer Upper day, where we join 4 of our talented furniture friends and bring you brand new makeovers! I’ll link to my friend’s makeovers after our after photos at the bottom of this post! Don’t forget to check out their masterpieces!! Okay, back to our makeover!

Rustic furniture has a certain charm and character that is hard to find in modern pieces. But sometimes, these old gems need a little love and attention to really shine. That’s where painting comes in!
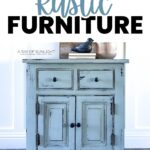
For painting our rustic table, we decided to use milk paint. It’s a popular choice for rustic furniture as it creates a beautiful, distressed look that fits right in with the style. Plus we’re adding some new hardware for a fresh update.
Now let’s dive into the process and see how you can get the same results for your own piece. It’s easy, fun, and a great way to personalize your rustic furniture, and we’re here to guide you every step of the way.

Supplies Used to Paint Rustic Furniture
As an Amazon Associate, I earn from qualifying purchases. I also may earn from other qualifying purchases with other companies or get free product to review and use. All opinions are my own.
- Electric Screwdriver
- Vacuum
- Krud Kutter
- Damp Rag
- Shackteau Interiors Milk Paint Powder in Sea Glass
- Painters Tape
- Zibra Round Paint Brush
- Space Heater (optional)
- Festool Sander
- 220 Grit Sanding Screens (Use code RAY10 to get 10% off your order)
- Foam Pads (Use code RAY10 to get 10% off your order)
- Tack Cloth
- Waterbased Polyurethane
- Paint Sprayer
- New Hardware
Preparing Rustic Furniture
We started by removing the very old and outdated hardware with our handy dandy electric screwdriver. We planned on changing out the old hardware for new hardware anyway, and it’s also easier to clean and paint without the hardware in the way.

Next, we gave the table a good cleaning with a vacuum to get rid of any dust, including the spider webs off the inside, outside, and underneath the accent table. We also cleaned the grease and grime off with Krud Kutter and a damp rag. Learn more about How to Prepare Furniture For Painting in this post!


We also removed the hinges and doors from the table with our screwdriver. We don’t want any paint getting on them, so it’s important to take them off before painting. We made sure to label the hinges and screws so we could easily put them back on later.
Mixing Milk Paint
Our milk paint of choice was Shackteau Interiors Milk Paint Powder in the color Sea Glass. After mixing equal parts water and milk paint powder, we let the solution sit for about 10-15 minutes before painting. This allows the milk paint to thicken up a bit and become easier to work with. We have a guide on how to mix milk paint here for more details.

While waiting for the milk paint, we covered the inside of the drawers with painters tape to protect them from any accidental paint on them. We did leave the hinges on the doors and tried taping them off too, then decided it would just be easier to remove them altogether.
Painting Rustic Furniture with Milk Paint
After 15 minutes, we applied the first coat of milk paint onto the accent table with our Zibra Round Paint Brush. It’s one of the best paint brushes for painting furniture on our list – you can check out other options in the post.

You may notice we didn’t sand the table before painting, and that’s because milk paint is meant to give a chippy, distressed look. However, if you want a smoother finish, you can sand the piece before painting.
How to Create A Chippy Paint Finish
After the first coat of paint was dry, we applied a second coat of milk paint. The coverage looked good after the second coat, but we wanted more of a chippy look for the finish. Milk paint naturally creates a chipping effect, but we wanted to enhance it even more.
Would you like to save this?


So we decided to add some heat to the surface while the milk paint dried by using a space heater. It still didn’t chip much, so we brought out our Festool sander and some 220 grit sanding screens. We sanded the surface to help create a more distressed look, and it worked! For a more detailed guide here’s our blog post about how to get a chippy paint finish with milk paint.

For the details on the doors, we also sanded them with the Festool and foam pads to get into the grooves. Once we were happy with the level of chipping, we cleaned up all the sanding dust with a vacuum and tack cloth.
Topcoating Milk Painted Rustic Furniture
We loved the new look that was taking shape with this piece, so we decided to topcoat it with our favorite water based polyurethane. We mixed the polyurethane, poured it into our paint sprayer, and sprayed 2 coats of topcoat, letting it dry between coats.

If you haven’t tried spraying poly before, you can learn how to spray polyurethane here! And if you’re looking to invest in a sprayer that can also work well with polyurethane, check out these best sprayers for polyurethane options in this post!
Adding New Hardware to Rustic Furniture
After the poly on our painted rustic table was dry, it was time to add the final touches! We started with installing the hinges and attaching the doors to the table. Labeling all the screws and hinges beforehand really helped a lot to put everything back together easier. Luckily only one screw was a little bit of a pain, and in the end, the hinges worked great!


And as we mentioned above, we used new hardware to complete this rustic furniture makeover! We went through our stash of knobs and tried different styles, but ultimately decided on these bronze round knobs. They were the perfect finishing touch to this accent table!
Watch the full makeover of this rustic table on our YouTube video below!

Our rustic table makeover is complete, and we couldn’t be happier with how it turned out. The milk paint gave it a beautiful distressed look, and we made it even chippier to add more character. The new hardware also really added a fresh update to the piece. We hope this guide has inspired you to try painting your own rustic furniture!


Don’t forget to check out these other awesome before and after furniture makeovers from my Furniture friends!! (Click the links below the photos!)

- Bookshelf Makeover from Confessions of a Serial DIYer
- Three-tiered Table Plant Stand from My Repurposed Life
- End Table Makeover from Salvaged Inspirations
- French Provincial Dresser from Petticoat Junktion
More Before and After Makeovers
See All >
Click any of these “before” photos below to view the “after” of that makeover.


Painting Rustic Furniture
This makeover will inspire you to transform your old pieces into unique, stylish decor. Learn how we used milk paint and new hardware to bring new life to a thrifted rustic accent table!
Materials
Tools
Instructions
- Remove old hardware and clean the furniture thoroughly with Krud Kutter and a damp rag. Make sure to get into all the nooks and crannies, including underneath the furniture.
- Take off any doors or hinges that may be on your piece. Label everything so you can easily put them back in place later. This will also make it easier to paint without any obstructions.
- Mix equal parts water and milk paint powder, and let the solution sit for 10-15 minutes before painting. This will make the milk paint easier to work with and give it a thicker consistency.
- Cover any areas you don't want to paint with painters tape, such as the inside of drawers. This will protect them from getting accidentally painted.
- Apply 2 coats of milk paint with a round paint brush, letting each coat dry completely. If you want a smoother finish, you can sand the piece before painting or use a paint sprayer for more even coverage.
- For a chippy finish, add heat to the surface while the milk paint is drying by using a space heater. Or you can use a sanding tool (sander and sanding screens or foam pads) to create a distressed look. Make sure to clean up any dust with a vacuum and tack cloth afterwards.
- Topcoat the milk painted furniture with waterbased polyurethane, spraying 2 coats and letting each coat dry completely.
- Reattach any doors or hinges that were removed earlier. Follow the labels to easily put everything back in place.
- Add new hardware to the furniture for a fresh update. Try out different styles and see which one looks best before making a decision.
- Admire your beautifully painted rustic furniture!
Recommended Products
As an Amazon Associate and member of other affiliate programs, I earn from qualifying purchases.


More Painted Furniture Makeovers
- Painting a Bedside Table
- Painting a Sideboard
- Rustic Industrial Coffee Table
- Painting Mahogany Furniture with Chalk Paint
- Painting Stained Furniture Without Sanding
Follow us on YouTube to get more tips for painting furniture. Or share your project with us on our Facebook Group and be part of our community. See you there!

You know I love a distressed finish, and that look was perfect for this piece! Love it! XOXO
Ahh thanks so much for the love Christy! I appreciate you so much!
Great tutorial Natalie and I love the Milk Paint color with the dark interior! Pinned XOXO
Thank you so much Denise!
Natalie,
I love the distressing the milk paint creates. The color is perfect, and the hardware brings it all together. 100% improvement friend!!
Pinned and shared on FB
gail
Aww thanks so much Gail!
I absolutely love this piece! Perfect colour and finish choice. Thank you for sharing. I don’t often comment, but I love all your work. You are so meticulous in your methods and really make the end result so professional-looking.
Wow! I really appreciate this so much! Your words mean a lot, especially knowing you don’t often comment. Thank you so much for the love Anita!