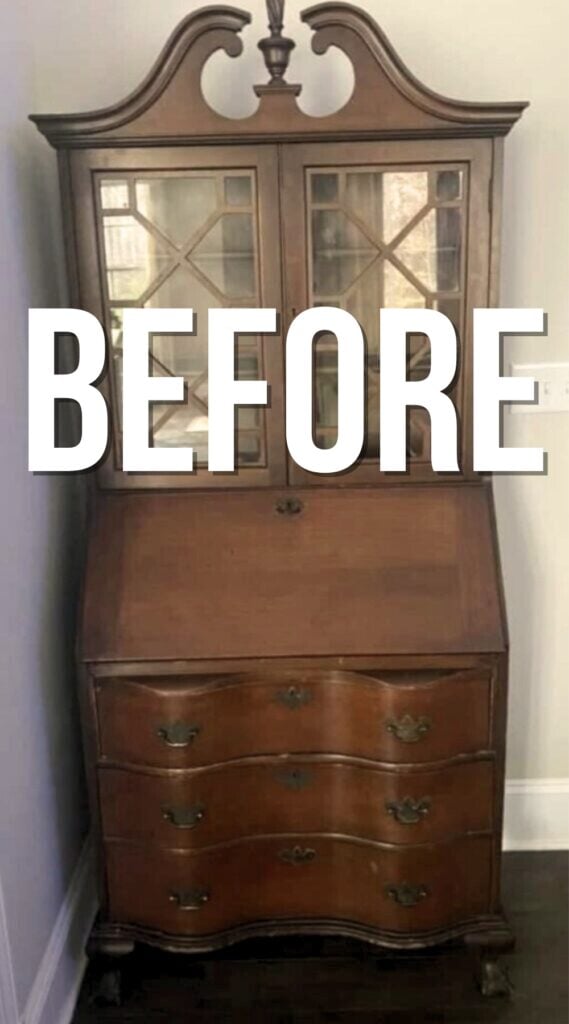
How to Refinish Wood Furniture


Today, we will be diving into the step-by-step process of how to refinish wood furniture, especially a beloved family heirloom like this vintage secretary desk. Far from just a simple paint job, when refinishing furniture we’re going the extra mile to return this gem to its original wood form, a style forecasted to be all the rage in 2023.
Grab your sandpaper and gel stains; we’re about to release the hidden beauty of this classic piece and turn it into a beautiful updated piece that can be loved for years to come!
If the thought of giving a second life to an old, dusty piece of furniture stirs your heart, then you are in the right place. We believe that every piece of furniture, especially family heirlooms like the vintage secretary desk we’re about to restore, tells a story.
They’re more than just everyday objects; they’re records of our past, reflections of our memories. And the beauty of restoring them? You get to add your own chapter to their story.

In this post, we’re joined by Kristen at The Broken Masterpiece, sharing her beautiful secretary desk makeover. You’ll be inspired by this transformation for sure!
And by the end of this post, you’ll be equipped with all the tips and tricks to embark on your own restoration journey. So let’s roll up our sleeves, and together, we’ll breathe new life into old wood!

Supplies Used for Refinishing Wood Furniture
As an Amazon Associate, I earn from qualifying purchases. I also may earn from other qualifying purchases with other companies or get free product to review and use. All opinions are my own.
- Goof Off Spray
- Steel Wool
- DeWalt Sander
- SurfPrep Sander (I use the 3×4 one) (Use code RAY10 to get 10% off your order)
- 80 to 100 Grit Sandpaper
- 120 to 150 Grit Sandpaper
- 180 Grit Sandpaper
- Sanding Contour Pads
- RZ Mask
- Mineral Spirits
- Zibra Brush
- Lilly Moon Gel Stains in Natural Cork and Wooden Barrel
- Water Based Poly
- Wagner Beginner Sprayer
- Rust Oleum’s Gold Metallic Spray
- Gold Drop Pulls
Removing Wood Stain
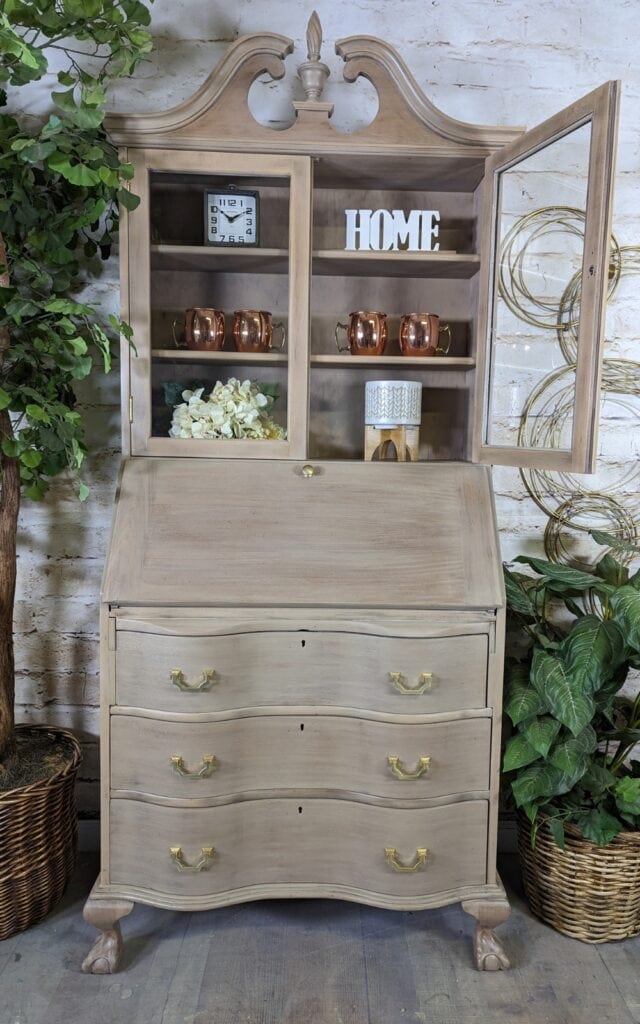
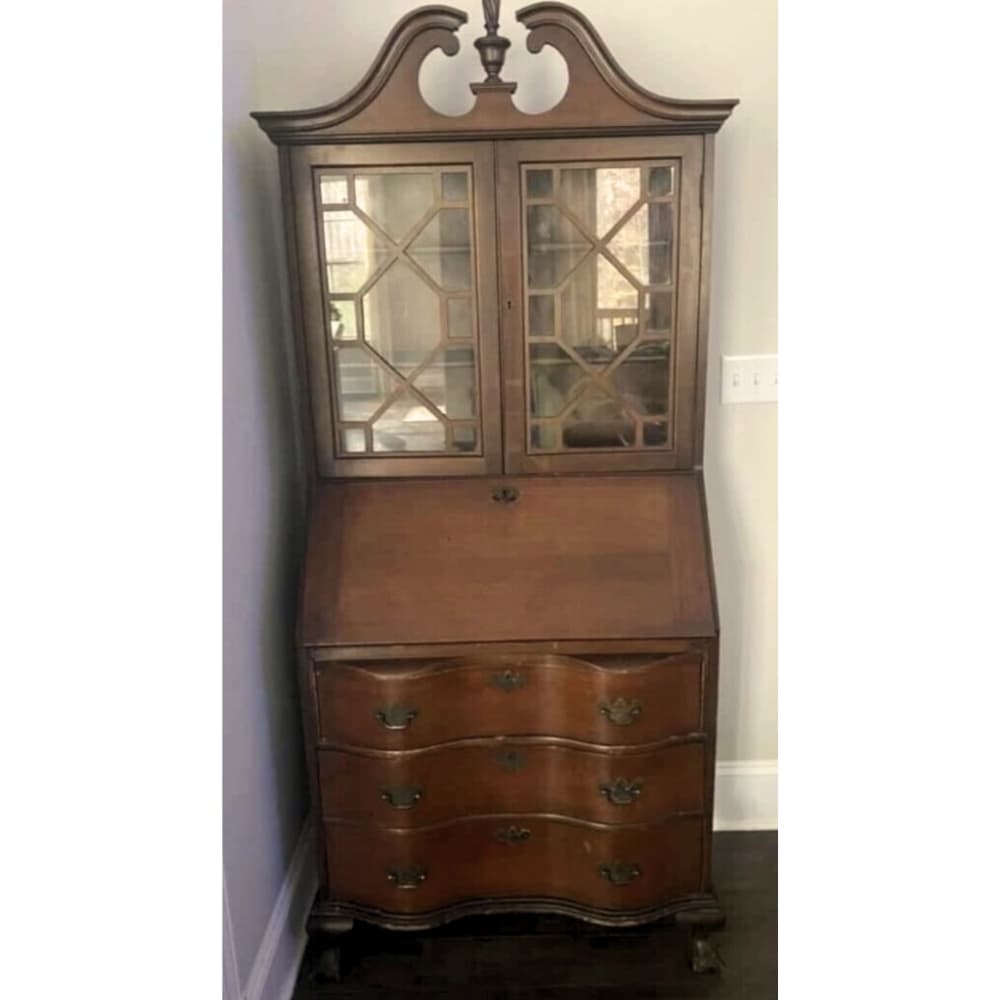
The subject of today’s restoration is an enchanting family heirloom – a vintage secretary, brought to me by my lovely client. However, instead of a paint job, our goal is to refinish the piece back to its beautiful wood form – a trend we predict will gain immense popularity in 2023.
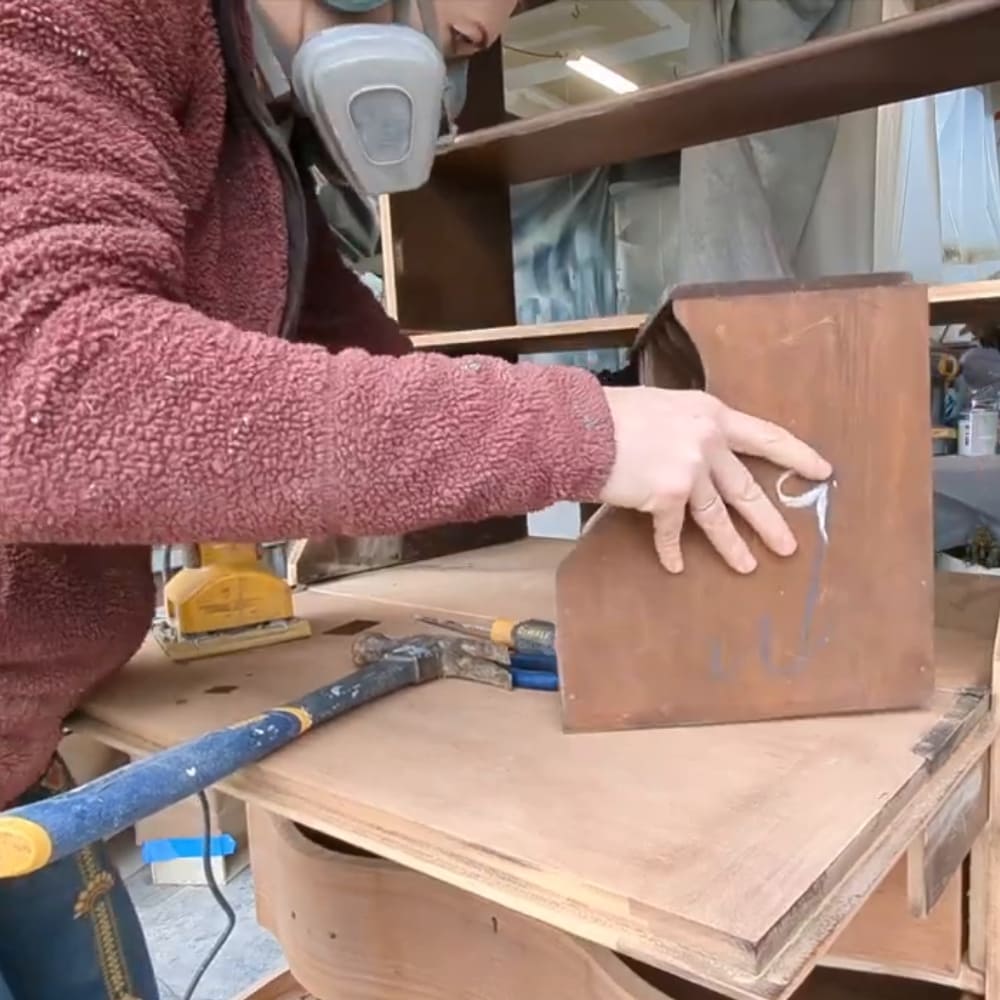
The first step in the restoration process is to remove all the handles and clean the entire piece. I used Goof off and steel wool to remove any debris and gunk that had accumulated over the years.
Here’s our blog post about how to clean furniture before painting to learn more about the detailed steps of cleaning furniture.
Once the piece is dry, it’s time to start sanding! I used a DeWalt Sander for the bulk of the sanding and a SurfPrep Sander for the finer details and the veneer. If there isn’t a lot of varnish on the wood, you can simply start sanding with 100 grit sandpaper.
Check out the best sanders for furniture and best sandpaper for refinishing furniture to find the perfect match for your project. Here are more essential furniture refinishing tools and top furniture refinishing tools to make your refinishing projects quicker and easier.
However, if there is a significant amount of varnish, it’s best to use a chemical stripper to remove it before sanding. I also removed the fretwork in the front to give it a more modern feel.

“Tip: Always remember to keep all your hardware in safe storage so that you don’t lose them. For vintage pieces like this, hunting for replacement hardware could be a real nightmare”
-The Broken Masterpiece
Secretary Desk Makeover
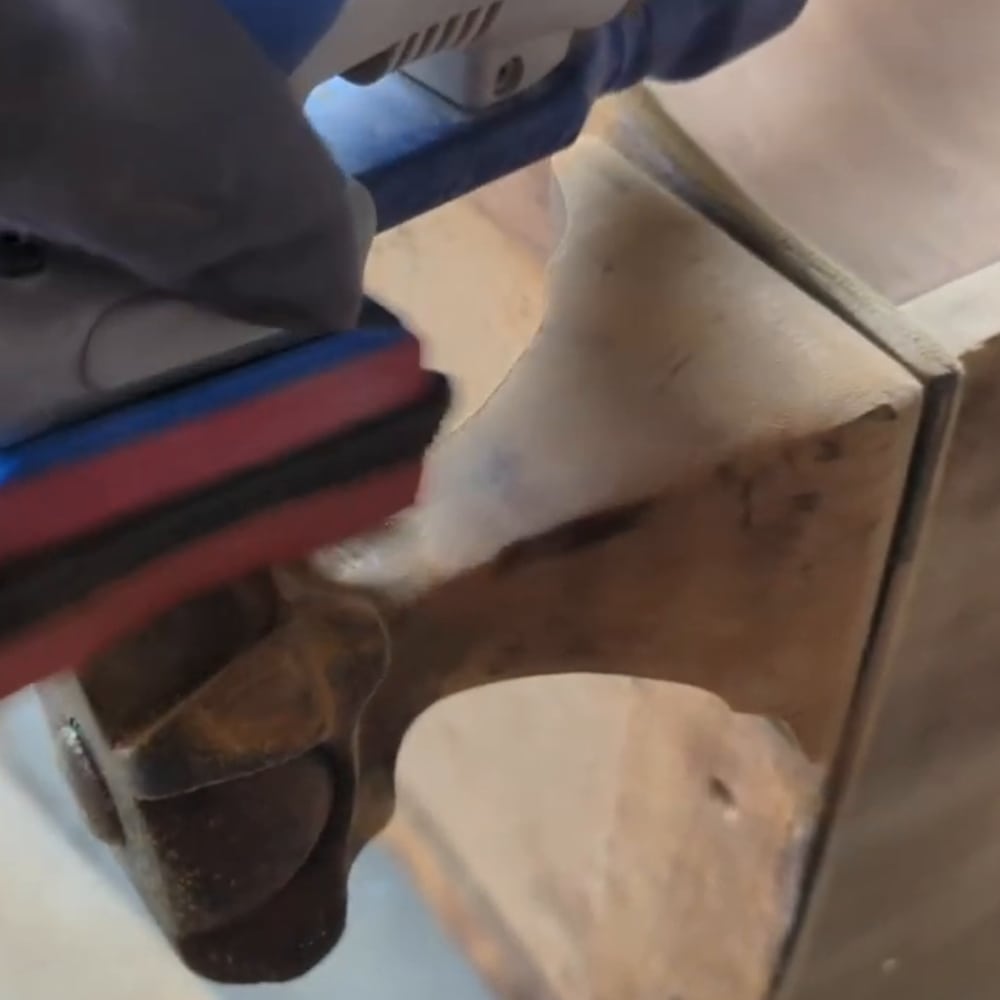
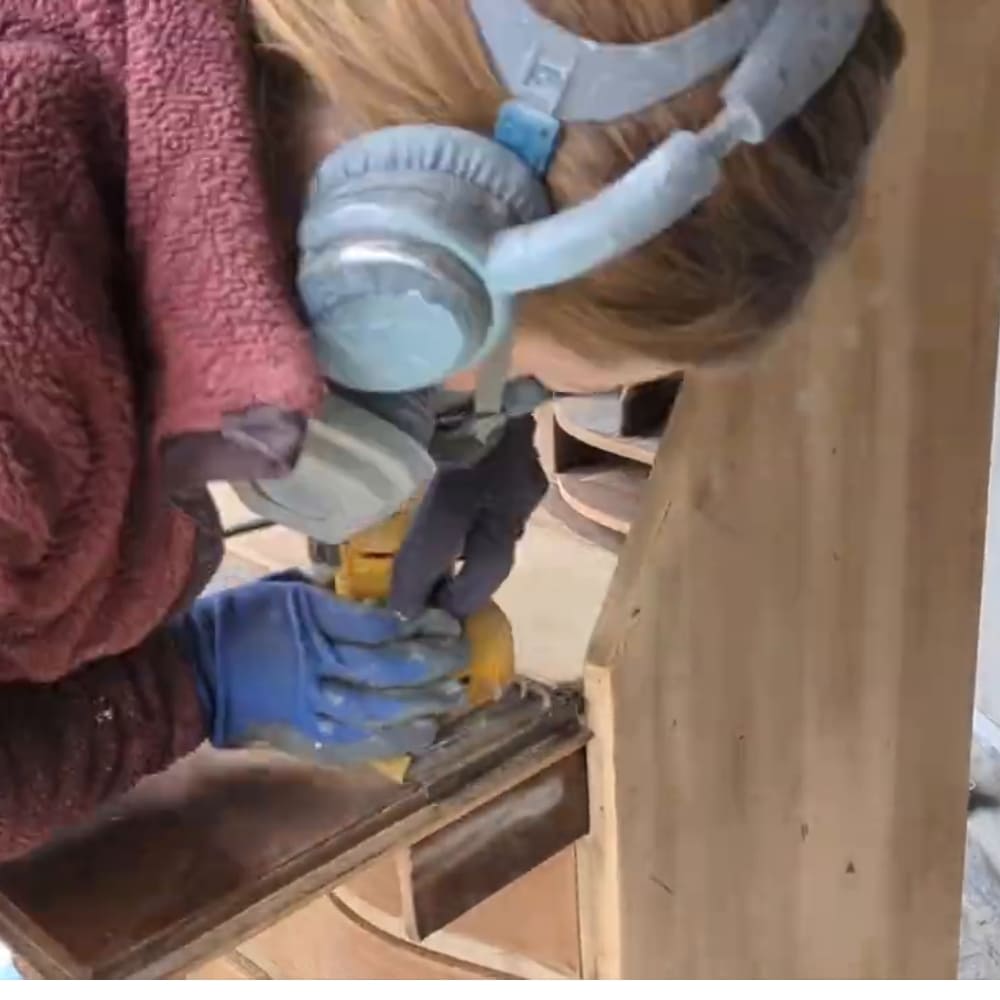
To make sure that every part of the piece was properly sanded and finished, I had to take it apart completely. This involved removing the top, back, and all the hardware.
It’s important to keep all the hardware together to avoid losing any pieces, as it can be difficult to find vintage hardware like this.
Sanding in Detail
After disassembling the piece, I went through multiple rounds of sanding to achieve a smooth wood finish. I started with 80 to 100 grit sandpaper, then moved on to 120 to 150 grit, and finally finished with 150 and 180 grit.
Here’s our list of the different types sandpaper for furniture painting to know advantages and disadvantages of each type.
Sanding multiple times and gradually increasing the grit helps to flatten any raised wood and create a smooth surface that will take the stain well.
If you don’t want to sand, here is how to remove wood stain from furniture with a chemical stripper. If you don’t want to use a stripper, here’s how to refinish wood furniture without stripping.
Preparing for Gel Stain
Once the sanding was complete, I wiped down the entire piece with mineral spirits and water to remove any remaining debris and dust. This step is crucial to ensure that the surface is clean and ready to accept the stain.
Would you like to save this?
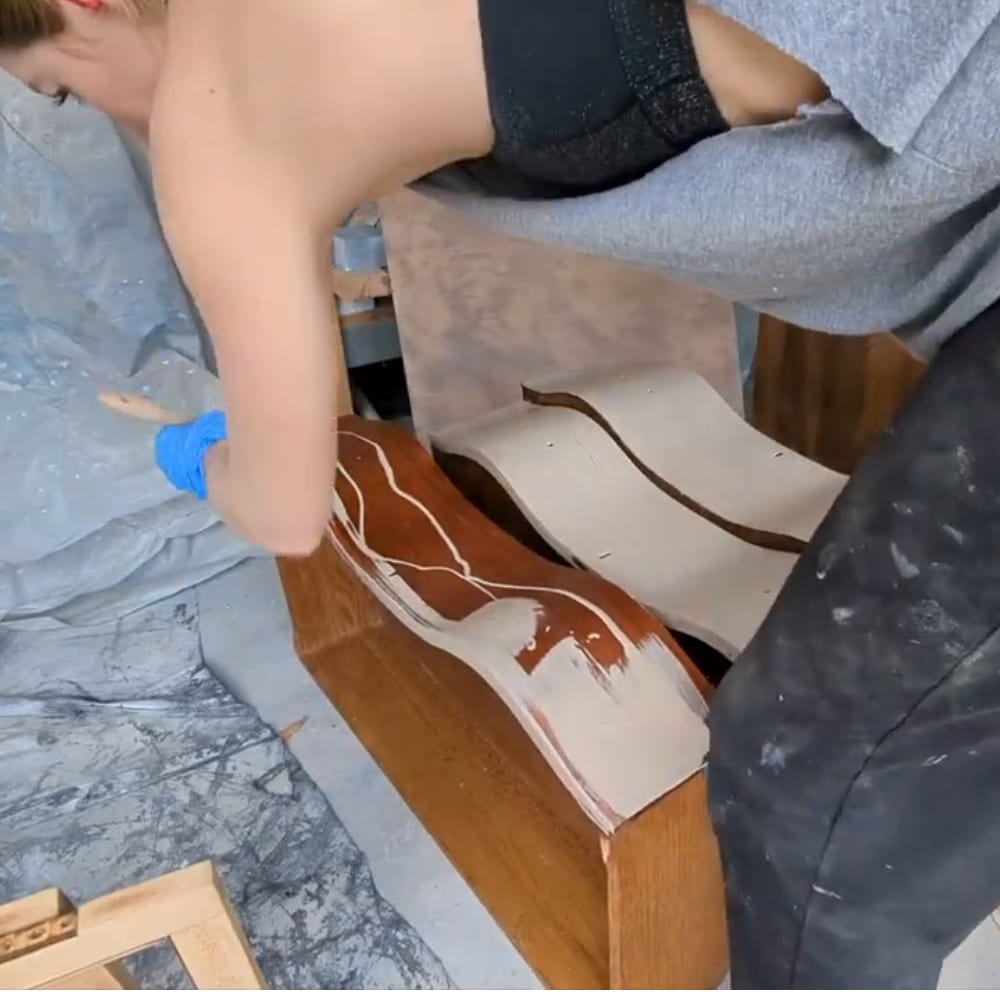
Applying the Gel Stain
Before applying the gel stain, it’s important to wet the surface with water. This helps the stain to spread evenly and prevents it from drying too quickly.
I used a rag to wet the surface and then applied the gel stain using a Zibra brush. Here’s our list of the best brushes for staining wood to help you find the one that fits your needs perfectly.
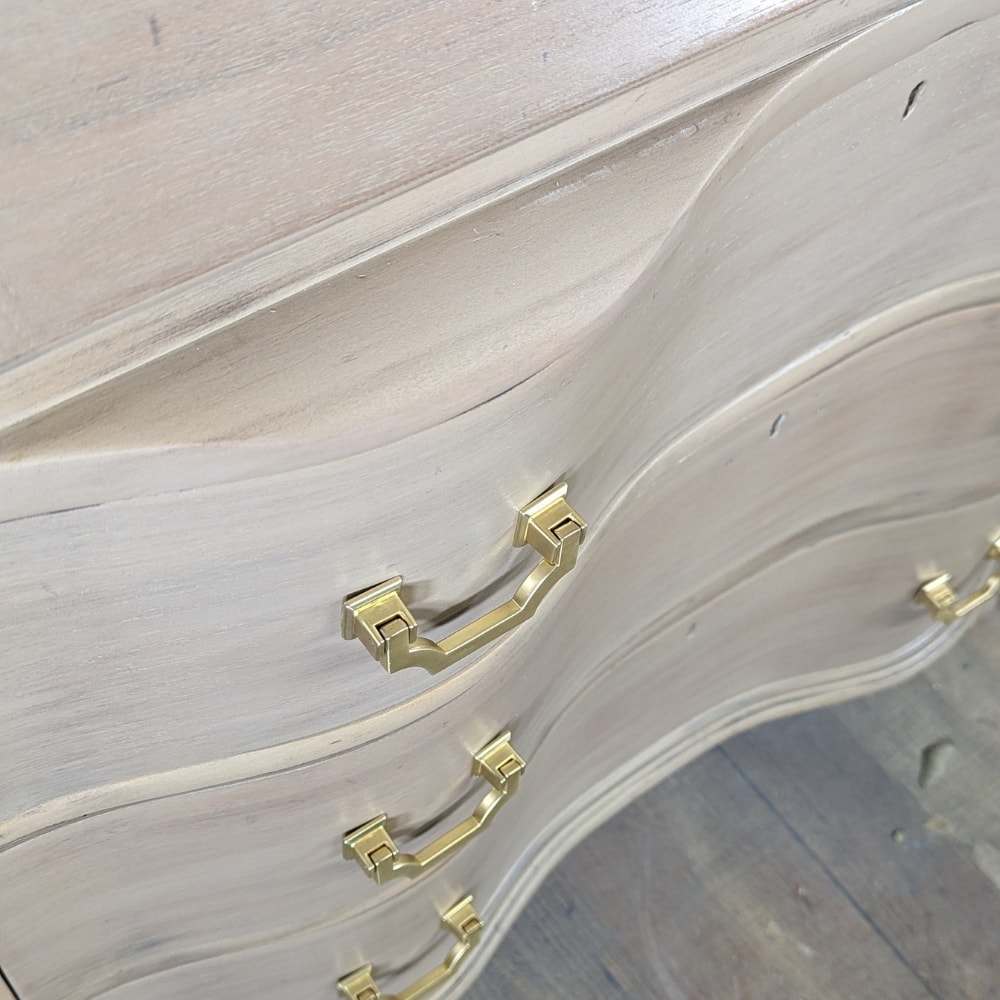
I chose to mix two colors, Natural Cork and Wooden Barrel, to achieve the desired shade.
When working with gel stains, it’s best to work in sections to prevent the stain from drying out. I started with the drawers, applying the stain in the direction of the grain. For the final pull, I went across the drawer horizontally to create a unique look.
Check out this hexagon end table makeover for another inspiration using Lilly Moon Gel Stain.
After a few minutes, I checked the stain to see if it was ready for the next coat. I repeated this process for the entire piece, working in sections and checking the stain as I went along. If you want a darker finish, here’s how to stain wood furniture darker to guide you.
Check out the best wood stains for refinishing furniture to explore the different types of wood stain and help you select the right one for your project. And if you’re wondering can you stain over paint, check this blog post to know the answer.
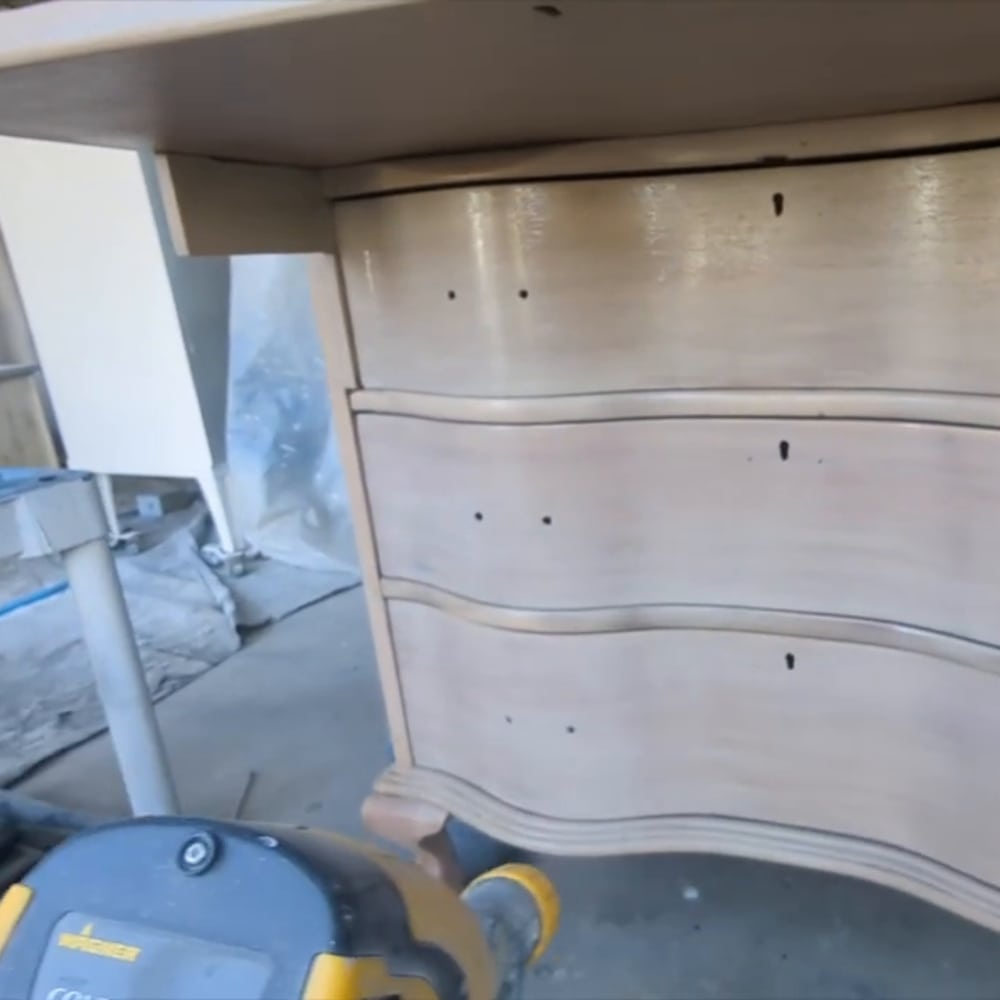
Sealing Stained Wood
Once the stain was dry, I applied a top coat to protect the wood and give it a finished look. I used Stellar Shield, a protective top coat from Lilly Moon, but you can also use a waterbased polycrylic. Learn more about sealing painted furniture here.


I filled my sprayer with a satin poly acrylic and applied a thin coat to the entire piece. It’s important to apply thin coats to avoid drips and guarantee an even finish. Here’s our list of topcoats for painting furniture to choose the right topcoat for your next project.
If you want to spray your topcoat on as well, here is how to spray polyurethane (aka waterbased polyurethane), but if you want to apply it by hand, here is how to apply polycrylic by hand.
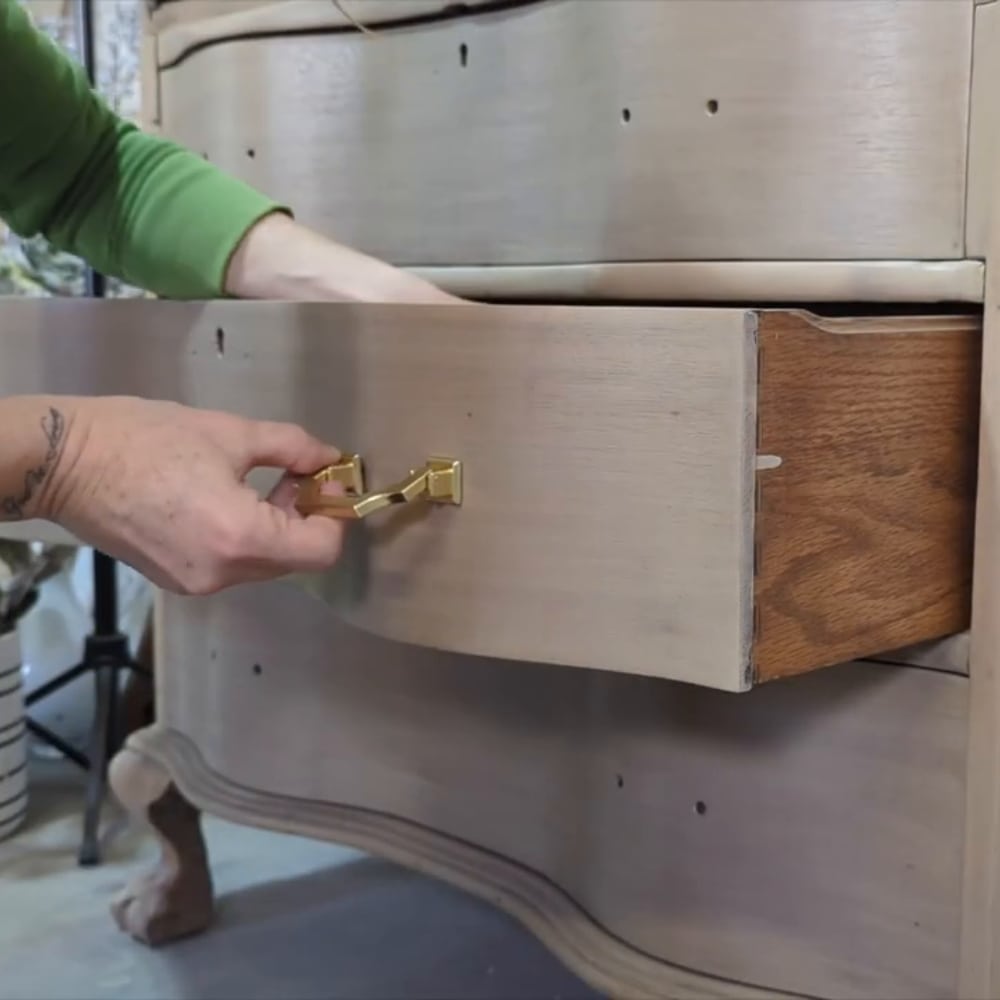
Final Touches and Reassembly
After the top coat dried, I reassembled the piece, making sure to put all the hardware back in its original place. Piece-by-piece and slowly, everything that you took apart goes back. The hardware, now painted with Rust Oleum’s Gold metallic spray, fits back.
Here’s how to paint drawer pulls post for detailed instructions.
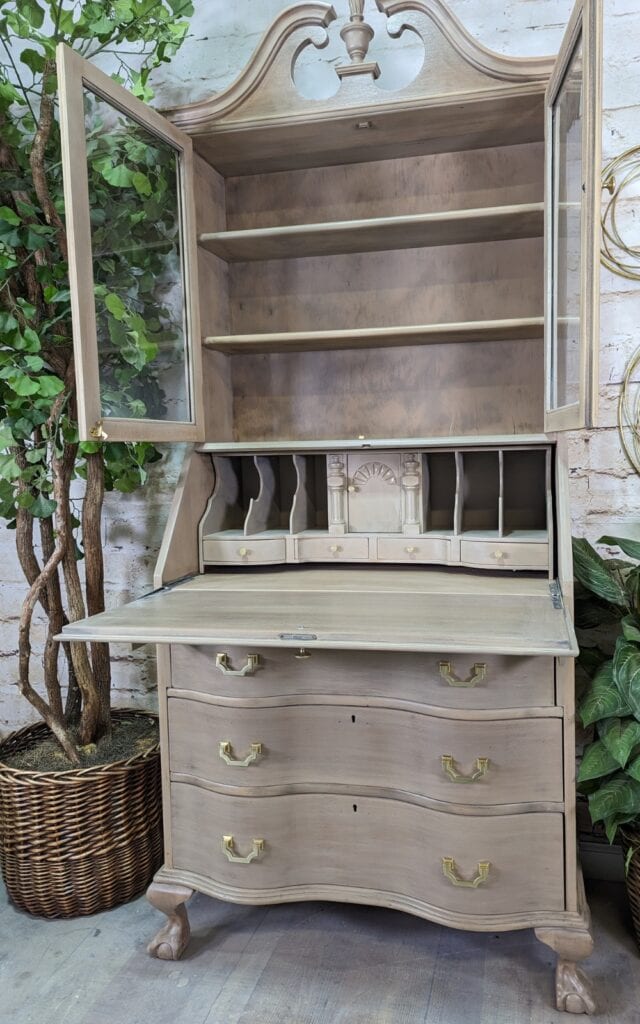
Finally, I staged the piece for photographs, showcasing its beauty and functionality.
More Before and After Makeovers
See All >
Click any of these “before” photos below to view the “after” of that makeover.


Restoring an antique piece of furniture can be a labor intensive process, but the results are well worth it. By taking the time to properly prepare the piece, sanding it thoroughly, and applying the right products, you can bring new life to an old piece of furniture.
So, if you have an antique piece that’s been sitting in your attic or basement, waiting to be refinished, don’t hesitate to give it a new lease on life following this and our guide on how to refinish antique furniture. For more inspiration, here are refinished dining table ideas and armoire refinishing ideas.
With the right tools, products, and techniques, you can transform it into a stunning piece that will be cherished for years to come.
If you enjoyed this flip, you can find Kristen on YouTube under The Broken Masterpiece. And for more behind-the-scenes content you can also join Kristen on Instagram, or Facebook!


How to Refinish Wood Furniture
Check out this easy step by step tutorial on how to refinish wood furniture so you can love your old family heirlooms again!
Materials
Tools
Instructions
- Carefully dismantle the furniture to making sure every part is properly sanded and finished. This involves removing the top, back, inside of the desk and all the hardware.
- Use multiple rounds of sanding to create a smooth wood finish. Start with 80 to 100 grit sandpaper, progress to 120 to 150 grit, and finally finish with 150 and 180 grit.
- Wipe down the entire piece with mineral spirits and water to remove any remaining debris and dust.
- Wet the surface with water before applying the gel stain, to help the stain spread evenly. Apply the stain in the direction of the wood grain, working in sections and checking the stain as you go.
- Apply a top coat to protect the wood and give it a finished look. Use a sprayer to apply a thin coat to the entire piece.
- Reassemble the furniture, making sure all the hardware is returned to its original place. The hardware should be painted with a metallic spray for an updated look. Stage the piece for photographs, showcasing its beauty and functionality.
Recommended Products
As an Amazon Associate and member of other affiliate programs, I earn from qualifying purchases.


more refinishing furniture tips
- How to Refinish a Dresser
- Furniture Refinishing Ideas
- Refinishing an Old Dresser
- The Farmhouse Cabinet Makeover
- How to Change Wood Color Without Sanding

Hi! Question, I read on another one of your posts that if I am sanding before painting, I can just “scuff up” the surface a little so my paint and primer has something to grip onto. However, when it comes to staining….if I am trying to refinish a dresser with existing stain and top coat, am I to sand the entire surface down to bare smooth wood in order to stain?
Yes that is correct. You have to remove the old finish before you can stain (the stain has to penetrate into the wood.) Unless you use a gel stain, then you can stain over an existing finish. Here is how to use gel stain when refinishing furniture. How to Stain Already Stained Wood
Thank you, thank you…. For such great detailed information- i look forward to your emails, every day. But this time, it hit the nail in the head.. because two weeks ago I acquired an exact piece, minus the top bookcase part…. I so looking forward to start on in, thanks to you inspiring me….
That’s amazing! This came in the perfect timing then!