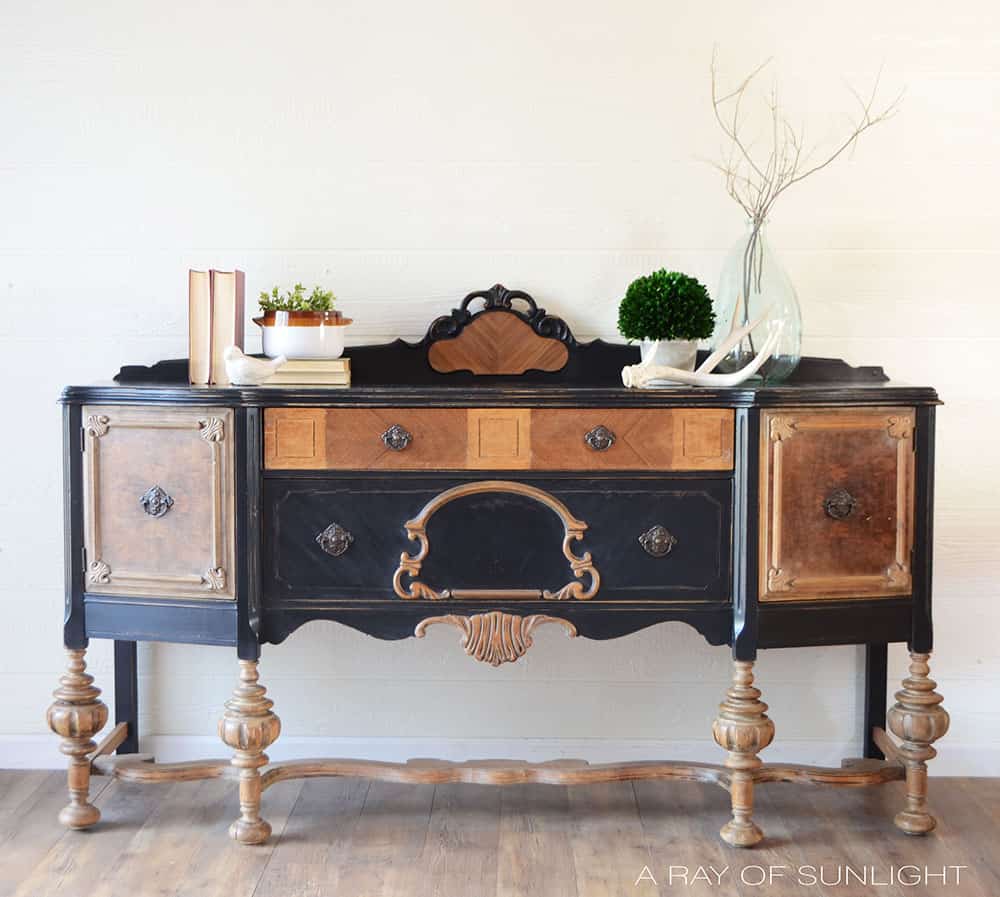
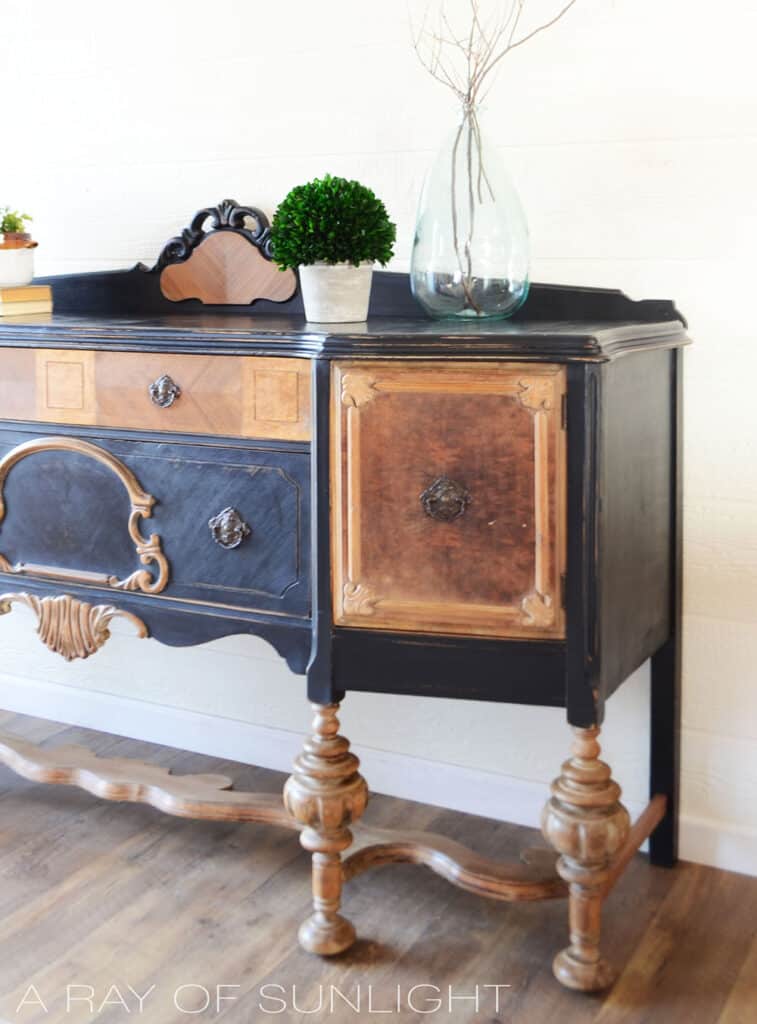
Black Painted Antique Buffet


This buffet was headed for the dump. But we fixed it up and are ready to show you how to fix damaged veneer on your own piece, and how to strip the finish. Here is our black painted antique buffet makeover!
If you’re looking for some inspiration for black painted furniture ideas, this is the perfect place to start. This buffet was once old and worn, but with a little bit of love and some black paint, it has been transformed into a stunning piece that will make a statement in any room.

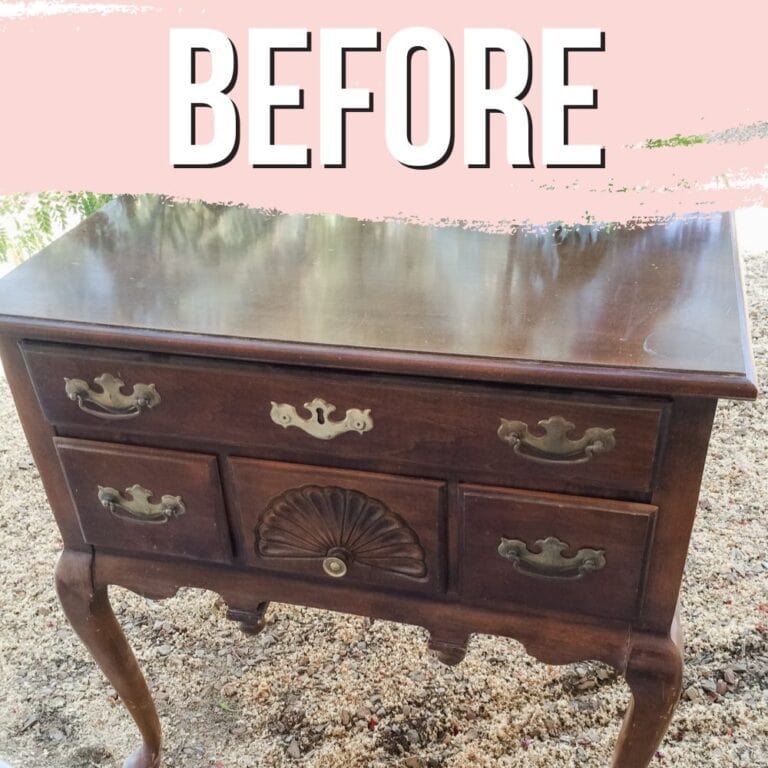
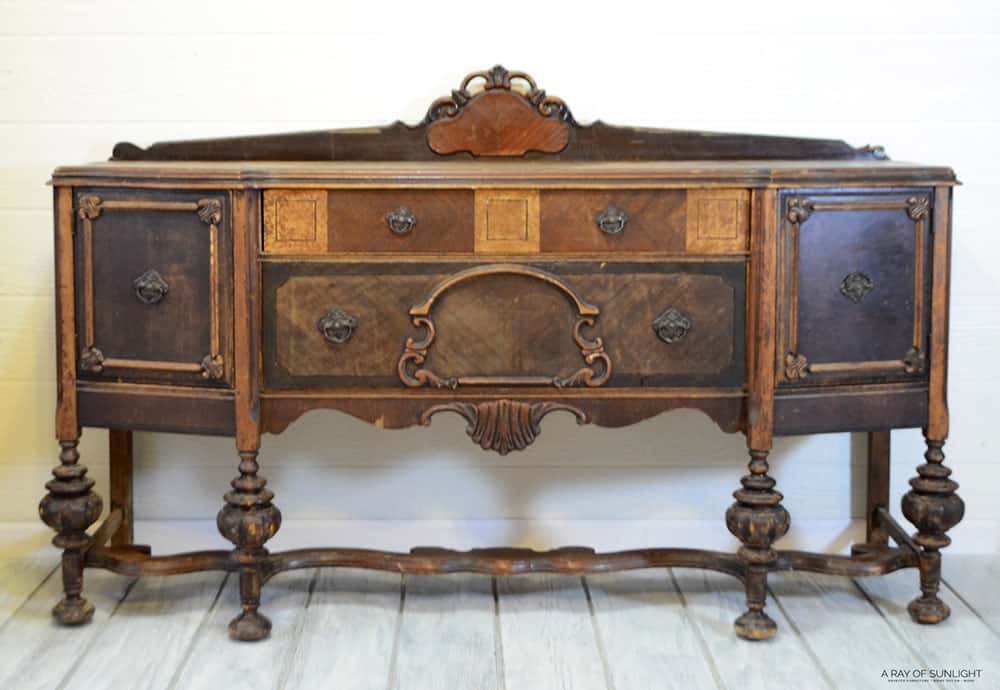
A few weeks ago I picked this STUNNING buffet up from a refinishing friend. It had been sitting in her garage for a year and she lost all motivation to tackle such a huge project! I about killed over when I saw that she was selling it and rushed over to her home as soon as I could!

She pointed out dozens of problems from the bubbling and chipping veneer, to places that needed some glue. She gave me the full run down, and the list was long.
I’m not going to lie, it was going to be my biggest project yet, but I was up for the challenge to make this trash into a treasure.
Makeover of Black Painted Antique Buffet
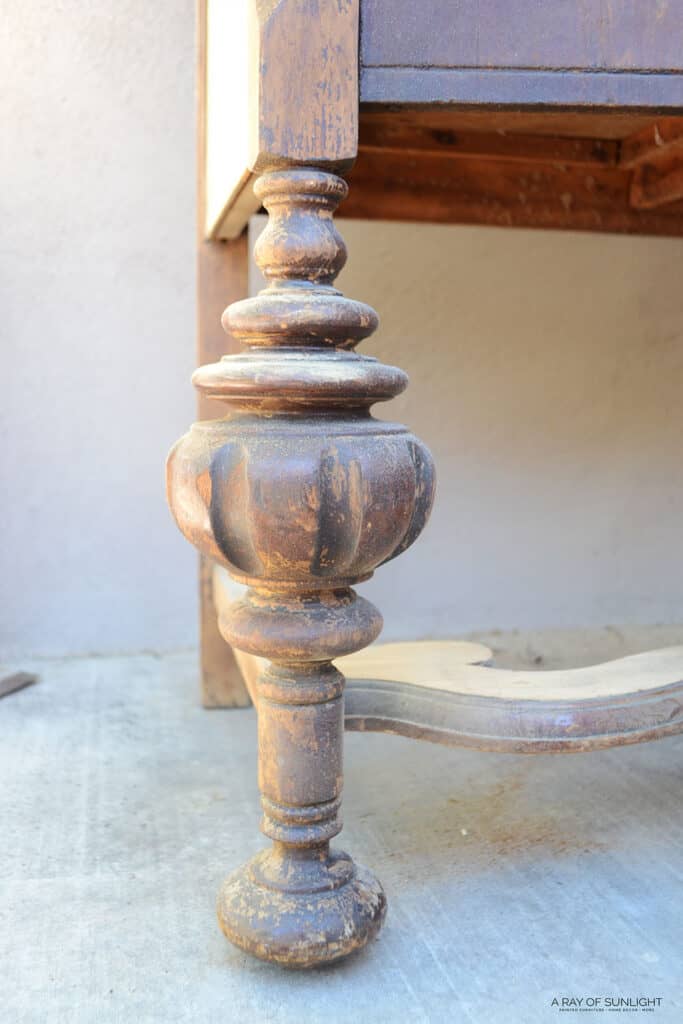
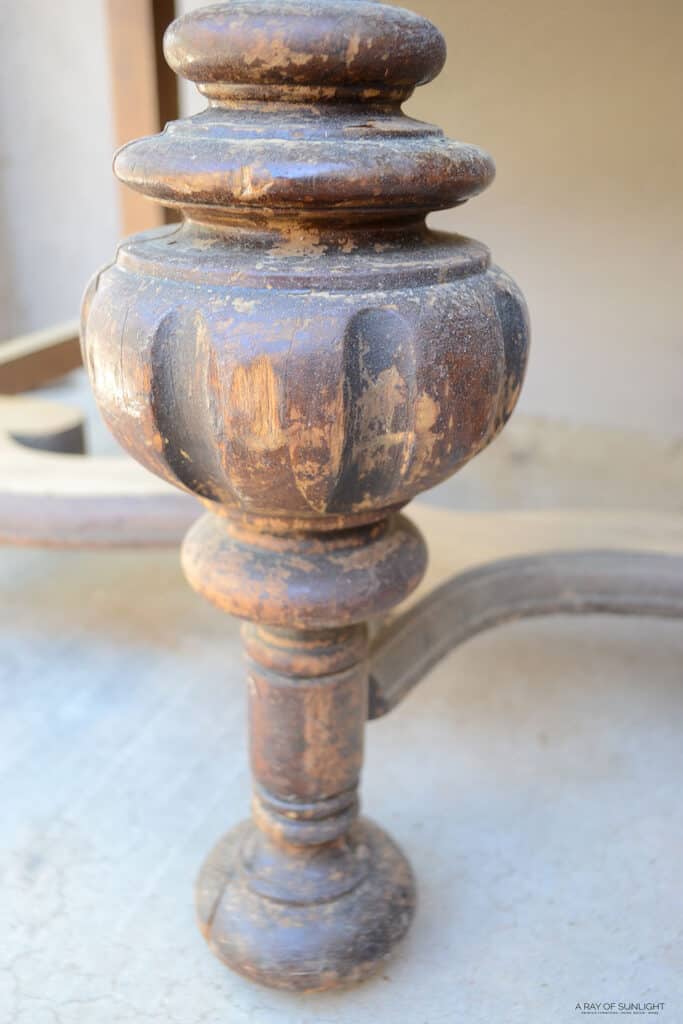
After we got it home and brought it inside I couldn’t stop staring at the beauty. It was so beautiful. Those legs, all of the detail, that huge drawer. Mmmmmhhh!
A long time dream had finally come true. We don’t get these amazing antique buffets in our area very often! And I couldn’t wait for the next morning to get working on bringing new life to this old wornout buffet.

Supplies Used for Black Painted Antique Buffet
As an Amazon Associate, I earn from qualifying purchases. I also may earn from other qualifying purchases with other companies or get free product to review and use. All opinions are my own.
- Krud Kutter
- Thick Gloves
- Putty Knife
- Orbital Sander and 220 Grit Sanding Discs
- Utility Knife
- Respirator
- Bondo Autobody Filler and Spreader
- Shop Vac and Tack Cloth to remove dust
- Wood Glue
- Clamps
- Pre Taped Plastic
- Painters Tape
- Black Paint
- Paint Sprayer
- 220 Grit Sandpaper
- Furniture Wax (I wish I would have used polyurethane instead of wax)
Grab our list of the 10 best painting furniture supplies too!
Can Veneer Be Painted?
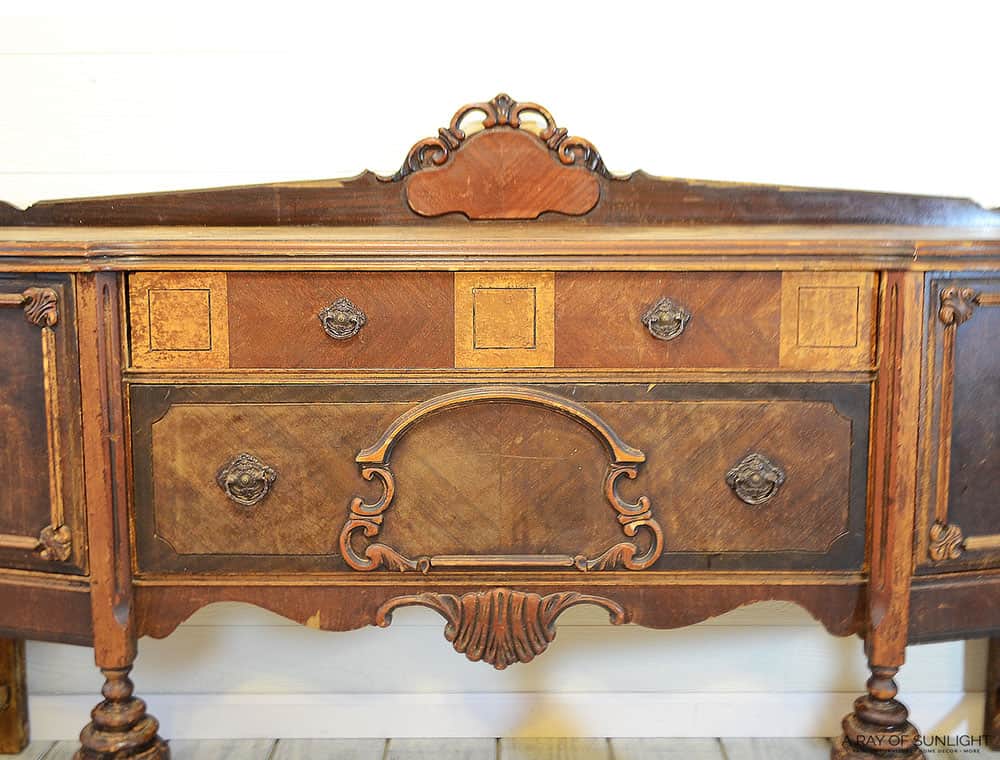
Yes! Wood veneer can be painted just like wood furniture. You’ll want to make sure the wood veneer is in good condition and repaired or removed if it isn’t in good condition. This buffet, like most antique pieces of furniture, had a wood veneer over “lesser quality” wood. It was made of all real wood though.
In this buffet’s makeover, I’m sharing what happens if the wood veneer isn’t properly fixed or removed before painting.
Repair and Remove Veneer
The next morning we moved it back outside to get started on repair work. I couldn’t resist starting to literally just pull off the old veneer on the side. That veneer was chippy, and boy was it ready to come off.
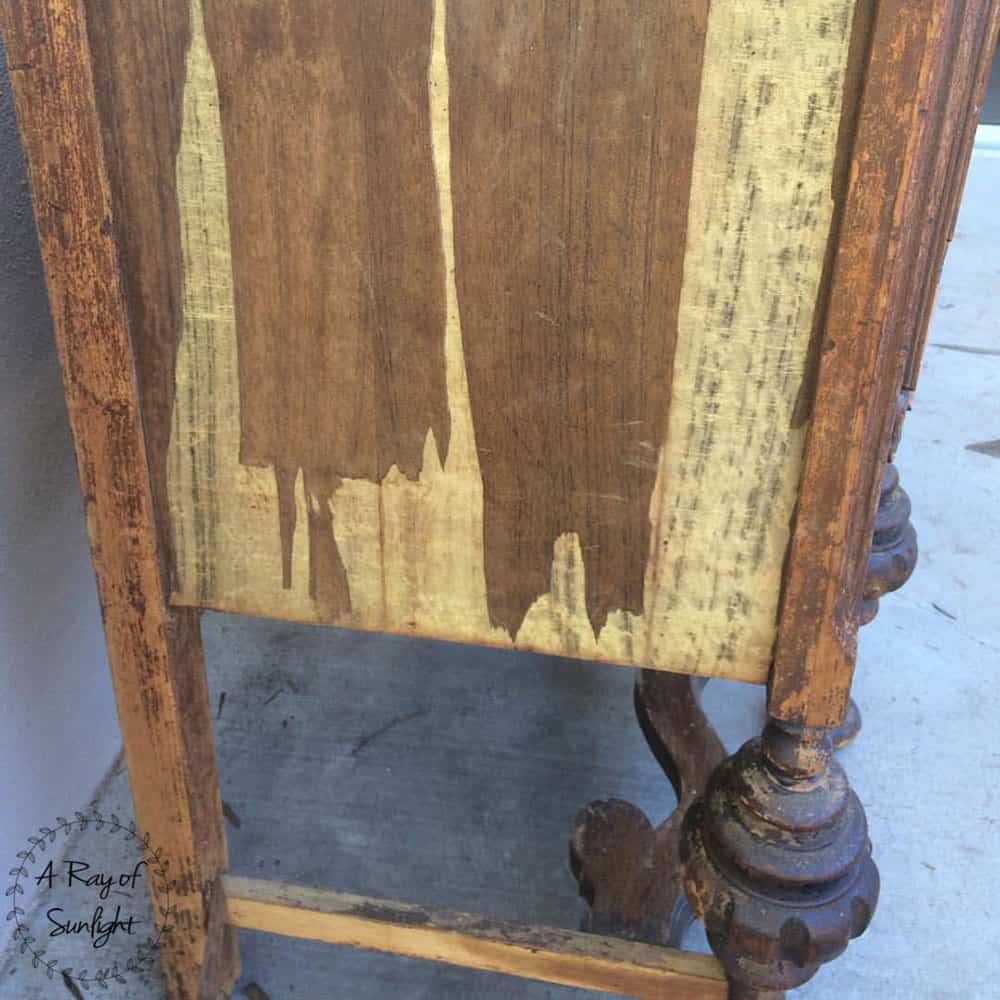
I had a tiny bit of help from my putty knife and hammer to get off the hard spots. I simply stuck the thin metal putty knife under a loose spot in the veneer, and then used the hammer to gently knock the putty knife into the glue that holds the veneer on. This one really wasn’t too hard though.
Patching Bubbled Veneer
Next, I took off the backsplash and started sanding the top of the buffet with my orbital sander. I hoped that I could just sand the top to a smooth finish, cut out the bubbled veneer with a utility knife and patch it all up with Bondo.
So I carefully cut out any veneer that I could see that wasn’t glued down with my utility knife. And then I used this Bondo trick to fill in and repair bubbled veneer that I had cut away. You can check out this post on how to repair bubbled veneer for more details.
Once the Bondo was completely dry, I used my orbital sander again to sand the Bondo completely smooth with the existing veneer. Check out the best sanders for furniture you can use for sanding furniture here.
Spoiler Alert… The repair didn’t work this time. I’ll share more about that below.
How to Fix Chipping Veneer
There were a couple of spots where the veneer was just barely chipping around the edges. This type of veneer damage is the easiest to fix though, so it was all good.
To fix the small chips, I glued (wood glue) and clamped the wood around the chip to make sure it wouldn’t chip anymore. Then I used Bondo again to fill in those small chips that were left by the missing veneer. Read this post to learn more about repairing veneer with wood filler.
It’s basically the same method as before. And then I let it all dry. Then I used my orbital sander again to sand the Bondo smooth with the wood. You can see these repairs in the photos above and below. You’ll see a light pink color near the inside legs. But once the Bondo is painted, you’ll never know it was there.
This type of Bondo does not stain well though, so if you are wanting to stain the wood, you’ll want to use Bondo wood filler instead. (It takes stain as well as regular wood filler takes stain..) Check out how to repair chipped veneer furniture and stain Bondo here.
If your antique piece has cracks here and there, check out this post on how to repair cracks in antique wood furniture.
Get Our Secrets!
Grab this super convenient How to Repair Furniture Ebook with all of our secrets on how to repair furniture for only $14.
You can print it out and have instant access whenever you come across damaged furniture, and know exactly how to fix it!
Click on the picture of the book to purchase!

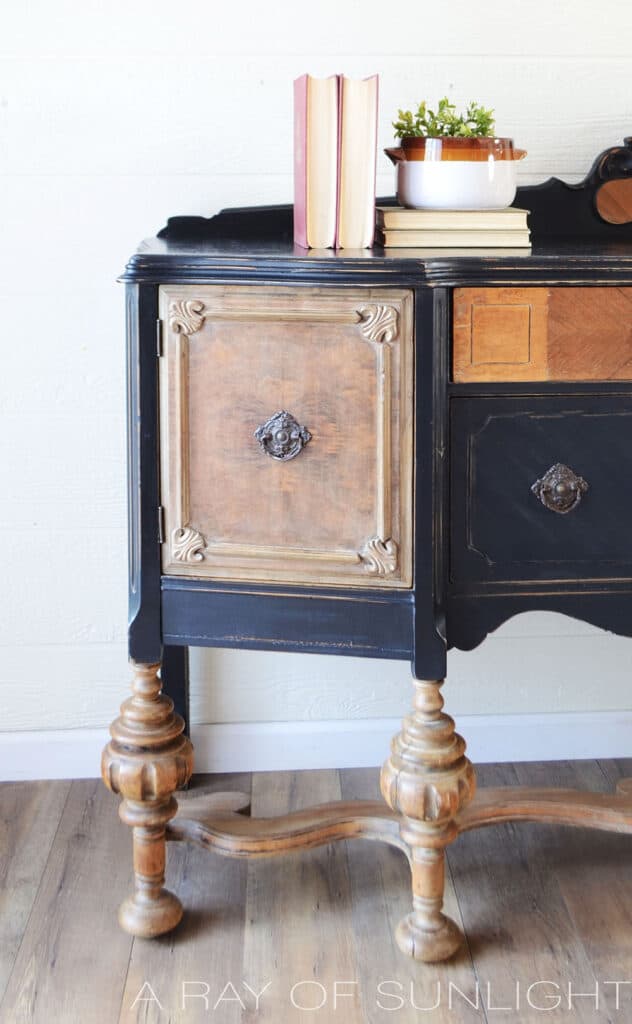
On that note though, if the veneer damage is pretty bad, you can sometimes see if the wood underneath is decent enough. Sometimes it has a really cool grain pattern, but it’s not usually the very prettiest wood. That’s why there is veneer over it.
But if you are really wanting the natural wood look with stained wood, you can remove all of the veneer (gently) and then sand and stain the wood that has been hiding underneath! I’ll share more about that below as well.
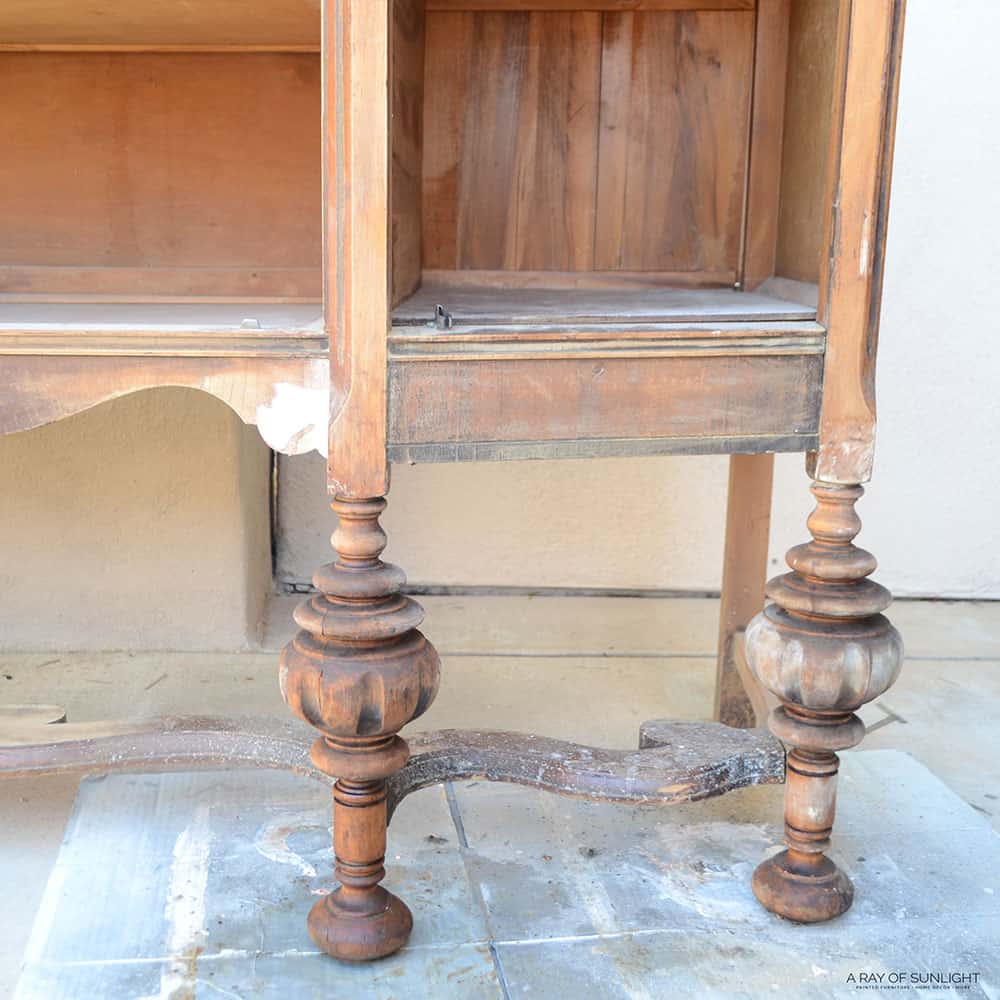
Remove Old Stain on Buffet
I kept dreaming about those legs with no paint or stain. Just raw wood natural legs.
I shared the process of how to remove old stain from wood here. After stripping all of the legs and the leg brace, I let them dry. And then I glued down the rest of the repairs I needed to.
Quick Tip: If you need to do repairs, but you’re planning on using a chemical to strip down wood, make sure to do the repairs after you strip. Otherwise, the stripper may eat through the wood glue and mess up your repair work.
I also stripped the doors and drawers with the same method.
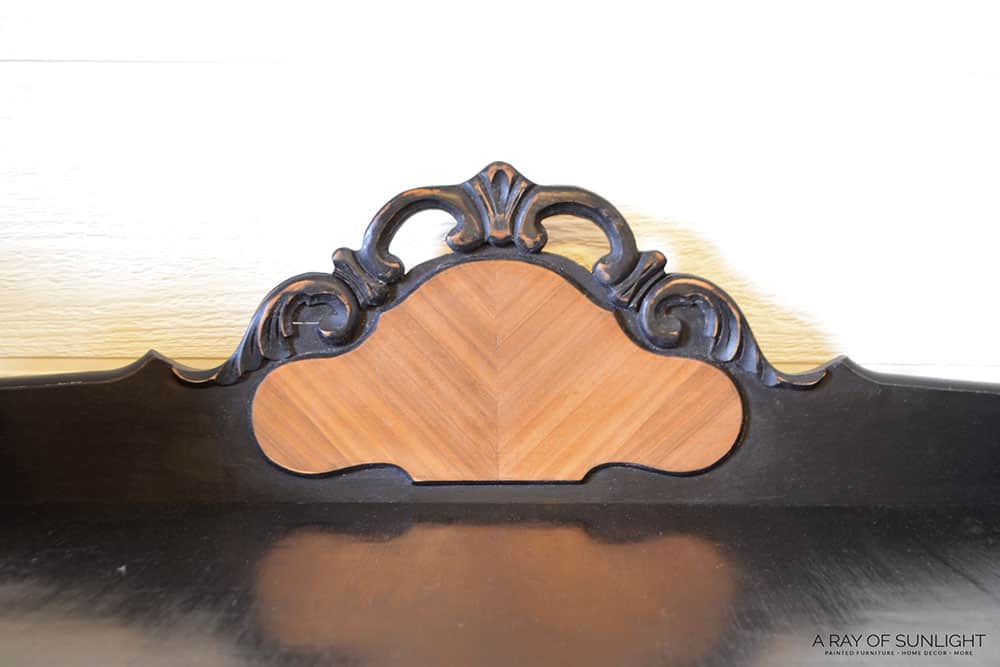
Repair Backsplash of Buffet
The backsplash even got a new makeover. The right top edge of the backsplash had broken off somehow, so I grabbed the jigsaw and cut both sides of the backsplash edges to match each other.
If you look closely at the before photo, you can see how the far right side of the backsplash wasn’t the same shape as the far left side. That was an easy enough fix.
My biggest tip on this one is to cut the damaged side down to the exact shape that you are wanting. Then grab a piece of paper and a pen to make an outline of the shape.
I cut my shape out then flipped the template over so that it mirrored the original template shape. Then I went to the undamaged side of the backsplash and traced the outline of that template onto the backsplash that needed cut down.
Once I had the outline traced on, I was able to follow the line to get the same exact shape as the other side.
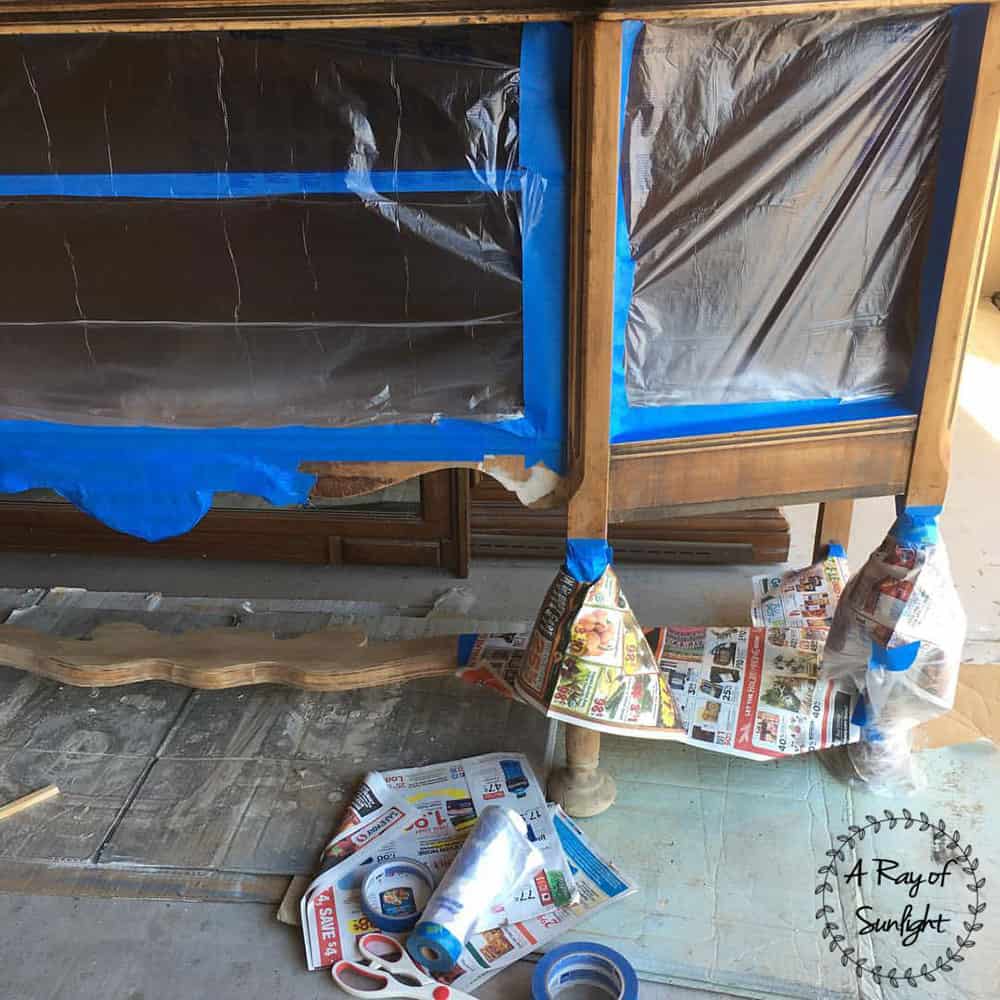
Prep Buffet for Paint
Before painting, I cleaned the surface of the furniture with Krud Kutter to remove grease and grime that might make the paint not stick. Learn more about how to clean furniture before painting here.
After everything was wiped down I taped off anything that I didn’t want to get paint on. Especially since I use one of these best HVLP paint sprayers for a nice smooth finish. I love to use this pretaped plastic and painter’s tape to tape off spaces like this. And then I used some old newspaper and tape to cover the legs and the leg brace.
You’ll notice in the picture below that I taped excessively around the raised detail down at the bottom in the middle of the buffet. I honestly didn’t want to spend a lot of time taping, so I taped the whole area, and then went back with a small artist brush later to get close to the detail work.
Would you like to save this?
Learn more about how to prevent overspray when painting furniture here. And read this post to learn all about how to prepare furniture for painting!
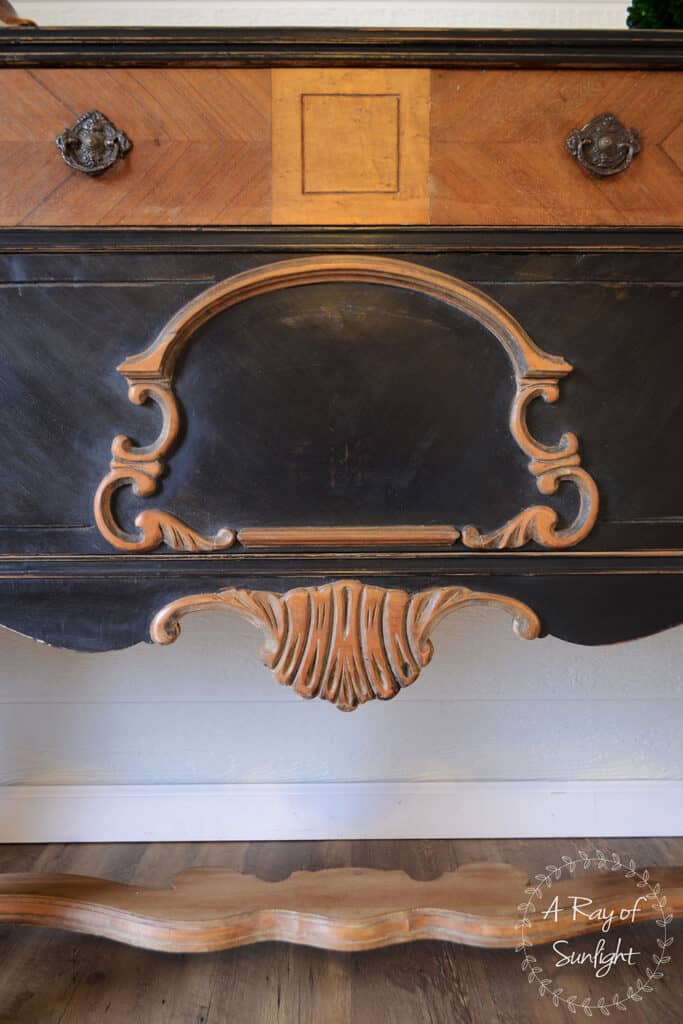
How to Paint an Antique Buffet Black
Finally, after a week and a half, I was done with the prep work (or so I thought), and I started to paint it. I made some chalk paint with my homemade chalk paint recipe and black latex paint. The color is actually called black at Home Depot. Fancy right? haha here are more black chalk painted furniture ideas you can try.
I thinned out the paint and put it in my paint sprayer, and sprayed a coat onto the buffet. Here’s more about how to thin paint for a Wagner sprayer. Check out this coffee table makeover to see how we paint black paint with a sprayer.
Learn the fastest way to paint grooves and details here for painting detailed pieces like this buffet.
P.S. Back then, I didn’t know or understand bleedthrough and the importance of using a primer (not to make the chalk paint stick, but to create a better looking painted finish. Now I know, and I prime every piece… even if I use a paint that claims that you don’t need to prime.)
You can learn more about how to stop stains from coming through paint by priming here, and check out the best primers for painting furniture you can use in this post.
Fix and Remove More Veneer
And then I about cried when I realized that the moisture from the paint made more veneer on the top bubble up again. I was crushed when I saw all of that hard work of sanding, filling with Bondo, and more sanding was all for nothing. So I finally did what I should have done, to begin with.
I slowly and painfully removed all of the veneer from the top of the buffet. This time the veneer was a lot harder to remove. I started out with my trusty putty knife and hammer.
I removed a lot of the veneer, but there were places that were being super stubborn and would not come off. So I tried a couple of different things.


How to Remove Veneer with Wet Towel
First I tried the wet towel method. Basically, you put a wet towel (not soaking wet, but not just damp either), on the stuck on veneer overnight.
The veneer and glue are supposed to get moist and lift up after that. It seemed to work great, but waiting overnight for it to get really wet just isn’t for me.
How to Remove Veneer with Heat
The other method I tried (while waiting on the wet towel to work its magic in another area) was a hairdryer. Now, if I was smart, I would have a heat gun for this. But I didn’t, so I went to the next best thing. And it worked pretty well.
I found that it was easiest to heat up the metal putty knife first, and then point the hairdryer at the veneer while I scraped under the veneer. This was pretty slow and steady since the glue needed to get hot enough to get soft before I could really get in between the veneer and the wood. But it worked!
(P.S. it’s best to wear thick gloves when working with veneer so you don’t get slivers or splinters.)
What is the Best Method to Remove Veneer?
This is such a tricky question. It honestly depends on the project, your time, the weather, and what you’re feeling up to.
I would say the wet towel method isn’t going to be the best in the scorching summer heat in the South. But it will probably be better in a high humidity area, or on a rainy day. The heat method would probably work better with an actual heat gun, but it worked with a hairdryer too!
*UPDATE: Since writing this post, I’ve learned an even easier way to remove veneer here!! Check out our quick video as well to learn more!
After all of the veneer was off, and the wood was completely dry, I put on a very thin coat of Bondo to fill in the deep grain of the wood underneath. After more sanding with the power sander and more filling with Bondo, and then even more sanding it was finally ready for paint.
Paint Another Coat of Black Paint on Buffet
I sprayed on another coat of black chalk paint. You can learn how to paint furniture black by hand here if you don’t have a paint sprayer yet. When it was dry, there were no more issues with the top! Yay!!
Once all of the paint was dry I grabbed my sanding block with 220 grit sandpaper wrapped around and distressed all of the edges to give a worn look. Discover these 6 distressing furniture techniques you can do here if you want the same rustic style.
Because of its age, this buffet has dings and scratches and I wanted to highlight all of those things. Each ding and scratch tells another story and shows how beautiful this piece really is.
Sealing Black Painted Buffet
After wiping everything clean again with a tack cloth, I sealed the whole piece with wax. And I honestly really wish I would have sealed it all with polyurethane instead. I wanted to seal it with wax, thinking that the wood would look better with wax.
But I think I would have gotten the same exact finish, but the poly would have been so much easier and faster, especially since I spray polyurethane with a paint sprayer. Check out our tips and tricks on how to spray polyurethane here!
But I’m really not a waxing girl.
Almost a week later I still do a little happy dance every time I walk by it. It is such a stunning old piece that had been almost forgotten about. But now it has a new finish that shows its curves and details and it is ready to proudly serve another family for many more years to come.


Buffet Makeover Ideas
Aside from painting your buffet black, there are many other ways to give this furniture piece a makeover. You can choose to keep its original charm and simply refinish the wood with a new stain. You can choose a light or dark stain depending on your style and the wood’s natural color.
This will give your buffet a fresh, updated look while still maintaining its classic appeal. Here’s how to stain wood furniture if you’re new to refinishing furniture with stain. It’s actually a lot easier than you might think!
Another option for a buffet makeover is to use another color besides black. This could be one of these bold furniture paint colors like red, teal, or yellow, or one of these neutral furniture paint colors like cream and gray to create a more subtle look. Whichever color you choose, make sure it complements the rest of your home decor.
You can also add some unique hardware to your buffet. This could be vintage knobs and pulls, modern handles, or even leather straps for a rustic touch. Maybe your old hardware just needs some cleaning too. Here’s how to clean old furniture hardware if you want to keep the original pieces.
Don’t be afraid to mix it up and combine techniques. You can paint the base and stain or refinish the top for a two tone look. Or you can use more than one color on your buffet, like painting the drawers a different color than the rest of the piece.
So, would you take on a piece like this antique black buffet?? For more similar makeovers, here are painted antique buffet ideas and chalk painted antique furniture ideas. Check out these painted buffet ideas if you still need more inspiration.
More Before and After Makeovers
See All >
Click any of these “before” photos below to view the “after” of that makeover.


Black Painted Antique Buffet
This buffet was headed for the dump. But we fixed it up and are ready to show you how to fix damaged veneer on your own piece, and how to strip the finish.
Materials
Tools
Instructions
- Start the makeover by repairing and removing veneer off the buffet. Then fill in and repair bubbled veneer with Bondo. Once the Bondo is completely dry, sand the Bondo completely smooth with the existing veneer. For any small chips, glue and clamp the wood around the chip to make sure it wouldn’t chip anymore. Use Bondo again to fill in those small chips that were left by the missing veneer. Let Bondo dry and sand smooth after.
- Strip old stain from wood then let it dry.
- Now, before painting, clean the surface of the buffet with Krud Kutter to remove grease and grime that might make the paint not stick. Tape off anything that you don't want to get paint on and to prevent overspray.
- Make homemade black chalk paint from your latex paint then thin out the paint before putting it into your paint sprayer. Spray black paint onto the buffet and once all the paint dries, sand and distress the edges for a worn look.
- After wiping everything clean with a tack cloth, seal the whole buffet with wax or polyurethane.
Recommended Products
As an Amazon Associate and member of other affiliate programs, I earn from qualifying purchases.


More Buffet Makeovers
- Antiqued Blue Farmhouse Buffet
- Dark Green Buffet Makeover
- Olive Green Painted Antique Buffet Makeover
- Buffet Turned Into Bathroom Vanity
- How to Add Legs to a Buffet
Learn the Art of Updating Furniture!
If painting furniture feels overwhelming or your past attempts didn’t go as planned, this course will guide you step by step.

Follow us on YouTube to get more tips for painting furniture. Or share your project with us on our Facebook Group and be part of our community. See you there!
This is such a fabulous piece!! I love how you did it!!
Thank you so much! That is so sweet of you!
Hi…I just love what you did with this piece! It looks gorgeous. I am wondering if you know anything about the history of the buffet? I have a dresser set that has very similar details. The variety of woods, the curly design work, the fan design…I've been trying to get some information…any information…about them. But what you did with the paint and bare wood is so ingenious! I had my dressers stripped because the woman I bought them from had painted parts. 20 years ago…she was ahead of the times with that! When the man working on them discovered the types of wood under the paint…maple, walnut, oak…he suggested just using a clear coat to show that. But the fronts of the drawers have veneer breaking off and I always wondered what to do about that. Your solution is great! Thanks for sharing!!
Hey Deb!
Unfortunately I don't have any information on the history of the piece! Sorry! Thank you for reaching out though! I'm glad you enjoyed our blog!
-Natalie
Gorgeous! Great job!
Absolutely Stunning ❣️
Glad you shared about using Bondo over stipped veneer– I used wood filler over and over, sand, wood filler, repeat. I even had Bondo! I learn something new-to-me with every one of your posts. Thanks for that!
LOVE this makeover! The work and time you put into this one was well worth it. I think for me it’s the beautifully carved legs. But I’m also a sucker for wood legs. Well done, my friend. ?
WOW!
This piece is gorgeous Natalie! Great save! Pinned!!!
This one is stunning, Natalie! ? Black and wood is always a winning combo. Pinned!
Gorgeous! So much work but the outcome was worth it.
This is definitely a master level project. Your results are really interesting, what to paint and what to save is always a dilemma, and this has a fun/quirky vibe…that would fit anywhere!
Thanks for your love Sandra! I agree, it was a lot of work to makeover this buffet.
I like this one a lot!
Thank you for the love on our black painted buffet!
Love what you do with furniture. I do not have the patience.
Ahh I get that! But I’m so glad you appreciate what we do!