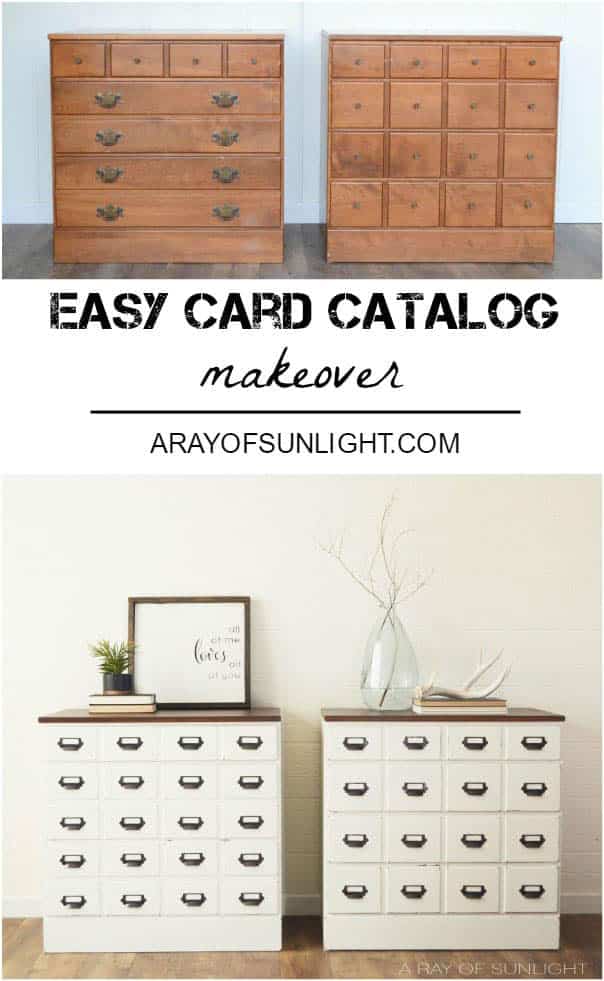
DIY Card Catalog Dresser Makeover
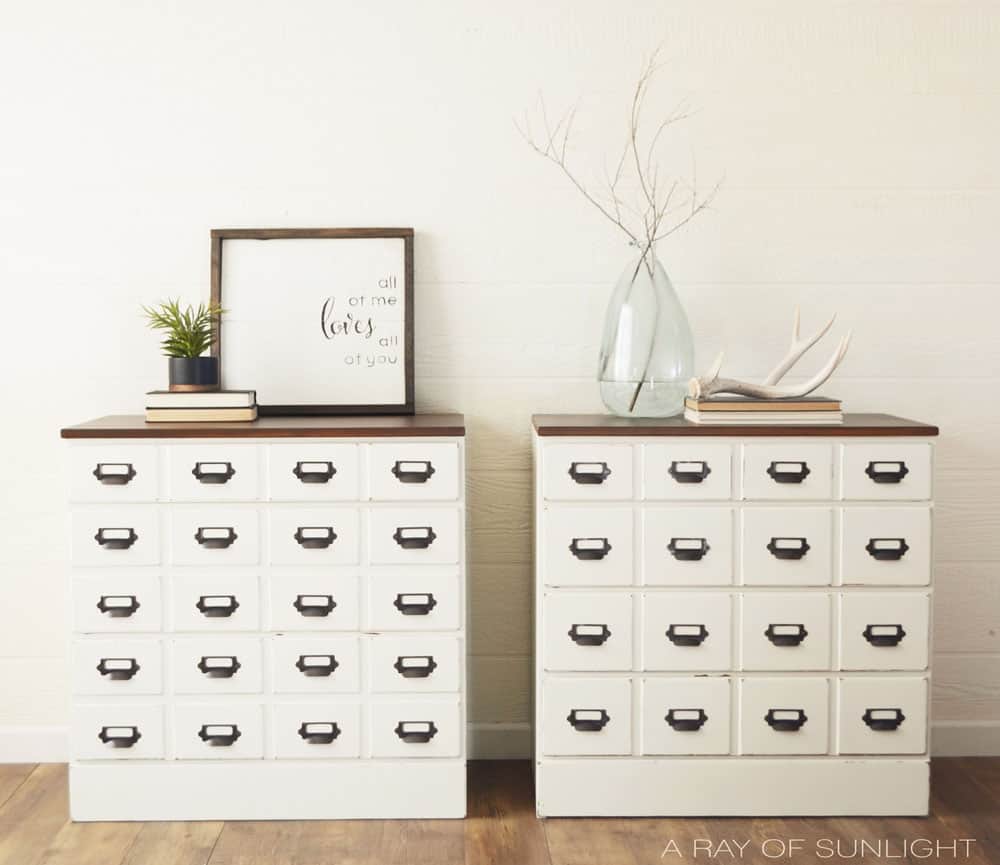
Do you have old thrifted furniture you want to update into card catalog/apothecary-style nightstands for your farmhouse style bedroom? In this DIY card catalog dresser makeover, we easily transformed this Ethan Allen Chest of Drawers into two beautiful nightstands with a router and card catalog hardware.
It’s one of the painted nightstands ideas that will bring charm and personality to your bedroom while giving you functional storage space. So, follow along as we show you how to create these stunning pieces step by step!
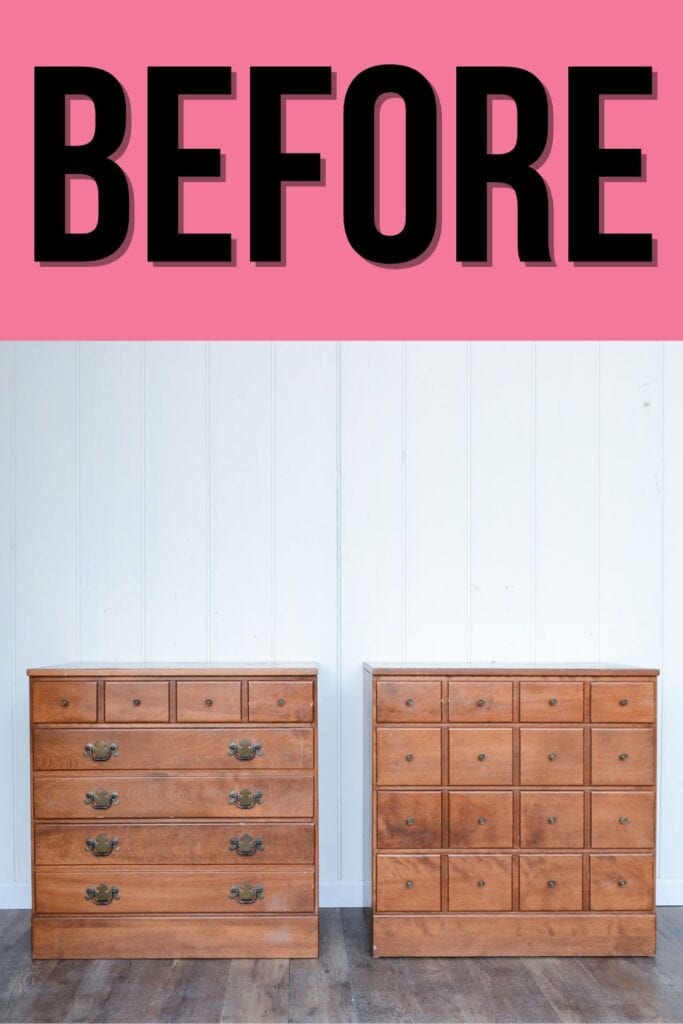
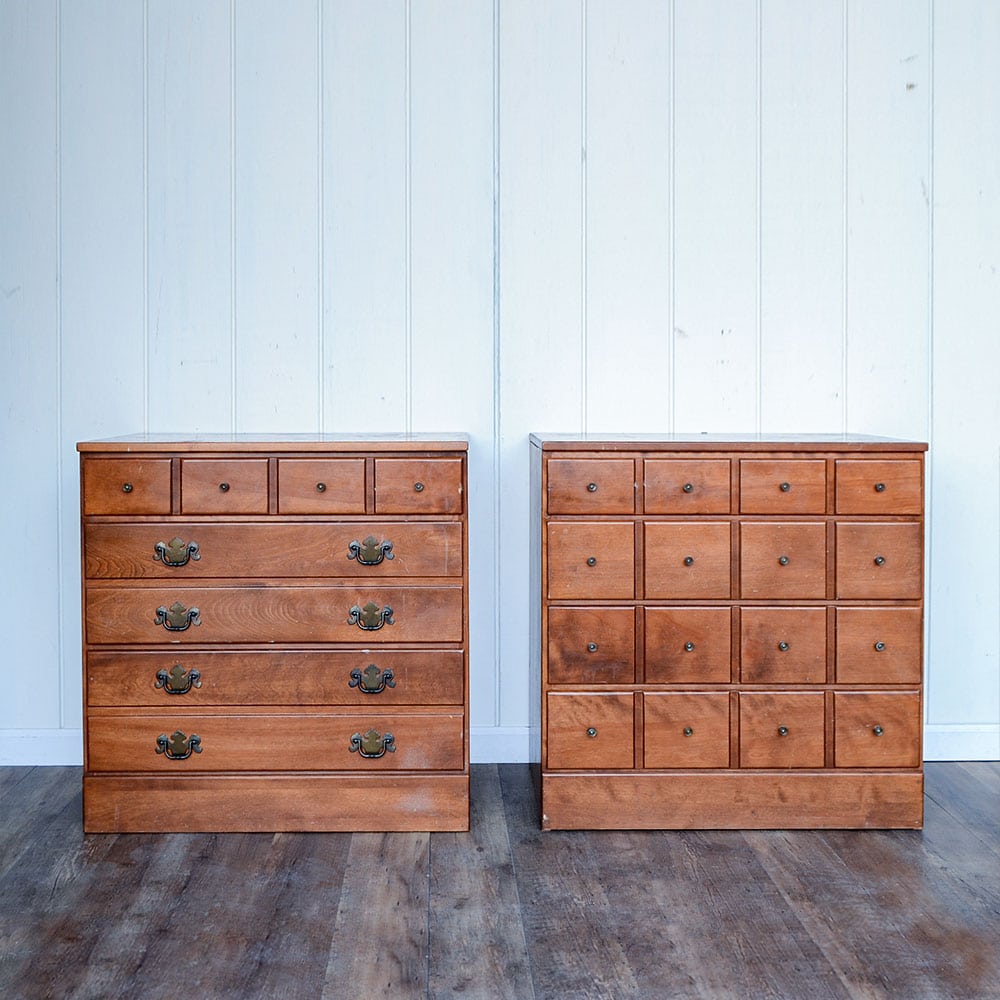
Last weekend, I spotted this apothecary-style dresser on Craigslist. Since I’ve been searching for something similar for a while now, it only took a few minutes to contact the seller and jump in the truck to snatch them up. If you want to know my best places to get good furniture for cheap, check out this post to find out.
On Craigslist, he only had a photo of the dresser on the right, so I had no idea what the other one was going to look like. I was so disappointed to find that the “matching” dresser wasn’t the same, but I bought them both anyway. There had to be a way to change it so it had the apothecary feel to it.

Faux Card Catalog Cabinet Inspiration
A few days later, I stumbled across a post from Julia at Boxwood and Brass. Her pieces are always top-notch, and I just love following her to see what she does next.
Well, by a miracle, she had just finished up the same exact Ethan Allen dresser. It was spot on with what I wanted to do, and I finally had an idea of how to accomplish it.
I quickly scoured the comments to see if she had given any hint about how she had transformed the drawer fronts. Her husband had routered out the drawer fronts to create her vision. That was just the inspiration I needed to transform our dresser.
Within 24 hours, I called my dad to get his advice and ask for his help on this one. I had never used a router before, even though it’s on my list of tools to get. Of course, I couldn’t wait to see the transformation for myself, so we got to work as soon as possible.
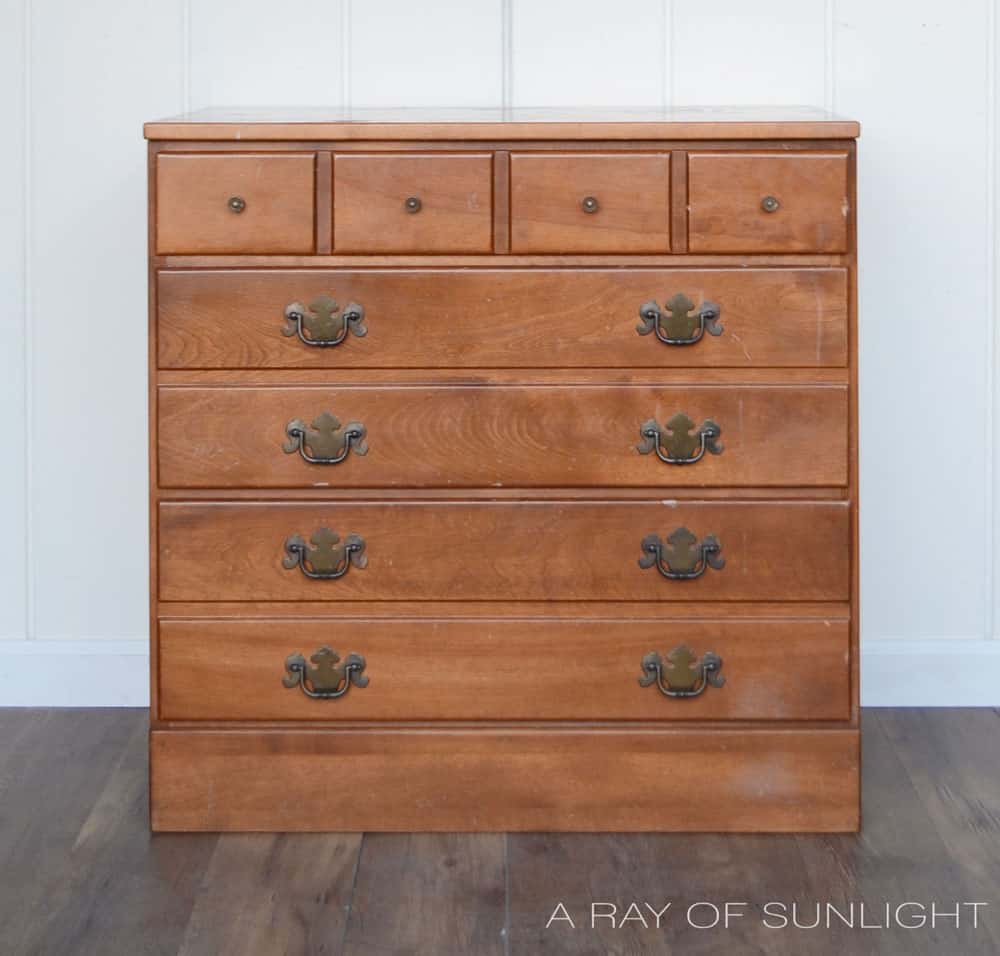
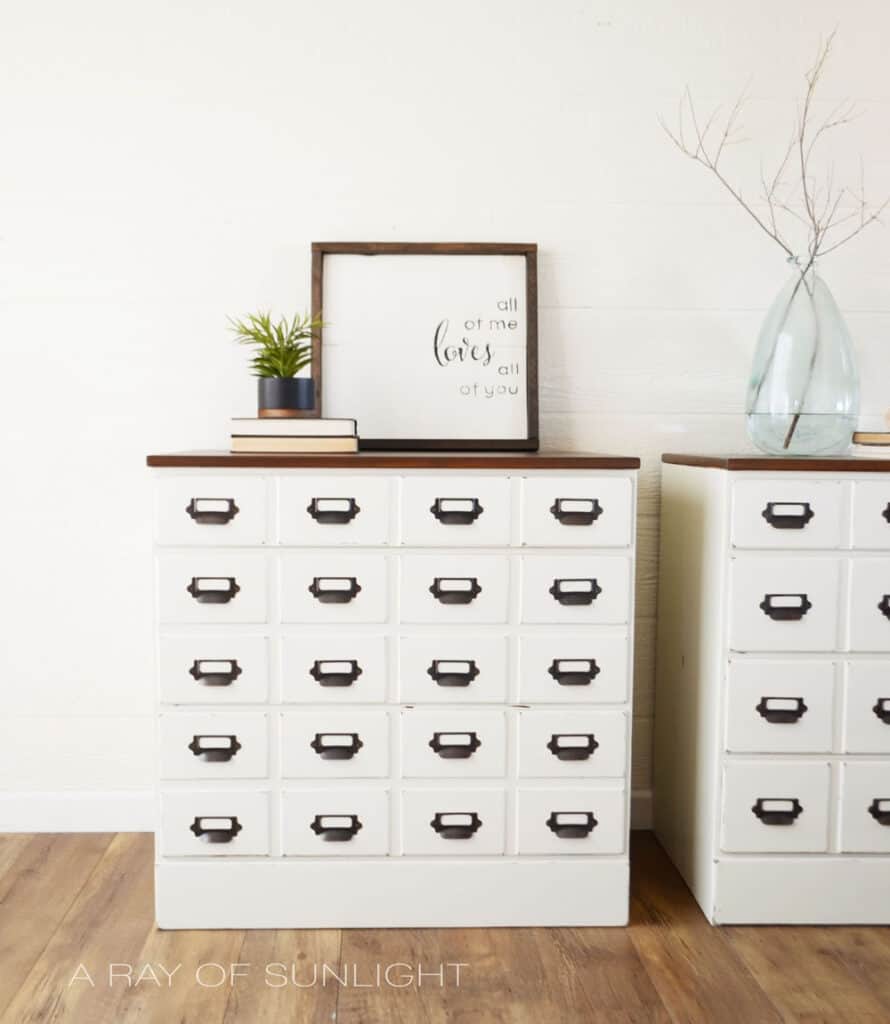
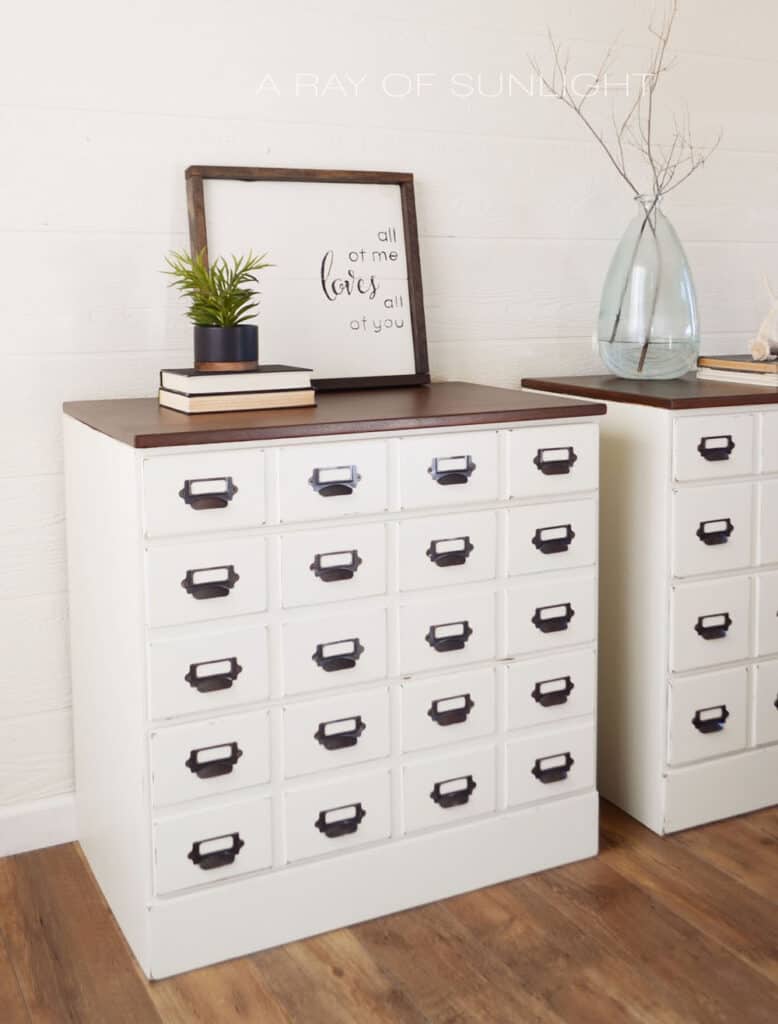
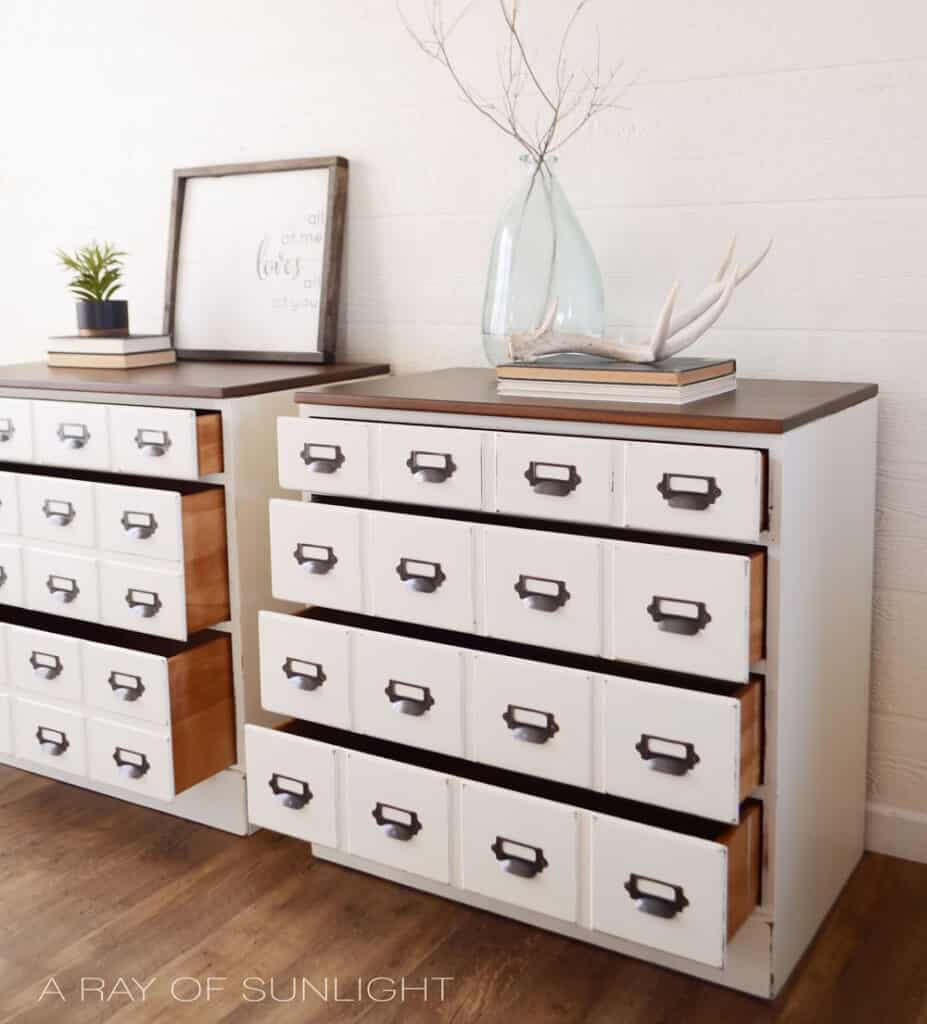
We wanted to mimic the exact grooved-out design that Ethan Allen had originally created, but we wanted the bottom two drawers to look like they were actually 16 small drawers instead of 4 longer drawers.
The original grooved-out design was 5/8″ wide x 1/8″ deep. Each edge had an angle, just like a “v”.

Supplies Used for DIY Card Catalog Dresser Makeover
As an Amazon Associate, I earn from qualifying purchases. I also may earn from other qualifying purchases with other companies or get free product to review and use. All opinions are my own.
- Bondo / Wood Filler
- Router / Router (Home Depot)
- Router Bits – 5/8″ Straight Bit & 1/4″ V- Groove
- Measuring Tape / Ruler & Pen
- Clamps
- Straight Edge (We used a scrap of wood that had a straight edge)
- Eye Protection
- 220 Grit Sandpaper (this is the best kind!)
- Painter’s Tape
- Painter’s Plastic
- Citristrip
- Clear Shellac
- General Finishes Bone White Chalk Style Paint (Not available anymore, but General Finishes Alabaster is a great alternative).
- Paint Sprayer
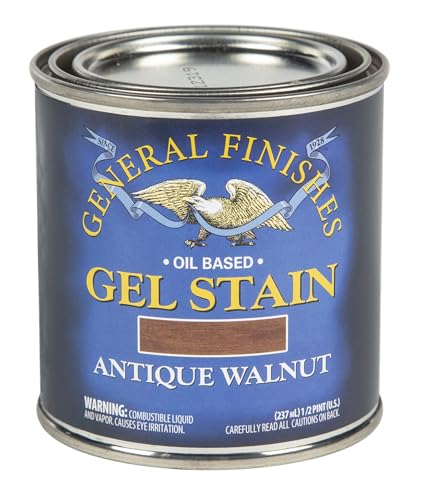
- General Finishes Antique Walnut Gel Stain
- Varethane Polyurethane
- Card Catalog Style Hardware
- KREG Cabinet Hardware Jig
How to Make Card Catalog Drawers
First, we filled in all of the old hardware holes with Bondo. Wood filler works, too, but it’s a pain compared to Bondo. Learn all about this product in our Bondo Wood Filler review here!
Since publishing this post, I have learned of an even easier way to fill hardware holes – learn more about it in our how to change hardware on a dresser here.You can also check out this comparison post of filling holes when replacing cabinet or furniture hardware to see which wood filler works the best!

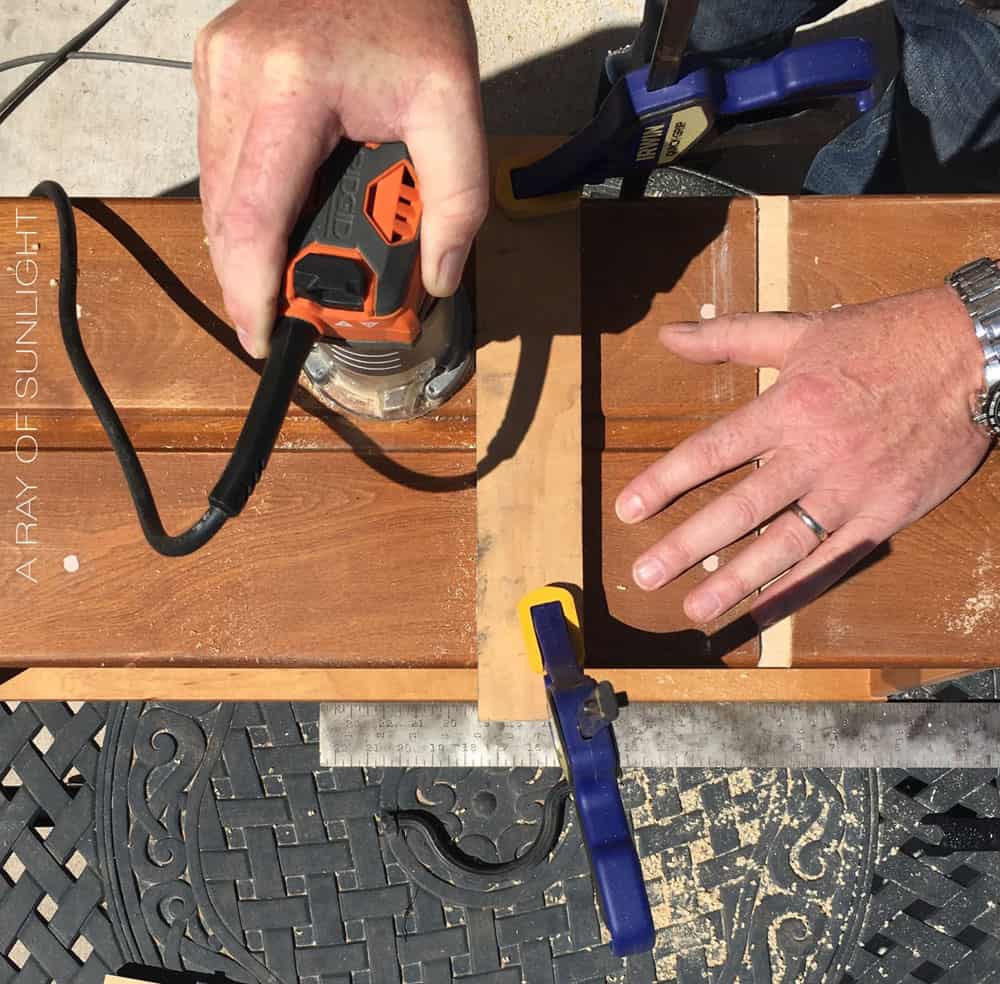
Using the top drawer of the dresser as a guide, we measured and clamped the straight edge to the drawer front.
Using Straight Bit
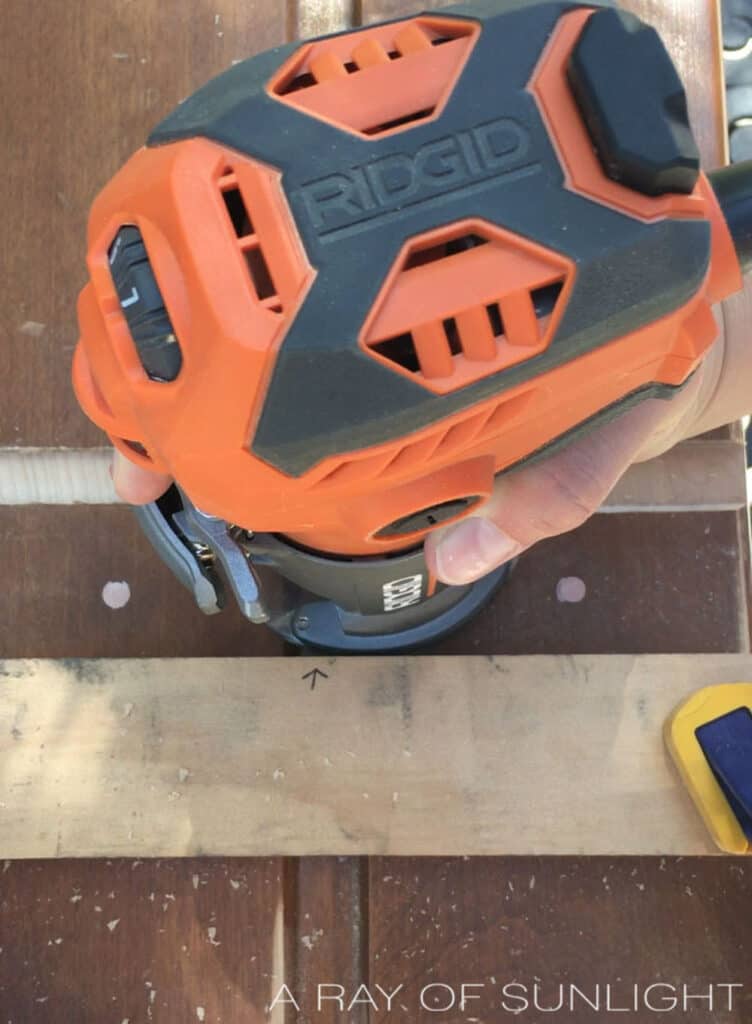
Once everything was measured and then double-checked, we put the straight bit onto the router. We held the router level and kept it flush against the side of the straight edge. Without the straight edge, there is no way we would have ended up with completely straight lines!
Using V-Groove Bit
Once all of the straight grooves were cut, we changed out the Straight Bit for the V-Groove Bit. This time we wanted the center of the router to be right on the edge of the groove we just routered.
We measured and then checked to make sure our measurements were correct by placing the center of the bit right on the edge. Then, we made sure the edge of the router base was flush against the straight edge. Once again, we kept the router flush against the straight edge as we cut.
*Note: Be aware of the direction the bit is spinning. At one point the bit didn’t want to cut evenly and straight. We realized that when we were cutting one edge, the router needed to be pushed away from me. When we cut the other side of the groove, the router had to be pulled towards me.
Otherwise, the bit was cutting away from the wood, causing it to jump around.
The most time consuming process was measuring and then double and triple checking to make sure we were cutting in the right spot. It wasn’t something we could mess up on and just start on a new board. But the extra time double checking was well worth not messing up.
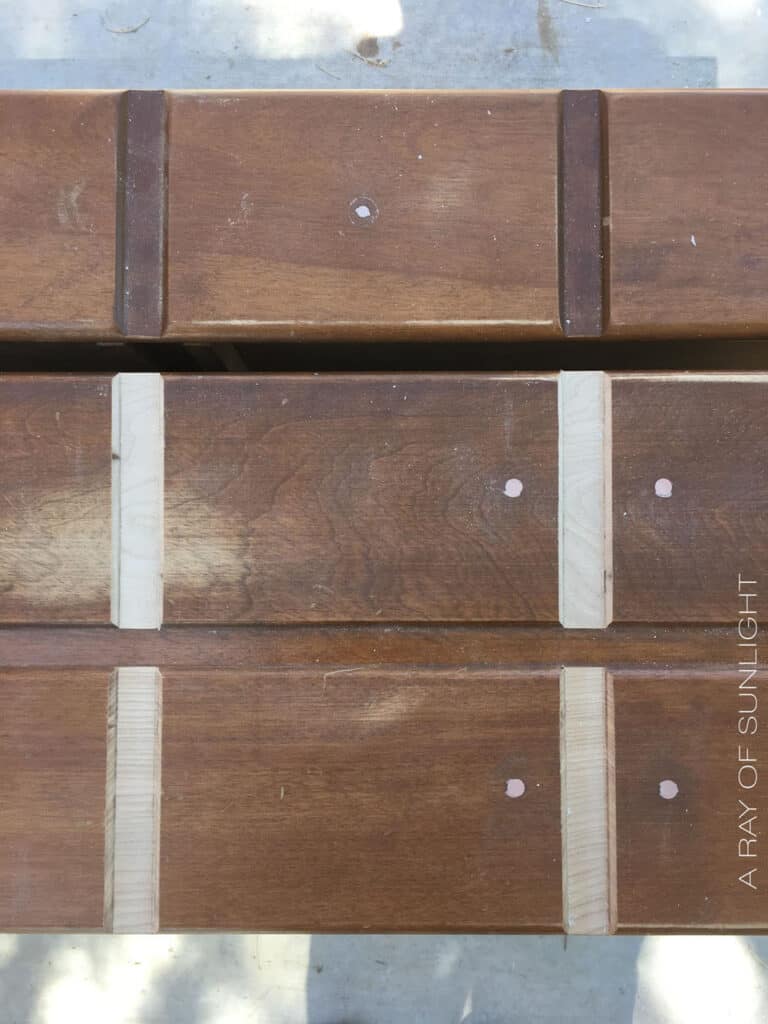
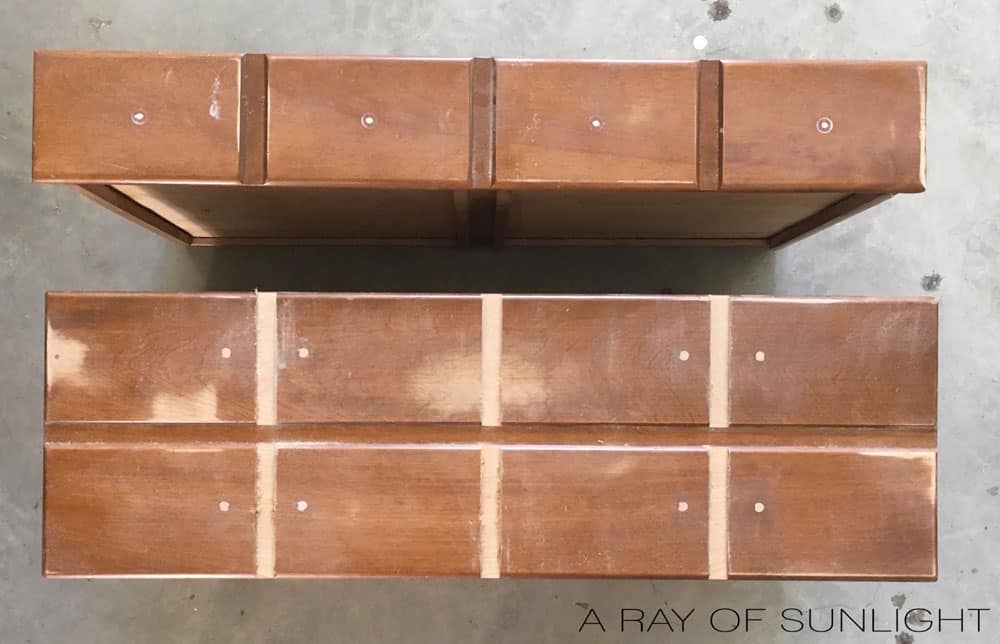
Then, we cleaned up the edges with the V-Groove Bit. When all the new grooves were cut, we sanded everything smooth with 220 grit sandpaper.
Prep for DIY Card Catalog Dresser Makeover
To get the dressers ready, here’s how to prepare furniture for painting. We stripped the tops with Citristrip, lightly sanded everything, and thoroughly cleaned them. Learn more how to remove stain from wood with Citristrip here, and learn the importance of sanding before painting furniture here!
We taped off the tops and the insides of the drawers to prevent overspray from getting into the drawers. Here’s a more detailed guide on how to tape off drawers for painting with a paint sprayer, and here are more tips on how to prevent overspray when painting furniture!
Would you like to save this?
Then we gave them 2 coats of clear shellac. Shellac is super important to use when painting lighter colors. The wood/stain tends to bleed through the lighter colors, causing random yellow/red spots. It’s also called bleed-through. Learn all about this issue and how to stop stains from coming through paint here.
Shellac primer works, too, but clear shellac dries clear instead of white primer, making it easy to distress without white under your paint. Check out this post for the best primers for painting furniture and how to choose the right one!
Painting Card Catalog Dresser with Chalk Paint
We used our paint sprayer and sprayed on about 3 coats of General Finishes Bone White Chalk Style Paint (Not available anymore, but General Finishes Alabaster is a great alternative). Usually, we spray on at least 5 coats when we paint a shade of white, so I was super happy to see amazing coverage with this paint.
If you want to know your options, check out our list of the best HVLP paint sprayers for furniture here! For white chalk paint, here are the best white chalk paint for furniture options.
Using 220 grit sandpaper, we distressed the edges and then wiped and vacuumed away the dust. Learn all about the best distressing furniture techniques here, including sanding!
Staining Card Catalog Dresser Tops
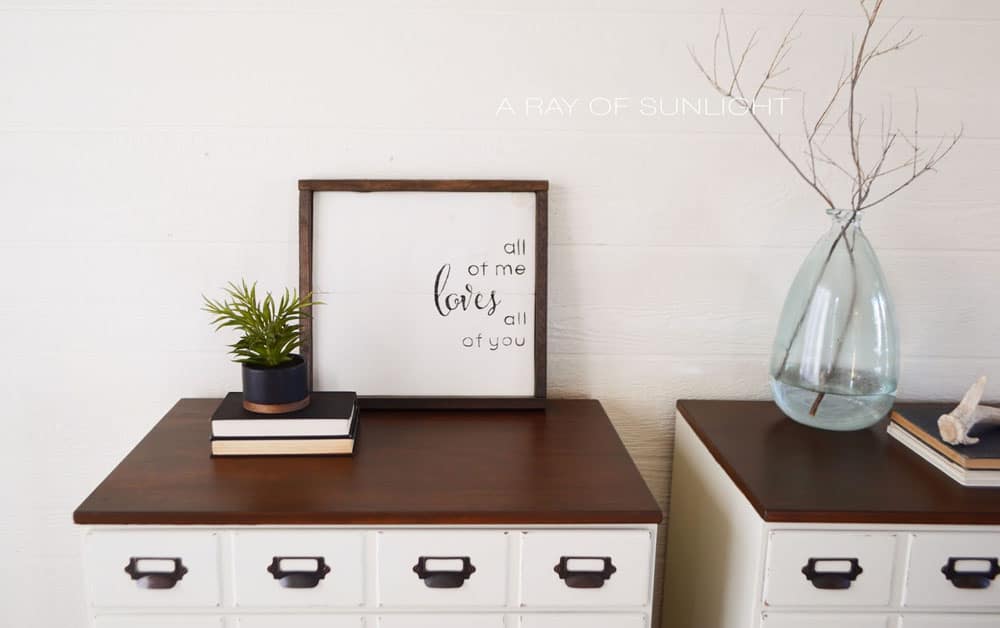
Then we took all of the tape and plastic covering off, and we gave the tops two coats of General Finishes Antique Walnut Gel Stain. The stain really brought out the natural beauty of the wood grain and gave it a rich, warm tone, a beautiful contrast to the crisp white paint on the rest of the dresser.
Our guides on how to stain wood furniture and how to stain wood darker can give you more tips and tricks on staining furniture!
Topcoating White Dresser with Stained Top
Once all the paint and stain were dry we sprayed on multiple coats of my favorite clear topcoat, Varethane Polyurethane in Satin. The polyurethane just helps add durability and makes everything easy to wipe down.
Learn ALL of my tips and tricks on how to spray polyurethane here! We have a list of the best sprayer for polyurethane here if you need recommendations. And learn all about the best topcoats for painting furniture here, aside from poly!
Adding Card Catalog Hardware
We ordered the card catalog style hardware from D. Lawless Hardware. You can also order the screws for your hardware from them as well.
Since we had 36 pieces of hardware to attach, I quickly made a handmade version of a hardware template out of cardboard, tape, and a small level.
I measured out where I wanted the hardware, made holes in the cardboard, and marked on each drawer where the screws would go. It made attaching the hardware so much more simple.
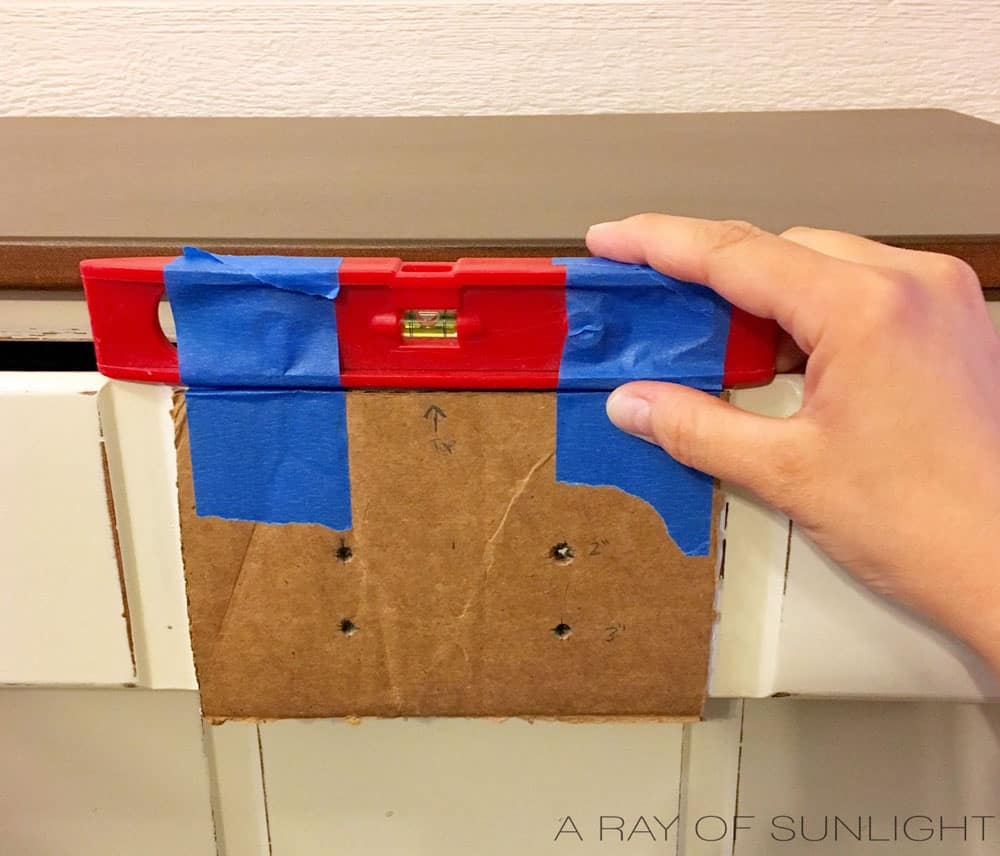
**Update: I recently bought this KREG Cabinet Hardware Jig that makes measuring out the hardware holes super easy peasy!**
I couldn’t be happier with the final results! Even up close and in person, I can’t even tell that the dressers didn’t come this way to begin with. The transformation is absolutely amazing, and I can’t wait to find another dresser with basic drawers to transform.
More Before and After Makeovers
See All >
Click any of these “before” photos below to view the “after” of that makeover.


If you want more furniture makeovers in classic colors, check out these stunning black and white dresser ideas!
Why Card Catalog Furniture?
Why are card catalog dressers and cabinets so popular in home decor these days? For starters, they’ve got that unique, vintage vibe that adds a ton of character to any space. Plus, they’re perfect for rustic or farmhouse style spaces!
Aside from its aesthetics, card catalog furniture is also super practical. Its many drawers provide plenty of storage space, making it great for organizing office supplies or small trinkets. The different sized drawers can even store larger items.
Just like any kind of furniture, you can easily customize them to fit your personal style. You can paint it in your favorite color or leave it natural for a more rustic look. You can also switch out the hardware to give it a more modern touch.

So, if you like this style, consider transforming a boring dresser into a beautiful card catalog piece! You’ll love the extra character and storage it adds to your space. Have fun creating your own unique card catalog furniture like this DIY card catalog dresser makeover!


DIY Card Catalog Dresser Makeover
Transform your old furniture with this DIY catalog dresser makeover, perfect for your farmhouse-style room.
Materials
Tools
- Measuring Tape
- Ruler & Pen
- Router
- Router Bits
- Clamps
- Straight Edge
- Eye Protection
- Paint Sprayer
Instructions
- Remove and fill in old hardware holes with wood filler. This creates a clean surface for painting and for the new hardware to be installed.
- Measure and clamp a straight edge to the drawer front as a guide for cutting the grooves with a router. This helps create straight and even lines in the wood.
- Use a Straight Bit on the router to cut the first set of grooves, keeping the router flush against the straight edge. Double check measurements before cutting so everything lines up properly.
- Switch to a V-Groove Bit on the router to cut the second set of grooves, making sure the center of the bit is on the edge of the first set of grooves. Keep the router flush against the straight edge while cutting.
- Use the V-Groove Bit to clean up any edges and sand everything smooth with 220 grit sandpaper for a polished look.
- Prep the dressers for painting by stripping, sanding, and cleaning them thoroughly. This prepares the surface for a smooth and long lasting paint finish.
- Apply 2 coats of clear shellac to prevent bleedthrough of any wood stains or colors when painting lighter colors on top. This also allows for easy distressing without white primer showing through.
- Tape off areas like the tops and inside of drawers to prevent overspray when painting. This creates a clean and professional finish.
- Spray 3 coats of chalk paint onto the card catalog dressers using a paint sprayer. It can take more coats when using white, so make sure to check coverage and apply more coats as needed.
- Distress the painted dressers with 220 grit sandpaper for a vintage look. Wipe away and vacuum the dust before moving on.
- Remove all tape and plastic coverings and apply 2 coats of gel stain in your desired color onto the dresser tops. This brings out the natural beauty of the wood grain and adds a warm tone to contrast with the white paint.
- Spray on multiple coats of clear polyurethane over the paint and stain on the card catalog dressers for durability and easy cleaning. This topcoat also adds a beautiful sheen to the finished piece.
- Attach card catalog style hardware using a handmade template or a KREG Cabinet Hardware Jig for precise measurements and drilling. This step adds the final touch to complete the transformation.
Recommended Products
As an Amazon Associate and member of other affiliate programs, I earn from qualifying purchases.


More Furniture Makeovers
- DIY Mustard Yellow Card Catalog Dresser
- Apothecary Style Vintage Nightstands Makeover
- How to Paint Furniture Black
- 30 Amazing Faux Card Catalog Makeovers
- White Painted Dressers
Follow us on YouTube to get more tips for painting furniture. Or share your project with us on our Facebook Group and be part of our community. See you there!
Great Blog Natalie Love your stuff.
Thank you so much Michelle! You're so sweet!
Amazing job! Love the dresser and you gave me some great ideas, Thanks for sharing ,
Great job. I do love General Finishes paints.
BEAUTIFUL!!
This is a great project — I really want to try this!
I have a question as I have 2 of these Ethan Allen dressers (My 6th grade Bday present was a bedroom set From EA) The dressers that I own, have a original finish/coat on them-basically clean by Windex. So I have always been hesitant to do anything with the dressers, as I wasn’t sure what my options could be for the top. I’m assuming yours were the same so curious what prep you did before the walnut stain?
Some of these dressers have a very shiny, plastic laminate top, and others have wooden top with a regular wood finish. I have come across both options for these exact dressers, the bottom of the dressers are both all real wood, but the top can differ. The prep changes based on if it is wood or laminate. You cannot stain laminate.
If it is in fact wood, I sanded them down to bare wood, and then stained them.
Hopefully that helps.