Painting Furniture with Benjamin Moore Advance Paint


This week I’m sharing how I tried painting furniture with Benjamin Moore Advance Paint. It’s an alkyd paint that doesn’t require a topcoat like a lot of furniture paint does. So I’ve been really curious to use it!
I’ve also been curious to try this type of paint for furniture because it’s known for its durability and smooth finish. If you’re also considering using Benjamin Moore Advance, keep reading!

Now, I know what you’re thinking – “another paint to add to my collection?!” – I think the same thing every time I hear about a new paint. And of course I had to try it to believe it. So I tested out Benjamin Moore Advance Paint to see if it’s really as good as they say.

The best part about Benjamin Moore Paint for furniture is that it doesn’t require a topcoat like most paints do. That means less time and effort for me, and hopefully for you too!
I’ll be sharing my experience using this paint in the hopes of helping you decide if it’s worth adding to your collection. Let me share my thoughts about it, how I used it, and how it turned out in the end. So let’s dive in!

Supplies Used For Painting Furniture with Benjamin Moore Advance Paint
As an Amazon Associate, I earn from qualifying purchases. I also may earn from other qualifying purchases with other companies or get free product to review and use. All opinions are my own.
- Krud Kutter and an old damp rag
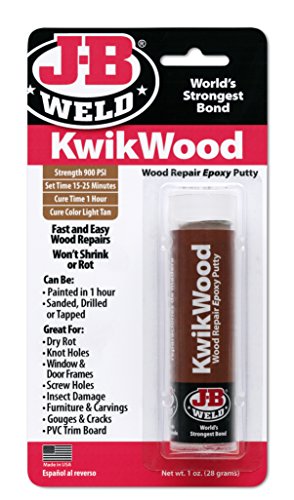
- KwikWood to fill in the old hardware holes
- SurfPrep Sander 3×4 vacuum compatible (Use code RAY10 to get 10% off your order)
- 100 Grit, 150 Grit, and 220 Grit Sandpaper for power sander (Use code RAY10 to get 10% off your order)
- Wood Filler
- Shop Vac
- Tack Cloth
- Clear Shellac in a Spray Can
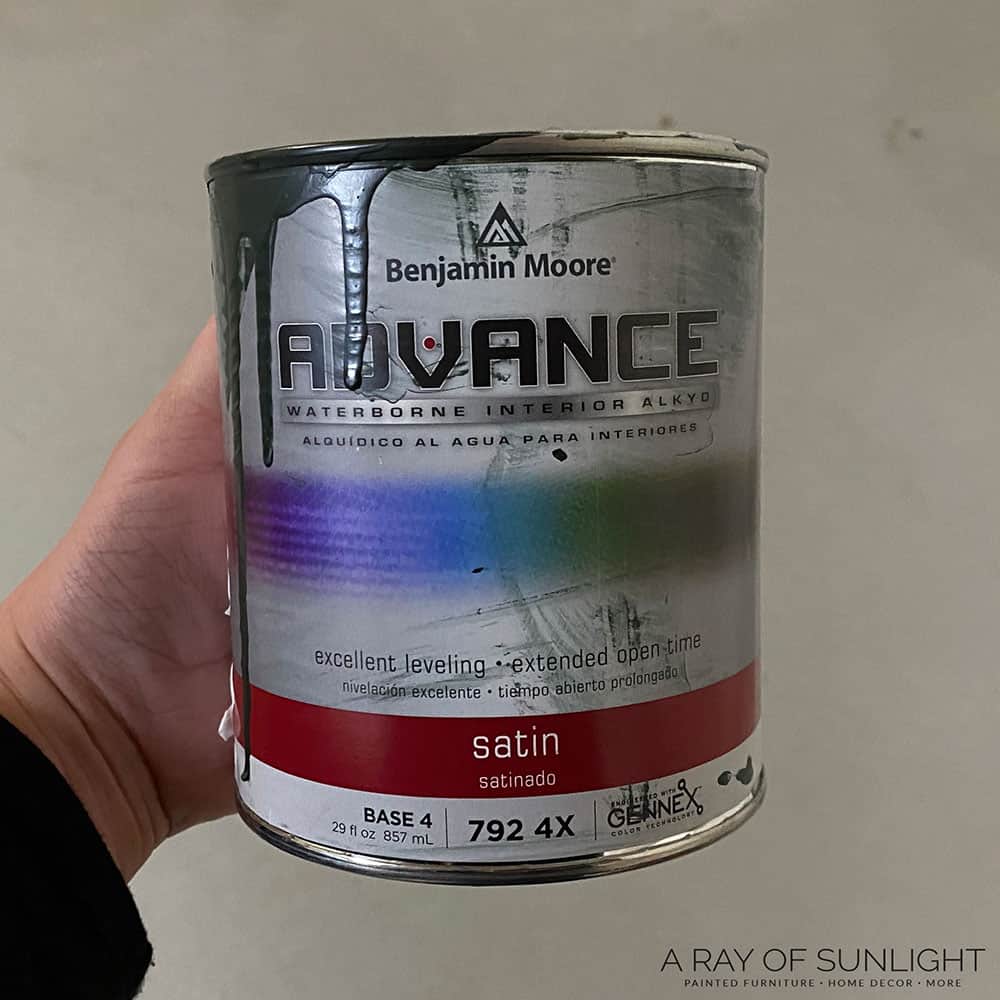
- Benjamin Moore Advance in the color Essex Green
- Fuji Q4 Paint Sprayer
- Sprayer Paint Filters
- Respirator
- My Favorite Waterbased Polyurethane
- Lime Wash Glaze
- Lint Free Rags
- 1/2″ Fine Grit Foam Sanding Pad (Use code RAY10 to get 10% off your order)
- Pre Taped Plastic
Benjamin Moore Advance Paint Furniture Makeover
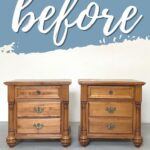
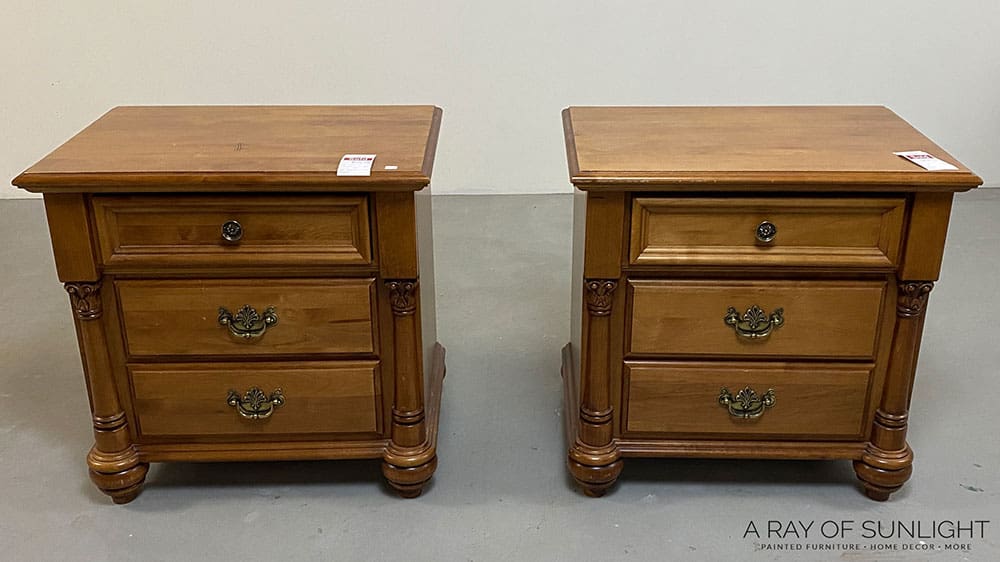
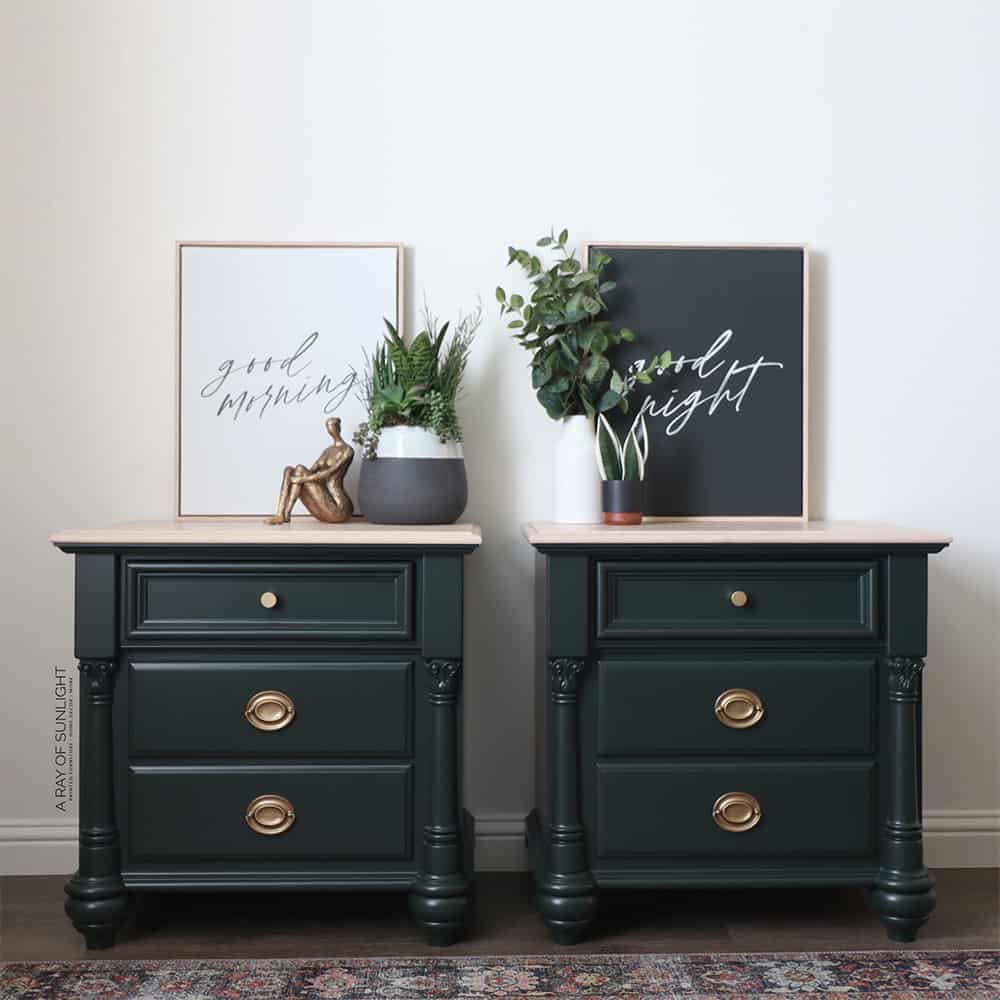
This is what we started with. I found these matching nightstands at our local thrift store for $35 each. They were in really good shape other than some scratches on the tops.
But man, raise your hand if you think the original hardware on this piece has to go! Actually, I think just changing out the hardware on these nightstands would have made a huge difference. Haha
But, I’m a painter, so you know I had to get some paint on these too!
Prep Nightstands for Paint
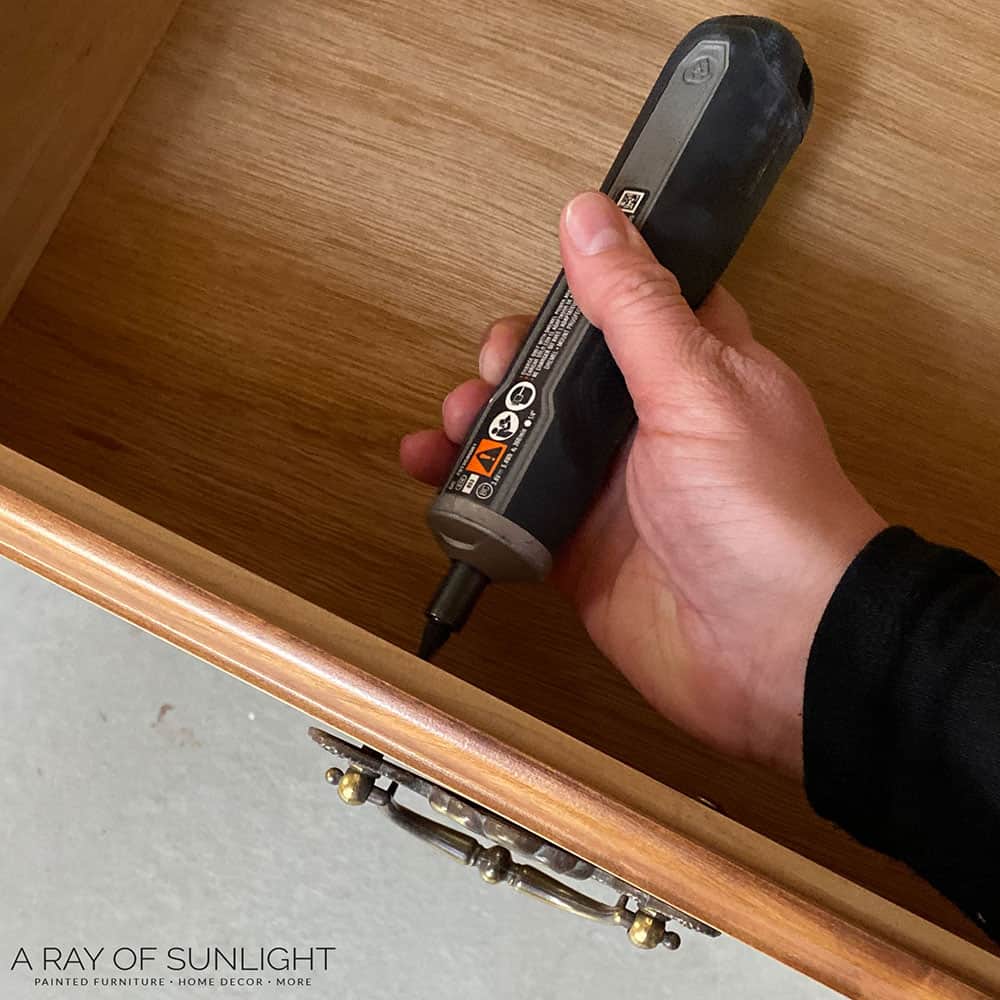
First I prepped the nightstands for paint. So first things first, I removed the old hardware.
And then I filled in the old hardware holes on the bottom drawers so I could put new hardware on. And then I cleaned the nightstands with Krud Kutter to remove any dirt, grease, or grime that was on the surface. If you’re new to painting furniture, check out this guide on how to paint furniture for beginners and walk you through the basics of painting furniture.
Read this post to learn all about how to prepare furniture for painting and this post about how to clean furniture before painting!
Fixing the Tops
I thought I would be proactive and sand the tops down just a little bit to remove those scratches in the top.
So I sanded it down with 100-grit sandpaper to start with, and then I sanded it down with 150-grit sandpaper. And after that, I sanded it all down with 220-grit sandpaper. Learn more about sandpaper for furniture painting here.
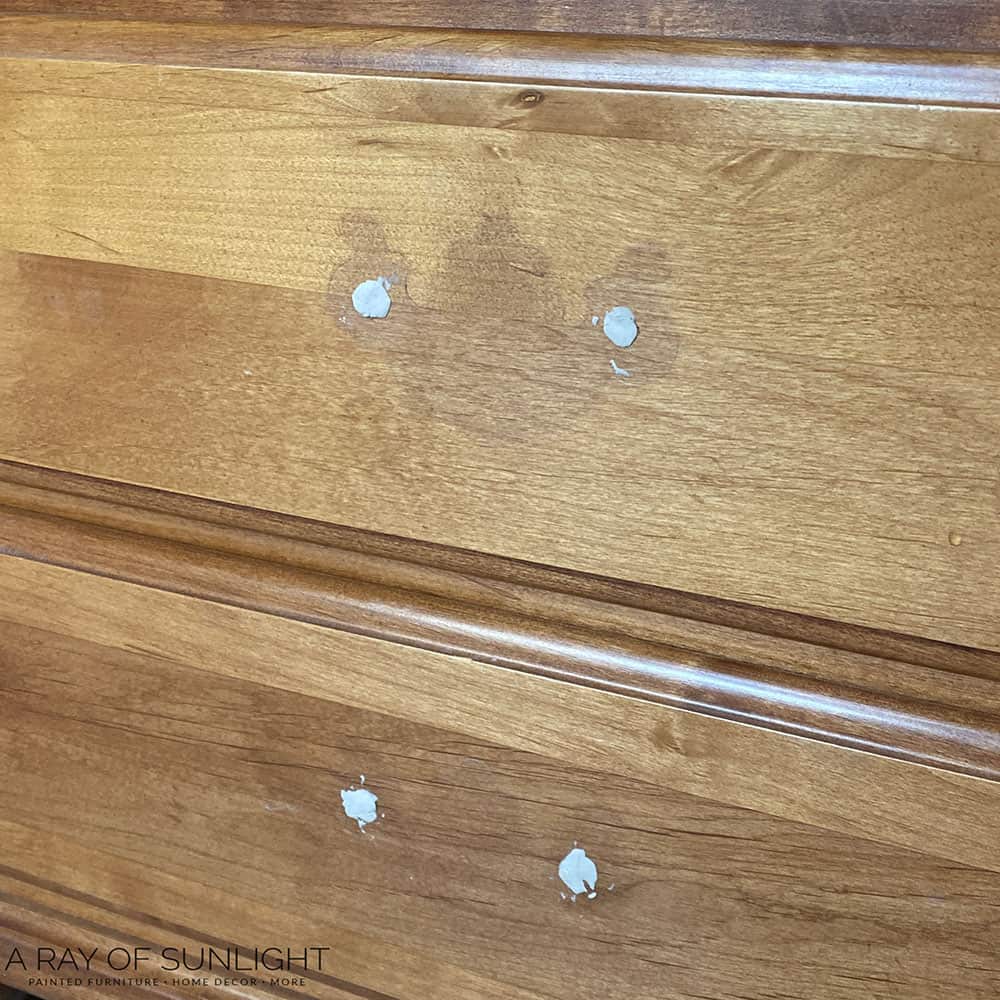
Then I filled the scratches that were still there with some regular ole wood filler. Learn about the best wood fillers for furniture here.
After the fillers were dry, I sanded the drawers down smooth and sanded the tops down smooth too. Learn all about the importance of sanding before painting furniture in this post.
And then I cleaned off all of the dust.
Prime Nightstands Before Painting
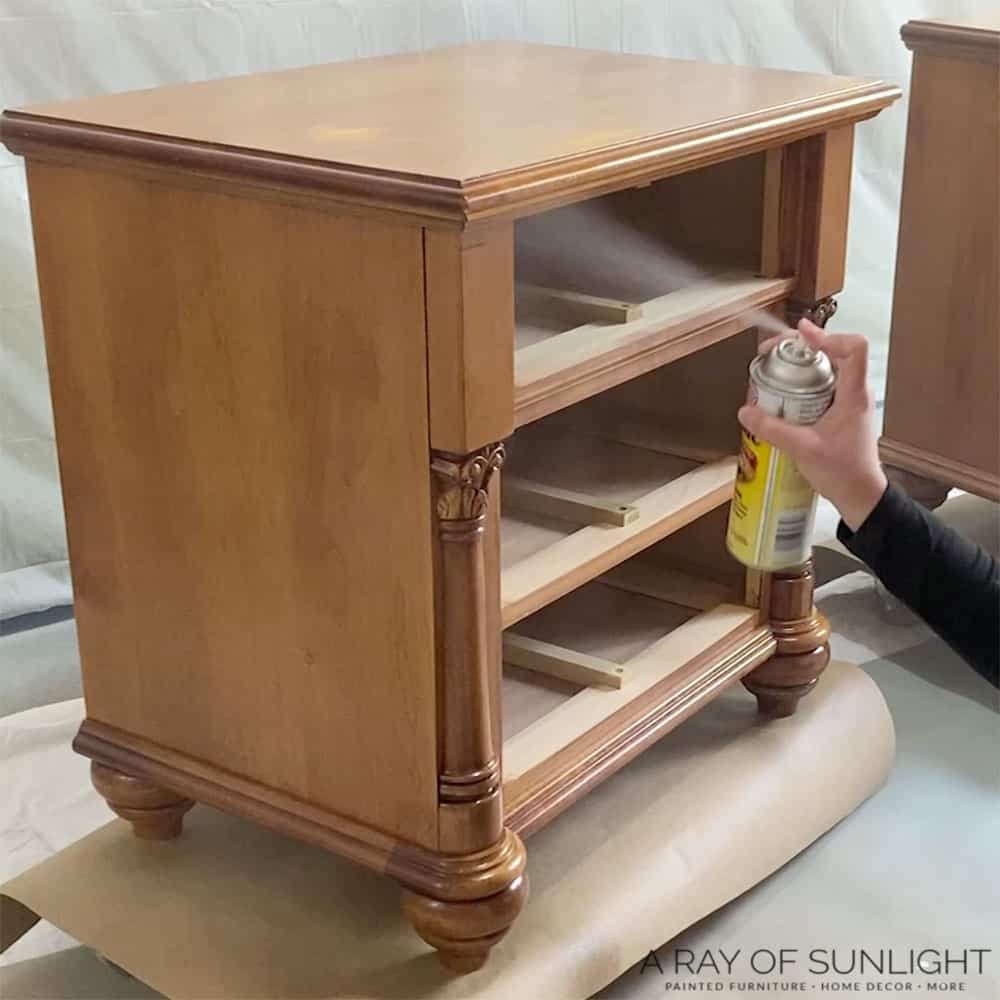
And moved them into my spray area to spray them with some clear shellac. I used the clear shellac mostly to help the paint stick to the surface without scuff sanding everything down first.
If you’ve seen any of my other videos, except for the ones lately, you’ve probably seen me talk all about scuff sanding and priming before painting.
But now I’m on a mission to really test out this clear shellac to see if all of the paints that I use will stick really well with only this clear shellac to make it stick.
I love how easy it is to spray on, and how I don’t have to sand even after I spray it on, unlike some spray primers that are gritty when you spray them.
Plus, this clear shellac helps to prevent bleedthrough issues. So it’s my go-to for almost everything. Haha check out the best primers to stop tannin bleed here.
So I sprayed both nightstands with 2 coats of clear shellac, letting it dry for an hour after each coat.
Learn about the best primers for painting furniture (and how to choose the right one) here.
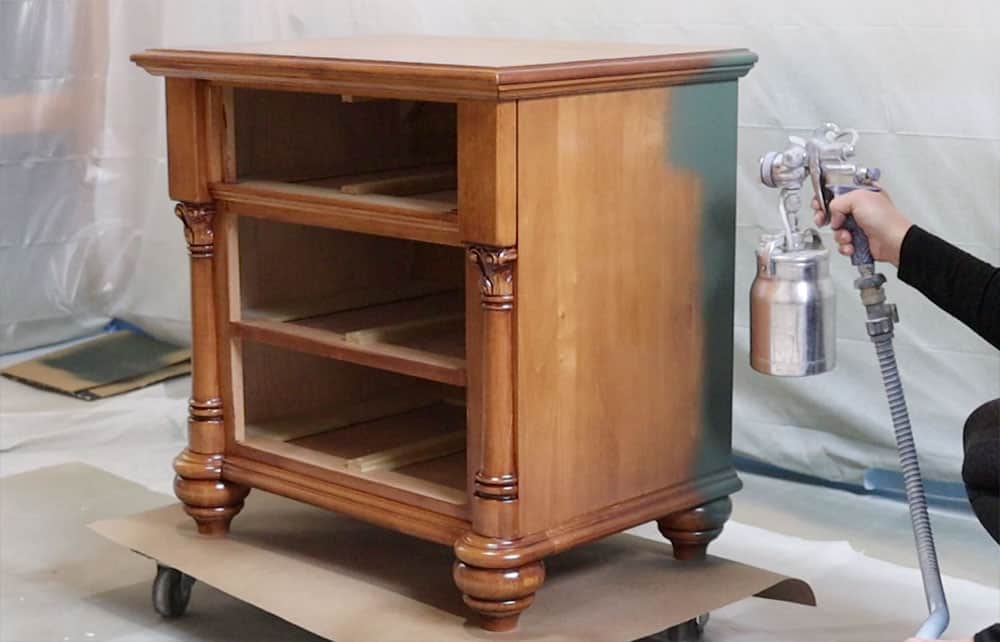
Paint Nightstands with Benjamin Moore Advance Paint
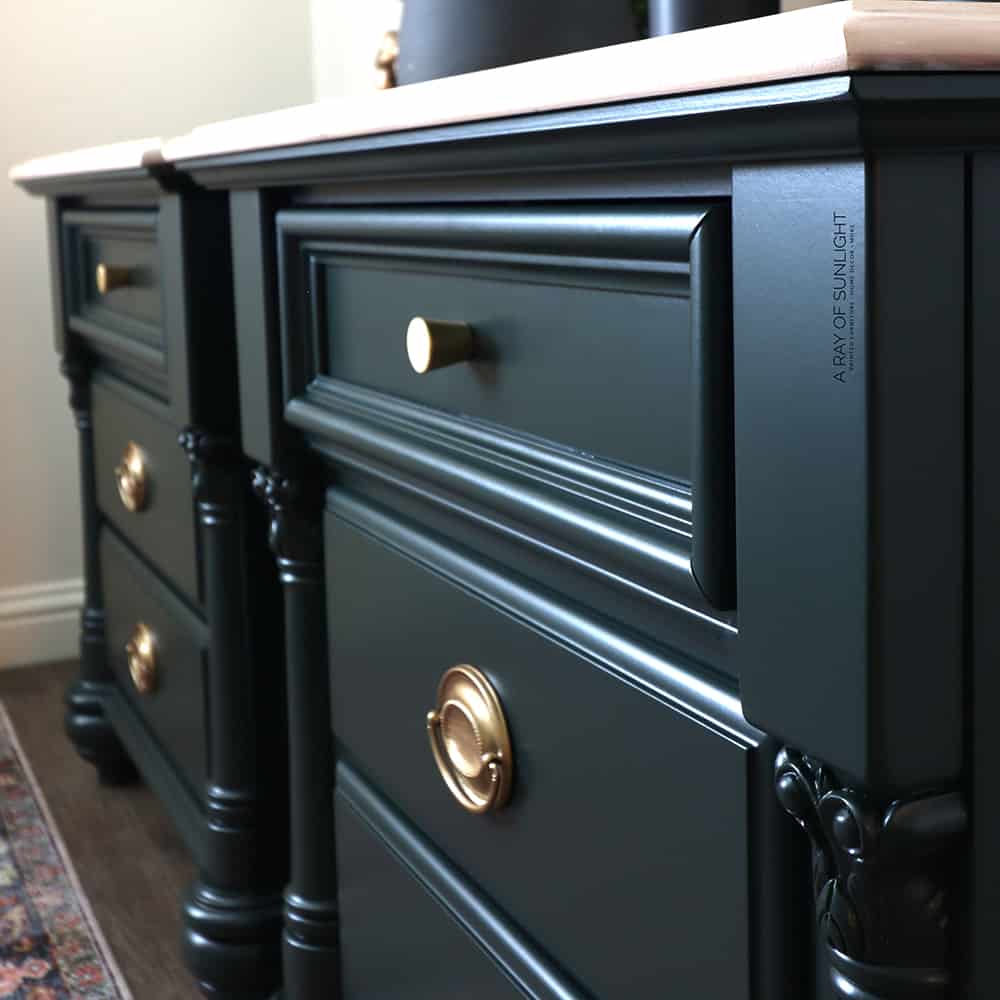
Then it was time to paint! I chose a satin sheen of the Benjamin Moore color named Essex Green.
Learn about the pros and cons of this paint in my Benjamin Moore Advance Paint Review.
Another great alternative to Benjamin Moore Advance is enamel paint, which provides a hard, durable surface. You can check out our guide on painting furniture with enamel paint.
Thinning Benjamin Moore Advance Paint
I poured the paint into my paint sprayer. And then I added about 20% water, and mixed the paint and water together really well.
Learn more about thinning paint for a paint sprayer here!
Before I sprayed it onto the furniture though, I tested out the spray on some cardboard so I could make sure that I had the settings and thickness of the paint right.
Spraying Benjamin Moore Advance Paint
And then I sprayed it on, all over the nightstands.
About Benjamin Moore Advance Paint
Okay, while I’m spraying, let’s talk a little bit about this paint. So this paint is an alkyd paint, meaning that it’s waterborne.
So you can clean it up with water, you can add water to it, but once it’s cured, it’s like a gloss or oil-based paint. And because of that, I’ve heard that it’s super durable!
I love that it doesn’t require a topcoat. Actually, you shouldn’t topcoat this paint. And from what I’ve heard, you can brush, roll or spray it on, and get great results.
Check out the best paint brushes here and the best rollers for painting furniture here.
But, one big downside is that the can says that it has to dry for 16 hours between coats.
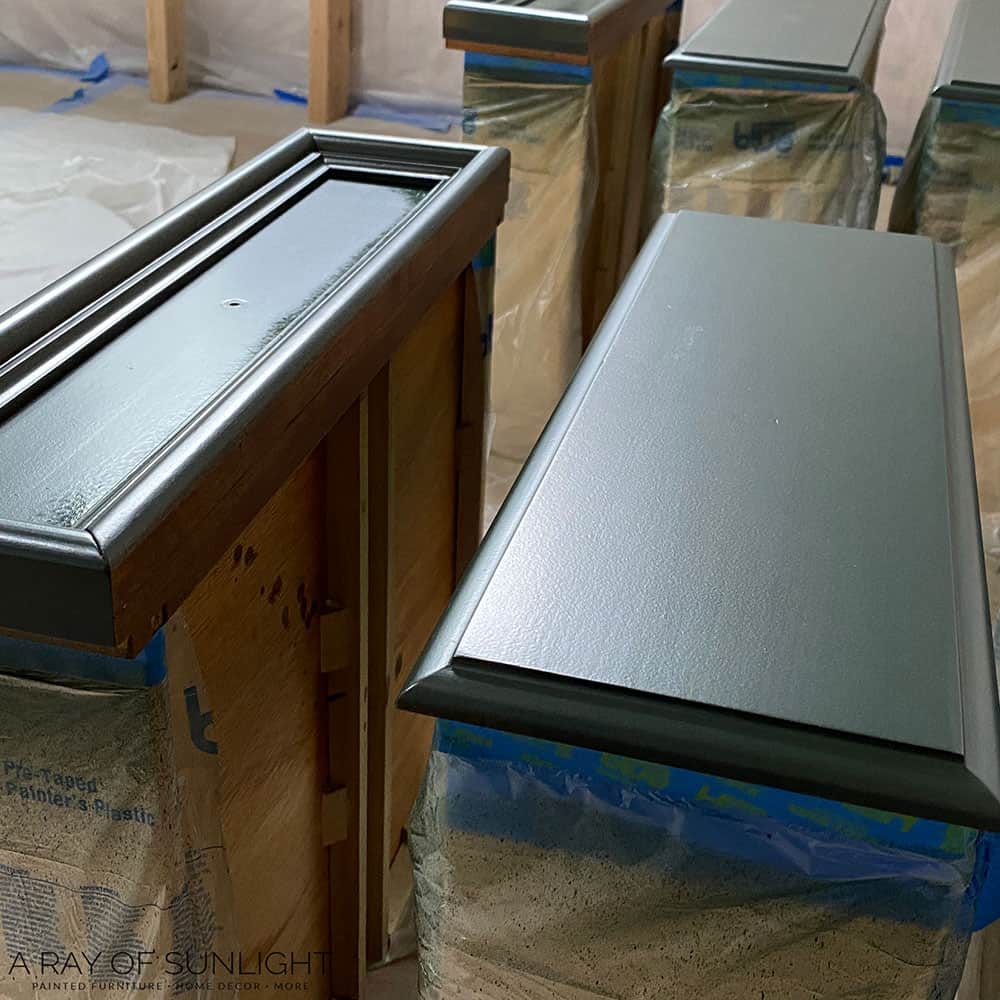
When I sprayed it, it did leave a slight orange peel texture behind, but I had heard from other painters that that was kind of normal, so I wasn’t too worried.
Here’s what the paint looked like after it had some time to dry. You can see that some of the orange peel stayed, but most of it leveled out.
Check out more emerald green painted furniture here.
Fix and Sand The Tops
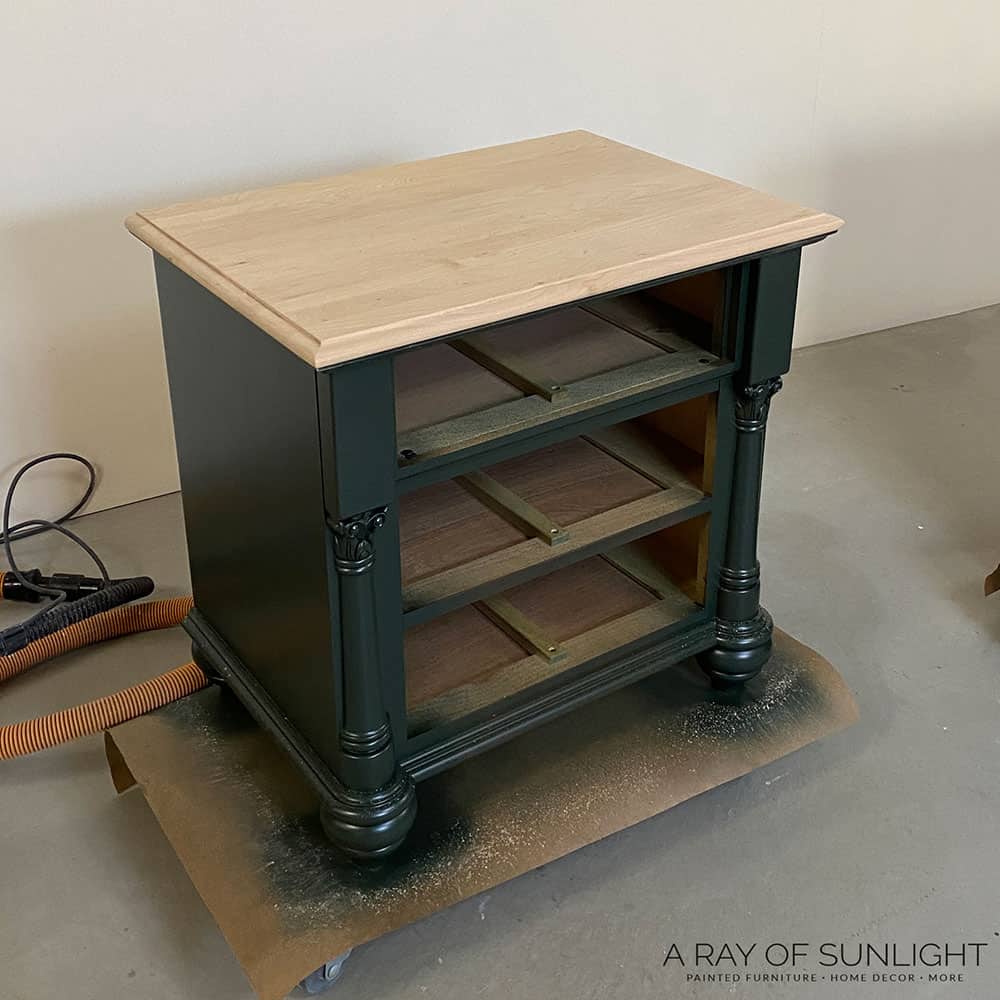
After about 17 hours, I checked on the nightstands… and I saw a big boo-boo.
The tops of the nightstands had a lot of swirl marks in them, which is really weird, because I normally don’t get swirl marks with this SurfPrep sander.
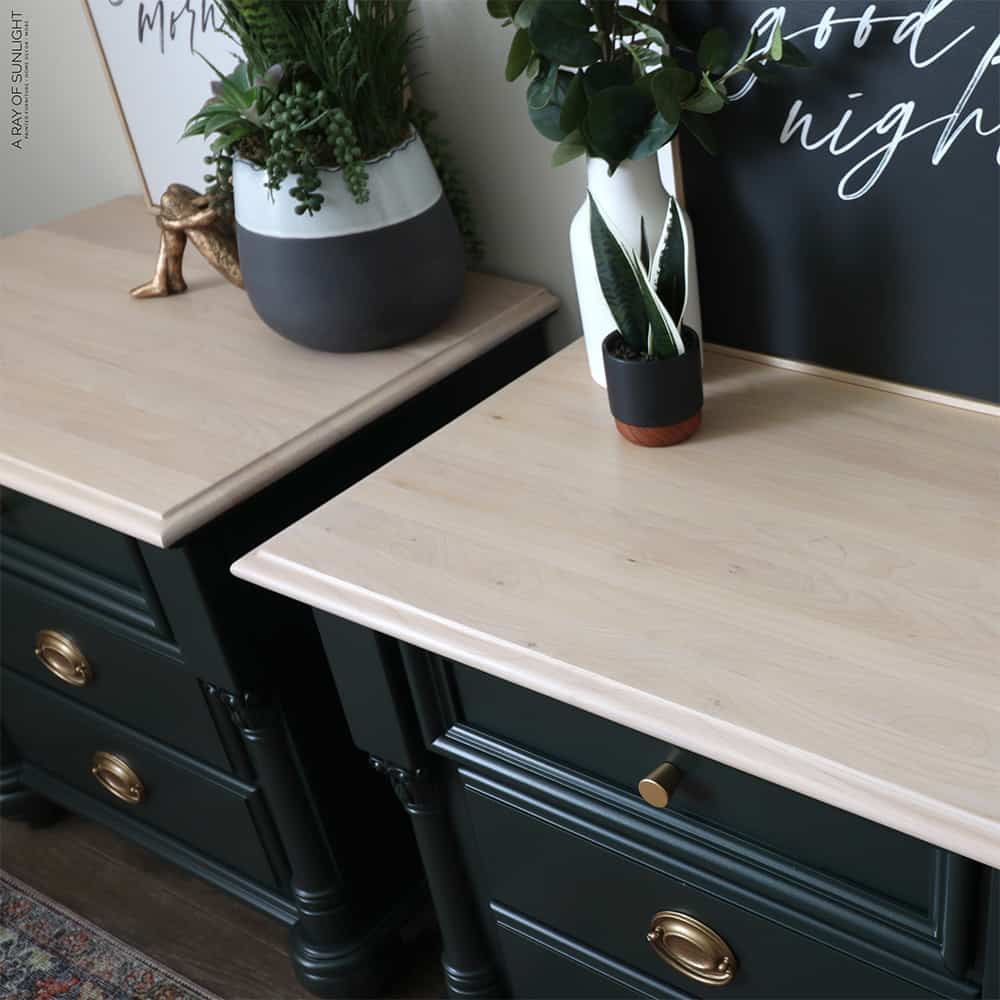
But the sheen also looked splotchy from the areas that I had sanded down more. So, I went back to the drawing board and I sanded the tops completely down to raw wood.
Check out the best sanders to remove paint here.

While I sanded them down, I had plenty of time to think about what I wanted to do now. I could either paint them again, or I could leave them wood. What would you do at this point?
Would you like to save this?
Whitewash the Tops
I decided to go with it and whitewash the tops. Learn more about how to whitewash furniture here.
So first I applied a coat of poly, and let it dry. And then I brushed on 2 coats of this lime wash glaze from Paint Couture Paint. And quickly wiped it back off.
After a few minutes, I wiped that dirty rag back over it to wipe a little bit of the glaze back onto it.
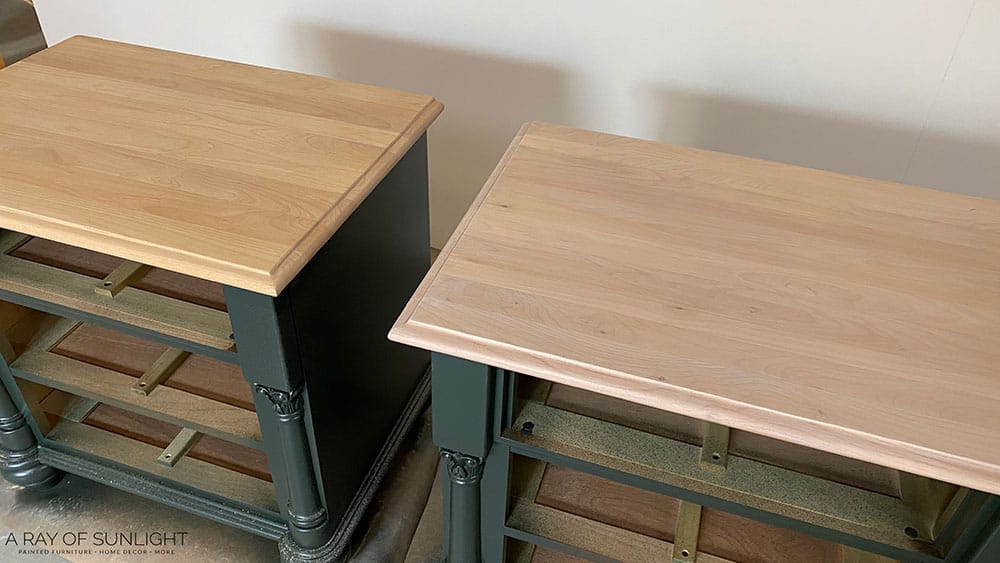
Check out the “after” on the right side, and the “before” on the left side here.
Get more whitewashed furniture ideas here.
A couple of hours later, after the whitewash was dry, I applied a couple more coats of water-based poly by hand.
You can also spray polyurethane with a paint sprayer too, but since this paint does not require a topcoat, I decided to play it safe and just apply the poly by hand to the wood tops.
I let each coat dry for a couple of hours between each coat and sanded with a fine pad before the last coat.

Paint 2nd Coat of Paint of Benjamin Moore Advance Paint
I also took a minute to lightly sand the green paint to make sure it was smooth before I painted another coat of paint.
And before I painted again, I taped off the tops so I wouldn’t get any paint on them. Learn more about how to prevent overspray when painting furniture here.
Then I sprayed a second coat of paint. The next day I removed the plastic and started trying to figure out what hardware to use.
Add New Hardware to Nightstands
I found these drawer pulls in my stash of old hardware, and I thought they might go well with the nightstands.
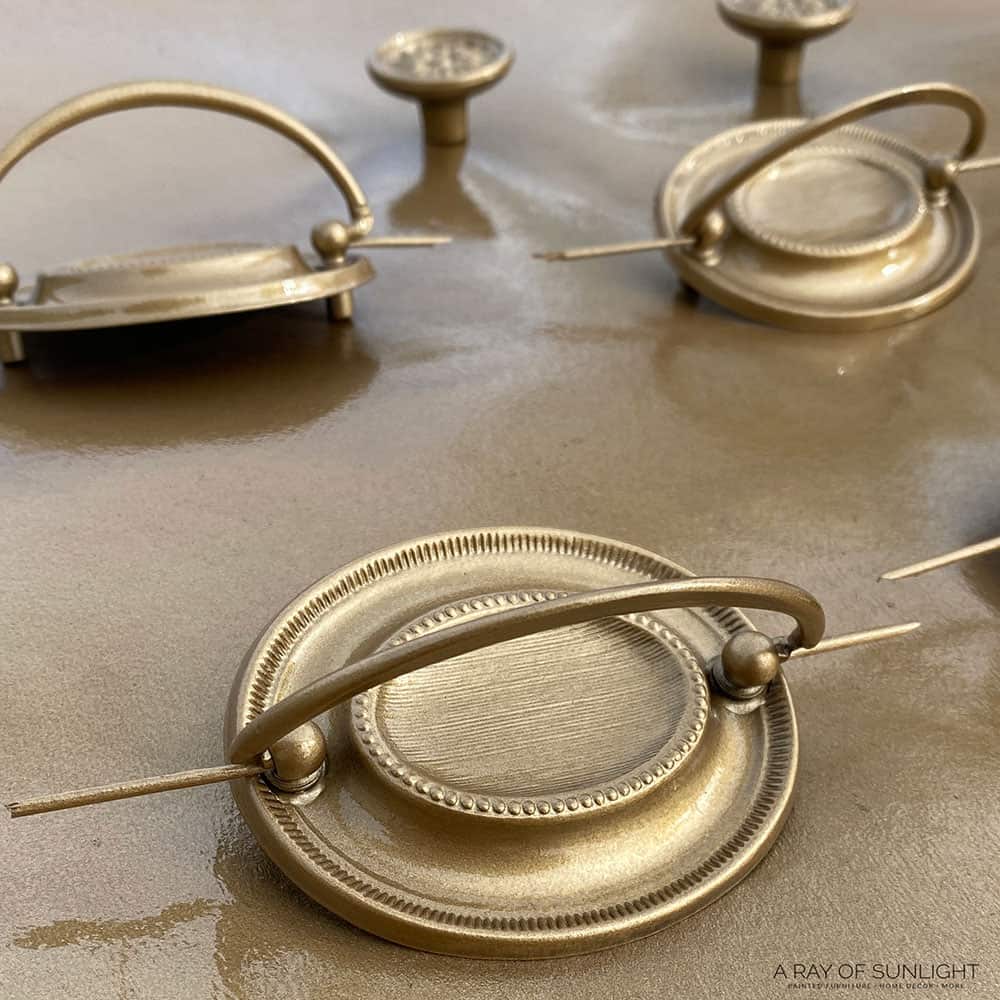
So I cleaned them up, and then I decided to paint them. Learn how to paint drawer pulls here and if you want to use spray paint, here’s how to spray paint drawer pulls!
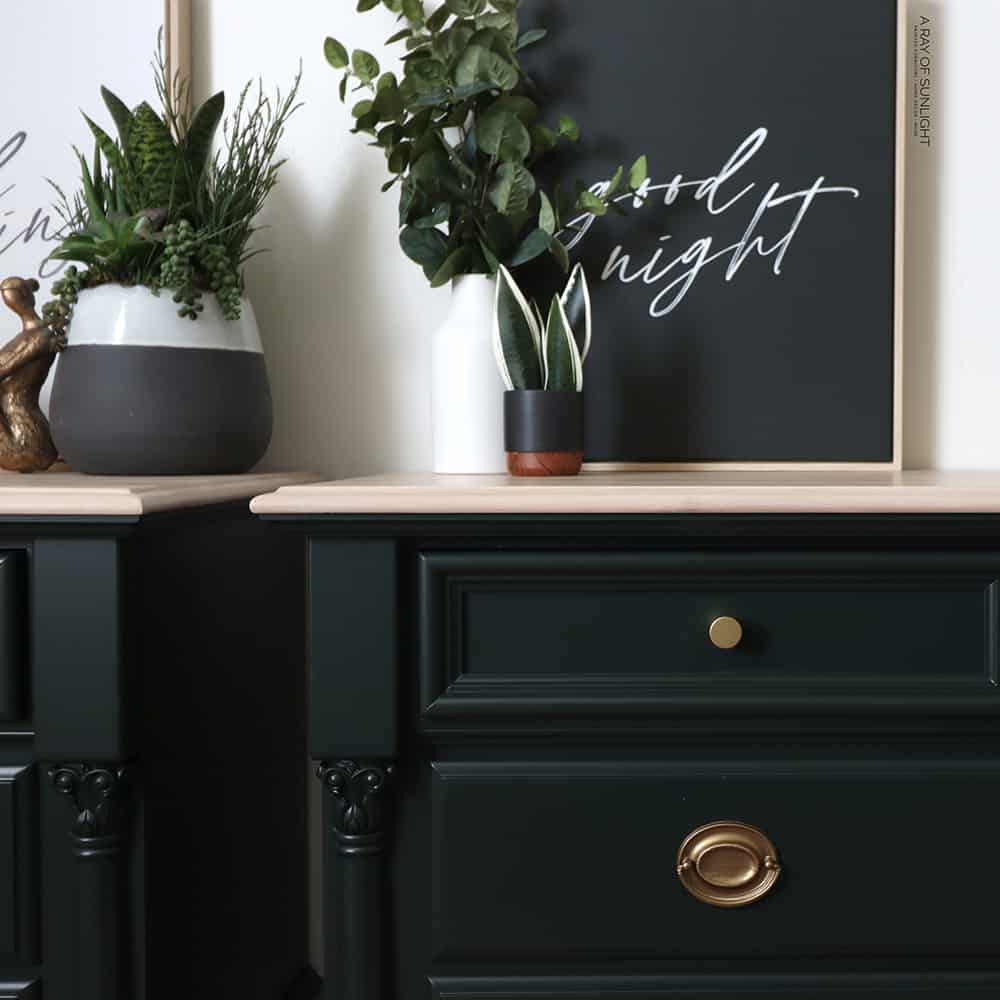
So here’s what they look like now.
More Before and After Makeovers
See All >
Click any of these “before” photos below to view the “after” of that makeover.


Get more painted nightstands ideas here! Looking for more ideas on styling mismatched nightstands? Check out these mismatched nightstands ideas.
Benjamin Moore Advance Paint Review
Alright, now for my final thoughts on Benjamin Moore Advance Paint.
I love that you don’t have to topcoat it. But overall, with dry times, it took longer than normal with other paint.
I’ve heard that these dark colors of alkyd paint take a really really long time to cure… and it’s so true.
I’ve had these nightstands painted for a couple of weeks, and I had to be SO careful when putting the hardware on. Just using the tape measure left marks!
With other furniture paints and water-based poly, I don’t have issues with light use even after a day or two.
The clear shellac primer seems to have worked well. I tested an area on the inside of the legs without any shellac. And the paint scratches off so easily there.
Where the shellac is, it doesn’t scratch as easily. I think that after the paint cures, then it won’t easily scratch where the shellac was applied first.
Do you need primer with Benjamin Moore advance?
Yes! You’ll want to use a bonding primer at the very least. But a stain-blocking primer and a good bonding primer is the best.
BIN shellac based primer is the best option as it has amazing bonding properties and it blocks stains.
I used clear shellac and had great results with bonding and no stains. STIX is another great option, though it doesn’t block bleed through.
Do you need to sand between coats of Benjamin Moore advance?
You don’t have to sand in between coats. But you’ll get a smoother finish and possibly better durability if you do. A light sanding with a very fine foam pad is the best.
Does Benjamin Moore Advance Paint need a top coat?
No. Actually, you shouldn’t topcoat Benjamin Moore Advance paint. As the alkyd paint dries, it may cause the poly topcoat to crackle.
Instead, buy it in the sheen that you want the final finish to be in.
What sheens does Benjamin Moore Advance paint come in?
If you’re wondering what finish options are available for Benjamin Moore Advance paint, you have three to choose from: Satin, Semi Gloss, and High Gloss.
Satin has a light sheen that adds a gentle glow to your furniture or walls and is easy to clean, making it perfect for high traffic areas. Semi Gloss offers even more durability and is often recommended for moldings and trim.
High Gloss, the shiniest finish available for Benjamin Moore Advance paint, creates a smooth, reflective surface that makes colors appear more vibrant. Ultimately, the choice of sheen depends on your personal preference and the needs of your space.
How do you brush Benjamin Moore advance?
It’s best to use a synthetic, nylon paintbrush. Zibra paint brushes are a great option for brushing Benjamin Moore Advance paint.
Keep an eye out for drips as you brush the paint on, and brush it on in thin coats to help avoid any drips and sags in the paint.
Can I spray Benjamin Moore Advance paint?
Yes! That is how I painted these nightstands. I thinned the Benjamin Moore Advance paint with 20% water and used my Fuji Q4 paint sprayer.
I am very happy with the final finish (and I’m pretty picky about texture and brush marks in my finish.
Is Benjamin Moore Advance paint suitable for outdoor use?
Yes, Benjamin Moore Advance paint is suitable for outdoor use! The High Gloss finish is specifically designed for both interior and exterior applications, making it a versatile choice for all your painting needs.

The waterbased alkyd formula keeps your surfaces durable and tough, handling repeated washings with ease. So if you find that you need to wash off dirt and grime from your outdoor surfaces often, High Gloss finish is the way to go.
The high gloss also gives a shiny finish that is a great way to add color and shine to your outdoor furniture, doors, trim, and more.
So if you’re thinking to get a paint that works both indoors and outdoors, Benjamin Moore Advance paint in High Gloss can be one of your options! And as mentioned, you don’t need to topcoat it, making it a more convenient choice.


Painting Furniture with Benjamin Moore Advance Paint
This alkyd paint doesn't require topcoat like a lot of furniture paint does. Here's how to use Benjamin Moore Advance for painting furniture.
Materials
- Krud Kutter
- KwikWood
- 100 Grit, 150 Grit, and 220 Grit Sandpaper (Use code RAY10 to get 10% off your order)
- Wood Filler
- Tack Cloth
- Clear Shellac
- Benjamin Moore Advance in the color Essex Green
- Paint Filters
- Waterbased Polyurethane
- Lime Wash Glaze
- Lint Free Rags
- 1/2" Fine Grit Foam Sanding Pad (Use code RAY10 to get 10% off your order)
- Pre Taped Plastic
Instructions
- Prep the nightstands for paint. Start by removing the old hardware and filling in the old hardware holes so you can put new hardware on. Then clean the nightstands with Krud Kutter to remove any dirt, grease, or grime.
- For any scratches, you can sand them down and fill them with wood filler. After the filler dries, sand the areas smooth again. Then clean up all the dust.
- Spray clear shellac onto the nightstands to prime them before painting. Do 2 coats, and let them dry for an hour after each coat.
- Get your Benjamin Moore Advance Paint and thin them by adding about 20% water. Mix the paint and water together really well.
- Now, spray 2 coats of paint onto the nightstands. Note that you need to dry the Benjamin Moore paint for 16 hours between coats.
- For the the tops, sand them to raw wood then whitewash them. First apply a coat of poly and let it dry. Then brush 2 coats of lime wash glaze and quickly wipe it back off. After the whitewash dries, apply a couple more coats of water-based poly.
- Add painted hardware pulls or any hardware you want to attach.
Recommended Products
As an Amazon Associate and member of other affiliate programs, I earn from qualifying purchases.


More Nightstand Makeovers
- DIY Emerald Green Mismatched Nightstands
- How to Repurpose Desks into Tall Skinny Nightstands
- Grey Painted Dressers
- How to Whitewash Wood – Nightstands
- Nightstand Makeover with Benjamin Moore Advance Paint from Savvy Apron
Learn the Art of Updating Furniture!
If painting furniture feels overwhelming or your past attempts didn’t go as planned, this course will guide you step by step.

Follow us on YouTube to get more tips for painting furniture. Or share your project with us on our Facebook Group and be part of our community. See you there!

Love you painting! I have a question I am changing an old dresser into bathroom vanity. It has a Formica top so I was going to leave it. Thought it would be great. Would just paint front and sides in black with the general finishes. The original color is an antique white, should I still use shellac?
Thank you ,
Pat
Hey Pat!
Yeah I would still shellac. Mostly to help the paint stick better.
I like the 1.3 tip.
I’m in love! These night tables are beautiful! I would buy them in a heartbeat!
Absolutely stunning! I love paint and wood combos. The green is so beautiful, they look more high end now.
Thank you so much!!
I would love this with my side tables. They are beautiful!
Aww thank you so much!