Painting Furniture with Lilly Moon Paint

There’s something about thrifted furniture that makes it so much more special. It could be the history behind each piece or the unique imperfections that make it one of a kind. This week, we tried painting furniture with Lilly Moon Paint for the first time, and here’s how it turned out.
Lilly Moon Paint is one of the many types of paint for furniture that has been gaining popularity among DIYers. So, if you haven’t yet, it might be time to try this brand!
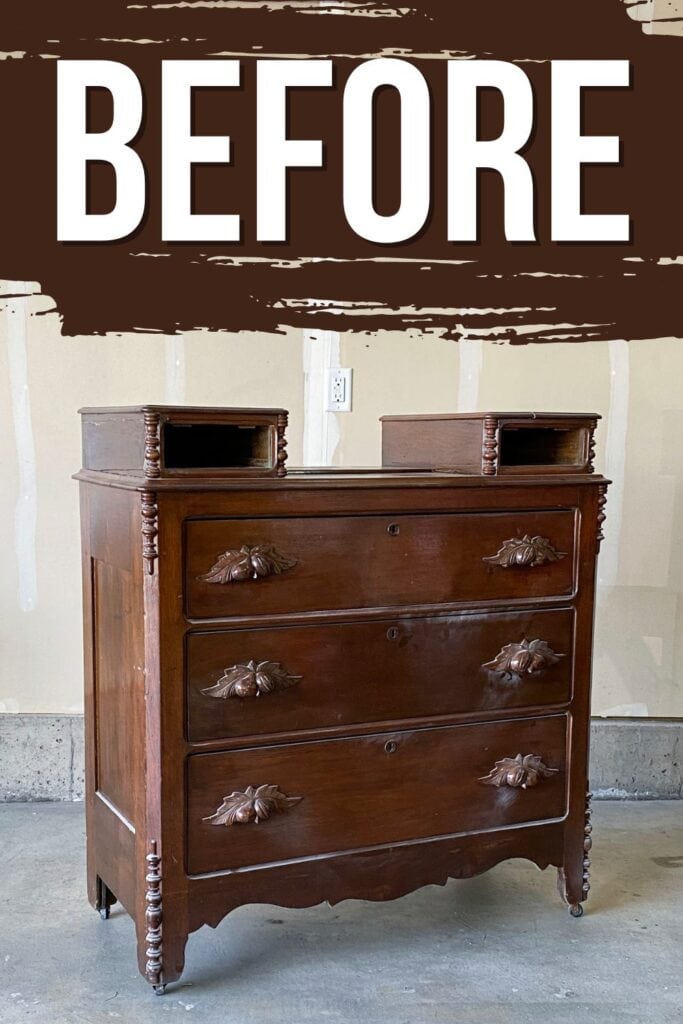
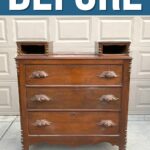
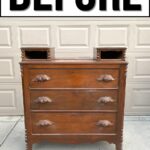
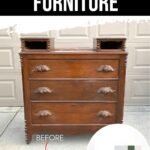
We found this antique dresser on Facebook marketplace. It didn’t come with the top 2 drawers, and I’ve debated what to do with it for about a year… until recently.

If I removed the top 2 drawers, you would see that the top wasn’t 1 solid piece. If I kept the drawer cubbies, I would have to do something with them, but what? Well, check out what I ended up doing!
I’ll walk you through the process and give you some tips and tricks on using Lilly Moon Paint for furniture. I’ll also share my honest review of the product to help you decide if it’s the right choice for your next project. Let’s dive in!

Supplies Used For Painting Furniture With Lilly Moon Paint
As an Amazon Associate, I earn from qualifying purchases. I also may earn from other qualifying purchases with other companies or get free product to review and use. All opinions are my own.
- Electric Screwdriver
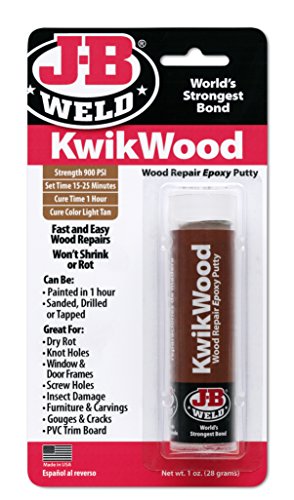
- KwikWood
- Natural Wood Filler
- Vacuum
- Krud Kutter
- 100, 150, and 220 Grit Sandpaper (Use code RAY10 to get 10% off your order)
- SurfPrep Sander (Use code RAY10 to get 10% off your order)
- Plastic Wood Filler
- Foam Sanding Sponges (Use code RAY10 to get 10% off your order)
- Wood for the Top
- Router
- Router Bits
- Wood Glue
- Brad Nails
- Nail Gun
- Painters Tape
- PreTaped Plastic
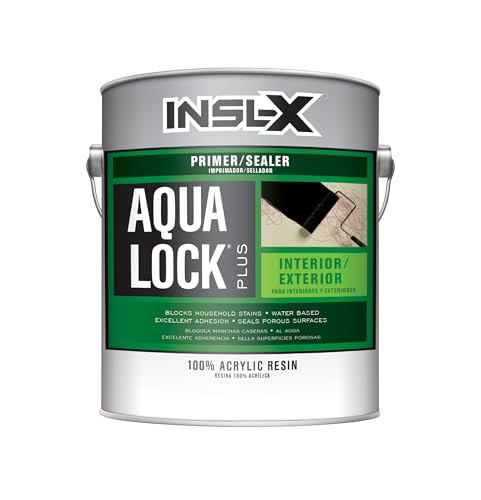
- Aqua Lock Primer in Black
- Mohair Paint Roller
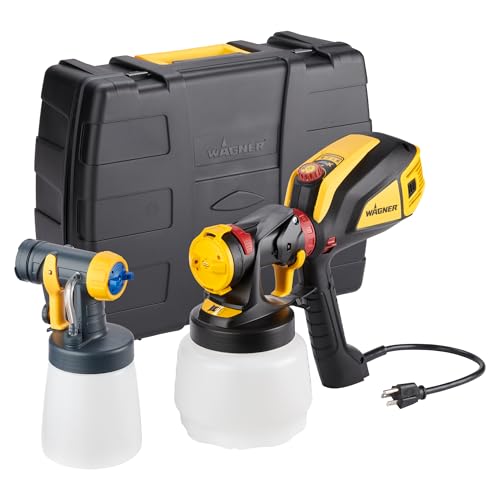
- Wagner FLEXiO 3500 Paint Sprayer
- Lilly Moon Paint Opulent in Wilderness
- Respirator
- Paint Filters
- KREG Hardware Jig
- Staalmeester Paint Brush
- Wise Owl Furniture Salve
Remove Dresser Hardware
Like every furniture makeover, I started by removing the hardware. Look at the gunk behind these things!! Taking off the hardware makes it much easier to paint without interruptions.
I personally don’t like the pulls, so they aren’t going back on. One way or another, we had to remove the hardware.
Remove Top Drawer Boxes and Top Itself
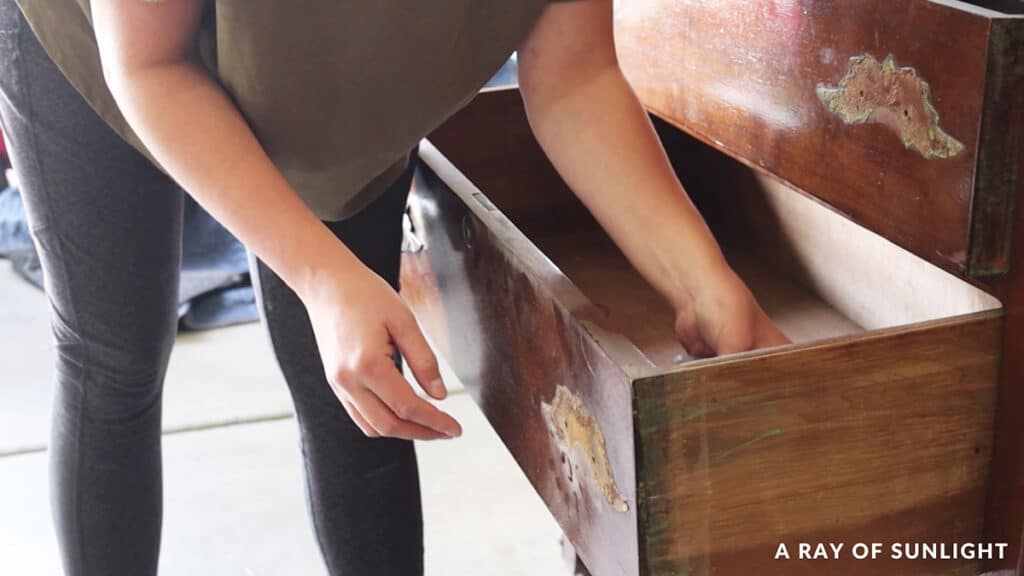
Then I removed the drawer boxes on the top. They were attached with a couple of screws in the front and in the back. But then that left us with a top that had 2 large holes in it. So we pried that off.
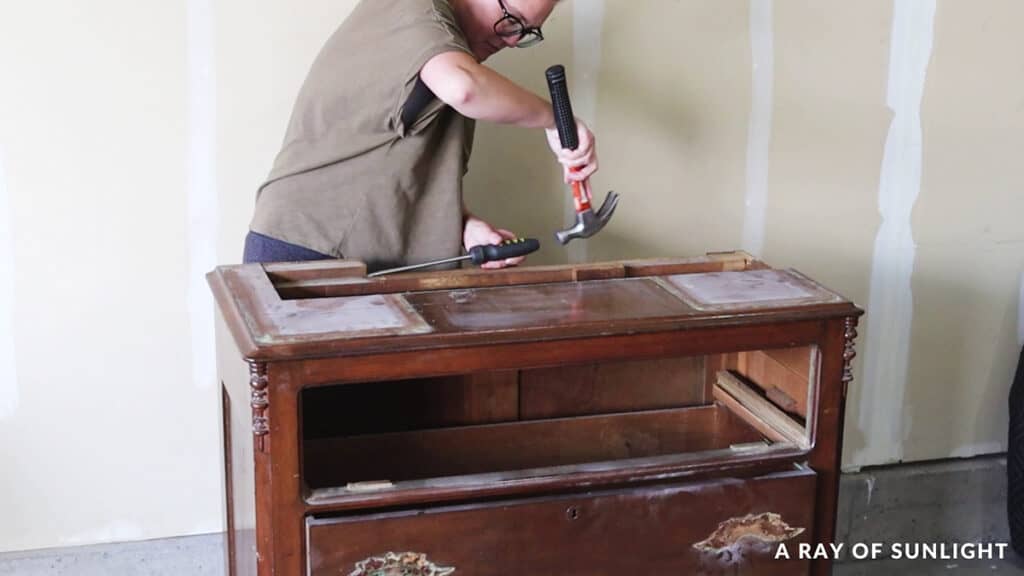
And it didn’t want to come off… at first. Haha, we eventually got it off though, and it was just held on with some old glue and nails.
Clean and Sand Furniture Before Painting
Then we sprayed everything with my favorite furniture cleaner, Krud Kutter, and wiped it all down to remove any dirt, grease, or grime. All of that gunk from behind the hardware didn’t budge at all though.
So when the Krud Kutter was dry, we used 100 grit sandpaper to sand it off. I went through so many sheets of sandpaper on these. I have no idea what it was, but man, it didn’t want to come off. Eventually, it all came off, and then I sanded it all with 150 grit and then 220 grit sandpaper to smooth it out.
Learn more on how to clean furniture before painting here, and learn more about the best sandpaper for furniture painting here.
Fix Furniture Damage
My husband took over for a bit to scuff sand the dresser for me and then filled in the scratches and dings with wood filler. We let the wood filler dry overnight, and then he sanded the wood filler down and finished scuff sanding everything the next morning.
Check out this post to learn more about the best wood fillers for furniture, and learn the importance of sanding before painting furniture here.
And then he cleaned up all the dust with the vacuum. At this point, I realized that the keyhole on one drawer was damaged, so I fixed that with some KwikWood.
Check out this post to learn more about repairing old furniture, and here are more broken dresser ideas to inspire you to transform your old pieces even if they have damage!
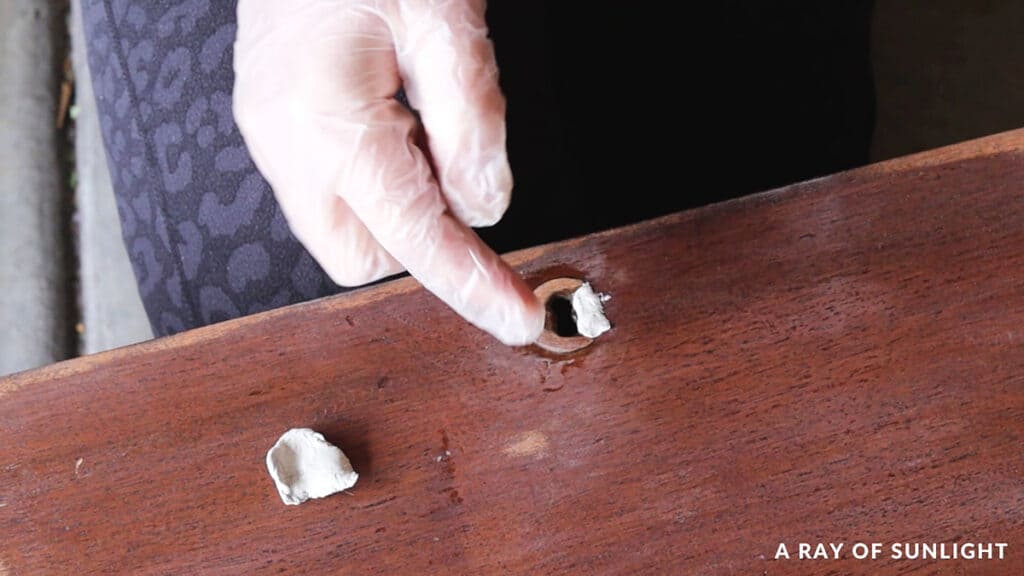
And then I realized that we needed to fill in the hardware holes because I wasn’t putting the old hardware back on… and the old holes weren’t evenly spaced either. Haha so Taylor filled those hardware holes in with more KwikWood.
Read this post to learn how to use KwikWood! Or check out this comparison post on the best ways of filling holes when replacing furniture hardware.
Cut New Furniture Top
While the KwikWood dried, we cut a new top for the dresser.

We measured twice and used the table saw to cut it to the right size… But when we put it on the dresser, it was an inch too big. So we cut it again! Thank goodness we cut it too big and not too small! Then we taped the edges so we could router the edges and get a clean cut…
And tested out some different router bits. Good thing we tested them because we didn’t go with the first option! Then Taylor routered the edge of the new top, and I did the most important job… removing the tape. Haha
We attached the new top to the dresser with some glue and brad nails with our nail gun. Nothing too complicated here! Here’s another great post about replacing a dresser top on this black vintage farmhouse dresser. If you like a weathered wood top look, check out how to make a plank top dresser here.
And then, I filled the nail holes and knots with some plastic wood filler. After the wood filler and KwikWood were dry, we sanded them down smooth and cleaned up all the dust. Learn about the best sanders for furniture in this post.
Get a detailed tutorial on how to prepare furniture for painting here so your piece is properly ready for a fresh coat of paint.
Prime Furniture Before Painting With Lilly Moon Paint
We lined our paint tray with some tin foil. And filled it up with some Aqua Lock Primer in black. The more I use this stuff, the more I love it! Check out more of the best primers for painting furniture here.
I brushed and rolled it onto the dresser, hoping to fill in the open wood grain that I created by sanding the drawers down to raw wood in some spots… And to fill in any open wood grain texture on the top. Read more about the best paint brushes for painting furniture here and the best rollers for painting furniture here.
If I would have sprayed it on, it wouldn’t have filled in any wood grain. So even though I don’t care for rolling paint on, this was an exception to my rule. Haha
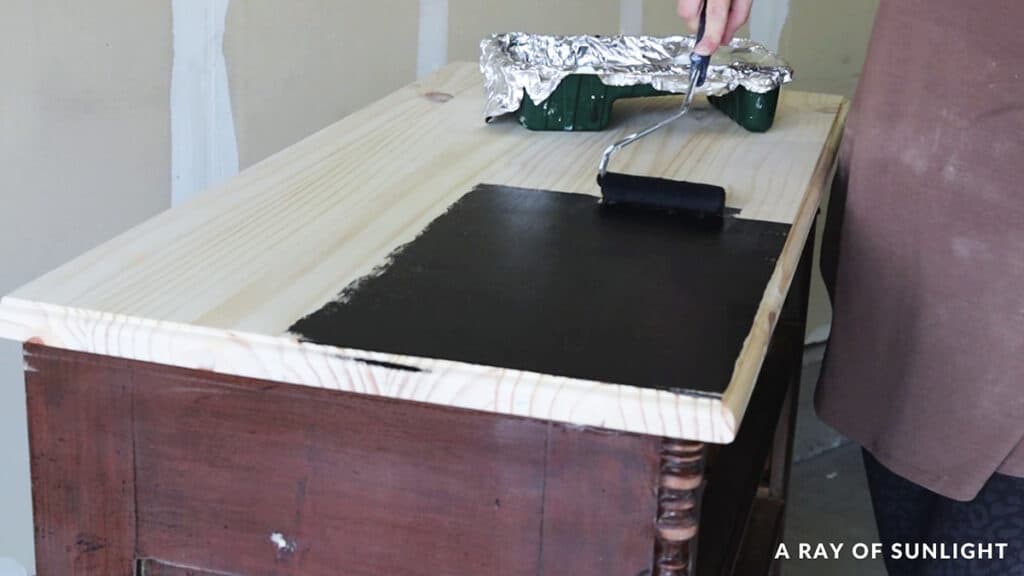
It went on really well with the roller though! I love that it’s black, it’s waterbased, and has excellent adhesion properties.
Hide Wood Grain When Painting
When the primer was dry, I could still see some wood grain texture on the drawers where I had sanded to bare wood. So I filled those spots in with some wood filler and let it dry overnight. Check out this post to learn how to hide wood grain when painting.
Would you like to save this?
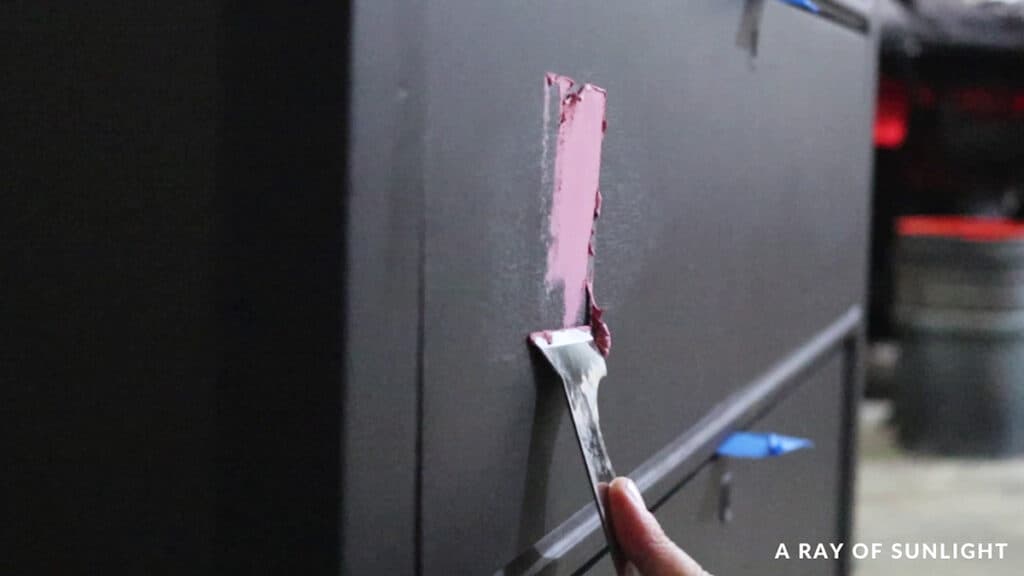
The next day I sanded everything down smooth with 220 grit sandpaper… though I probably didn’t need to sand everything.
The primer went on really smooth, but since I was already sanding, I just hit all of it. Then I primed the drawers and the top of the dresser again for good measure. And when the primer was dry an hour later, I sanded it down smooth again and cleaned up the dust.
Spray Painting Furniture with Lilly Moon Opulent Paint
Since I wanted to spray paint onto the dresser, I taped off the drawers with painter’s tape and plastic so the paint wouldn’t get inside the drawers. Here’s our list of the what is the best painters tape to help you find the right painter’s tape for your next project.
We also laid down plastic on the walls and floor. Learn more about how to prevent overspray when painting furniture here.
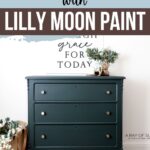
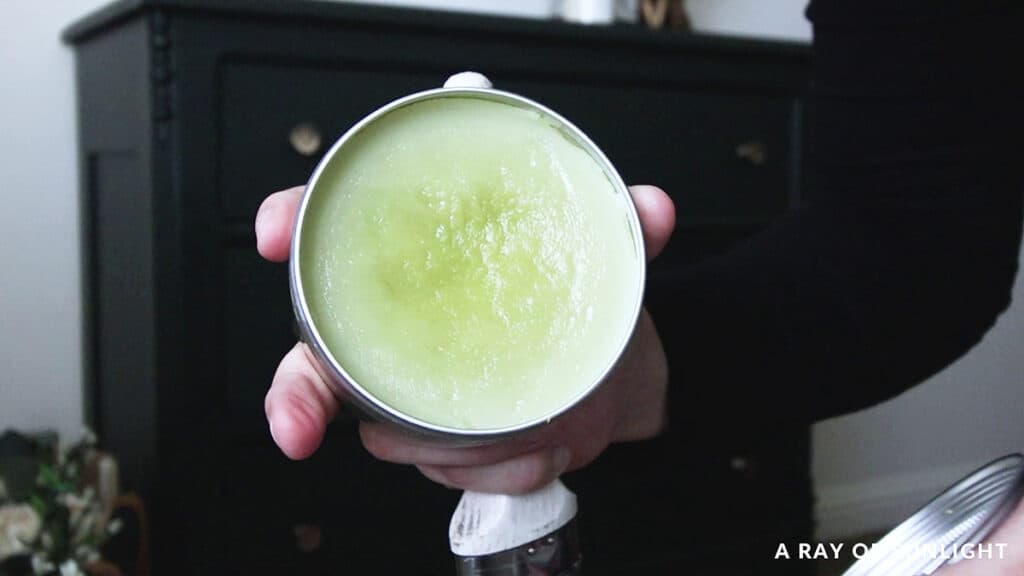
And then I mixed the paint into the sprayer. I used Lilly Moon Paint’s new all in one paint called Opulent in the color Wilderness. They were a sponsor at a conference I went to, so I got it for free to try out. And this color is gorgeous!
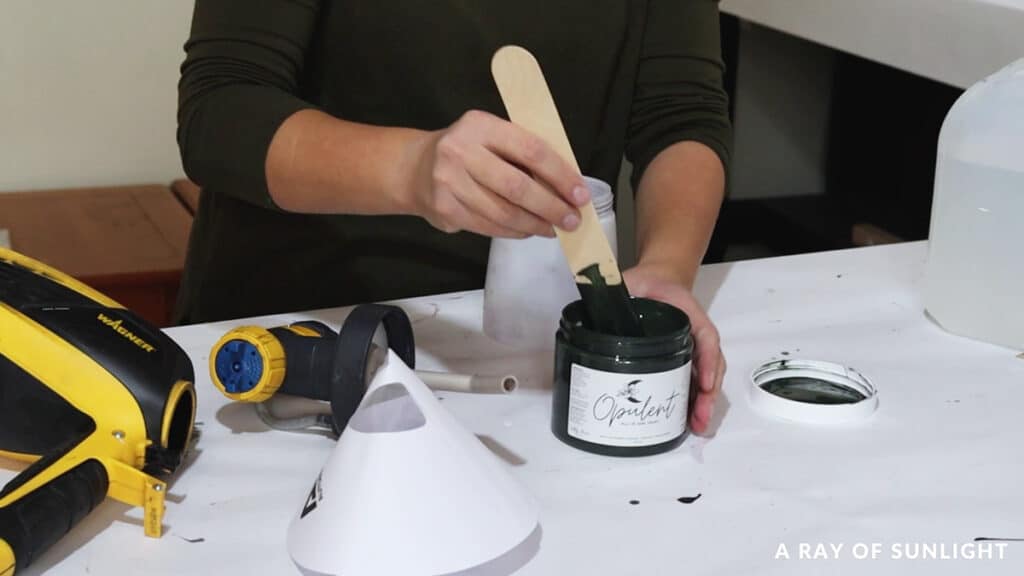
I added about 15% water to the paint because you know me… I don’t like spraying paint without thinning it out. Read this post to learn more about how to thin paint for Wagner FLEXiO Sprayer.
I tested the spray out on a cardboard box and then sprayed it onto the dresser. It felt thicker than I liked… It sprayed slower and I was worried that there was going to be a lot of texture still.
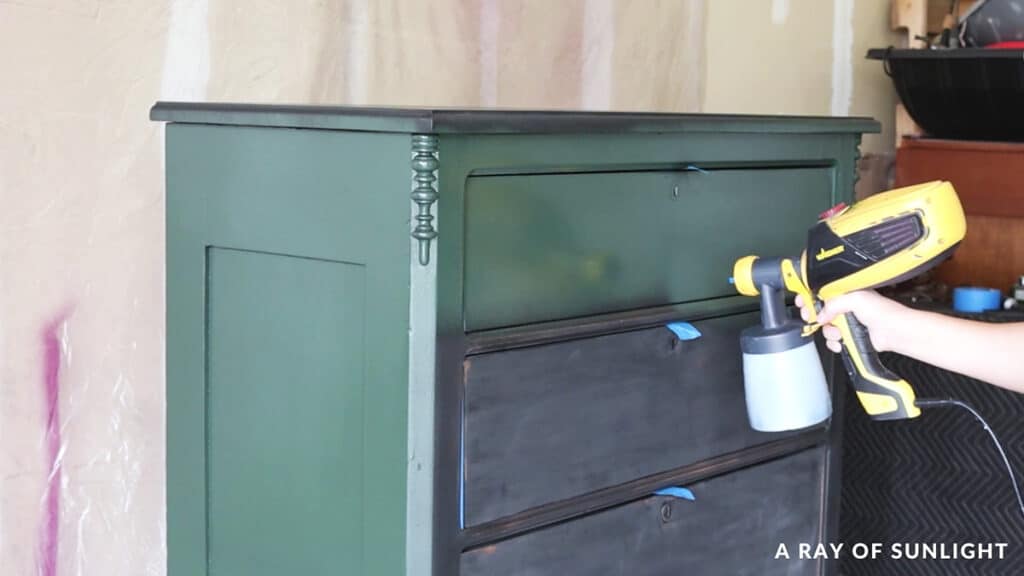
But an hour later I checked out it, and it looked so good! No texture left behind! And the paint had really good coverage too! It did feel slightly rough to the touch, which happens to me with my favorite topcoat a lot too, when it dries too fast or overspray gets on it.
Not shown here, I did add a splash more water to thin it out just a little more… And then I sprayed a second coat of paint. I liked how it sprayed on better this time.
Updating furniture Hardware
I let it dry for 4 hours, and then I drilled new holes into the drawers with my KREG hardware jig. And I put new brass knobs on. Check out this complete guide for finishing touches of painting furniture you can do!
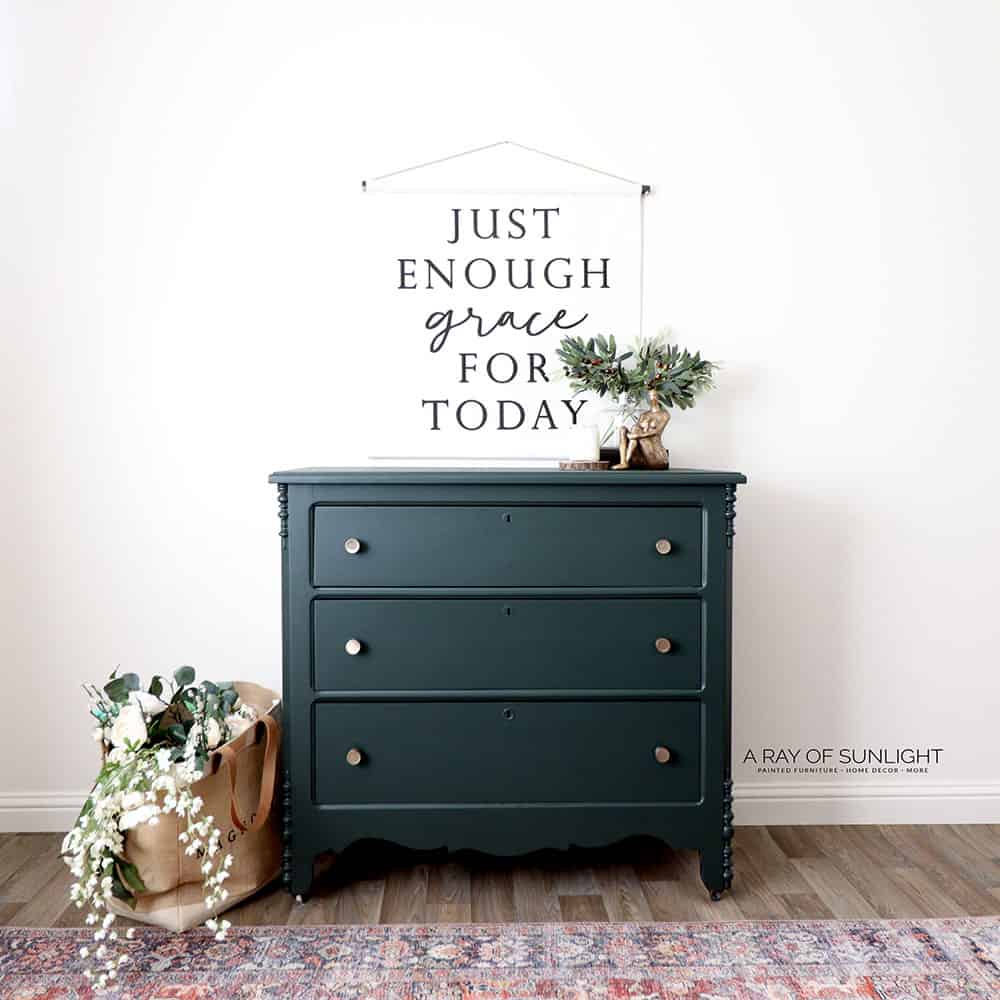
First, I absolutely LOVE this color! Isn’t it such a good shade of green??

More Before and After Makeovers
See All >
Click any of these “before” photos below to view the “after” of that makeover.


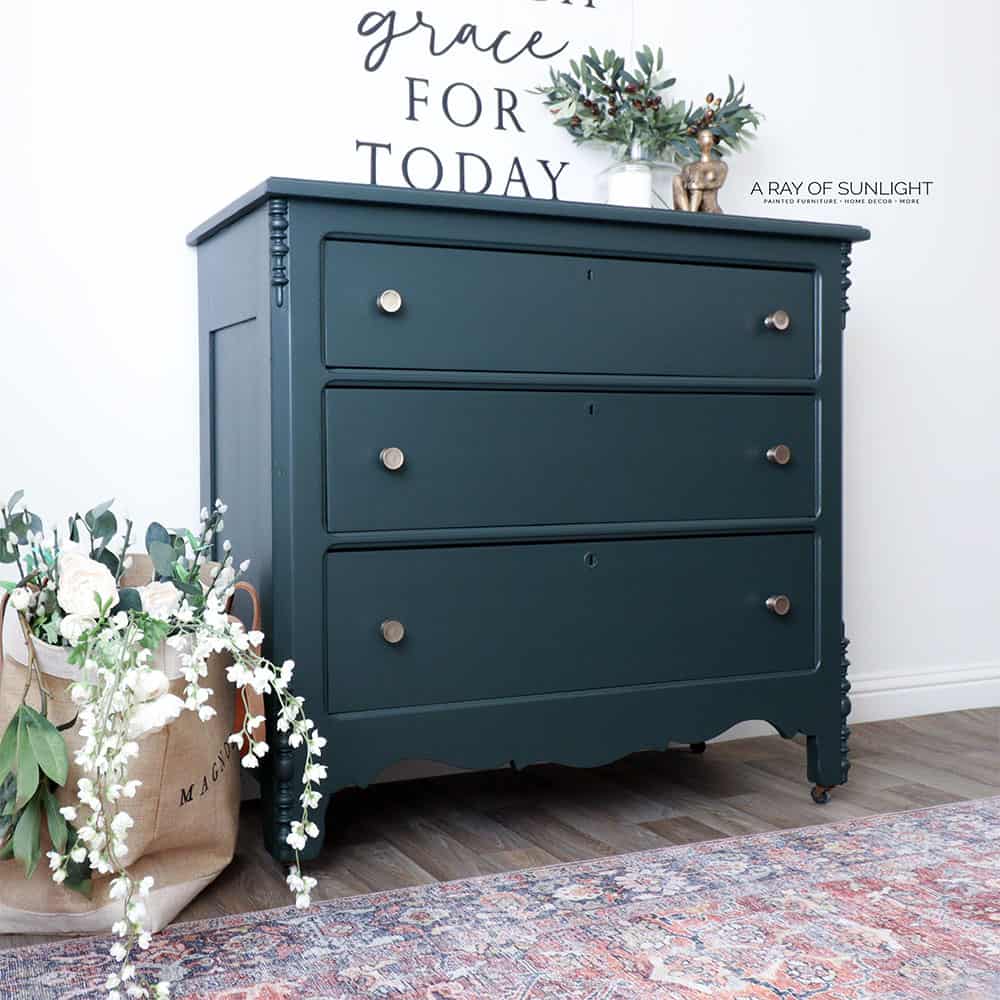
I love the new look overall. The details on the side of the dresser stand out more now, and I think it looks so much better without the drawers on the top.
Lilly Moon Paint Review
As far as the Lilly Moon Opulent paint… overall I think it’s a great paint. But I wouldn’t say that it’s my favorite ever.
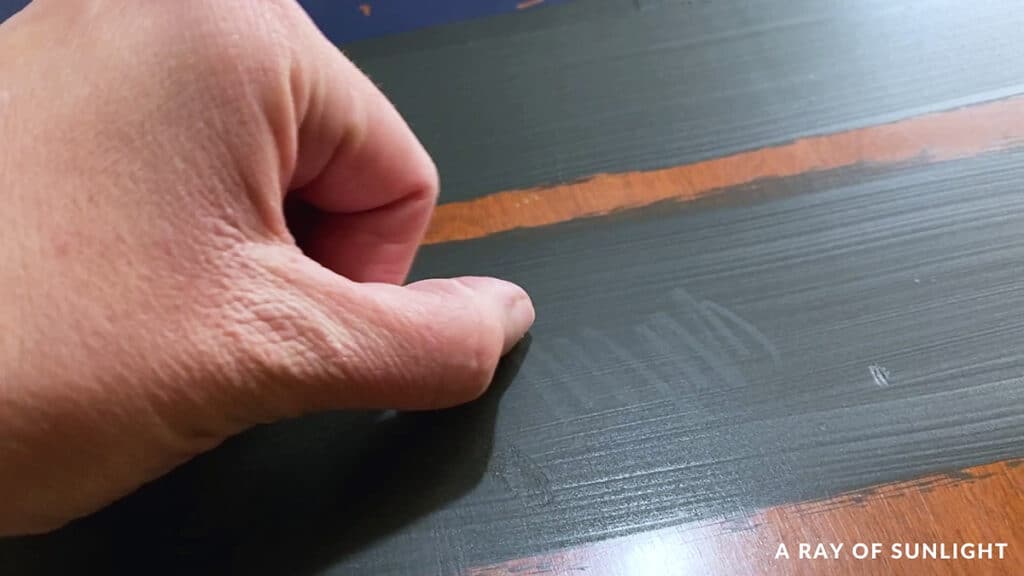
It’s very durable! I brushed some on a scrap board, with and without sanding beforehand, and no priming. Only a few days later it’s not budging when I scratch at it.
I didn’t get any bleedthrough stains at all, which I thought I might get some bleeding… but there’s absolutely none. Read more about bleedthrough and how to stop stains from coming through paint here! And check out the best primers to stop tannin bleed here.
The selection of colors is fabulous, and the coverage was great!
Since it’s an all in one paint, I didn’t think it would be matte, where it scratches, scuffs, and gets dirty really easily… but it is definitely matte. That’s the biggest bummer about this paint for me…But if you love a matte paint finish though, this paint is excellent!
Lilly Moon Paint Colors
If you want to try out Lilly Moon Paint in other colors, they do have a wide selection of Opulent all in one paints. You can choose from many of their classic colors to bold and vibrant shades that will match any home decor style.
For this makeover, we used Wilderness, a beautiful and elegant green shade, and we’ve also used Magnolia Garden, which is a sage green color, in this hexagon end table makeover, perfect for those who love a more muted and calming shade.
Here’s my full Lilly Moon Paint review to learn more about this paint, including their Mineral Paint line, for other paint options from the brand.
Seal Furniture with Furniture Salve
I ended up putting some Wise Owl furniture salve all over the dresser to help reduce how easy it is to scuff and get dirty.
And then I also added some salve inside the drawers to freshen up the wood, and on the wood drawer tracks to help the drawers go in and out easier. If you have any issues with the track system, here are ways how to fix broken dresser drawer tracks.
Learn more about how to fix old dresser drawers that stick in this post if your old dresser drawers are hard to open!
And… now I’m thinking I might just keep this dresser instead of selling it. We’ll see! If you want to know how to make money painting furniture, check out this post to find out. And you might have the question “Is selling furniture profitable?” check out this post to get your answer!

There goes my experience using Lilly Moon Paint for this dresser makeover! It’s a good durable paint with great coverage that’s worth a try. Be sure to check out their awesome color selection for your next furniture project!


Painting Furniture with Lilly Moon Paint
Transform any thrifted furniture with an all-in-one paint. Here are the steps for painting furniture with Lilly Moon Paint.
Materials
- KwikWood
- Natural Wood Filler
- Krud Kutter
- 100, 150, and 220 Grit Sandpaper (Use code RAY10 to get 10% off your order)
- Plastic Wood Filler
- Foam Sanding Sponges (Use code RAY10 to get 10% off your order)
- Wood for the Top
- Wood Glue
- Brad Nails
- Painters Tape
- Pre-Taped Plastic
- Aqua Lock Primer in Black
- Lilly Moon Paint Opulent in Wilderness
- Paint Filters
- Wise Owl Furniture Salve
Tools
Instructions
- Remove the old hardware, top drawer boxes, and the top of the dresser.
- Clean the dresser, scuff sand, and fill in any damage with wood filler. Let the wood filler dry overnight, and then sand it down and scuff sand everything the next morning. Clean up all the dust with the vacuum.
- Cut a new top for the dresser, router the edges for some nice details then attach the new top to the dresser with some wood glue and brad nails.
- Prime the dresser and when it dries and you see some wood grain texture, fill in those spots with wood filler and let it dry overnight. Sand everything down smooth then prime again for good measure. Sand again after the primer dries.
- Tape off the dresser drawers with painter’s tape and plastic so the paint wouldn’t get inside. Mix the Lilly Moon paint into the sprayer and add about 15% water to thin it out. Spray 2 coats onto the dresser.
- Let the paint dry for 4 hours, then drill new hardware holes with the KREG hardware jig. Attach new hardware.
- Apply Wise Owl furniture salve all over the dresser to help reduce how easy it is to scuff and get dirty.
Recommended Products
As an Amazon Associate and member of other affiliate programs, I earn from qualifying purchases.


More Dark Green Painted Furniture Makeovers
- Dark Green Chalk Painted Dresser Makeover
- Hunter Green Dressers
- DIY Dark Green Nightstands Makeover
- Vanity Turned into Nightstands
- Painted Sewing Table With Silk All-in-One Mineral Paint
Follow us on YouTube to get more tips for painting furniture. Or share your project with us on our Facebook Group and be part of our community. See you there!
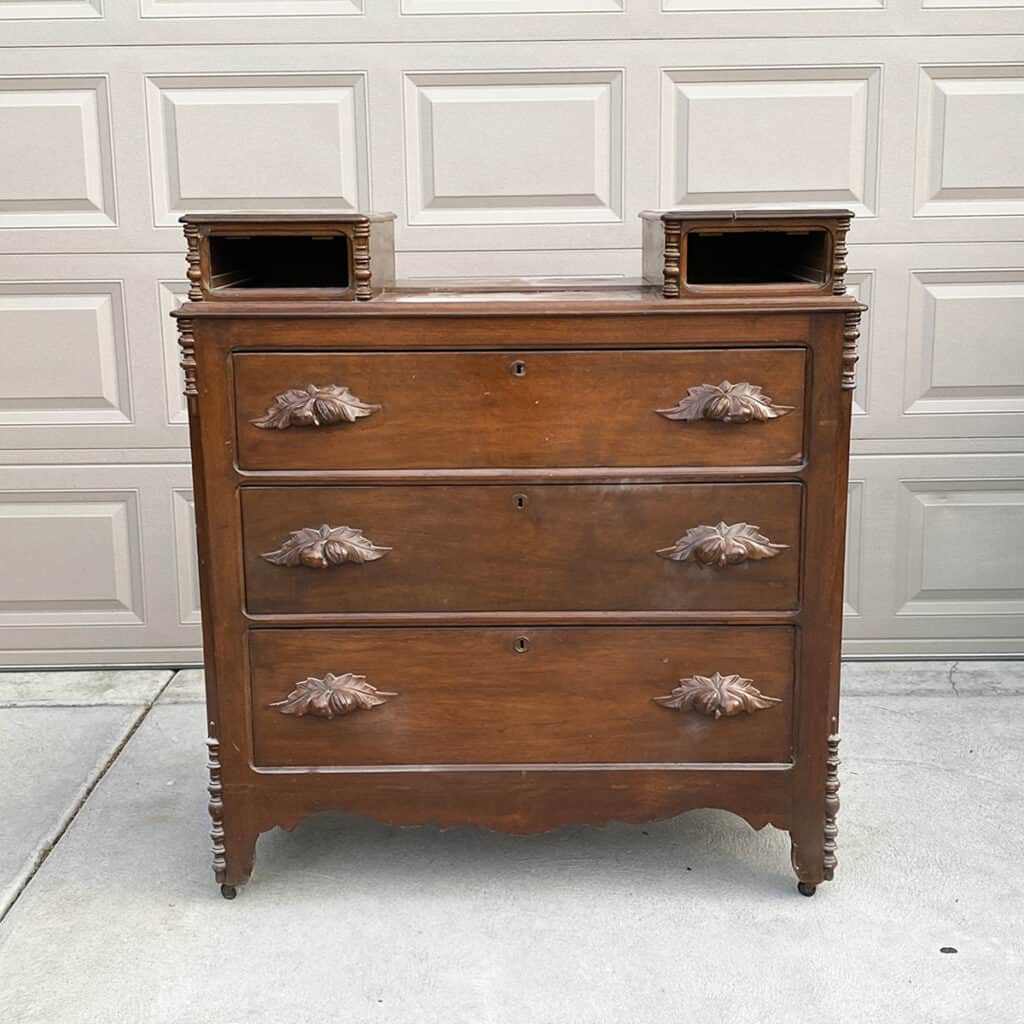
Ya know that was an Eastlake Dresser. Those were made between 1870-1890. More valuable unpainted. But yours did turn out beautiful!! I am painting an Eastlake right now.
I just bought similar dresser at an Estate Sale…mine is 3 drawers. I will not be painting mine. I fell in love with the knobs. My dresser and a nightstand cost me a total of $27. Saw a nightstand at an antique store today for $325….the dresser was $950. I have some truly ugly and cheap estate sale furniture that I will be painting this color because it is absolutely beautiful.c