Vanity Turned into Nightstands


Today, we’re diving into the transformation of a vintage vanity turned into nightstands. From dealing with stubborn old paint to the pure joy of picking the perfect green color, I’ll guide you through each step of this labor of love from these best green painted furniture ideas.
So, if you’re all about giving old furniture a chic twist or simply enjoy a good makeover story, this blog post is gonna get those creative juices flowing. Stick around as we breathe new life into these charming pieces and transform them into functional, stunning nightstands.
Welcome to Furniture Fixer Upper day, where we join 4 of our talented furniture friends and bring you brand new makeovers!

I’ll link to my friend’s makeovers after our after photos at the bottom of this post! Don’t forget to check out their masterpieces!!
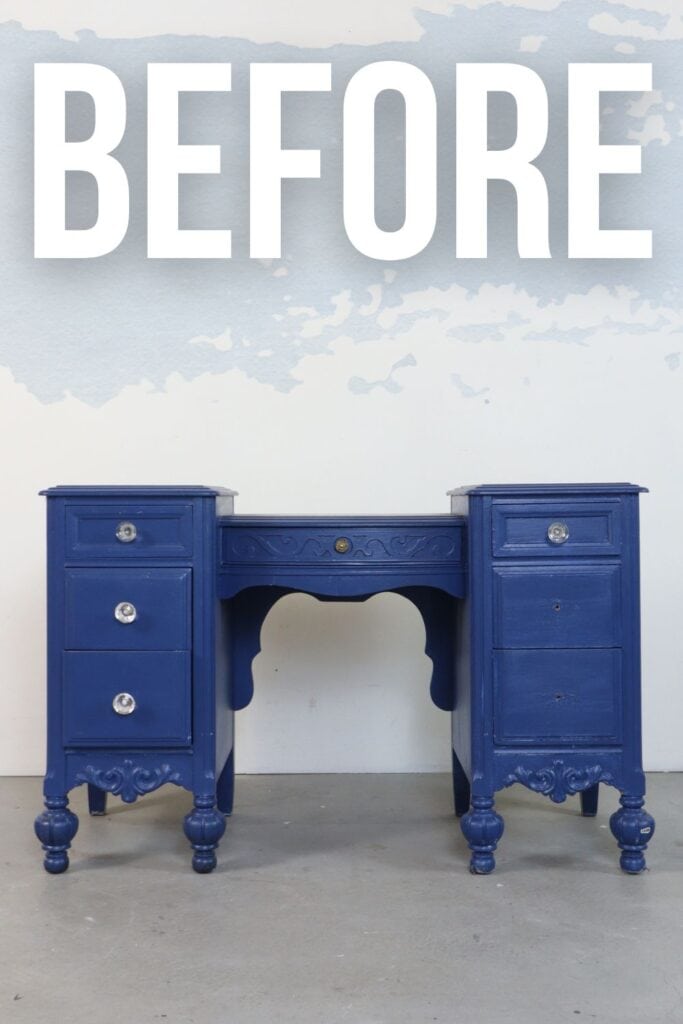
Okay, back to our makeover! First things first, let’s set the scene. Imagine someone in your neighborhood is giving you an old vintage vanity.
It’s covered in dust, the paint is not your vision, but beneath all that, you can see the potential. It screams out for a second chance.
You have the vision, you see those charming, chic nightstands right there in that old vanity. Sounds exciting, right?
Well, that’s exactly what happened to me, and in this post, I’ll share how I turned that vision into reality, all the do’s and don’ts, and hopefully inspire you to start your own transformation project.
So, buckle up and get ready for an exciting journey of transformation, from vintage vanity to gorgeous green nightstands.

Supplies Used for Vanity Turned into Nightstands
As an Amazon Associate, I earn from qualifying purchases. I also may earn from other qualifying purchases with other companies or get free product to review and use. All opinions are my own.
- Electric Screwdriver
- Universal Ratchet (Gator Socket)
- Hammer
- JB Weld Epoxy Putty
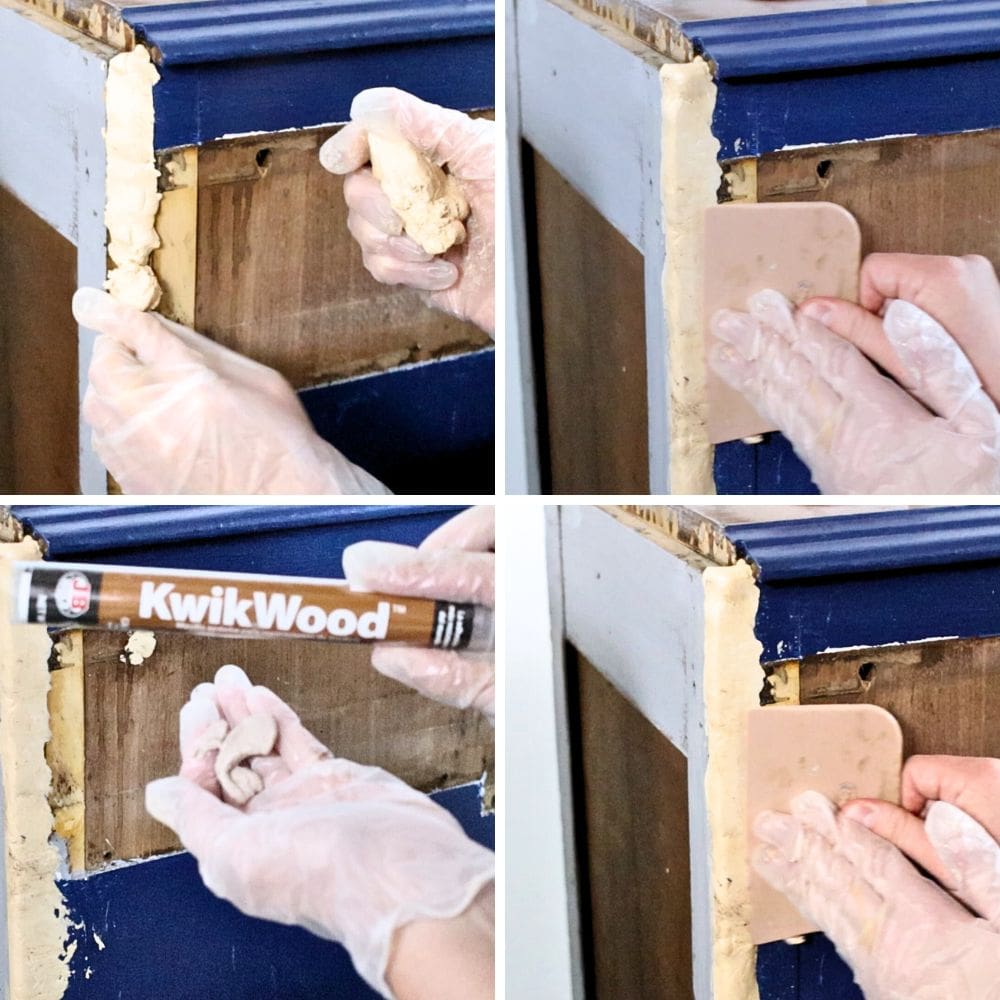
- KwikWood
- Disposable Gloves
- Plastic Wood Filler
- Plastic Putty Knife
- Rotex 125 Sander
- SurfPrep Sanding Screens 5” Round (Use code RAY10 to get 10% off your order)
- Diablo Sanding Discs 60 Grit
- Stripwell QCS Stripper (Use code SUNLIGHT10 to get 10% off your order of Stripwell QCS!)
- Carbide Scraper
- SurfPrep 3×4” Sander (Use code RAY10 to get 10% off your order)
- SurfPrep Pro Foam Pads (Coarse and Medium Grit) (Use code RAY10 to get 10% off your order)
- SurfPrep 3×4” Sanding Screens (Use code RAY10 to get 10% off your order)
- Contour Sanding Grips
- RIDGID Shop Vacuum
- Tack Cloth
- Heirloom Traditions Paint in Peony Color
- Foam Roller
- Paint Brush
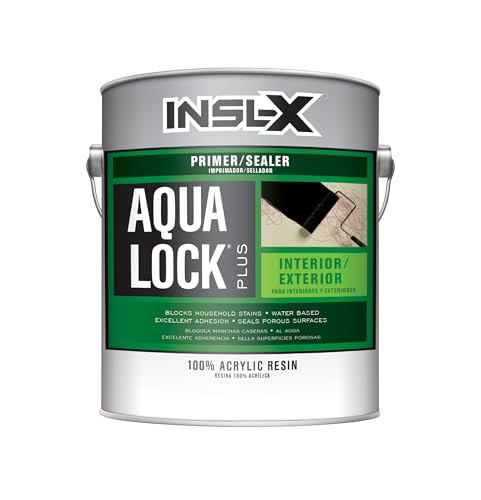
- Aqua Lock Primer in Black
- Wagner FLEXiO 595 Paint Sprayer
- Paint Filters (filter paint before spraying!!)
- Respirator
- Clear Shellac
- Melange ONE paint in Jacobs Well
- Black Knobs
Turning a Vanity into Nightstand
First I took the vanity apart. I looked around for screws or any signs of how this middle part was attached to the sides.
I found screws on the backside and took them out with my electric screwdriver. Thankfully none were stripped and they came out easily.
There were also screws under the middle area, so I removed the middle drawer and set it aside then removed those screws.
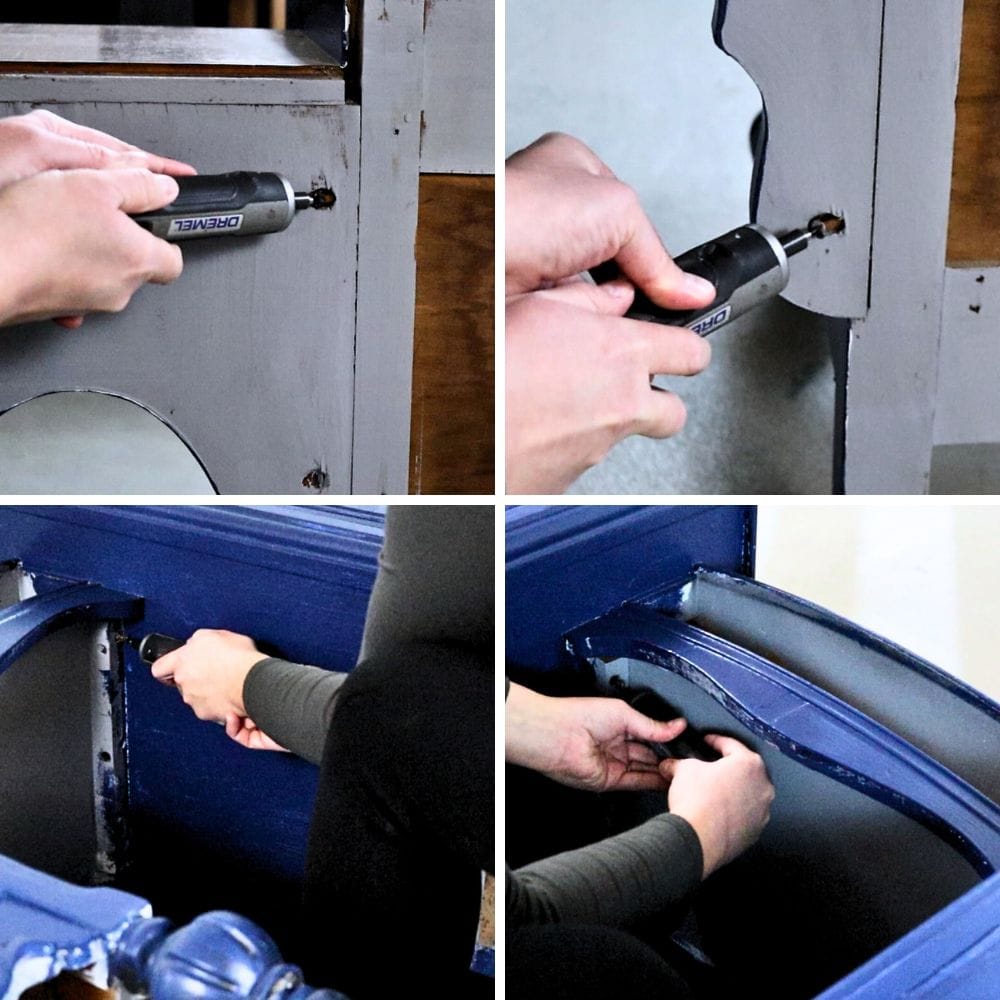
They were a bit harder because I couldn’t see where to line the screwdriver and there was paint on some of the screw heads. But once they were loose I gently pulled and it came off.
But now what was holding the rest of it on? I hit it with a hammer a couple of times and it didn’t budge… so it must be held on well…
I couldn’t see any other signs, but when I removed another drawer, I found bolts coming inside the drawer right where the middle piece was secured.
I loosened the bolts from inside the drawer with a universal ratchet that fit around the square nut and slowly was able to loosen it.
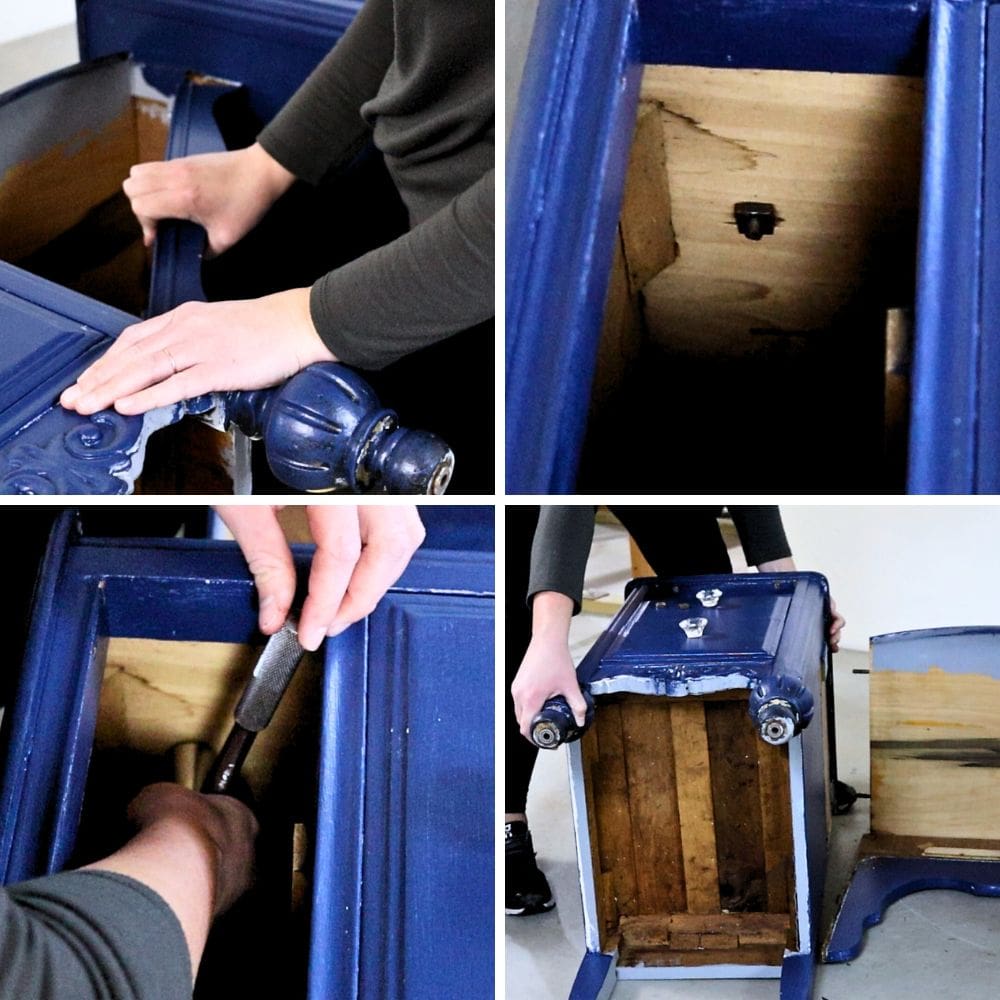
Ahh, it felt so good when it finally came apart. Last but not least I chiseled the remaining little piece of wood off… and took off some of the veneer with it.
Fixing Missing Wood Chunks
Here’s what I was left with. Each nightstand had just a few holes to fill, but they also had these large cutouts in the corners that I’m not about to just paint over.
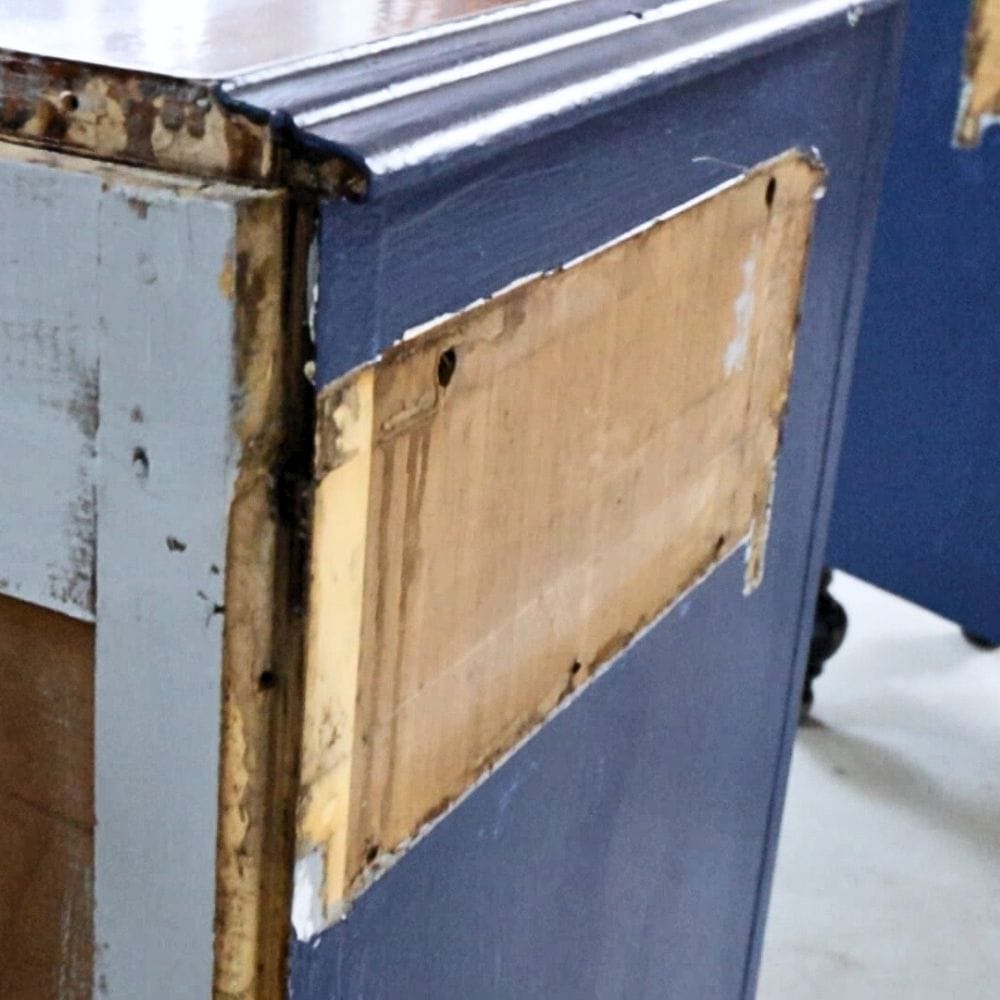
So, I filled them in. I’ve had this JB Weld Epoxy Putty for years. It’s very similar to Kwikwood, but it came in a much larger container. I don’t like it as much as Kwikwood, but I think it still gets the job done.
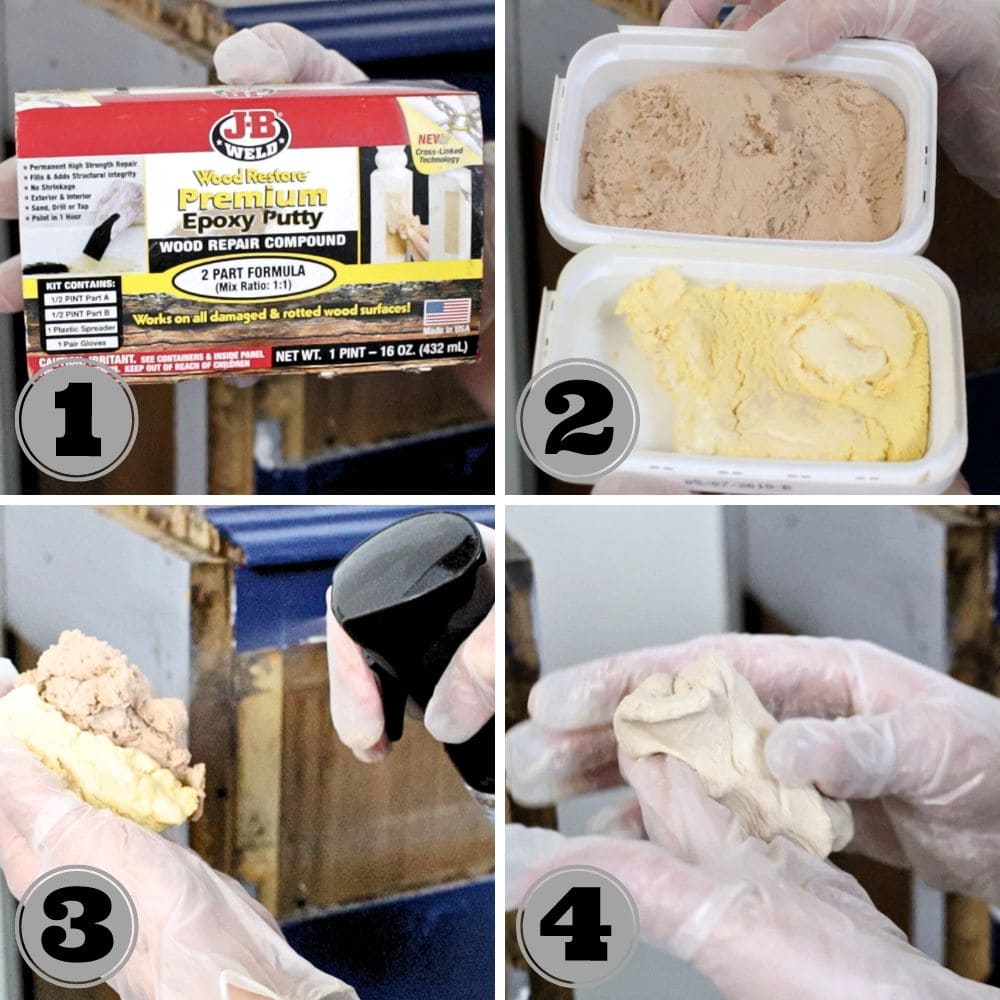
If it was warm outside, I would have taken these out to the garage and filled the corner in with Bondo. But Bondo is stinky and I work inside my home when it’s cold out.
Plus this was a great excuse to get rid of this filler I’ve had around for years. I used all of it and needed to fill the holes, so I used Kwikwood for the holes, and then Plastic wood filler for the chipped veneer.
The next day I came back to the project to sand down all of the filler down.
I used 120 grit screens at first, but the Epoxy Putty was soft enough that it was clogging the sandpaper, so I switched to the cheaper and more aggressive 60 grit diablo discs.
This was another great chance to test out my new Rotex 125 sander that is more aggressive than my other sanders.
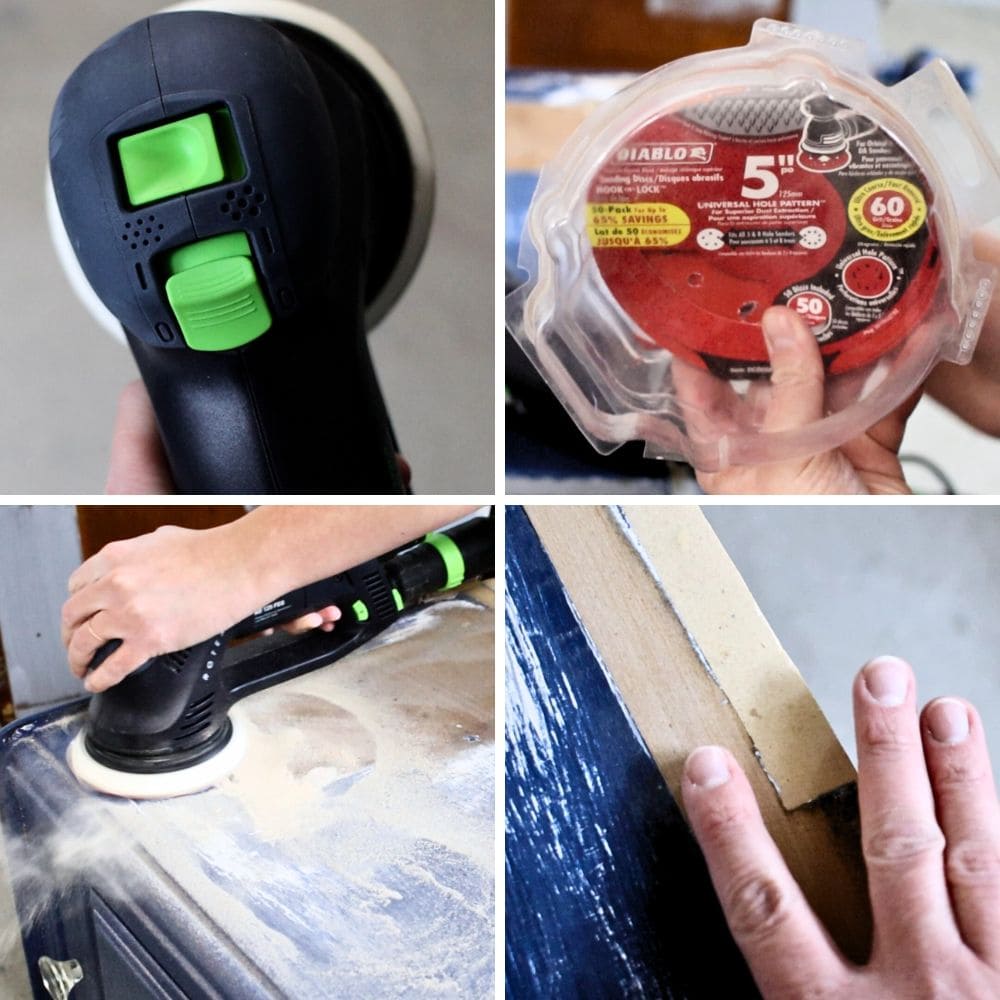
Eventually, I got everything sanded down smooth, but unfortunately, some of the veneer chipped again, so I’ll have to fill that in again.
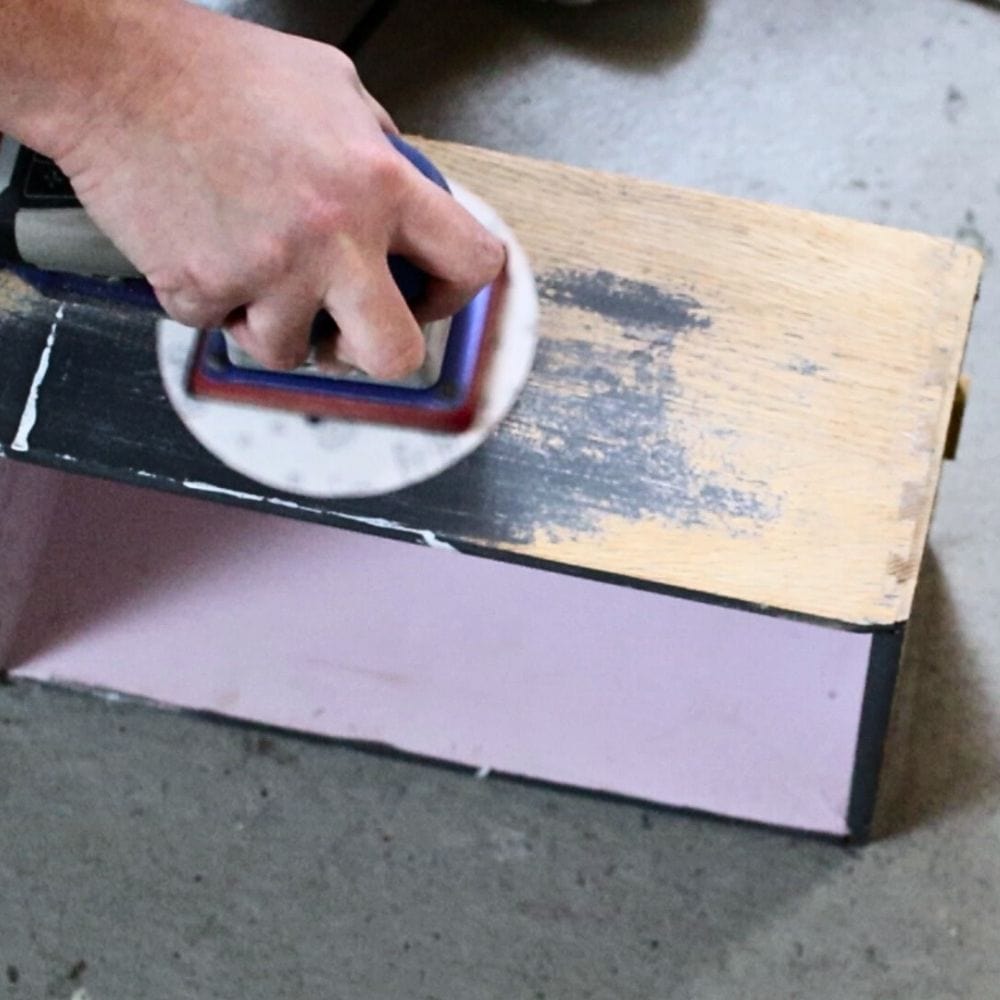
Remove Paint from Furniture
Now, these nightstands were painted with a brush, and as I sanded the filler, it progressed to sanding off the brush marks out of the paint.
I think this paint is latex paint, which doesn’t help because it clogs sandpaper easily and gums up when sanded.
Sanding was a slow process, so I sprayed some Stripwell QCS stripper onto the other nightstand while I sanded the first nightstand.
I ended up spraying 2 coats on, letting it sit for 15 minutes after each coat. But the paint still wasn’t budging much with a regular scraper. So, I got out the strong carbide scraper.
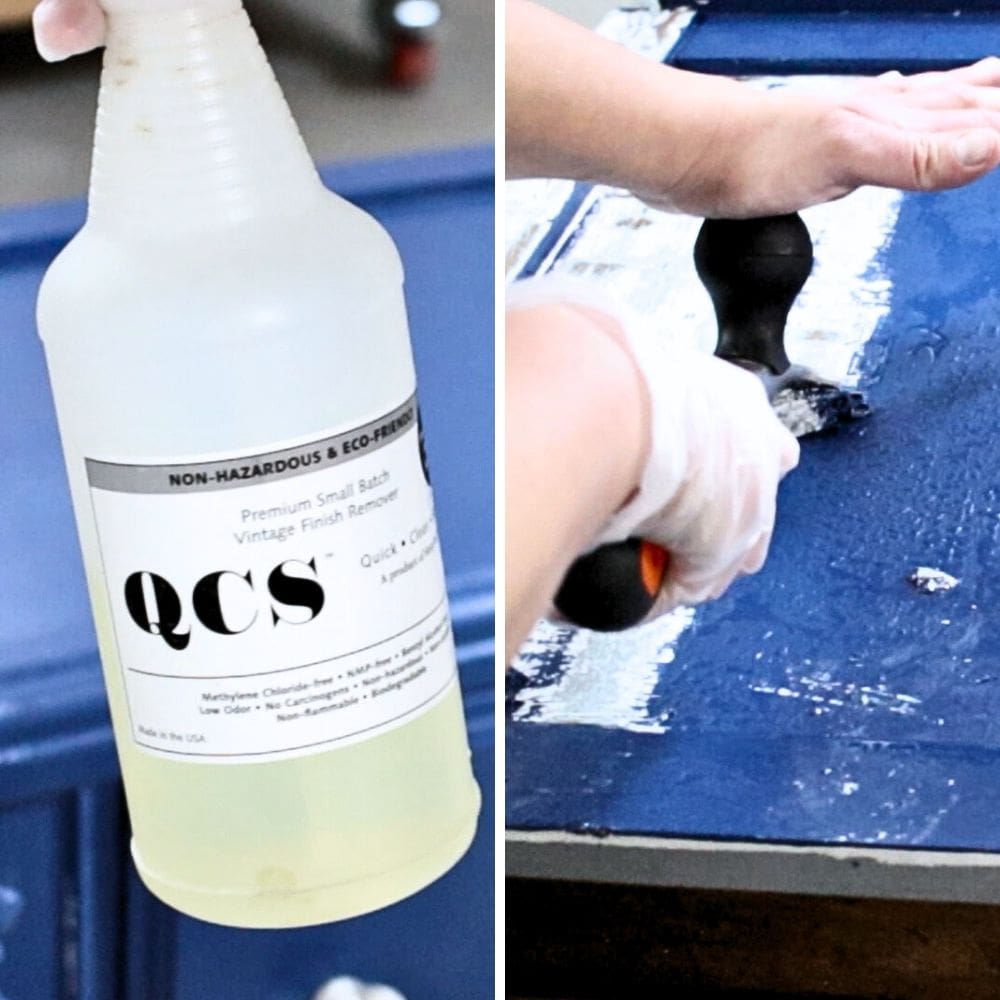
This thing removed most of the paint, without much effort on my part because the Chemical stripper softened the paint up. I scraped my little heart out for a few hours before calling it quits for the night.
Would you like to save this?
I really just wanted to make the surface smooth and remove any brush marks and drips in the paint so my paint would look and feel smooth.
But I made a mess trying to remove more of the paint than I needed to. I walked away from the project for a few days, came back and spent 6-7 hours total sanding everything smooth.


The worst parts were the feet and the scrolly detail at the bottom. So I didn’t remove the paint all of the way, I just made it feel smooth.
And then I crossed my fingers that it would be smooth enough to not see the lines of the old paint underneath the new paint.
Oh, also in this process I sanded the paint off of the sides of the drawers so they would open and close easier, and because I like seeing the wood on the drawers.
I also sanded the inside of the drawer smooth but didn’t worry too much about the insides. Finally, the next day, I finished sanding, and then I vacuumed up the dust and wiped the rest away with a tack cloth.
Painting Inside Drawers
Since these nightstands are for my pink loving girls, I touched up the paint inside the drawers with more pink paint, Heirloom Traditions Paint in Peony.
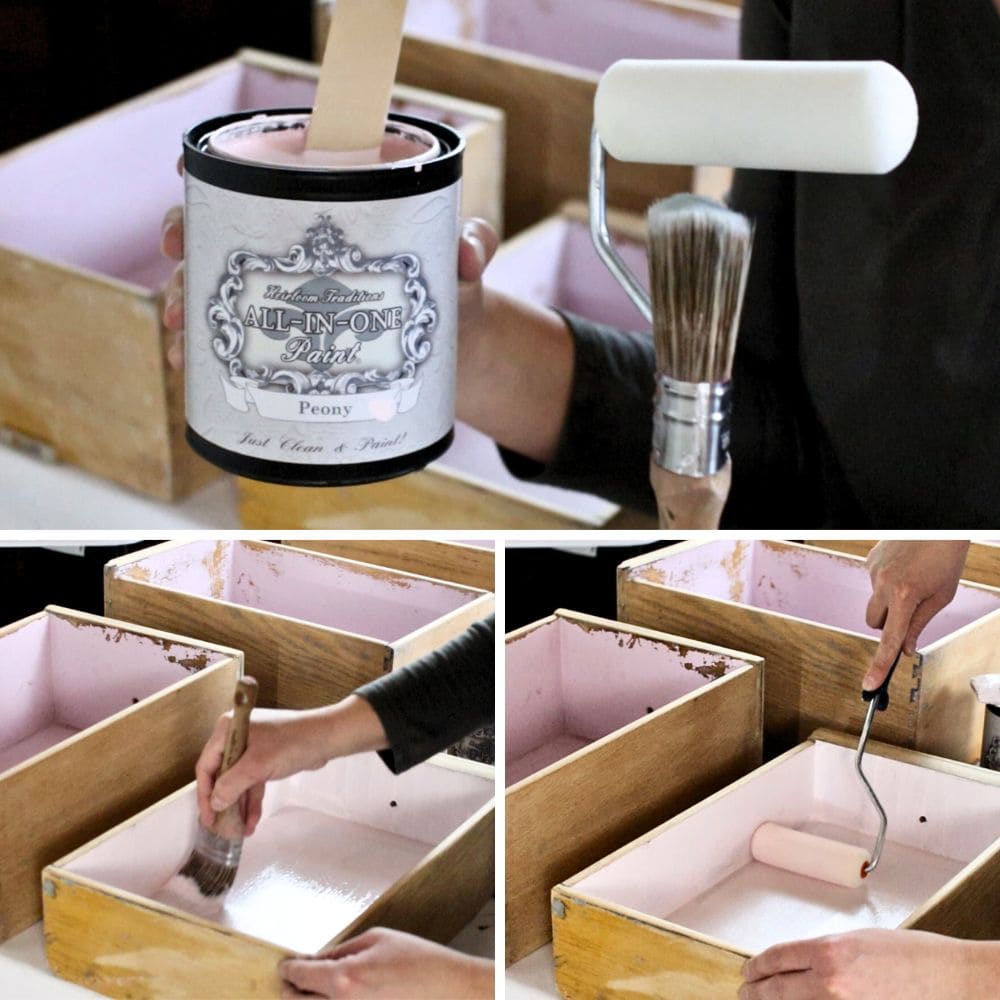
The bummer about this paint and color is that it doesn’t have good coverage, so I painted 2 coats and could still didn’t get full coverage in places where the paint had chipped off when sanding…
So I had to paint like 5 coats to get full coverage here. You can check out my Heirloom Traditions All In One Paint review for more of my experience and thoughts on it. For the best application techniques, here’s how to use all in one paint.
Priming Nightstands Before Painting
While the paint dried, I put the drawers back in the nightstands, and then I mixed up the black Aqua lock primer to prime these for new paint.
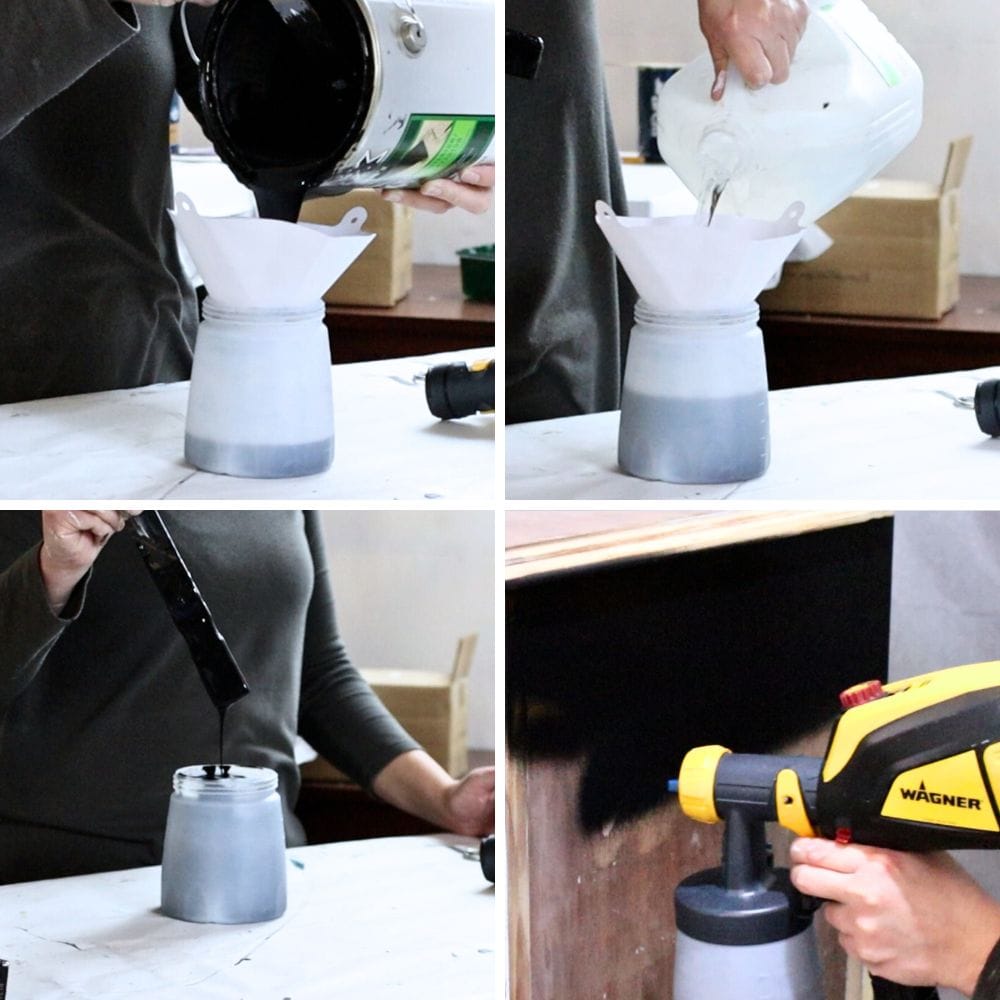
I love this black primer when painting dark colors, and spraying it on creates a flawless finish. You can see painting furniture with Lilly Moon Paint where I brushed and rolled it, if you’re more comfortable with these methods.
This primer will create a coat of even coverage so the paint doesn’t look spotty. It also will help the paint stick, and seal in the wood. Then I cleaned out the sprayer and let 2 coats dry overnight.
Filling Wood Grain and Scratches
The next day, I could see all of the scratches and wood grain marks I accidentally made when removing the paint and other chips from its age.
So I filled all of those in with Plastic wood filler, and then I let it all dry. The next day, I sanded the wood filler smooth and cleaned up the dust again. Then, we moved them outside to spray with clear shellac.
This probably wasn’t necessary since I am using a dark paint color, but since I sanded the old finish off, there is a very good chance the wood tannins would come through my paint.
Shellac is how we block those stains from showing up in the paint, so it was worth an extra step to prevent my paint job from getting ruined.
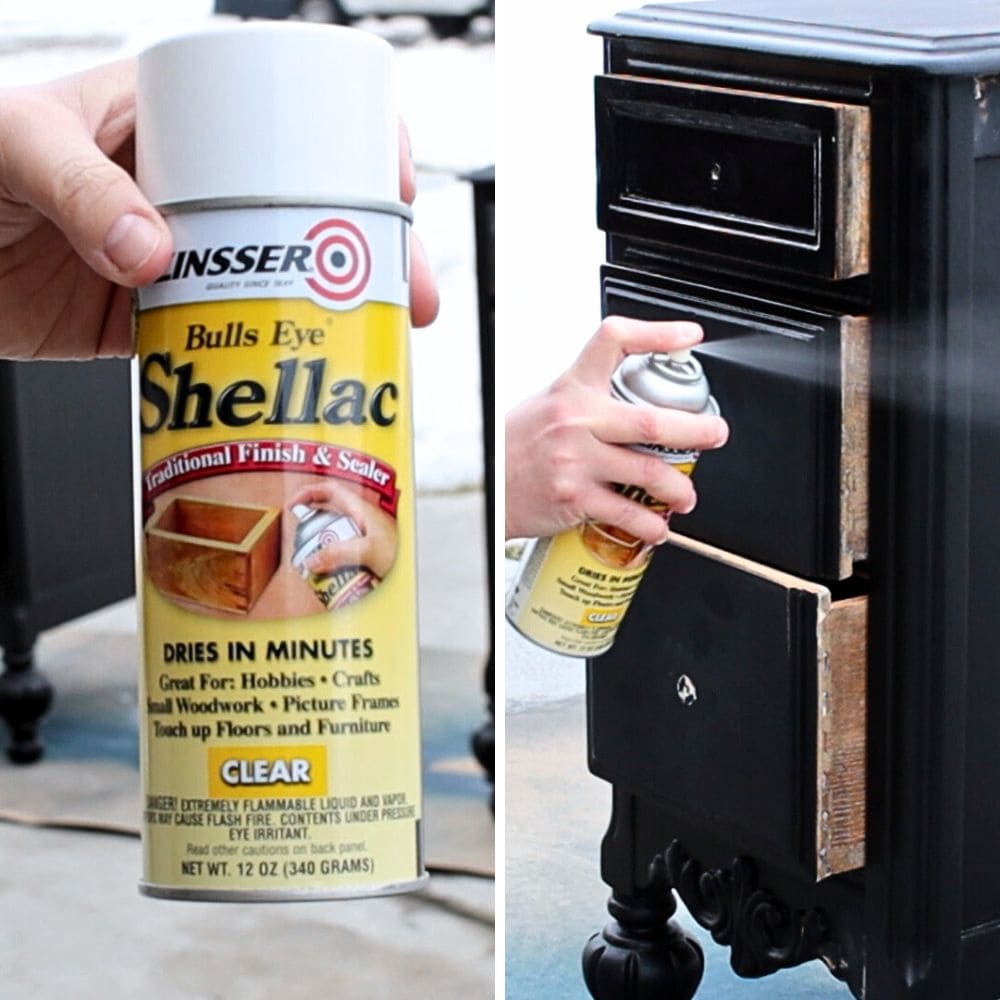
We let the shellac dry overnight and then sprayed another coat of the black primer over everything to create even coverage over all of the wood filler spots.
If you paint over wood filler without a tinted primer, you most likely will see the wood filler spots show up as a matte sheen. I also brushed the primer on the edges of the drawers at this point.
Painting Nightstands with All in One Paint
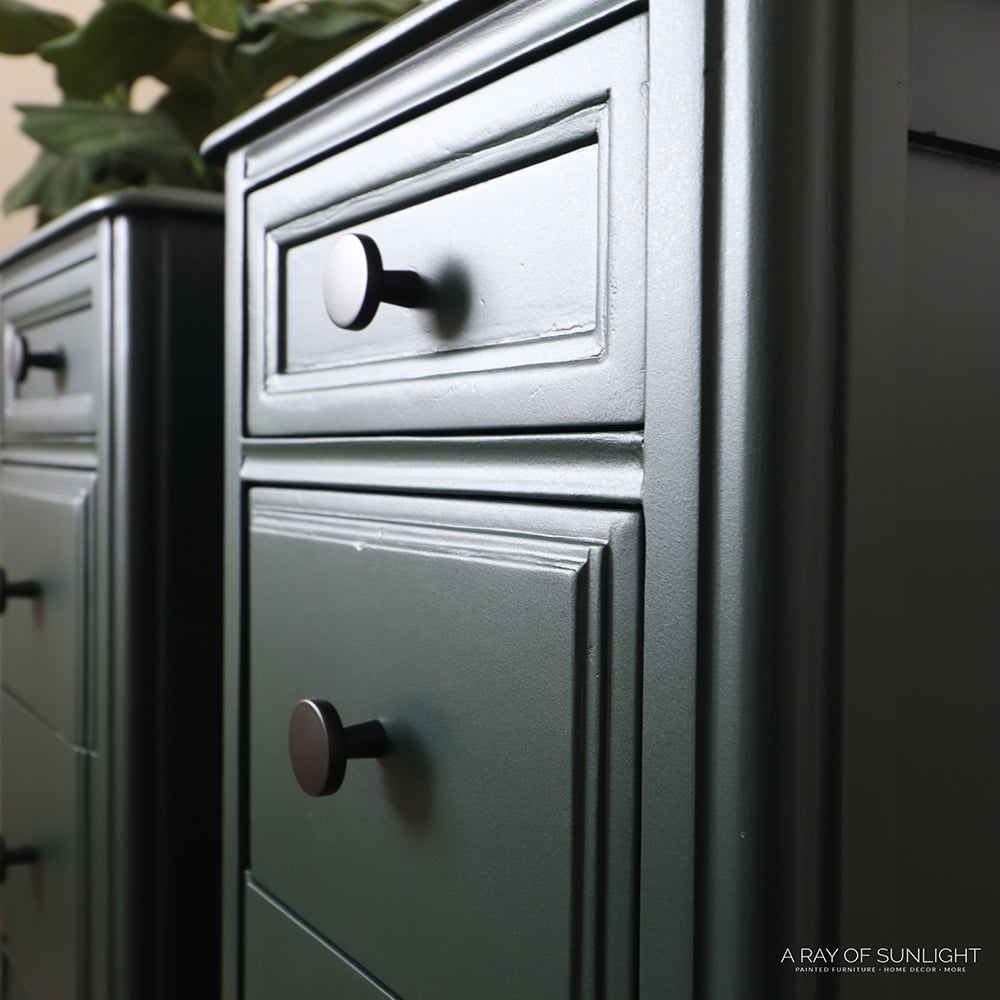
After the primer was dry an hour later, I finally was ready to move onto the paint! I chose Jacobs Well by Melange Paint, in their ONE paint line.
This is an all in one paint with primer, paint, and built in topcoat. It dries to a beautiful satin sheen and it creates a flawless finish when sprayed on.

I used the same Wagner FLEXiO 595 sprayer to spray it on, let it dry for a couple of hours, and then sprayed a second coat on to make sure I had full coverage. Watch the full makeover of this vanity on our youtube video below!
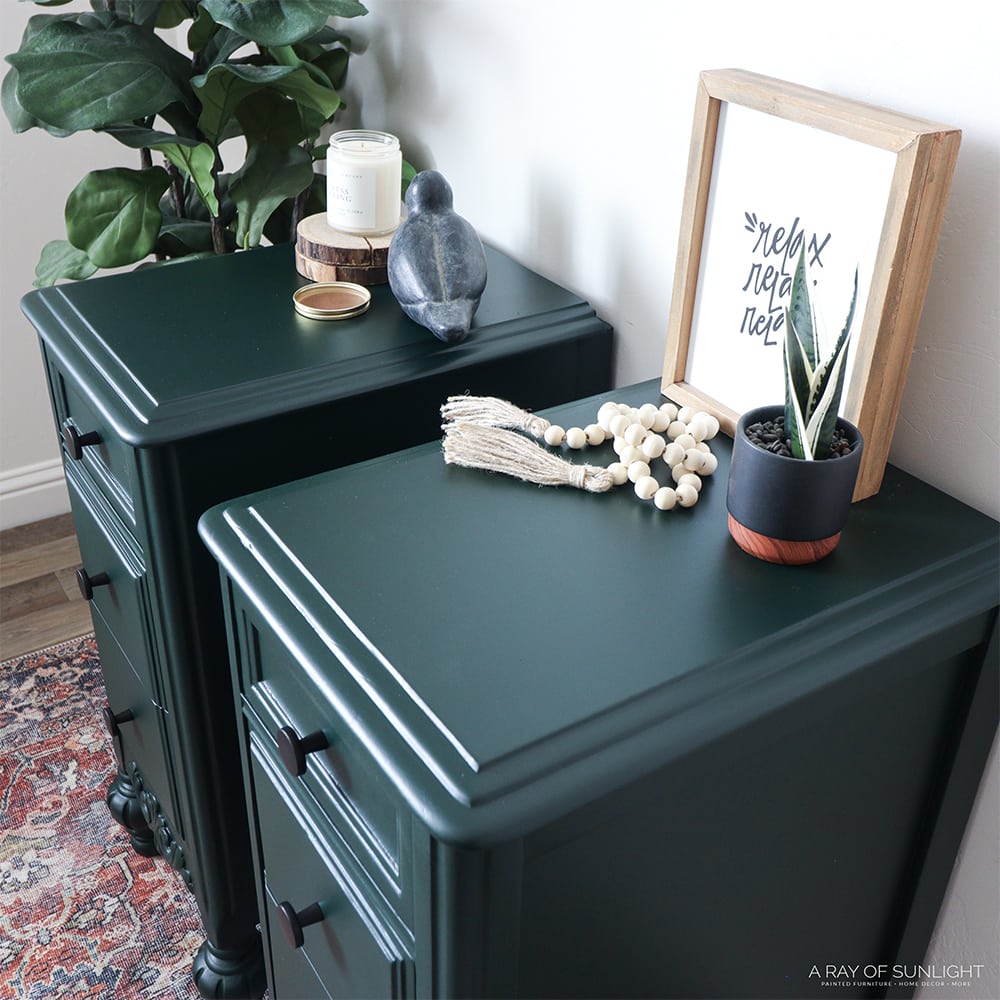
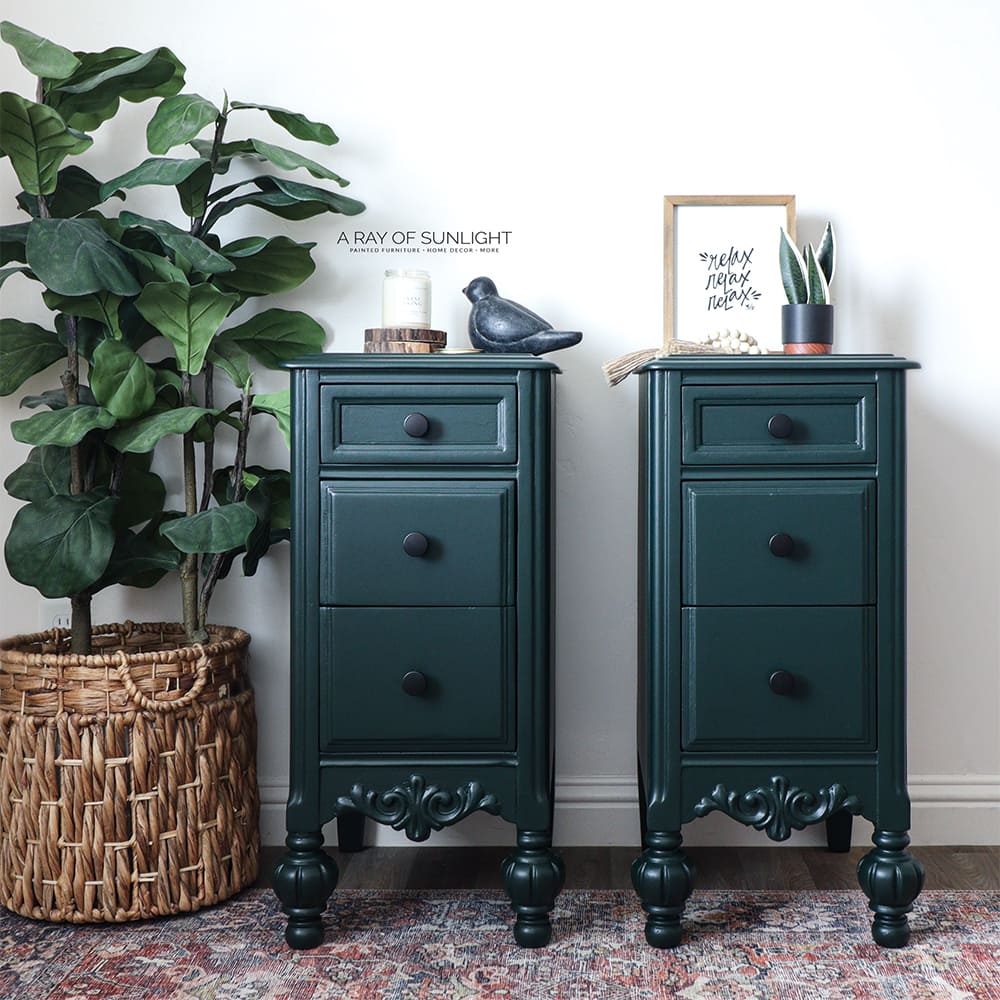
Last but not least, a couple of days later I put new black knobs on the nightstands to finish off the look. And here’s what they look like now!!
More Before and After Makeovers
See All >
Click any of these “before” photos below to view the “after” of that makeover.


Oh, I’m SO excited to keep these nightstands! The color is perfect, and the tall, skinny shape of these nightstands is exactly what I need in their small bedroom. For more nightstand makeovers, check out these modern nightstand ideas and DIY nightstand ideas.
Turn your nightstands into more functional pieces with these DIY repurposed nightstand ideas and upcycled nightstand ideas. Check out these refinishing nightstand ideas if you want to stain instead of paint.
Don’t forget to check out these other awesome before and after furniture makeovers from my Furniture Flipping friends!! (Click the links below the photos!)
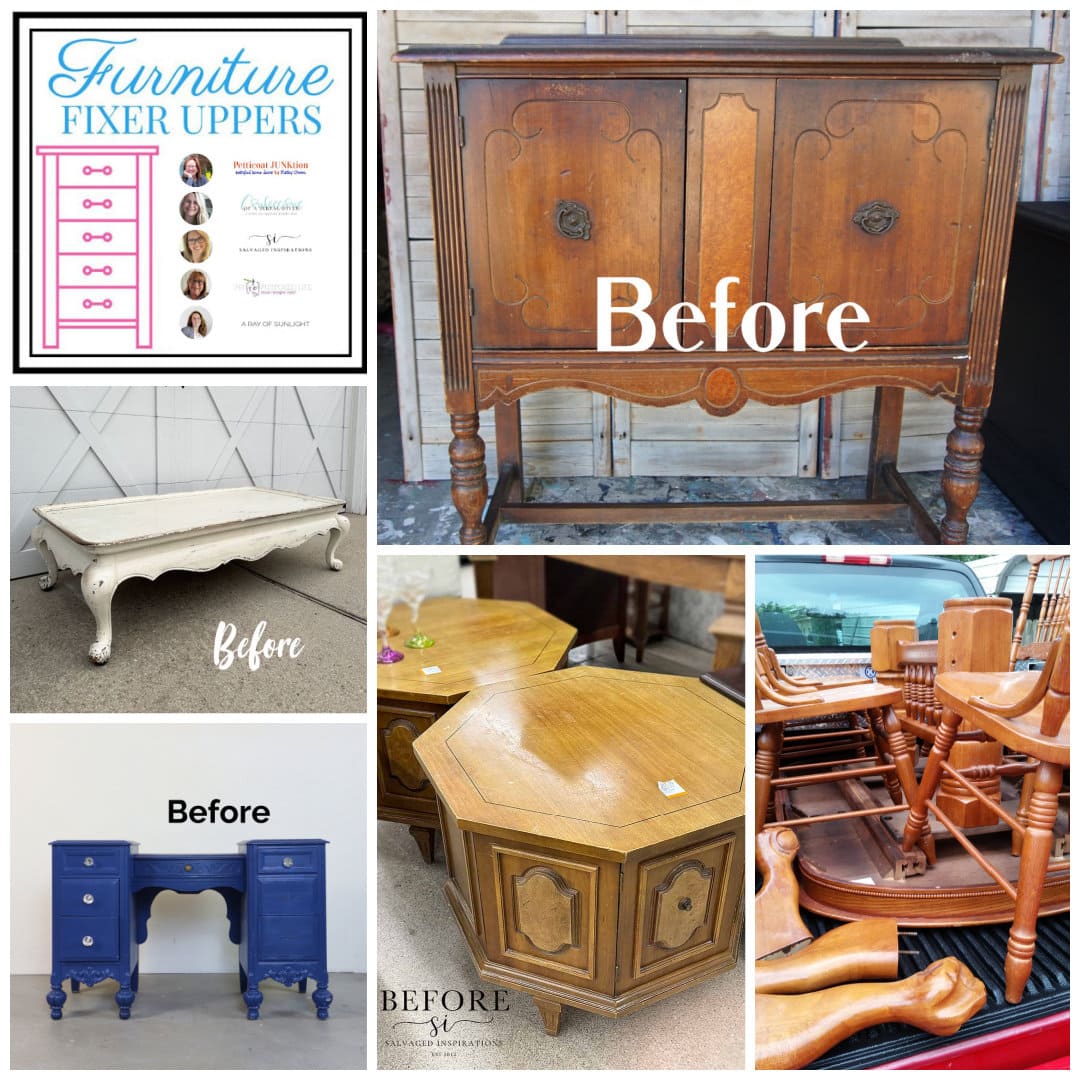
- Antique Buffet from Petticoat Junktion
- Dining Table Set from My Repurposed Life
- Octagon End Tables from Salvaged Inspirations
- Coffee Table Makeover from Confessions of a Serial DIYer


Vanity Turned into Nightstands
We're diving into the transformation of a vintage vanity turned into nightstands. Let's breathe new life into these charming pieces and transform them into functional, stunning nightstands.
Materials
- JB Weld Epoxy Putty
- KwikWood
- Disposable Gloves
- Plastic Wood Filler
- SurfPrep Sanding Screens 5” Round (Use code RAY10 to get 10% off your order)
- Diablo Sanding Discs 60 Grit
- Stripwell QCS Stripper (Use code SUNLIGHT10 to get 10% off your order of Stripwell QCS!)
- SurfPrep 3x4” Sander (Use code RAY10 to get 10% off your order)
- SurfPrep Pro Foam Pads (Coarse and Medium Grit) (Use code RAY10 to get 10% off your order)
- SurfPrep 3x4” Sanding Screens (Use code RAY10 to get 10% off your order)
- Contour Sanding Grips
- Tack Cloth
- Heirloom Traditions Paint in Peony Color
- Aqua Lock Primer in Black
- Paint Filters
- Clear Shellac
- Melange ONE paint in Jacobs Well
- Black Knobs
Tools
Instructions
- Take the vanity apart using a screwdriver to remove screws on the backside and under the middle area. Use a hammer if necessary to loosen any stubborn parts.
- Check for bolts inside drawers that may be securing the middle piece, and use a universal ratchet to loosen them. Carefully chisel off any remaining pieces of wood or veneer.
- Use an epoxy putty to fill in any missing chunks of wood, making sure to smooth out the surface before it dries completely. Once the filler has dried, use sandpaper or a sander to smooth down any rough spots and level out the surface.
- Remove any paint from the furniture using a chemical stripper, such as Stripwell QCS. Apply two coats of the stripper and let it sit for 15 minutes each before scraping off with a carbide scraper.
- Touch up any paint inside the drawers using Heirloom Traditions Paint in Peony, or any desired color. Make sure to apply multiple coats if necessary for full coverage.
- Prime the nightstands with 2 coats of black Aqua lock primer to create an even base for painting. Use a sprayer for a flawless finish and let dry overnight before proceeding to painting.
- If there are any wood grain or scratches, fill them in with Plastic wood filler, let it dry completely, and sand down any rough spots. Clean the surface of any dust before proceeding to the next step.
- Spray a coat of clear shellac on the nightstands to prevent wood tannins from showing through the paint. Let it dry overnight and then spray another coat of black primer for even coverage.
- Use an Melange ONE's Jacobs Well paint color for a beautiful deeg green finish. Apply 2 coats with a sprayer, letting the first coat dry before applying the second.
- Finish off the nightstands by adding new hardware such as black knobs to complete the look.
Recommended Products
As an Amazon Associate and member of other affiliate programs, I earn from qualifying purchases.


Follow us on YouTube to get more tips for painting furniture. Or share your project with us on our Facebook Group and be part of our community. See you there!

I’ve never used a black primer but it looks amazing. And your nightstands are GORGEOUS Natalie. I love the color… and your styling! 😍 XOXO
Thank you so much Denise!
What a tremendous makeover. Love it.
Thank you!!
Natalie,
That was a lot of work but oh so worth it. I love how the nightstands turned out, and I’m happy to hear you’re keeping them because you would be hard-pressed to get all that time, effort, and money out of them if you sold them. 🙂
Perfect vision and a beautiful makeover!
pinned!
gail
Thanks so much Gail! I think you’re right.
All I can say is, “Wow!” I’ve done a lot of furniture refinishing over the years, but this project is beyond impressive. What a whole heck of a lot of work! And the end results are incredible. Gorgeous! I would have loved to have seen a photo with the drawers open and I’m curious if you decided to do anything with the remaining pieces. Thanks so much for sharing your vision and talents. Just awesome!
Thanks so much! The insides are just plain pink. Nothing too special. As for the remaining pieces, they are going to the scrap wood pile to be used in the future… maybe. haha
Wowza these turned out amazing! And the color is gorgeous!
Thank you so much Christina!
WOW…another STUNNING transformation. Featuring when my link party opens.
Oh thank you so much Carol! I appreciate it!
I’ve got hand it to you; this project was indeed a labor of love! Your perseverance is more than commendable, but that is one of the reasons I follow you. You always do excellent work, and these pieces are beautiful! Your work is a great inspiration!
I LOVE all makeovers, I really was surprised what you did with that vanity and turned it into 2 end tables BEAUTIFUL!!!!!!!!!!!!!!!!!!!!!!!!!!!!!!!!!!!!!!!!!!!!!
Thank you so much! I’m so happy you love them!