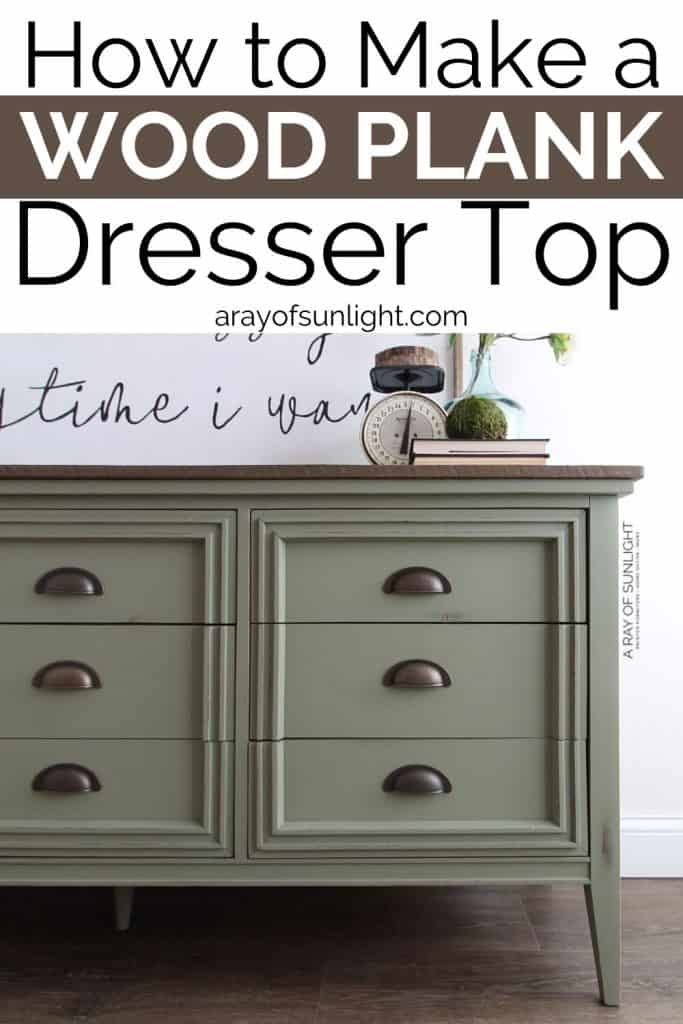
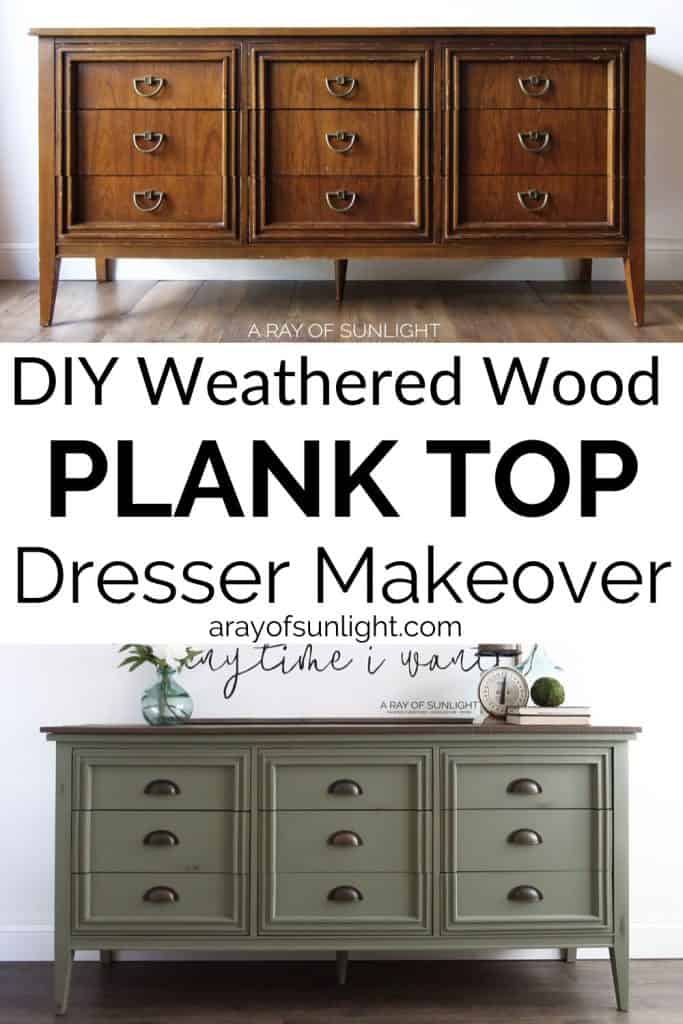
How to Make a Plank Top Dresser


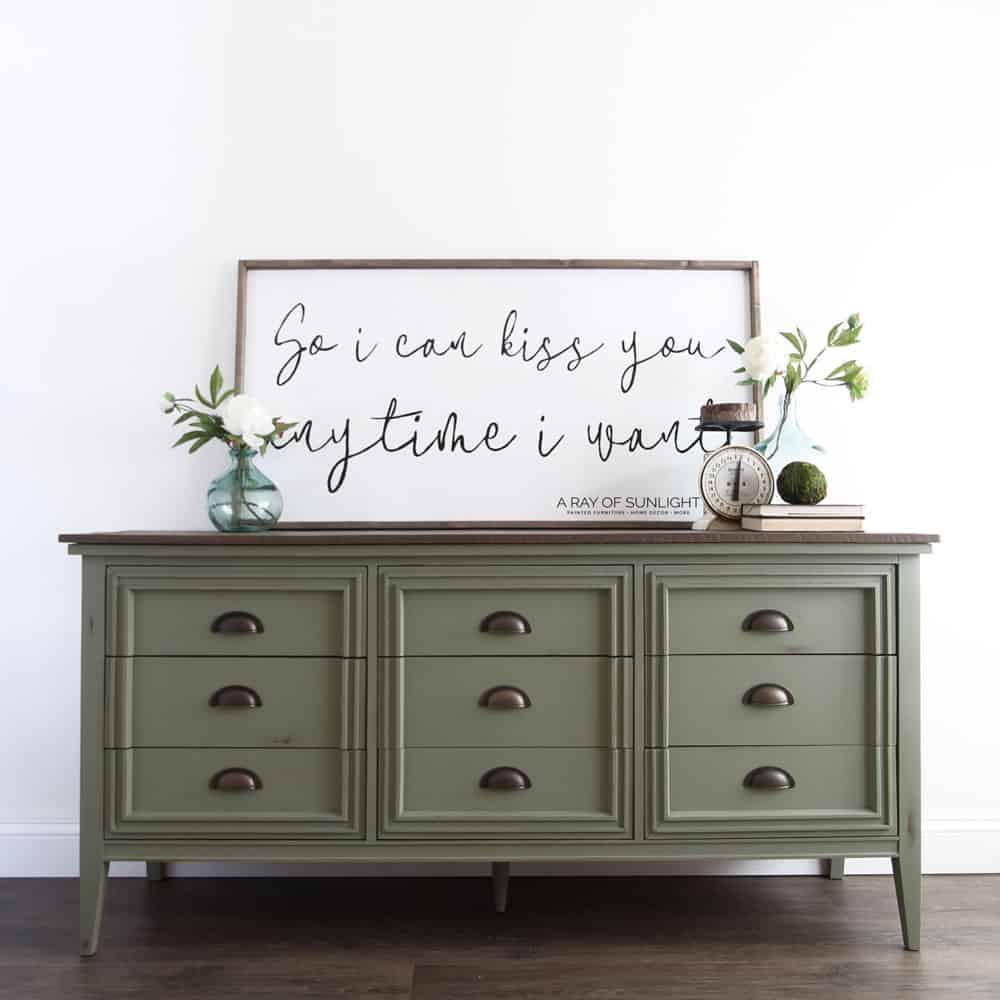
Create a farmhouse style dresser by adding weathered wood planks to the top! With this guide on how to make a plank top dresser, you can cover a damaged dresser top with it, without replacing the dresser top. This will give your dresser a unique and rustic look that is perfect for any farmhouse style bedroom.
If you’re into DIY dresser makeovers, this project is definitely worth adding to your list. It’s simple and impactful, and best of all, it can be done in just a few easy steps.
If you’re looking to add a wood top to your dresser, you’ve come to the right place! Replacing a damaged dresser top can be expensive and time-consuming, so why not try this budget-friendly alternative?

By using wood planks, you can easily cover up any scratches or imperfections on your dresser without having to replace the entire top. Not only is this cost-effective, but it also allows for more customization.
You can choose from different types of wood and stains to match your unique style. Plus, the planks add a beautiful rustic touch that will make your dresser stand out in any room.
Let’s dive into how to DIY replace a dresser top with wood planks, without actually replacing the dresser top!
Supplies Used to Make a Plank Top Dresser
As an Amazon Associate, I earn from qualifying purchases. I also may earn from other qualifying purchases with other companies or get free product to review and use. All opinions are my own.
- Old Dresser
- 1″ Common Boards
- Measuring Tape
- Pen / Pencil
- Saw
- 220 Grit Sandpaper
- Nail Gun with 1 1/4″ nails
- Wood Stain
- Polyurethane Topcoat
Now let’s dig into each of those steps!
Measure Top of the Dresser
It’s pretty self-explanatory. You need to know the length and depth of the top of the dresser.
Now add 1 1/2” to the length and 3/4” to the depth. This will give you an overhang of 3/4” on each side, and no overhang on the back.
Measure and Cut Wood Planks
If you have a table saw, this next step is super easy. If you don’t, you’ll need to do a little bit of math. Divide the depth + 3/4” into however many wood planks you want on top.
*It really doesn’t matter how many wood planks you have, but I try to keep the amount and the size either really random, or symmetrical. Avoid doing 5 of one size and 1 of another completely different size.*
So if you need 20” of wood planks, and you want there to be 5 planks, then each piece of wood needs to be 4” wide.
If you aren’t familiar with wood, you might think you can just grab some 1” x 4” common boards and be set.
But those common boards don’t actually measure like their names suggest. A 1” x 4” board actually measures somewhere around .75” x 3.5”.
Cutting Wood Planks With Table Saw
With a table saw, you can easily rip each 1” x 6” board down to 4” wide or you could use (4) 1” x 6” boards ripped down to 5” each.
You can also get fancy and rip them into different widths so your plank top has a lot of character and dimension!
Cutting Wood Planks Without Table Saw
If you don’t have a table saw there is still hope! I used to put wood plank tops on dressers all the time before I had a table saw. The trick is to find a combination that gets you close to what you need.
So in the 20” example (your dresser top is 19.25″ deep), you could use (4) 1″ x 4″ boards and (1) 1″ x 6″ board to reach 19.5″.
You would have only a 1/4″ overhang instead of a 3/4″ overhang, but that’s perfectly fine! I would place the 1″ x 4″ boards on the outside and the 1″x 6″ board in the middle.
Pick Straight Boards and Cut Them to Size
Once you figure out your layout, pick out straight boards (you can even lay them on the ground next to each other in the store to make sure they fit together nicely!)
Then cut each board down to the length that you need them (length of the dresser plus about 1 1/2″)
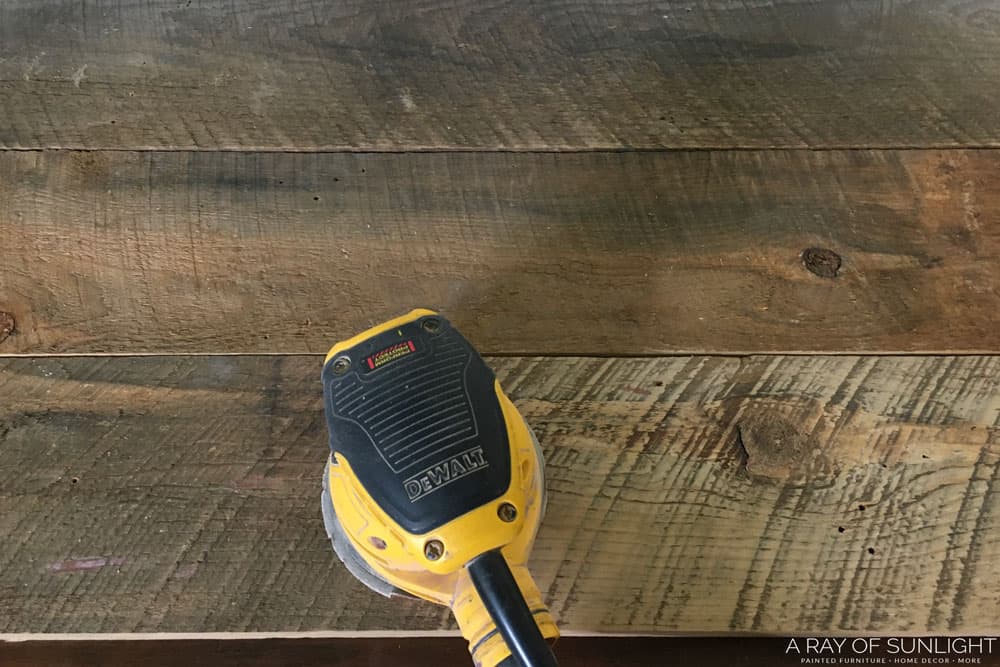
Make sure to sand each board down smooth with this 220 grit sandpaper, especially on the edges before moving onto the next step!
If you are working with reclaimed wood, make sure to sand it all down smooth!
Line Up Wood and Nail into Place
Lay your boards how you want them on the dresser top.
I like to start with the board in the back and line it up with the back of the top of the dresser. Then I measure the overhang on each side to make sure the wood plank is centered.
Randomly nail the boards into the dresser top with a nail gun. I also like to add extra nails near the edge to make the wood plank top extra secure when someone lifts the whole dresser by the wood planks.
Then line the next wood plank up against the back wood plank. Make sure there aren’t any major gaps between the wood planks.
(You can use a few wood clamps to squish them together and hold them onto the dresser!)
Once it’s all lined up, nail that board into the dresser top. I have this cheap brad nailer, with 1 1/4″ brad nails and a small air compressor that gets the job done!
Keep repeating the process until all of your boards are nailed to the top of your dresser.
Should I remove and replace dresser top?
The old dresser top helps secure the wood planks on the dresser top. So it’s best not to remove it.
If the old top is really warped or badly damaged structurally, then you would want to replace the dresser top. Learn how to replace a dresser top in this vintage farmhouse dresser makeover.
But if your top has some water damage or cosmetic damage, this is the perfect way to cover a damaged dresser top without having to replace the top.
If you’re looking for ways on how to repair your furniture instead, check out this post on how to repair water damaged wood.
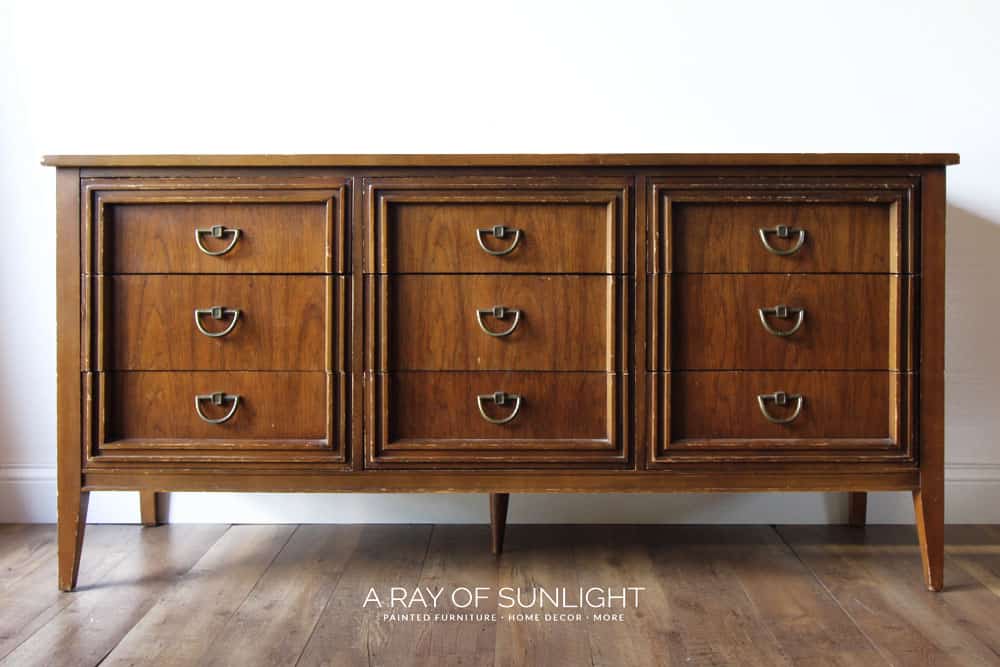
Also, I prefer to make a plank top dresser on a dresser that doesn’t have a super nice top, to begin with.
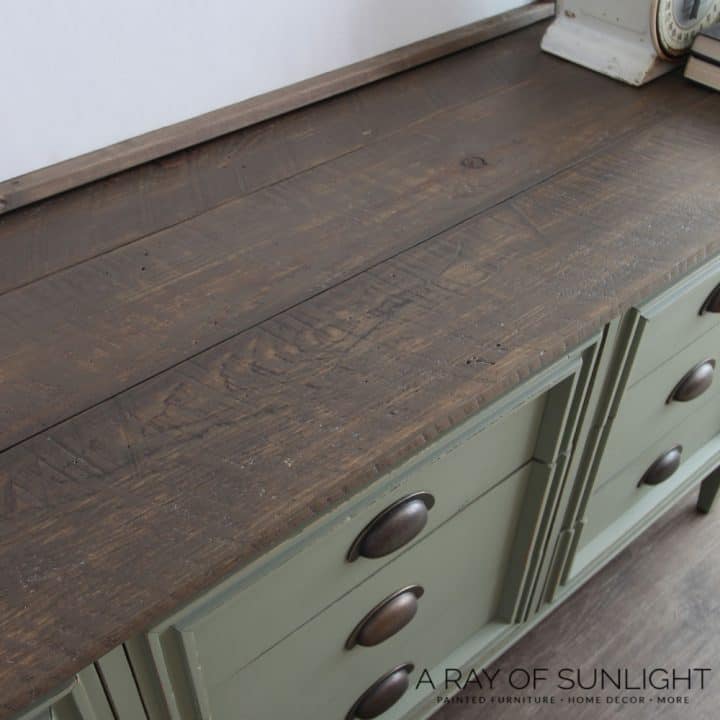
This dresser, in particular, had an MDF top that was wrapped in wood veneer. So I wasn’t putting holes into a nice or expensive wood top.

What wood should I use for wood plank top?
Typically I use 1″ common boards. They are cheap and easy to find. These particular boards are reclaimed weathered wood planks from our friend’s basement remodel.
When is the best time to stain the wood?
It’s best to stain the wood planks before you attach them to the dresser. You don’t want the stain to get onto your dresser!
Make sure to stain the top and sides of each wood plank really well. You may end up seeing the sides of each wood plank in the gaps.
I also like to stain the bottom of each plank, just where the overhang area is. That way, when someone looks under the dresser, they will see all the wood is stained.
What stain did you use on this plank top dresser?
This stain is a homemade mixture of a water-based stain. Did you know that you can make stain out of latex paint?
I only use it on wood planks, but I love it because it doesn’t have a strong smell like oil-based stain, it dries quickly, and cleanup is easy.
I just thin out brown latex paint to the consistency of stain. Then brush on the “stain” and wipe it off immediately. You can still see the wood grain in the wood too, so it looks just like a stain!
I talked about this more in-depth in this post on how to make a wood sign (about halfway down the post) and I used the same exact color.
When I do use an oil-based stain on dresser tops, I usually use this wood stain. You can also check how I DIY-ed the best stain for weathered wood look here.
If painting the dresser, when is the best time to attach the wood planks to the dresser top?
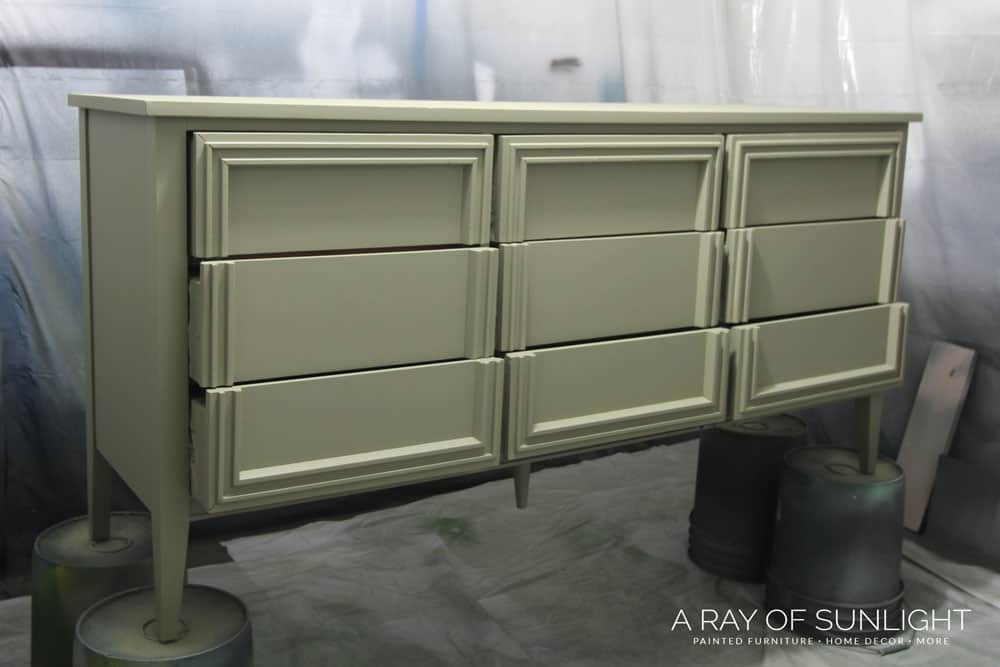
Make sure your dresser is completely painted and dry before turning it into a plank top dresser.
You don’t have to paint the top of the dresser (I like to give it one coat, just in case you end up seeing it through the gaps), but make sure you paint the sides of the top as you will still see them.
How much overhang should I have on each side?
I like to have about 3/4″ of an overhang on each side and front. But really, anything goes. You can have it line up exactly with the dresser top, with no overhang, or you can have it overhang further if needed.
Every piece of furniture is different. Look at other furniture to see what size of overhang you like, and go with that!
Also, sometimes the overhang on the front is different than the overhang on the sides. That’s perfectly fine too!
How do I protect my plank top dresser?
Make sure to seal your wood planks with at least 3 coats of polyurethane. I really like to use my favorite water-based poly (if you use oil-based stain, wait at least 48 hours before using water-based poly)!
Just brush it on, wait for it to dry, and apply at least 2 more coats. Then be extra careful with it for at least 48 hours, and then careful for 30 days until it has completely cured.
Get all of the details on this mid century modern farmhouse dresser makeover in olive green, including the green furniture paint used here.

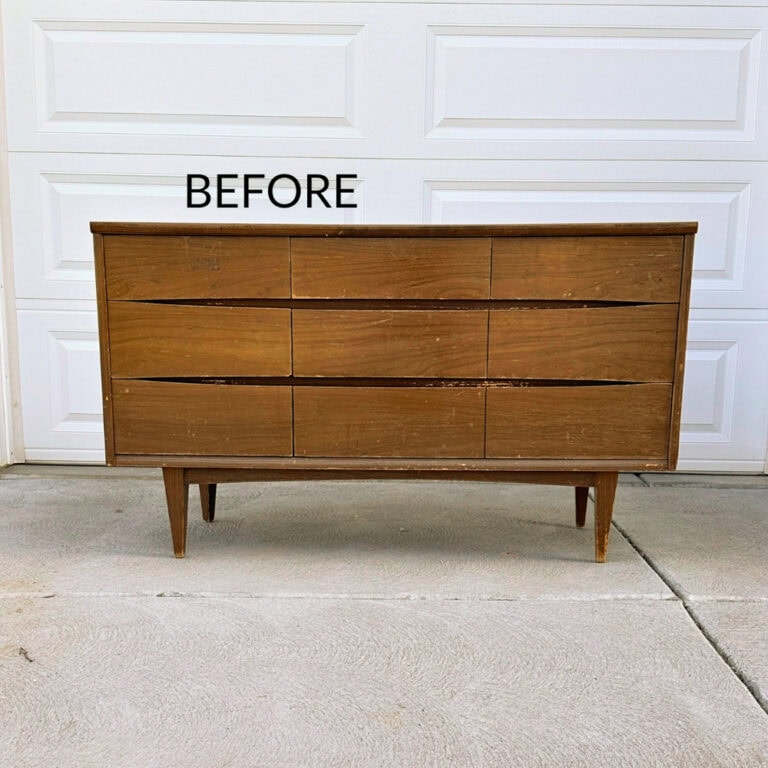
More Before and After Makeovers
See All >
Click any of these “before” photos below to view the “after” of that makeover.


Can I use a different wood stain color for my plank top dresser?
Yes, you can absolutely use a different wood stain color for your plank top dresser! In fact, experimenting with different stains can add a unique touch to your dresser and make it stand out.
Just make sure to test the stain on a small area of the wood before applying it to the entire dresser, as some woods may react differently to certain stains.
You also want to make sure it’s a stain color you want to commit to before applying it to the entire plank top.
You may also want to consider the color scheme and style of your room when choosing a stain for your dresser, as it can greatly impact the overall look of the furniture piece.
You can mix different stains to create a custom color that suits your taste and decor.
Can I use this plank top technique on other furniture besides dressers?
Yes, you can definitely use this plank top technique on not just dressers, but also on other furniture pieces!
Some great examples of furniture that can benefit from this technique are coffee tables, side tables, and even dining tables.
Just make sure the base of the furniture piece is strong enough to support the weight of the wood planks.
You may also want to consider the size and style of the furniture when deciding on the desired overhang for your wood planks.
Another creative way to use this technique is by applying it to vertical surfaces, such as walls or kitchen cabinets.
It gives a rustic or farmhouse feel to any space and can add visual interest to an otherwise plain surface. Just make sure the wood planks are securely attached to the surface and properly sealed for longevity.
How to Make a Wood Plank Top Dresser
Create a farmhouse style dresser by adding weathered wood planks to the top. Here’s how to make a plank top dresser!
Materials
Tools
- Measuring Tape
- Pen / Pencil
- Saw
Instructions
- Measure the top of the dresser. Then add 1 1/2” to the length and 3/4” to the depth. This will give you an overhang of 3/4” on each side, and no overhang on the back.
- Measure and cut wood planks to fit. Divide the depth + 3/4” into however many wood planks you want on top.
- Pick out straight boards then cut each board down to the length that you need them (length of the dresser plus about 1 1/2″). Make sure to sand each board down smooth with 220 grit sandpaper, especially on the edges before moving onto the next step!
- Line up the wood boards and nail them in place.
- Stain the wood. It’s best to do so before you attach them to the dresser. You don’t want the stain to get onto your dresser!
- Make sure your dresser is completely painted and dry before turning it into a plank top dresser.
Recommended Products
As an Amazon Associate and member of other affiliate programs, I earn from qualifying purchases.


More Dresser Makeovers
- How to Refinish a Dresser
- DIY Dresser Makeover
- DIY Fluted Dresser
- Chalk Painted Black Dresser
- DIY Black French Provincial Dresser
Would you like to save this?
Follow us on YouTube to get more tips for painting furniture. Or share your project with us on our Facebook Group and be part of our community. See you there!
I was very happy to find this web site. I need to to thank you for your time for this wonderful read!! I definitely appreciated every bit of it and i also have you book-marked to check out new things on your blog.
You often cover the how to I have been wanting to try. I also appreciate the links to the products you use.
Thank you