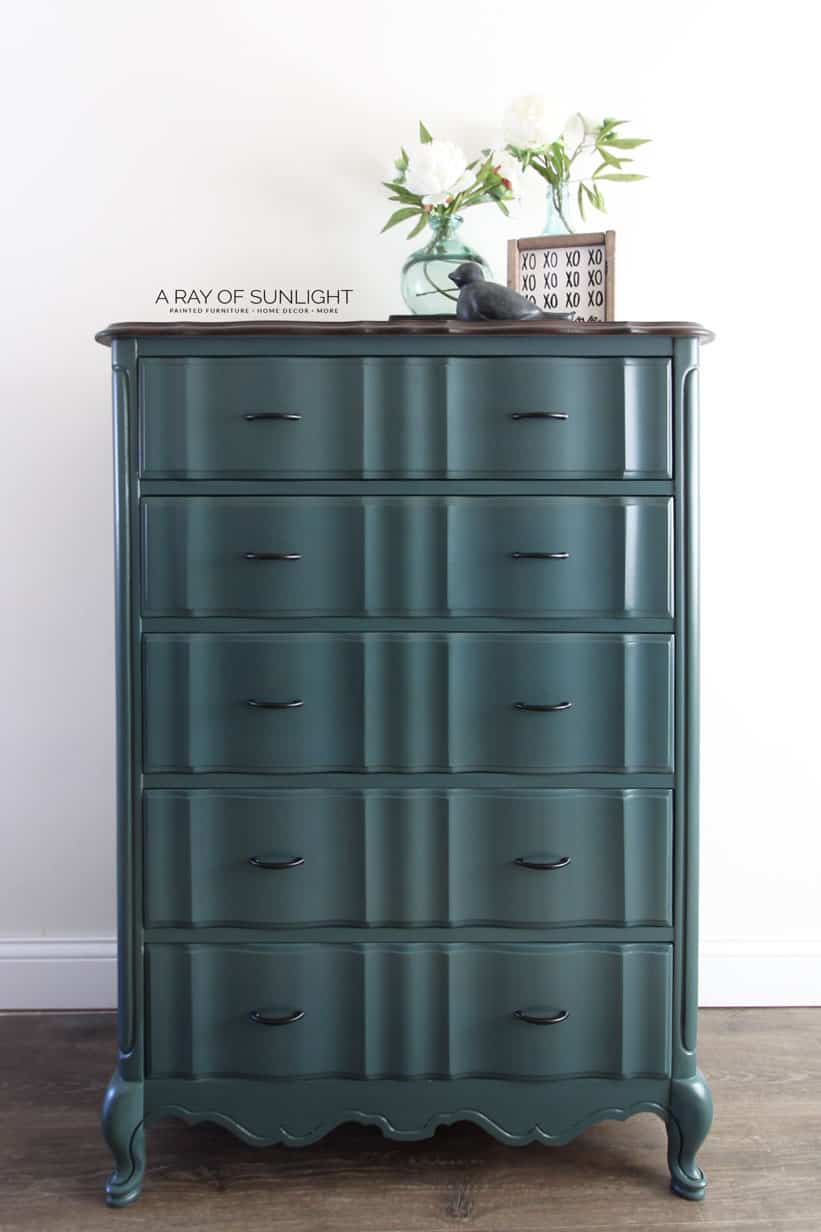
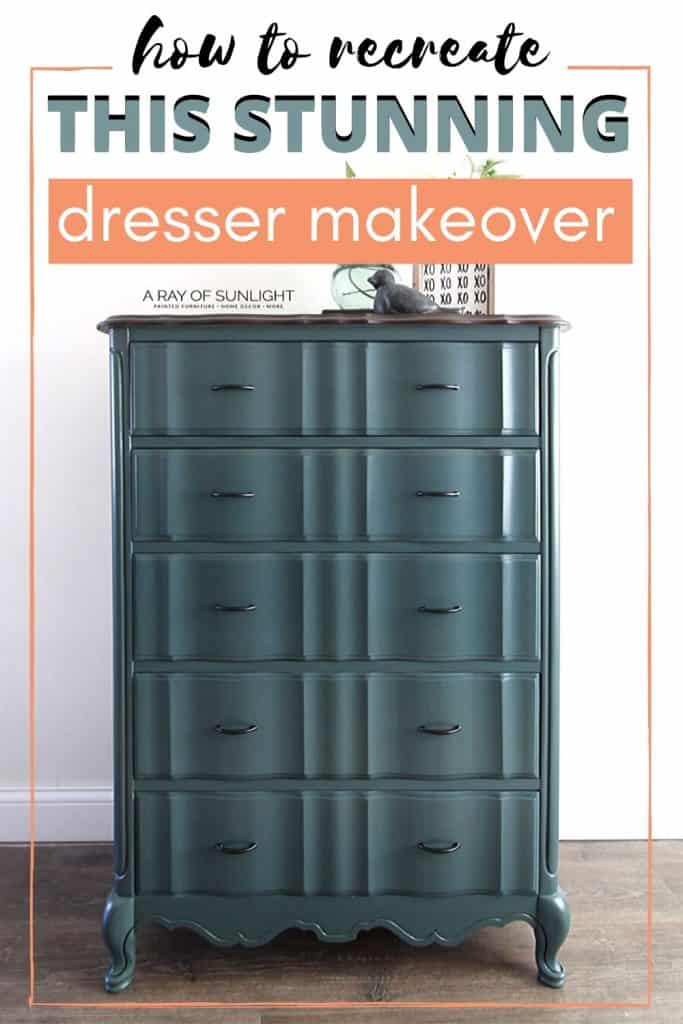
Teal Blue Tall Dresser Makeover


Got a tall dresser that needs some love? Here’s an idea – how about giving it a fresh coat of blue paint? This teal blue tall dresser makeover is a combination of a classic french provincial style and a vibrant color, making for an eye-catching statement piece. The contrast between the elegant details of the dresser and the bold blue painted furniture creates a unique and modern look.
In this guide, we’ll show you step-by-step how to recreate this stunning transformation. This is an easy and fun project that can turn your dresser from drab to fab!
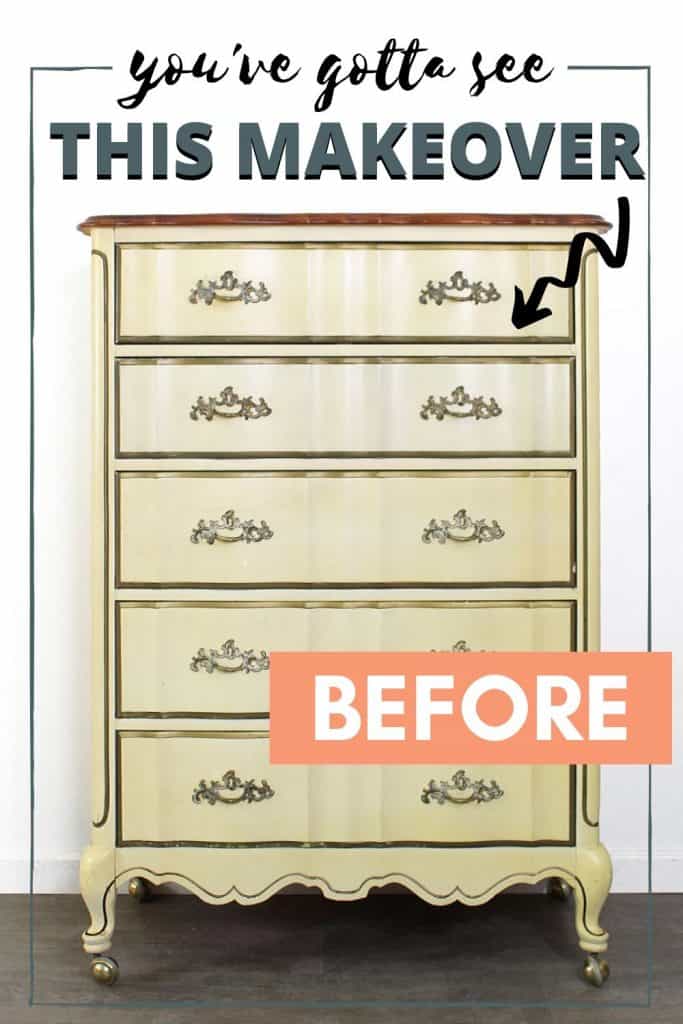
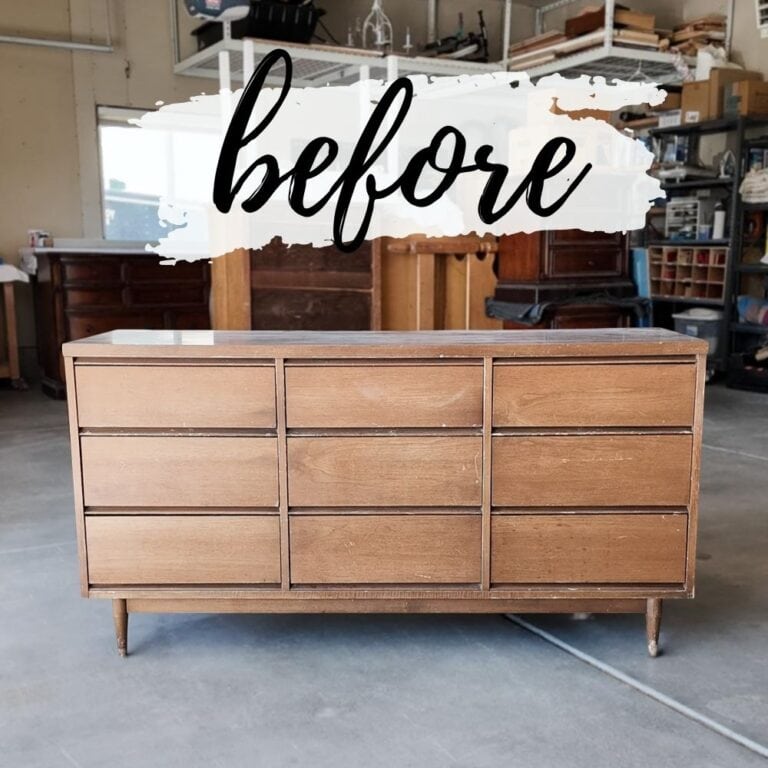
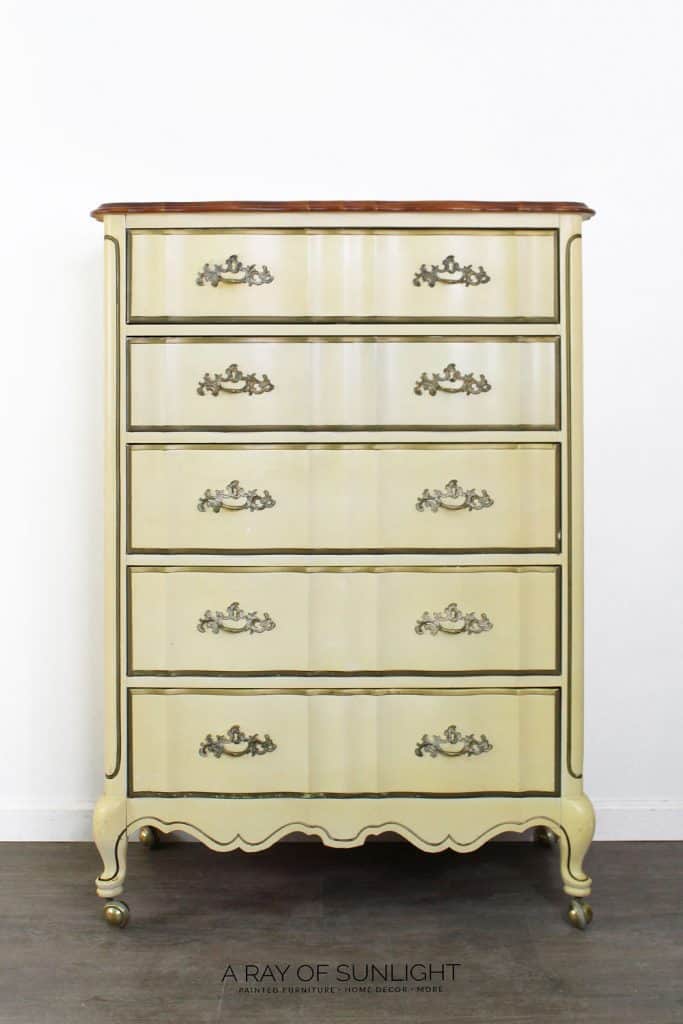
That is what this dresser looked like before I painted it. It is a classic french provincial tall dresser, with its ornate carvings and curved legs. But the dated finish just wasn’t doing it for me anymore. I wanted to give it a fresh new look that would bring out its beauty and make it a standout piece in any room.

Now onto the star of our makeover – teal blue paint. This color is a great choice for furniture because it adds a pop of color without being too overwhelming. It’s also versatile, as it can be both bold or subtle depending on the shade and finish. Plus, blue is known to have a calming effect, making it a perfect choice for your bedroom.
You can check out more color inspiration for your dresser with these painted dresser color ideas.

Supplies Used for Teal Blue Dresser Makeover
As an Amazon Associate, I earn from qualifying purchases. I also may earn from other qualifying purchases with other companies or get free product to review and use. All opinions are my own.
- 220 Grit Sandpaper
- KwikWood
- Pre-Taped Plastic
- Painters Tape
- Paint Sprayer
- Fusion Mineral Paint in Homestead Blue
- Waterbased Polyurethane
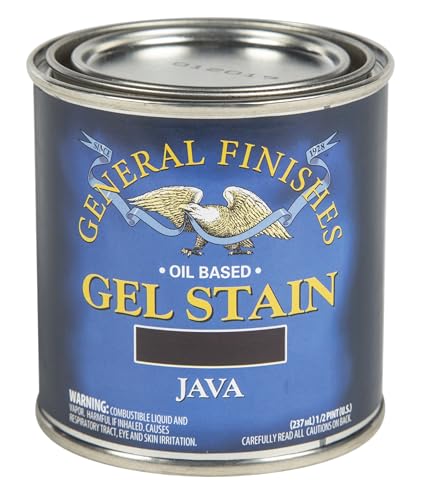
- Java Gel Stain
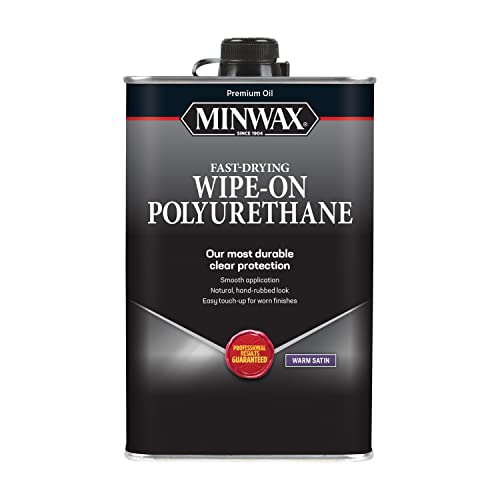
- Minwax Wipe-On Poly
- Fusion Mineral’s Antiquing Glaze
- Zibra Round Paint Brush
- New Hardware
This dresser was a long time coming. I bought it as part of a set of french provincial dressers from an estate sale. (Here are the best places to get good furniture for cheap!)
First I stripped the top of the dresser with my favorite less-toxic paint stripper. Learn more about how to remove wood stain here.
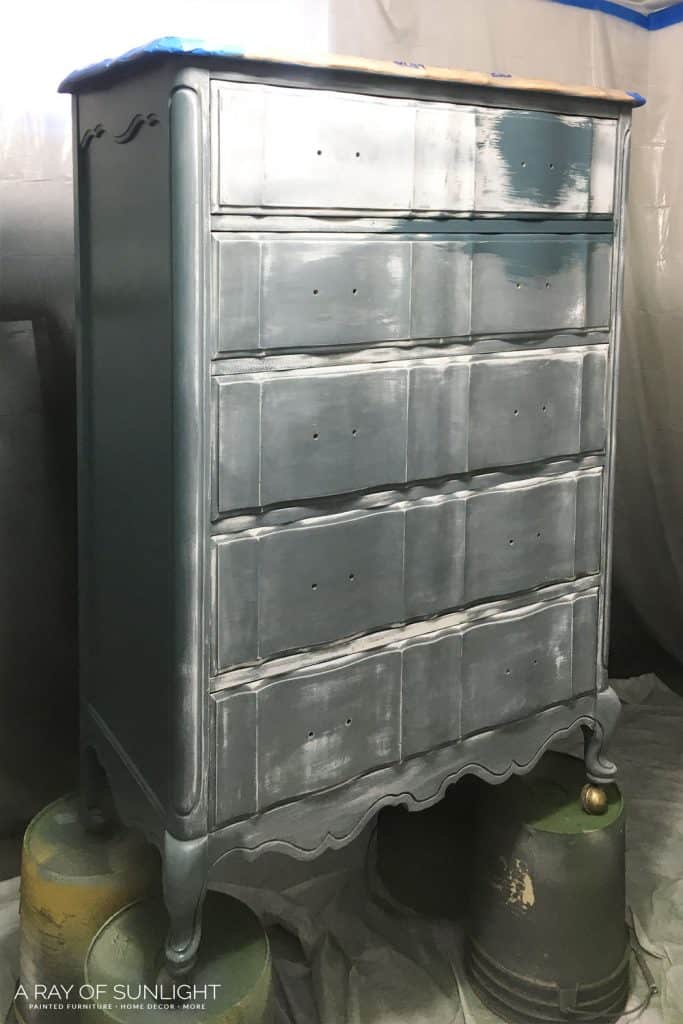
Then I tried to paint the body of the dresser with milk paint, but I hated how it was going. (Mostly because of how milk paint chips, so you could see the cream and gold paint under the blue milk paint.)
See what chippy milk paint looks like on this chippy gray milk paint dresser. And learn more about how to use milk paint on furniture here.
I tried again, got the milk paint to stick well, and then I waxed it. Ugh, I hated it. So I took a step back and took a breather…. for a couple of months. haha
When I came back, I removed the furniture wax with mineral spirits and I scuffed the paint finish with this sandpaper so there wasn’t any shine to it.
Learn more about how to repaint a dresser with this simple guide.
The Teal Blue Tall Dresser Makeover
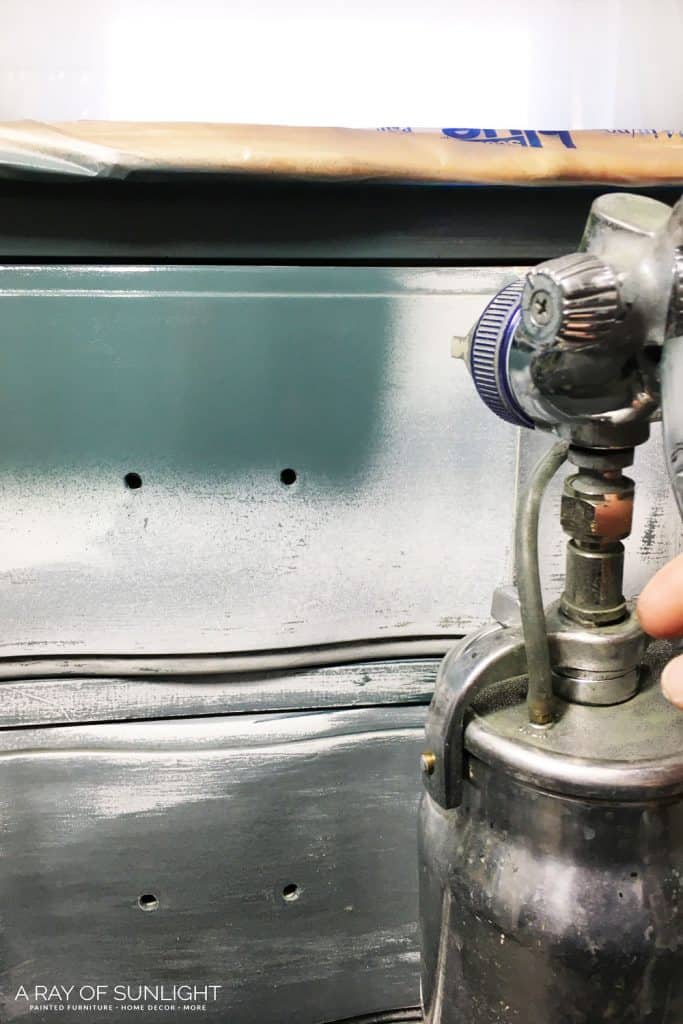
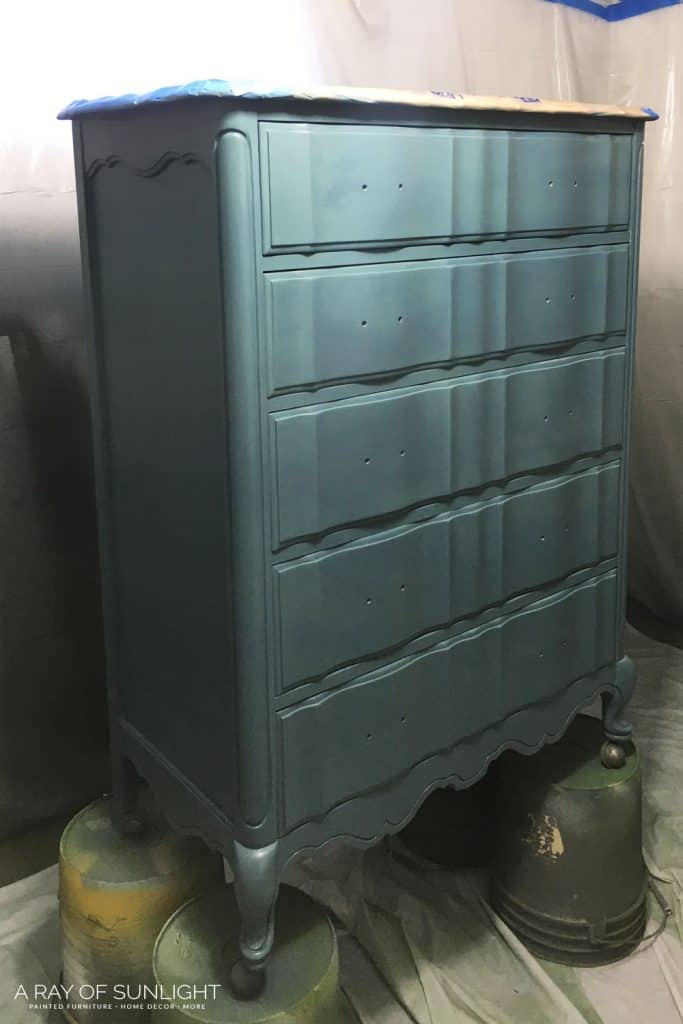
I taped off the drawers and the top of the dresser with this pre-taped plastic (that stuff is the best when you’re spraying paint!) and some painters tape, and then I put the drawers all back into the dresser. Check out how I tape off the drawers to prevent overspray when painting here.
Then I put this gorgeous teal Homestead Blue Fusion Mineral Paint into my Fuji paint sprayer (my expensive, but best money I’ve ever spent, paint sprayer!). For more blue paint options, here’s our list of the best blue paint for furniture.
How to Spray Fusion Mineral Paint
If you want to spray furniture with a paint sprayer, I highly suggest learning the ropes with a cheaper paint sprayer like this Wagner Double Duty paint sprayer that I used for 3 years.
Check out the best HVLP paint sprayers for furniture here. And here is a crash course on using a paint sprayer!
Fusion Mineral Paint has to be thinned with water before you can spray it. But it sprays and dries into a beautiful durable finish that doesn’t have to be sealed like chalk paint.
Fusion Mineral Paint Dry Time
I painted 2 coats of Homestead Blue, letting the paint dry for 2 hours after each coat. I have painted this dresser and another small 3 drawer dresser and I still have paint left in the pint-sized jar, so Fusion Mineral Paint goes pretty far!
Learn more about this paint in my Fusion Mineral Paint review and my Fusion Mineral Paint vs Heirloom Traditions Paint comparison.
Sealing Fusion Mineral Paint
Then I sprayed 2 coats of my all time favorite water-based polyurethane to give the new teal blue paint some added protection AND give it a satin sheen. Learn ALL of my tips and tricks on how to spray polyurethane here!
Yes, Fusion Mineral Paint doesn’t have to be sealed like chalk paint, but it still dries in a matte finish, making it hard to wipe dust off. Plus, I like to protect my furniture from getting easily scratched or ruined as much as I can.
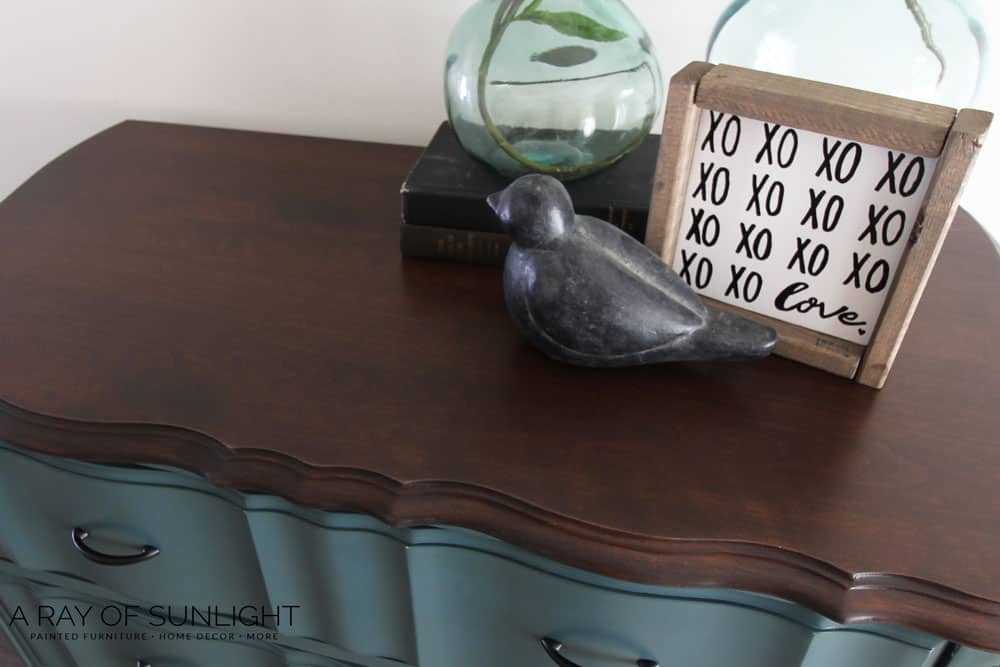
Gel Stained Dresser Top
To finish off the look, I wiped a coat of Java gel stain (a gorgeous dark stain with a hint of red) onto the freshly sanded top.
Once the gel stain was dry, (after 48 hours) I sealed the stain with 3 coats of Minwax Wipe-on Poly in Satin. (See how to stain wood darker with gel stain here.)
Gel Stain Vs. Wood Stain
I don’t have a photo of it, but there was a chip in the top of the dresser (on the back edge). I originally filled it in with a little bit of Kwikwood and was a little bit nervous about how it would stain.
A regular wood stain has to sink into the surface in order for it to really stain. But, gel stain was made to be able to sit on top of the surface, while creating a stained look. That’s why I used gel stain on the top of this dresser instead of a regular wood stain.
Would you like to save this?
The gel stain made the Kwikwood patch and the rest of the sanded-down raw wood look seamless! You can’t even tell that the patch is there!
I wish I had a photo of it, but I guess you’ll just have to take my word for it. Check out this wood stain repair tutorial on damaged wood to learn more.
Fusion Mineral Paint Antiquing Glaze
I wanted to do one extra thing to make the teal blue even deeper. So I brushed on a coat of Fusion Mineral’s antiquing glaze with a Zibra round paint brush.
I have a sample size of the glaze and I used maybe half of it for this dresser. I didn’t apply it like I normally apply glaze though.
(See how I normally apply glaze over chalk paint on this blue painted dresser here or check out this youtube video below.)
This time I just brushed it on in a thin layer, making sure to keep the strokes long, and all in the same direction.
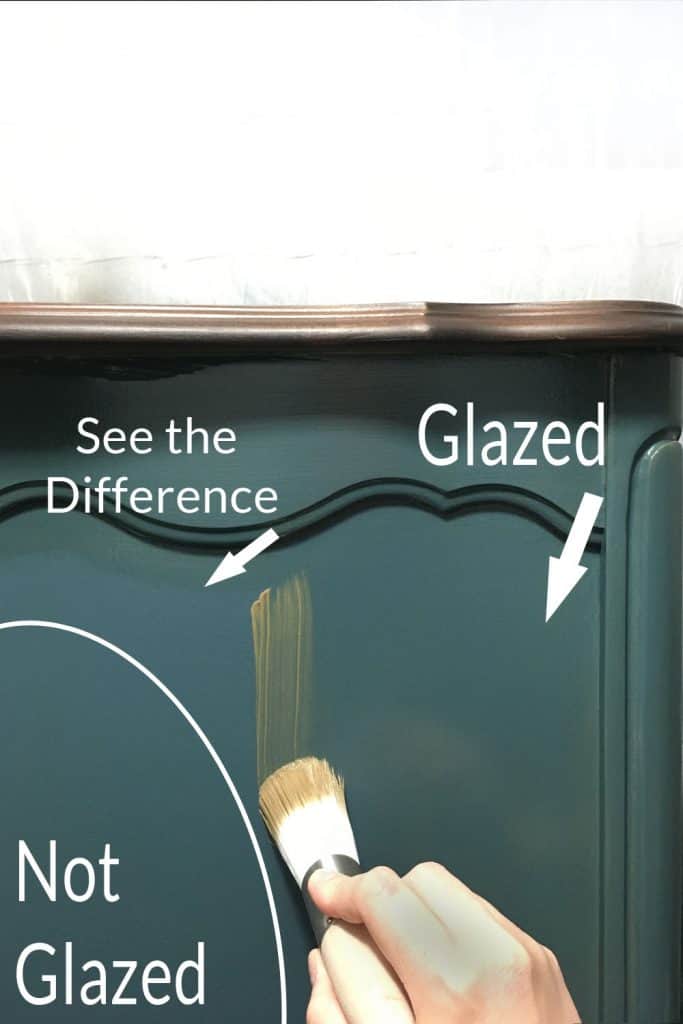
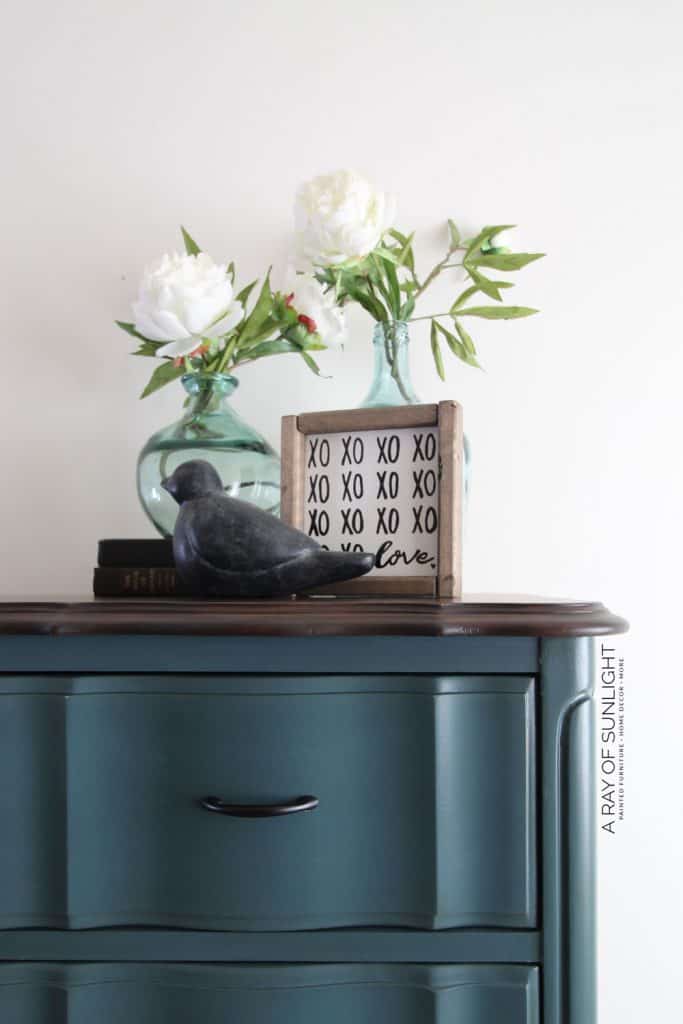
The antiquing glaze deepened the teal blue, but it also added a little brown to the finish to make it look a little bit older. Then I sprayed one last coat of my favorite poly for good measure. Check out my list of the best polyurethane for furniture here.
Changing Dresser Hardware
The french hardware got thrown into my stash of vintage hardware and I attached black modern drawer pulls in their place.
Honestly, it was a pain to find hardware that would fit these holes and I wish that I would have just filled in the hardware holes before painting so I could put knobs on instead. Learn more about how to change hardware on furniture here!
But I originally thought that I was going to use the French provincial style drawer pulls so I didn’t fill the holes in. Oh well! In the end, I love these new pulls!
Check out more French painted furniture ideas here. For dresser makeovers in other colors, we have these dresser paint color ideas. And if you want more tall dresser makeovers, here’s our list of tall dresser ideas and repurpose tall dresser ideas.
More Before and After Makeovers
See All >
Click any of these “before” photos below to view the “after” of that makeover.


Is gel stain easier to use than regular wood stain?
Gel stain is generally considered easier to use than regular wood stain. This is because gel stain is thicker and stays on the surface of the wood, rather than sinking in like traditional wood stain. This allows for more control and less mess during application.
Gel stain also has a longer drying time than regular wood stain, which gives you more time to work with the product and fix any mistakes.
Overall, many DIYers and professionals prefer gel stain for its ease of use compared to regular wood stain.


Is antiquing glaze the same as stain?
No, antiquing glaze is not the same as stain. While both products can be used to darken or add depth to wood or painted surfaces, they do this in different ways.
Antiquing glaze is specifically designed for use over paint and can create a variety of effects, while stain is meant to penetrate the surface of bare wood.
Antiquing glaze can give furniture that cool aged or vintage vibe, while stain simply brings out the natural wood color.
Can you use antiquing glaze over any type of paint?
Yes, you can use antiquing glaze over any type of paint for furniture. Just make sure that the paint is fully dried and cured before applying the glaze.
Keep in mind that different types of paints may react differently to the glaze, so it’s always a good idea to do a small test patch first.
However, some types of paint may not be the best for use with antiquing glaze.
For example, glossy or satin finishes may not allow the glaze to adhere properly, and high gloss paints may be too slick for the glaze to create an aged effect.


Teal Blue Tall Dresser Makeover
Paint your French provincial dresser for that antique look. Here are the steps for the teal blue tall dresser makeover.
Materials
Instructions
- Prepare your furniture for paint. Tape off the drawers and the top of the dresser with pre-taped plastic and some painters tape to prevent overspray.
- Get your Fusion Mineral Paint in Homestead Blue and paint dresser with 2 coats, letting the paint dry for 2 hours after each coat.
- Then spray 2 coats of water-based polyurethane to give the new teal blue painted dresser some added protection AND give it a satin sheen.
- For the dresser top, wipe a coat of Java gel stain onto it after sanding. Once the gel stain dries after 48 hours, seal the gel stain with 3 coats of Minwax Wipe-on Poly in Satin.
- To make the teal blue even deeper, brush on a coat of Fusion Mineral’s antiquing glaze. Brush it on in a thin layer, making sure to keep the strokes long, and all in the same direction.
- Add your new dresser hardware.
Recommended Products
As an Amazon Associate and member of other affiliate programs, I earn from qualifying purchases.


More Teal Painted Dresser Makeovers
- Teal Painted Dresser
- Teal Chalk Painted Dresser
- Teal Painted Highboy Dresser
- Homestead Blue Dresser and Nightstand by Saw Nail and Paint
- Blue DIY Dresser Makeover
Follow us on YouTube to get more tips for painting furniture. Or share your project with us on our Facebook Group and be part of our community. See you there!

Absolutely stunning. And it is exactly the colour/finish I was looking for to redo a large wooden trunk in my living room. Thank you so much for sharing.
Oh that makes me so happy! Glad I could help you!
I am in love with this piece! I have a question about your glaze! You said you did it differently to how you do it in your video. Do you leave the glaze on without rubbing it?
Thanks
Hey Tracy!
Yep that’s exactly what I did differently with this one. I didn’t rub it back off after I brushed it on.
I want to order the jitterbug paint and black wax. I put it in an order then lost it. Please send me company name. It was country something. Thanks. dhorne1955@yahoo.com
Hey Denise!
That paint line is Country Chic Paint. Be sure to use to code RAYOFSUN10 to get 10% off your order.
Well it looks much, much nicer painted and glazed. Could you have glazed the paint and put the poly over it? Would there have been a difference? Thanks for the tip with the gel stain, nice to know.
Thank you! You definitely want to poly before putting glaze on. And then I poly afterwards as well.
If you don’t poly between the glaze and the paint, the glaze will soak right into the porous paint, and you won’t be able to work with it at all.
This is beautiful!
In your experience how much water do you need to add to thin a pint of fusion mineral paint to be able to spray it?
Thanks in advance
Devon
I honestly couldn’t say for sure. Start with 10% water to paint ratio.
This is beautiful! Love the color and technique is amazing!!
Natalie,
This really is a stunning piece. My eyes want to just drink the blue!
Ahh thanks so much! So glad you like it!
Great job, I love the finished project.
Thank you so much! So glad you do!