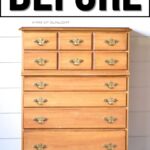
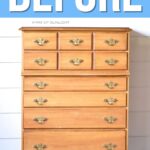
Painting Furniture With Chalk Paint
Chalk paint has been getting more popular lately as an affordable and easy way to give your furniture a makeover. And here’s another chalk paint makeover for you! We’ll show you the process and results of painting furniture with chalk paint that you can easily follow and recreate.
With chalk paint furniture ideas like this, you can give your old and worn out furniture new life without spending so much. Let’s check out this beautiful chalk painted furniture piece!

If you’ve never worked with chalk paint before, don’t worry! It’s a great option for beginners and experienced DIYers alike. It’s a versatile paint that can be used on a variety of surfaces, including wood, metal, and even fabric.

This type of paint has a matte finish and can give your furniture a vintage, shabby chic look. But you can also create a more modern look with it, so whichever style you prefer, this paint will work for you!
Keep reading to see how we painted this dresser with chalk paint, along with some tips and tricks from preparing the furniture to sealing the finished piece.

Supplies Used for Painting Furniture With Chalk Paint
As an Amazon Associate, I earn from qualifying purchases. I also may earn from other qualifying purchases with other companies or get free product to review and use. All opinions are my own.
- Electric Screwdriver
- Krud Kutter
- Wood Filler
- 220 Grit Sandpaper
- Wood
- Router
- Router Bits
- Nail Gun
- Glue
- Wood Stain
- Legs
- Painter’s Tape
- Clear Shellac
- Country Chic Paint in Vanilla Frosting
- Vonforn Paint Sprayer
- Varathane Polyurethane
- New Hardware
Cleaning Furniture Before Chalk Painting
Before anything else, we had to do some prep work for our dresser. First up, we grabbed our handy little electric screwdriver and took off all the hardware from it. This made it easier to get a clean and smooth finish on the entire piece without any obstructions.

Next, we used Krud Kutter to thoroughly clean the surface. It’s important to remove any dirt, grime, or grease that may be on it so that the new coating can adhere properly.
Filling in Damage and Sanding Furniture
After cleaning the dresser, we noticed some dings and scratches on the surface. We used wood filler to fill in these imperfections and create a smoother surface for the new coat. Here are the best wood fillers for furniture you can use!

After the wood filler dried, we sanded it down smooth and flush with the rest of the dresser. We also scuff sanded the entire piece with 220 grit sandpaper. This helps to create a better bond between the paint and furniture.
Replacing the Top of Furniture
To give our furniture piece a more updated look, we decided to replace the top of the dresser. This meant cutting a new piece of wood to fit the dimensions of the top and routering the edges for a polished finish.

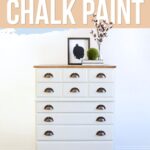
We then stained the new top with a dark walnut stain to contrast with the lighter chalk paint color we chose for the rest of the dresser. We applied the stain going with the grain of the wood and letting it sit for 5-10 minutes to let it set in before wiping off the excess. You can learn more about how to stain wood furniture in this post!

Once the stained top dried, we attached it to the dresser using a combination of glue and a nail gun for maximum stability. We also made sure to tape off the new top before spraying shellac and paint on the rest of the dresser to avoid any unwanted overspray.
Adding Legs to Furniture
We wanted some more height on our dresser, so we added legs to it! This not only gave the dresser a more elevated look but also made it easier to clean underneath.
We started by adding blocks of wood to the corners of the base where we wanted the legs to go. Next, we attached furniture leg plates to these blocks and marked the holes for the screws. After drilling pilot holes, we screwed in the plates.

Once the plates were in place, we simply screwed on the new legs! If you’re adding legs to your furniture too, make sure to pick ones that fit your style and can handle the weight of the piece. Check out this post on adding legs to a dresser for a more detailed guide!
Priming Furniture Before Chalk Painting
Before we could start painting with chalk paint, we needed to prime the furniture first. We applied 2 coats of clear shellac spray to prime our dresser. This not only created a smooth and even base for our chalk paint to stick to, but also helped block any potential bleedthrough from the wood.
Would you like to save this?

Clear shellac is one of the best knot blocking primer options out there! Bleed through or these wood tannins coming through paint can be a common issue when painting, so it’s important to use a good primer like clear shellac to prevent it. If you’re facing bleedthrough, here’s how to fix paint bleed through to help you tackle it!
Chalk Painting Furniture with A Paint Sprayer
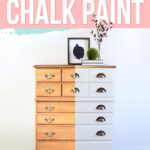
It was finally time to start painting with chalk paint! We thinned down Country Chic Paint in Vanilla Frosting, and then poured it into our Vonforn paint sprayer. We also used this color in this DIY farmhouse dresser makeover. If you’re considering Beyond Paint vs Chalk Paint, check out this comparison post!
Thinning and using a sprayer will help you end up with a smoother and more consistent finish. Here’s how to thin paint for a sprayer and how to spray paint a dresser with chalk paint for more tips and tricks!
Here’s how to fix lumpy chalk paint if you get any lumps. And here are more common chalk painting mistakes to avoid!

We sprayed 2 coats of paint on the dresser, making sure to let it dry between each coat. The paint sprayer made the process quick and easy, covering large areas of the dresser with minimal effort. If you are working indoors, check out our guide on how to use a paint sprayer indoors.
(Optional) Before we moved on to topcoating the dresser, we decided to give the edges a light distressed look by lightly sanding the paint. If you choose to go for this look, you can learn more about how to distress chalk paint here!
Topcoating Chalk Painted Furniture
After we finished painting our dresser with chalk paint (and distressing it if you choose too), it was time to add a protective topcoat. If you want your furniture to be more durable and resistant to wear and tear, you need to do this. Especially for chalk paint that is porous and can easily get damaged by moisture or scratches.
We cleaned out the paint sprayer from the chalk paint and filled it with Varathane Polyurethane. We removed the cover from our new stained top and then sealed our chalk painted dresser with 3 coats of poly. So, can you use a paint sprayer for polyurethane? Yes, check out the post for more tips!

Remember to let each coat dry completely before applying the next one! You want to make sure the topcoat is fully dried before using your furniture. This can take anywhere from a few hours to a full day, depending on the humidity and temperature in your area.
Here’s more on how to keep chalk paint from scratching to prevent these scratches and flaking and protect your chalk painted furniture for the long run.


We added new hardware to our dresser for a final touch. You can find a variety of hardware options at your local hardware or home improvement store, or even online. Learn more on how to change hardware on a dresser properly here!

This white chalk painted dresser with its new stained wood top and legs has completely transformed our space! It’s really awesome how a few simple steps and some chalk paint can make such a big difference.
If you have a desk you want to transform with this paint, here’s how to chalk paint a desk to guide you! Learn these 3 painting furniture hacks you’ll wish you knew sooner for successful DIY projects.

More Before and After Makeovers
See All >
Click any of these “before” photos below to view the “after” of that makeover.


Painting Furniture With Chalk Paint
Check out this guide for painting furniture with chalk paint from prep work to sealing the paint, helping you to make a beautiful finish on your furniture that fits both vintage and modern styles.
Materials
Instructions
- Remove the hardware from the furniture piece. Removing them will make the painting process much easier and create a smoother finish.
- Clean the surface thoroughly using a cleaner like Krud Kutter to get rid of any dirt or grime that may prevent the paint from adhering to your furniture.
- Fill in any dings or scratches on the furniture surface with wood filler. This will help create a smoother surface for the new coat of chalk paint.
- Sand the dried wood filler and scuff sand the entire piece with 220 grit sandpaper. This helps to create a better bond between the paint and furniture.
- To update the look of your furniture piece, consider replacing the top with a new piece of wood. Make sure to router the edges for a polished finish.
- Stain the new top using a dark walnut stain for contrast. Let it sit for 5-10 minutes before wiping off excess and attaching it to the dresser using a combination of glue and a nail gun.
- Tape off the new top before spraying primer and paint on the rest of the dresser to avoid overspray and guarantee a clean and professional looking finish.
- For a more elevated look and easier cleaning, add legs to your furniture piece by attaching leg plates and screwing in the new legs. Make sure to choose sturdy legs that fit your style and can handle the weight of the furniture piece.
- Prime the furniture with 2 coats of clear shellac spray before painting with chalk paint. This will create a smooth base for the paint and prevent any potential bleedthrough or wood tannins from showing through.
- Thin down your chalk paint and use a paint sprayer for a smoother and more consistent finish. Make sure to spray 2 coats for full coverage, letting it dry between each coat.
- Topcoat your chalk painted furniture with a protective polyurethane for durability and resistance to wear and tear. Let each coat dry fully before using the furniture.
- Add new hardware to your dresser for a final touch. This small detail can make a big difference in the overall look of your chalk painted piece!
Recommended Products
As an Amazon Associate and member of other affiliate programs, I earn from qualifying purchases.


More Painted Furniture Makeovers
- Painting a Dining Table White
- Painting Bedroom Furniture White
- Painted Bed Frame Ideas
- Painting A Bedroom Set
- Painting A Buffet
Follow us on YouTube to get more tips for painting furniture. Or share your project with us on our Facebook Group and be part of our community. See you there!
