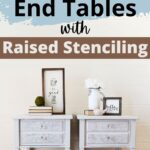
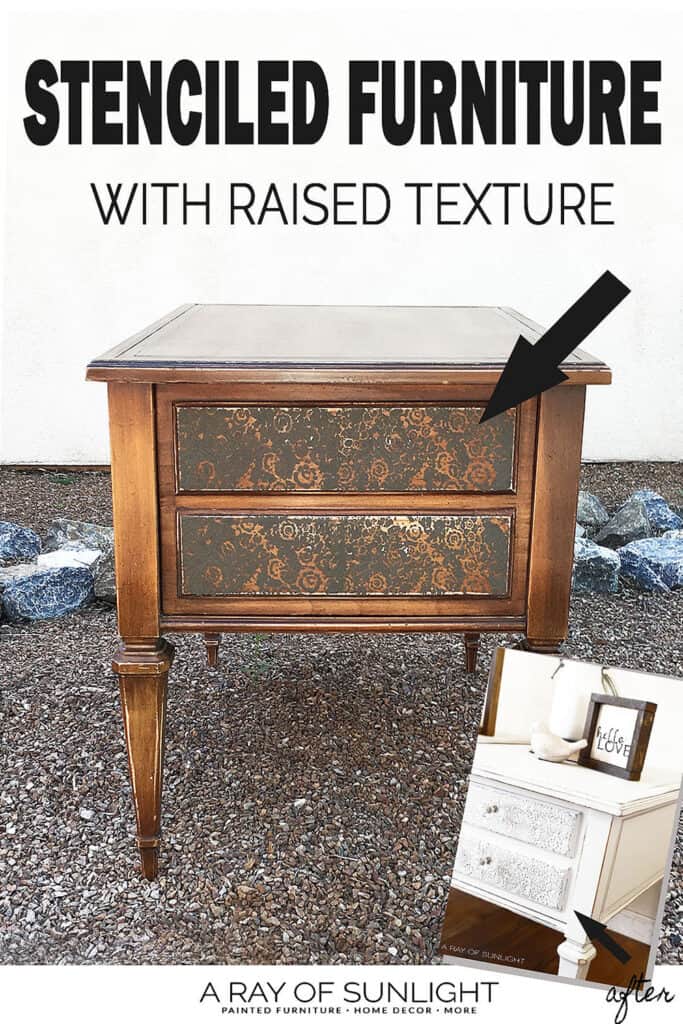
Shabby Chic End Tables with Raised Stenciling

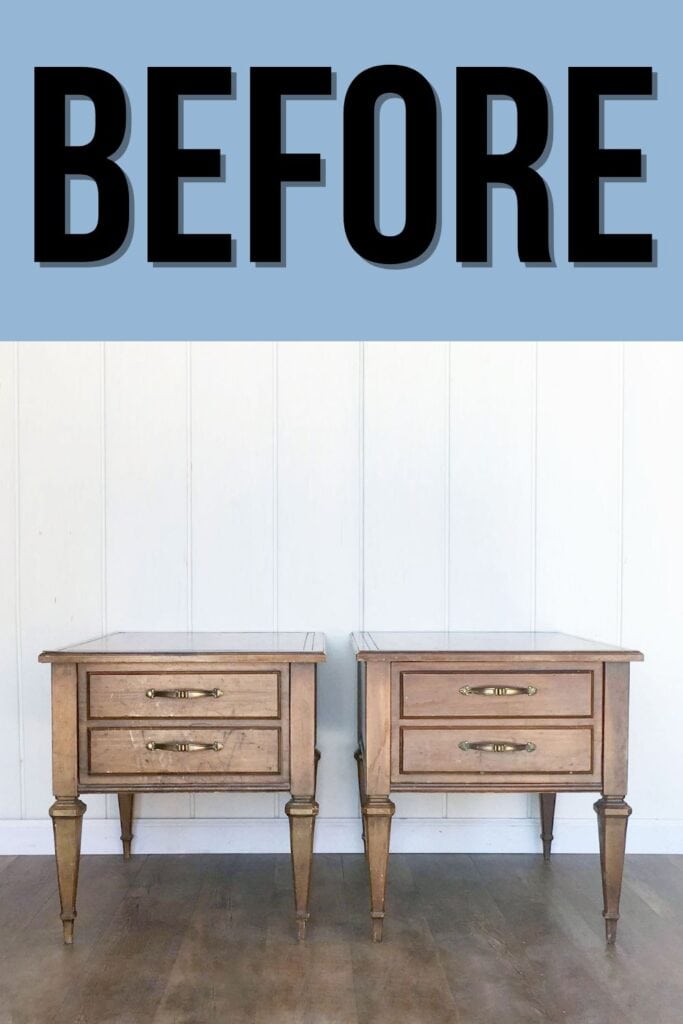
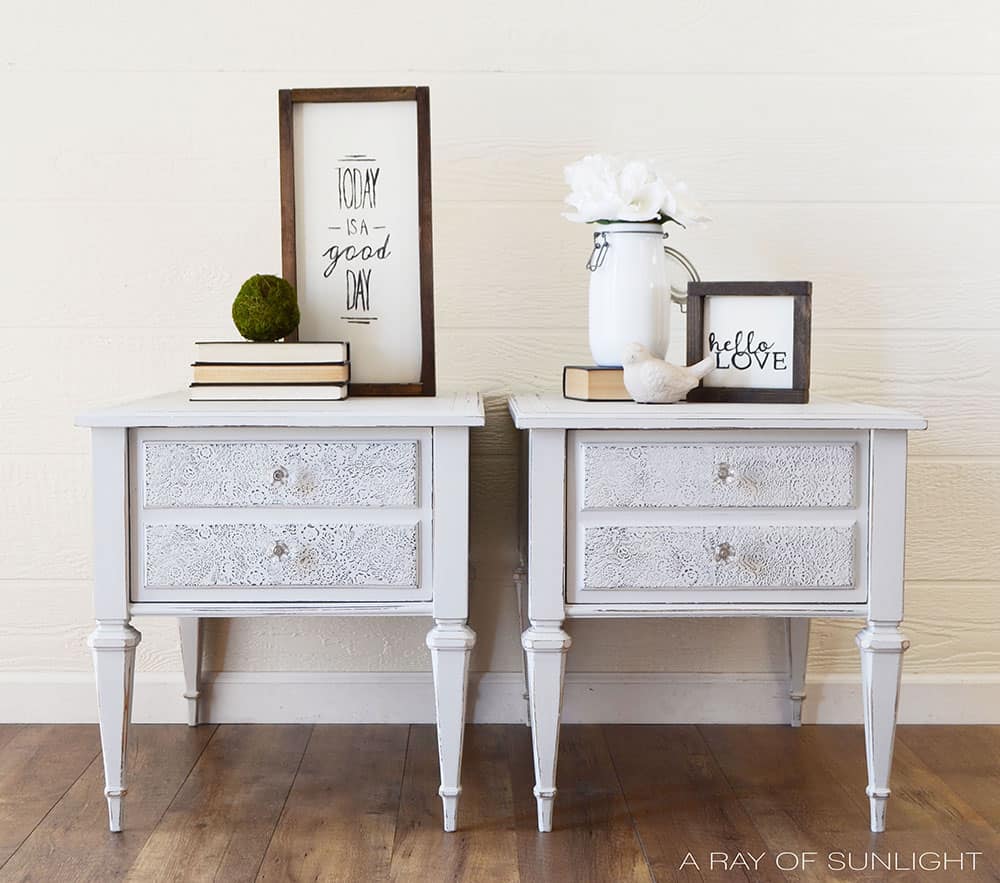
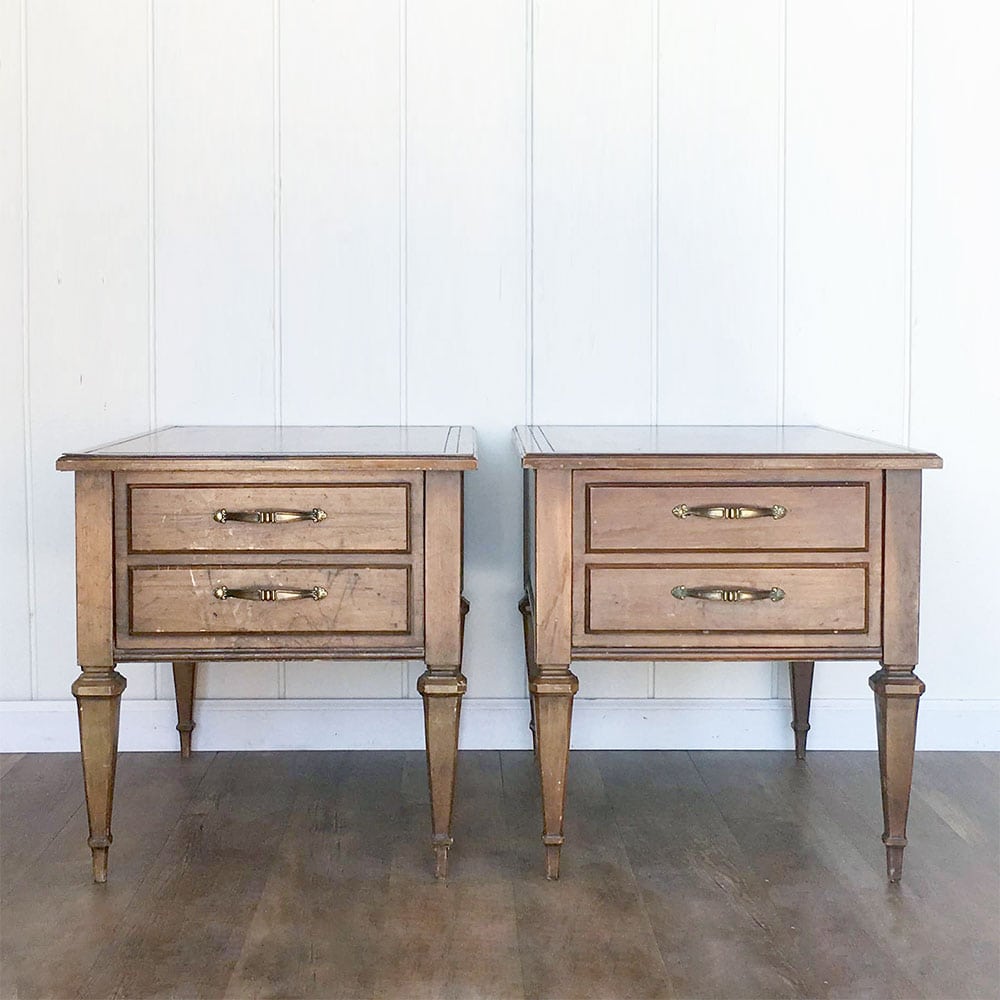
I’m so excited to share this painted nightstand idea with you today! These tables were old and worn, but with a pint of paint, and a lace stencil they were completely transformed into new beautiful shabby chic end tables with raised stenciling. I mean, come on! How about them drawers!?
You won’t believe how simple and fun this project was. So let’s dive into the details and see how you can recreate these end tables for your own home!
End tables are functional pieces that don’t have to be boring or basic. On top of painting them a new color, adding some raised stenciling can really elevate their look and add a touch of uniqueness.

Stenciling is also fun and easy, and it’s also budget-friendly! You can find inexpensive stencils at your local craft store.
Plus, you can choose from a variety of designs to fit your personal style and home decor. You can go as simple or intricate as you want! Let’s get started on this project!

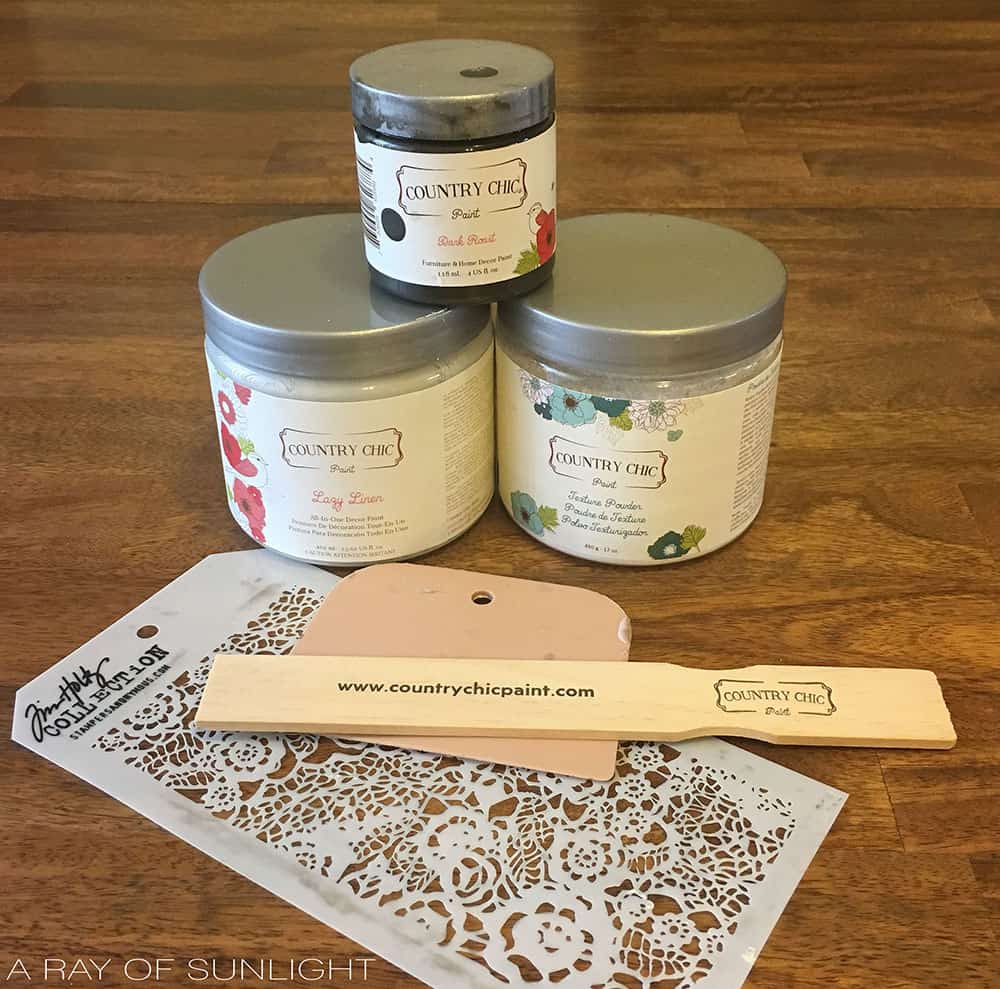
Supplies Used for shabby chic end tables with raised stenciling
As an Amazon Associate, I earn from qualifying purchases. I also may earn from other qualifying purchases with other companies or get free product to review and use. All opinions are my own.
- Dixie Belle Mud Texture Putty (In substitute of texture powder that is no longer available)
- Country Chic Paint – Dark Roast
- Country Chic Paint – Lazy Linen
- Painters Tape
- Stencil
- 220 Grit Sandpaper
- Waterbased Polyurethane
- New Knobs
Grab our list of 10 must have painting furniture supplies too!
Prep End Tables for Paint
We started out by drilling a new hole for the new hardware and filling in the old hardware holes, then lightly sanding the whole piece. Learn more about how to prep furniture here.
How to Stencil End Tables with Raised Stenciling
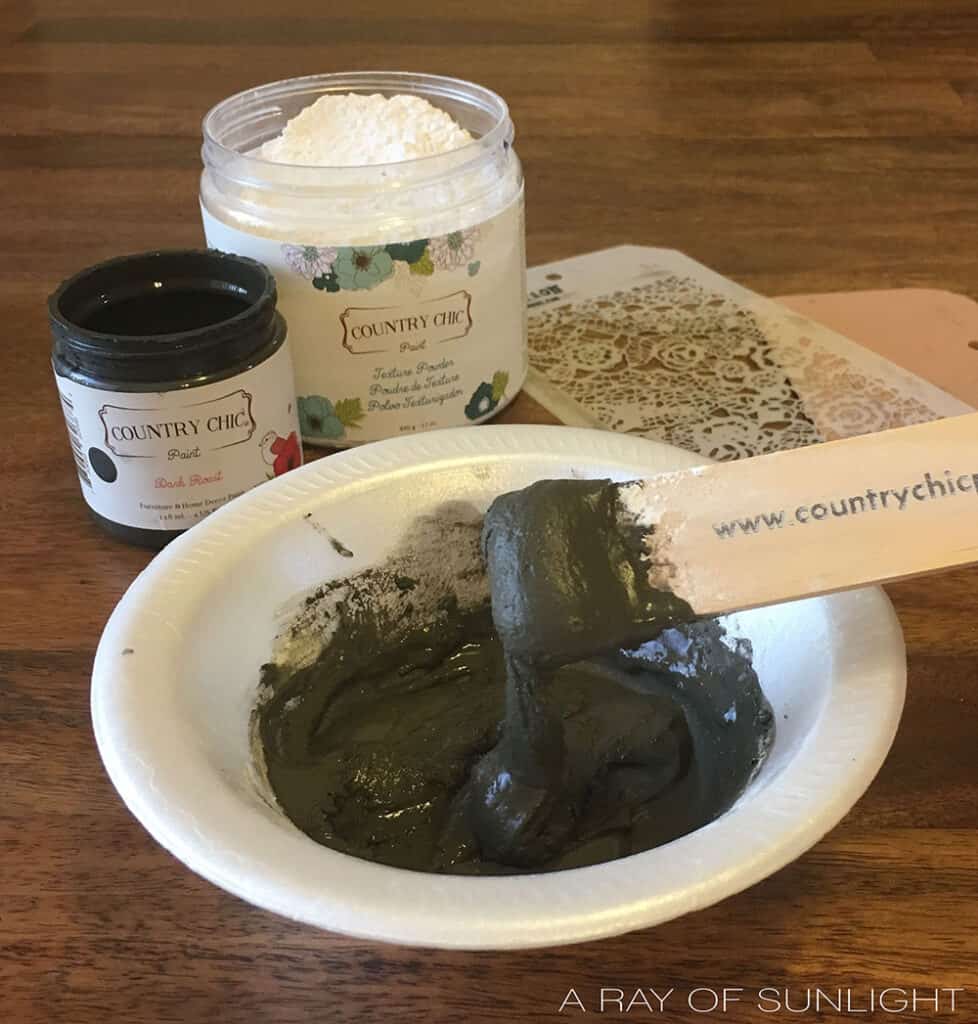
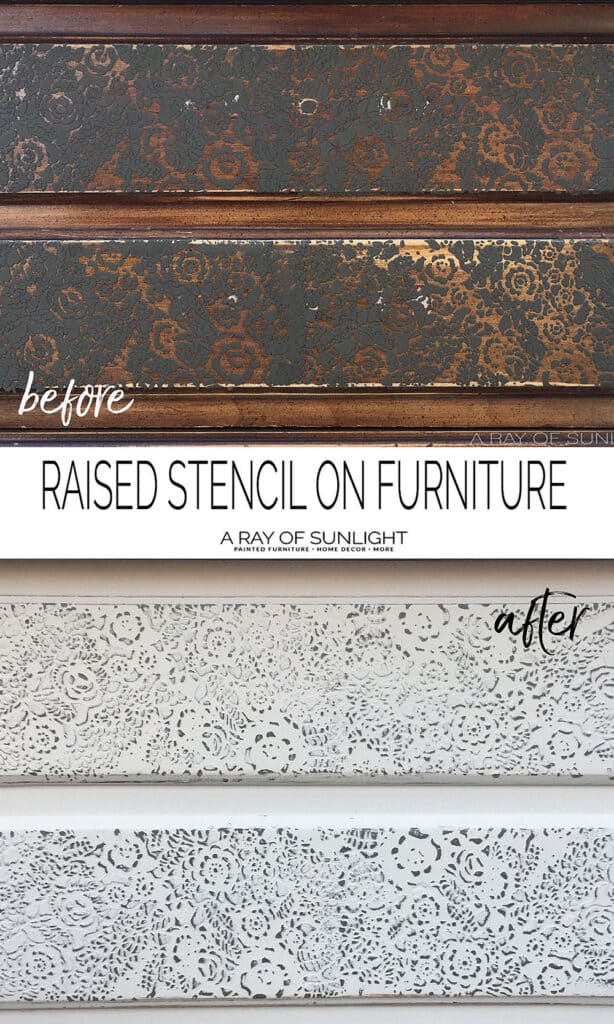
I wanted to do something to add a little bit of character to the tables. I was easily able to do just that with a little bit of texture powder (currently not available, but you can use this Dixie Belle Mud Texture Putty as a substitute) mixed with Dark Roast from Country Chic Paint.
Simply mix 1 part texture powder with 1 part paint to create a smooth peanut butter consistency. I only mixed up a few tablespoons of it and still had extra when I was done.
That texture powder is some amazing stuff!!
Applying Texture Powder to the Drawers
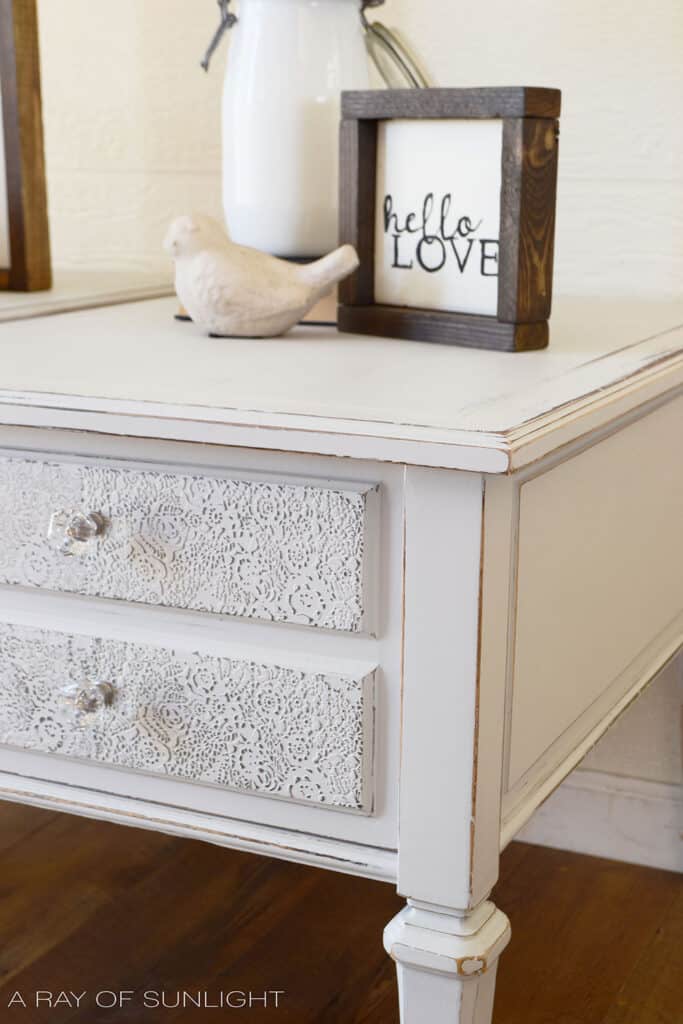
I removed the drawers and stood them up, so I was working on a flat surface. Then I put some painters tape on one edge of my stencil (isn’t that lace stencil amazing?!?) to help keep it in place as I worked, and placed the stencil over the raised part of the drawer fronts.
I used a straight edge to spread a thin layer of texture powder over the stencil. Once it was spread evenly, I lifted up the stencil and worked on the next raised part of the drawer. Check out how to stencil without bleeding here.
My stencil was a bit on the small side and didn’t cover the entire surface. When this happens it’s best to wash off the stencil, cover the bowl of texture powder, and wait a few minutes to let the texture start to harden.
Otherwise, the raised texture that was just created can easily get smashed and ruined.
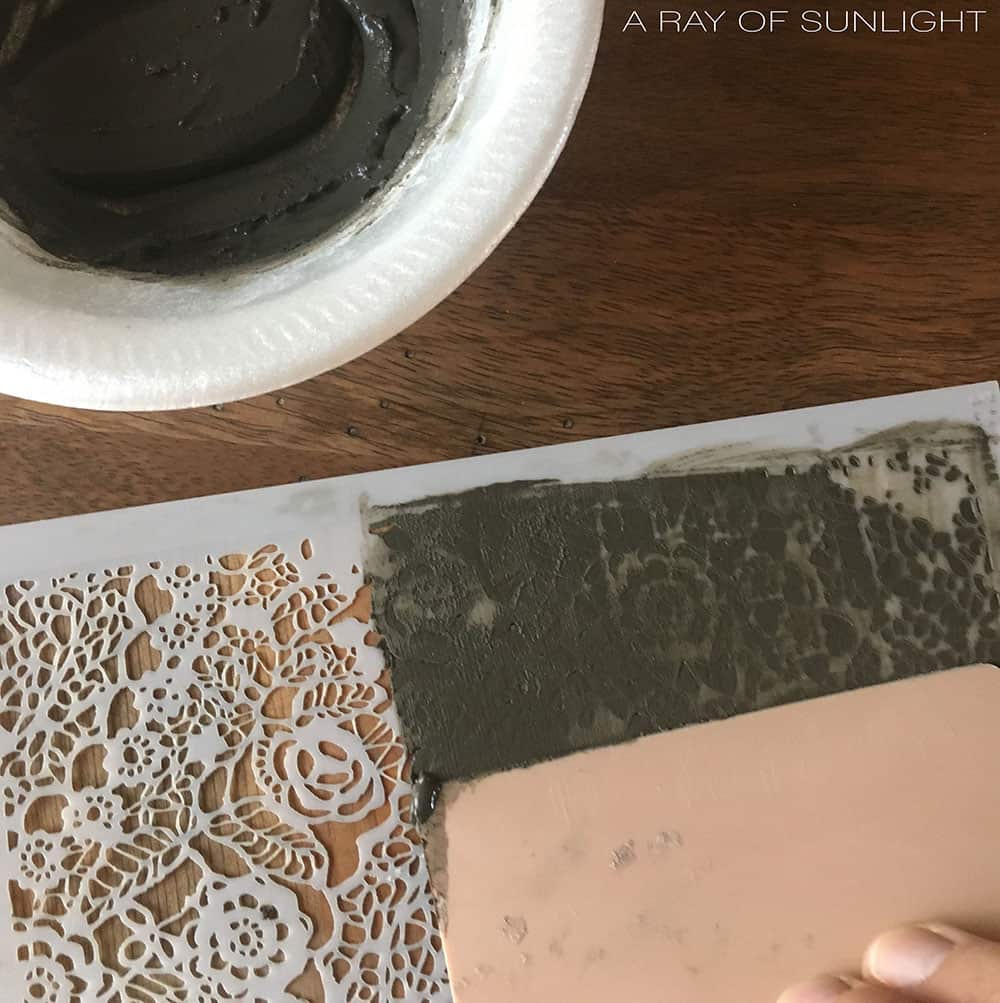
If the texture gets ruined, simply grab a wet cloth and rub it off. I didn’t worry too much if the texture was smudged, as it isn’t too noticeable when painted over.
Once the first section was starting to dry, I matched the stencil up and spread a thin layer of texture powder over the second half of each of the raised surfaces. Then I let it all dry overnight. Here’s another method for adding texture to furniture, check out my post about how to decoupage furniture with rice paper.
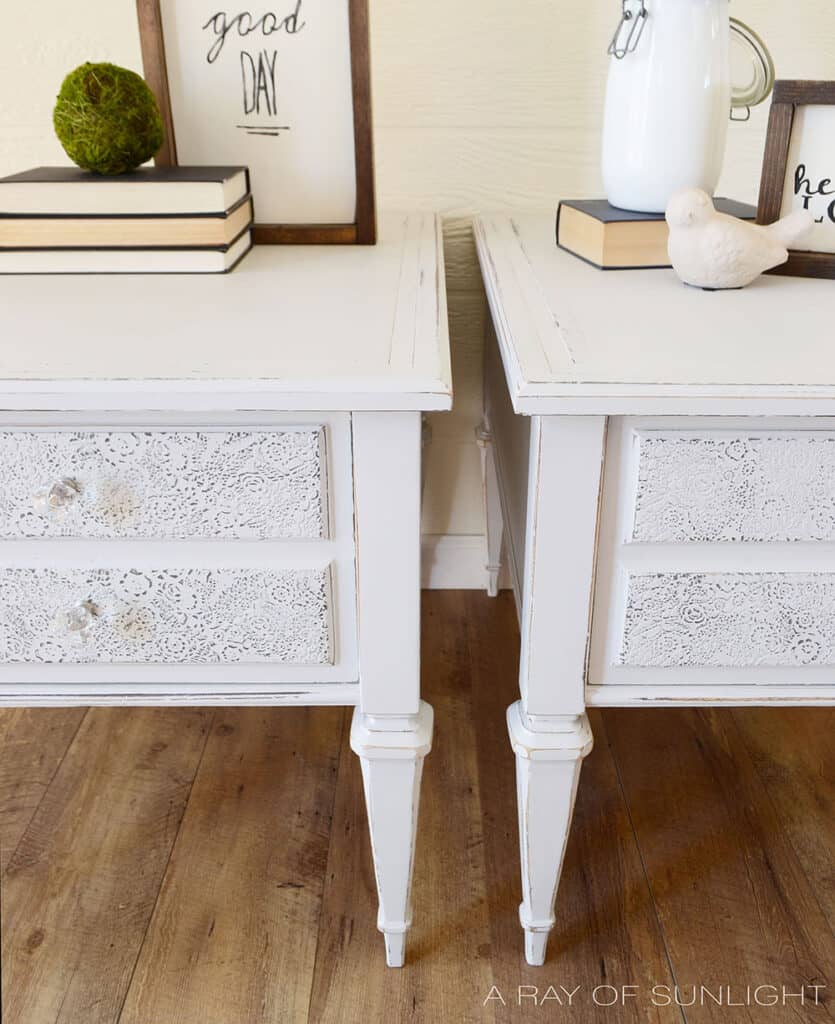
Paint and Distress Raised Stencil
The next day I painted them in the beautiful light grey, Lazy Linen from Country Chic Paint. Check out my honest and detailed Country Chic Paint review here if you are yet to try this paint.
Would you like to save this?
Then I distressed the raised edges with 220 grit sandpaper and sealed with satin polyurethane. Learn ALL of my tips and tricks on how to spray polyurethane here! And learn all about the best topcoats for painting furniture here!
For the finishing touch, we replaced the old hardware with new crystal knobs.
It was so fun to add some extra character with this raised stencil technique, and it was super easy too! I loved that I didn’t have to be perfect with the texture because it just added more character to the pieces.
Get more shabby chic painted furniture ideas and shabby chic dresser ideas for your next DIY project here! You can also update your pieces with these end table refinishing ideas.
More Before and After Makeovers
See All >
Click any of these “before” photos below to view the “after” of that makeover.


Can I use this raised stencil technique on all types of furniture?
Yes, you can use this raised stencil technique on most types of furniture. But it’s important to consider the texture of your furniture.
This technique works best on flat or slightly raised surfaces, such as drawer fronts or cabinet doors. However, it may be more challenging to make it work on highly curved or intricate pieces.
If you have a piece with a very rough or uneven surface, it may be difficult for the raised stencil to adhere properly. In this case, you may need to sand down the surface smooth before applying the texture powder.
For intricate or curved surfaces, you may need to use a smaller stencil or carefully place the stencil in sections to create the raised effect on the entire surface.
Overall, check the texture and shape of your furniture before attempting this technique. If you want more stenciled furniture, here’s our list of dresser stencil ideas.
How to clean and maintain furniture after using raised stencil technique?
Cleaning and maintaining furniture after using the raised stencil technique is relatively easy. If you applied polyurethane as a topcoat, it will provide some protection against wear and tear.
However, it’s still important to use coasters or placemats on the furniture to prevent scratches and damage.
You should also dust your furniture regularly with a soft cloth to prevent buildup of dirt and grime. If there are any spills or stains, clean them up immediately.
To maintain the raised stencil effect, avoid scrubbing or rubbing too hard on the stenciled areas when cleaning. This could potentially remove some of the texture powder and ruin the raised effect.


Shabby Chic End Tables with Raised Stenciling
Turn your old and boring furniture into these shabby chic end tables with raised stenciling with this guide.
Materials
Instructions
- Prep the tables for painting by removing hardware and filling in the old hardware holes. Drill new holes for the new hardware as well then lightly sand the tables.
- Mix 1 part texture powder with 1 part paint to create a smooth peanut butter consistency.
- Remove the drawers and tape the stencil on to help keep it in place.
- Spread a thin layer of texture powder mixture over the stencil and repeat to the other drawers. Let it dry overnight.
- Apply a few coats of paint over the dried stencil and lightly distress the raised edges with sandpaper. Seal everything with satin polyurethane.
- Attach new hardware and enjoy!
Recommended Products
As an Amazon Associate and member of other affiliate programs, I earn from qualifying purchases.


More Stenciled Furniture Makeovers
- Navy Dresser with Textured Drawers
- Embossing Furniture
- Stenciled Furniture
- DIY Navy Chest of Drawers
- How to Stencil Painted Furniture
Follow us on YouTube to get more tips for painting furniture. Or share your project with us on our Facebook Group and be part of our community. See you there!
love love love!!!
Love the shabby chic end table you did. You are so good at refurbishing furniture. You got me hooked. I mean HOOKED. I have done four coffee tables. Sold only one. I just got a sander. Next is a sprayer. I am doing my furniture in my basement since it’s too cold outside. I’m from SD
Whoot whoot!! I’m so glad to hear it! That’s how it starts! We do furniture in our basement too because of the winters here in Idaho, and when we lived in Minnesota, so I feel you! Congrats on your projects!
Country Chic texture powder is no longer available on Amazon. Do you know of another source, or perhaps another brand that works well?
Ohh darn! It does look like Country Chic texture powder is sold out currently. I did find this Dixie Belle Mud product that looks like it could be a good alternative though! I have used Dixie Belle products often and like them, but I have never tried this Dixie Belle Mud for stenciling before. Here is the link if you’re interested. (Ref) https://urlgeni.us/amazon/dixiebellemudfb