Blue Chalk Paint Coffee Table
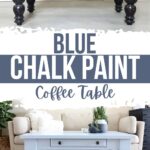
This easy blue chalk paint coffee table makeover is something anyone can do, and it’s budget-friendly too! Here’s how to paint a coffee table.
Get more tips and Chalk Painting secrets that you need to know here!
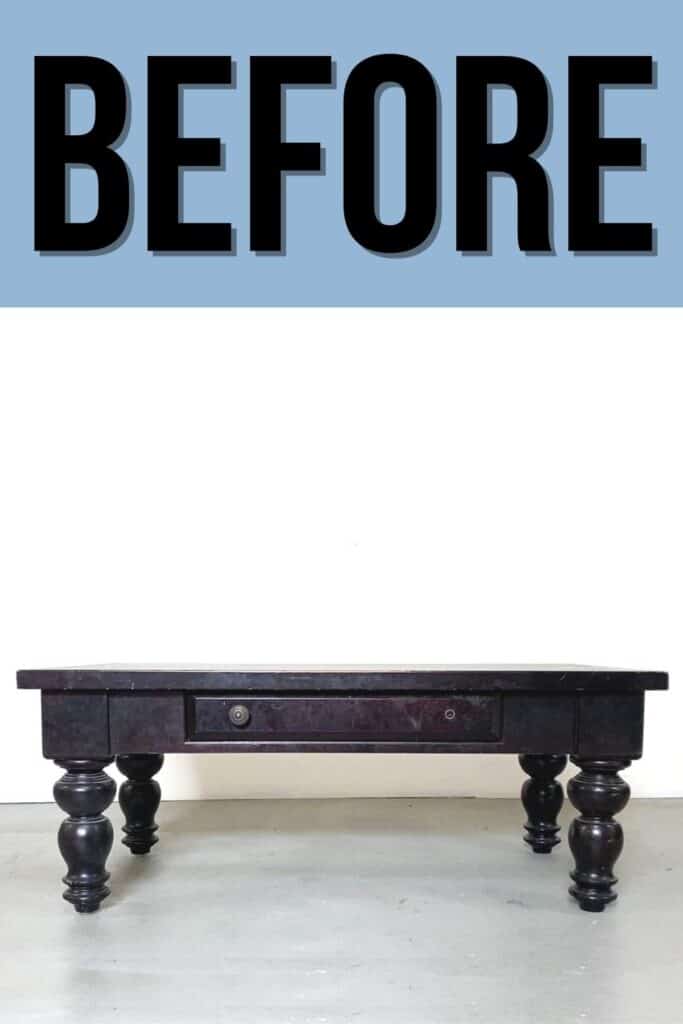
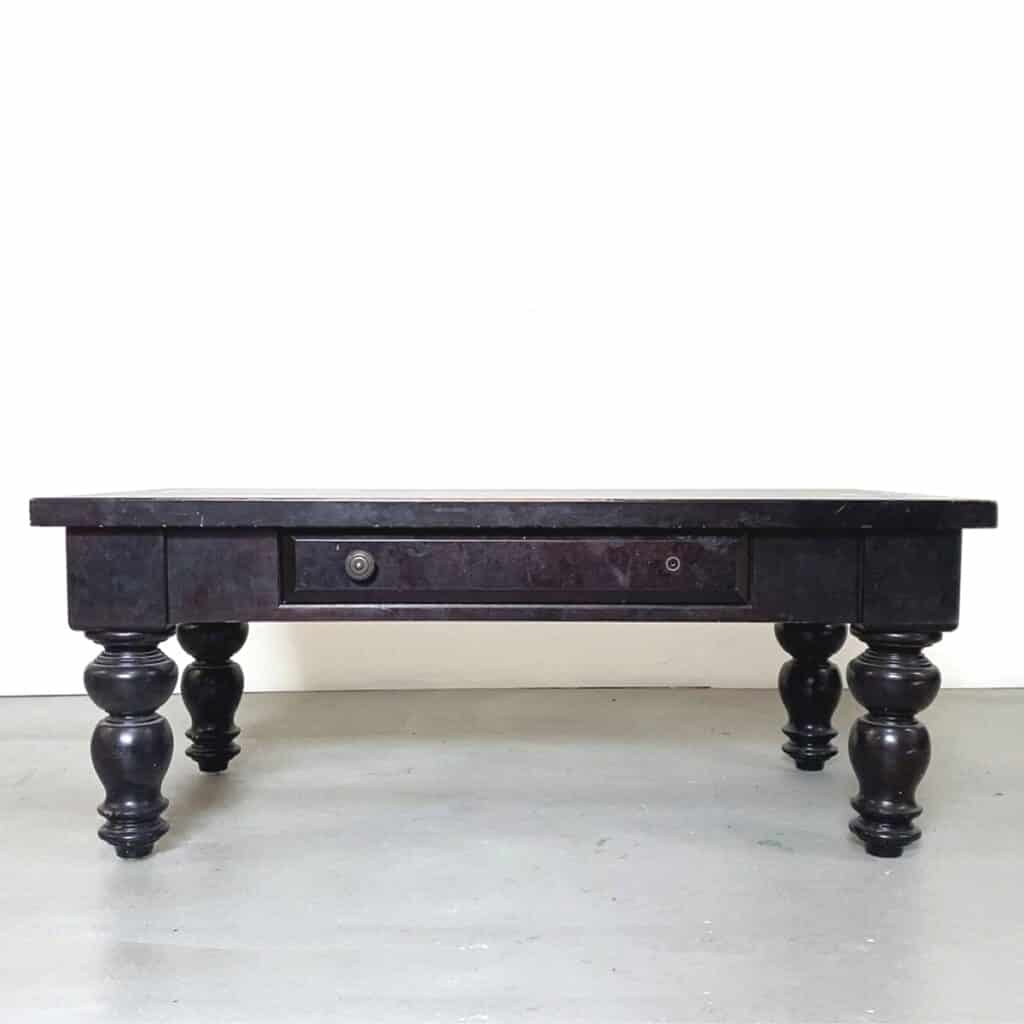
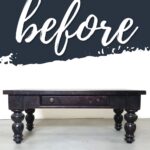
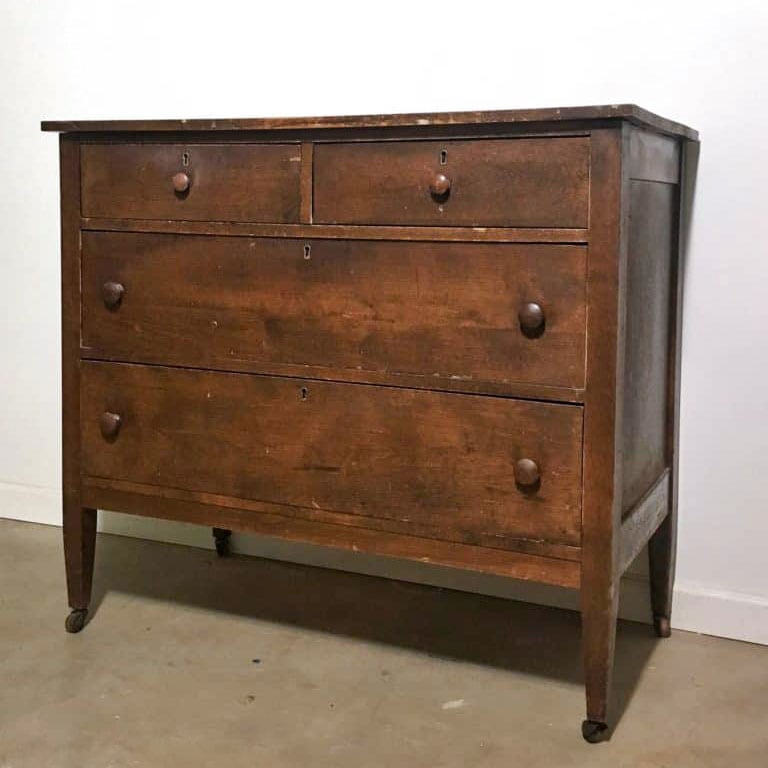
My sister gave me this massive, dark coffee table when she was done with it. So let’s paint it and make it look new again!


Supplies Used For Blue Chalk Paint Coffee Table Makeover
As an Amazon Associate, I earn from qualifying purchases. I also may earn from other qualifying purchases with other companies or get free product to review and use. All opinions are my own.
- Krud Kutter
- Sander (Use code RAY10 to get 10% off your order)
- 150 Grit Sandpaper (Use code RAY10 to get 10% off your order)
- Coarse Grit and Fine Grit Foam Pads (Use code RAY10 to get 10% off your order)
- Interface Pad
- Carbide Scraper
- Shop Vacuum
- Tack Cloth
- Clear Shellac
- Behr Latex Paint in Flat Sheen
- Calcium Carbonate Powder
- Paint Sprayer
- Wood Filler
- Round Zibra Paintbrush
- BIN Shellac Based Primer
- Waterbased Polyurethane
Get my list of the 10 must have Painting Furniture Supplies here.
Preparing A Coffee Table for Paint
I started like I always do. I cleaned the table with Krud Kutter and an old damp rag, trying to remove all of the oil, grime, and dirt that could be on it.
Learn more about How to Prepare Furniture For Painting and, more specifically, How to Clean Furniture Before Painting here.
Removing Old Finish from A Coffee Table
This step was mostly optional.
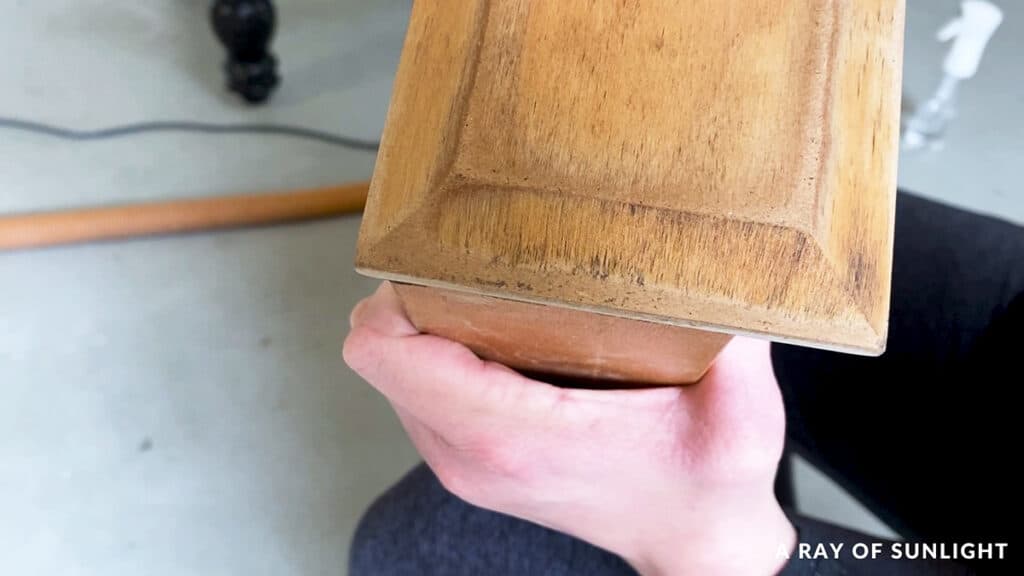
I had visions of sanding it down to bare wood and whitewashing the wood to make a light wood finish… but when I sanded the drawer down to bare wood, I easily sanded through the veneer.
I think this is the thinnest veneer I have ever seen!! See those spotty and lighter areas on the edges? That’s MDF under the thinnest wood veneer ever.
So, that kind of ruined those plans, and I took a step back from it for a while.
But, the top of the coffee table had a lot of blemishes and scratches in the old finish, so I wanted to remove those before painting… or else you can still see them after you paint.
I recently learned about a carbide scraper and how you can use it to scrape off stain or paint to get to the wood underneath.
So I bought one and tried it out. Check this out! Look how fast it gets it down to almost bare wood!
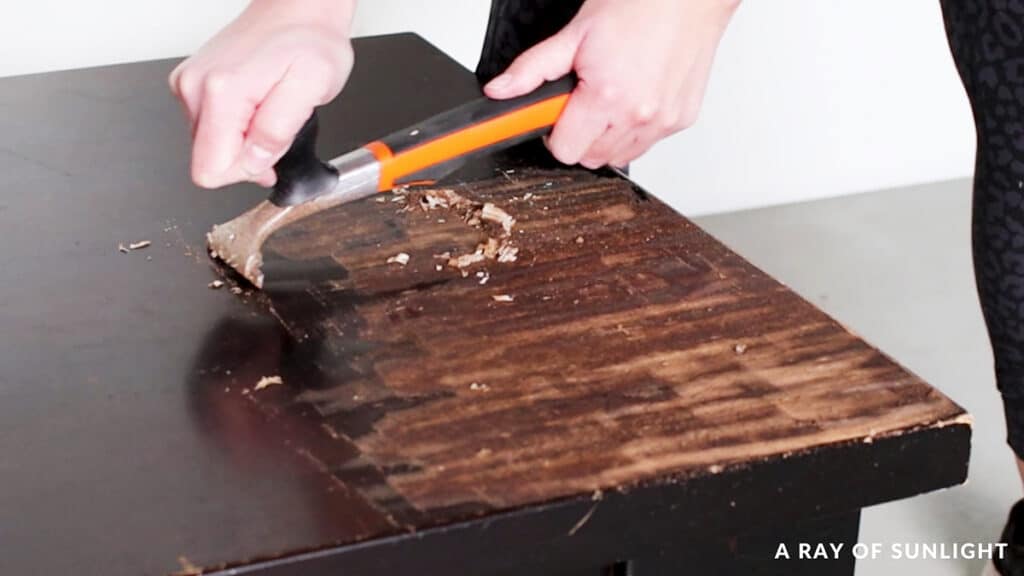
The worst thing about it is that it takes a lot of muscle and energy. So I asked my husband to step in and help me with some of it.
But still, it took 13 minutes for us to get the top scraped off! That’s so fast compared to sanding or chemical stripper!
Learn more about the Best Tools for Removing Paint from Wood here.
Then I sanded the top with 150 grit sandpaper to smooth everything out. That only took a few minutes.
I’m starting to think that using a carbide scraper to get most of the finish off and then using a sander lightly after that is the way to go! At least on flat surfaces.
Sanding and Priming Before Painting Coffee Table
Then I scuff sanded the legs to help the paint stick to them.
Learn more about the importance of Sanding Before Painting Furniture in this post.
I used a coarse grit foam sponge with a squishy interface pad and my sander to get into most of the curves on those legs.

Man, I love this SurfPrep sander and those foam sponges!
If you’re curious about it, here’s my honest review of the SurfPrep Sander. Learn more about SurfPrep Sanding Sponges here.
Learn more about the Best Sanders for Furniture here!
Some of the crevices were too small to get the sander into, so I had to do a little by hand with the coarse grit foam sponge, but I’m so grateful to have this sander so I didn’t have to do it all by hand!
After the whole coffee table was scuff sanded, I vacuumed up the dust and used a tack cloth to remove any remaining dust.
Want to skip the scuff sanding step? Check out this best paints for furniture without sanding list. If you use really great paint, you can skip sanding.
Then we took it outside and sprayed it all with a couple of coats of clear shellac. I planned to use a lighter color of paint, and I was really worried there would be bleedthrough staining issues.
So, I primed it really good with shellac to block those stains. Here’s how to stop stains from coming through paint for more tips on tackling bleedthrough. Also, clear shellac helps my paint stick. For other primers you can use when chalk painting, here’s our list of the best primer for chalk paint.
Then we brought it back inside and let it dry overnight.
Painting A Coffee Table with Blue Chalk Paint
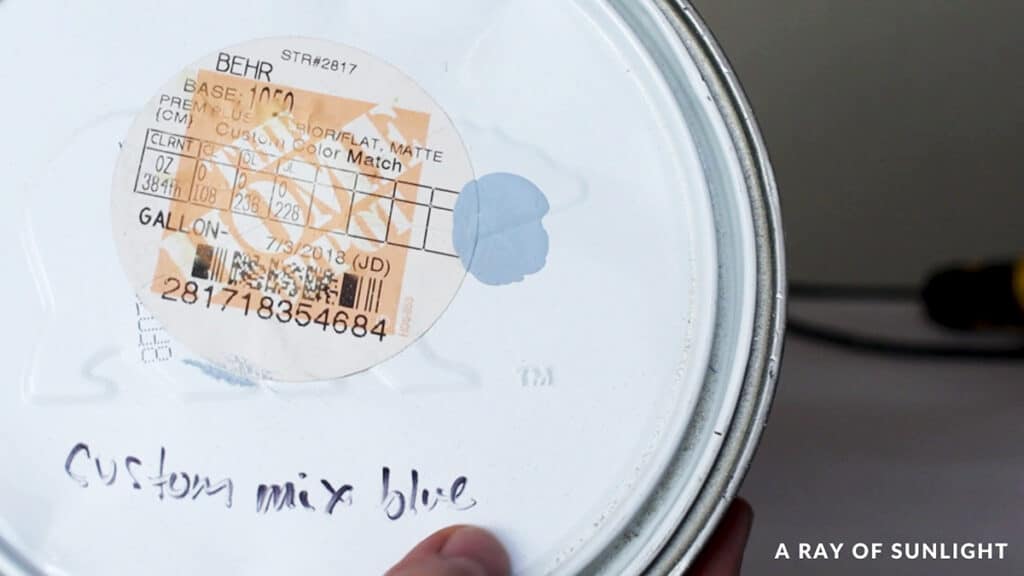
The next day I mixed up this blue paint that I had tinted years ago to match a color I mixed up.
If you like this specific color, you can give this code to a Home Depot paint department employee, and they can mix up this same color for you.
Check out the best Blue Chalk Paint for furniture here.
I turned it into homemade chalk paint by mixing calcium carbonate powder with some water and then mixing that into the latex paint.
Alternatively, you can use BB Frosch Paint Transformer Powder to make chalk paint from latex paint. It is amazing and much better than my homemade chalk paint recipe.
Check out my honest BB Frosch Paint Transformer Review to learn more about the features, and pros and cons of this product.
Would you like to save this?
Wondering What is Chalk Paint exactly and why it’s popular? Read this post to learn more!
I added a little bit more water to thin out the paint a little more. and mixed everything really well.
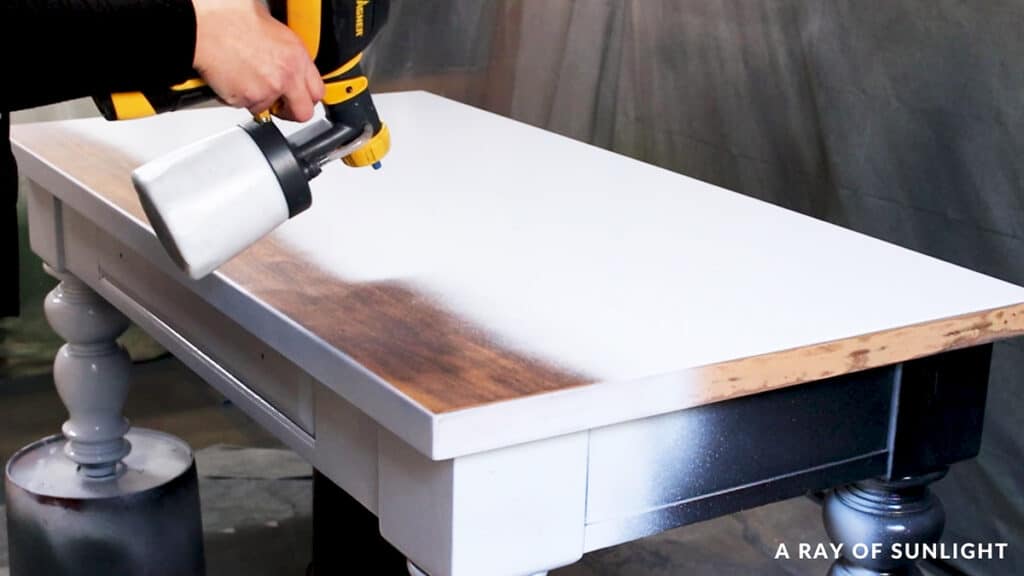
I tested my sprayer’s settings, and then I sprayed a coat of paint on the table.
Here are the Best HVLP Paint Sprayers for Furniture.
But, if you just want to brush or roll your paint on, that’s great too!
Here are the Best Paint Brushes for Painting Furniture and the Best Rollers for Painting Furniture.
When the paint was dry, I found a couple of spots that needed to be filled with wood filler.
Here’s our list of the best wood fillers for furniture.
I let the wood filler dry, and then I sanded it smooth. Then I sprayed another coat of paint, and then I came back with a paintbrush and the paint to get into the crevices on the legs a little better.
Bleed Through Stain Issues
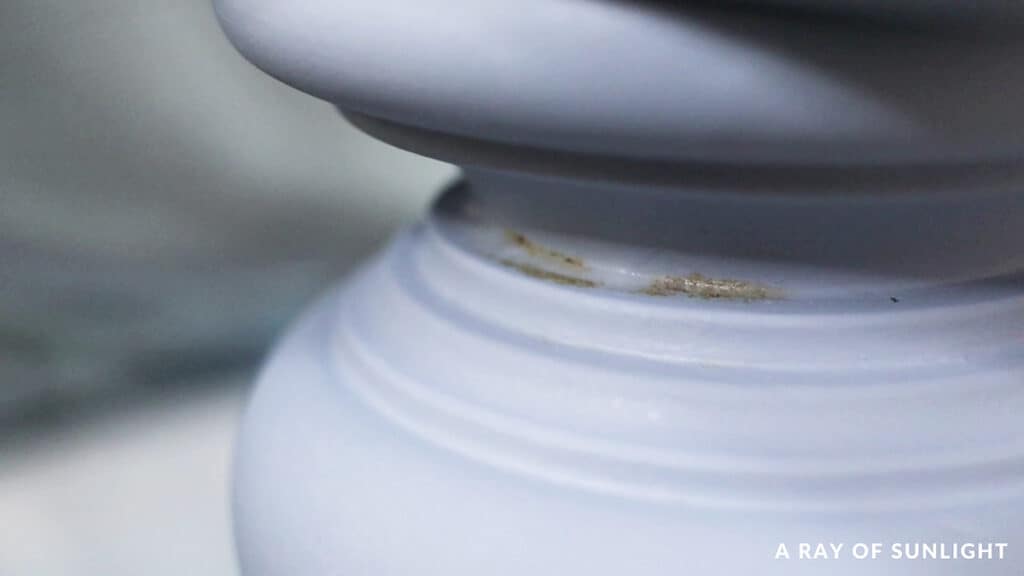
But when I came back, there was a strong bleedthrough stain on a leg. GAhhhhhh.
We considered our options and decided to take it back outside and spray more shellac all over. And then let it dry until the next week. (While we enjoyed some time with family.)
When we came back to it, I sprayed another coat of paint, and guess what… there was still bleedthrough.
So I brushed some BIN shellac primer onto that spot again. The BIN shellac primer is tinted white, so you can tell if bleedthrough is blocked or not usually.
Check out the best primers for painting furniture here.
Then I sprayed some more paint over it the next day and it seemed okay.

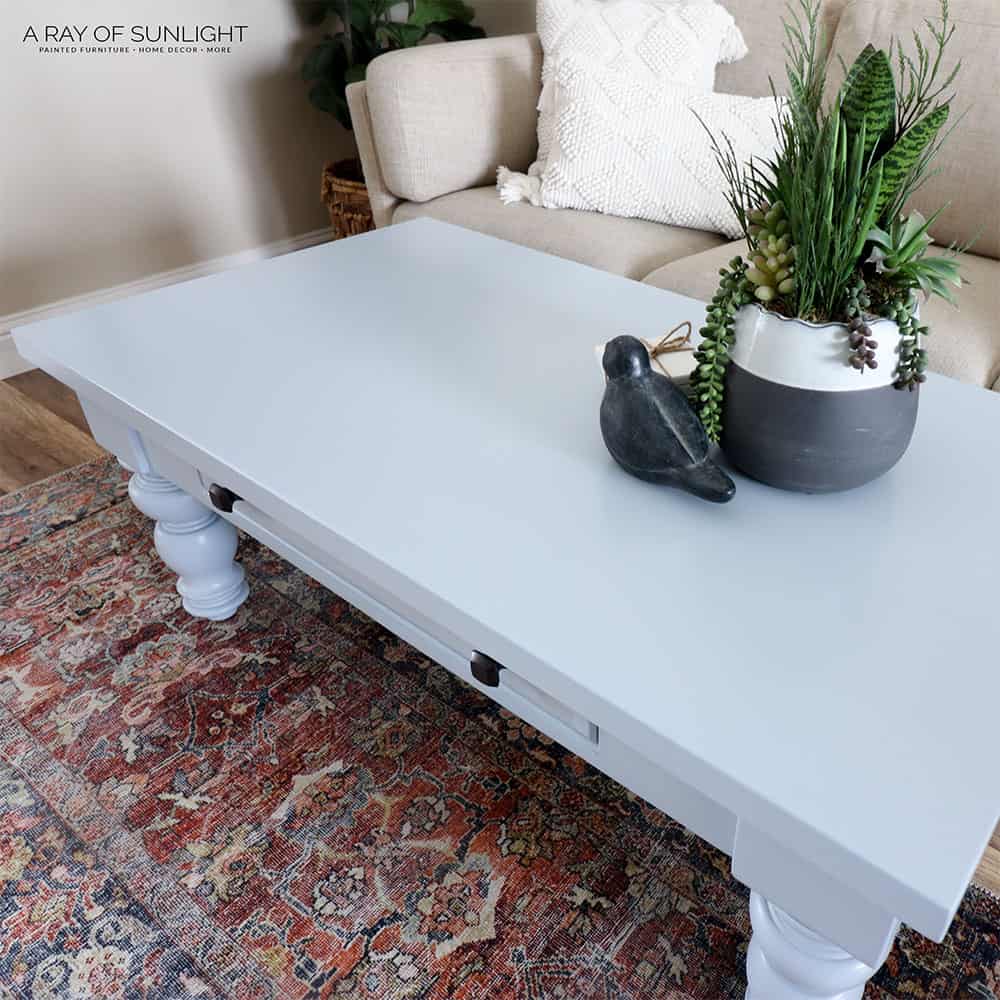
Topcoating Blue Chalk Paint
So I moved on to topcoating the chalk paint. I used my favorite water-based polyurethane to seal the chalk paint.
Learn more about Topcoats for Painting Furniture here.
What’s the best polyurethane for furniture? Check out that list to help you know what polyurethane to use.
I emptied out the paint sprayer, but I didn’t clean it. And then, I put some water-based polyurethane in it in a semi-gloss sheen.
I adjusted my sprayer’s settings and sprayed a coat of polyurethane on it.
Learn more about How to Spray Polyurethane in this post.
And when I came back, there was a bleedthrough stain again.
It seemed like it was coming through a crack, so I put some caulk on it, let it dry, and then I brushed some BIN shellac primer onto it.
Check out the Best Primers to Stop Tannin Bleed here.
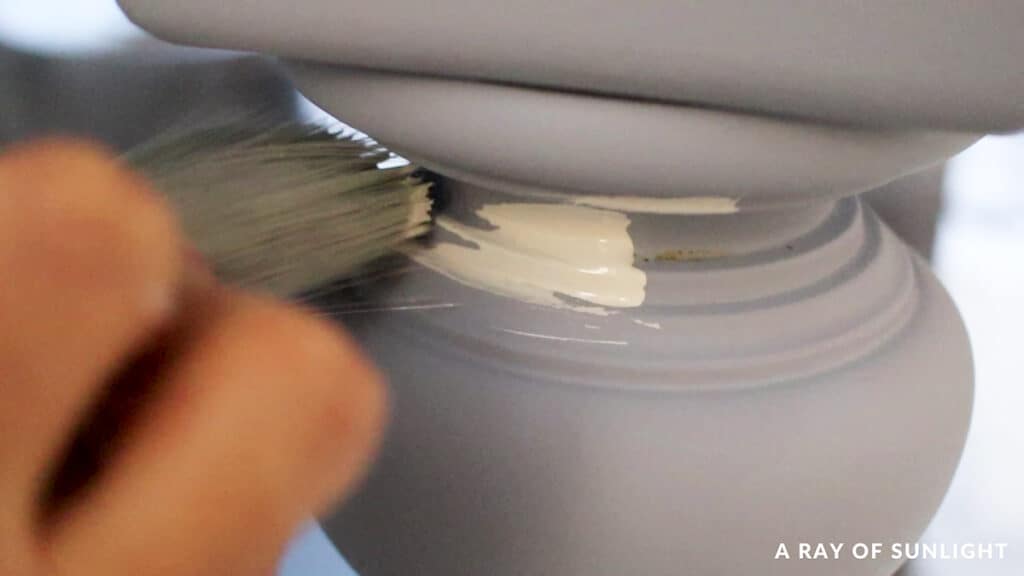
Aye, aye, aye. I can’t believe how many times I had to touch this spot up. This time I used a small brush to touch up the paint.
While that dried, I sanded the rest of the coffee table by hand with a fine grit foam sponge to make everything feel smooth.
I didn’t use the sander because I didn’t want to sand through the paint on accident. I cleaned the dust and sprayed more polyurethane on, and guess what!
FINALLY!!! NO more bleedthrough!! Only took me how many tries!?!
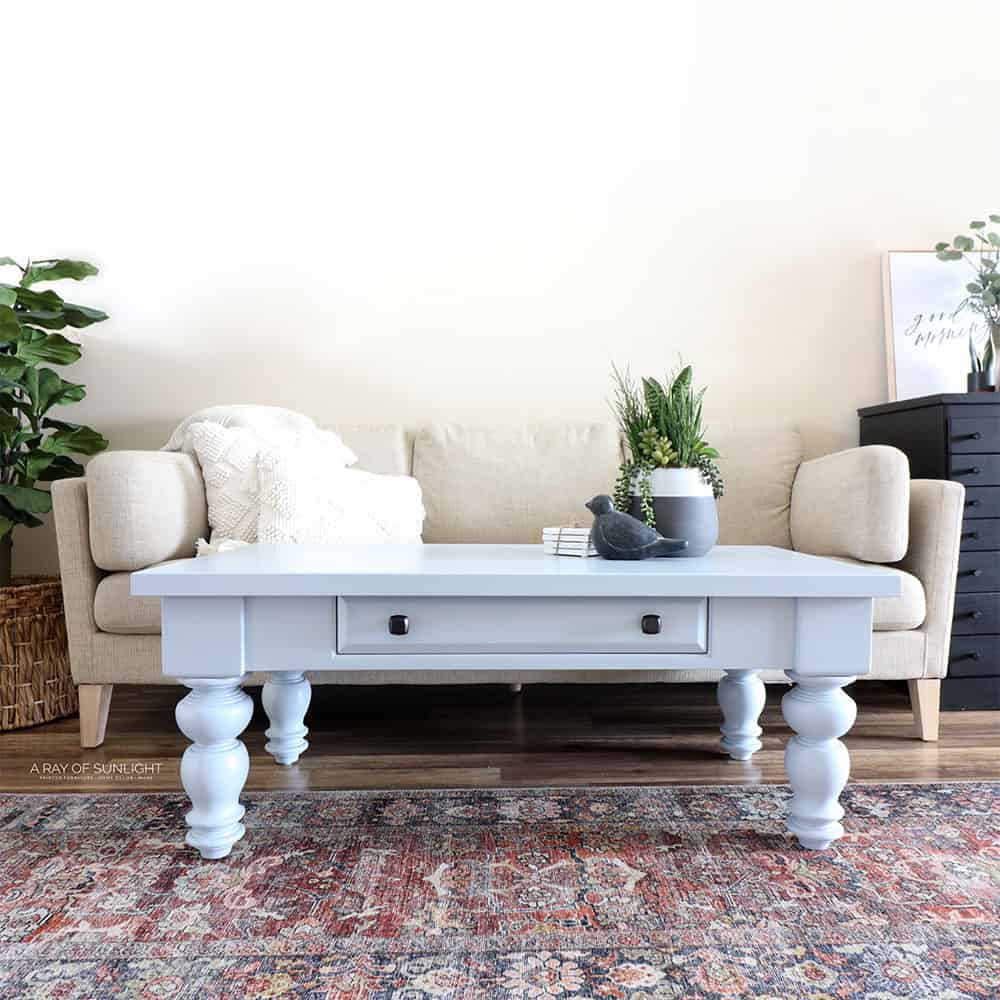
Watch the full makeover on our YouTube video, and check out the after photos below to see what it looks like now!!
More Before and After Makeovers
See All >
Click any of these “before” photos below to view the “after” of that makeover.


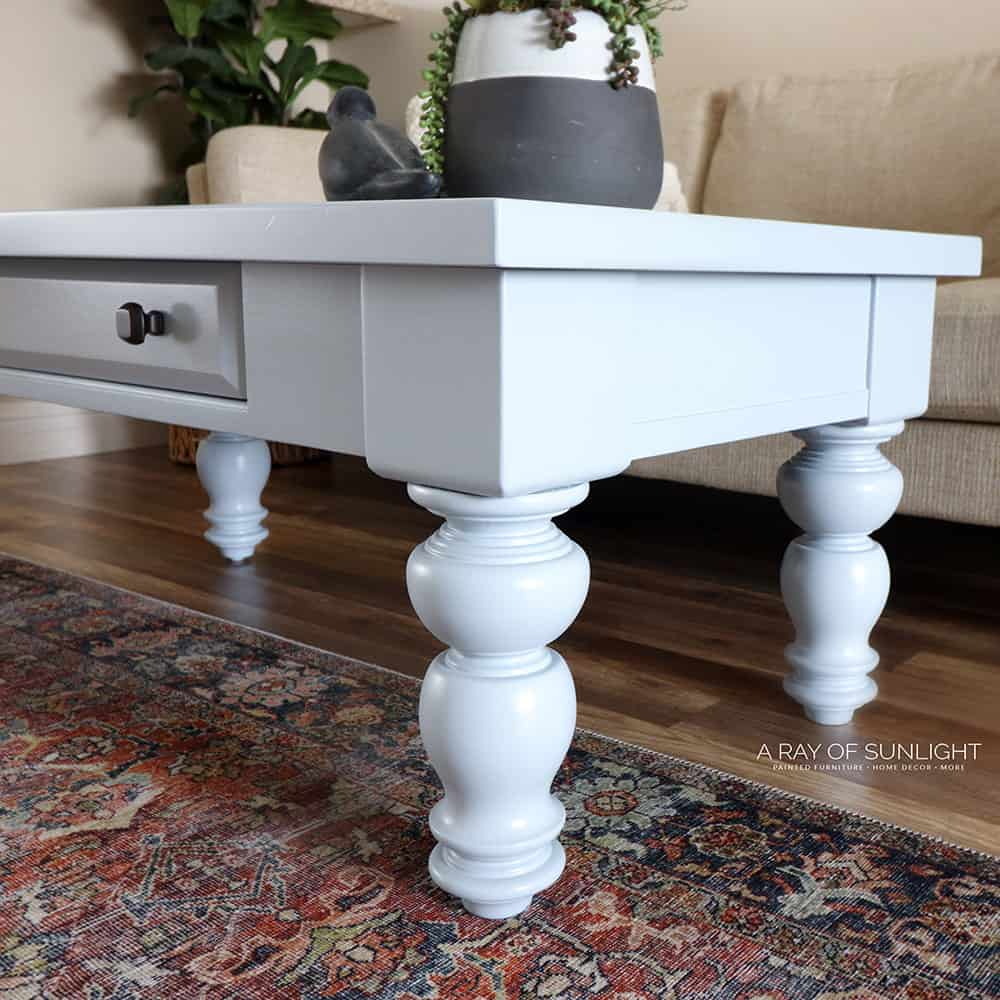
It’s like a breath of fresh air! I love the light blue on it instead of the dark finish it had before. It’s still a pretty big coffee table, but it doesn’t feel so heavy, and it totally brightens up the space. Check out more French blue painted furniture and light blue painted furniture here.
For similar projects, check out these coffee table makeover ideas and redoing coffee table ideas. Here are more ideas for painting a coffee table. If you like the bold and classic look, here are black painted coffee table ideas. You can also go for a more natural look with these coffee table refinishing ideas.
Once it has cured, we’ll be listing it for sale locally. What do you think of the new look?? Let us know in the comments!


Blue Chalk Paint Coffee Table
Paint your coffee table with blue chalk paint and give it a new life. Here's a blue chalk paint coffee table makeover!
Materials
Instructions
- Clean coffee table with a degreasing cleaner to remove grease, oils, dirt, and grime.
- To get to the wood underneath, scrape off stain or paint with carbide scraper then smooth everything out with sandpaper.
- Scuff sand the coffee table legs with sander to help paint stick. For crevices too small to get the sander into, sand them by hand with the coarse grit foam sponge.
- Prime with a shellac primer to block bleed through and help the chalk paint stick. Let dry overnight.
- Make homemade chalk paint by mixing a few tablespoons of calcium carbonate powder with water, and then mix it into a cup of latex paint.
- Spray 2-3 coats of paint onto the coffee table. See if there are any spots that needs to be filled with wood filler. If there is, fill and let the wood filler dry, then sand it smooth before spraying the next coat.
- Seal the chalk paint with 3 coats of water-based polyurethane.
- Let dry for 24 hours before using.
Recommended Products
As an Amazon Associate and member of other affiliate programs, I earn from qualifying purchases.


More Painted Table Makeovers
- Black Coffee Table Makeover Idea
- White Painted Coffee Table
- Coastal Style Coffee Table Makeover
- Painting a Coffee Table
- Paint a Table Black
Follow us on YouTube to get more tips for painting furniture. Or share your project with us on our Facebook Group and be part of our community. See you there!