The Easiest Way to Remove Paint from your Old Wood Furniture


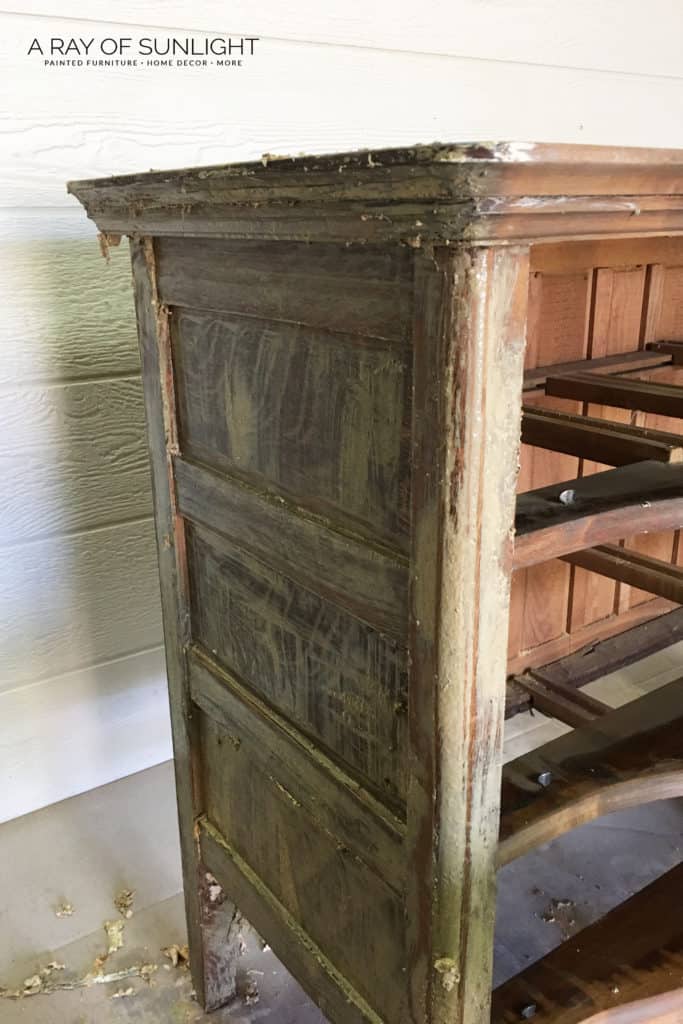
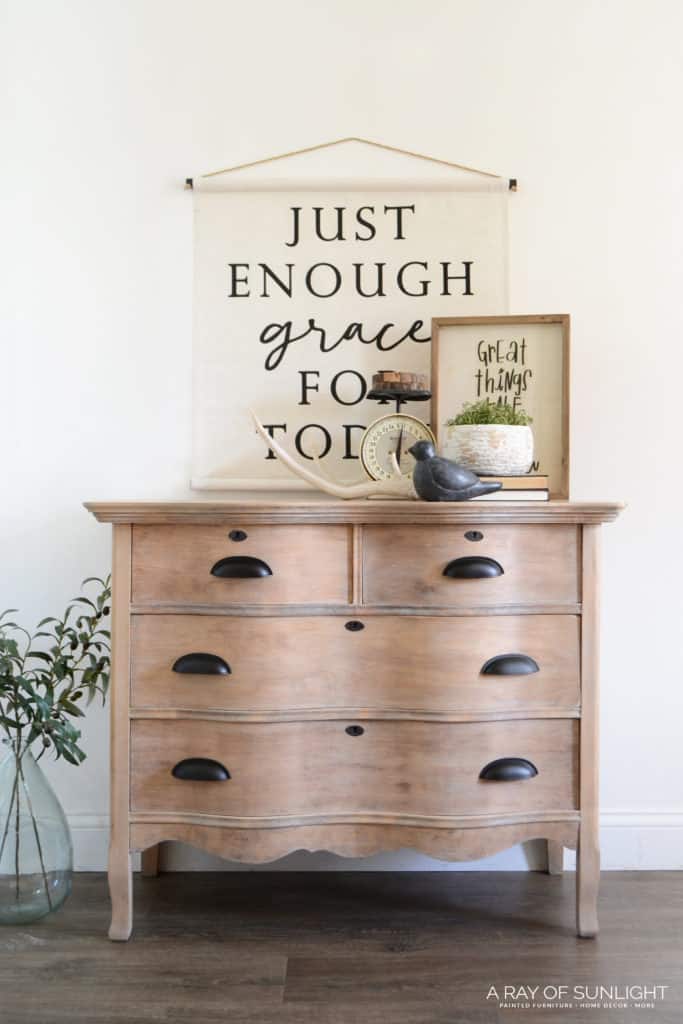
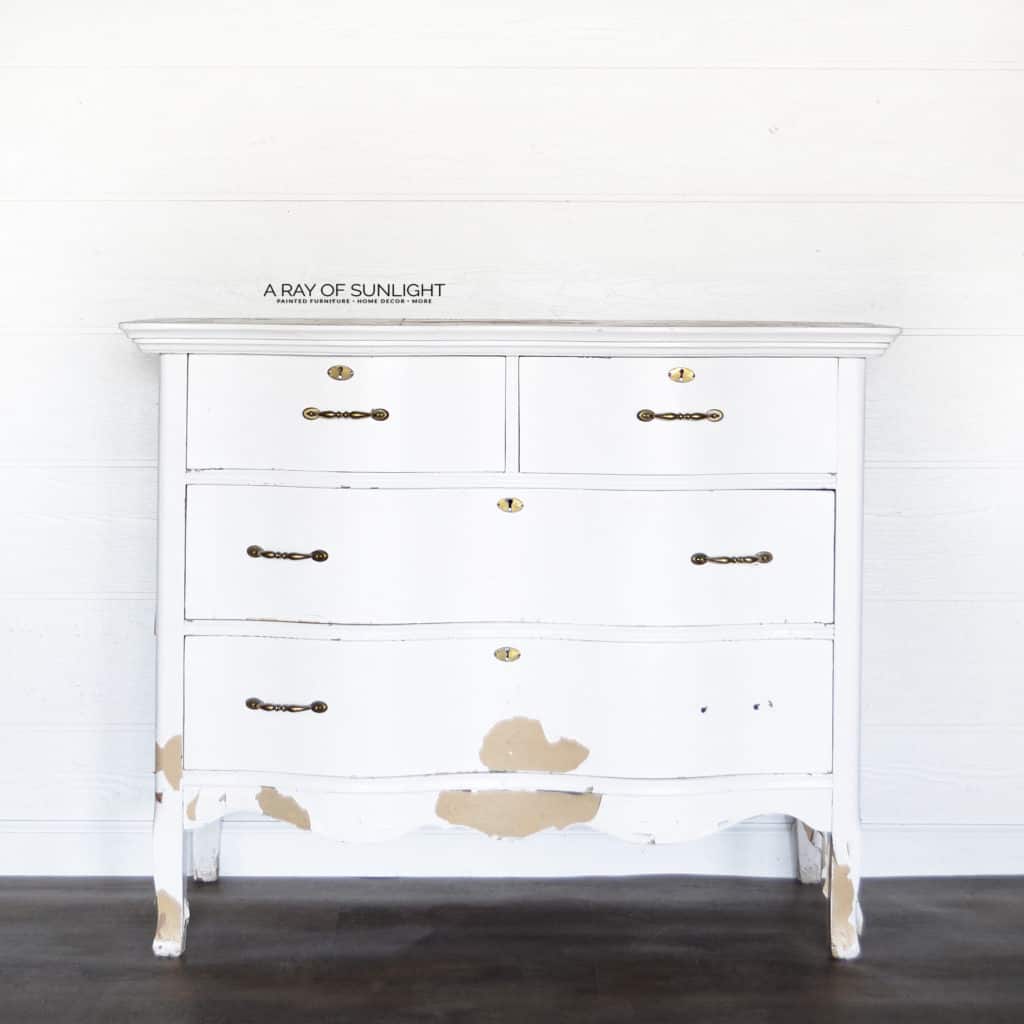
Look at what was underneath 3 layers of chipping old paint! With multiple layers of paint like this, you’ll need to do the right refinishing furniture techniques to make sure you remove them properly and don’t damage the wood underneath. So let’s dig into the whole process of how to remove paint from wood furniture!
This dresser makeover started with stripping off the paint, then we found some stunning raw wood underneath, and just had to keep it natural! Let’s dive in and show off the beautiful natural wood hidden under all that old paint!
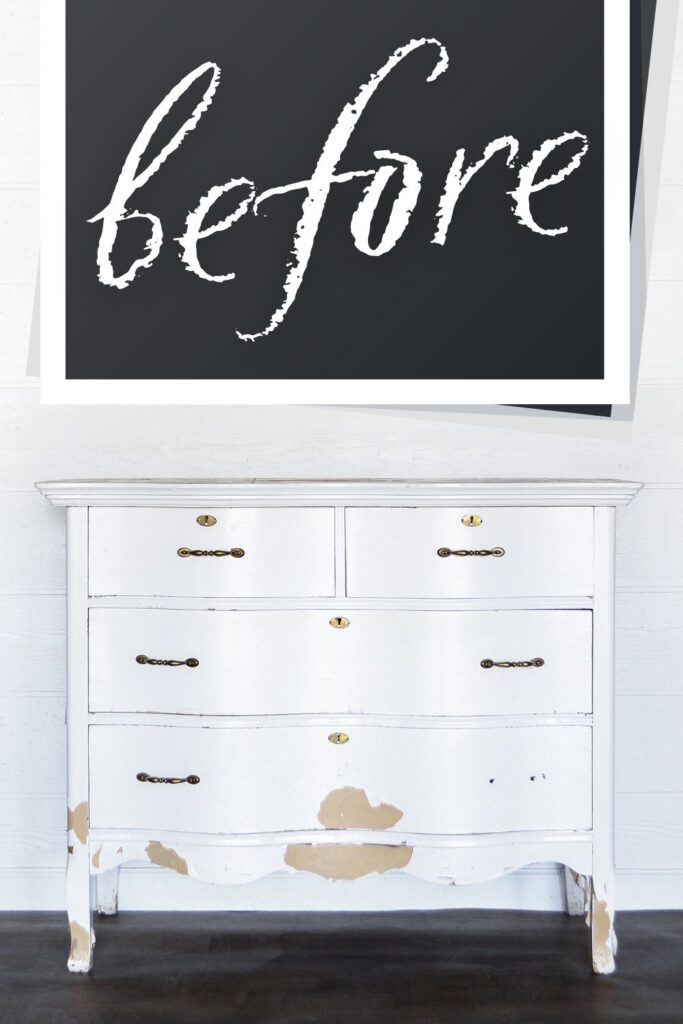
Our client brought us her Grandma’s old dresser that has been in her family for over 100 years! And there were at least 3 layers of paint on it when it made its way to me. So we definitely had to tackle those layers first!

The original plan was to give the dresser a fresh new layer of dark grey paint. But again, the old finish was in really bad shape. So we planned to strip off the old paint to give the new paint a good solid base. That was the plan. Until we saw what the wood looked like underneath.
Let’s go through the steps to remove old paint or stain from any type of wood furniture. That includes wood veneered furniture just like this one, too. Then we’ll finish up the process by keeping the wood natural with a few tips.
Supplies Used To Remove Paint From Old Wood Furniture
As an Amazon Associate, I earn from qualifying purchases. I also may earn from other qualifying purchases with other companies or get free product to review and use. All opinions are my own.
- Lead Paint Testing Kit
- Citristrip
- Gloves
- Cheap Paint Brush
- Plastic Wrap
- Scraper
- Mineral Spirits
- Steel Wool
- Scrubbing Pad
- 220 Grit Sandpaper
- 400 Grit Sandpaper
- Power Sander
- Shop Vac
- Tack Cloth
- Waterbased Polyurethane
- Paint Sprayer
- Wax
Grab our list of 10 must have painting furniture supplies, too, so you can have these products on hand and easily get started on your next DIY project.
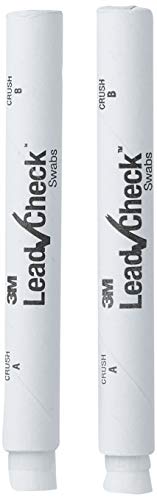
How to Test for Lead Paint
It’s a super simple process, but it’s super important to know if you’re working with lead based paint. Lead is toxic and can make you sick if it’s not removed properly. So if you’re working with lead based paint, it’s best to remove it with a chemical stripper (like we did) instead of sanding it off.
You can find these little lead paint testing kits at your local hardware store. (I pick mine up from Home Depot a lot). The test is easy as squeezing the two ends of the lead tester, shaking it to mix the liquids, and then rubbing that liquid onto all of the layers of paint.
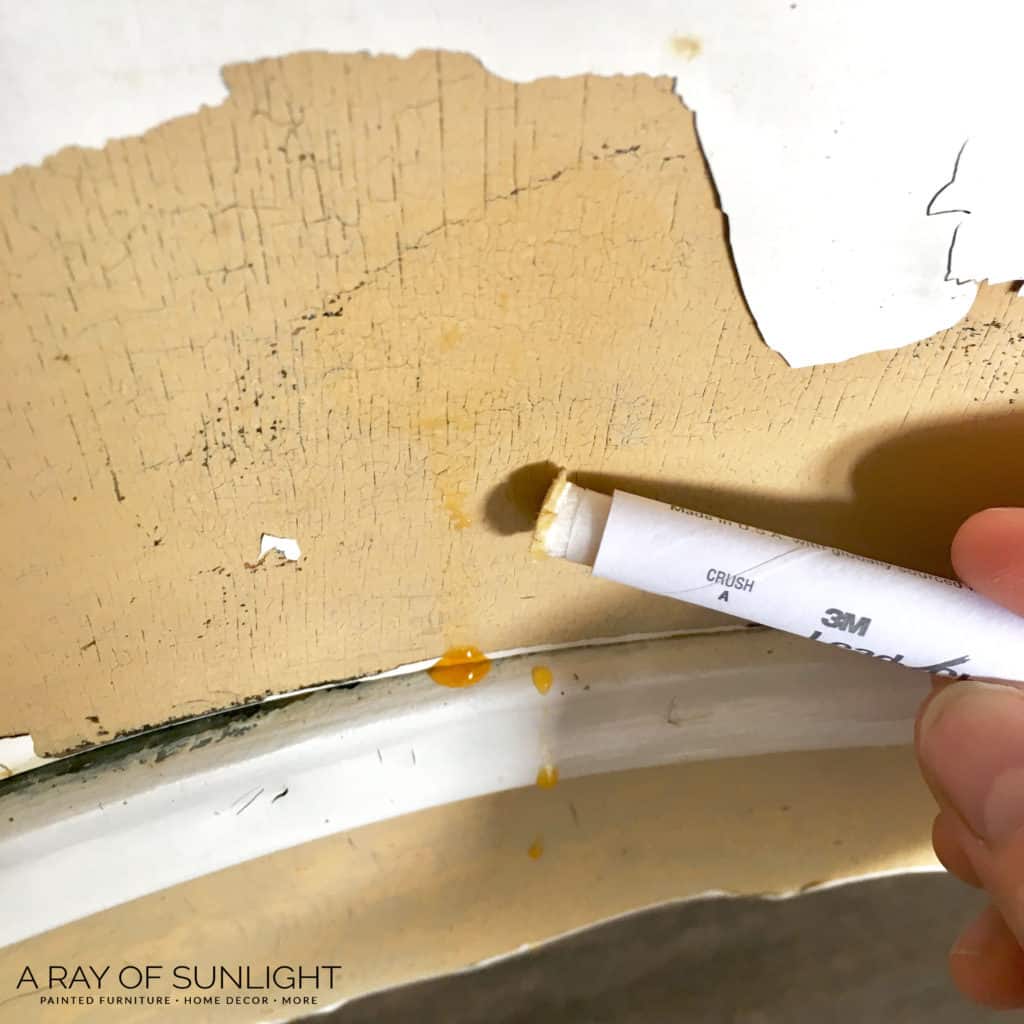
If it turns red or pink, then you have lead in your paint. If the liquid stays a yellow-orange color, then you most likely don’t have lead in your paint.
If you only see yellow or orange, test it on the little confirmation card to make sure the liquid in the tester is working correctly. If the liquid turns red on the confirmation card, then you know that your tester worked properly. Check out this post for a step by step guide on how to use a lead paint test kit.
We tried this lead test out on this dresser and found a mix of results. The white paint didn’t have lead in it, but the layers underneath did. (Paint used before 1978 most likely has lead in it.) So since we knew we were working with lead paint, we knew better than to start sanding the paint to remove it.
If the old paint is chalk paint, here’s how to remove chalk paint easily and quickly. Or check out my post on how to paint over chalk paint here if the existing chalk paint is still in good condition.
how to strip paint from wood furniture
Our favorite way to remove paint or stain is to use this chemical stripper called Citristrip. It isn’t harsh like a lot of strippers are. Check out the best wood stain removers, including Citristrip, to learn more about the benefits of each product.
In fact, it actually smells good! And most importantly, it works time and time again. But I have a little extra trick when it comes to using Citristrip to remove paint or stain from wood. (See step 2)
How to Use Citristrip Stripper
Safety first! Put on some nice thick chemical resistant gloves to protect your hands… and some eye protection is nice too. Also, it’s best to use this stripper outside, but you can totally use it inside too with some windows open for ventilation.
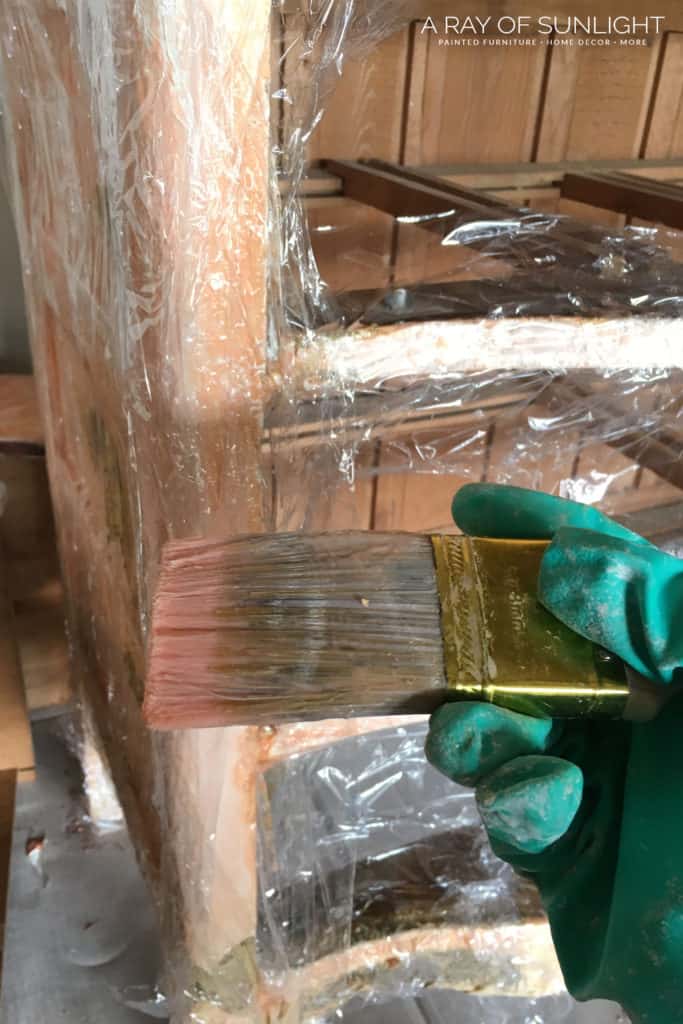
You really want it to be thick. I usually dump it out of the container onto the top of the furniture. Then I just move the stripper around with the paintbrush until it’s everywhere. Also, the stripper will eat up foam brushes in a second. So I like to use a cheap chip brush or a dollar store paint brush.
And then *here’s the little trick I use to make it work even better*: I cover the Citristrip with plastic. No joke. I personally like to use plastic wrap or garbage bags. But the plastic makes the stripper work for longer.
Then it’s time to walk away. Walk away, go to bed, work on other projects, run errands. Do what you need to do. But don’t mess around with it for at least 8 hours. But it can sit for up to 24 hours too.

*Update* – Citristrip has changed its formula. I now find myself letting it sit for a little longer with no problems. It doesn’t dry out as fast anymore.
So, just leave it. Just let it do its thing. A sign that it is ready is when it is really wrinkled up like the stripper sucked up all the paint and then started to dry.
Meanwhile, you can check out the low VOC and less toxic stripper we used in this how to refinish a dresser post! Plus, here are more of the best tools for removing paint from furniture.
Removing Stripper and Paint
For furniture with detail (surfaces that a flat scraper can’t reach), use an old toothbrush, toothpick, or (no joke) even floss to get into tight details and corners. Get more juicy details on how to remove old stain from detailed wood or another post and video on how to remove wood stain from furniture legs here.
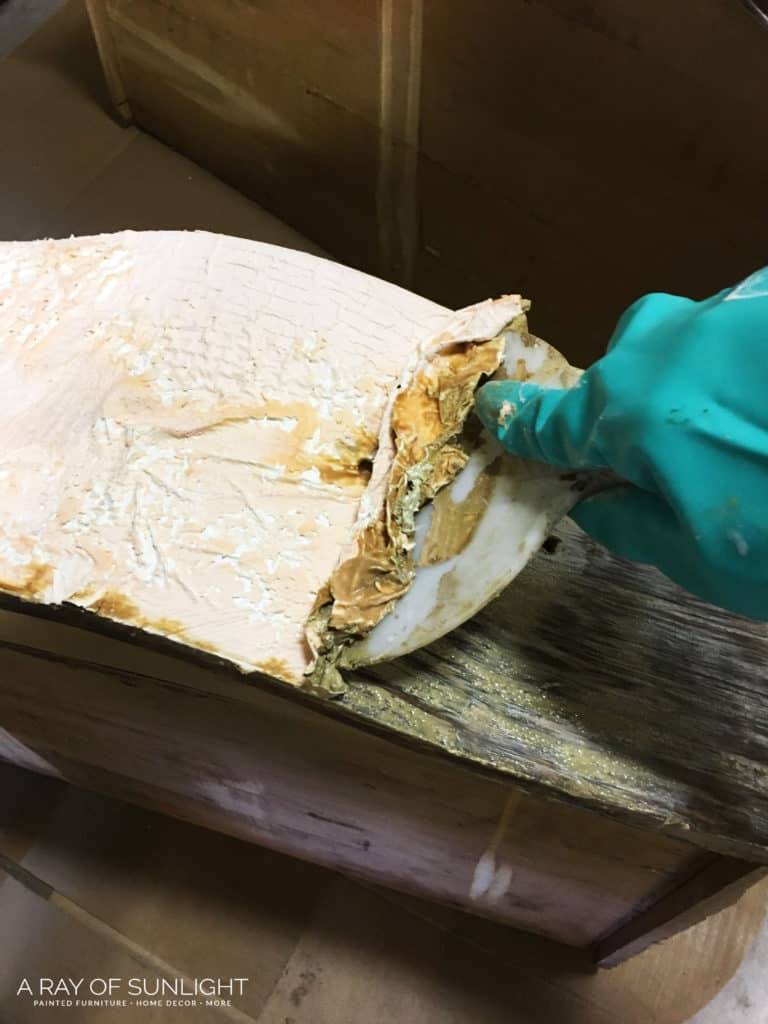
I scrape all of the stripper and paint into empty and clean plastic containers like sour cream, cottage cheese, pasta sauce, etc. containers. I like having something that has a wide opening and that has a lid.
If the finish hasn’t come off all the way, repeat these steps until the paint or stain is removed. It usually takes 1-2 rounds for me. There will always be some gunk or residue left over that needs to be washed off. Get more tips on how to scrape paint off wood here.
Or you can also use these best sanders to remove paint instead of a chemical stripper!
How to Remove Citristrip Residue
I typically use mineral spirits (poured into a plastic bowl) and some fine steel wool to scrub off anything that is left. The mineral spirits really helps loosen some of the old finish, and the steel wool scrubs it away.
You can also use a scotch-brite scrubbing pad with the mineral spirits. It doesn’t work as well as the fine steel wool, though.
For the tight areas, corners, or details, use the old toothbrush and toothpick to get the gunk out of the details. And as you scrub off the remaining gunk, replace your scrubbing pad as it gets too much gunk on it. You want to get that wood all clean and fresh.
At this point, the freshly stripped wood will be very wet and saturated. I usually go over it a few times with paper towels to wipe up as much liquid as possible.
what to do after stripping paint from wood
And then, it’s time to let the wood dry completely. I usually leave it alone for a day or two, depending on the weather and humidity. Learn more from our tutorial on how to strip paint from wood furniture.
Would you like to save this?
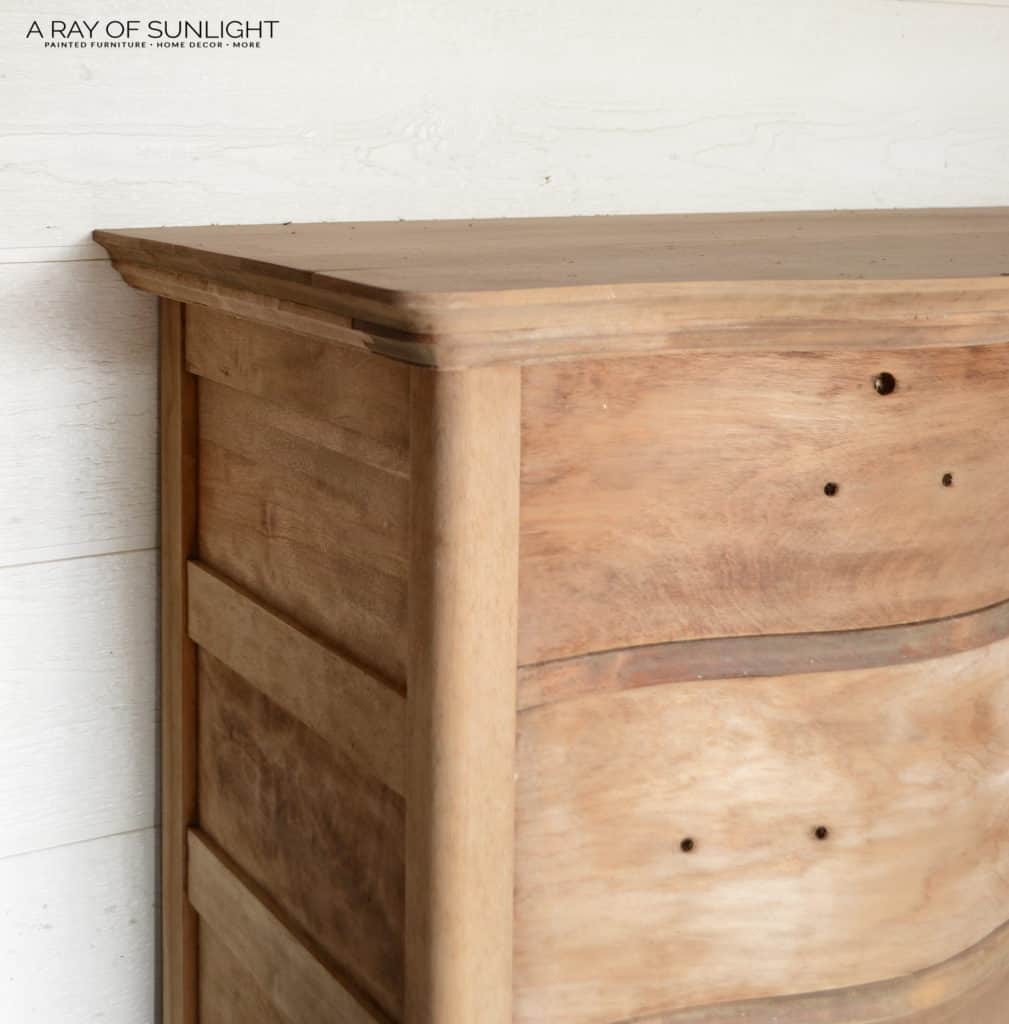
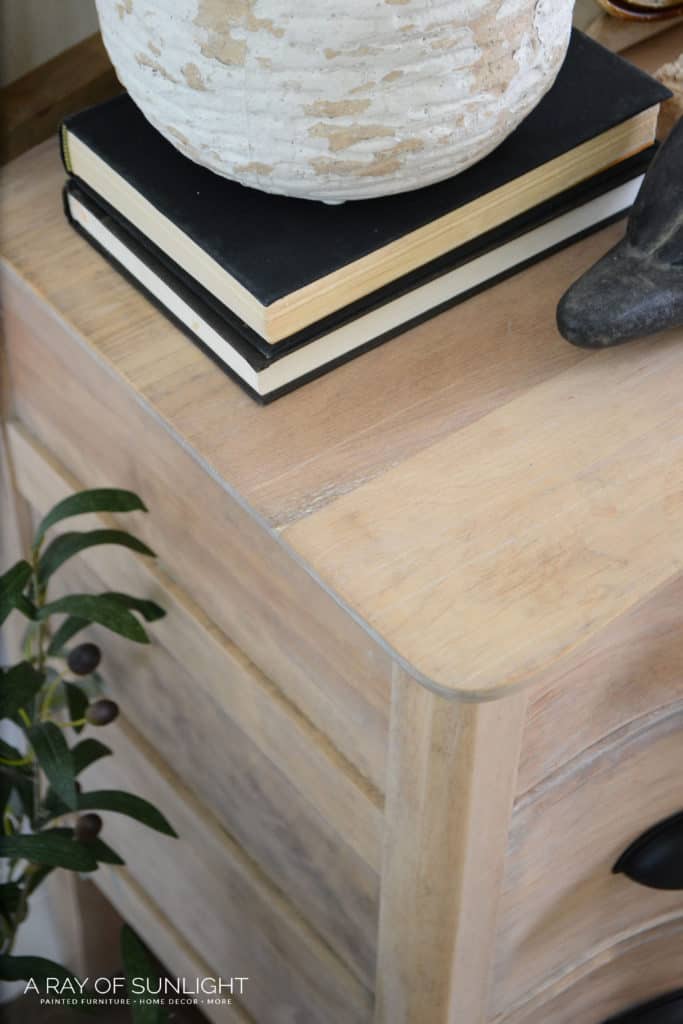
This is what the dresser looked like once it was dry. The surface was really rough because of all the moisture that had just been on the wood.
So before I did anything else, I sanded the wood with 220 grit sandpaper to smooth it down. Learn more about the best sandpaper for furniture or best sandpaper for refinishing furniture and what grit sandpaper is for removing paint from wood here. Check out my guide on how to sand down wood as well for more on this step.
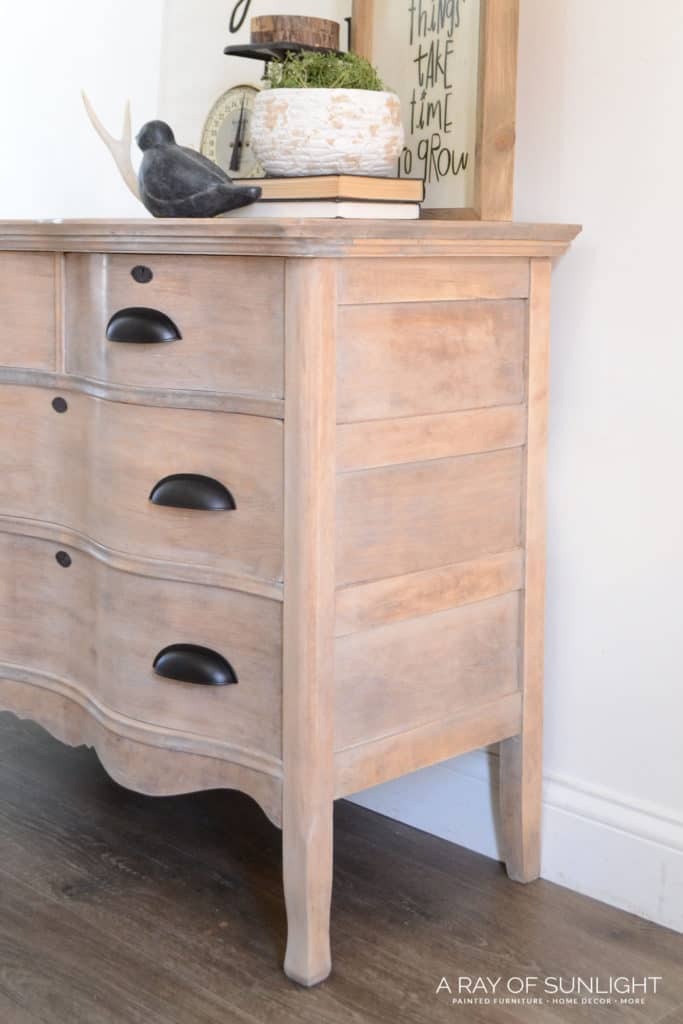
Now at this point, you could totally prime and paint the wood again. That’s actually what the original plan was. But once we saw the beautiful wood underneath all of that paint, we decided to stick with a wood finish.
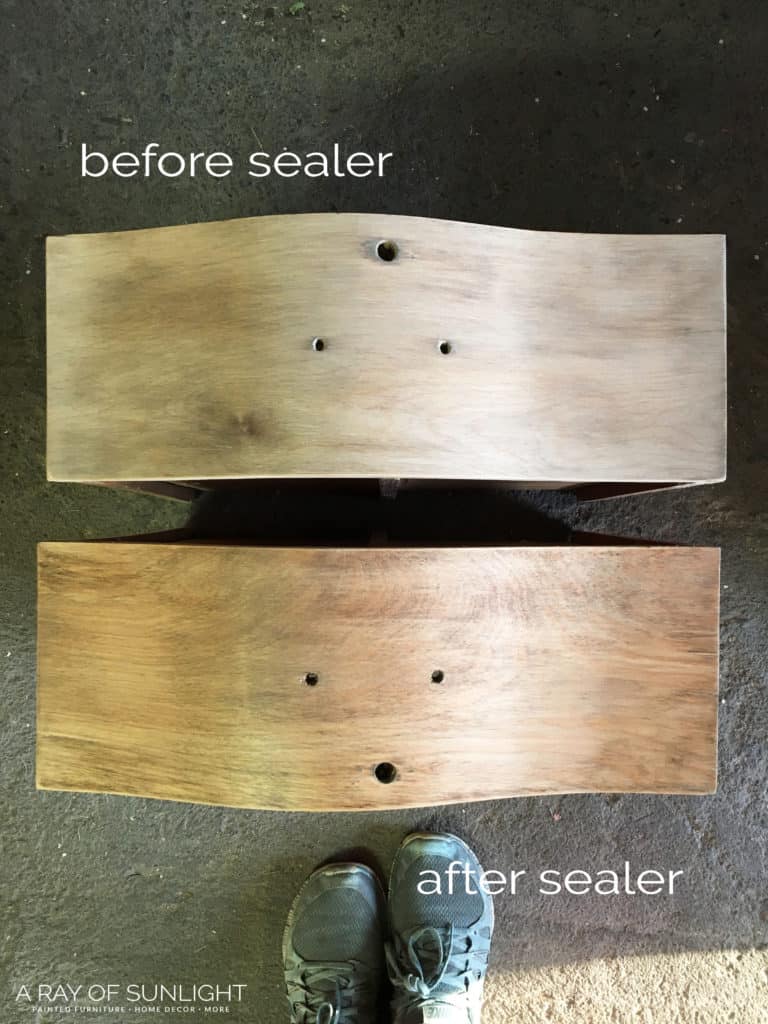
how to seal Raw wood without changing the color
The trick with a raw wood finish is that it needs to be sealed. But once the raw wood is sealed, the color of the wood darkens, and sometimes it gets an orange tint to it. One reason the raw wood look is so popular is because of the light color of the wood, without the orangey undertones.
Check out how to tone down orange wood furniture here if you have orange furniture and looking for a more muted orange finish.
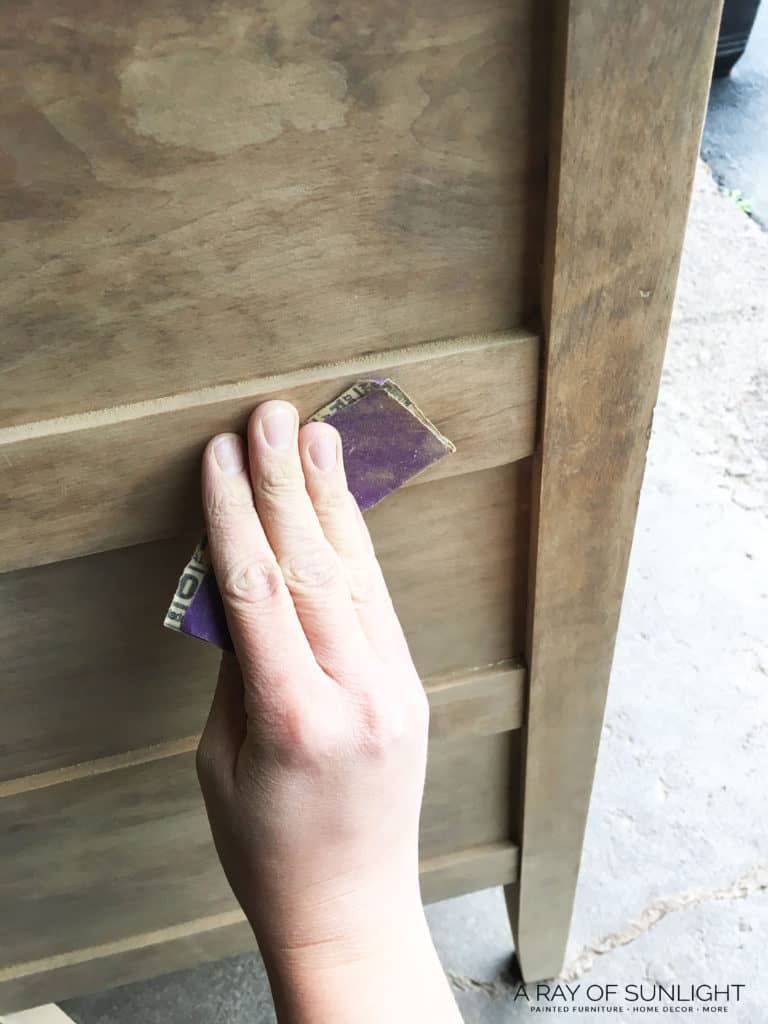
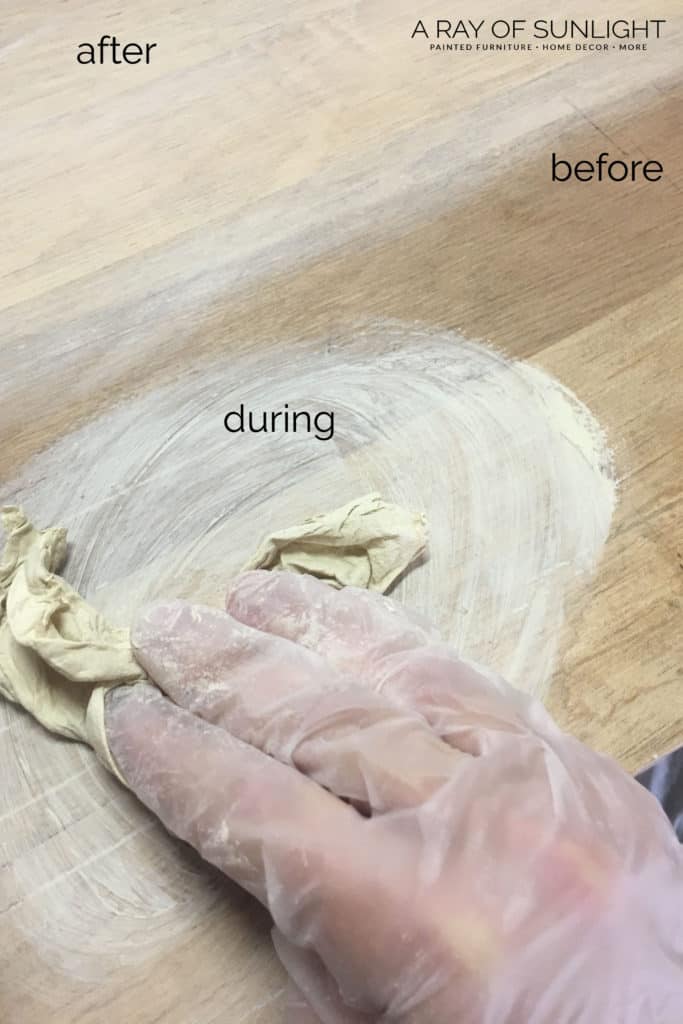
Sanding Raw Wood Furniture
We really wanted to make the wood grain look as good as possible so we fixed those issues with a couple of simple tricks.We grabbed more 220 grit sandpaper and really worked on getting the wood grain to be even and to remove any “water” stains that the stripper and mineral spirits had left.
On the flat areas, we used our power sander to really get the wood grain to shine. This piece of furniture was made with wood veneers though, so I was very careful with the power sander to not sand too hard. Check out the best sanders for furniture here for some great recommendations.
When the wood was as smooth and fresh as possible, I went back over the whole dresser with 400 grit sandpaper. The 400 grit is really fine and creates a super super smooth finish. Then I removed all of the dust with my shop vac and tack cloths.
I like to put the brush attachment onto the hose of the shop vac to brush the dust into the vacuum. The brush really helps with the corners and details… and the flat surfaces. Basically all over! haha And if you haven’t ever used tack cloths before, you NEED to!
They are really tacky (kind of sticky), so they do a really good job of picking up any leftover dust. They work great on painted furniture too and can be used a few times before needing replaced.
Seriously. I used to use lint free rags and thought that was good enough. But these tack cloths are my new favorite tool for refinishing furniture.
After you have sanded or stripped, if the wood is still not very light, you can bleach the wood to make it lighter! Check out this post on how to bleach wood to see how homemade bleach can make wood lighter.
Sealing Raw Wood Furniture
It’s super important to use a water based poly for this. I love to use Varathane polyurethane on my furniture projects! It’s super durable and is easy to use! If you use an oil based poly, the wood will really start to amber and have orange tones to it. And over time the oil based poly will amber way more than water based poly will.
Make sure to apply 3 coats of poly on the wood. The best way to apply the poly is with a paint sprayer – you can learn ALL of my tips and tricks on how to spray polyurethane here! And here’s my list of the best HVLP paint sprayers for furniture for beginner and intermediate painters.
To make sure the last coat of poly left a super smooth finish, I gave the dresser a light sanding with 400 grit sandpaper. And, of course, I vacuumed and wiped off the dust with a tack cloth again before applying the last coat of poly.
How to Use Liming Wax
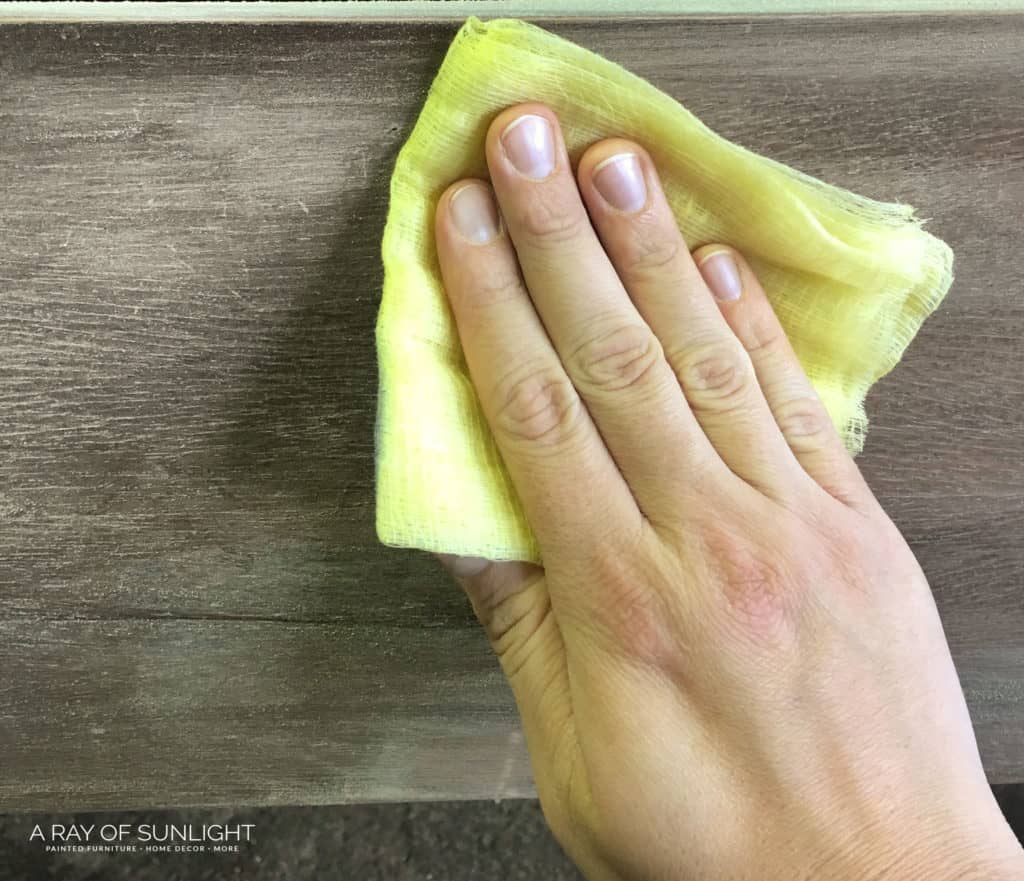
Once the poly was completely dry, I applied a really light coat of a white wax. To make your own colored wax, just mix 3 parts clear wax with 1 part of your paint of choice. Denise at Salvaged Inspirations has a great little post all about tinting furniture wax with paint.
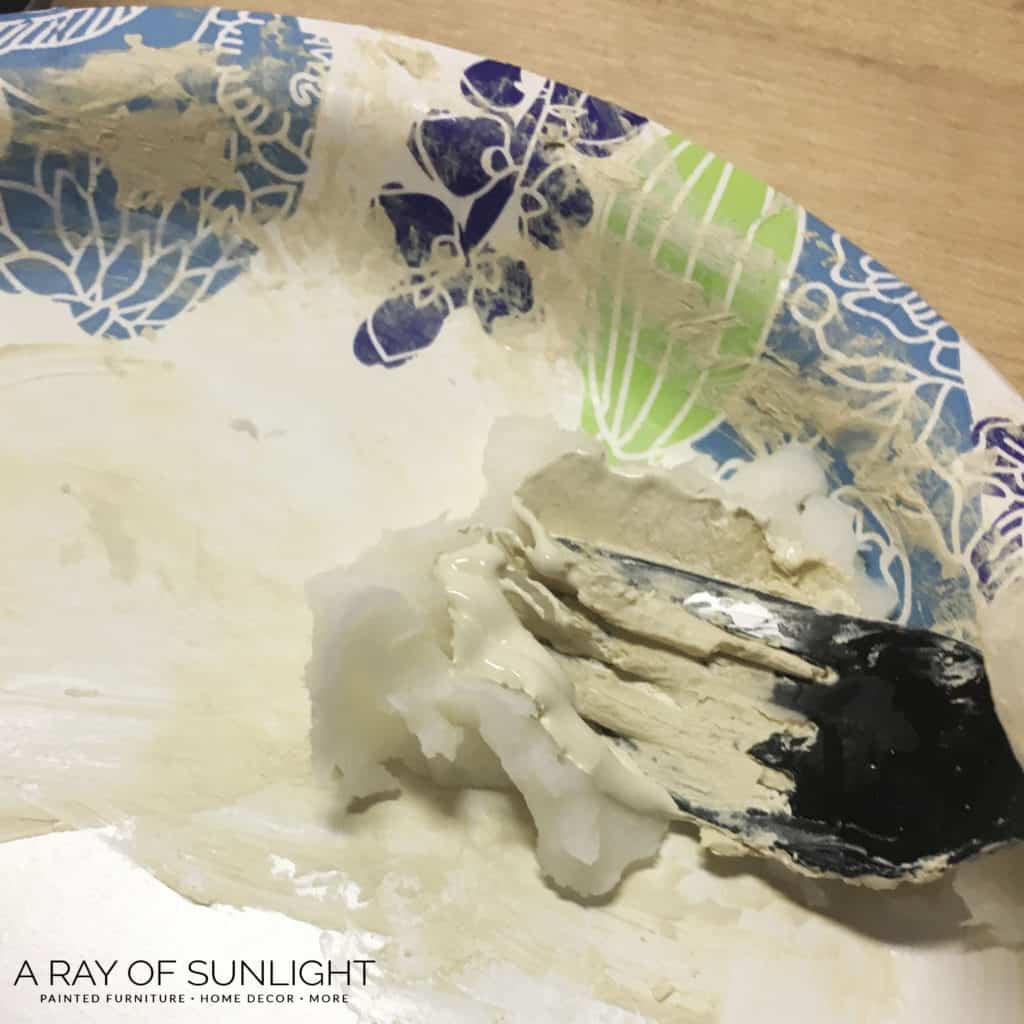
I actually chose to mix in a cream paint instead of a white paint. I wanted the wax to recreate the color of the raw wood before it was sealed. And I felt like the pure white would be too bright and too much of a contrast.
Then, I used part of an old t-shirt to rub the wax onto the sealed wood. Once the wax was dry, I buffed out the wax with another t-shirt rag.
You can also whitewash instead of using liming wax. Learn about how to whitewash furniture in this post.
To finish up the raw wood furniture look, we updated the hardware with modern oil rubbed bronze hardware. Here’s more on how to change hardware on furniture to guide you if you also want to do the same.
There you go! Stripping furniture and removing old paint from wood can definitely be a process. But I think it’s a process that is worth it. Especially when you find beautiful wood underneath and are able to show it off. Check out more antique dresser refinishing ideas here!
More Before and After Makeovers
See All >
Click any of these “before” photos below to view the “after” of that makeover.


Stripping and Repainting Furniture
After stripping paint from furniture, you can also choose to give it a fresh coat of paint for a completely new look. This is a great option if you want to update your furniture to match your current decor or don’t like the natural wood look.
Sand and prime the furniture before applying your chosen paint color. These steps will guarantee that the new paint adheres well and gives a smooth finish. Check out our guides on sanding for paint prep and priming wood for painting for more details and tips.
After the primer dries, you can apply your paint color of choice. If you’re unsure what type of paint to choose, here are our best paint for wood furniture recommendations. These best painted furniture ideas should also inspire you with different paint colors, techniques, and finishes.
And don’t forget to add a topcoat to protect your newly painted furniture! Here’s all about sealing painted furniture to know why it’s important, how to choose the right sealant, and how to apply it properly for a long lasting finish.
So that’s our complete guide on how to strip painted furniture and reveal its natural beauty! You can choose to leave it as is for a beautiful raw wood look but know that you have the option to repaint for a fresh new look.

The Easiest Way to Remove Paint from your Old Wood Furniture
Give your furniture a fresh look by stripping off paint to bare wood. This is how to remove paint from wood furniture.
Materials
Instructions
- Test the paint for lead using lead paint testing kit. Squeeze the two ends of the lead tester, shakie it to mix the liquids, and then rub that liquid onto all of the layers of paint. If it turns red or pink, then you have lead in your paint. If the liquid stays a yellow orange color, then you most likely don’t have lead in your paint.
- If you’re working with lead-based paint, remove it with a chemical stripper. Apply a thick layer of stripper with a cheap brush then cover it with plastic wrap. Let it sit for 4-12 hours.
- Scrape off the stripper and paint with a plastic scraper. Clean off the sticky residue left behind with mineral spirits and 0000 steel wool. Let your wood furniture dry completely for a day or two before doing anything else.
- To get raw wood furniture look, start by sanding the wood down super smooth with sandpaper then remove all the dust with shop vac and a tack cloth.
- Seal the raw wood with 3 coats of water-based polyurethane. And to make sure the last coat of poly leaves a super smooth finish, lightly sand it with 400 grit sandpaper.
- Once the poly is completely dry, apply a light coat of liming wax. Just mix 3 parts clear wax with 1 part of your paint of choice. Use part of an old t-shirt to rub the wax onto the sealed wood.
- Attach hardware to your raw wood furniture.
Recommended Products
As an Amazon Associate and member of other affiliate programs, I earn from qualifying purchases.


More Raw Wood Makeovers
- DIY Whitewash Dresser
- Refinishing an Old Dresser
- Coffee Table Makeover Idea
- Buffet Turned Into Bathroom Vanity
- How to Strip a Kitchen Table
Learn the Art of Updating Furniture!
If painting furniture feels overwhelming or your past attempts didn’t go as planned, this course will guide you step by step.

Follow us on YouTube to get more tips for painting furniture. Or share your project with us on our Facebook Group and be part of our community. See you there!
Hi! Your dresser looks amazing! Can you use this for a dining table as well, or does the sealant need to be something more? Thank you!
Hey Jillian!
For a dining table I would use oil based poly instead of water based. You’re going to need extra protection with all the wear and tear a kitchen table gets! General Finishes has some really good and durable oil based poly!
The most amazing is the final color of this dresser and raw wood look. If I use an oil based poly in a dining table isn’t it going to look yellow /orange over time? How can I achieve this great color? Would it also be better to avoid wax? Thanks!
Yeah, the oil based poly will definitely amber over time, compared to the water based poly.
You basically just need to decide if you want more durability or if you want the color to be right.
But yeah, for a dining table I would definitely avoid wax.
I’m trying to strip handrail on stairs
Love the look of this dresser! I am getting ready to redo a table. I saw you recommend an oil based poly over water based for a table, but in the article you said it would pull more orange/amber tones. Would you recommend mixing in more cream paint to offset this? Also, do you know what color and type of paint you mixed in? I”m scared I’ll get to the last step and use the wrong color and type of paint and mess it up! Thank you for this detailed post!
Hey Laura!
That’s such a good question! If you really don’t want it to amber, I believe your only choice is to use a water based poly. But I would make sure to use at least 4-5 coats of poly if you go with water based for a table. And then be more careful with it. I don’t think the cream paint would help offset the ambering at all, because the ambering would be on top of the cream paint. I honestly have no idea what exact paint I mixed into the wax, but it wasn’t anything super special. It might have been the color Heavy Cream in latex paint from home depot. But I’m not 100% sure.
Goodluck on your project!
Your articles are awesome! Thank you for sharing how to remove paint from old furniture!
Hi Natalie, loved your post! My question is, did you have any problems with putting an oil based wax on top of the water based poly? Does wax ever cause yellowing? Donna-Rei
Hey Donna! I haven’t had any problems in putting oil based wax over water based poly. If you’re worried about it, you can wait 48 hours after the poly completely dries to make sure you don’t have any issues. I’m not 100% sure if it does or doesn’t cause yellowing though.
Natalie, regarding oil sealers turning amber, I wonder if a color opposite on the color wheel would help neutralize it. Depending on just *how amber, possibly a violet or if more of an orange, a blue…..? It’s the kind of thing that you add a color in preparation for a sure thing – the future yellowing.
Your desire and effort to share your wealth of information in such detail is appreciated. Thank you.
Hey Linda! You might be onto something! Thank you for sharing!
I have a very large kitchen table that I refinished 6 years ago. Sealed it with 4 pr 5 oats of water based poly. The table is vigorously tested daily by our large family of eight. It is washed with dish soap and rinsed with water several times a day. It has held up beautifully! I thought I would need to light sand and re-coat occasionally, but no. Enough layers of water based poly will hold up to everyday use.
Can you skip the lead test and go ahead with the citristrip?
Yep! Just proceed as you would if it was lead based. Making sure to not sand it so dust gets in the air, etc.
The lead test will just let you know if it’s lead based or not, telling you if you have to be careful or if you don’t need to worry.
Hi, love this! Currently doing it to a console table. Question though… with the wax process afterwards… i thought one would have to re-wax it a year afterwards and so on. Is this true?
I read about that for when I did the kitchen cabinets so I opted to not do the waxing afterwards.
Hey Julia!
Yep, you’re right. I would never put wax on kitchen cabinets because of the heat and constant abuse they get. Furniture doesn’t get as much traffic and abuse, so you’re more safe to use wax on it, and it will last longer than on a kitchen.
If you don’t want to use wax, you can do a whitewash instead.
I am doing a dresser that is very close to this one. After stripping off the white paint, the drawer fronts look reddish. Maybe in the past someone finished it with a cherry stain? Is there any way to tone the red down? Do you think after lime waxing it tone down that red look?
Hey Jamie!
Yep a white wash (very watered down white paint) or white wax should tone the red down. Best of luck!
What about this technique on camper cabinets? I’ve been renovating one with wood cabinets with a wood varnish and now some of the varnish is starting g to come off. I didn’t want to paint them and love this type look.
Hey Ashley!
As long as the cabinets are wood, this technique will work!
Best of luck!
Natalie
I have a similar piece that I picked up recently and would like to refinish. It’s really beautiful and is at least 100. years old. Unfortunately the previous owner spray painted It with dark blue paint and then added a coat of poly. Would Citristrip work on spray paint? What would you recommend me using beforehand to remove the polyurethane? Thank you so much!
Hey Leslie!
Citristrip will remove the polyurethane and the spray paint. Just brush a thick layer of citristrip on it and let it go to work for you.
Best of luck!
I plan on stripping a similar old dresser that was painted probably in the 70’s or 80’s to make into a cottage bathroom vanity with a vessel sink on top. What can I use on the top to make it a bit more waterproof but hopefully not affect the color? (Hoping to keep it similar color to yours – like a natural wood/white wash/grey undertones)
Hey Kira!
Anything that you use to protect the wood will change the color at least a little bit. I would at least poly it and then you can add a white wash instead of wax to help lighten it up.
Best of luck!
Love how this dresser looks! How much citristrip does it take to cover a piece this size.? I’ve never stripped anything so was curious as to how much stripper to purchase. Thanks!
Hey Rhonda! I think I went through 1 or 2 of the 1/2 gallon size containers when all was said and done.
I had been saving your post for awhile and just decided to jump in with an old spindle style bed frame. Found 4 layers of paint and I am doing my second coating of Citristrip. My question is if I can overdo the number of times I apply the citristrip? Here in Colorado the air is SO dry that I found it had dried out overnight, even when covered with plastic. (I THINK the wood underneath might be mahogany so, I am super excited. ) I have a second layer brewing right now and laid the Citristrip on even thicker….
Hey Diane!
Nope I don’t believe that you can overdo how many times you use Citristrip, as long as there is still something to remove. Best of luck!
Hello! This is beautiful! Can it be done with laminate wood?
Hey Adriana!
I’m honestly not sure if you could do this on laminate. Sorry!