How to Paint a Wooden Bench


Have a wooden bench that you want to paint and put outside? In this post, we’ll share how to paint a wooden bench for outdoor use with all-in-one products from Heirloom Traditions Paint.
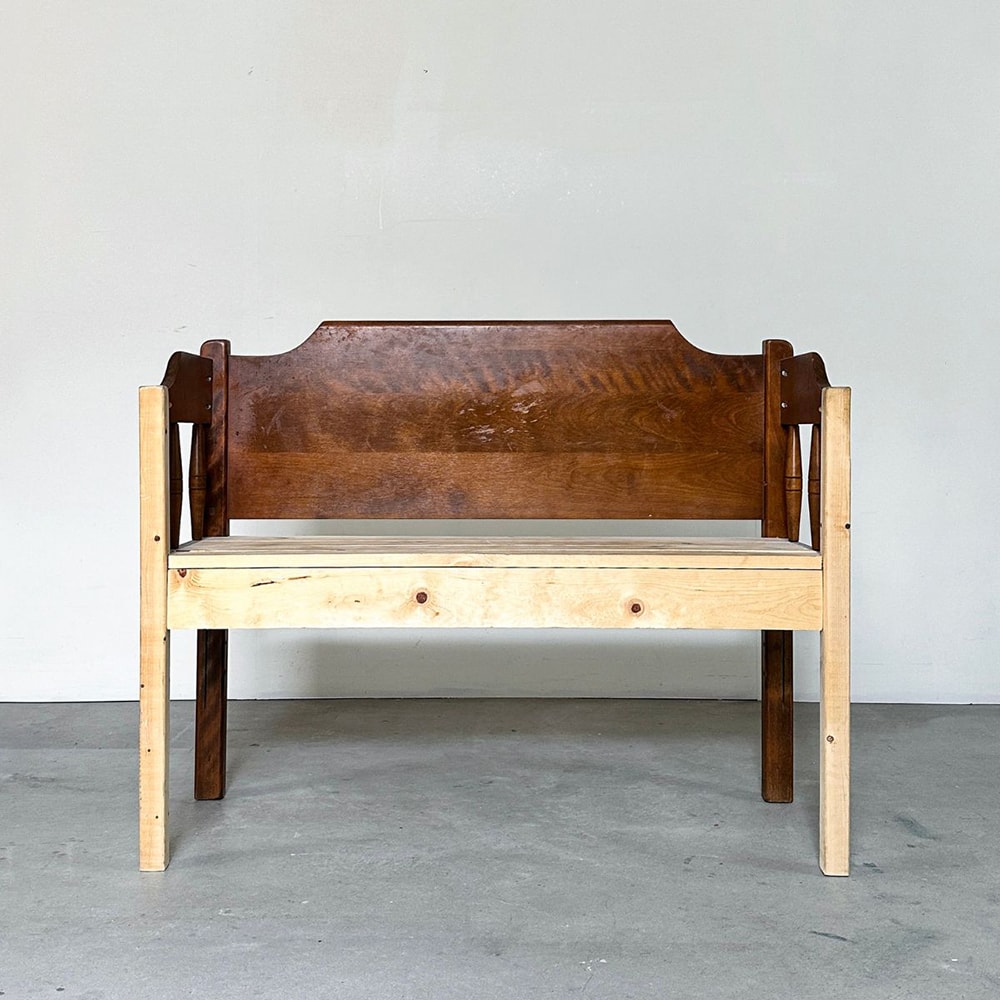
These all-in-one products don’t need topcoats, so you’ll save time and money on your project. Plus, they are rated for outdoor use! Here is what our bench looked like before we painted it.
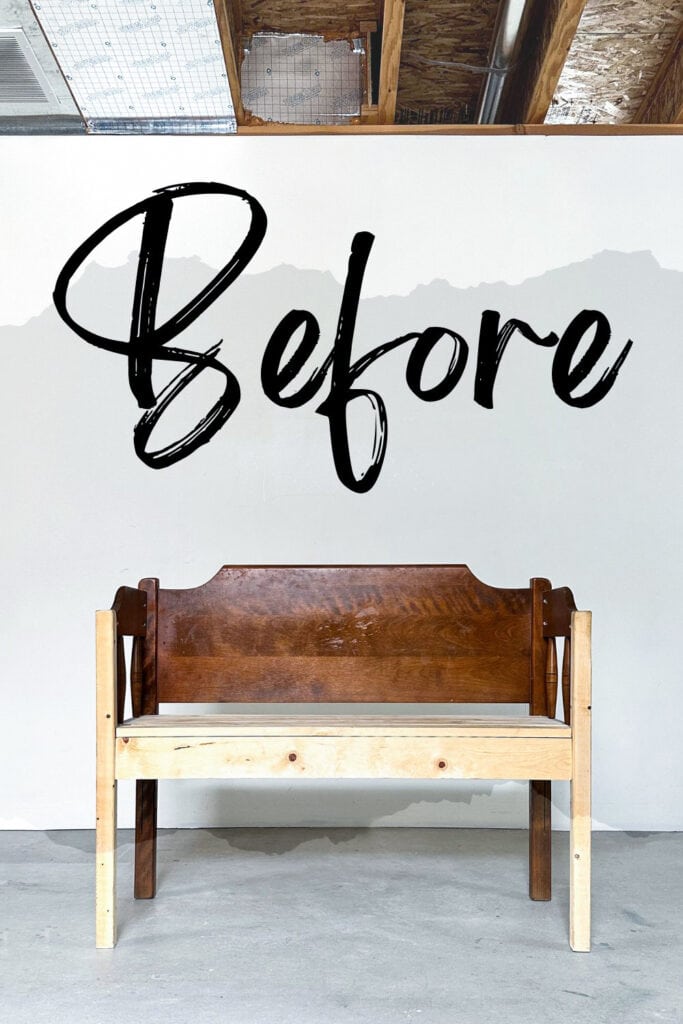
I can’t believe it has been over 5 years since I built this bench out of a headboard and footboard and some pine wood. Yep, I was finally ready to paint it!

If you want to build a bench from a headboard and footboard, check out our other headboard bench tutorial, how to make a bench from a headboard and footboard. We go into a lot of detail on how to make the bench in that post and talk a little bit about painting it.
But in this post, we’re going into a lot of detail on how to paint the bench for outdoor use, without having to use topcoats on the paint and stain. First, here are the supplies that we used.

Supplies Used for Painting a Wooden Bench
As an Amazon Associate, I earn from qualifying purchases. I also may earn from other qualifying purchases with other companies or get free product to review and use. All opinions are my own.
- Krud Kutter
- KwikWood
- 80 and 150 Grit Sanding Screens (Use code RAY10 to get 10% off your order)
- Medium+ Grit Pro Foam Pad (Use code RAY10 to get 10% off your order)
- Shop Vacuum
- Plastic Wood Filler
- Mineral Spirits
- Heirloom Traditions All in One Stain
- Chip Brush
- Lint Free Rags
- Heirloom Traditions All in One Paint in Putty Color
- Wagner Paint Sprayer
- Clear Shellac
- Painters Tape
- Pre-Taped Plastic
- Mini Hand Sander
Before Painting Furniture
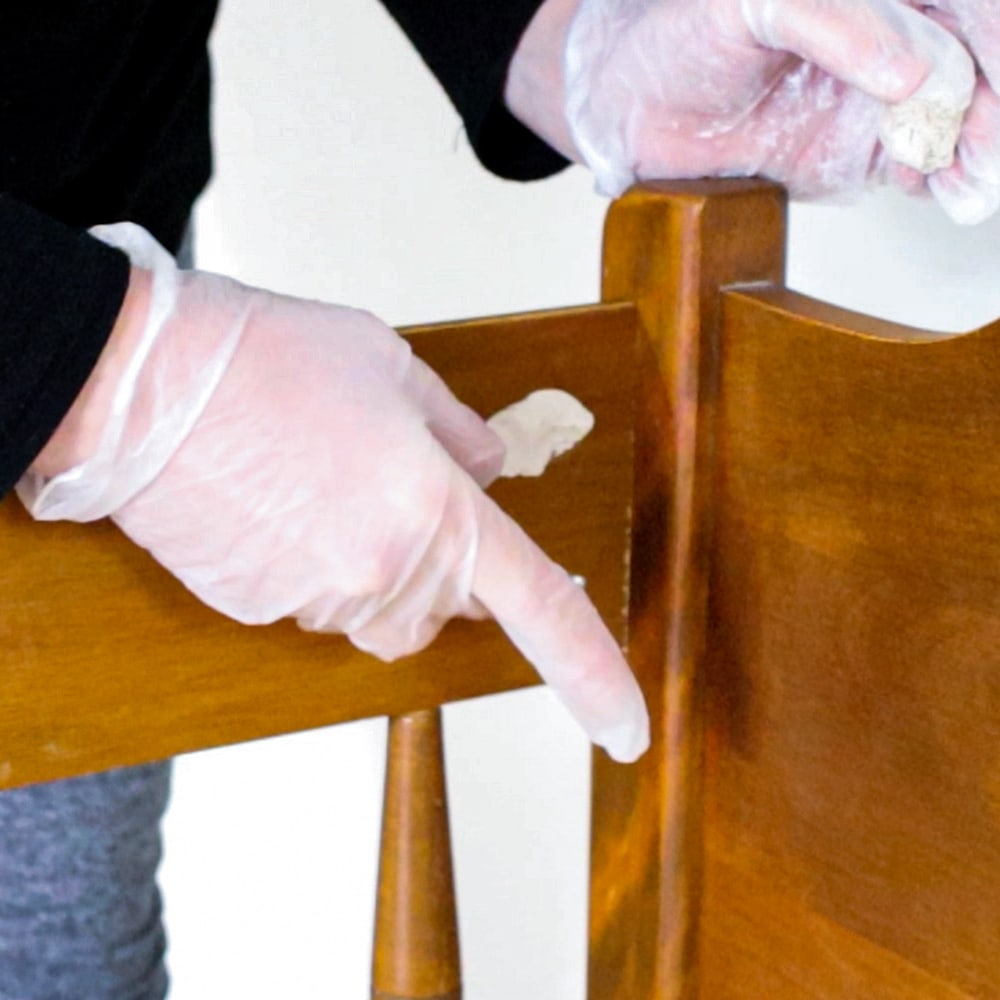
First I cleaned the bench off with some Krud Kutter and an old damp rag. We have to get all of the grease and grime off before doing anything else so the paint and stain will stick properly. Learn more about cleaning before painting furniture if you’re not sure how to clean your furniture.
Then I filled in the pocket holes that I made when I built the bench. I used my favorite KwikWood filler to fill them in so I wouldn’t have to fill them multiple times or wait days for it to be dry. Check out this tutorial on how to use KwikWood if you’re not familiar with using this wood filler.
While I waited for the KwikWood to dry, I sanded the raw pine wood smooth. We used this as is for a couple of years, as a bench in our mudroom, so it looked decently dirty. I started with 80 grit sanding screens, then used 150 grit screens to make it feel smooth again.
The sanding screens are my favorite type of sandpaper of all time, except for the foam pads. They last so much longer and sand faster. Here’s our list of the best sandpaper for furniture painting to learn more about the different types of sandpaper there are.
And then I took a break for a couple of months! I was overwhelmed by all the things I needed to do on this piece. Ooops! When I got back to work on it, I sanded the KwikWood smooth with 80 grit sanding screens.
Then I realized that the pine had a lot of imperfections, gouges, and knot holes that should be filled anywhere that I planned to paint. So, I filled those in with this plastic wood filler and waited for it to dry.
Then I sanded the wood filler down flush with a medium+ grit pro foam pad so I could easily sand the curved edges on the posts. I removed all of the dust with a vacuum and brush attachment.
Heirloom Traditions All in One Stain
And then we moved the bench out to the garage for this stinky part. I mixed mineral spirits into some Heirloom Traditions All in One Stain in the walnut color. The mineral spirits thinned out the gel stain a little bit so it would be easier to work with on the raw wood.
Here’s our list of the best wood stains for furniture to explore what type of wood stain is best suited for different pieces of furniture.
This was my first time using this Heirloom Traditions stain, and I have to say, it worked pretty well! It’s an all in one stain, so there is a built in topcoat. It is also oil based, flammable, and stinky, hence why I moved outside to use it.
I also tested it out over the existing walnut finish, and it matched perfectly and made the old finish look new again! Check out my detailed blog post about Heirloom Traditions All in One Stain to learn more.
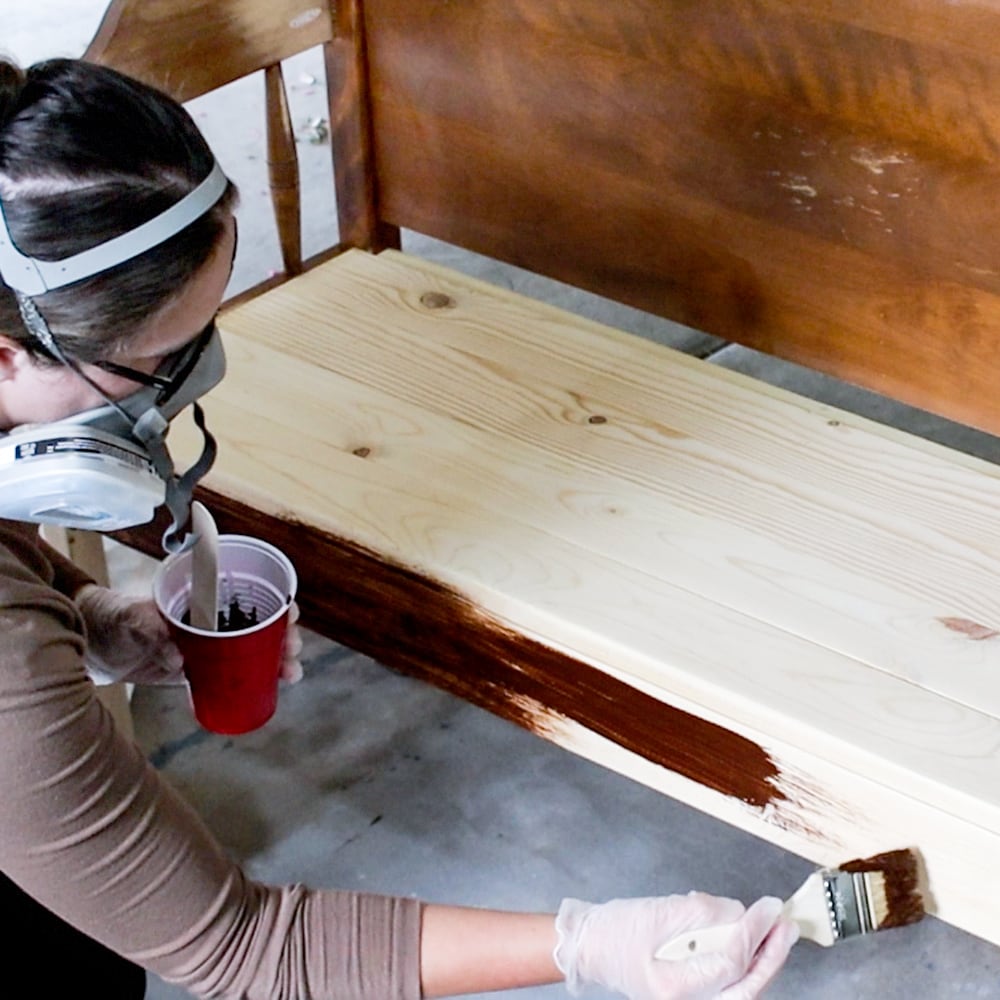
I let the stain dry overnight, and I made sure to lay my stained rags and brush outside to dry completely before throwing them away to prevent any fires.
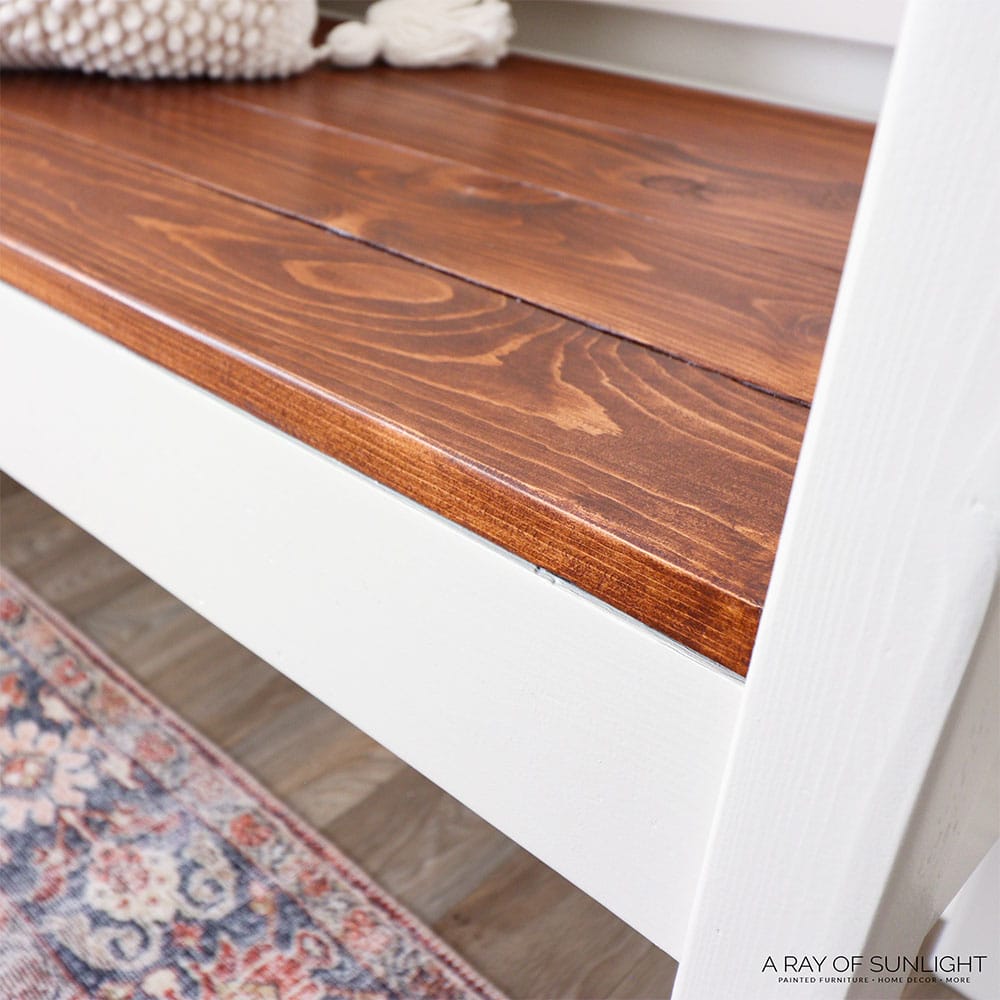
I ended up staining the seat of the bench 3 times so the raw wood had a thick coating. I’m planning to have this bench outside so I want to give it the best chance of holding up as I can.
Each time I used a chip brush and some lint free rags to apply a very thin coat. And I let it dry for about 6 hours between coats. Check out my step-by-step guide on how to stain wood furniture.
Heirloom Traditions All in One Paint
Then I let it dry over the weekend before bringing it back inside and taping off the seat as carefully as I could while praying “Please be a good tape job, please work!” haha. Check out this post to learn how to prevent paint bleed through painter’s tape.
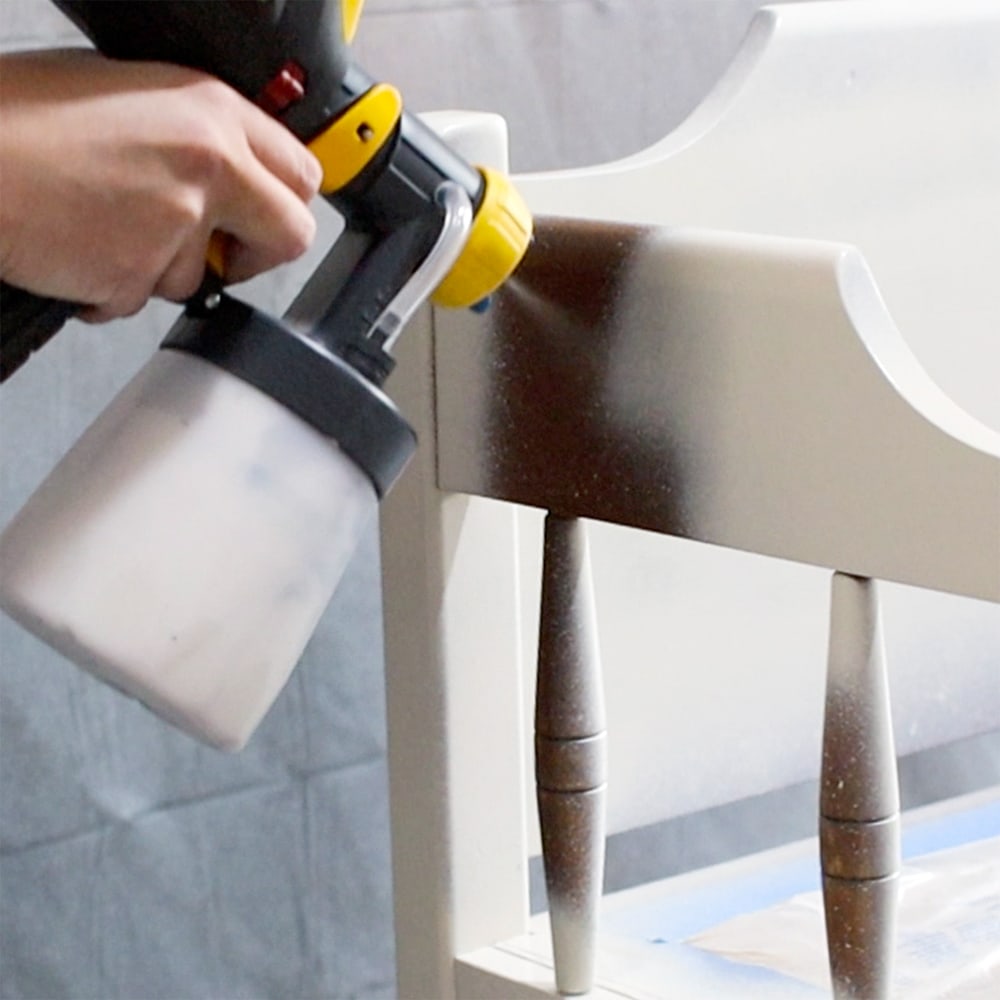
I mixed up some Heirloom Traditions Paint in the color Putty, into my Wagner paint sprayer. This paint is also an all in one paint that has a built in topcoat and primer, it’s very durable and actually doesn’t need the surface to be sanded before using it.
It creates a beautiful finish if thinned out with 20% water and then sprayed on with this sprayer. Check out our blog post about how to thin paint for Wagner sprayer so you can get the most out of your Wagner sprayer and create professional-looking results.
Here’s more on how to use Wagner FLEXiO 3500. And check out my honest Wagner 3500 Paint Sprayer review here.
Would you like to save this?
I sprayed on 1 coat all over and let the paint dry for a couple of hours. When I came back, I saw more imperfections in the pine wood, so I filled those in again with wood filler, and when it was dry, I used this new to me mini hand sander to sand the wood filler smooth.
Then I cleaned up the dust again. Check out this Heirloom Traditions All In One Paint review to get an overview of my personal experience with this paint.
Stopping Stains From Coming Through Paint
And in the process, I found some bleedthrough. I knew I was being lazy when I skipped priming, even though I was using a light color. And it came back to bite me.
So, we moved it back outside and sprayed a couple of light coats of clear shellac onto the bench. Yes, this paint has a built in primer, but it’s not a stain blocking primer. So, when painting light colors on wood, there is always a chance of bleedthrough.
Learn more about how to stop bleed through stains, and here’s our blog post about the best primers to stop tannin bleed to better understand each product so you can easily decide which one is best for your next project!
We let the clear shellac dry overnight and then I finally got the last coat of paint on the next day. And then the most satisfying part, other than seeing the before and after… I removed the tape and plastic to reveal what it all looks like now!
Watch the full process in our YouTube video below:
More Before and After Makeovers
See All >
Click any of these “before” photos below to view the “after” of that makeover.


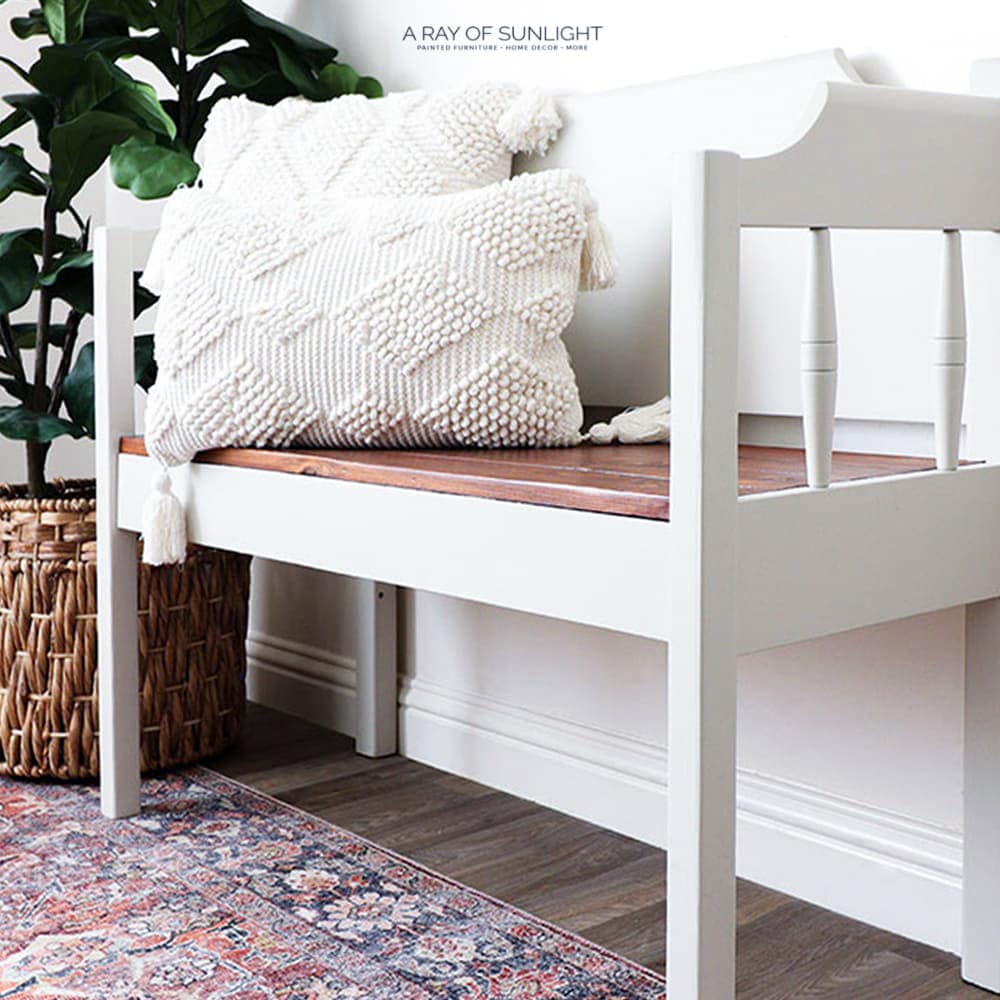
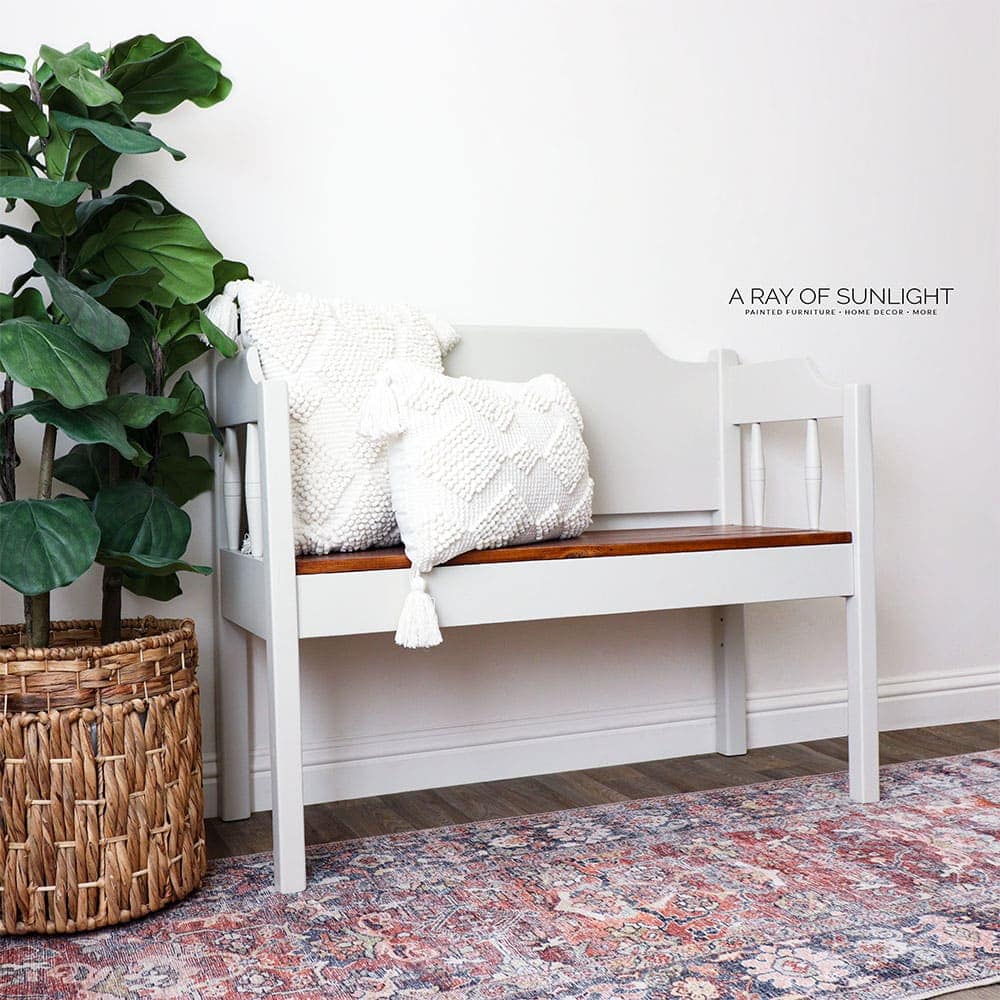
Why did I wait 5 years to paint this thing? It looks so much better hahaha! Now for the fun part, we’re going to put this outside once the paint and stain cures, and we’ll see how it holds up!
Check out another makeover of painting a wood bench with chalk paint here. Here are more painted benches ideas for inspiration! For chair makeovers, here are chalk painted chair ideas and painted dining chairs ideas you can do.


What color should I paint my bench?
In this makeover, we used light taupe as the color for our wooden bench. Classic white or off white colors can give your bench a clean and timeless look that will match any outdoor decor. For more neutral colors, check out these neutral furniture paint colors!
But there are so many other options to choose from! If you want a pop of color, consider painting your bench in a bold red or vibrant blue. These colors can also add a playful and fun touch to your outdoor space.
Another factor to consider is the surroundings of your bench. If it will be placed in a garden with lots of colorful flowers, a neutral color may be best so as not to clash with the natural beauty of your surroundings.
On the other hand, if your bench will be placed in a more minimalist and modern outdoor space, a brighter color may be just the thing to add some interest and contrast.
Can I paint over an already painted wooden bench?
Sure, you can definitely paint over an already painted wooden bench!x In fact, it’s a great way to give your old bench a new look without having to replace it. Just make sure to properly prepare wood for painting before applying your new coat of paint for the best results.
Our post on repainting furniture will guide you through the process step by step. And if you’re feeling adventurous, you can also try out different painting techniques like distressing furniture or stenciling furniture to give your bench a unique touch.
If your already painted bench has a glossy finish, you may need to sand it down to create a better surface for the new paint to adhere to.
Repainting an already painted bench is definitely an awesome opportunity to switch things up, especially if you’re kind of tired of the old color. So don’t be afraid to change up your bench’s look with some fresh paint!


How to Paint a Wooden Bench
Do you want your wooden bench to look fresh and updated? Check out our step by step guide on how to paint a wooden bench.
Materials
Instructions
- Clean the bench with Krud Kutter and an old damp rag. Then fill in any damage or holes with KwikWood or Wood Filler. Let dry.
- Sand any raw wood smooth, starting with 80 grit sanding screens and 150 grit sanding screens.
- Then sand the wood filler down. Sand curved edges with a medium+ grit foam pad and remove all the dust with a vacuum and brush attachment.
- Move the bench outside. Then mix mineral spirits and Heirloom Traditions All in One Stain in walnut color and apply it to the bench. Apply 3 coats of stain, letting it dry between coats for a few hours. Let it dry for a couple of days.
- Tape off the seat and then thin out Heirloom Traditions All in One Paint in Putty color with 20% water. Spray 1 coat all over and let the paint dry for a couple of hours.
- If there are imperfections in the pine wood, fill it again with wood filler, and when it dries, sand it and clean up the dust again. If you see bleedthrough stains coming through the paint, spray clear shellac onto the paint and let dry overnight.
- Apply the last coat of paint the next day and remove the tape and plastic. Let the paint and stain cure for 30 days before putting it outside.
Recommended Products
As an Amazon Associate and member of other affiliate programs, I earn from qualifying purchases.


More Painted Furniture Makeovers
- Redoing End Tables
- Painting Furniture Grey | Without Sanding or Priming
- Painting Furniture Black – No Topcoat!
- Painted Sewing Table With Silk All-in-One Mineral Paint
Follow us on YouTube to get more tips for painting furniture. Or share your project with us on our Facebook Group and be part of our community. See you there!
This is such a cute bench, I love that you made it too! Tanya @twelveoeightblog
Thank you for sharing your links with us at #272 SSPS Linky. See you again next week.
What a great project! Thank you so much for sharing at this week’s Tuesday Turn About link party!
Your bench re-fresh turned out great! It’s a lot of work to fill holes but the results always make it worthwhile with a truly beautiful finish. Great job!!! So happy to feature your post at this week’s Share Your Style #399 for you. <3 Glad you stopped by! I'll be heading over to read about when you refinished your buffet. I just bought one second-hand and am thinking I may paint it at some point; it's really big and really stands out in our small dining room. 😉
Enjoy your weekend and keep cool,
Barb 🙂