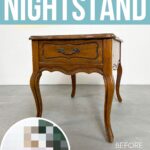
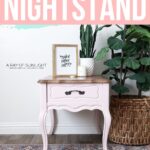
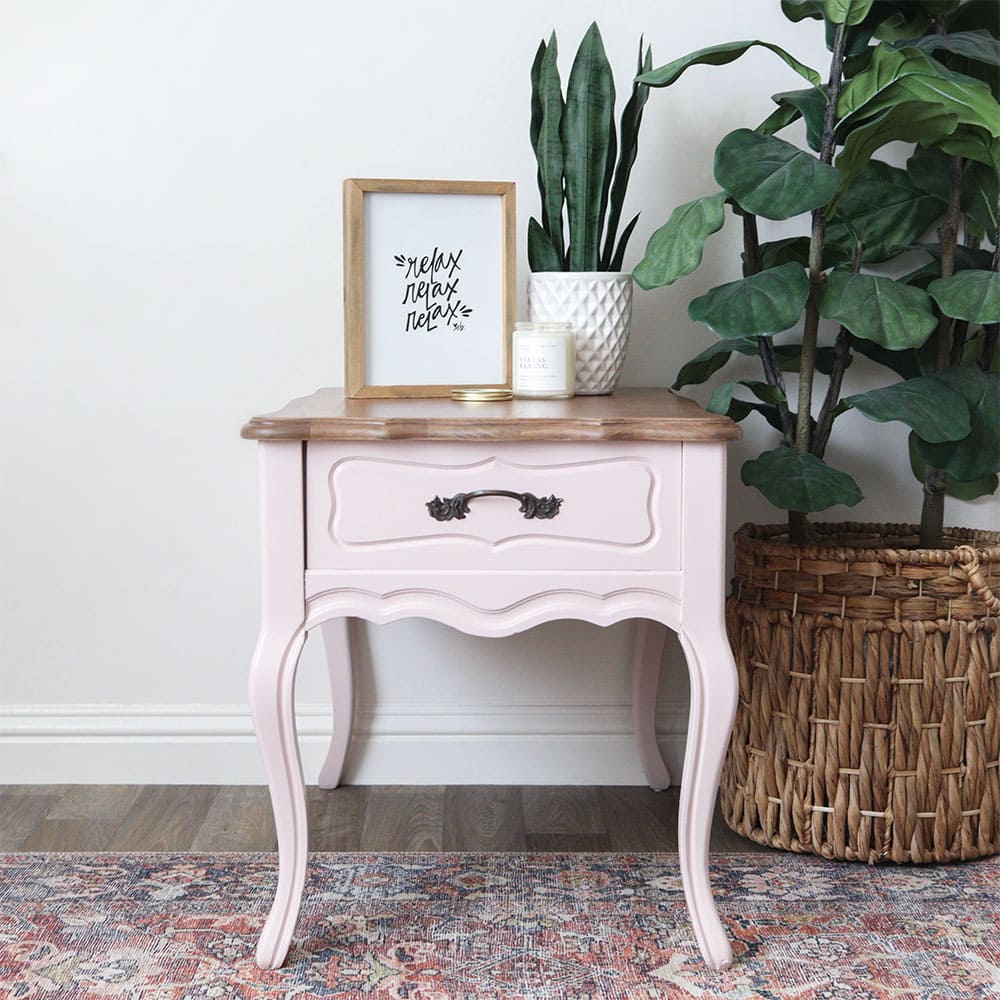
Pink Painted Nightstand
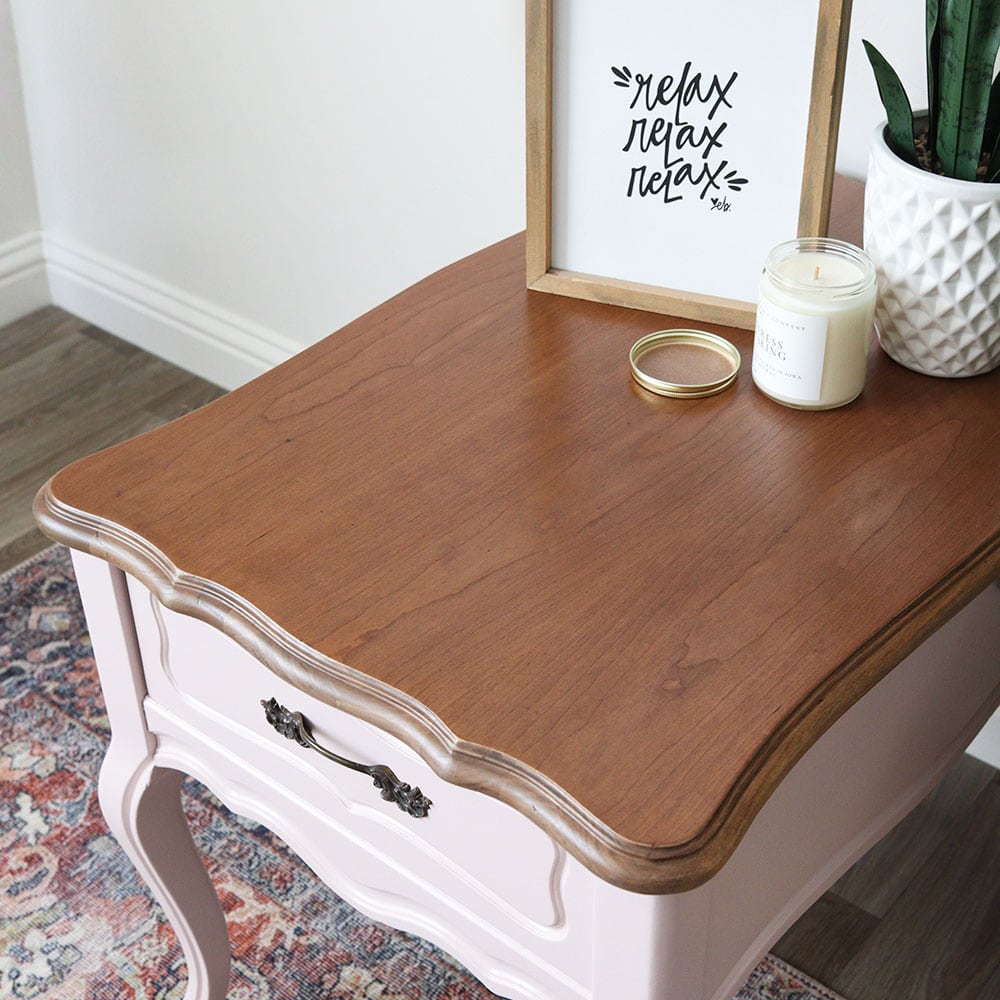
Are you looking for a budget-friendly paint to give your furniture pieces an amazing makeover? This blush pink painted nightstand makeover is proof that this paint can transform any piece of furniture into something beautiful.
In this blog post, I’ll be sharing my experience with chalk painting furniture using Rustoleum Chalked Paint. So read on if you’re interested in learning more about how to use it to update your old furniture!
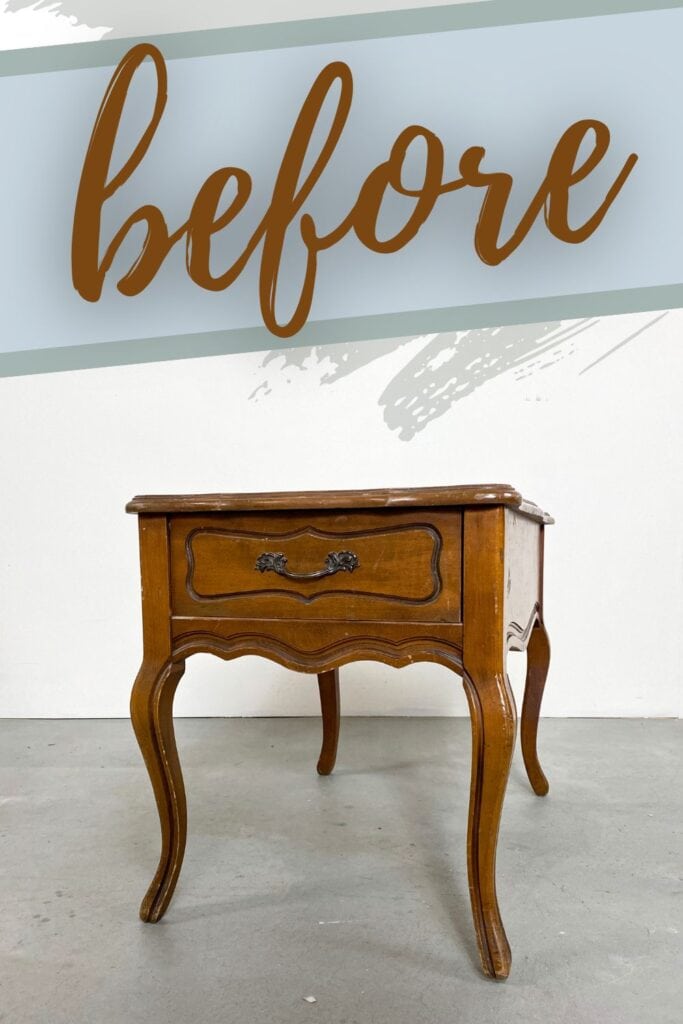
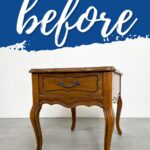
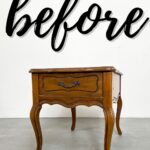
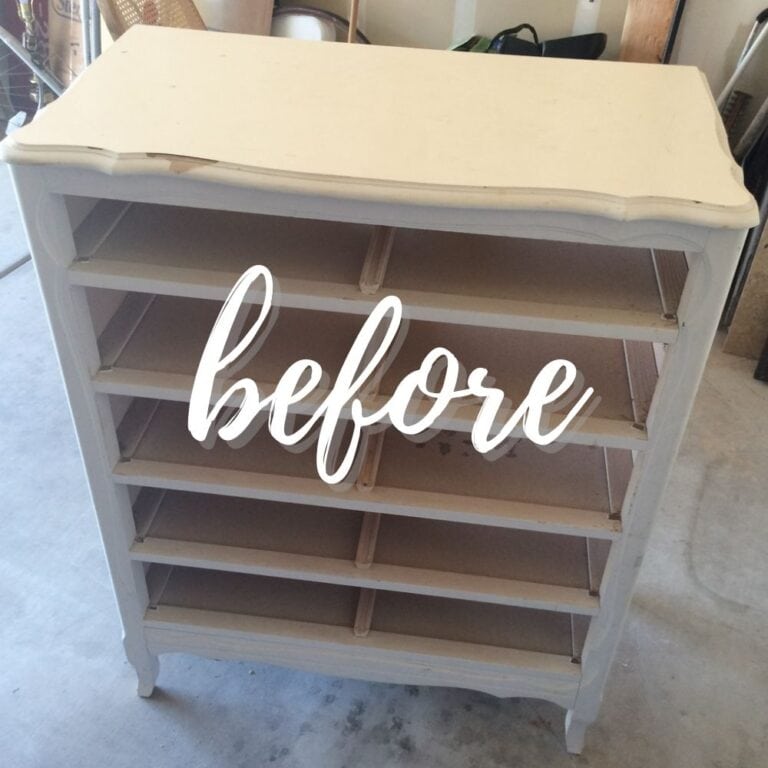
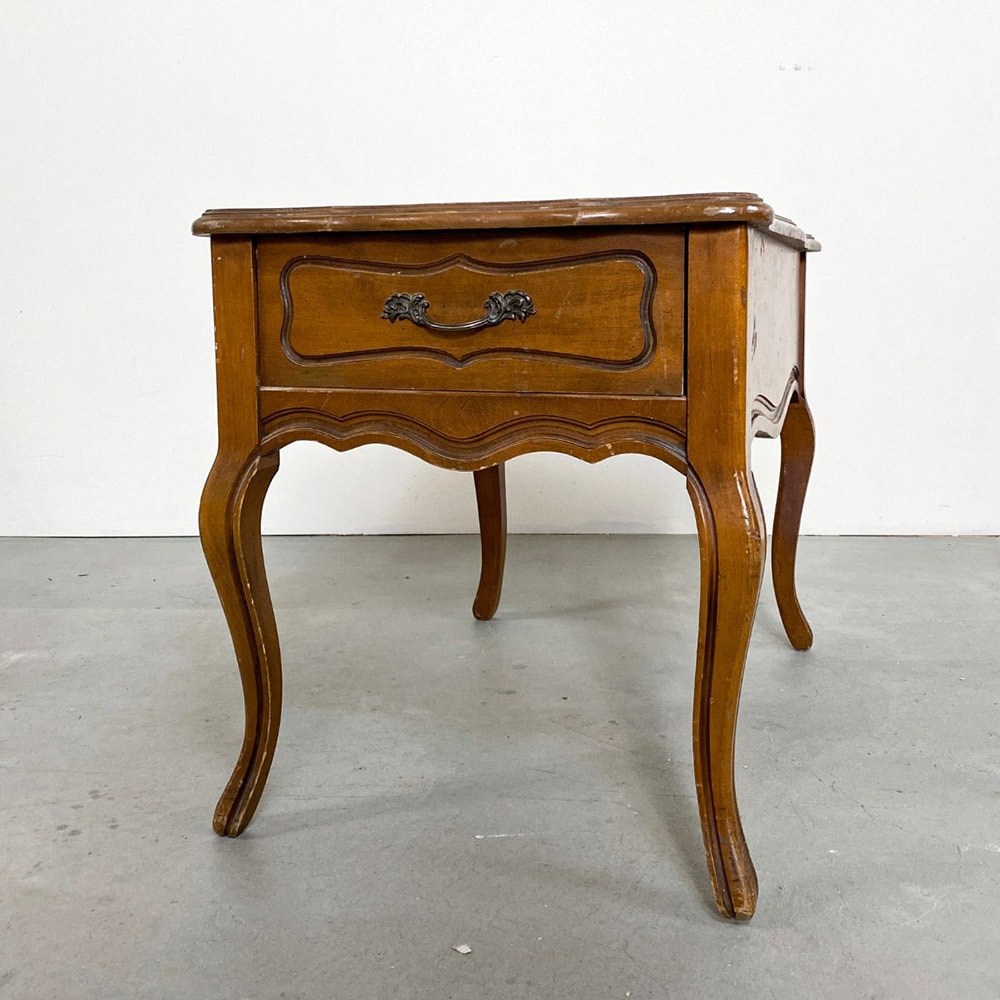
This end table started out looking like the photo above. Then we did this Dixie Belle Silk Paint Review on it. Months later I used it to compare SurfPrep VS Festool Sanders to each other, and then it was left like this.
Giving furniture a makeover with paint is an easy and inexpensive way to transform any room. And this blush pink painted nightstand makeover proves that you can take a piece of furniture from drab to fab!


Supplies for Pink Painted Nightstand
As an Amazon Associate, I earn from qualifying purchases. I also may earn from other qualifying purchases with other companies or get free product to review and use. All opinions are my own.
- Fine Grit and Medium+ Foam Sanding Pads (Use code RAY10 to get 10% off your order)
- Festool Sander
- Stripwell QCS stripper (Use code SUNLIGHT10 to get 10% off your order of Stripwell QCS!)
- 220 Grit Sandpaper
- Waterbased Special Walnut Stain
- Rag
- Tape
- Pre Taped Plastic
- Clear Shellac
- Rustoleum Chalked Paint Blush Pink
- Sprayer
- Wood Filler
- Shop Vacuum
- Tack Cloth
- Varathane Waterbased Polyurethane in Semi Gloss
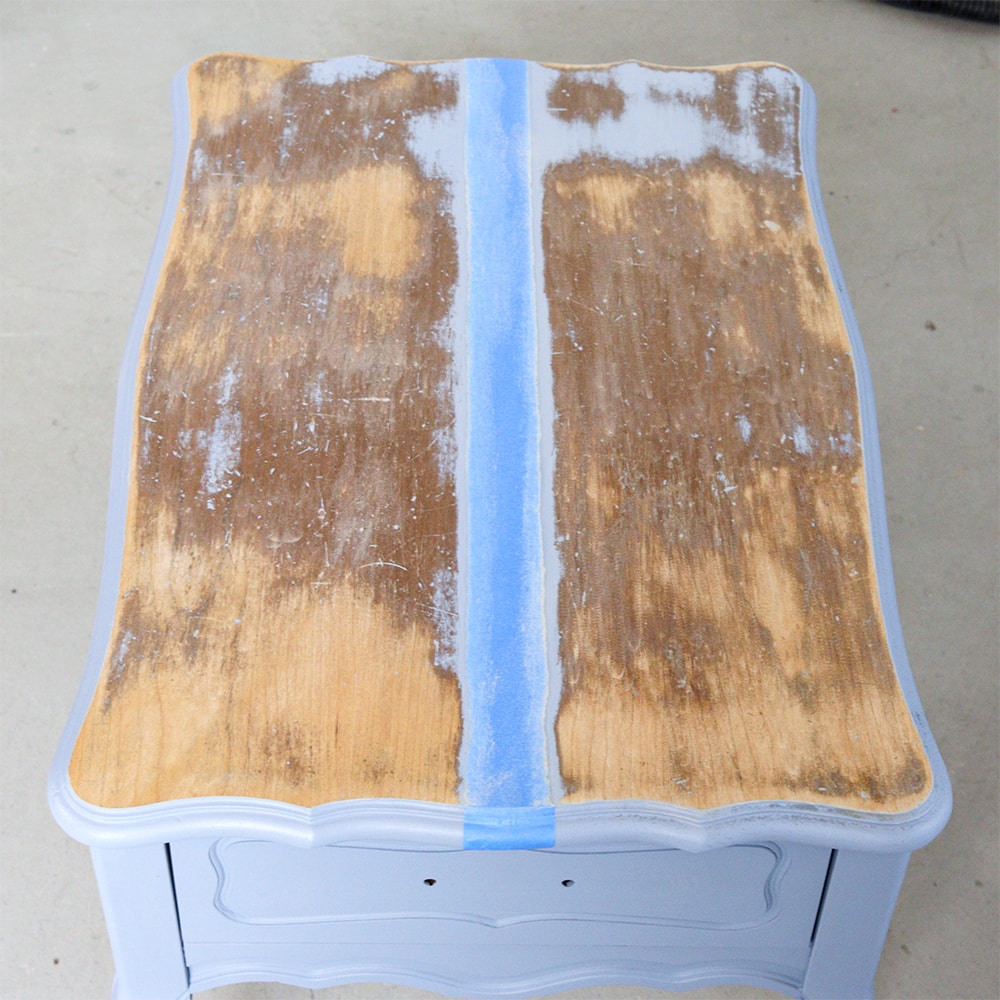
Preparing The Nightstand for Paint
So, to start this makeover, I finished sanding down the top to bare wood, and I sanded the rest with a fine grit foam pad and Festool Sander to smooth out the brush marks from the old paint job.
Check out my Festool RTS 400 REQ Sander Review here.
Learn more about the importance of sanding before painting furniture here.
And since I hadn’t used this piece to test out enough stuff, I used some Stripwell QCS stripper (use code SUNLIGHT10 to get 10% off your order of Stripwell QCS) to remove the paint in the grooves on the top edge, and in the few little gouges in the middle area.
Check out this Stripwell QCS review to have an overview of what it is, how it works, and my experience of using it on furniture.
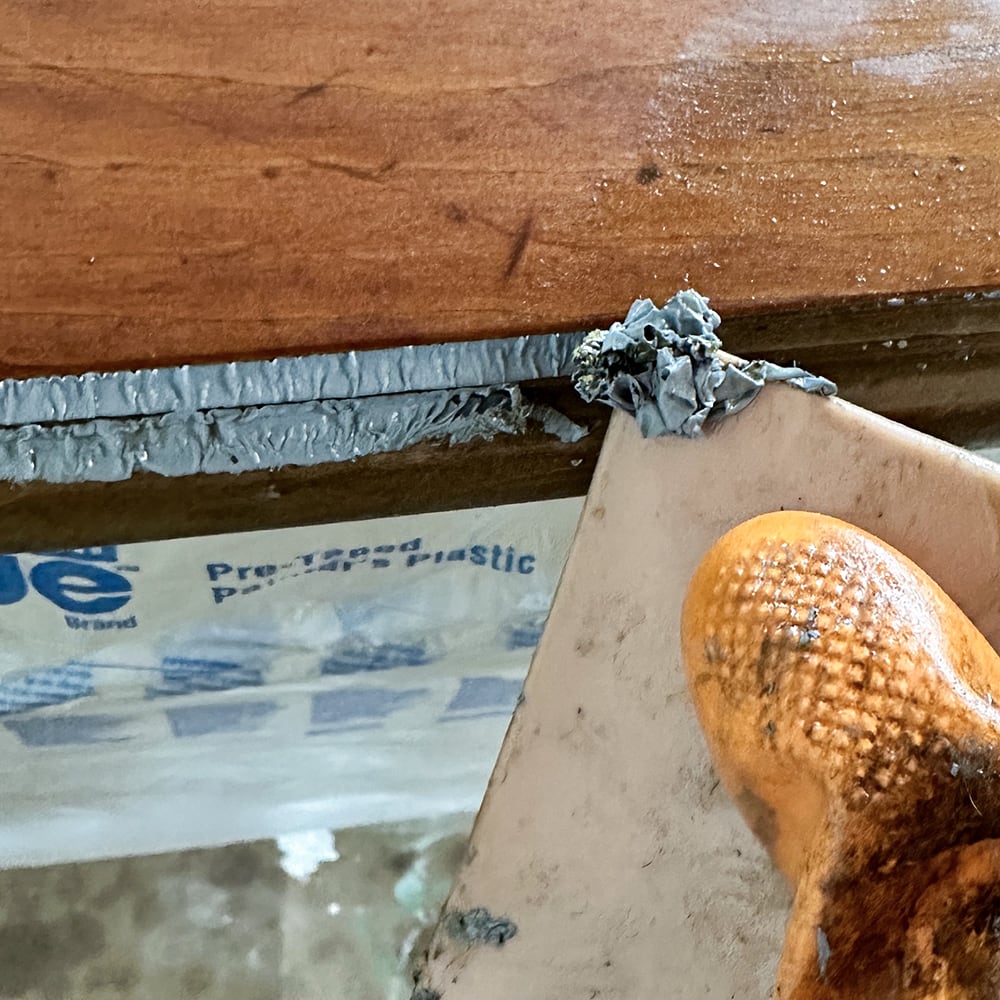
This stripper claims that it works on vintage finishes, and I’ve had great success with it so far, but I wanted to see how it worked on a modern paint job.
Sure enough, it worked very well! As time goes on this stripper is becoming my favorite!
If you are a beginner at DIY projects and don’t have any idea about stripping furniture, you can check out our blog post to learn how to strip paint from wood furniture.
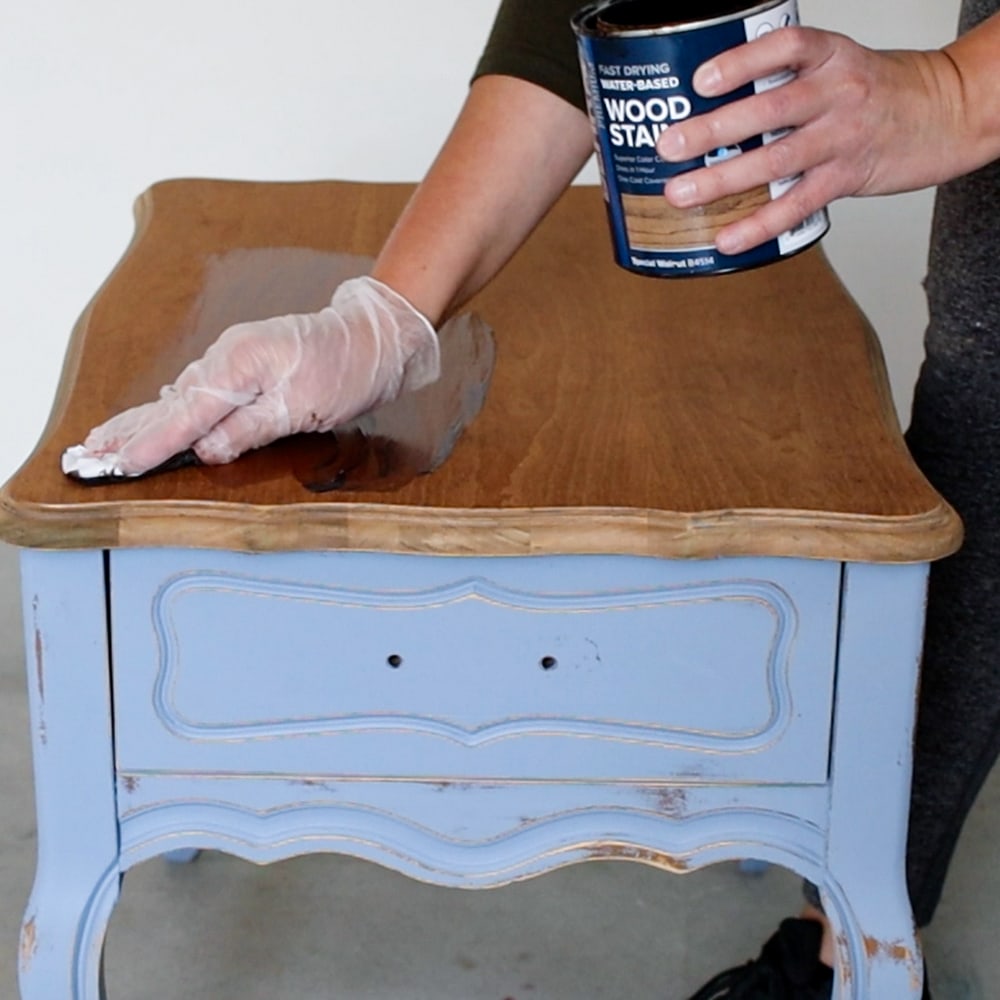
Staining Wood with a Rag
Once the wood was dry, I lightly sanded it smooth with 220 grit sandpaper, and then I stained the top with some waterbased special walnut stain.
If you want to explore what type of wood stain is best suited for different pieces of furniture, here’s our blog post about the best wood stains for refinishing furniture.
I just used a rag, dipped it into the stain, and rubbed the stain very quickly onto the top, trying to rub it on with the lines in the wood. Waterbased stain dries very quickly, so I worked as fast as I could.
Then I wiped off the excess stain. Easy peasy and no harsh fumes or flammability to worry about.
Check out this blog post to learn more about how to stain wood with a rag.
Then I let the stain dry for a few hours, and then taped some pre-taped plastic around the top so I wouldn’t get any paint on it. Learn more about what is the best painters tape here and how to prevent overspray when painting furniture to protect furniture surfaces.
Benefits of Priming Before Painting
Since this is a light color, and some of the table was sanded to bare wood, I couldn’t find any excuse to skip the priming step. So, we took the table outside and sprayed a couple of coats of clear shellac onto the table.
The clear shellac helps stop bleed through stains that come from wood or stain and show up in the paint… and no matter how many coats of water based paint you use, the stains will keep showing up.
Here’s our blog post about the best primers to stop tannin bleed to better understand each product so you can easily decide which one is best for your next project!
And once you put a clear topcoat over the paint, they get worse. The clear shellac also helps chalk paint stick way better to furniture, so it’s a win win!
We let the shellac dry overnight (and actually for at least a week before we got back to this project…)
Using Rustoleum Chalked Paint
I picked out this really cute pink from Rustoleum Chalked Paint, called Blush Pink. This is my first time ever using Rustoleum Chalked Paint on a makeover, so let’s see how it compares!
Read through my Rustoleum Chalk Paint Review to learn more.
Check out our types of furniture paint post to see what other amazing paint there is to use on furniture.

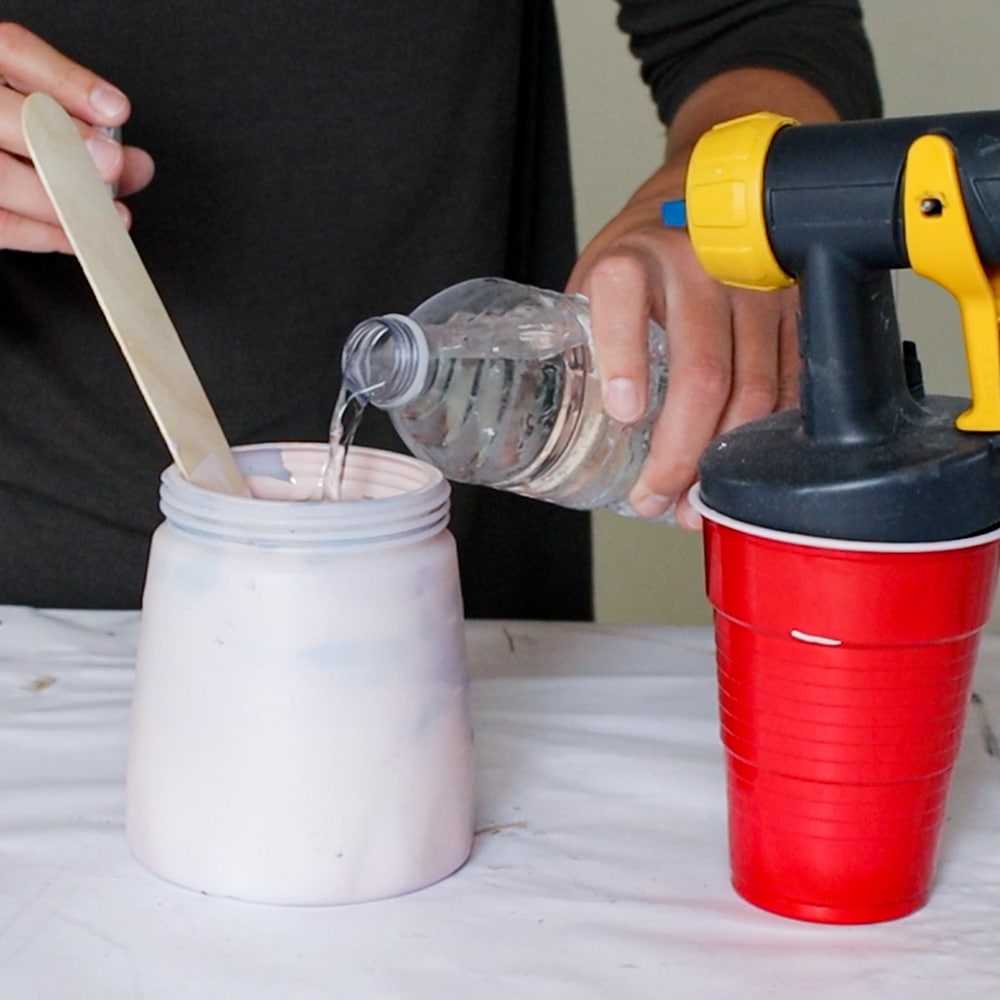
The instructions on the can say that you can thin the paint with up to 2 ounces of water for a quart of paint. So, I did the math for how much paint I was mixing into my sprayer, and it wasn’t as much as I typically would thin out paint.
Check out my honest Wagner 3500 Paint Sprayer Review here.
Would you like to save this?
I was nervous about how it would turn out. Learn exactly how I thin paint in our how to thin paint for Wagner FLEXiO sprayers post.
You should also check out my guide on how to use Wagner FLEXiO 3500 to learn more.
I tested the spray on some cardboard, and had to turn my settings way up to be able to spray the thicker paint… and the paint looked more splattery than I like. I decided to test the spray on part of the nightstand, thinking that I could sand it smooth later if it was terrible.
The first coat didn’t look terrible. The paint leveled out pretty well. So I continued. The second coat was bad though. There was so much texture. I think I should have mixed the paint again before spraying the second coat.
Oh, and then when the paint was dry, on one side of the table there were bleedthrough stains popping through the paint! It’s so hard to see on camera, but this side just looked different, and there were splotchy spots in a few places.
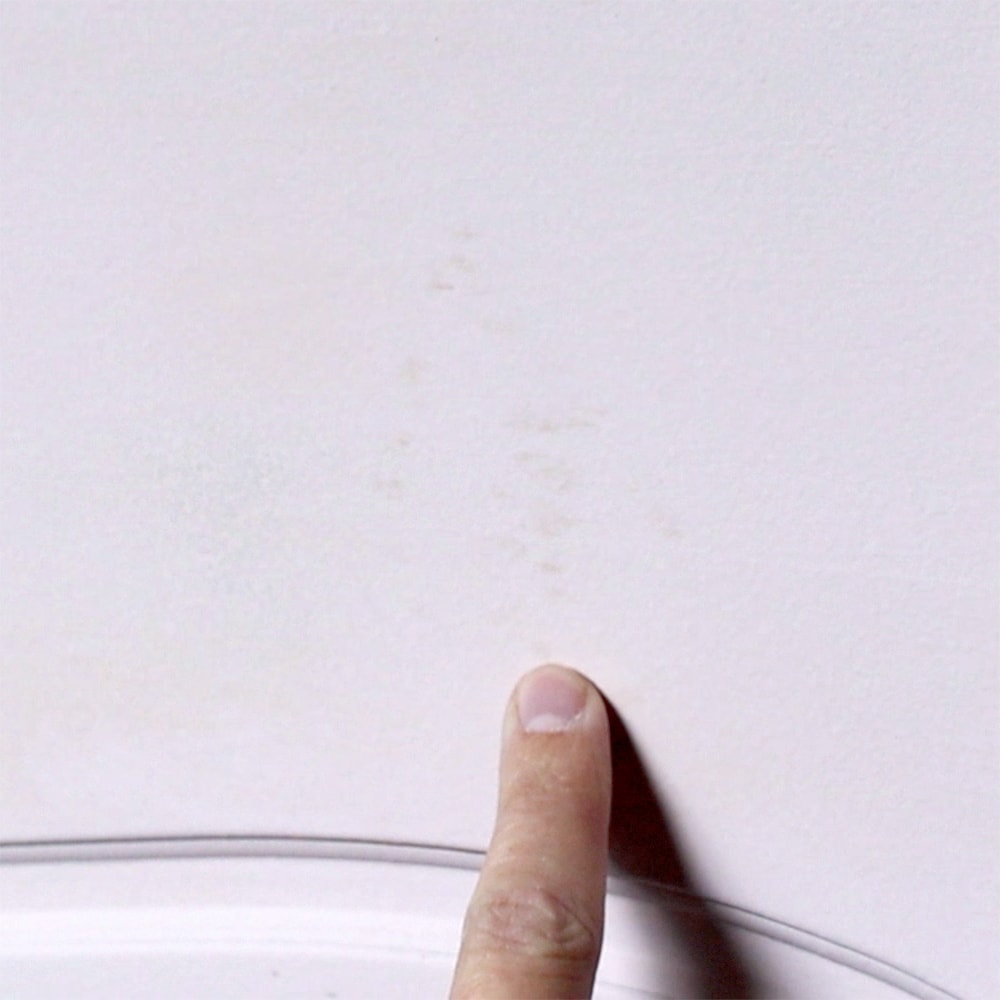
Gahhh. I guess we didn’t use enough primer.
Fixing my Mistakes
I also spotted a scratch in the drawer that needed filled in, so I filled that in with wood filler and then I sanded the table all smooth with 220 grit sandpaper and a medium+ grit foam pad in the curves and details.
One thing is for sure, this paint sands very easily! I love it when paint sands easily like this!
I cleaned up all of the dust with my shop vac and tack cloth, and then we sprayed 2 more coats of clear shellac onto the table. And again let it dry overnight before painting it.
Behind the scenes, I had been doing some tests to see if I could thin the paint without compromising it too much. The thinned-out paint stuck almost as well as the full strength paint did to this sample board without any sanding or priming.
That convinced me to thin out the paint more so I could have a super smooth texture.
I sprayed it onto a piece of cardboard again and lowered my settings for the thinner paint. There was still thicker paint inside the sprayer though because I didn’t clean it out yet.
Learn how to clean a Wagner FLEXiO sprayer to make sure that it keeps performing its best every time you use it.
So, I had to keep adjusting my settings as I sprayed because the paint came out faster and faster as the thinner paint started to come out more and more.
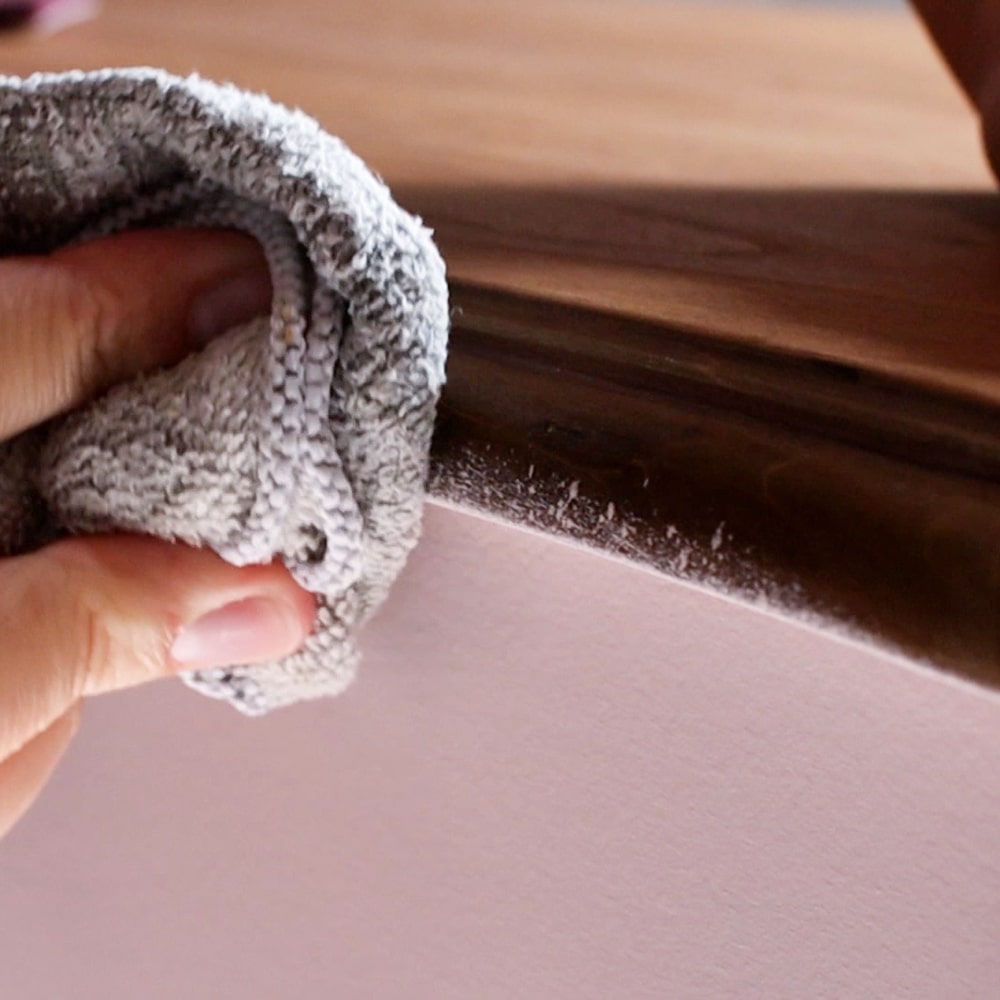
And because of that, I ended up spraying a little too much on some of these corners. I caught the drips before the paint had dried completely, so I used a damp rag to wipe off the excess paint, down to the layer of shellac. Learn more on how to fix spray paint drips here.
But for the last coat, it all went on without any issues! Finally!! I got it right! haha


Topcoating Rustoleum Chalked Paint
Then I removed the tape… and I didn’t do a very good job on this tape job because it lifted and paint had gotten under it. Thankfully it easily wiped off the stain, even after it had been there for a couple of days.
Learn how to prevent paint bleed through painter’s tape here. Find out what is the best painters tape that doesn’t bleed here.
Then I sprayed the table with 3 coats of water based Varathane polyurethane in the semi-gloss sheen. Here is more information on how to spray polyurethane with a paint sprayer.
If I topcoated by hand, I would have followed the tutorial in our how to apply polycrylic to painted furniture post.
This clear topcoat gives the paint and stain a durable protective coating that will protect it from getting scratched or dinged up easily. Plus, it makes furniture so much easier to keep clean!
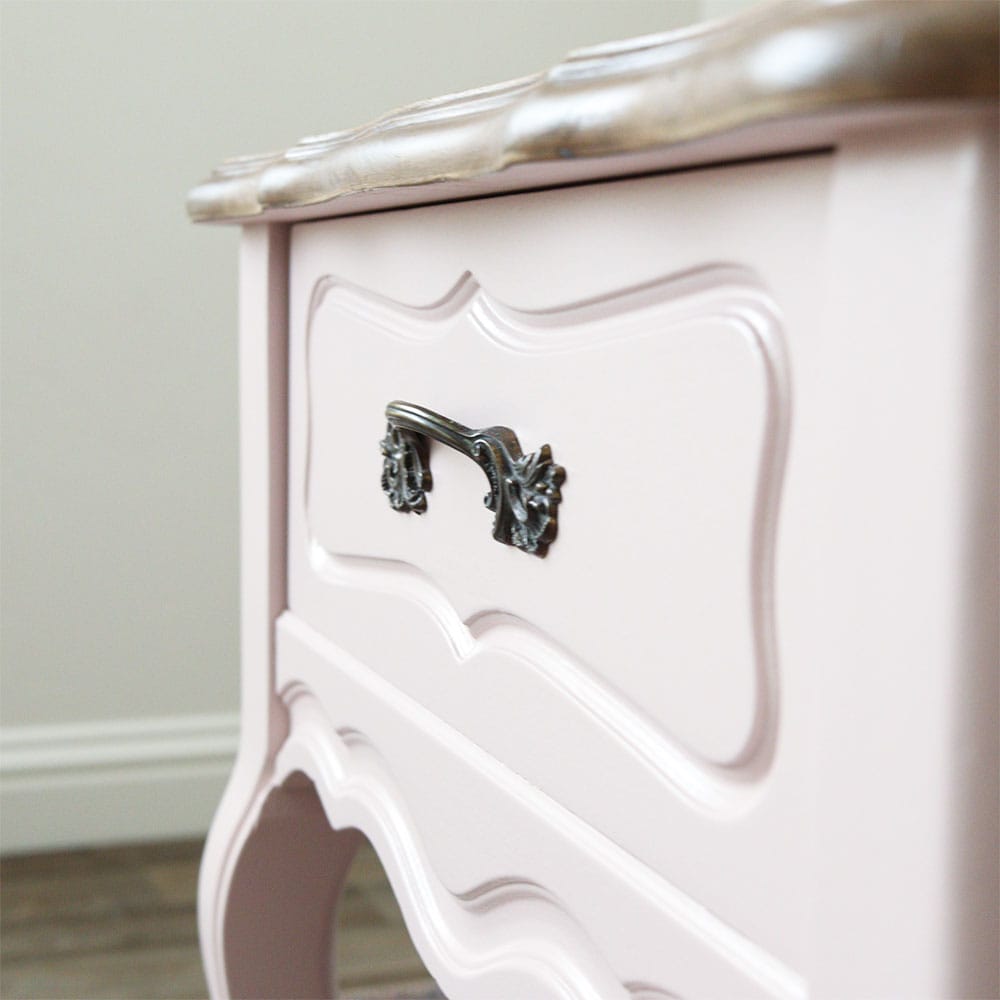
Last but not least, I put the original hardware back on the drawer. If you want to pair this nightstand with a dresser, here’s our pink vintage dresser with gold hardware.
And here’s what this cute little nightstand looks like now! It turned out so cute!! I love the new look! What do you think of the new look? Let me know in the comments!! And you can watch the full makeover in our YouTube video:
More Before and After Makeovers
See All >
Click any of these “before” photos below to view the “after” of that makeover.

For more similar makeovers, here’s our list of DIY nightstand ideas and chalk painted bedroom furniture. Here are pink dresser ideas and pink chalk painted furniture ideas if you want another one for your home! For more color inspiration, here are nightstand color ideas and painted dresser color ideas.


Pink Painted Nightstand
Do you want to have a fresh look for your nightstand? So, check out this guide to learn the step by step process of this pink painted nightstand makeover.
Materials
- Fine Grit and Medium+ Foam Sanding Pads
- Stripwell QCS stripper (Use code SUNLIGHT10 to get 10% off your order of Stripwell QCS!)
- 220 Grit Sandpaper
- Waterbased Special Walnut Stain
- Rag
- Tape
- Pre Taped Plastic
- Clear Shellac
- Rustoleum Chalk Paint Blush Pink
- Wood Filler
- Tack Cloth
- Varathane Waterbased Polyurethane in Semi Gloss
Tools
Instructions
- Sand and strip the old finish off on the top. Sand the rest of the furniture with a fine grit foam pad to smooth out the brush marks from the old paint job. When the top is dry, lightly sand it with 220 grit sandpaper to get it ready for stain.
- Dip a rag into the waterbased special walnut stain and rub it to the wood. Wipe off the excess stain and let dry for a few hours.
- Then tape some pre taped plastic around the top. Spray a couple of coats of clear shellac onto the table and let it dry overnight.
- Thin the Rustoleum Chalked Paint in Blush Pink with about 10% water. Test the spray on cardboard and adjust the setting to make it smooth. Spray onto the furniture.
- Fill any scratches with a wood filler and sand it with 220 grit sandpaper and a medium+ grit foam pad in the curves and details.
- Clean up the dust with shop vacuum and tack cloth. If you have bleed through issues, spray more shellac onto the furniture.
- Then spray the table with a couple of more coats of paint.
- Remove the tape and spray 3 coats of water based Varathane polyurethane onto all of the table. Finally, put the original hardware back on the drawer.
Recommended Products
As an Amazon Associate and member of other affiliate programs, I earn from qualifying purchases.


more painted furniture makeovers
- Painted Hutch Makeover
- Painted Armoire Makeover
- Homemade Chalk Paint Dresser Makeover
- Painting a Coffee Table
- DIY Distressed Painted Dresser
Follow us on YouTube to get more tips for painting furniture. Or share your project with us on our Facebook Group and be part of our community. See you there!
The pink is so feminine, love it! I am also a fan of French provincial furniture and have collected several pieces over the years.
Love the feminine makeover of this adorable table. I haven’t tried that brand of chalk paint so thanks for the suggestion. This post will be a feature this week.
What a beautiful transformation! I love the pretty blush pink you chose! I am so excited to feature your post at this week’s Tuesday Turn About Link Party. Thank you so much for sharing!
What a beautiful blush colour and a totally gorgeous make-over Natalie and Taylor.
Thank you for sharing your pink painted nightstand make-over at Create, Bake, Grow & Gather this week. I’m delighted to be featuring it at tonight’s party and pinning too.
Hugs,
Kerryanne
I love this pink end table! The.end result is beautiful! I think the handle is upside down, though. Hope you don’t mind me saying that :-), because I just finished a set like this in white.
As I get older (excuse me—more mature!), I love pink more and more and, of course, the wood top really sets it off. Plus, I love the way you turned the handle on the drawer.
Oh thank you so much! And I love the use of “more mature” instead of older. hahah Thanks for the comment!!