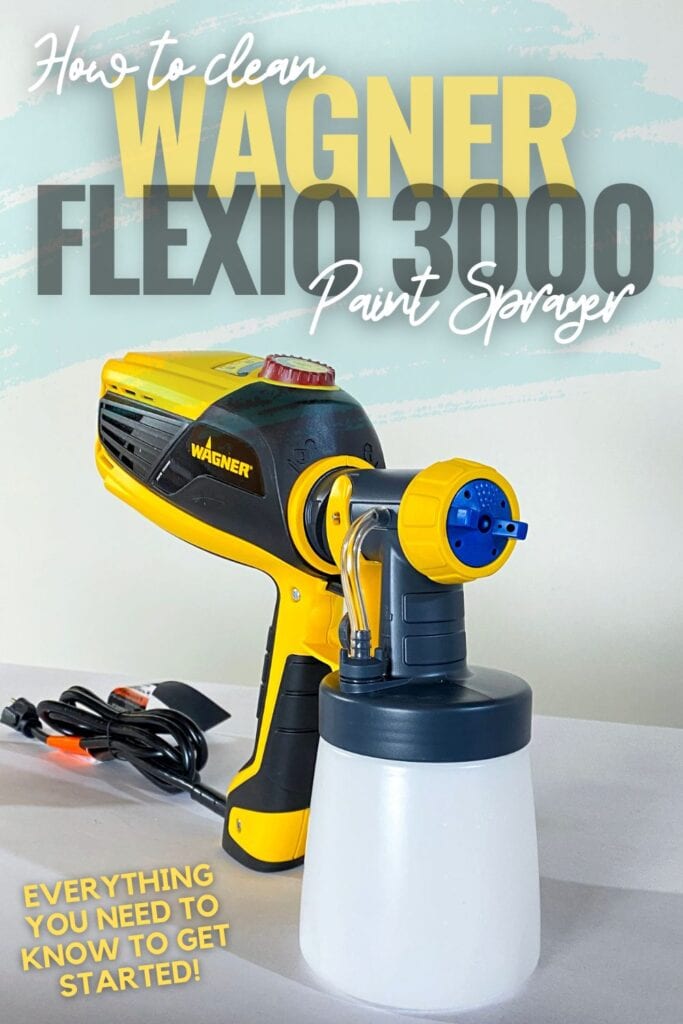
How to Clean a Wagner FLEXiO Sprayer
One of the most crucial parts of maintaining the optimal performance of your sprayer is to keep it clean after each use. But if you’re new to this tool, you may be wondering where to start. Don’t worry, we’ve got you covered! In this guide, we’ll walk you through the steps on how to clean a Wagner FLEXiO sprayer so you can keep using it for all your future projects without a hitch.
So whether you’re a beginner who’s learning how to use a paint sprayer on furniture or an experienced painter, read on for all the info you need!
Cleaning your sprayer after each use will not only help it last longer, but it will also make sure that it performs at its best every time. We know that figuring out how to clean it can seem a bit daunting at first, but don’t worry – we’ve got you covered.
The Wagner FLEXiO sprayers are so easy to clean, you’ll be able to move on with your day within about 5-10 minutes! There are other sprayers out there that are so much harder to use and keep clean, so you made a great choice in choosing from this line of sprayers.
Check out the best HVLP paint sprayers for furniture here.
Now let’s dive into how to clean your Wagner FLEXiO sprayer and get you on your way to your next fun project!
Supplies for Cleaning a Wagner FLEXiO Sprayer
As an Amazon Associate, I earn from qualifying purchases. I also may earn from other qualifying purchases with other companies or get free product to review and use. All opinions are my own.
- Wagner FLEXiO Sprayer
- Container with a lid.
- Soap and water for waterbased paint
- Mineral Spirits for oil based paint
- Small Brush
Empty the Container
Make sure to unplug your sprayer before you start to clean your sprayer. Then unlock and twist the sprayer head off of the motor part.
Then start emptying the paint container. This step may seem obvious, but there is no point in wasting paint or pouring it down the drain. Plus, it’s not good for the environment or your drains.
Leaving the paint in your paint sprayer for a long period is also not safe. Check out our post if you want to know how long can you leave paint in a Wagner sprayer.
So, pour the excess paint from your sprayer’s container, back into the paint container or another container with a lid.
If the size of the container is just right, you can balance the sprayer’s container tilted upside down so most of the paint can run out and into the other container.
Rinse the Container and Suction Tube
Next, rinse out the container and the suction tube. If you used water based paint, you can use warm soapy water for this, but if you used oil based paint, you’ll need to use mineral spirits for all of this process.
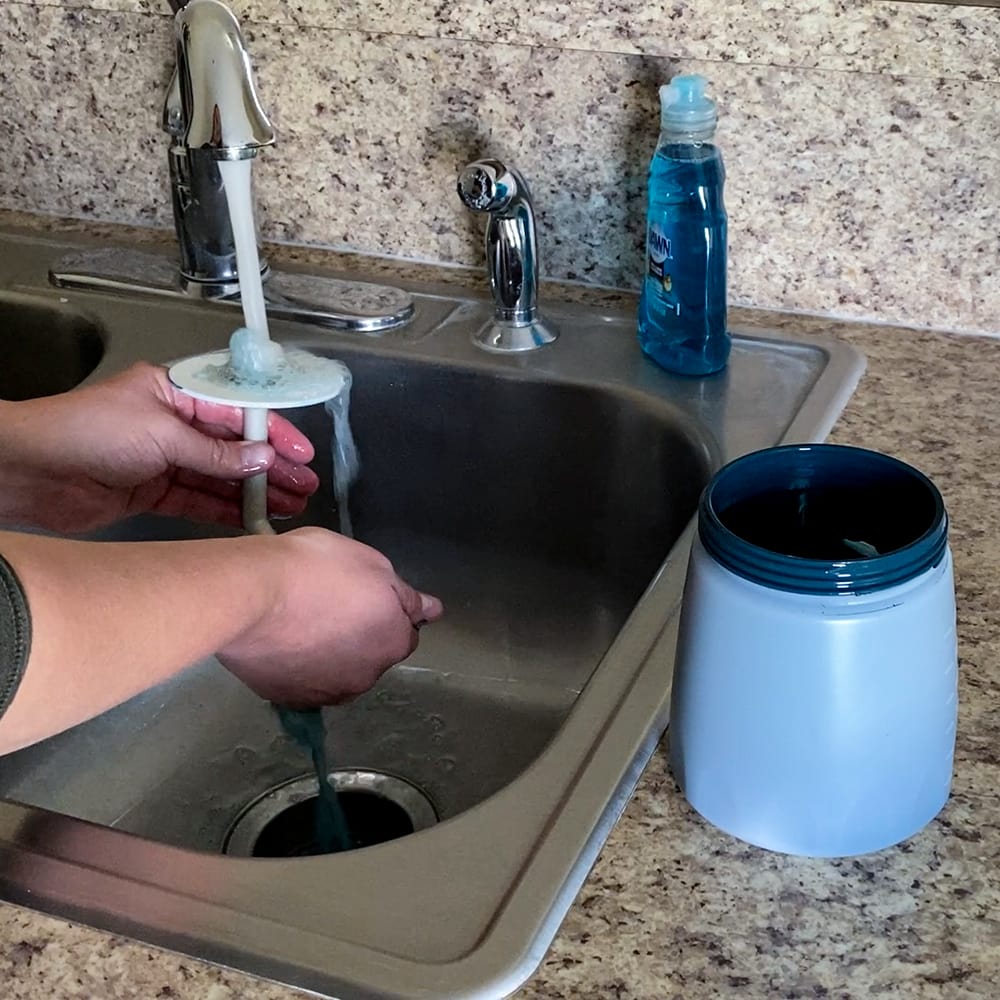
If you aren’t sure, read the label on your paint container to see what it says about cleaning up the paint.
The goal here is to remove most of the paint from inside the container, so you can have some clean water or mineral spirits to run through the paint sprayer in the next step.
If you have a bunch of paint left in your container when you move onto the next step, then the inside parts of your sprayer won’t really get cleaned out.
Get more details about this step in our how to clean a Wagner paint sprayer here.
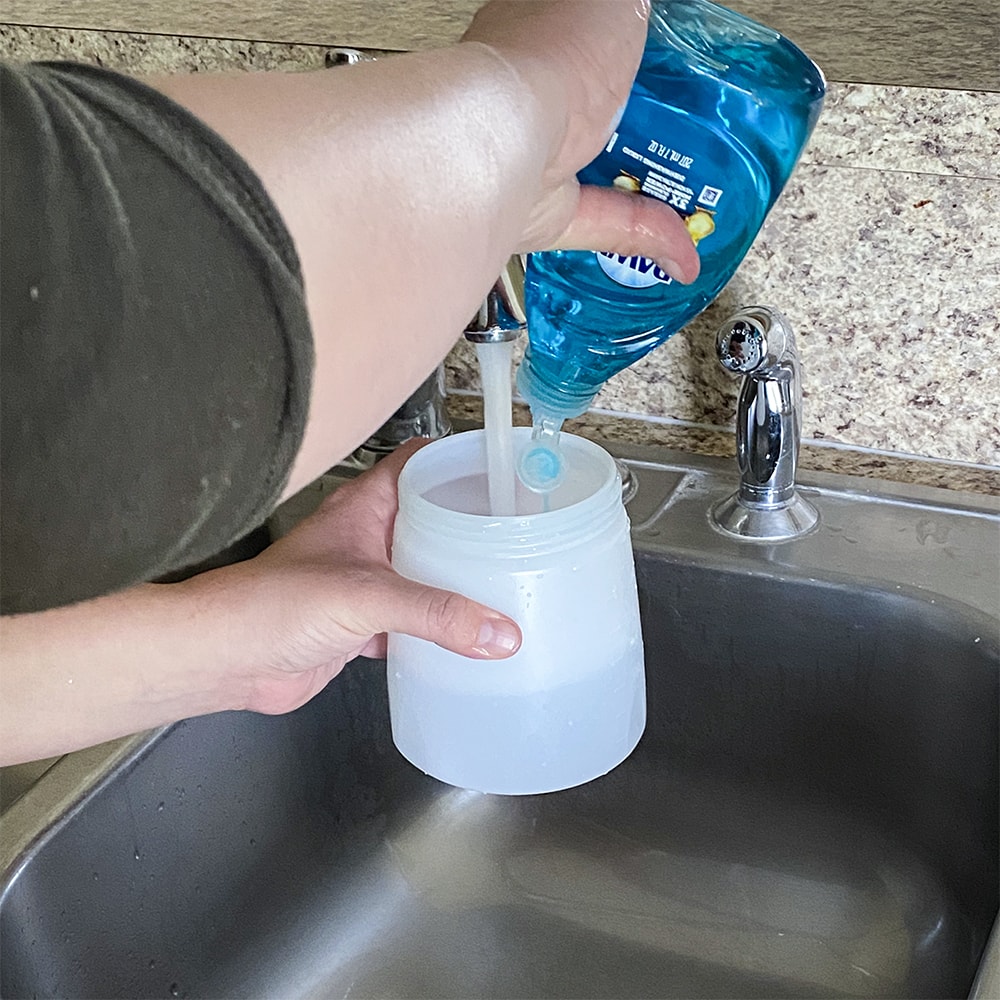
Spray Cleaning Solution Through the Sprayer
Once the container and suction tube is all cleaned, fill the sprayer’s container with some of your cleaning solution. So if you used water based paint, put some warm water with some dish soap into the container.
If you used oil based paint, put some mineral spirits into the container.
Put the suction tube back into the sprayer, and screw the container back on. Put the sprayer head back onto the motor.
Plug your sprayer back in, and then spray the cleaner through the sprayer for a few seconds, until the liquid comes out clean. I like to spray into a 5 gallon bucket, or into a rag to contain the spray.
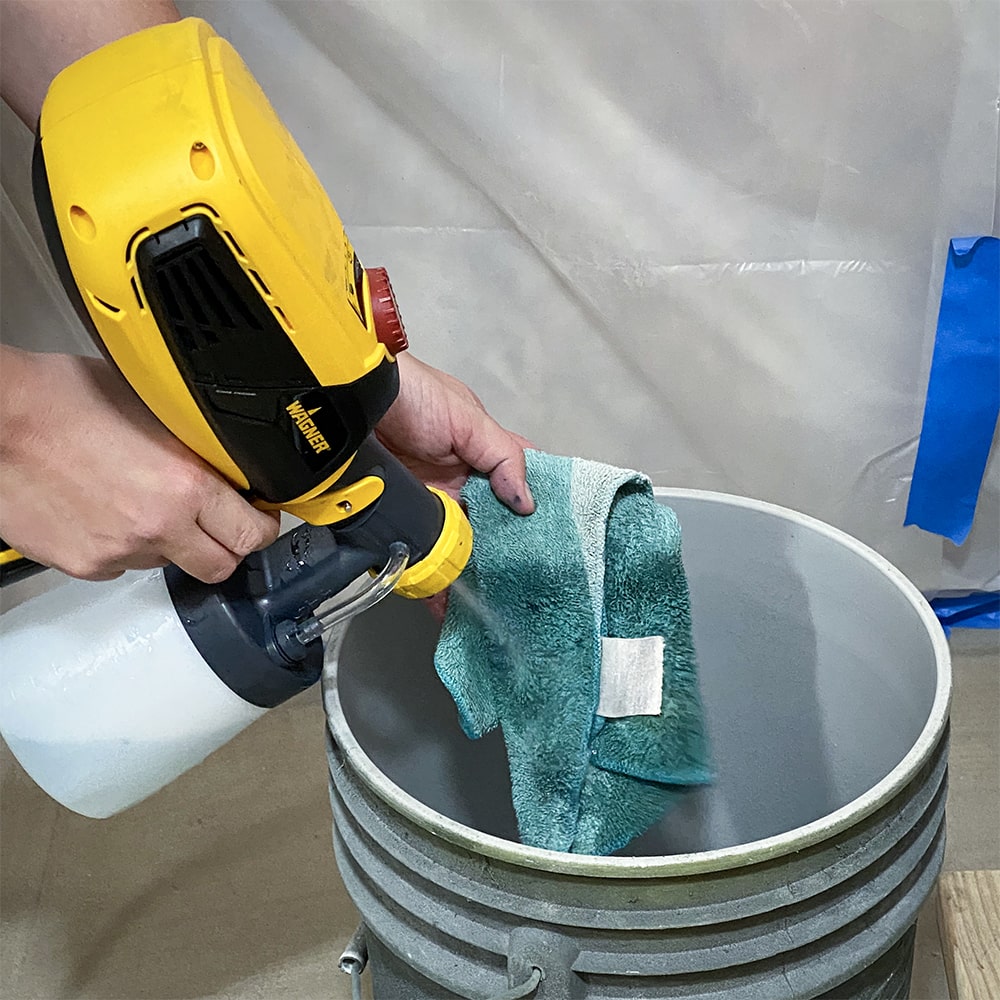
This step cleans the inside of the sprayer, where you can’t get any other way. You can also read this post about how to clean the Fuji Q4 paint sprayer to get more ideas on cleaning a sprayer.
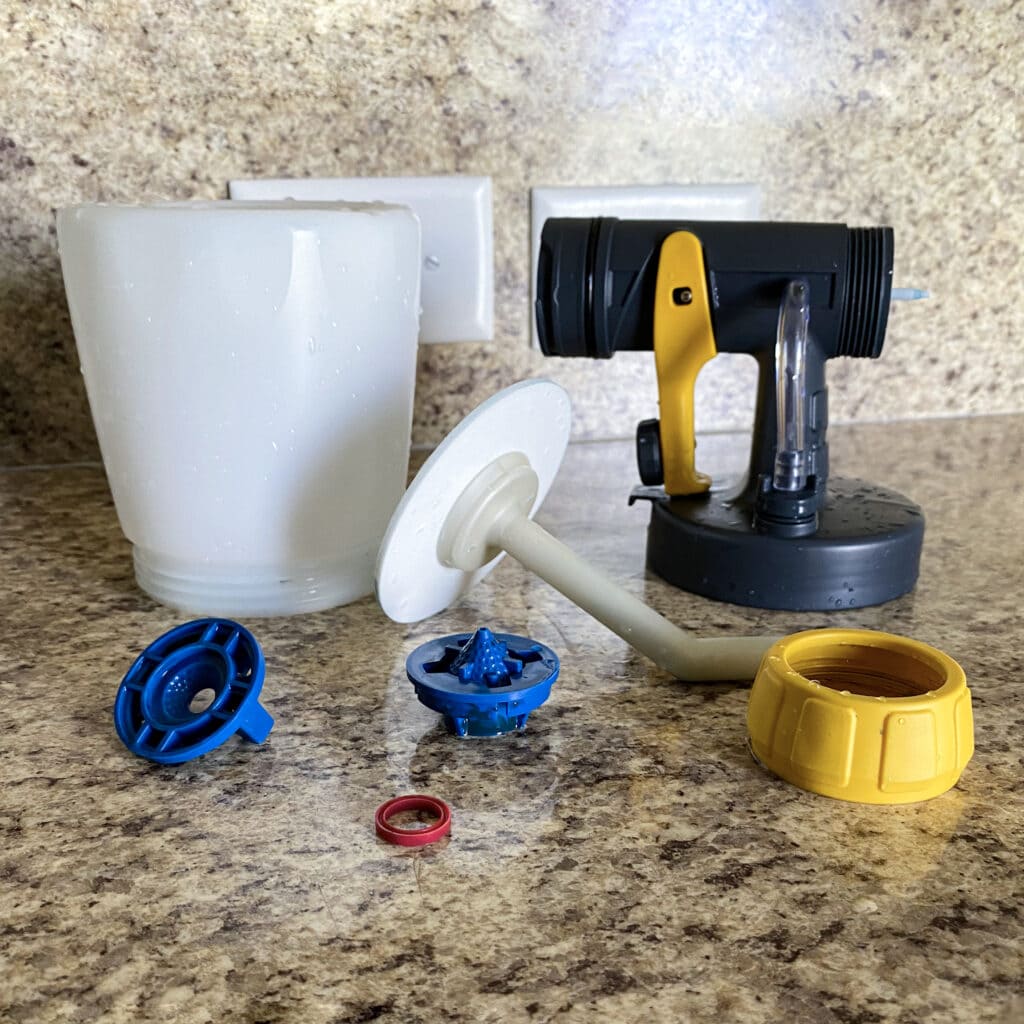
Disassemble the Sprayer
Then you can unplug the sprayer, remove the motor from the head of the sprayer, unscrew the container, and pour out the cleaner.
Then, disassemble the sprayer’s nozzle. For the detail finish nozzle, you can unscrew it and then a few small pieces fall off.
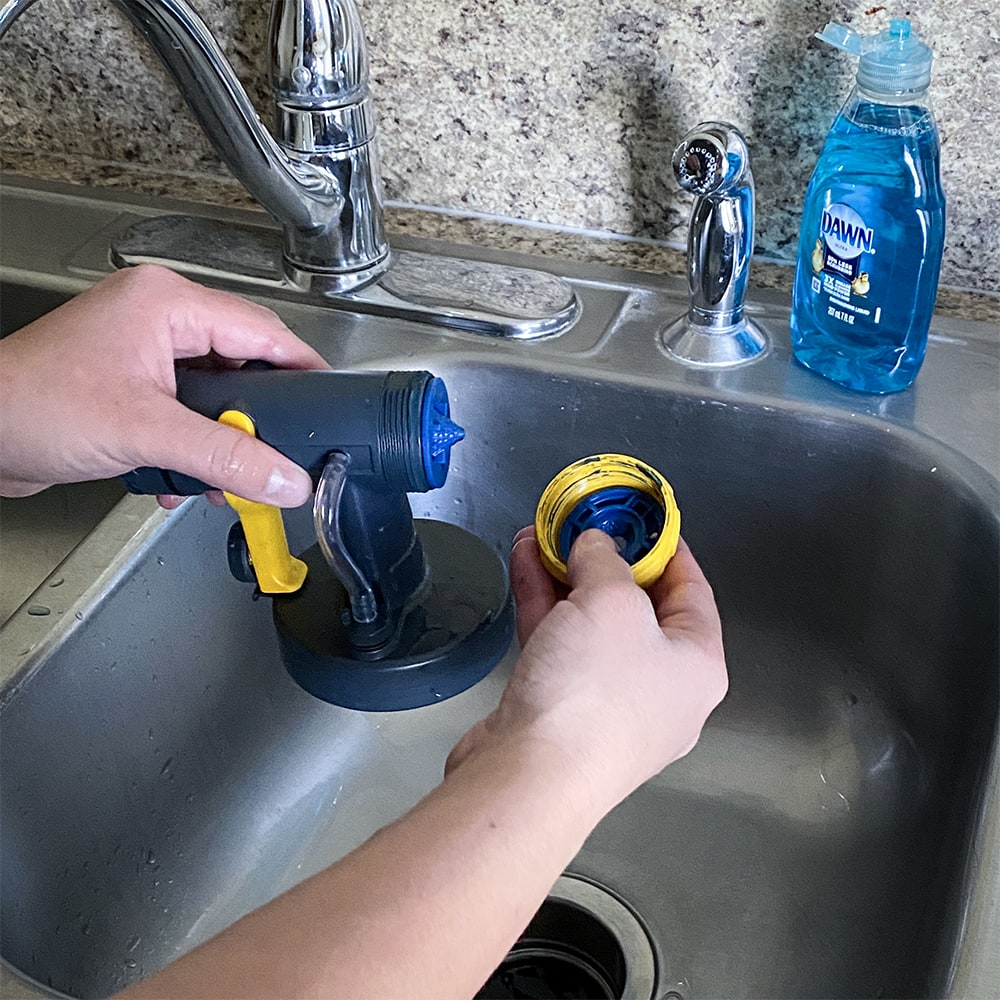
Don’t let any piece fall down your drain! But use a small brush to clean inside of the tip of the sprayer and remove any paint from the other 2 pieces. I also like to do a final rinse on the container and the nozzle.
If there is overspray on the outside of the container, I use a wet rag to rub off the paint.
Would you like to save this?
Let Dry Completely
Last but not least, let all of the parts dry completely before you put it all back together. If you put it back together wet and start spraying again, then the sprayer will start dripping while you spray… Which ruins the finish. You can, of course, try to speed up the drying process by drying everything with a rag.
That’s all there is to it! Honestly, the Wagner paint sprayers are the easiest of all of the paint sprayers to clean! That’s one of the biggest reasons I keep going back to them. But they also spray very well, especially these FLEXiO sprayers. Here is our list of the best Wagner paint sprayers for furniture.
If your Wagner FLEXiO not spraying, check out our post to learn why and how to fix this issue. And you can also check out our Wagner paint sprayer troubleshooting guide to help you out if you encounter any problems with your paint sprayer.
How often should I clean my Wagner FLEXiO sprayer?
You should clean your Wagner FLEXiO sprayer after every use. This will help keep it in good condition and make sure that it is always performing at its best. If you don’t clean it after each use, paint can start to accumulate and clog the nozzle, hindering the spray quality. Check out how to unclog a paint sprayer here if your sprayer does get clogged.
You can also check out our blog post about Wagner paint sprayer spitting and find out why and how to fix this issue.


It’s also important to remember that you should always use the type of cleaning solution recommended on the paint’s label, as different types of paints require different types of solution.
Can I use regular soap and water to clean my sprayer?
Yes, if you are using water based paint you can use regular soap and water to clean your Wagner FLEXiO sprayer. However, if you are using an oil-based paint then you will need to use mineral spirits instead of soap and water.
Typically, the back of the paint container will tell you what to use when cleaning up the paint. If not, you can usually find the information on their website.
Note: Shellac based products should not be used in these sprayers because shellac’s flash point is so low.
Learn how to use the Wagner FLEXiO 3000 or how to paint furniture with a sprayer here.
Is it necessary to disassemble the sprayer to clean it?
Yes, it is necessary to disassemble the sprayer after each use in order to properly clean it. This will make sure that all of the internal components are free from any paint residue.
The process should only take a few minutes and can be easily done following the steps outlined in this guide.
What’s the best way to dry all the parts after cleaning?
The best way to dry all of the parts after cleaning is to let them air dry. You can try to speed up this process by wiping down the parts with a rag, but you should always make sure that they are completely dry before putting them back together and using the sprayer again.
This will help prevent mold or mildew from forming inside, and it will help your sprayer spray correctly.
Are there any special cleaning products or tools I should use?
No, you don’t need any special cleaning products or tools to clean your Wagner FLEXiO sprayer. All that is needed is a warm water and soap solution (for water based paints) or mineral spirits (for oil based paints) and an old rag.
Here’s how to clean oil based paint from Wagner paint sprayer for a more detailed guide if you used this type of paint.
If you want to make sure you have gotten all of the paint from inside the nozzle, a small brush will do the trick and help make sure that your paint sprayer doesn’t get clogged.
And if you want a more thorough cleaning, taking apart your paint sprayer is the answer. Here’s how to take apart a Wagner paint sprayer!
That’s all there is to it! With these steps, you’ll be able to easily and quickly clean your Wagner FLEXiO sprayer after each use so that you can keep using it for all kinds of projects with excellent results!
Just remember to use the type of cleaning solution recommended on the paint can label, and you’ll be good to go! If you need more help with painting or other DIY projects, check out our blog for other helpful guides and tips! Good luck!

How to Clean a Wagner FLEXiO Sprayer
This guide teaches steps on how to clean a Wagner FLEXiO sprayer, to make sure your sprayer lasts as long as possible and works correctly for the next project.
Materials
Tools
Instructions
- Unplug the sprayer, unlock it, and twist the head off the motor part.
- Empty the paint container by pouring the excess paint into a container with a lid.
- Rinse the container and suction tube, and fill the sprayer's container with cleaning solution.
- Plug the sprayer back in and spray the cleaner for a few seconds until it is clean. Unplug the sprayer, remove the head, unscrew the container, and pour out the cleaner.
- Disassemble the nozzle and clean the inside and outside of the tip using a small brush.
- Allow parts to dry before reassembling.
Recommended Products
As an Amazon Associate and member of other affiliate programs, I earn from qualifying purchases.


More Paint Sprayer Reviews
- Honest Wagner Double Duty Paint Sprayer Review
- Is a Fuji Q4 Paint Sprayer Worth it? Honest Review
- HomeRight Super Finish Max Paint Sprayer Review
- Wagner 3500 Paint Sprayer Review
- Wagner Flexio 5000 Paint Sprayer Review
Follow us on YouTube to get more tips for painting furniture. Or share your project with us on our Facebook Group and be part of our community. See you there!
I live in a County area and have a Septic tank instead of city sewage. What steps should those of us on septic systems use? I can’t think this would work with a septic system. Thanks for answering for me!