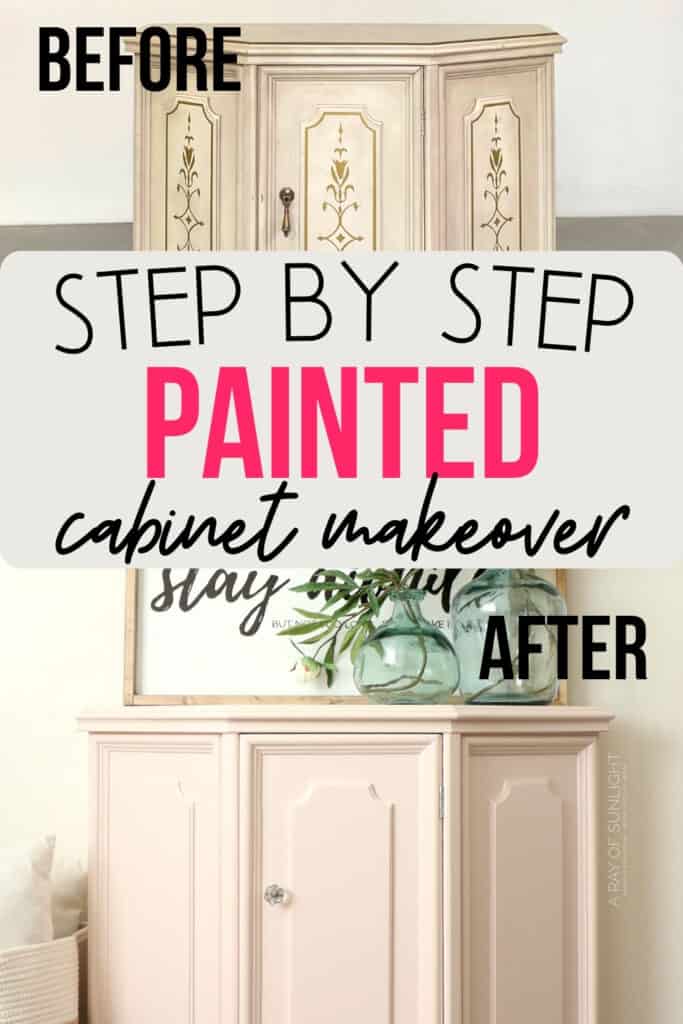
Painted Hallway Cabinet Makeover

There are plenty of furniture makeover ideas out there, but check out how an old hallway cabinet goes from outdated to fresh and new with this step by step tutorial. Here’s our painted hallway cabinet makeover!
Painting is one of the easiest and most affordable ways to update furniture. It could be an old or just outdated piece – a fresh coat can make all the difference. So, let’s dive in and see how we transformed this piece!
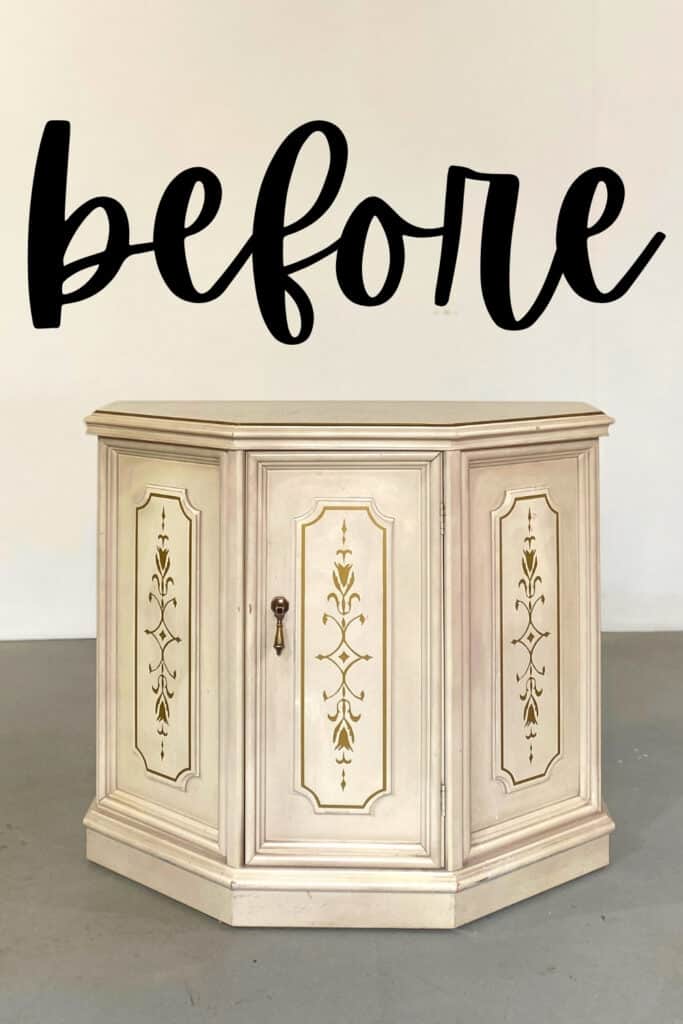
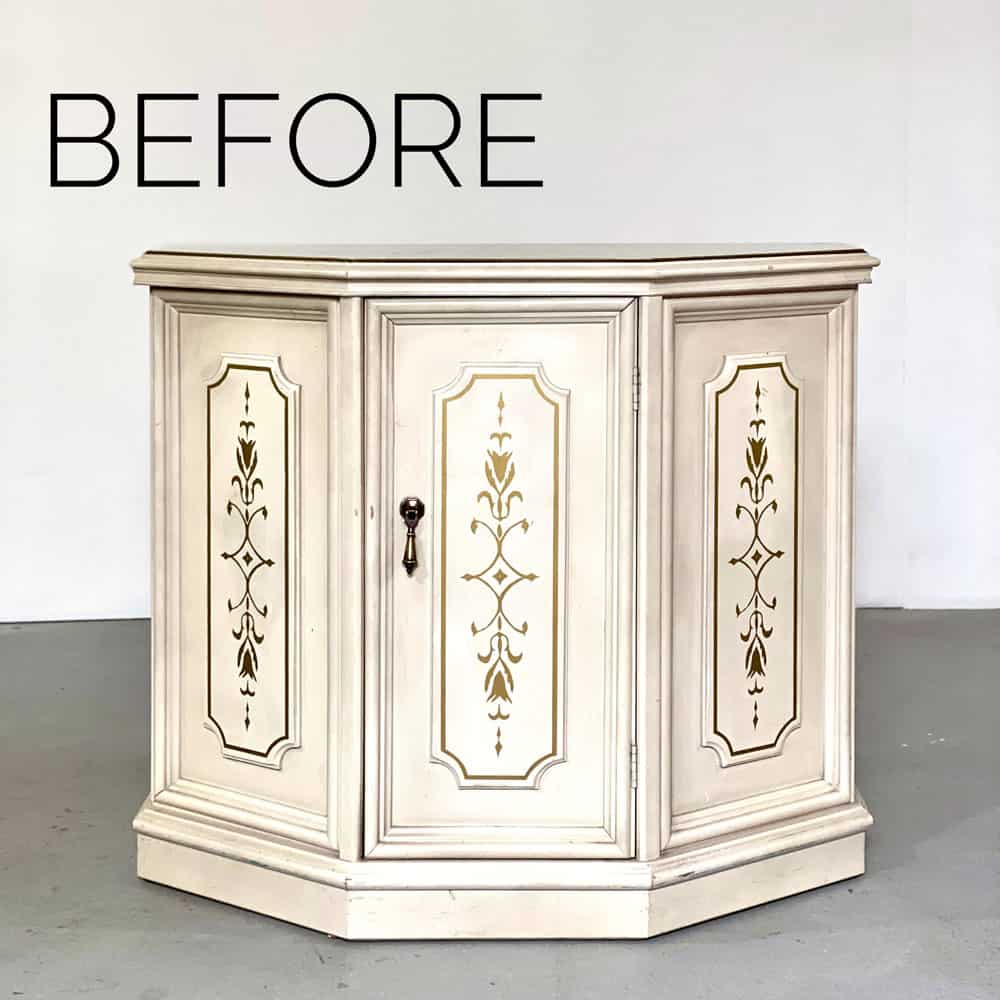
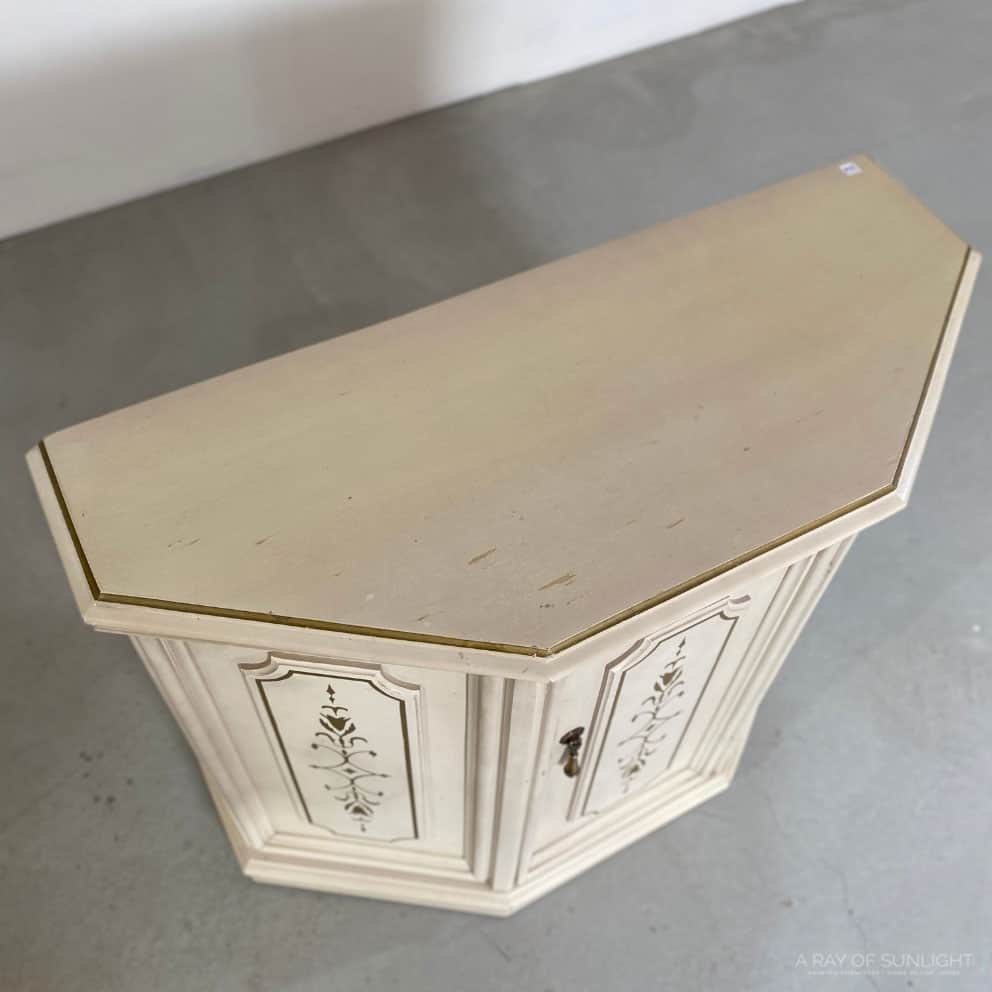
This was what it looked like before. We picked it up from our local thrift store. It was really dirty, and the top had some damage to the finish. But I think it would be a great little piece for extra storage in a small hallway or a bathroom.

First, though, it needed a little update. And a new coat is the perfect way to give it a new look! These painting furniture ideas can help you get started, but we’ll go through the steps specifically for this hallway cabinet makeover.
Keep reading to see how we turned this piece into something stylish and functional! And you don’t have to break the bank to make this fresh start.

Supplies Used for Painted Hallway Cabinet Makeover
As an Amazon Associate, I earn from qualifying purchases. I also may earn from other qualifying purchases with other companies or get free product to review and use. All opinions are my own.
- Krud Kutter Cleaner Degreaser
- Old Rag
- 3×4 Vacuum Compatible SurfPrep Sander (Use code RAY10 to get 10% off your order)
- 220 Grit Sandpaper
- 400 Grit Sandpaper
- Shop Vac with Hose and Brush Attachment
- Tack Cloth
- BIN Shellac Based Primer (or the Spray Can Version)
- Mini 3/8″ Nap Roller
- Chip Brush
- Paintable Caulking
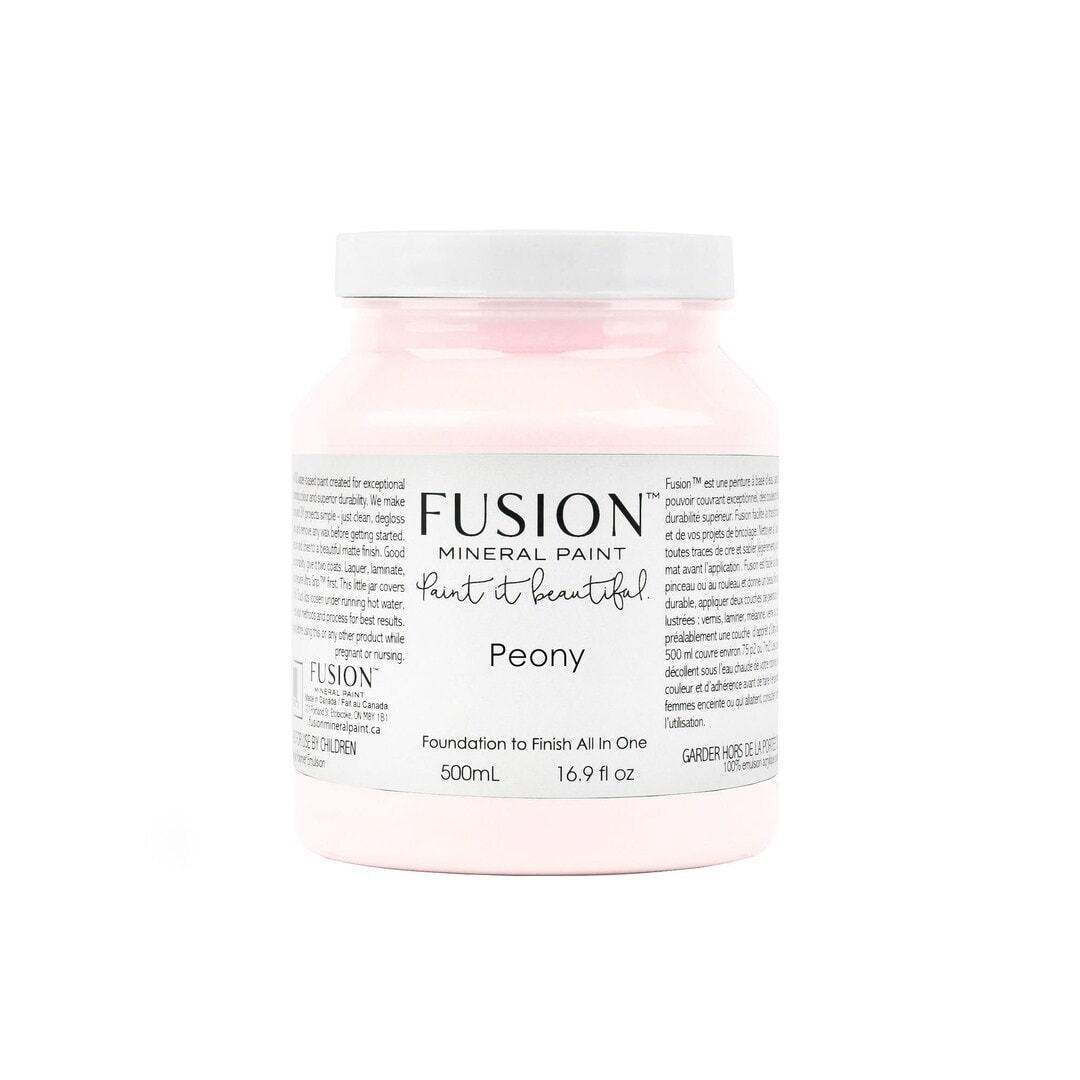
- Fusion Mineral Paint in Peony
- Fusion Mineral Paint in Cathedral Taupe
- Fuji Q4 Paint Sprayer
- Paint Filters
- Water
- Varathane Waterbased Polyurethane – My Favorite Topcoat
- New Knob
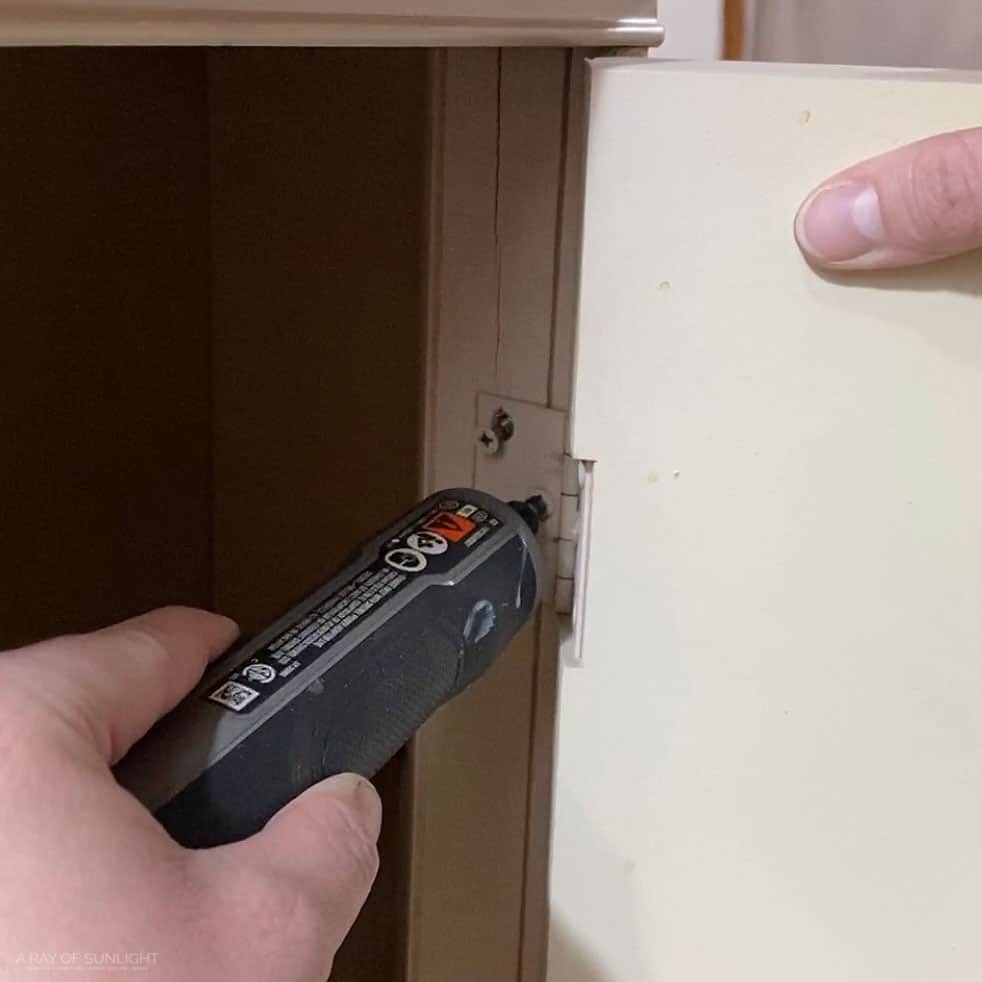
Remove Cabinet Hardware
First things first, I put it up on my workbench and removed all of the hardware, including the door hinges.
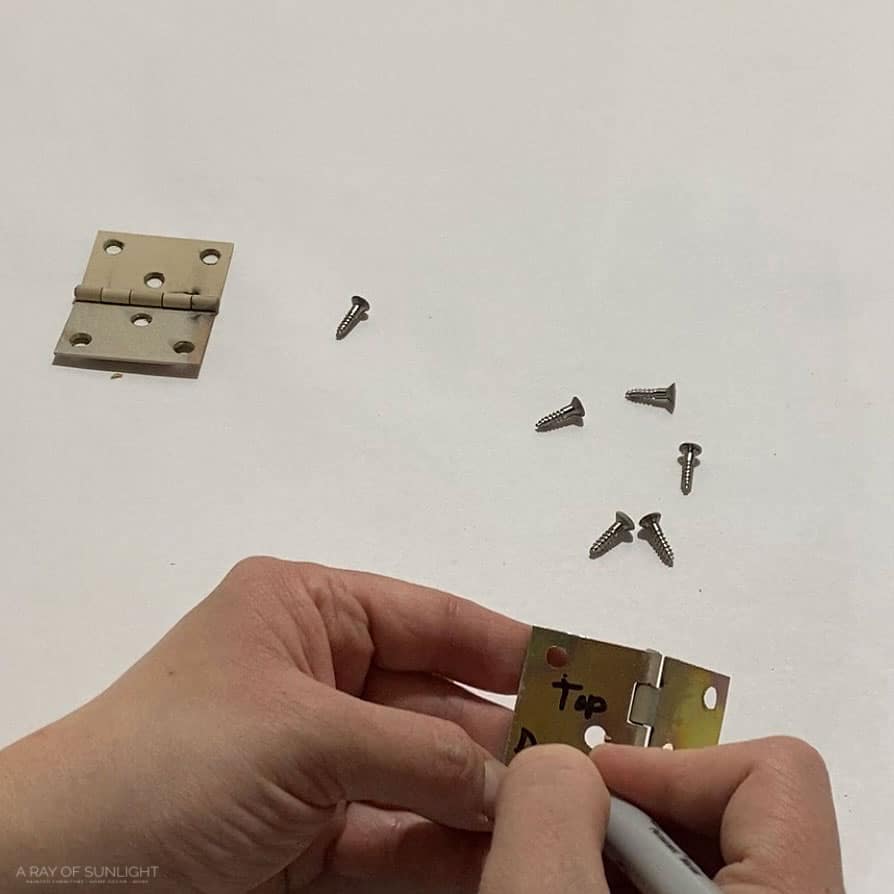
Hinges can be a mess to put back on, so I labeled them with a few details, including which one was on the top and which one went on the bottom, and which way they went on. Then, I put them in a container with the rest of the hardware.
Cleaning and Sanding for Adhesion
Next, I scrubbed the whole thing down with some Krud Kutter to make sure there wasn’t anything on the surface to prevent the new coat from sticking.
This thing was pretty gross, and as the spray sat, I could see it turning brown from all of the gunk. I cleaned it all a couple of times, including a rinse job at the end. Check out this post to learn more about how to clean furniture before painting.
Then, when it was all dry, I scuff sanded it all down with my favorite little sander. Read our Surfprep Sander reviews for more on this tool, and check out these best sanders for furniture for more options to help you work with ease.
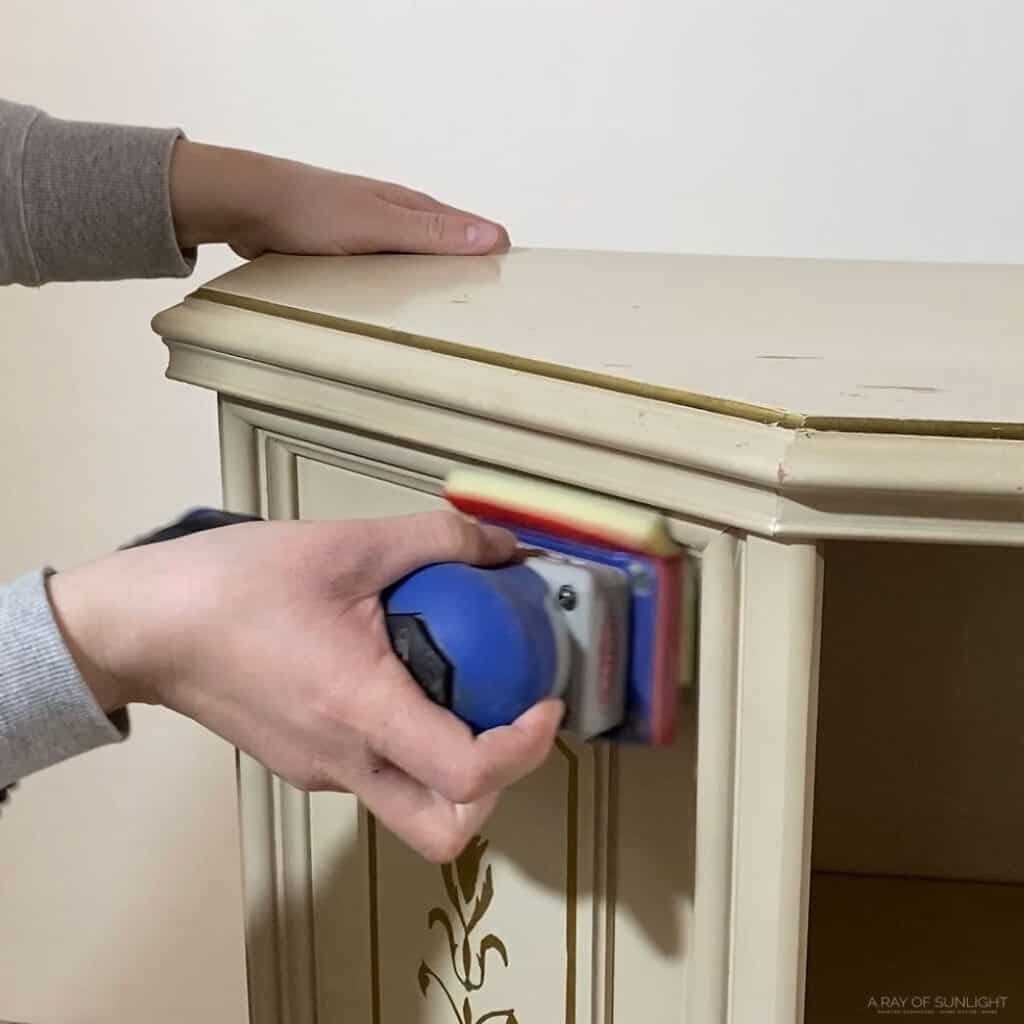
The scuff sanding is just an extra step to make sure the finish sticks really well. Before I got this little power sander, I used to scuff sand by hand with 220 grit sandpaper instead. Learn more about the best sandpaper for furniture painting here. But man, I sand a lot, so this little sander has been a game changer for me.
When scuff sanding, there is no need to actually sand down to bare wood. You just want to remove any shine and dull the surface so the coating has a better chance of holding on.
Since the top had some damage, I sanded it down a little more, trying to sand those scratches out. Learn more about the importance of sanding before painting furniture here! And here’s what happens if you don’t sand before painting if you’re thinking of skipping this step.
Then I vacuumed up all of the dust I created and wiped it all down with a tack cloth to remove any remaining dust. These tack cloths really are amazing at picking up every little last speck of dust and are so much better than just a lint-free rag.
To better help you with these steps, read our post on how to prepare furniture for painting here.
Prime to Block Bleed Through
Since I wanted to use a light color, I wanted to make sure that I wouldn’t have any bleed through issues where the wood underneath stains through the finish. So, I busted out some BIN shellac based primer and brushed and rolled it all over.
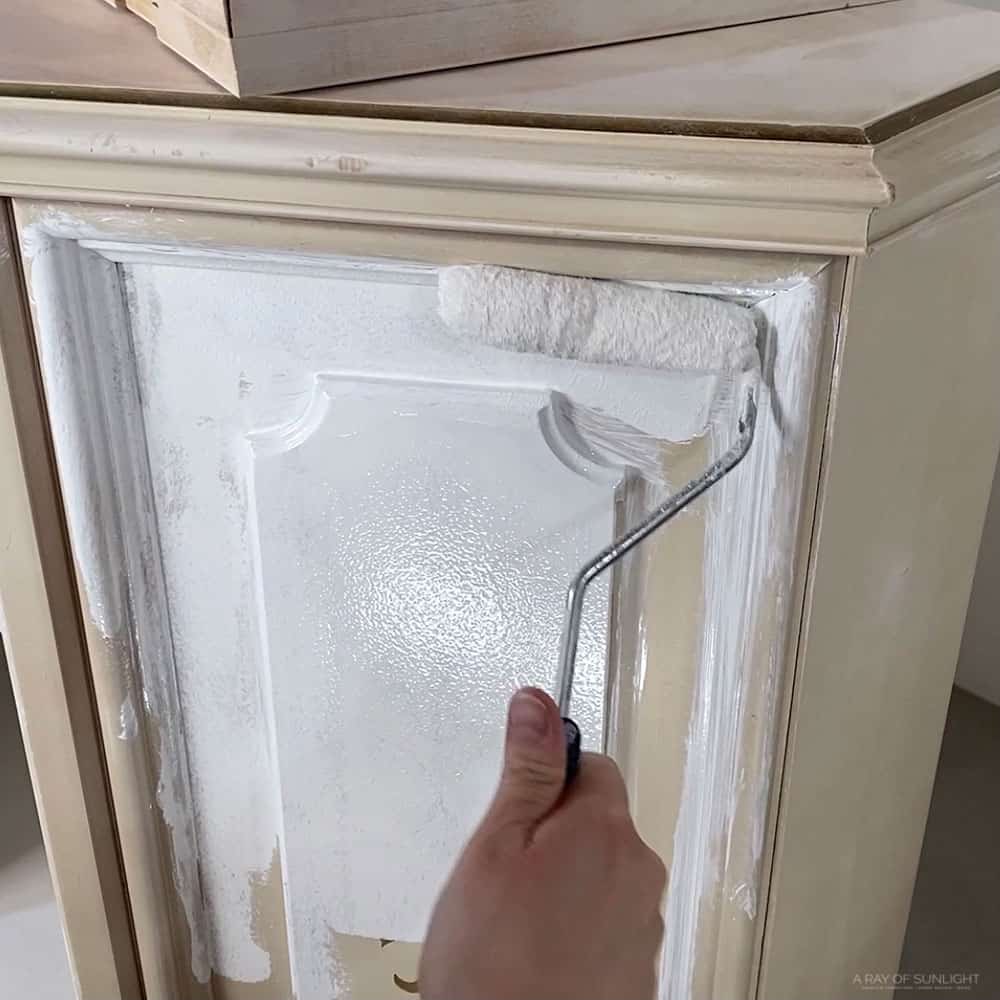
Honestly, I completely regretted my decision to brush and roll the primer on. I wish I would have taken it outside and sprayed it with the BIN shellac can instead.
Even though I used a nice roller, I still had a lot of texture from it, and it just took FOREVER to apply it instead of spraying it on. But if rolling is your only option, check out this post about the best rollers for painting furniture to help you get the best possible results.
So, next time, it’s back to the spray version of the primer instead! Learn about the best primers for painting furniture (and how to choose the right one) here. And here are more tips and tricks on how to stop stains from coming through paint!
After about an hour, the primer was dry, so I sanded the primer down a bit with 220 grit sandpaper to remove the texture it created.
Then, I removed the dust with the vacuum and tack cloth. And added on another coat of primer and let it dry.
Fill In Seams with Caulking
With the white primer on, I noticed a few seams that were really showing up, so I filled them in with some paintable caulking. This is totally optional and something I don’t do all the time. But sealing up those dark seams makes the end product look so much better in the end.
I squeezed it on and then used my finger to push it into the seams, and then I used a damp rag to remove the excess caulking. For other repairs, check out the best wood fillers for furniture here.
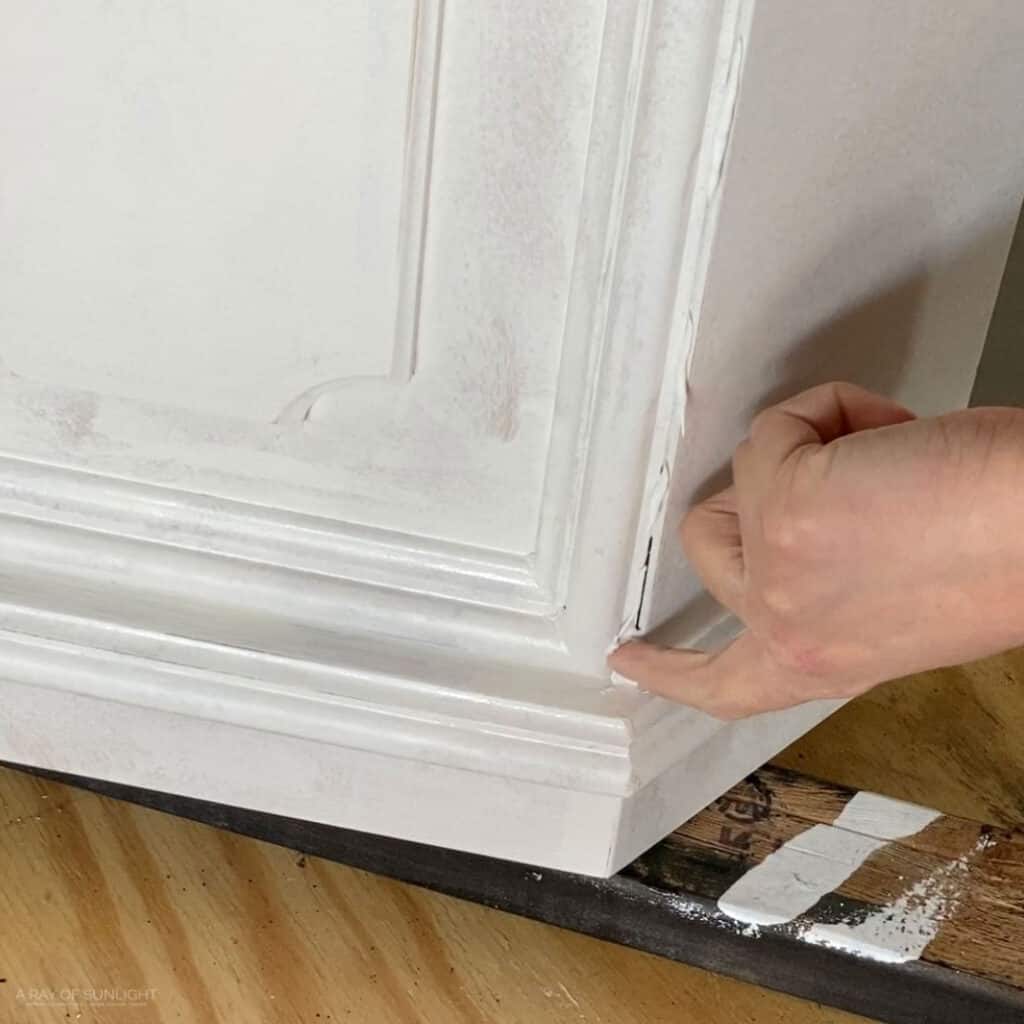
Caulking isn’t easy to sand down, so I really wanted to get it wiped off before it dried.
Would you like to save this?
Painted Hallway Cabinet Makeover
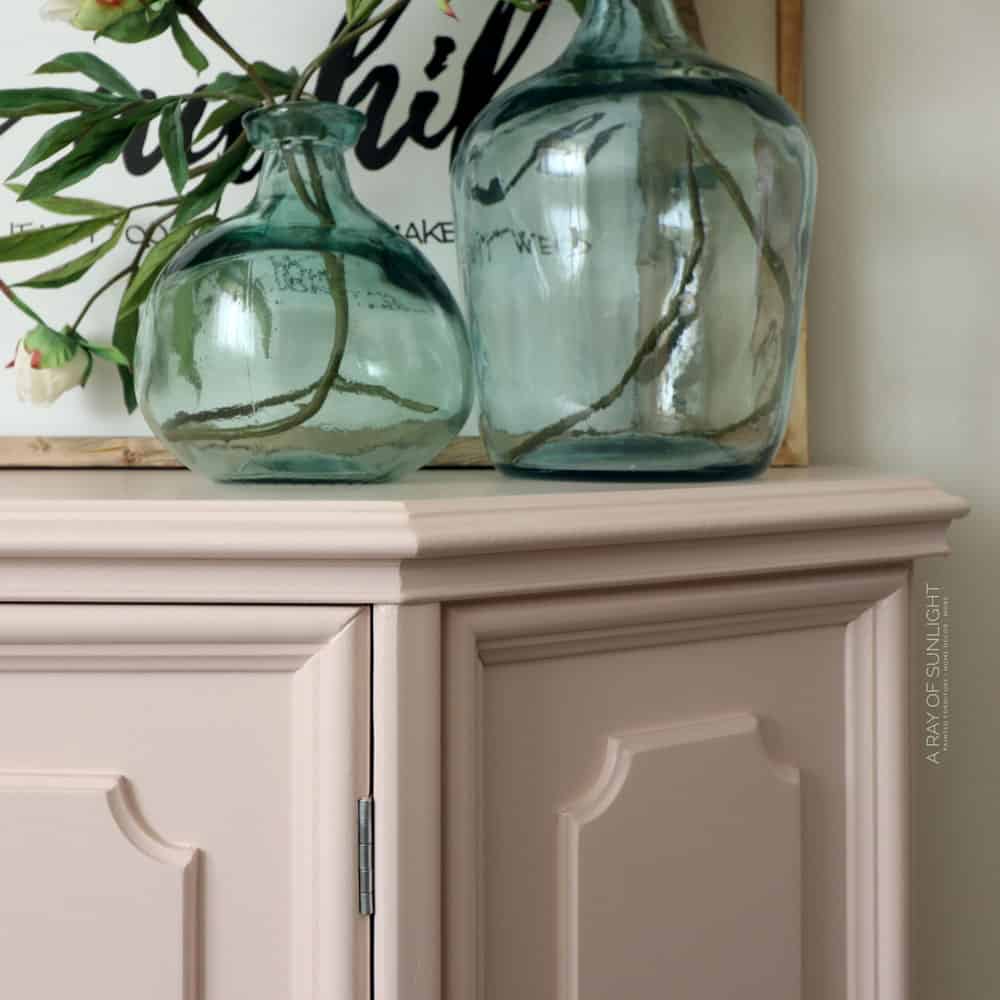
I used a couple of colors that I had on hand. I mixed Fusion Mineral Paint’s Peony and what I had left of Cathedral Taupe together to create a more muted pink. Check out this Fusion Mineral Paint review to learn more about the pros and cons of this brand.
It was probably about a 20 to 1 ratio. (If I had more Cathedral Taupe, I would have put more of that in with the same amount of Peony.)
I mixed them up in my sprayer’s container, making sure to filter the mixture before it went into the container so I didn’t get any debris that could cause clogging. Then, I added in some water to thin it out a bit.
With this sprayer, I don’t measure how much water I use. With my cheap paint sprayer, I definitely measure both to make sure it can handle the job.
Fusion Mineral seems to need to be thinner than other products that I use in my HVLP gun, too. Here’s how to thin paint for a Wagner sprayer to guide you through the process. And here are more spray paint tools you will need.
Brushing vs Spraying
Then, I gave my cabinet a few coats. Learn the tips and tricks of painting furniture with a sprayer here.
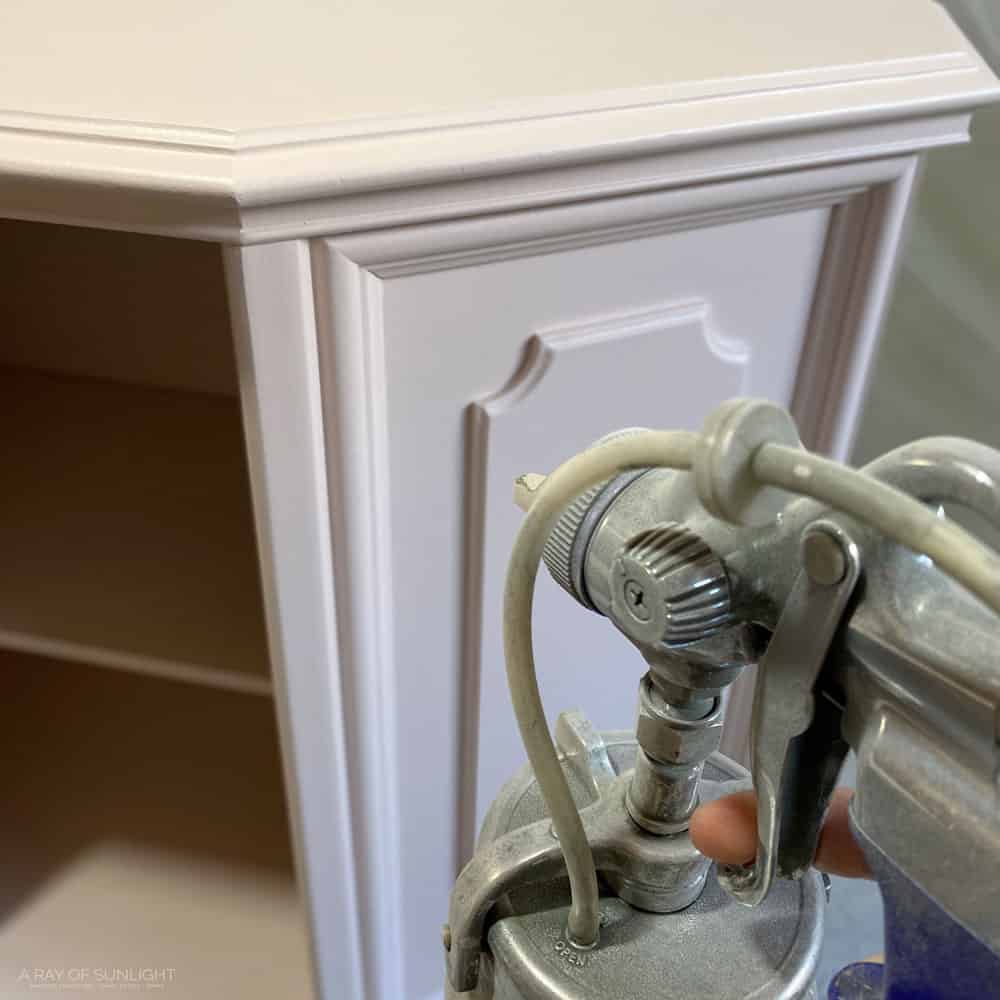
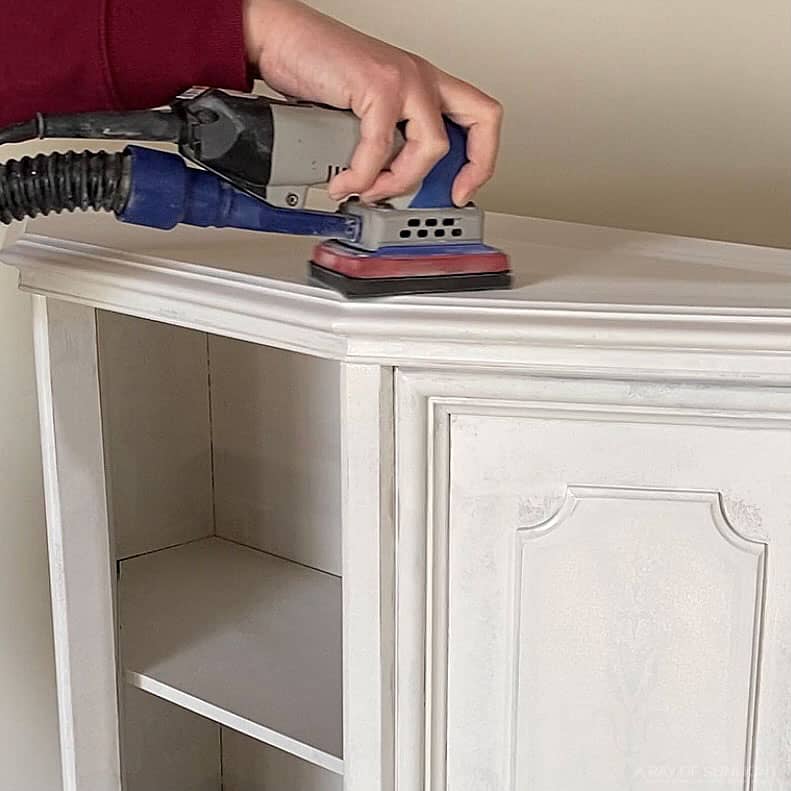
I let it dry for about 2 hours in between each coat, and I also sanded in between each coat to knock down some texture that was left behind.
You can also apply with a brush instead. Personally, I really like the Staalmeester brushes with Fusion Mineral Paint. It’s the best way to get a brush free finish! But if you don’t want to spend the money on their pricey brush, I would recommend brushing it on with a Zibra round paint brush.
The Zibra round brush gets into details, molding, and trim so much easier than a flat brush. And Zibra brushes are high quality at a very reasonable price! Check out more best paint brushes for painting furniture here.
Topcoat Painted Hallway Cabinet
Fusion Mineral Paint is very durable, dries in a matte finish, and technically doesn’t require a topcoat. Check out more best all-in-one paints for furniture, in this post.
But if you’ve been around here for any time, you might notice that I still topcoat these types, just for extra durability. I mean, if I’m going to go through all of this work, I’m going to do what I can to make the finish as durable and long lasting as possible.
So, after the last coat was dry, I applied 3 separate coats of my favorite clear, waterbased poly. We have a more detailed guide on how to spray polyurethane here. I also sanded in between the coats of poly with 400 grit sandpaper to make sure the finish was silky smooth when I was done.
Check out our topcoats for painting furniture for more options, as well as tips on how to apply it to your finished piece.
Get Our Secrets!
Grab this super convenient How to Repair Furniture Ebook with all of our secrets on how to repair furniture for only $14.
You can print it out and have instant access whenever you come across damaged furniture, and know exactly how to fix it!
Click on the picture of the book to purchase!

Clean and Add Hardware
The next day I put the cleaned up hinges back on and a new knob. If you want to keep the old hardware, here’s how to clean old furniture hardware to bring back its shine.
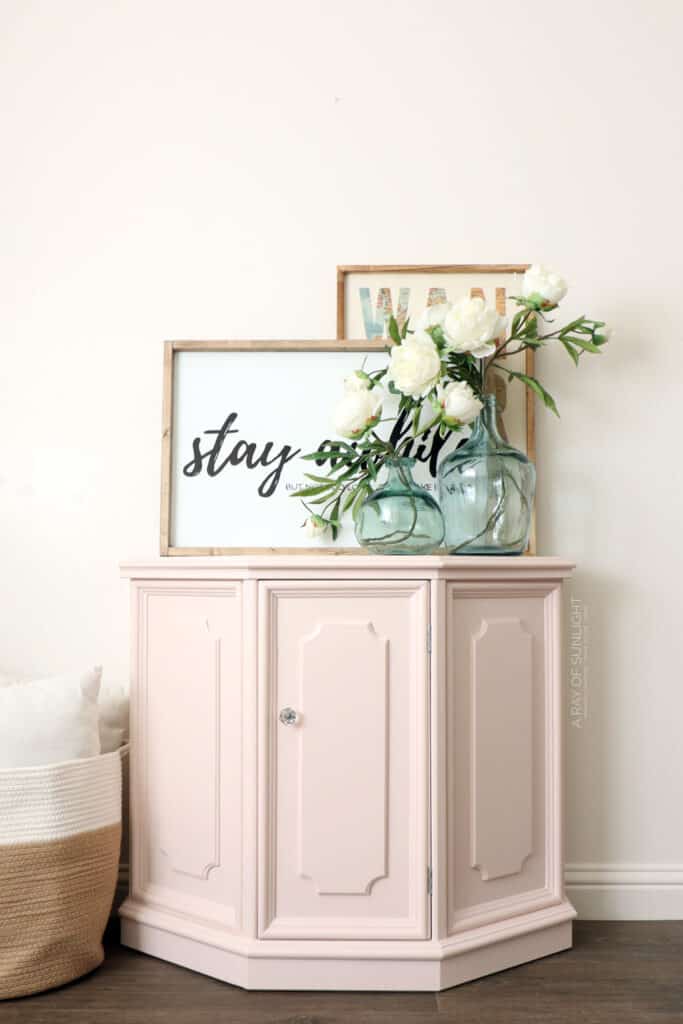
And here’s how the painted hallway cabinet makeover turned out!
More Before and After Makeovers
See All >
Click any of these “before” photos below to view the “after” of that makeover.


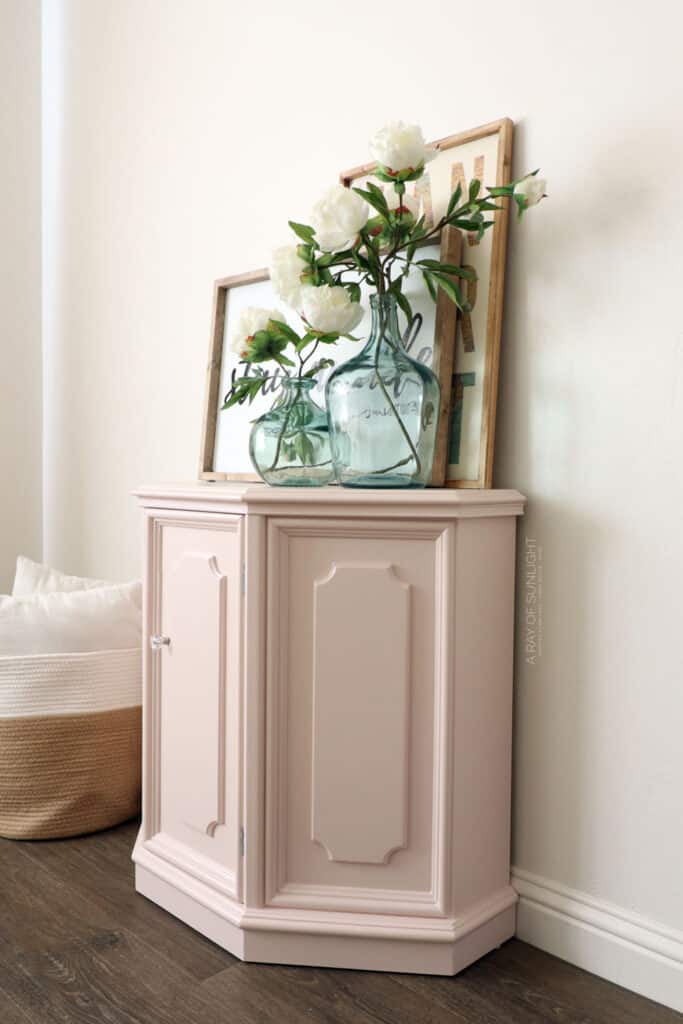
Goodbye old outdated finish, hello modern look! If you like this pink color, here’s our list of pink dresser ideas and pink painted furniture ideas you can get more inspiration from.
More Painted Hallway Cabinet Ideas
Hallway cabinets are not only functional pieces, but they also serve as a great opportunity to add some style and personality to your home. Here are some more creative and unique ways:
- Use a bold color: These bold furniture paint colors will help make your piece a great focal point in your hallway.
- Add patterns or stencils: If you’re feeling adventurous, try adding some patterns or stencils. Here’s how to stencil painted furniture to guide you. You can also use wallpaper like these wallpaper dresser ideas.
- Go for a distressed look: This has a rustic and charming appeal that can add character to any space. Try distressing with these distressing furniture techniques.
- Use multiple colors: Who says you have to stick to just one color? Create a fun and playful look with multiple colors! Check out these creative dresser ideas to get some colorful inspiration.


Aside from this pink painted hallway cabinet makeover, there is so much more you can do to add a pop of color and style. So, we hope with this guide and these additional ideas, you’ll feel inspired to transform your own pieces!


Painted Hallway Cabinet Makeover
This old hallway cabinet goes from outdated to fresh and new. Here are the steps for this painted hallway cabinet makeover.
Materials
Tools
- Power Sander
- Shop Vac with Hose and Brush Attachment
- Mini 3/8" Nap Roller
- Chip Brush
- Paint Sprayer
Instructions
- Prep your hallway cabinet for paint by removing all of the hardware, including the door hinges. Clean it with Krud Kutter and when it dries, scuff-sand the cabinet to make sure the paint sticks really well. Vacuum up all of the dust and wipe it all down with a tack cloth to remove any remaining dust.
- Apply a few coats of primer to block bleed through. After about an hour the primer dries, sand the primer down a bit with 220 grit sandpaper to remove any texture it created. Clean up all the dust from sanding.
- For any seams, fill them in with some paintable caulking. Squeeze it on and then use your finger to push it into the seams, and then use a damp rag to remove the excess caulking.
- Mix the paint in the sprayer's container, making sure to filter it, and then mix in some water to thin it out a bit.
- Spray a few coats of paint onto the hallway cabinet. Let paint dry for about 2 hours in between each coat, and also sand in between each coat to knock down some texture that's left behind.
- After the last coat of paint is dry, spray on 3 separate coats of clear, water-based poly. Also sand in between the coats of poly with 400 grit sandpaper to make sure the finish is silky smooth when done.
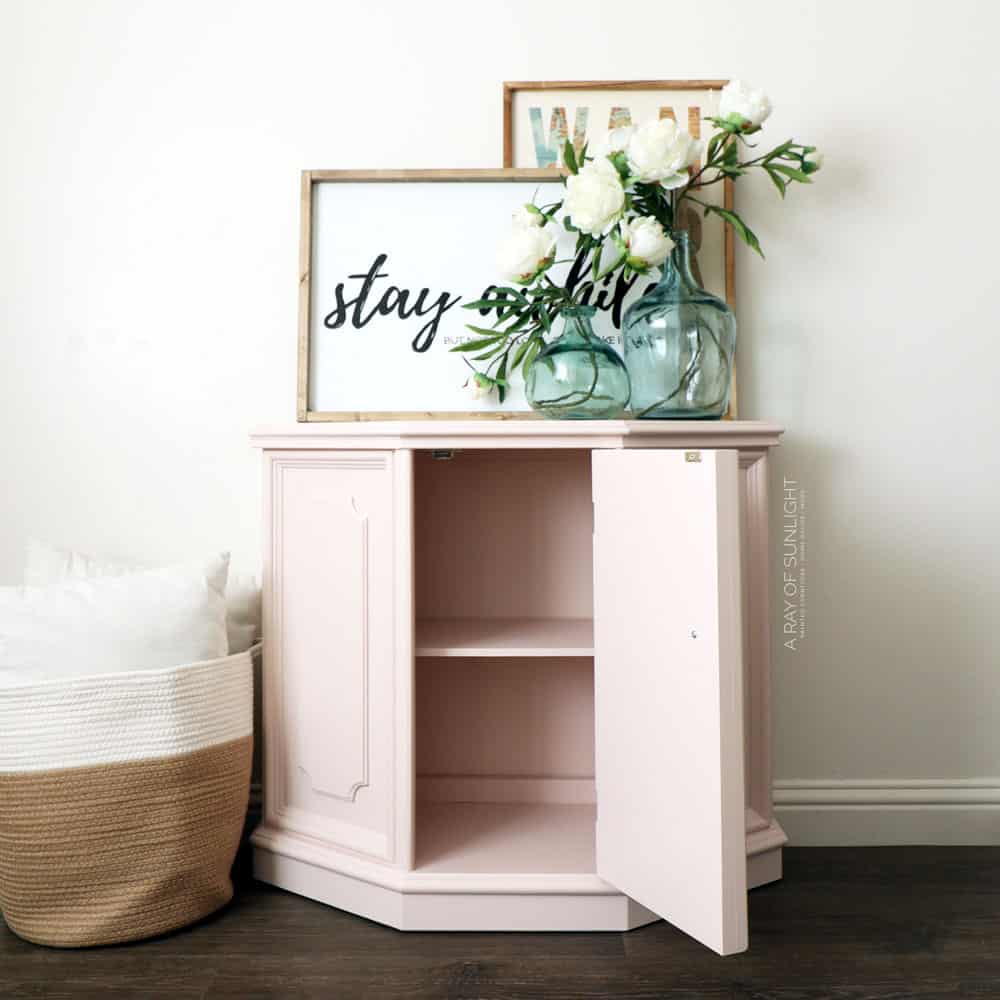
- Put the cleaned-up hinges back on and a new knob.
Recommended Products
As an Amazon Associate and member of other affiliate programs, I earn from qualifying purchases.


More Pink Painted Furniture Ideas

Follow us on YouTube to get more tips for painting furniture. Or share your project with us on our Facebook Group and be part of our community. See you there!