How to Use a Wagner Double Duty Paint Sprayer
Learning how to use a paint sprayer on furniture for the first time can be intimidating. Especially a new paint sprayer. But we’re here to help break it down into bite size, easy to digest pieces so you can tackle your next project. Here’s how to use a Wagner Double Duty paint sprayer.
If you have this Wagner model or are thinking about buying one, this guide will come in handy as we’ll take you through the steps of how to use it and share some tips along the way.
I remember when I first bought my Wagner Double Duty paint sprayer. I was excited, nervous, and confused. But I’m so glad I took the plunge and learned how to use it!
It served me well over the years, and really made painting furniture go SO much faster! (Read our honest Wagner Double Duty paint sprayer review here!)
So here’s a breakdown of how to use a Wagner Double Duty paint sprayer, followed by some Frequently Asked Questions that I’m sure will really help.
As an Amazon Associate, I earn from qualifying purchases. I also may earn from other qualifying purchases with other companies or get free product to review and use. All opinions are my own.
Supplies For Using a Wagner Paint Sprayer
- Wagner Double Duty Paint Sprayer
- with the included Viscosity Cup
- Paint
- Mesh Filters
- Thinning Agent (More about that below)
- Cardboard to Test on
- Mask / Respirator
Don’t skimp here. I know it’s super tempting to skip the filters, but they can make or break using a paint sprayer.
If you get clumps in the paint sprayer, it will clog. And then you will have to get that clog out before finishing your project.
How to Use a Wagner Double Duty Paint Sprayer
NOTE: If you’re really nervous, try spraying water through the paint sprayer before spraying paint. You’ll be able to get a hang of some of the controls, and not have to worry about messing anything up!
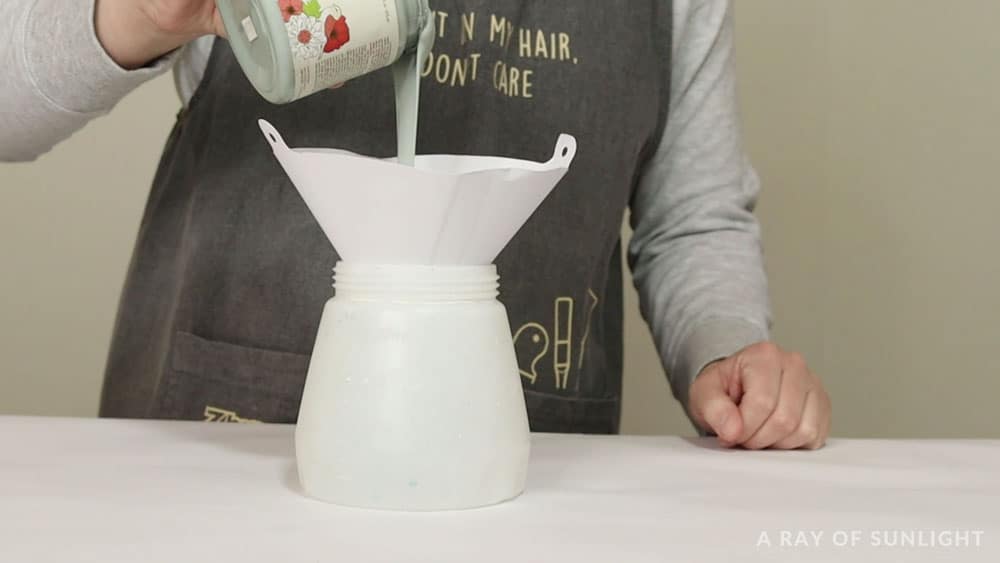
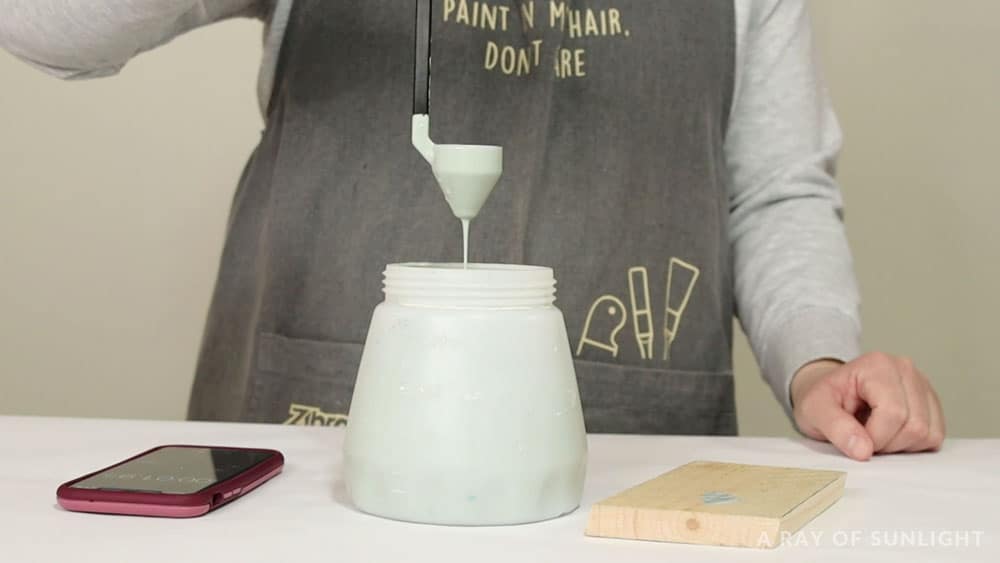
Filter the Paint into Sprayer Container
- First, mix your paint really well.
- Then set a mesh filter over the container, and pour your paint into the filter.
- Use a stir stick to help the paint go through the filter and into the sprayer’s container.
All of those supplies are very much needed, so make sure you have them all before starting!
You may be thinking that you just want to skip this step, especially because you’re using a brand new can of paint. Don’t skip this step!
If you don’t have a mesh filter that I suggest and use, you can make a flour sifter or anything that has fine mesh work. The goal is to catch any clumps, tiny debris, or dried paint before it gets into the paint sprayer.
Thin the Paint with the Viscosity Cup
Once the paint is clump free, and in your paint sprayer’s container, it’s time to thin it!
Yeah, it doesn’t sound much fun, but it’s totally necessary to make the Wagner Double Duty paint sprayer work. But, it also helps your paint level out better and not have little bumps when it’s dry.
I even thin the paint in my really high end professional paint sprayer (even though it can totally spray thick paint without any thinning!)
What to Thin Paint With
It just depends on what type of paint you are using. Water based paints can be thinned with water or Floetrol. Oil based paints should be thinned with paint thinner.
If you’re not sure, check the label on your paint to see what they suggest cleaning it up with. I’ll refer to these as the “thinning agent”.
How to Thin Paint for Wagner Sprayers
Thankfully the Wagner Double Duty paint sprayer comes with a little black viscosity cup that takes all of the guessing out of thinning paint!
- Stir some thinning agent into your paint (make sure it’s mixed really well!)
- Fill the viscosity cup completely full of the thinned paint.
- Use a stopwatch to see how long it takes for the paint to completely run out of the bottom of the viscosity cup.
You want the paint to empty out of the viscosity cup in about 35-40 seconds.
If it takes longer for the paint to run out, add more thinning agent. If it runs out faster than 35 seconds, add more paint to your container (make sure you filter it!) Learn more about how to thin paint for a Wagner sprayer here!
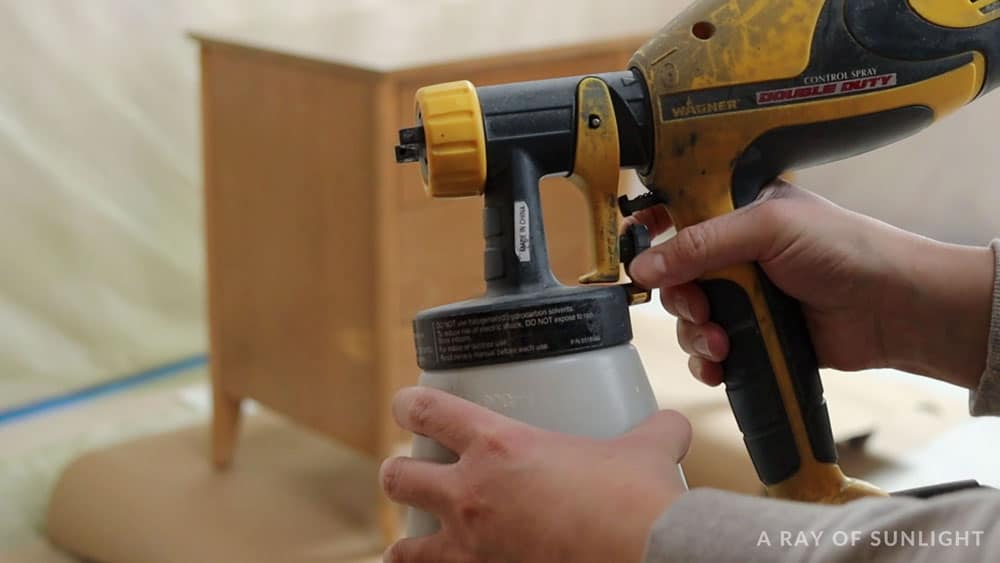
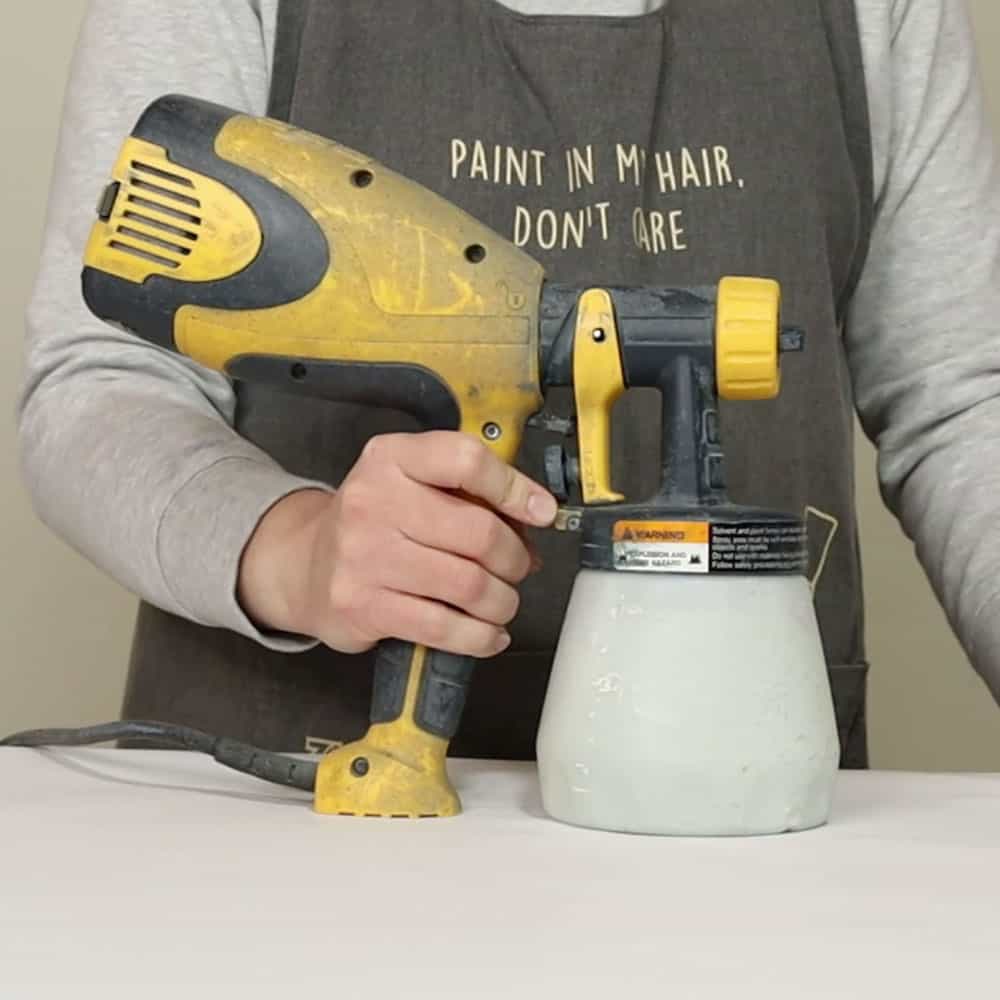
Once it’s the right thickness (or viscosity) you can screw the head of the sprayer onto the container, and then attach the turbine to the sprayer and container.
Test the Spray and Settings on Cardboard
TEST IT before you start spraying your project!
You can mess around with the settings to adjust how much paint comes out of the sprayer when you pull the trigger. And you can change the spray pattern by twisting the air cap.
Spray a piece of cardboard until you have the settings how you want them!
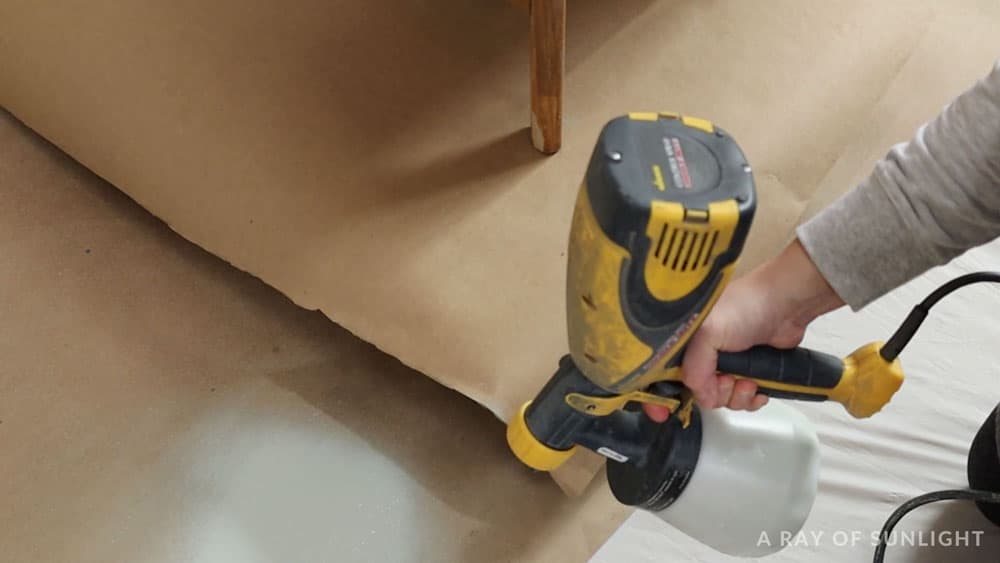
This is also a great time to make sure that the paint sprayer is spraying right.
Is the paint really really thin? Is it too thick and not spraying at all? Then adjust the viscosity of the paint.
Is too much or too little coming out of the sprayer? Then adjust the material adjustment knob behind the trigger.
Do you want it to spray vertical, horizontal or in a circle pattern? Twist the air cap and tighten the nut back up.
If there are any problems, you’ll be so glad that you tested on cardboard before spraying your project!
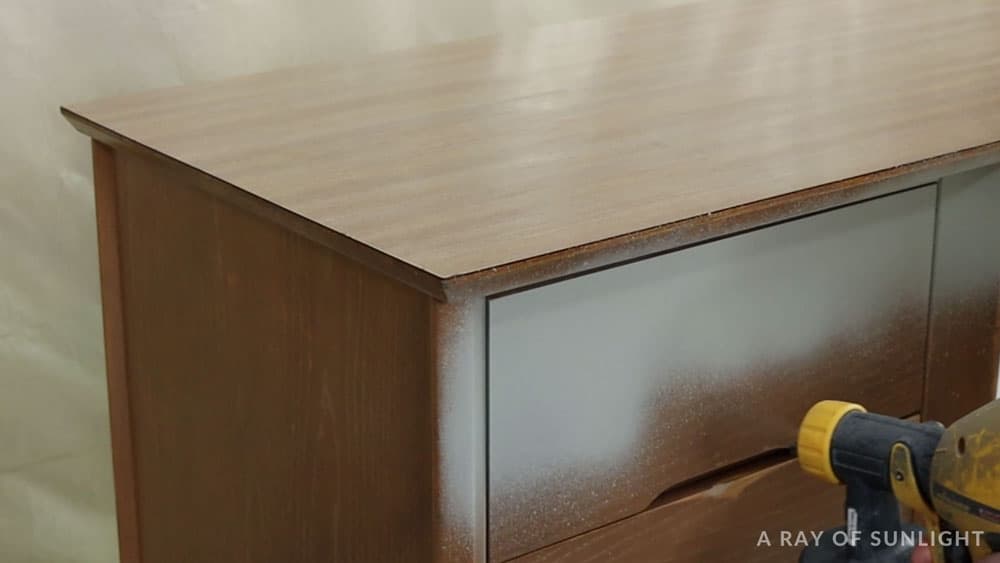
Paint Furniture with Wagner Sprayer
Once you’re happy with how it’s spraying, you can spray your project!
If you haven’t already, cover any surface that you don’t want to get painted. Here’s a great post on how to prevent overspray when painting furniture!
Try to keep the sprayer as level as possible, and move at the same speed over the entire piece. Spray thin coats at a time so you don’t have problems with the paint dripping. Learn more, and watch a quick video on painting furniture with a sprayer here.
Clean Wagner Sprayer
Once you’re done spraying, take 5-10 minutes to clean the paint sprayer. Here’s a quick rundown, but you can learn more about how to clean a Wagner paint sprayer here.
Dump out any paint you have left in the container, and then rinse the container and suction tube off.

Then fill the container with the appropriate cleaning agent. Spray the cleaning agent through your paint sprayer to remove any paint from the inside of the sprayer.
Would you like to save this?
Then disassemble the sprayer and remove any paint from all of the pieces. Once it’s clean, let everything dry before you put it all back together.
Here’s a video all about using a Wagner Double Duty paint sprayer to paint furniture:
How often should you clean Wagner paint sprayer?
It’s key to give your Wagner paint sprayer a good clean after each use. This will help prevent any leftover paint or debris from drying and clogging up the sprayer, making it easier to clean and maintain in the long run. Plus, a clean sprayer means better results for your next project!
Besides cleaning after each use, it’s also a good idea to give your Wagner paint sprayer a very thorough clean if you’re switching between different materials, like from paint to stain. This helps avoid cross-contamination and keeps your sprayer in top shape for each material type.
And of course, if you run into any issues with your sprayer, it’s always a good idea to give it a thorough clean before trying again. For this, taking apart your paint sprayer is the answer. Here’s how to take apart a Wagner paint sprayer! A little extra cleaning really goes a long way in keeping your Wagner paint sprayer running smoothly.
Can You Use Chalk Paint in a Wagner Sprayer?
YES! Chalk paint is the number one type of paint that I use. You may have to thin it out more than regular paint because it’s thicker. But I have never had a problem with using chalk paint in my sprayer.
Spray Polyurethane With Wagner Sprayer
Spraying water-based polyurethane is my absolute favorite way to apply polyurethane!
You can spray it without thinning, though I do like to add a little bit of water to my water based polyurethane to make it dry more smooth.
Check out this post on how to spray polyurethane for step by step details on the best way to spray poly!
Can You Use Stain in a Wagner Paint Sprayer?
Yep! It’s super easy to spray stain with your paint sprayer. I personally don’t do it very much because I don’t like to use mineral spirits to clean it up.
Since stain is so thin, you don’t need to thin it out with anything. Just filter it into the container, and start spraying.
When it comes to clean up, you’ll need to use mineral spirits instead of warm soapy water.
Can You Use Oil Based Paint in a Wagner Sprayer?
Yes! Just like with stain, you’ll need to use mineral spirits to clean it up. And you’ll need to use paint thinner to thin it out enough.
How Long Can You Leave Paint in a Wagner Sprayer?
Well, you technically shouldn’t leave paint in your paint sprayer for more than a few hours. But, I’ve honestly left chalk paint in mine for a couple of weeks and been fine.
I don’t recommend it though! I especially don’t recommend it if you’re using oil based, or quick/hard drying products.
Typically, the best practice is to clean it out after a few hours if you’re spraying multiple coats within a few hours. If you aren’t going to spray again within a few hours, clean it out.
The longer you let the paint in your sprayer, the harder it will be to clean. And if you let it sit for too long, you’ll ruin your paint sprayer.
How to properly store Wagner paint sprayer when not in use
When you’re done using your Wagner paint sprayer for the day, it’s important to properly store it so that it stays in good condition.
Once your sprayer is clean and dry, reassemble the sprayer and place it back in its original box or a secure storage container. This will help prevent dust and debris from accumulating on the sprayer.
Make sure to store the sprayer in a cool, dry place where it won’t be subjected to extreme temperatures or moisture. This will help extend the life of your sprayer and prevent any damage from occurring.
When you’re ready to use your Wagner paint sprayer again, simply take it out of storage, clean it out if it got dirty in storage, and start painting!


Wagner Paint Sprayer is Not Spraying
There are a few things that can make a Wagner Paint Sprayer keep clogging. A lot of these are simple things to fix.
Q: Is it plugged into a working outlet? 😉
A: Make sure it’s plugged into a working outlet.
Q: Is the material adjustment knob too far back, making the trigger not able to move?
A: Adjust the knob to see if anything comes out.
Q: Is the tip of the nozzle plugged with dry paint?
A: Scratch off the tip of the nozzle to remove any paint. Or take off the nozzle and clean it out with a small brush.
Q: Is the container screwed on as tight as possible?
A: Screw the container on as tight as you can.
Q: Is the suction tube pushed all the way in with the container seal pushed into place?
A: Insert the suction tube and container seal as far as you can.
Q: Are there clumps in your paint?
A: Clean the sprayer and filter the paint.
Q: Is the paint too thick?
A: Thin out the paint using the viscosity cup.
Check out my Wagner paint sprayer troubleshooting guide to help you out if you encounter any problems with your paint sprayer.
Filtering your paint through a mesh filter before putting it in the sprayer is super important, and the number one reason why I ever had issues with my paint sprayer not spraying.
*NOTE: Sometimes you can adjust the material adjustment knob (so the trigger can go back as far as possible), and spray for a few seconds to get the little clog out. If not, follow the instructions below.
The next reason was that my paint was too thick. In either case, the best thing to do is to clean the paint sprayer out, and start over.
- Dump the paint back into its original container.
- Rinse out the sprayer’s container and the suction tube.
- Spray the cleaning agent through the paint sprayer.
- Rinse it out.
- Filter the paint into the sprayer’s container.
- Test the thickness with the viscosity cup.
- Try spraying again.
If your sprayer can spray water or the cleaning agent, then you know it’s not because of the sprayer. The problem lies with the paint.
If you can’t get water to spray out of the sprayer, you probably don’t have a setting right, or the sprayer isn’t assembled correctly.
You’ve got this!

How to Use a Wagner Double Duty Paint Sprayer
Learning how to use a paint sprayer on furniture for the first time can be intimidating. Here’s how to use a Wagner Double Duty paint sprayer.
Materials
- Paint
- Mesh Filters
- Thinning Agent
- Cardboard to Test on
Instructions
- First, mix your paint really well. Then set a mesh filter over the container, and pour your paint into the filter. Use a stir stick to help the paint go through the filter and into the sprayer’s container. This is to catch any clumps, tiny debris, or dried paint before it gets into the paint sprayer.
- Once the paint is clump free, and in your paint sprayer’s container, it’s time to thin it! Stir some thinning agent into your paint (make sure it’s mixed really well!) Fill the viscosity cup completely full of the thinned paint. The paint should empty out of the viscosity cup in about 35-40 seconds. If it takes longer for the paint to run out, add more thinning agent. If it runs out faster than 35 seconds, add more paint to your container (make sure you filter it!)
- Test the spray and its settings on a cardboard. If the paint is really really thin or too thick and not spraying at all, adjust the viscosity of the paint. If too much or too little is coming out of the sprayer, adjust the material adjustment knob behind the trigger. If you want to spray vertical, horizontal or in a circle pattern, twist the air cap and tighten the nut back up.
- Once you're happy with the paint sprayer settings, you can spray paint your furniture! Try to keep the sprayer as level as possible, and move at the same speed over the entire piece. Spray thin coats at a time so you don’t have problems with the paint dripping.
- Once you’re done spraying, take 5-10 minutes to clean the paint sprayer. Dump out any paint you have left in the container, and then rinse the container and suction tube off. Then fill the container with the appropriate cleaning agent. Spray the cleaning agent through your paint sprayer to remove any paint from the inside of the sprayer. Then disassemble the sprayer and remove any paint from all of the pieces. Once it’s clean, let everything dry before you put it all back together.
Recommended Products
As an Amazon Associate and member of other affiliate programs, I earn from qualifying purchases.


More Paint Sprayer Resources
- Can you Spray Milk Paint?
- HomeRight Super Finish Max Paint Sprayer Review
- Wagner vs HomeRight Paint Sprayers
- Spray Paint vs Brush Paint Furniture
- Wagner Control Spray 250 Review
Follow us on YouTube to get more tips for painting furniture. Or share your project with us on our Facebook Group and be part of our community. See you there!