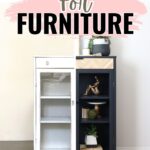
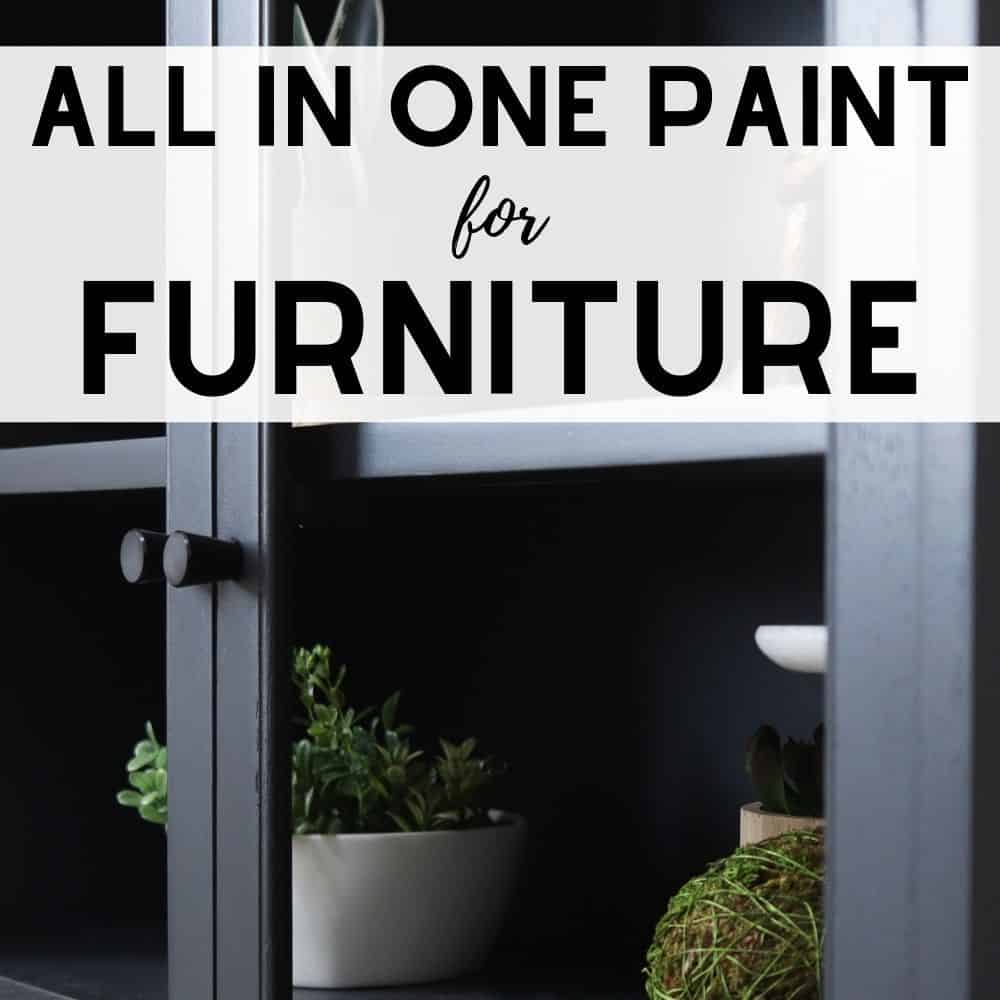
All in One Paint for Furniture + Cheap Herringbone Accent

This week, I’m spraying and sharing my updated thoughts on Heirloom Traditions All in One Paint for furniture. This is perfect for quick and easy furniture makeovers! With its all in one formula, it’s great for beginners or anyone looking to save time and effort on their DIY projects.
If you haven’t heard of or tried it yet, here’s Heirloom Traditions Paint for all the resources we have on this awesome product!
A few weeks ago, I tried out and reviewed a new to me paint for the first time in this Heirloom Traditions All In One Paint review, and I loved it… but I didn’t care for the textured finish that I got.

So here I am, trying to spray it on instead to get a smooth, texture free, and brushstroke free finish. Get more tips on how to paint furniture without brush marks here.
I added a cool herringbone accent to the drawer, too, and I’ll share how that went down as well. So, keep reading to learn more about this all in one paint for furniture and how to add a stylish accent to your piece.

Supplies Used for all in one paint for furniture makeover
As an Amazon Associate, I earn from qualifying purchases. I also may earn from other qualifying purchases with other companies or get free product to review and use. All opinions are my own.
- Heirloom Traditions All in One Paint – Weathervane
- Real Milk Paint Soft Wax
- Krud Kutter
- 150 Grit Sandpaper
- 220 Grit Sandpaper
- KwikWood
- Tack Cloth
- SurfPrep Sander (Use code RAY10 to get 10% off your order)
- Shop Vac hooked to the SurfPrep Sander
- JigSaw
- Clear Shellac
- Black Aqua Lock Primer
- Paint Filters
- Respirator
- Beginner Level Paint Sprayer (Here is its new model: Wagner Control Spray 250)
- Fine Grit Foam Sanding Pads (Use RAY10 to get 10% off your order)
- Jumbo Popsicle Sticks (the wide ones)
- Sharp Scissors
- Gorilla Glue
- Glue Brush (Makes it so easy to spread glue!)
- Oscillating Multi Tool
- Wood Filler (Natural and Golden Oak)
- 80 Grit Sandpaper
- Matte Topcoat (for herringbone drawer)
- Foam Sponge (to apply topcoat on drawer)
- Black Cabinet Knobs
- Black Drawer Pulls
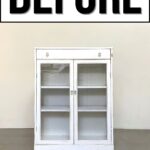
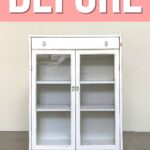
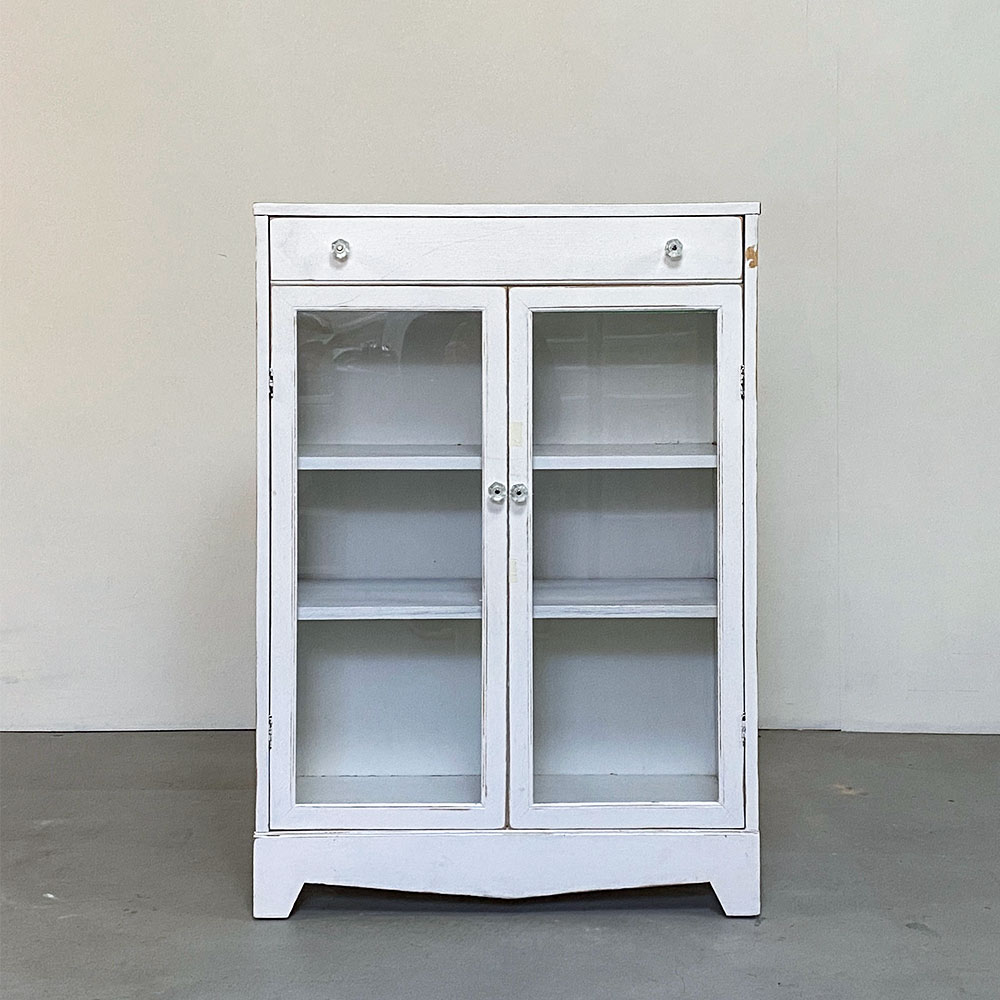
Alright, so here is the piece I worked on. A cute little farmhouse homemade cabinet that was at the thrift store for only $25.
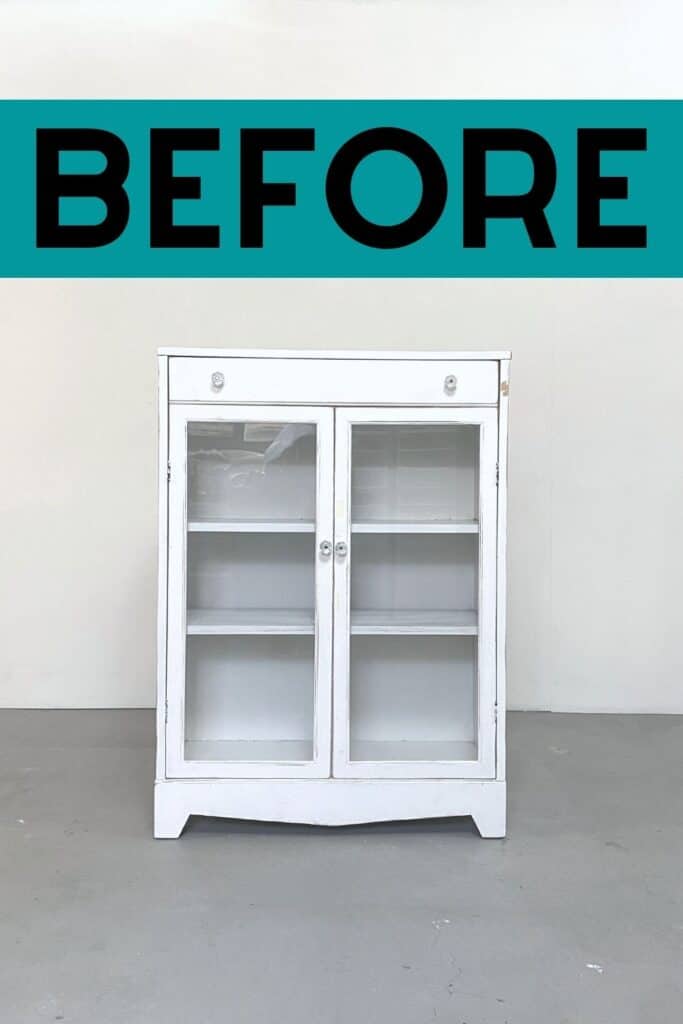
I’m not sure what it was coated with… whatever it was, it was stuck on pretty well. But there were a lot of drips and brush marks, and just not very good coverage overall.
Take Cabinet Apart and Make Repairs
First, I took everything apart. I removed the knobs, pried off the wood things to remove the glass, pulled off the back, and unscrewed the hinges to take off the doors.
That drawer kept getting stuck when I tried to close it, so I brushed some wax onto the tracks and sides of the drawers… and then it worked like new! It’s like magic! More tricks for old dresser drawers won’t slide here.
In case waxing doesn’t work, here are ways how to fix old dresser drawers that stick. If there is any damage on the drawers, check out these guides on how to fix broken dresser drawer tracks and how to fix a dresser drawer side.
And here are more broken dresser ideas to inspire you to fix and transform your old pieces.
Get Our Secrets!
Grab this super convenient How to Repair Furniture Ebook with all of our secrets on how to repair furniture for only $14.
You can print it out and have instant access whenever you come across damaged furniture, and know exactly how to fix it!
Click on the picture of the book to purchase!

Then, I cleaned the cabinet really well with Krud Kutter to make sure there wasn’t wax, grease, or dirt on anything else. Read more about how to clean furniture before painting here.
And then we sanded everything with 150 grit sandpaper to get rid of all of the brush marks in the existing finish.
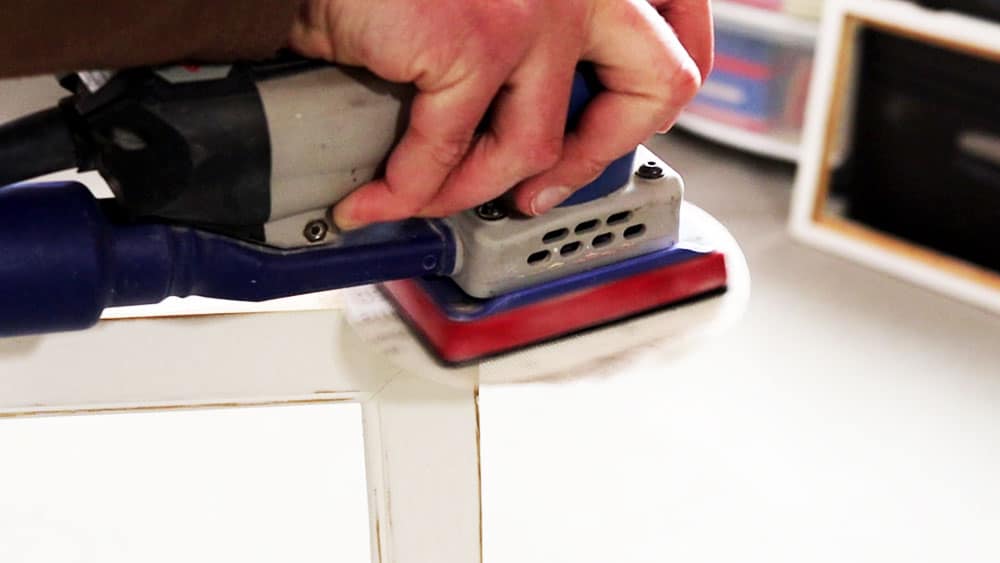
When the brush marks were all gone, we went back over everything with 220 grit to make sure the 150 grit didn’t make everything too rough. Learn more about the best sandpaper for furniture painting here. And check out the best sanders for furniture and the best sanders to remove paint here!
It’s funny the things that you don’t notice until you start working… while we were sanding, we saw that the back leg was a little damaged, so I filled that damage in with KwikWood. Read all about how to use KwikWood here and why I love it so much!
Cut Cabinet Base
I wanted this piece to look more modern and less primitive, so I marked some straight lines and cut the v-shaped base off with a jigsaw.
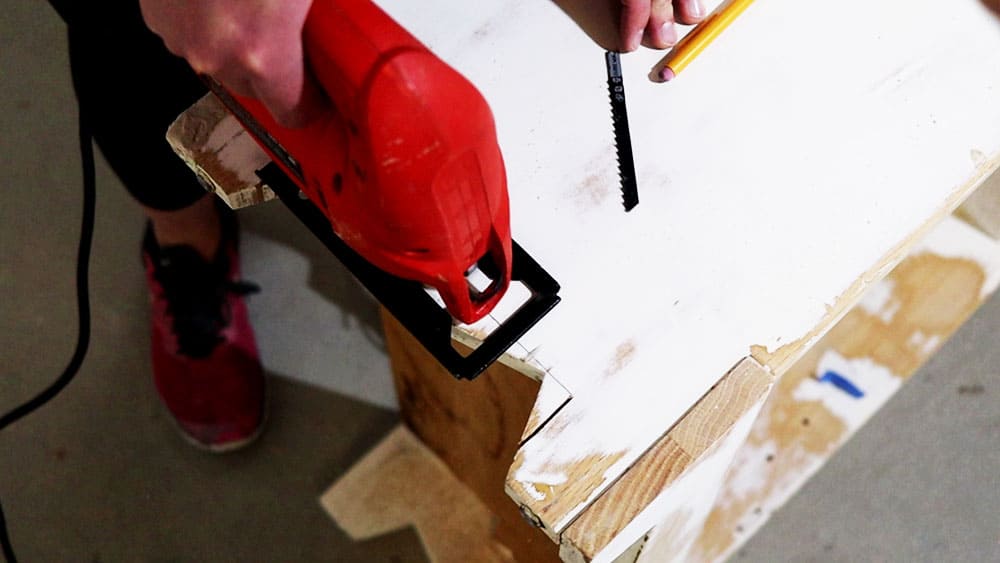
And then I sanded it to make my janky cuts look straighter.
Prime Cabinet (Usually Optional)
The next day, I moved the cabinet into my little work room and cleaned it off. If you look closely, you can see that there were a lot of bleedthrough stains coming through the old white finish.
And even though I was planning to use a dark color, I didn’t want those stains to come through the new finish. So I took the time to prime with my favorite stain blocking primer, this clear shellac. Learn more about the best primers for painting furniture here and how to stop stains from coming through paint here.
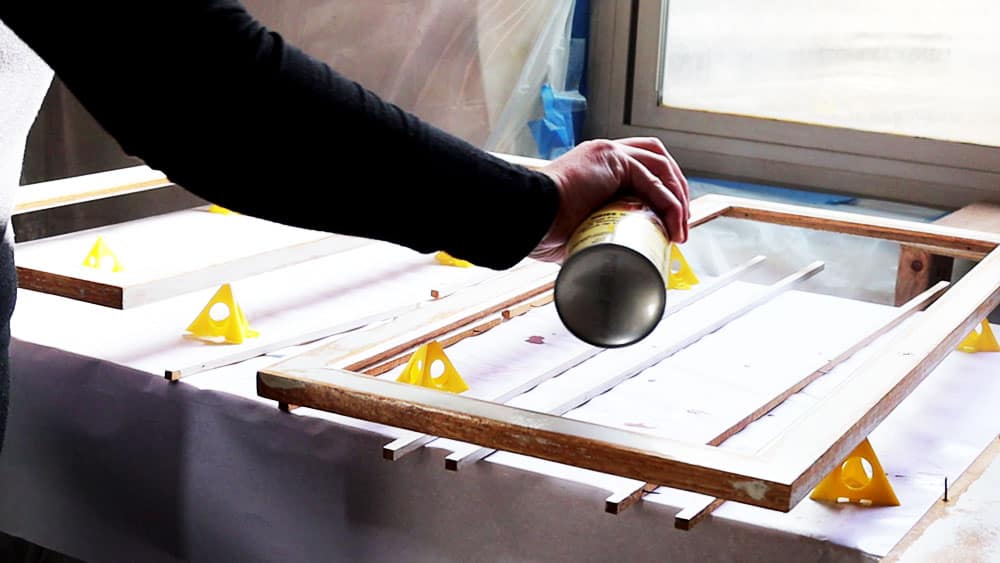
And then, I did another step that most of you will probably roll your eyes at. I primed it with a black primer called Aqua Lock. I thinned it out so I could apply it with my sprayer and have no texture.
Why Prime 2 Different Times??
- The cabinet was all spotty. Some spots had paint on them, some were down to bare wood. When you coat over spotty stuff like that, you’ll be able to see a difference between where there was raw wood and where there was an old finish.
- Clear shellac doesn’t do much to help with the coverage.
- And the Aqua Lock doesn’t provide true stain blocking power like shellac does.
- I love that Aqua Lock is black. True black. If I had primed with a white primer, I would have needed more coats of the dark color to cover all the white primer. Yeah, a grey tinted primer would have worked well, too! But I have a gallon of this Aqua Lock primer that I need to use.
A quick note, though: I didn’t prime to help with adhesion. I’ve tested Heirloom Traditions Paint over slick laminate, without sanding and without a primer, and it sticks very, very well. So if you aren’t worried about good coverage over raw wood, and if you aren’t worried about bleedthrough… no primer is required. Otherwise, you can check out these best primers to stop tannin bleed that you can use.
Here’s this 1-day dresser makeover for proof that painting furniture without sanding or priming with this product is totally possible! Also, check out these Heirloom Traditions Paint before and afters for more inspiration.
How to Use All in One Paint for Furniture
Alright, so now that is out of the way…
Can you water down Heirloom Traditions Paint?
You can! The back of the can says, “Do not thin,” but I have added water to Heirloom Traditions All in One Paint. I brushed 2 thin coats, letting it dry between coats. And it passed a scratch test after 24 hours of drying. (This was on a wood surface that had not been prepped other than cleaned off. Get all the tips and tricks on how to prepare furniture for painting here.)
While it’s not recommended by the brand, I fully believe that you can thin it out without compromising its durability and adhesion. Check out this guide for painting furniture with Heirloom Traditions Paint.
Can you use Heirloom Traditions Paint in a sprayer?
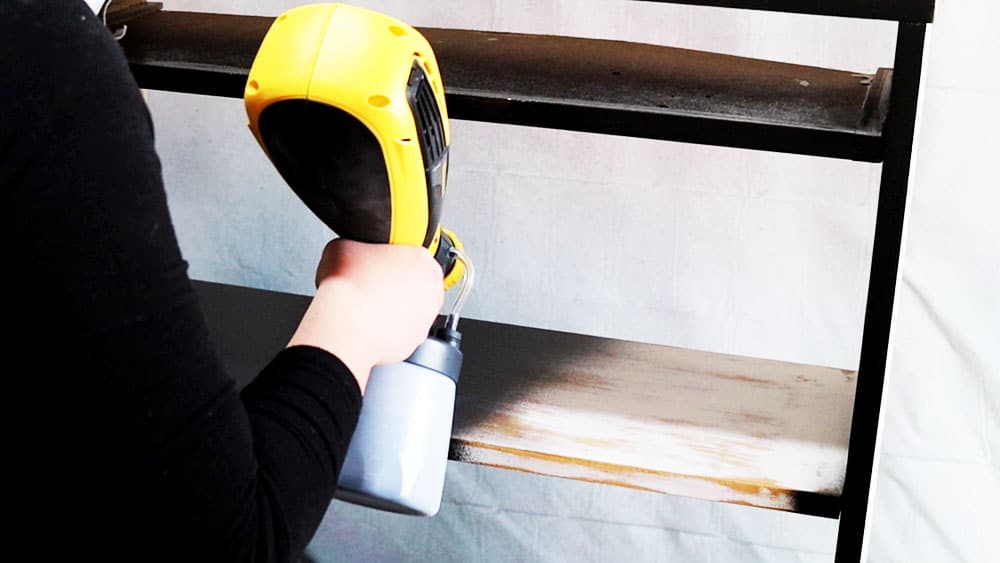
Yes! You’ll want to thin it out with some water to make it spray to a finish that doesn’t have texture and to make it spray easier.
I added about 20% clean water to it and then mixed everything really well. So, I had 15 ounces of paint and added about 3 ounces of water to it. And then I mixed it really well. Here’s a more detailed guide on how to thin paint for a Wagner sprayer.
I tested out the spray, and then I sprayed everything…
Would you like to save this?
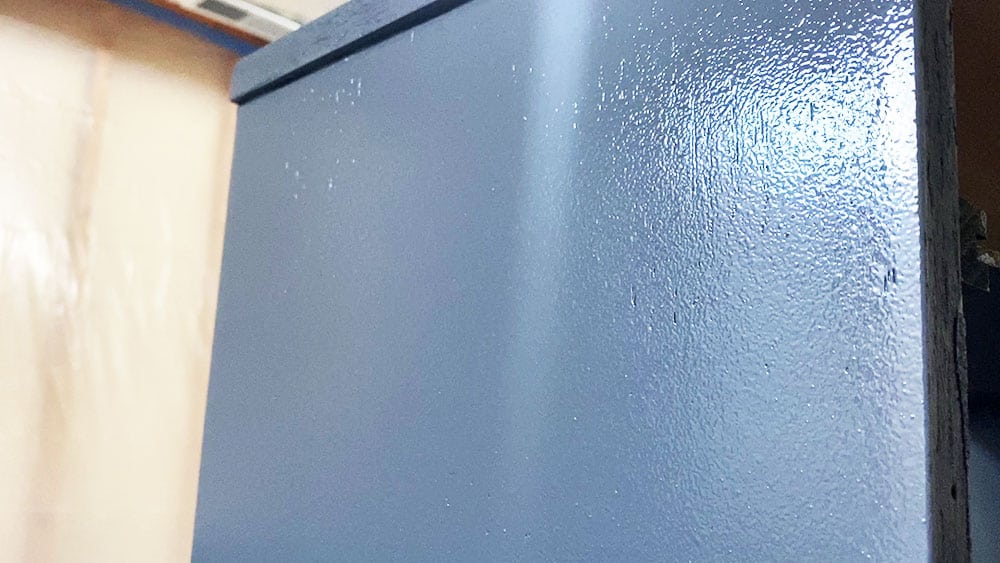
It sprayed with what seemed was going to be a lot of texture. But, after an hour or so, the paint was dry, and it was all smooth!
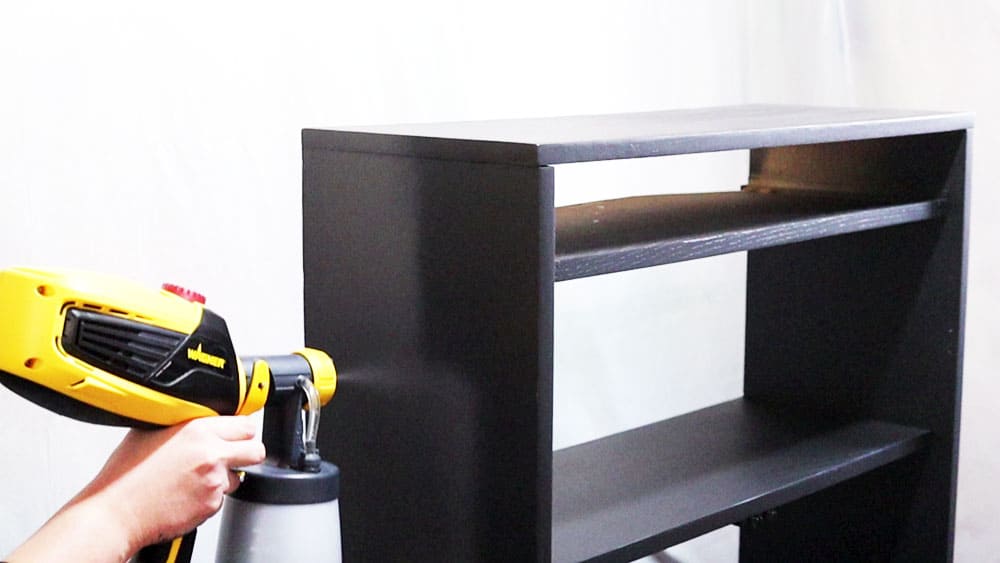
Sand Smooth and Apply 2nd Coat
Then, I sanded everything with 220 grit sandpaper and fine grit foam sanding pads. Between the primers and this first coat of paint, things were a little rough feeling, so this was just to make everything feel smooth.
Then I sprayed the 2nd coat. I tried to apply it on thick enough that it didn’t dry within 5 minutes… but not so thick that there were drips and runs. If you end up dealing with drips, here’s how to fix spray paint drips to make sure you have an even finish.
That middle ground thickness helped the paint level out and feel really smooth when it dried. In the end, I think I used around ¾ of the quart. Read this post to learn more about painting furniture with a sprayer.
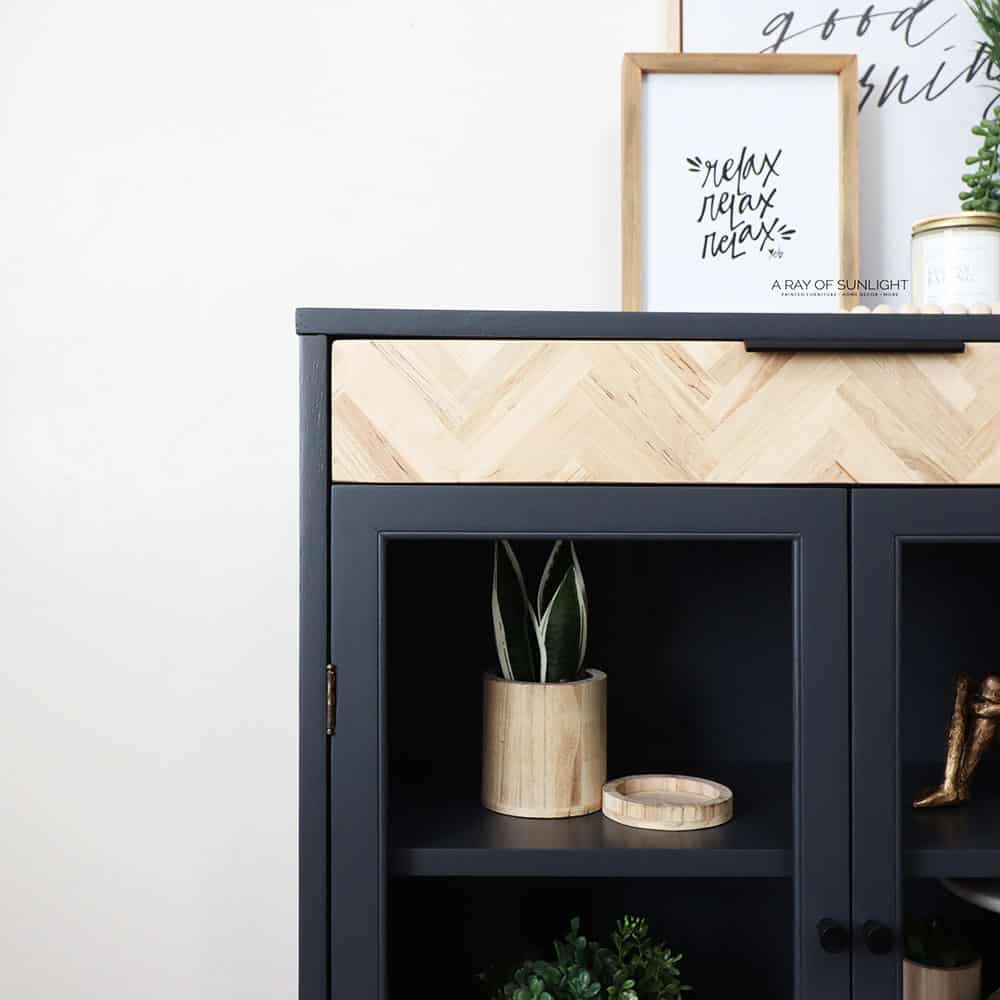
Make the Herringbone Drawer
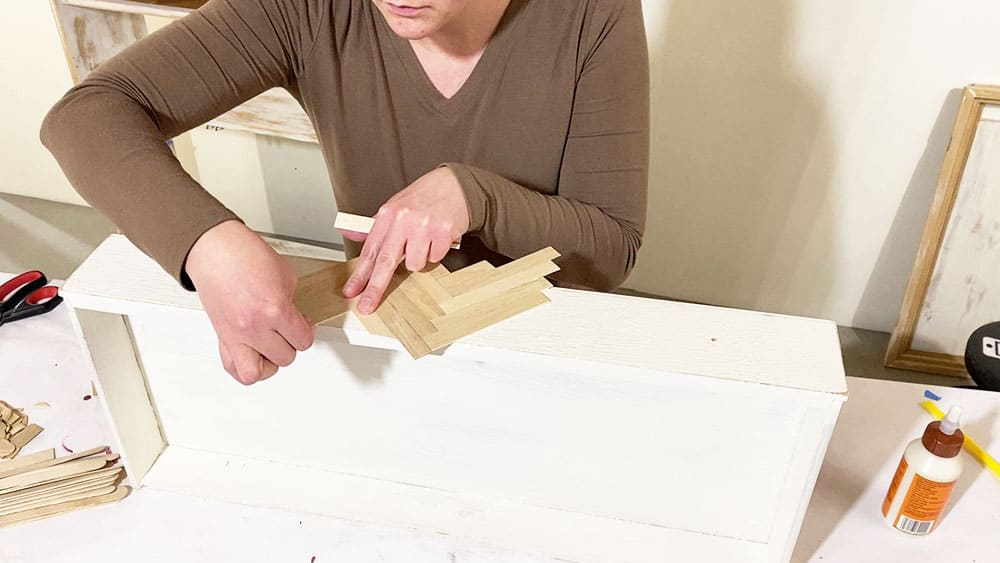
Alright, let’s talk about the drawer. I lined up some popsicle sticks and marked a straight line on them so I would cut them all to the same size. Then I just cut them with some scissors.
I wanted to make sure that I did it right, so I laid out the design on the table… And then, I glued them onto the drawer with gorilla glue.
What is herringbone furniture?
By the way, I saw this idea from Katie at Salvaged by K Scott and thought it was brilliant!
The herringbone pattern is a popular design that features zigzag or chevron shaped pieces laid out in an alternating pattern. You’ll often see it on tables, dressers, or flooring, and it’s a great way to add a bit of texture and visual interest to any piece.
The material you use can give this pattern a cozy feel or a modern vibe. Wood adds a cozy, rustic feel, while sleek tile or marble gives it a more modern, elegant look. You can also play with colors and finishes to make the herringbone stand out or blend in with the rest of your decor.
I put a piece of wood on the top and clamped it down to keep the sticks from moving. The next day, I popped off the clamps and used my multi tool to cut off the sticks….
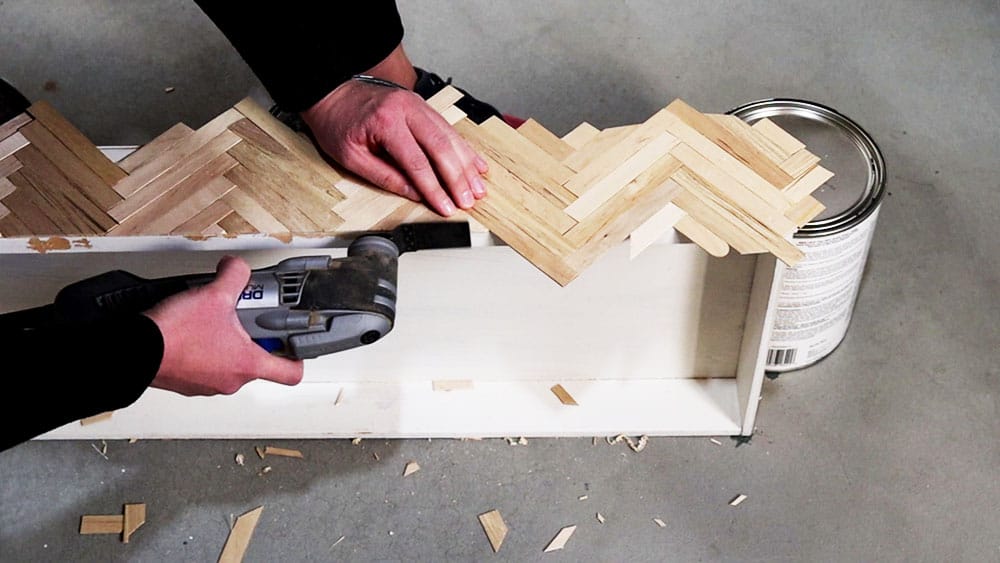
It went really well until I cut the bottom. The bottom of the drawer wasn’t completely flat, so the sticks didn’t stick as well to the bottom… So I filled that little detail in with wood filler.. and then glued the sticks back on. Discover the best wood fillers you can use here!
The next day, I cut the sticks again… and failed again in some spots. At this point, I was so close, so I sanded the edge of the sticks with 80 grit sandpaper. I didn’t want them to stick out past the edge of the drawer or to be able to snag on anything. And then I glued those last couple of pieces back on…
The next day, I cut them again, but I got a little bit smarter, and I clamped a piece of wood over them so they wouldn’t wiggle off from the saw. It worked!!
So then I put some natural colored wood filler all over the sticks to fill in the gaps.
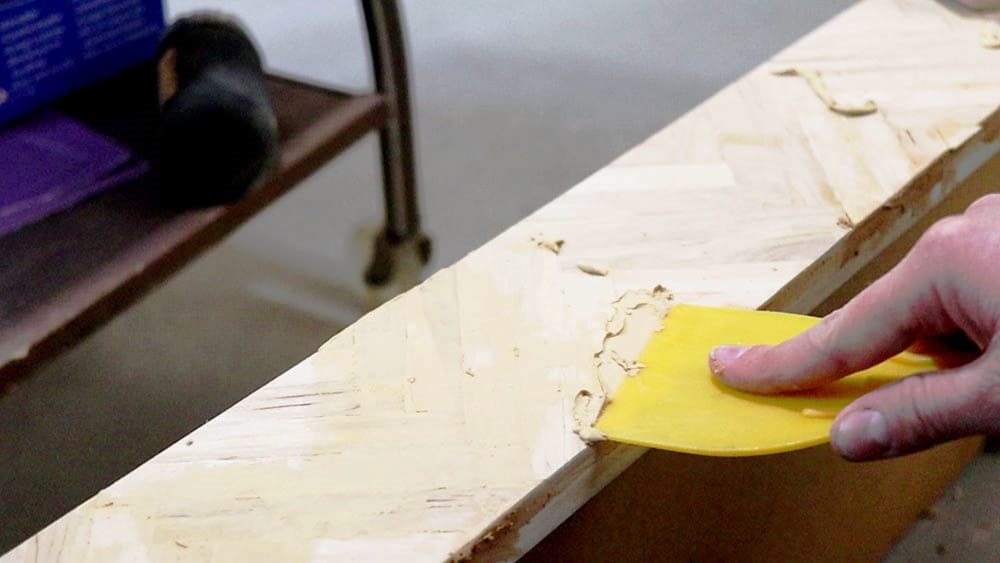
Once it was dry, I sanded the wood filler off… I ended up applying the wood filler 2 times to make sure everything was filled in. It looked SO good!!
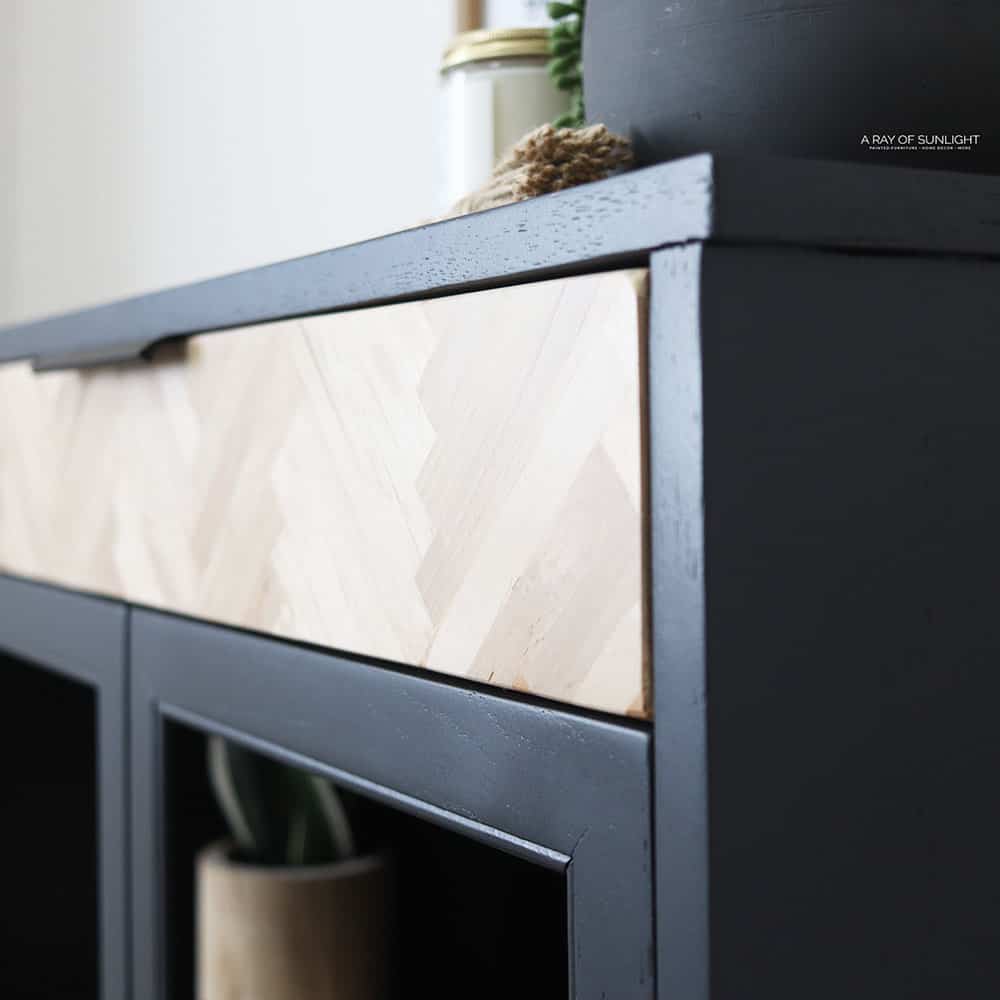
So then I cleaned everything off and top coated the drawer with 3 coats of matte poly and a foam sponge. Learn your options for topcoats for painting furniture here.

Clean Hardware and Reassemble Cabinet
Before I put everything back together, I cleaned the coating off the hinges. I just put them in boiling water for a few minutes, and then it came off pretty easily. For tougher jobs, here’s how to clean old furniture hardware.
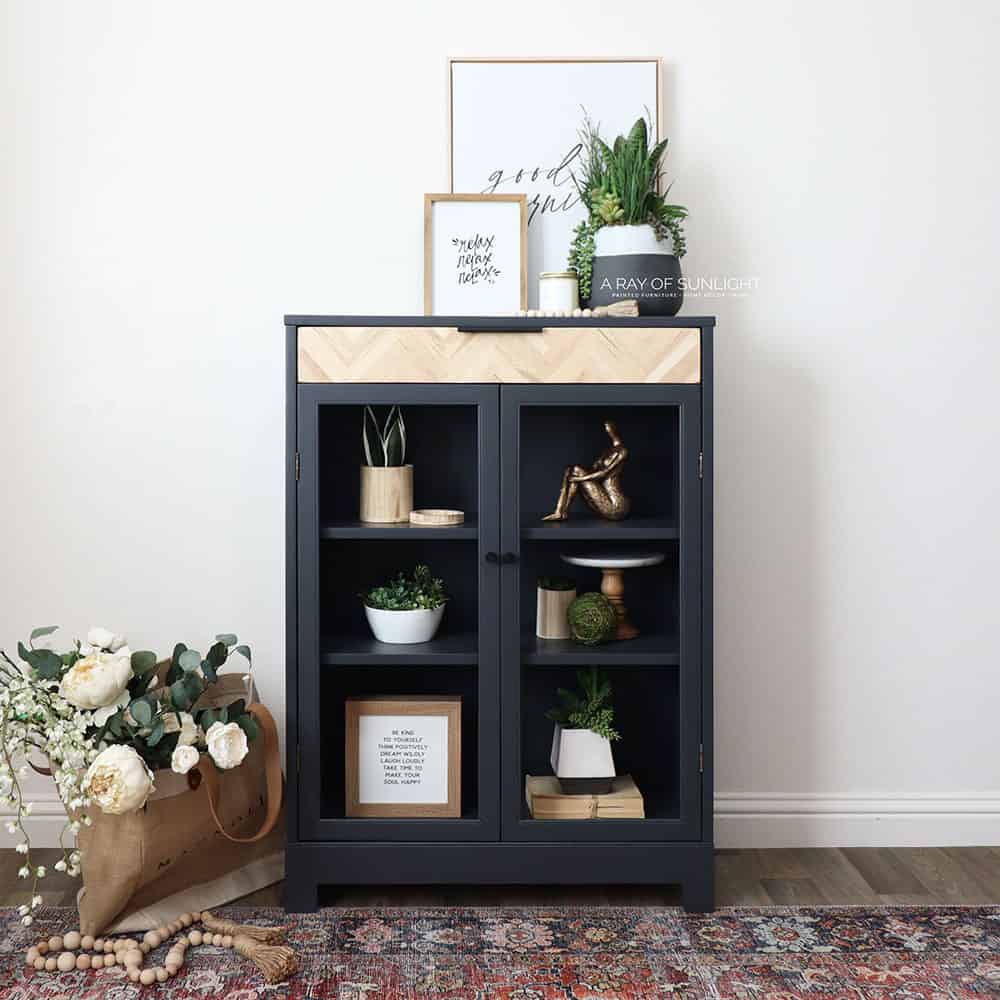
And here’s what it looks like now!!
More Before and After Makeovers
See All >
Click any of these “before” photos below to view the “after” of that makeover.


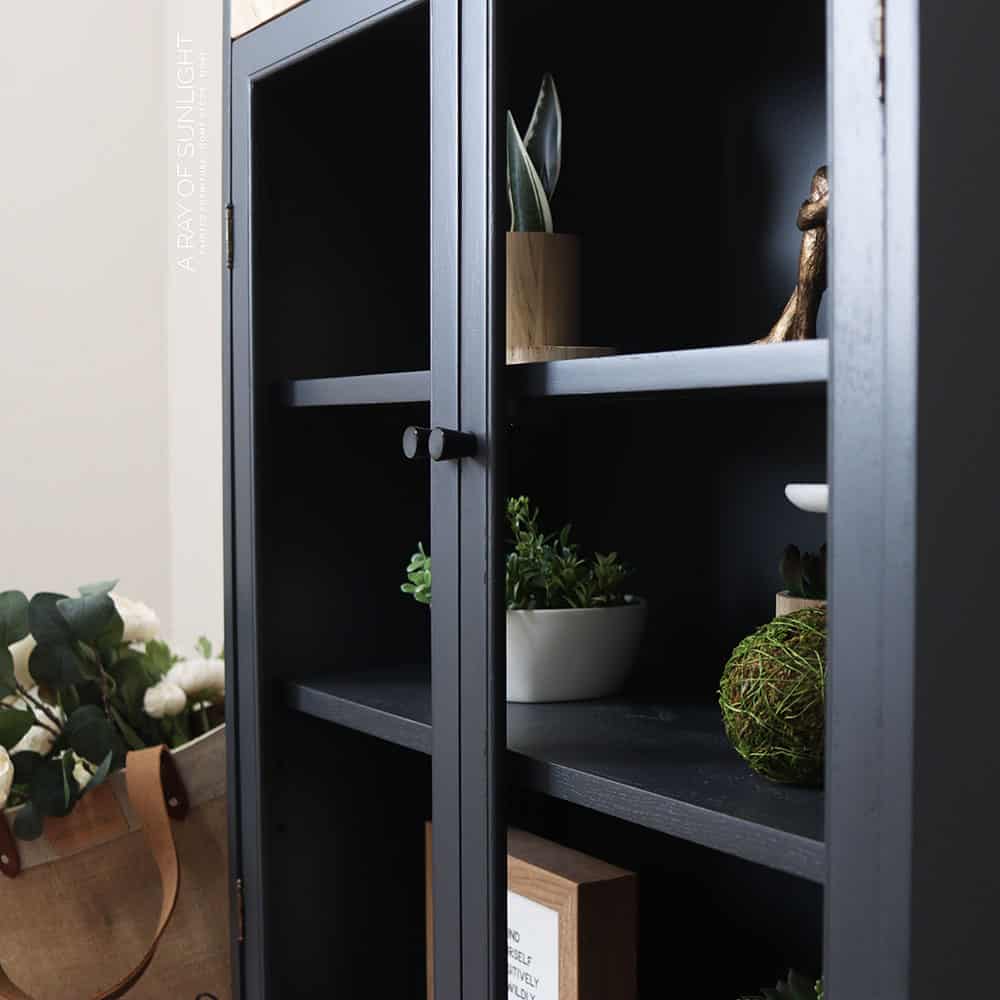
I love it!!! The paint sprayed on SO well. The finish looks absolutely amazing! And it’s durable! Oh, and I didn’t have to topcoat it. Haha
I think this stuff might just be one of my favorites out of these best all-in-one paints for furniture. Check out how to use all in one paint here for a more detailed guide on using one!
The herringbone drawer is my favorite, though. It definitely wasn’t easy… and I don’t know that I would want to do it on multiple drawers, but I love the way it looks! What do you think? If you have a bookshelf instead, check out these painted bookshelf ideas.
Does all in one paint need to be sealed?
Just like in this makeover, we did not use a topcoat! Again, the all in one formula means it has a built in primer and topcoat. Heirloom Traditions already dries to a beautiful satin sheen that doesn’t get dirty easily!
If you want a little extra protection or shine for your piece, you can still seal the new finish. This could be a smart move for high traffic areas or pieces you’ll be using a lot. Here’s everything about sealing painted furniture, including how to choose the right sealant.


Using an all in one paint for furniture can be a game changer in your DIY projects. It saves you time and money since you can skip the primer or topcoat if you want, plus it gives your piece a durable, gorgeous finish. And if you’re feeling creative, try adding a herringbone accent for a fun, unique look!


All in One Paint for Furniture + Cheap Herringbone Accent
Make any thrifted old furniture new again. Here's how to paint with All In One paint and add a cool herringbone accent.
Materials
- Heirloom Traditions All in One Paint - Weathervane
- Real Milk Paint Soft Wax
- Krud Kutter
- 150 Grit Sandpaper
- 220 Grit Sandpaper
- KwikWood
- Tack Cloth
- Clear Shellac
- Black Aqua Lock Primer
- Paint Filters
- Fine Grit Foam Sanding Pads
- Jumbo Popsicle Sticks
- Gorilla Glue
- Glue Brush
- Wood Filler
- 80 Grit Sandpaper
- Matte Topcoat
- Foam Sponge
- Black Cabinet Knobs
- Black Drawer Pull
Instructions
- Take the cabinet apart by removing hardware, prying off the wood things to remove the glass, pulling off the back, and unscrewing the hinges to take off the doors.
- Clean the cabinet with Krud Kutter to make sure there isn't wax, grease, or dirt on anything else.
- Make repairs on any damages.
- Cut the v-shaped base to make the legs look more modern.
- Prime the cabinet with a few coats of clear shellac. (optional)
- Thin out the all in one paint with some water so you can spray it to a finish that doesn’t have texture, and to make it spray easier. Add about 20% clean water then mix it really well.
- Apply 2 coats of paint. Sand everything after the 1st coat of paint with 220 grit sandpaper and fine grit foam sanding pads.
- Cut up some popsicle sticks and glue them to the drawer creating a herringbone pattern.
- Fill in the herringbone gaps with some wood filler. Once it dries, sand the wood filler off.
- Topcoat with 3 coats of matte poly.
- Clean hardware and hinges then reassemble the cabinet.
Recommended Products
As an Amazon Associate and member of other affiliate programs, I earn from qualifying purchases.


More All In One Paint Resources
- DIY Dresser Makeover
- Beyond Paint VS Heirloom Traditions Paint
- Fusion Mineral Paint VS Heirloom Traditions Paint
- How to Paint a Wooden Bench
- Melange One Paint Review
Follow us on YouTube to get more tips for painting furniture. Or share your project with us on our Facebook Group and be part of our community. See you there!
What color of paint from Heirloom did you use? I love the black color but want to order the right black.
Hey Christine! The color I used is in the list of supplies. If you click on it, it will take you right to the paint as well. Happy painting!
Absolutely love this and have the perfect piece to try this on.
Can’t wait!!!
Thanks once again for great inspiration and detailed “how to”.
Carol
Heirloom Traditions also has a true black called Iron Gate.
Love Iron Gate! It’s a great shade of black and looks sooo good on furniture!
Looks fantastic! I am waiting to find the right piece to try that popsicle stick effect. And happy birthday!
I am afraid I would have had to keep this little beauty!
This makeover is stunning. Thanks for sharing all of the details on how to make it work. Definitely love the herringbone detail as well. This post will be a feature this week. #HomeMattersParty
Rather a busy/dislocated presentation style.