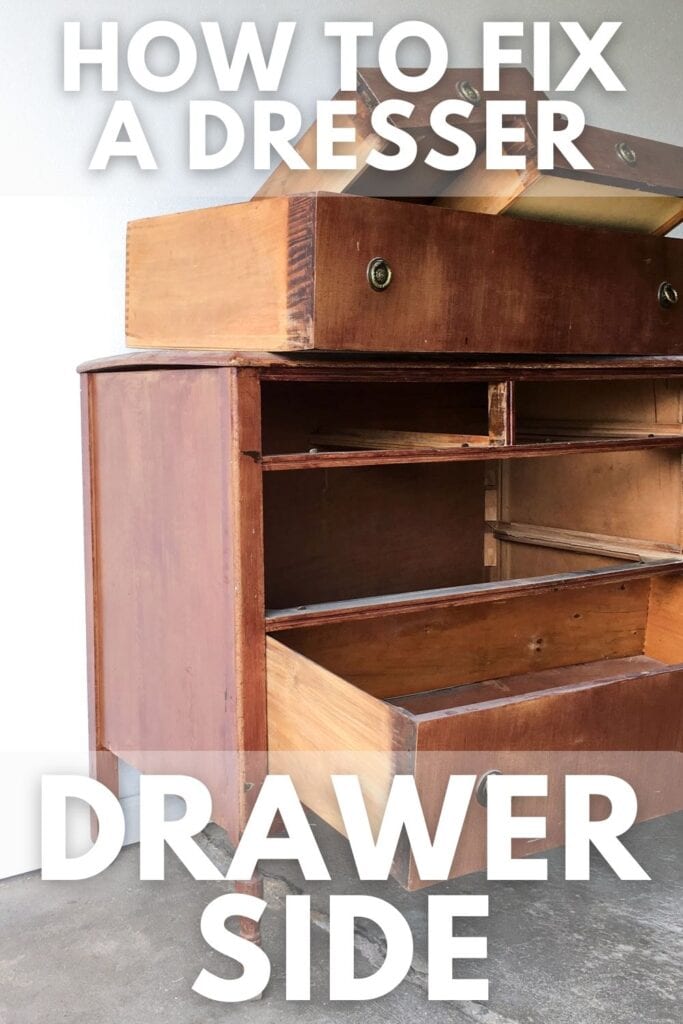
How to Fix a Dresser Drawer Side
Are you having trouble opening and closing your dresser drawer? For your stuck drawers, here’s how to fix old dresser drawers that stick. But if worst comes to worst, and the drawer side breaks off, well we’ve got your back with this guide on how to fix a dresser drawer side.
It doesn’t matter if it’s a new piece of furniture or you’re dealing with an old and creaky one – this guide will tell you all the steps you need to take in order to get your dresser drawer side fixed.
Before you can start fixing your dresser drawer side, you’ll need to figure out why it’s stuck. Is it due to a misaligned or worn down track? Or just a loose screw or two that need tightening? It could be something as simple as removing any debris or obstructions from the drawer.

Take the time to closely inspect the side of your dresser drawer, assess any damage, and determine how much of the drawer frame is intact. This detailed inspection will help you decide what to do next in terms of repair or replacement.
In this specific case, the bottom of the side broke off at some point in time, and no one fixed it. So, the drawer was really hard to open and close.
Once you’ve identified the cause of your dresser drawer side problem, it’s time to get down to business and get it fixed! Follow the steps below to get your dresser drawer side back in working order for smooth opening and closing.
Supplies for Fixing the Side of a Drawer
As an Amazon Associate, I earn from qualifying purchases. I also may earn from other qualifying purchases with other companies or get free product to review and use. All opinions are my own.
- Bondo (auto body kind)
- Power Sander
- Scrap wood for box mold
- Clamps
- Vaseline, wax, or spray pam
- Sandpaper
- Two straight boards (one the thickness of the break, one thin and skinny)
- KwikWood (for smaller breaks)
How to Fix the Side of a Drawer
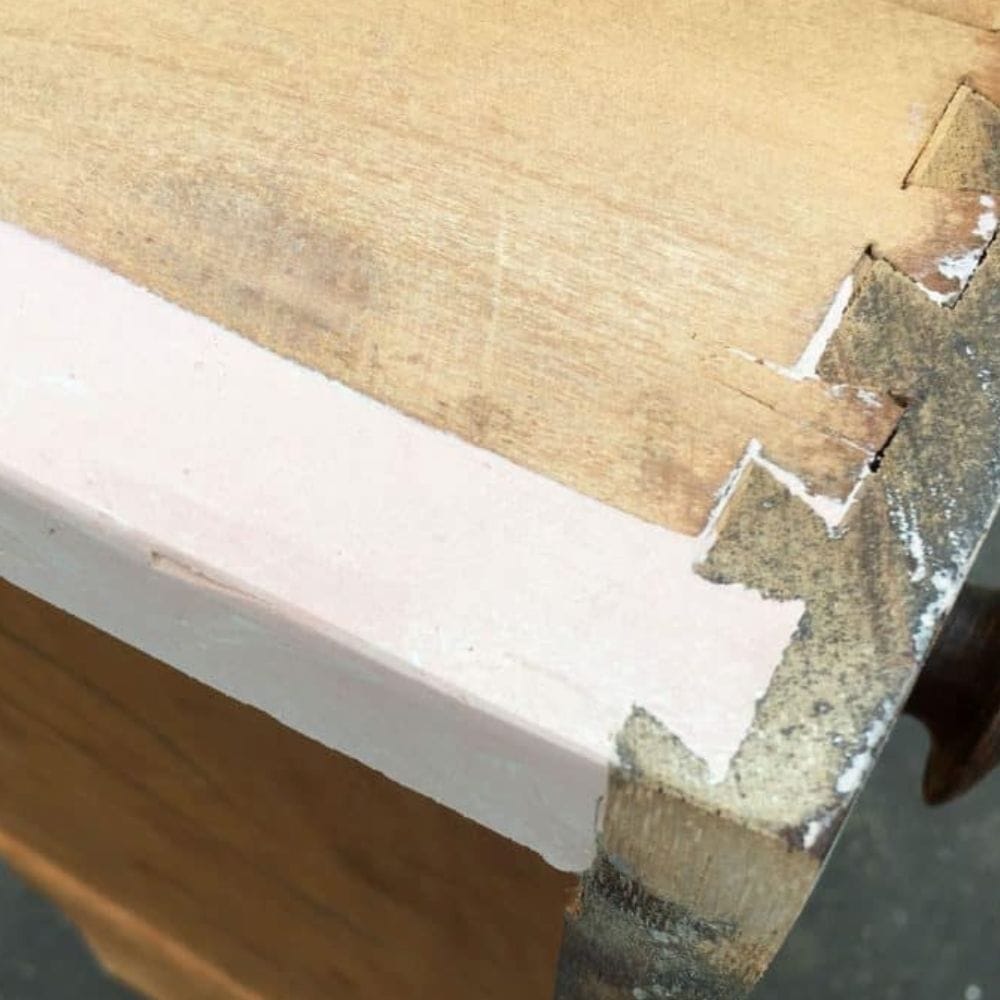
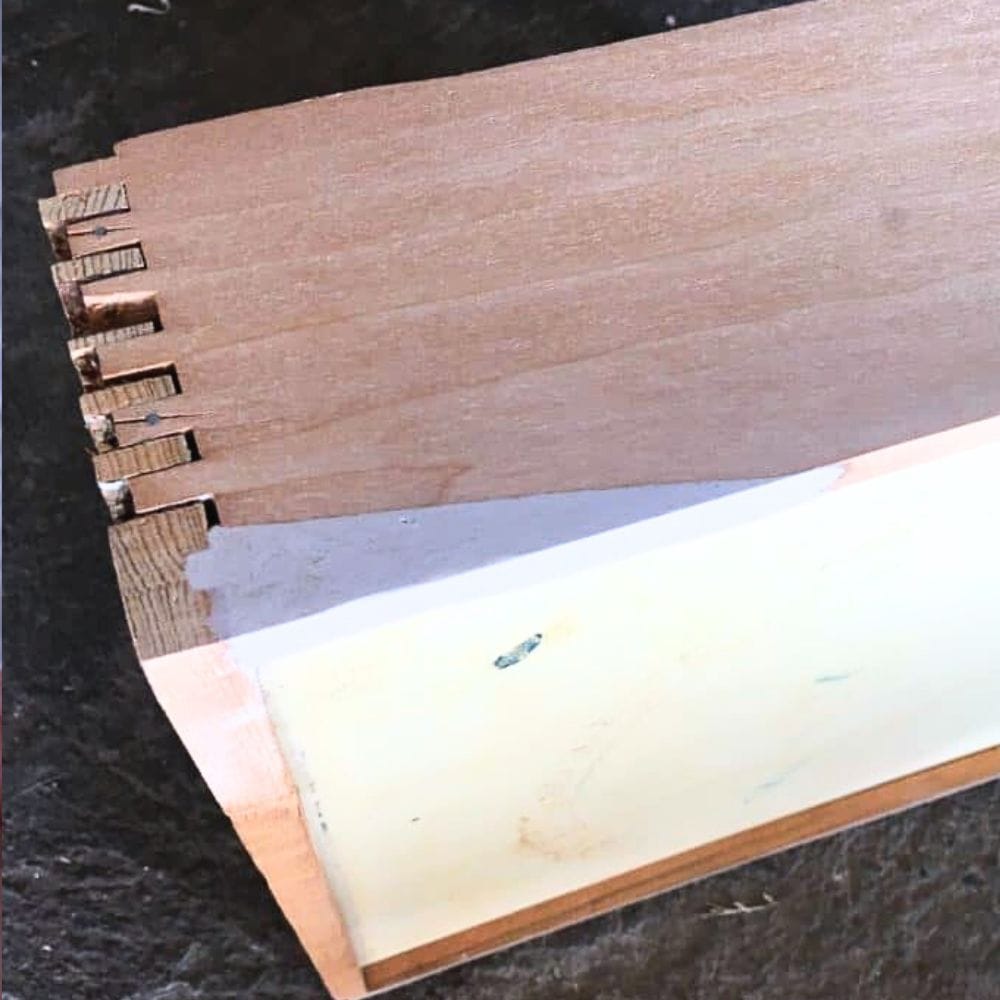
A problem we run into with dresser drawers sticking is when the side of the drawer is broken under the bottom panel of the drawer. Since there is a notch cut out in the side of the drawer for the bottom panel to slide into, it’s easier for the side of the drawer to break under pressure.
But don’t worry! You can easily fix it without replacing the whole side! Especially if your drawer has dovetails like this one!
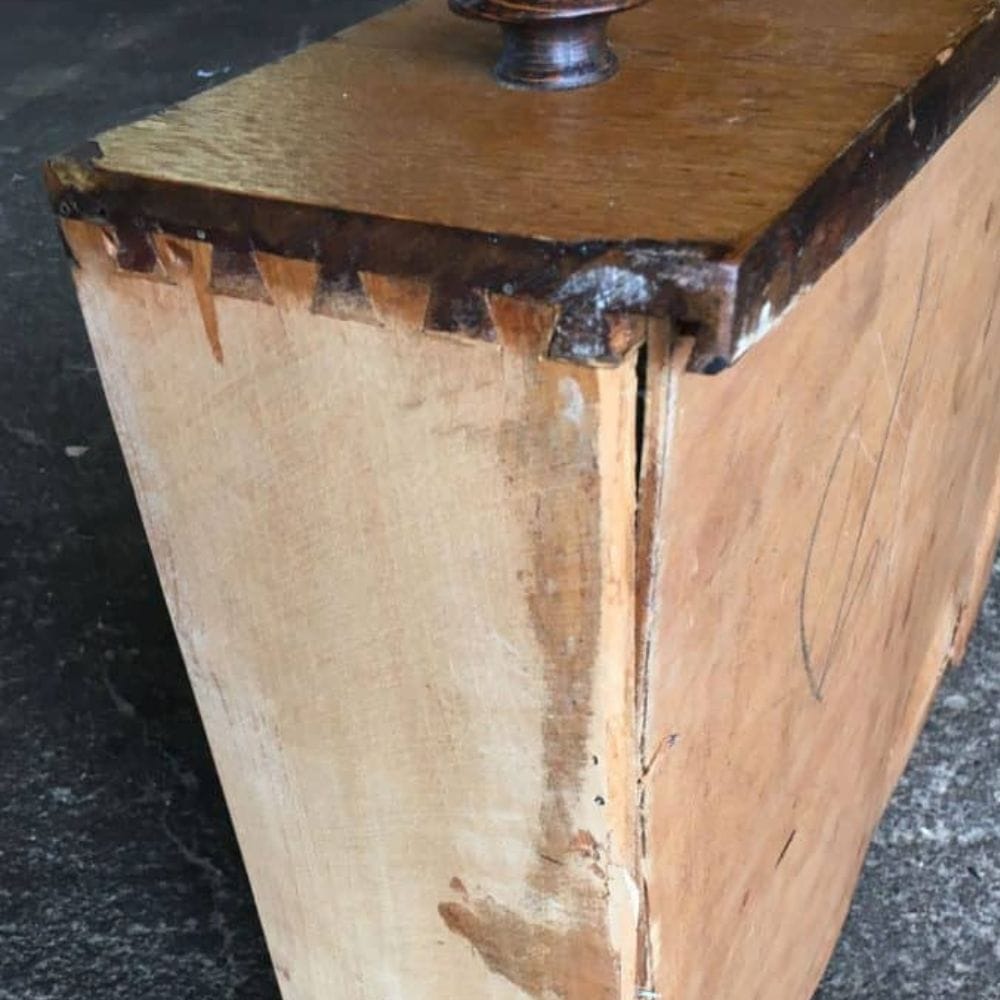
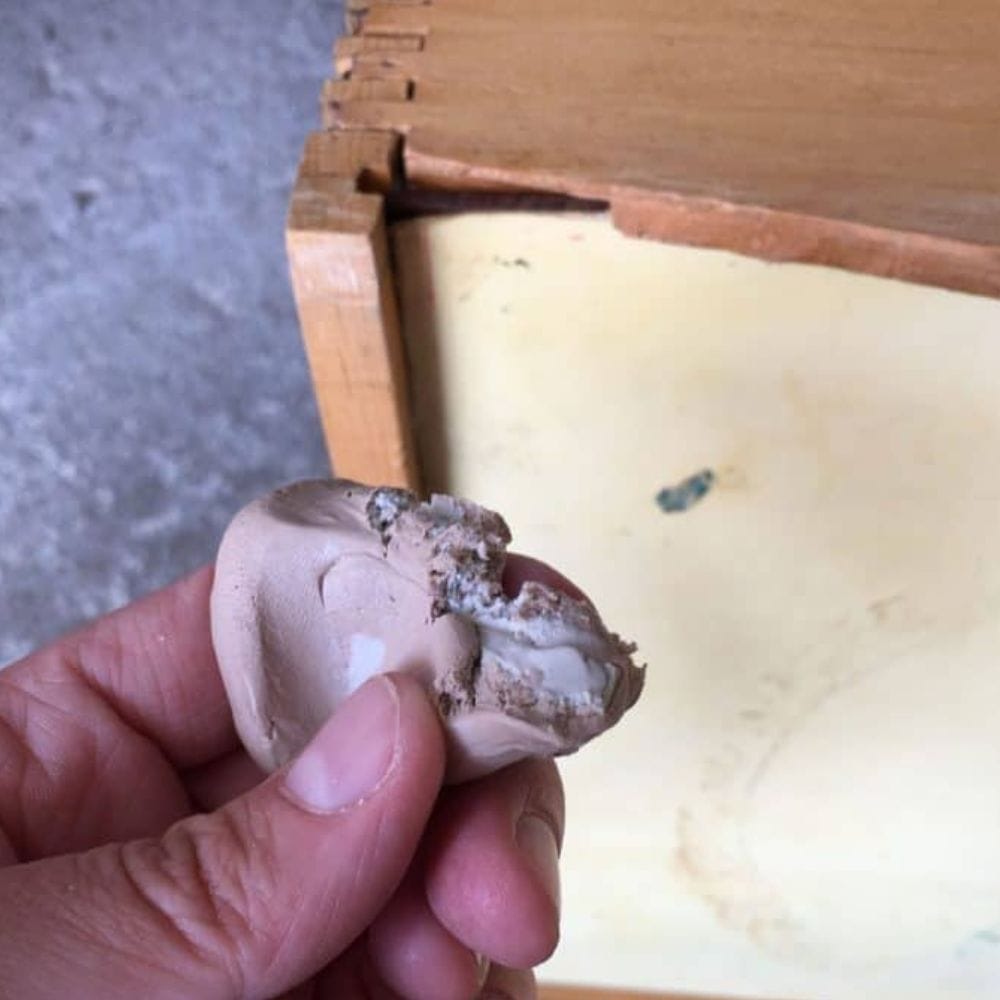
In this case, you can see that the drawer was broken right where the bottom panel of the drawer sits. Whoever tried to fix it in the past just put some nails into the bottom of the drawer to hold it into place, and called it a day.
The problem with that is the nails were digging into the wood tracks in the body of the dresser every single time it slid in and out. And it wasn’t very easy to slide it!
It also meant that the drawer sat crooked because one side of the drawer was shorter than the other. All of these things make old dresser drawers hard to open!
If you have an old dresser that is stuck due to age related wear and tear and want to fix it, check out our blog post about old dresser drawers hard to open.
Repair Broken Area of Drawer with Bondo
Instead of replacing the whole piece of wood (including the dovetails), you can repair the area and build the drawer back up.
You can use Bondo to build onto the side of the drawer and replace the broken area. Bondo is a fast drying material that is great for furniture repairs. I’ve used it many times to rebuild a broken corner, fill in missing veneer, or repair broken trim.
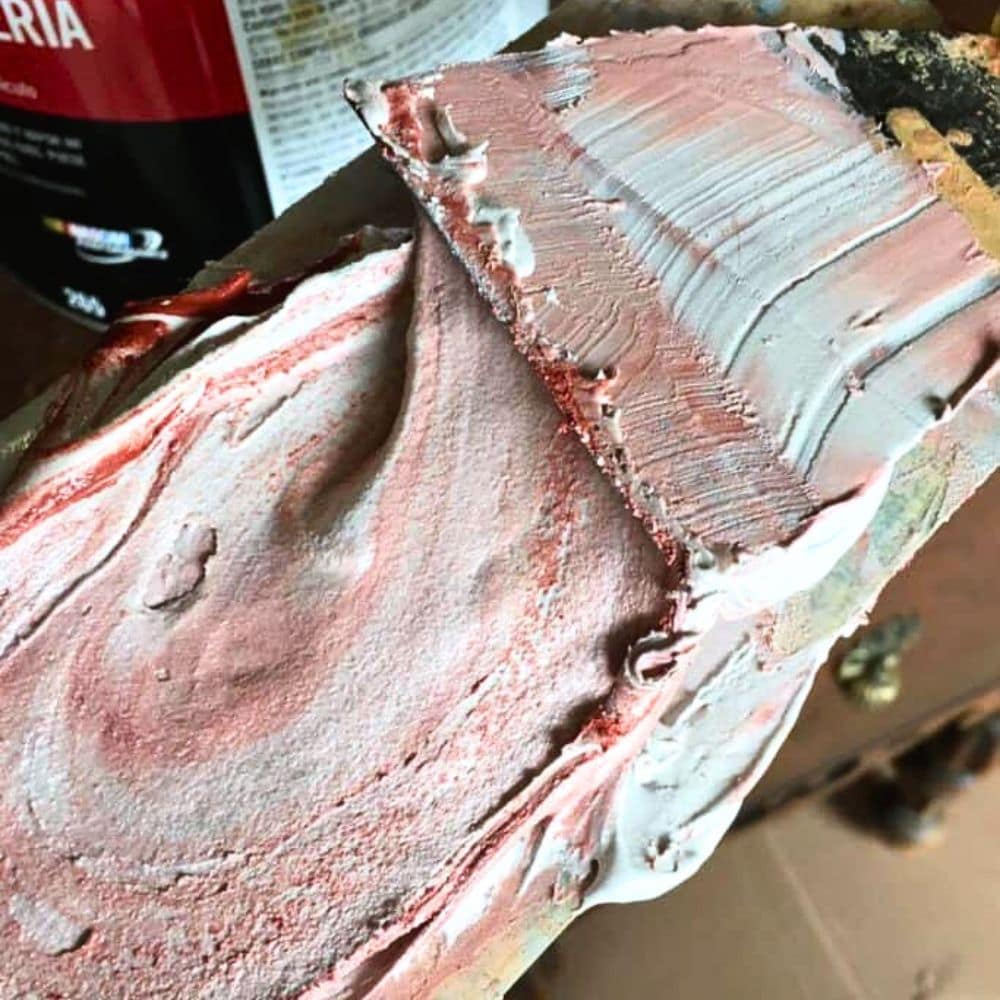
It’s a two-part epoxy that starts to dry very quickly after being mixed up, so you have to work fast. But that’s also the beauty in it. You don’t have to wait hours for this stuff to dry. It is ready to sand after about 30 minutes.
It dries very hard and can be a pain to sand down if you don’t have a power sander. Check out my Bondo wood filler review here to learn more about this product. And learn how to repair broken trim on furniture and how to repair chipped wood furniture using Bondo here.
**(I like the auto body kind of Bondo ((the pink stuff)) because you can see if you have mixed enough pink hardener in it, vs. the wood filler and all purpose kinds that have a clear hardener.) The other kinds will work as well! Just not as easy for the beginner.
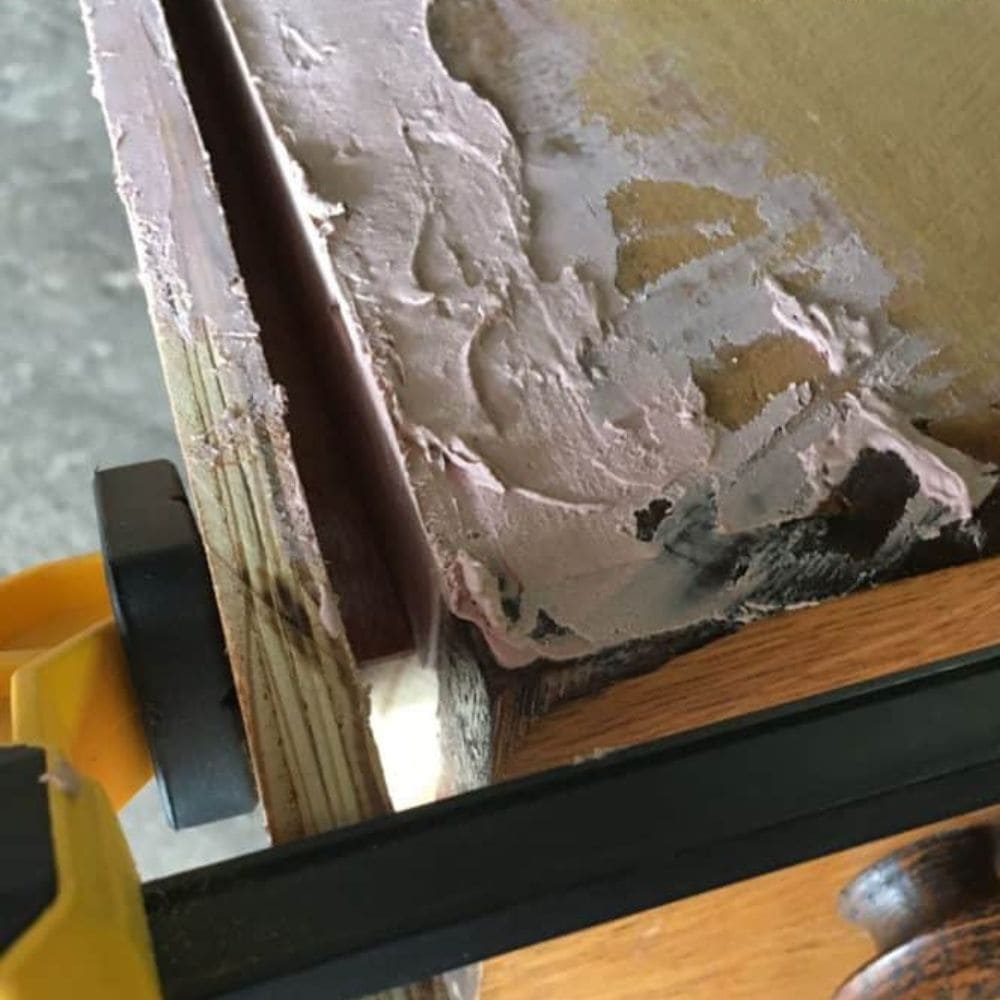
Bondo is thinner than clay, so it has to be contained and molded while it starts to set up, so the most difficult part of this process is to build a box out of scrap wood to mold it into the shape we need it to be.
How to Repair the Side of a Drawer
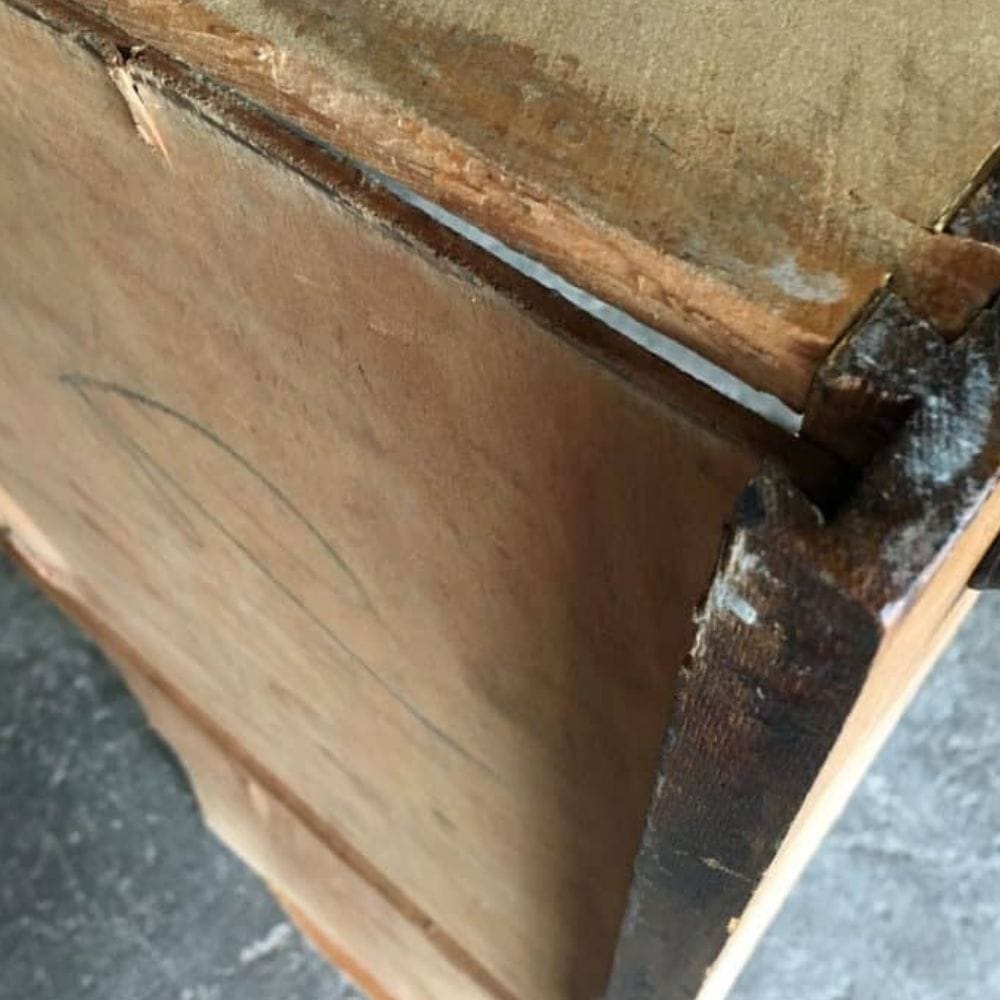
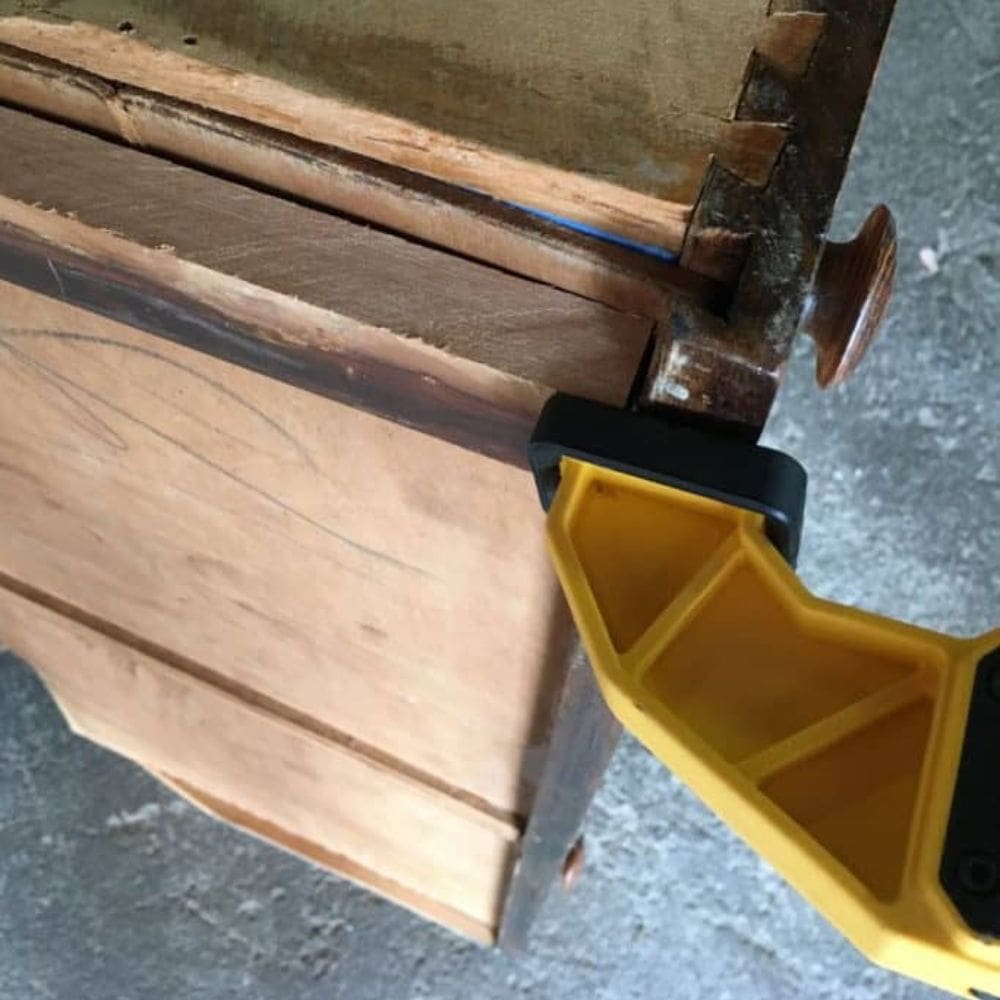
First, remove any nails, or staples holding the bottom in place. Locate two straight boards that are longer than the side of the drawer. One should be the thickness of the break.
So for this drawer, I needed a board that would line up from the bottom panel to the bottom of the drawer front. It was about 3/4″ thick. The second board can be thin and skinny.
It just needs to be at least a couple of inches wide to clamp onto the other boards while still creating the bottom of the box.
It’s better for this wood to be a little thicker than you need because you can sand the Bondo down smooth more easily than building it up more after the box is gone.
Build a Box Mold for the Bondo
I asked my husband to help hold the boards while we got them clamped into place. Two hands just weren’t quite enough.
Be sure to rub Vaseline, wax, or spray pam onto the boards before you clamp them in place. Otherwise, the Bondo will stick to them. You only want the Bondo to stick to the drawer.
It’s also best to scuff up the break with some sandpaper, and then make sure it’s dust free and wax free before moving on. This ensures the Bondo will stick to the drawer.
- Line up the first board so it is about 3/4″ from the side of the drawer.
- Place the thinner board on top of that, lining up with the side of the drawer.
- Clamp the boards onto the drawer.
Would you like to save this?
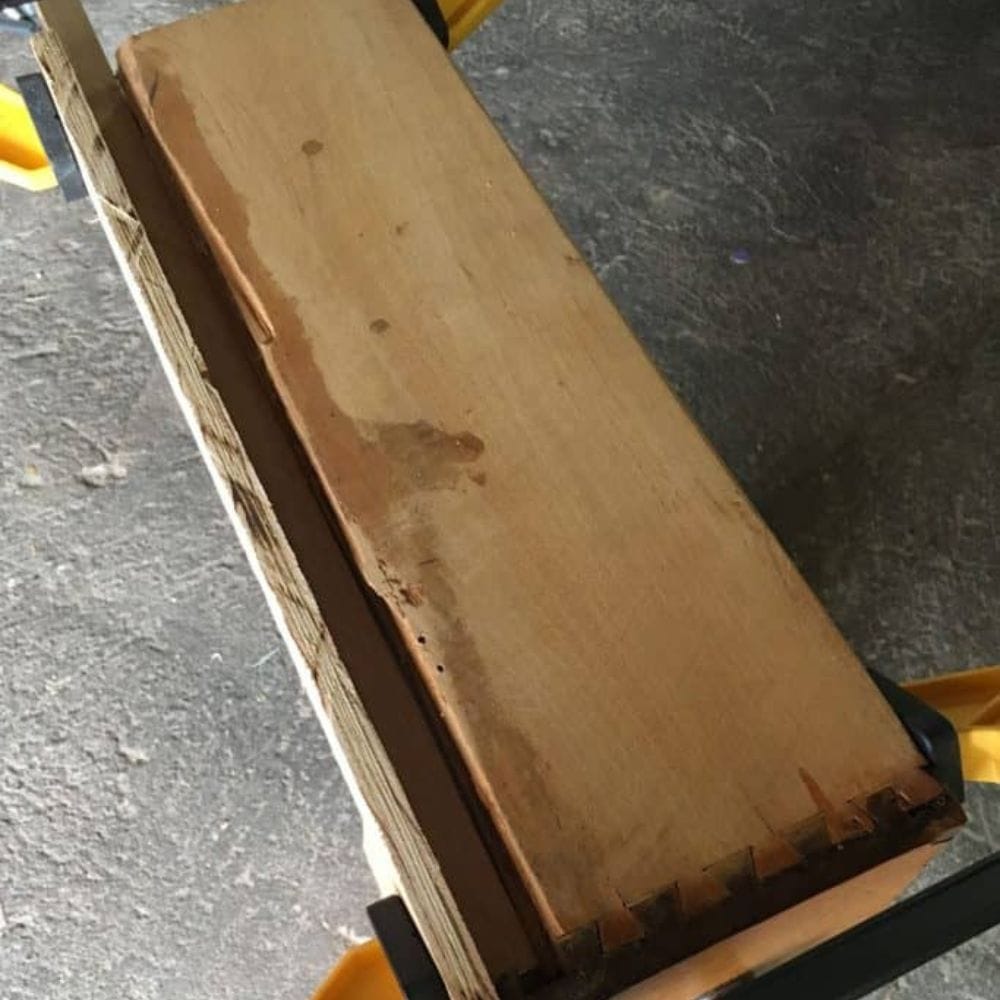
You should have created a box with the top open to put the Bondo into. The box is where the side of the drawer was broken.
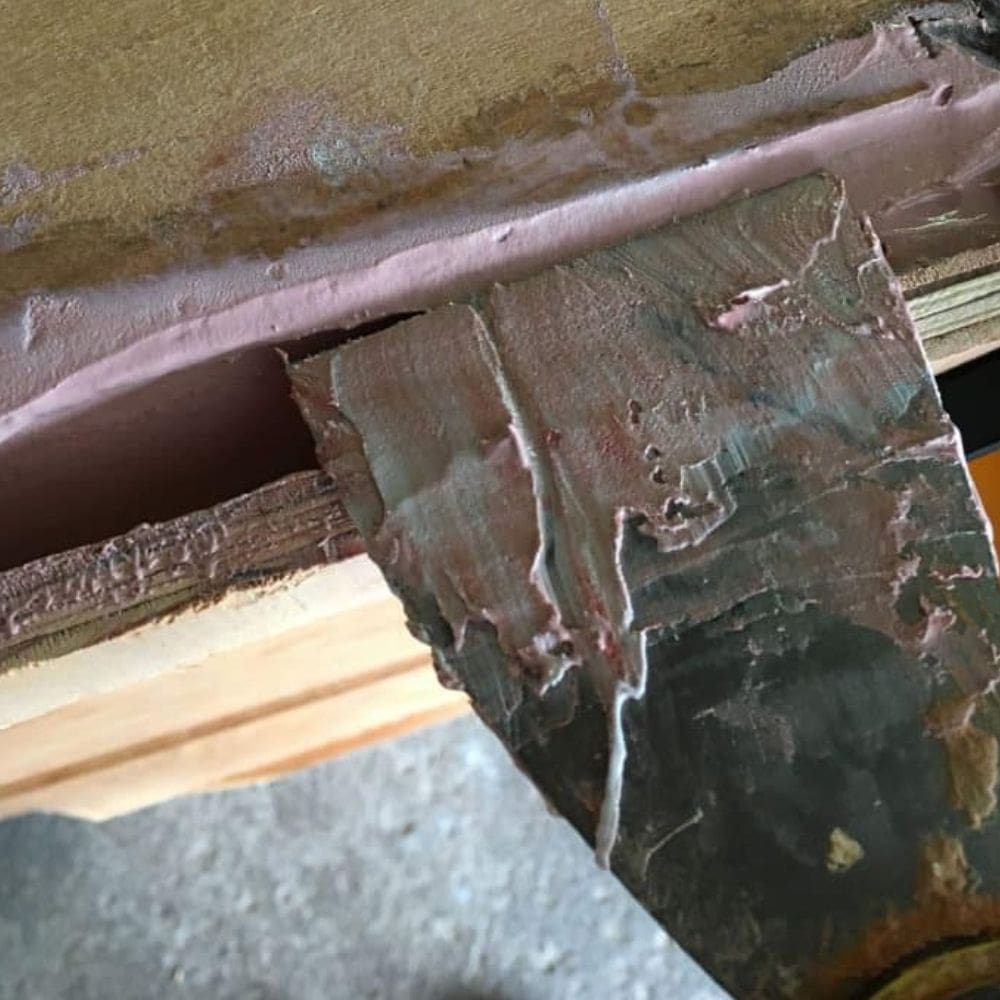
Fill the Box with Bondo
Once you have the box built, you can fill it with Bondo. Bondo is a two-part epoxy resin that needs to be mixed together. Once it is mixed, it starts to dry very quickly. Mix time and work time is typically 3-4 minutes. It’s also pretty stinky, so it should be used in a well ventilated area.
Mix the Bondo by following the increments described on the back of the can. Read this post to learn more about Bondo as the best way to fix chipped wood furniture.
Quickly fill the box with Bondo, making sure to push the Bondo into the drawer. You want the Bondo to really stick to the drawer. If you need more Bondo, mix up some more, and fill the box full.
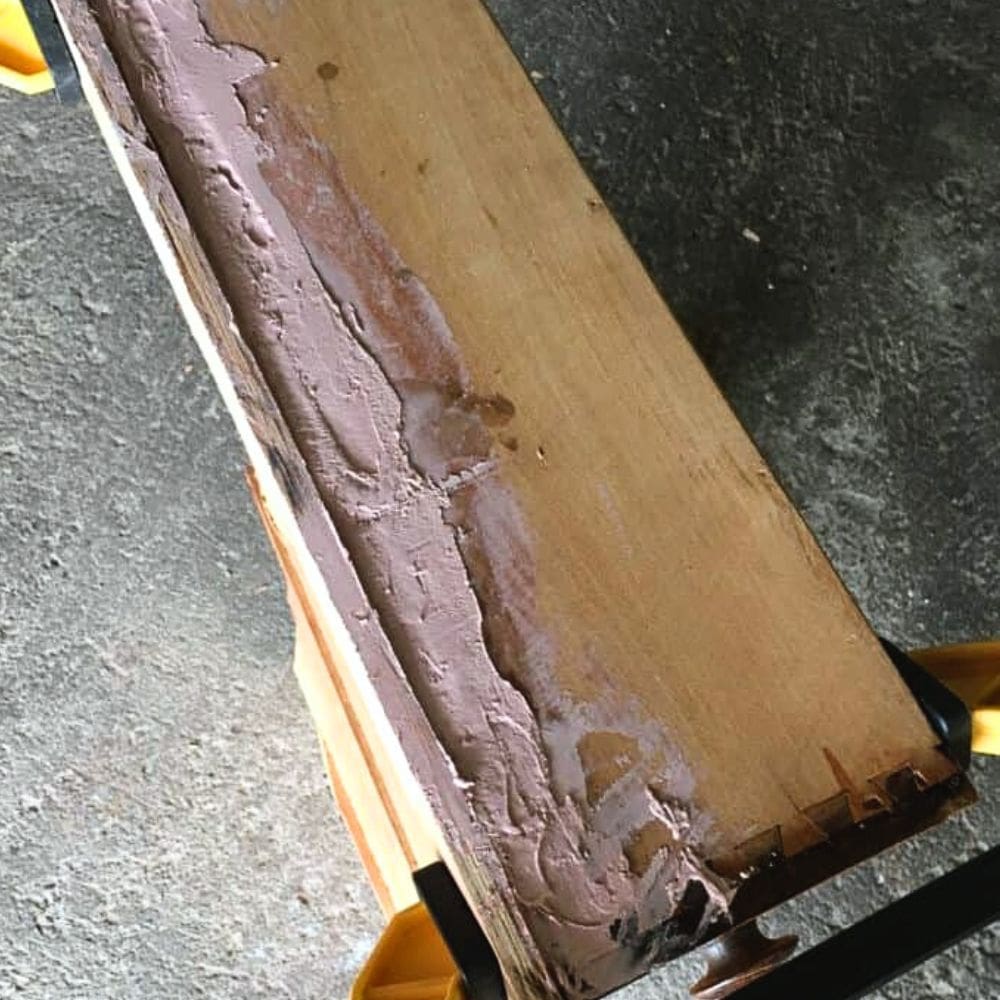
Let the Bondo dry for a few minutes. You can remove the box once the Bondo isn’t sticky. When you unclamp the boards, they should pop right off because of the wax.
Let the Bondo dry for at least 30 minutes, but an hour or so is better. With your power sander and some sandpaper, sand the Bondo down to the correct size and shape.

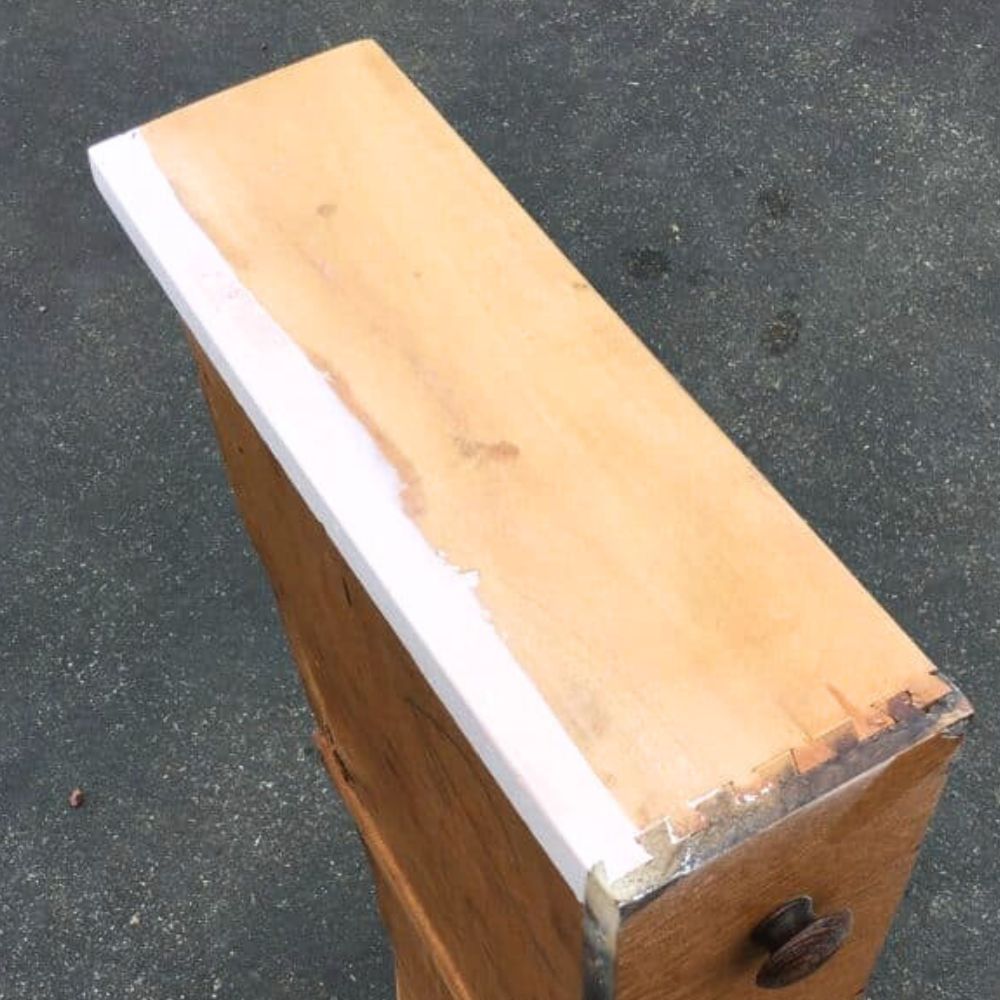
Test out the drawer and make sure it sits correctly in the dresser. Mine needed to be sanded down a bit more to allow for the front of the drawer to push into the dresser correctly.
If you’re still wondering, “Can a beginner fix this furniture damage?“, get more answers and tips from this post!
Repair Old Drawer with KwikWood
**For smaller breaks, you could use KwikWood instead. Its texture is more like clay, so you can mold it in the shape you need it in. And then once it’s dry after a couple of hours, you can sand it down more to shape. Learn more on how to use Kwikwood to repair furniture here!

Can the drawer side repair be done without using clamps?
Yes, it is possible to repair a dresser drawer side without using clamps. If you do not have clamps available, you can try using heavy books or other objects to hold the boards in place while the epoxy or Bondo dries.
However, using clamps will provide a more secure and stable bond for the repaired area. If possible, we recommend using clamps for a stronger repair. But if you do not have them available, again, improvising with alternative objects can still be effective.
Just make sure to apply even pressure and allow enough drying time for the repair material to set properly.
Is it necessary to sand down the Bondo after it dries?
Yes, it’s definitely necessary to sand down the Bondo after it dries. Sanding it down after it dries will help create a more even and seamless finish. It also helps to remove any excess Bondo and make sure the repaired area fits smoothly back into the dresser.
Plus, sanding can also help to blend the repaired area with the rest of the drawer for a more cohesive look. If you plan to paint or stain the dresser, sanding down the Bondo will also help the finish adhere better and create a more professional looking repair job. So don’t skip out on sanding down the Bondo!
Fixing a broken dresser drawer side doesn’t have to be difficult or expensive. You’ve got Bondo, which is great for larger repairs, and KwikWood for the smaller ones. Then just give the repaired surface a good sanding and you’re good to go!
And with that, you have a fixed dresser drawer side and your drawer will be just as good as new!
If it still doesn’t work very well, you may need to lubricate the drawer to help it go in and out. Here is our post on what to do when old dresser drawers won’t slide.

How to Fix a Dresser Drawer Side
Looking for a solution on how to fix your broken drawer side? Get step by step instructions on how to fix a dresser drawer side.
Materials
- Bondo (auto body kind)
- Scrap Wood for box mold
- Vaseline
- Sandpaper
- Two straight boards (one the thickness of the break, one thin and skinny)
Tools
Instructions
- Remove the nails or staples holding the bottom in place and find two straight boards.
- Rub Vaseline, wax, or spray pam onto the boards before clamping them in place.
- Use sandpaper to scuff up the break and remove any dust or wax before proceeding.
- Create a box by lining up the first board 3/4" from the drawer's side, then place the thinner board on top, lining with the drawer's side, and clamp the boards.
- Mix Bondo according to the can instructions, fill the box, and let it dry for a few minutes.
- Remove the box when Bondo isn’t sticky, let it dry for 30 minutes to an hour, and sand it using a power sander.
Recommended Products
As an Amazon Associate and member of other affiliate programs, I earn from qualifying purchases.


more dresser drawer repair tips
- How to Fix Dresser Drawers Bottom
- Dresser Drawer Bottom Replacement
- How to Remove Felt from Wood Drawers
- How to Repair Worn Drawer Runners
- Best Material to Line Dresser Drawers

Follow us on YouTube to get more tips for painting furniture. Or share your project with us on our Facebook Group and be part of our community. See you there!