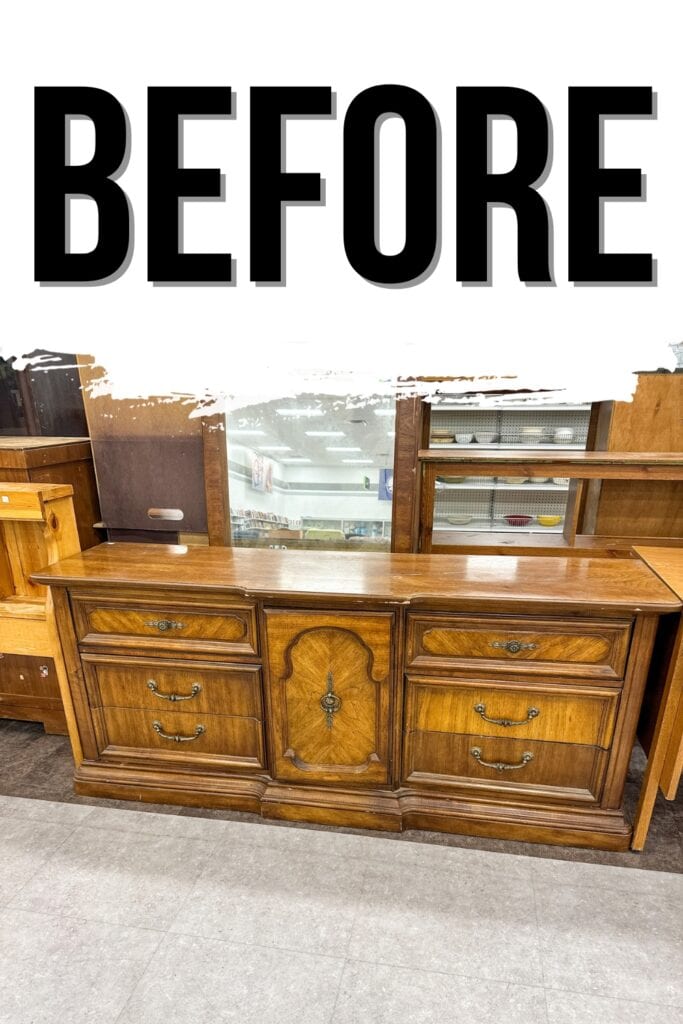
DIY Modern Grey Dresser
If you’re looking to freshen up your space with a touch of sophistication, then this tutorial is for you. We’ll take you through this DIY modern grey dresser makeover and how we transformed this old, outdated piece into one of these sleek and stylish gray painted furniture ideas.
Painting furniture deep gray has become increasingly popular in home decor, and we’re excited to show you how easy it is to get this look using Sherwin Williams Emerald Urethane Trim Enamel.
Welcome to Furniture Fixer Upper day, where we join 4 of our talented furniture friends and bring you brand new makeovers! I’ll link to my friend’s makeovers after our after photos at the bottom of this post! Don’t forget to check out their masterpieces!! Okay, back to our makeover!
Gray is versatile and can add depth and character to any room. It’s not just neutral, but it has the ability to create a statement in a space. That’s why using this color is a great way to add interest and elevate the overall look of a room.

With so many shades of gray available, you can easily find one that fits your personal style and complements your existing decor. If you prefer a light and airy vibe or a dark and moody look, there’s a shade for every aesthetic. You can also easily pair it with other colors, making it a popular choice for interior design.
With the right techniques and products, you can totally create a beautiful gray finish on any piece. Again, we’ll specifically be using the Sherwin Williams Emerald Urethane Trim Enamel for this makeover.

Supplies Used for DIY Modern Grey Dresser
As an Amazon Associate, I earn from qualifying purchases. I also may earn from other qualifying purchases with other companies or get free product to review and use. All opinions are my own.
- Vacuum
- Krud Kutter
- Electric Drill with Brush Attachment
- Clean Wet Rag
- 220 Grit Sandpaper (Use code RAY10 to get 10% off your order)
- Medium Grit Foam Sanding Pads (Use code RAY10 to get 10% off your order)
- Tack Cloth
- Pre Taped Plastic and Painters Tape
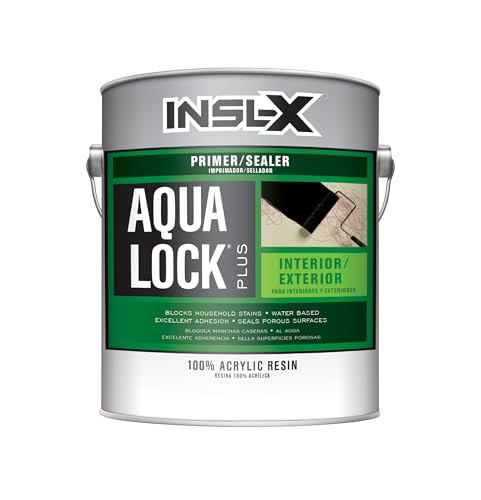
- Black Aqua Lock Primer
- Wagner FLEXiO 5000
- Plastic Wood Filler
- Power Sander (Use code RAY10 to get 10% off your order)
- Sherwin Williams Emerald Urethane Trim Enamel in Iron Ore
- Cardboard (for testing the spray)
- New Hardware
Prep the Dresser
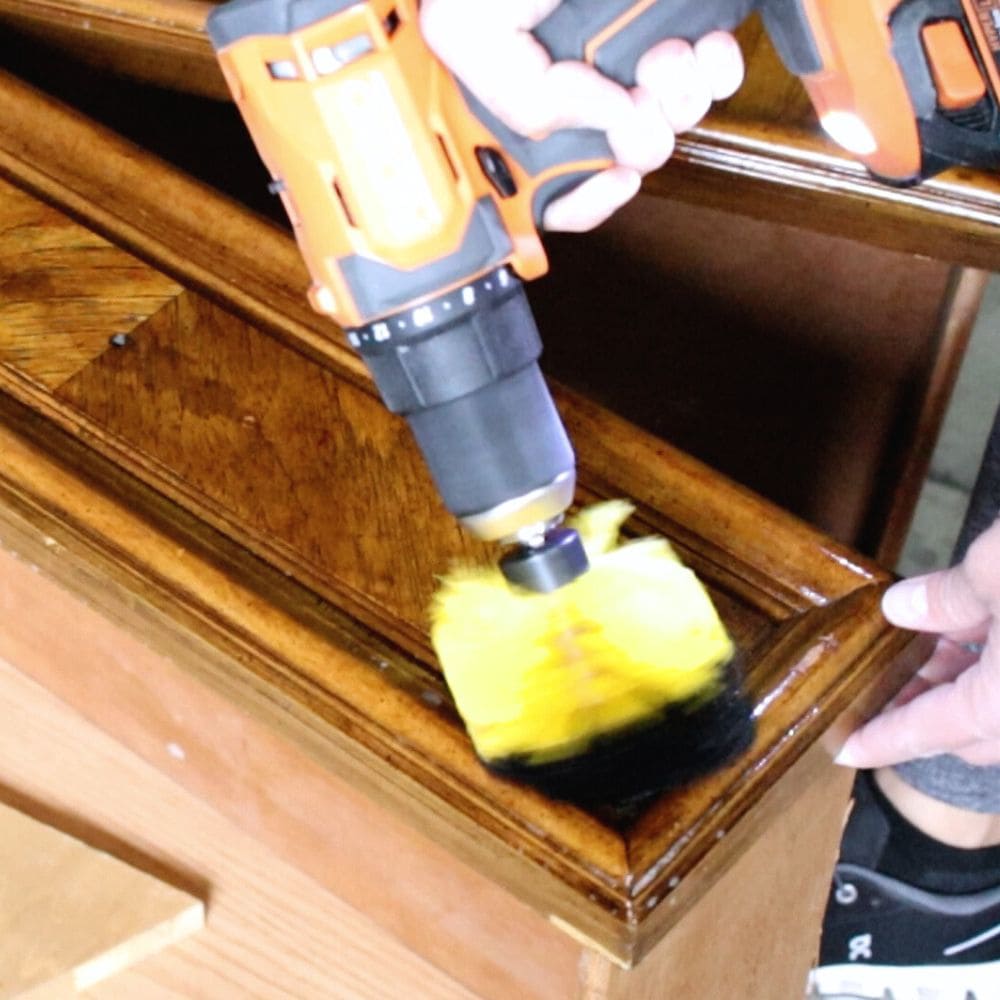
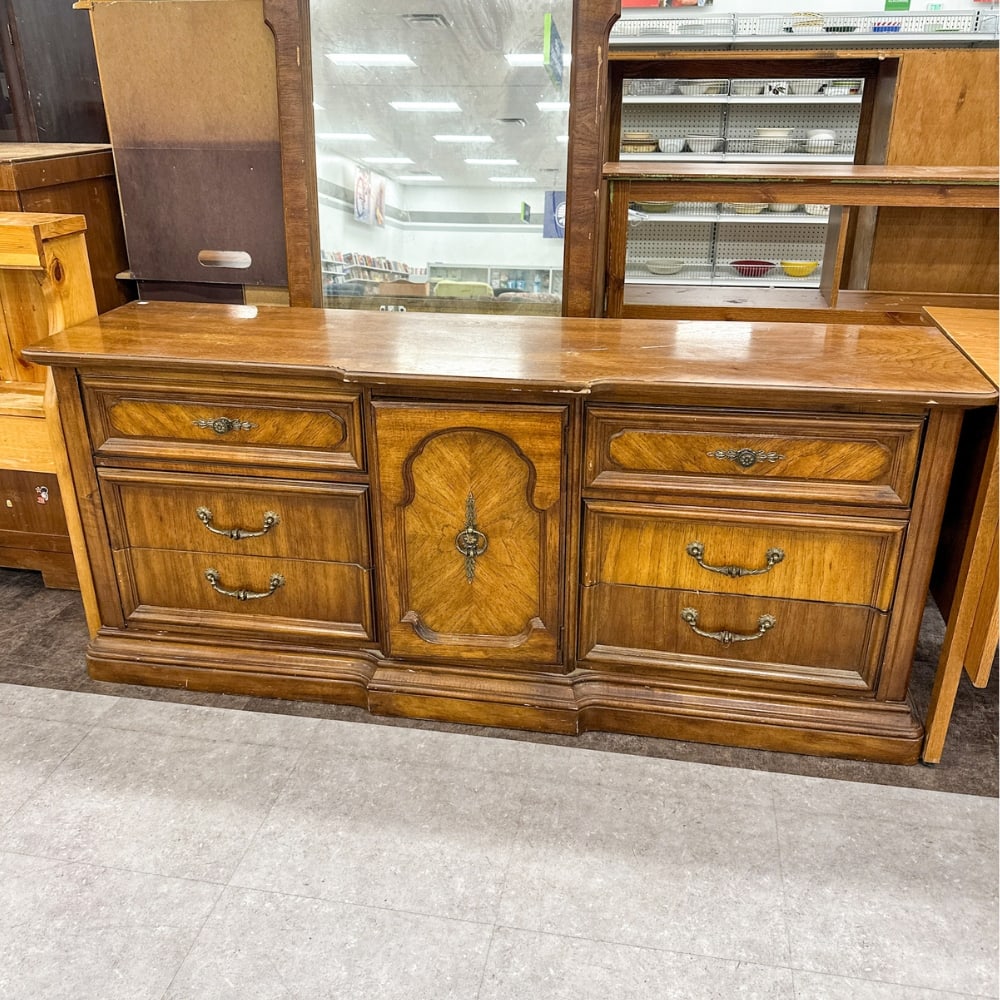
To get started, we took off the hardware and then gave the piece a good vacuum job inside to get rid of the dirt and spider webs. Next, we got down to business with Krud Kutter to thoroughly clean the piece inside and out.
For some extra scrubbing power on the wood, we grabbed our electric drill with a brush attachment. We then rinsed everything off with a clean, wet rag. Get more tips on how to clean furniture before painting here.
The latch of the dresser door in the middle was a little off and wouldn’t close all the way, so we took care of that by loosening, slightly adjusting, and tightening the screws. We also made sure to tighten any other loose screws, including those holding on the top.
Now everything is secure and working fine!
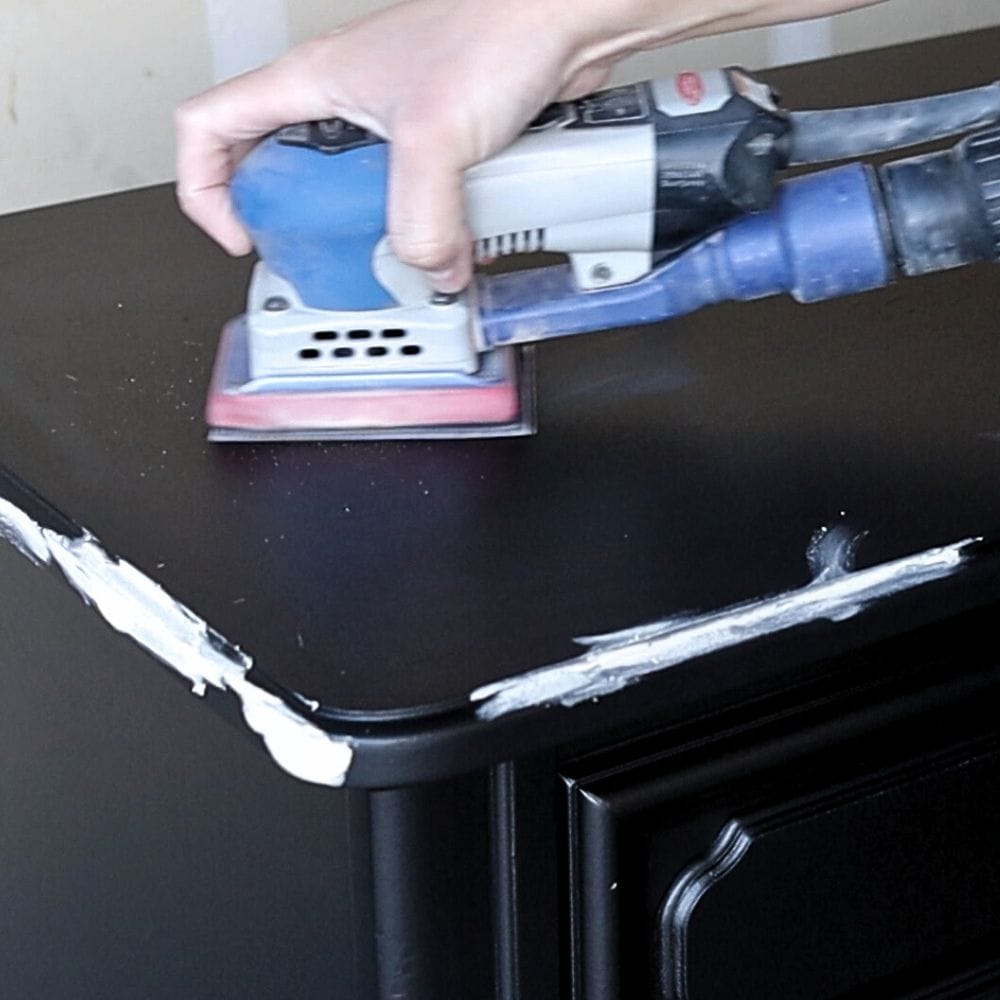
To continue preparing the piece, we scuffed up the finish with 220 grit sandpaper and medium grit foam sanding pads. The best sandpaper for furniture painting is 220 grit as it’s not too rough but still effective at removing old finishes and creating a smooth surface.
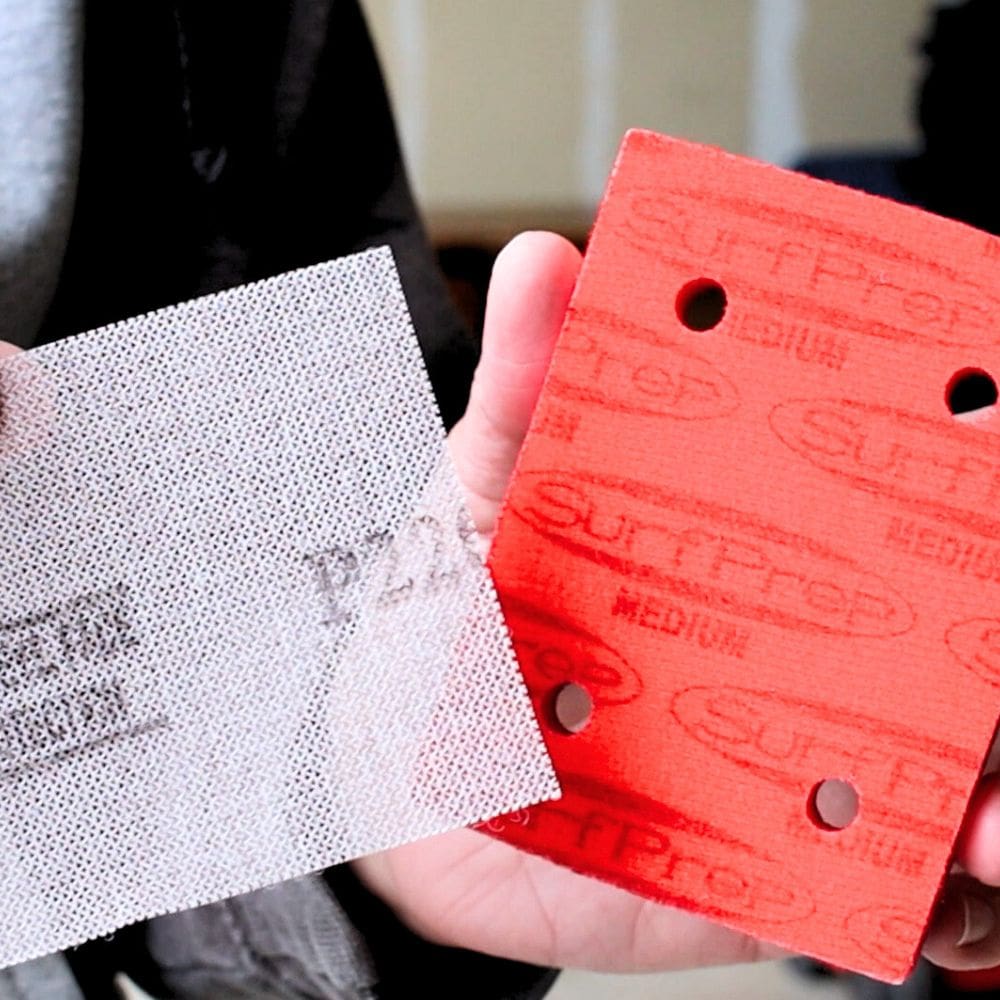
This step also guarantees the new paint sticks better and gives you a longer lasting finish. For more detailed guides on sanding before painting furniture and sanding for paint prep, head on over these posts.
After cleaning up the dust from sanding with a vacuum and tack cloth, we then taped off the drawers with pre taped plastic and painter’s tape. Gotta make sure we don’t get any coating inside the drawers! Learn how to tape off the drawers in our how to prevent overspray when painting furniture post.
Here’s all about how to prepare furniture for painting.


Primer For Enamel Paint
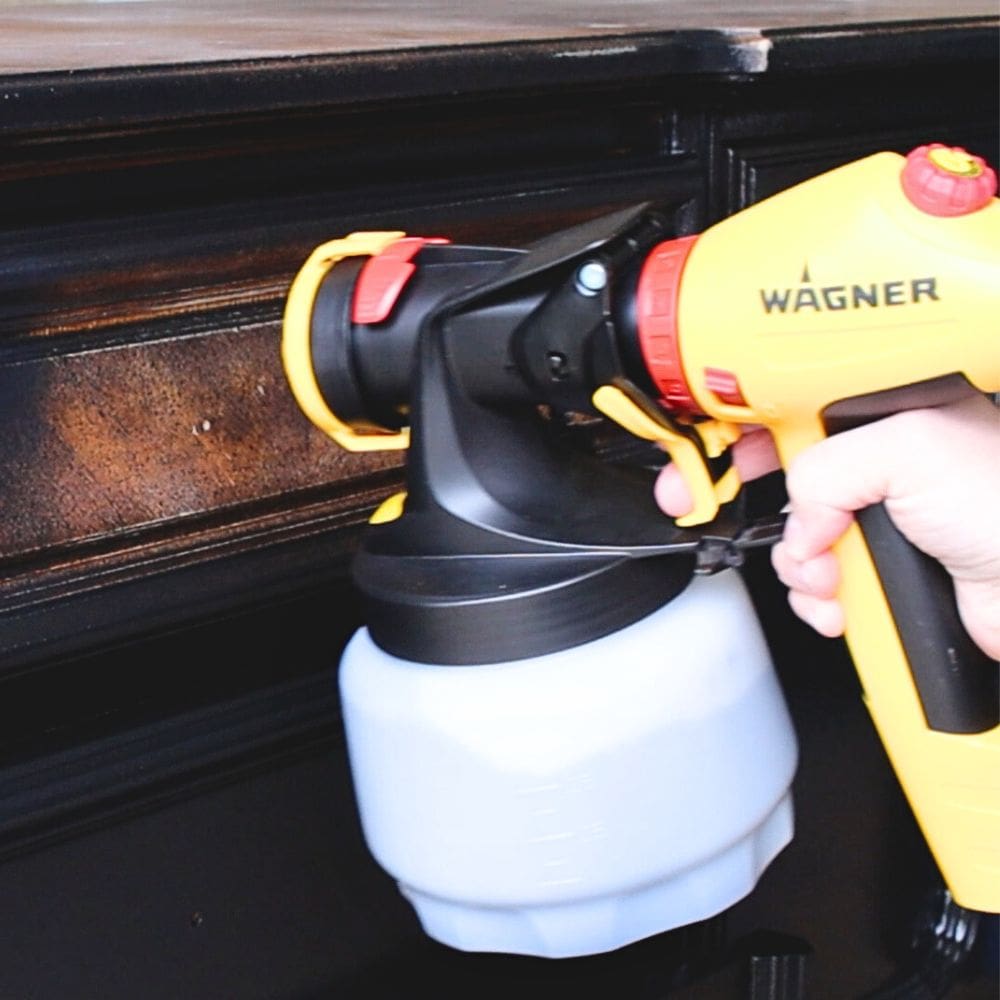
When it comes to enamel paint, a common question is if primer is needed or not. Yes, it is needed under the paint to help with even coverage and adhesion. For this project, we went ahead and primed with black Aqua Lock primer using our trusty Wagner FLEXiO 5000.
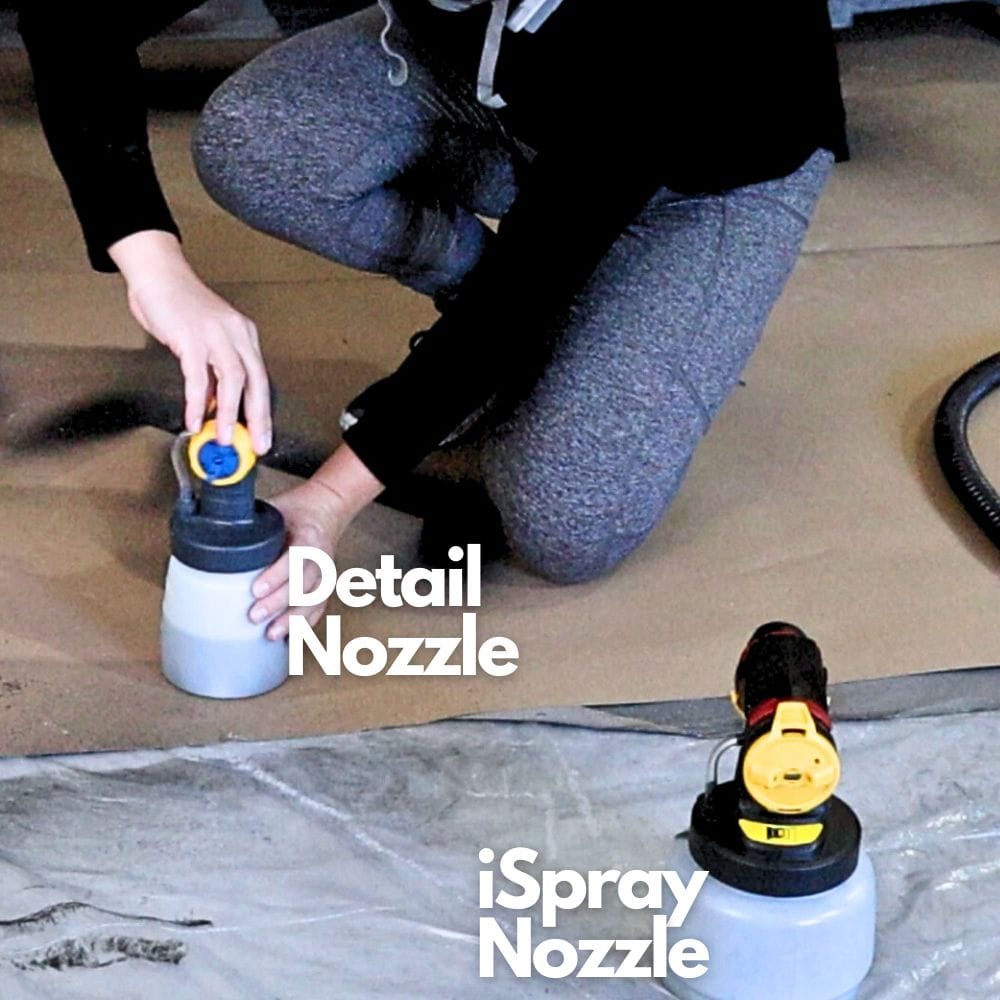
We decided to switch things up and try out the iSpray nozzle instead of the usual detail finish nozzle. For more details on how to use Wagner FLEXiO 5000 paint sprayer and the different nozzle options, check out our blog post!
After thinning the primer with about 15% water, we applied it and were pretty impressed with how smooth the spraying was and how little texture there was in the finish. Learn more about painting furniture with enamel paint here.
Before calling it a night, we also filled in any scratches or dings with plastic wood filler and left it to dry overnight. There are more options for the best wood fillers, but for any small cracks and dings, plastic wood filler is the way to go.
And, of course, we cleaned out the sprayer so it would be ready for the next day’s painting! Here’s how to clean a Wagner FLEXiO sprayer if you’re not familiar with the process.
The next day, once the filler had dried up, we gave it a good sanding with some 220 grit sandpaper using a power sander. To make sure everything was clean and smooth, we cleaned up the dust with a vacuum hose and brush attachment and then wiped it down with a tack cloth.
Would you like to save this?
At this point, I should have primed over the wood filler again. But I forgot and went on my merry way.
Spraying Sherwin Williams Paint
We chose the Sherwin Williams Emerald Urethane Trim Enamel Iron Ore color for this DIY modern grey dresser. This is a favorite because of its durability and the fact that it doesn’t require a topcoat, making the process much simpler.
And to top it off, it leaves a smooth finish without any brush marks. Our Sherwin Williams Emerald Urethane Trim Enamel review goes into more detail about this. Check out these neutral furniture paint colors for more shades like Iron Ore.
At first, we decided to give the Wagner iSpray nozzle a try by mixing the paint in. We wanted to see how it would work on the piece. We added about 15% water to thin the coating and made sure to mix it thoroughly. Here is a more detailed guide on how to thin paint for Wagner FLEXiO Sprayer.
However, when we actually started spraying on some cardboard, we weren’t really loving how it was coming out. We gave it a try on a small section of the piece but stopped because I was worried about the texture. (It honestly would have been just fine to keep spraying because this Sherwin Williams enamel levels so well.)
But, we switched back to our usual detail finish nozzle, and boy, did it give a much finer finish.
Unfortunately, when the paint was dry on the top, we could still see where the wood filler had filled in the scratches. It had a different sheen when it dried, so we just dabbed some primer onto those areas.
We didn’t brush it on to avoid any brush marks. After the primer dried, we sanded it smooth again with 220 grit sandpaper. Then, we applied the final coat. Get more tips and tricks on how to paint a dresser here.
Changing Dresser Hardware
And finally, we replaced the hardware on the piece. We didn’t want to use those bulky handles that were on it before, and we found these awesome adjusta-pull drawer pulls that can fit different hole sizes.
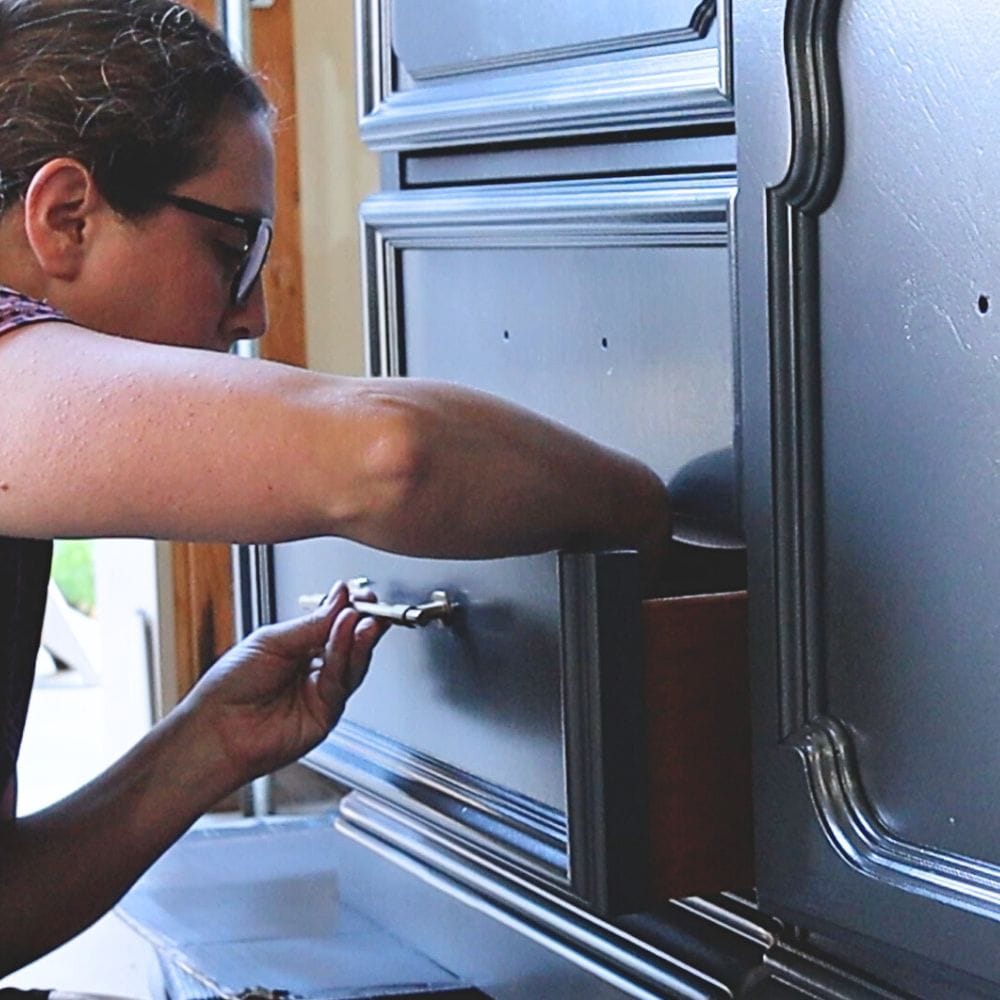
The old handles were, like, 5 and 3/4 inches apart, which made it difficult to find something that exact size. These adjustable pulls were a real lifesaver because we didn’t have to fill in the old holes!
But here’s our favorite way of filling holes when replacing cabinet or furniture hardware if you need it for any future projects. We’ve also got a handy guide on how to change hardware on a dresser if you need some tips and tricks.
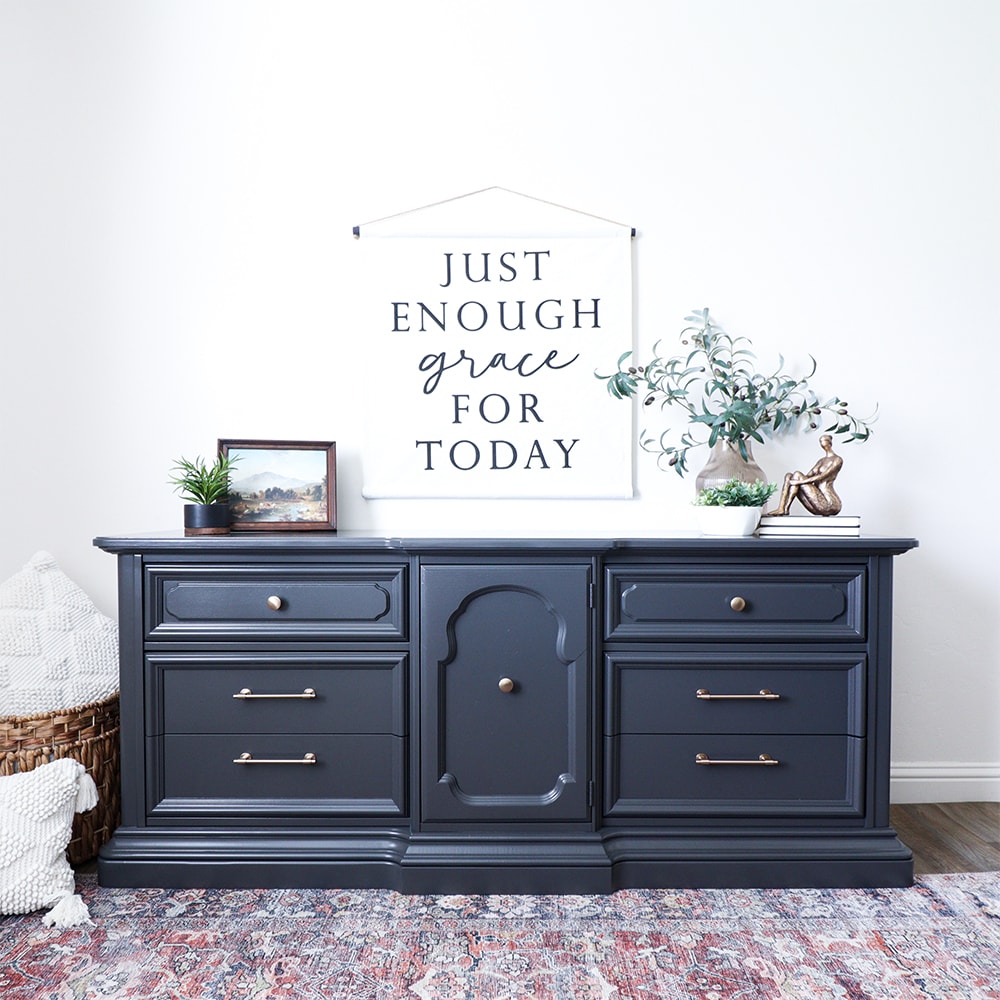
And here’s how it looks now! The Iron Ore color gives it a nice modern touch while still being neutral and versatile enough to fit in with any room decor.

More Before and After Makeovers
See All >
Click any of these “before” photos below to view the “after” of that makeover.


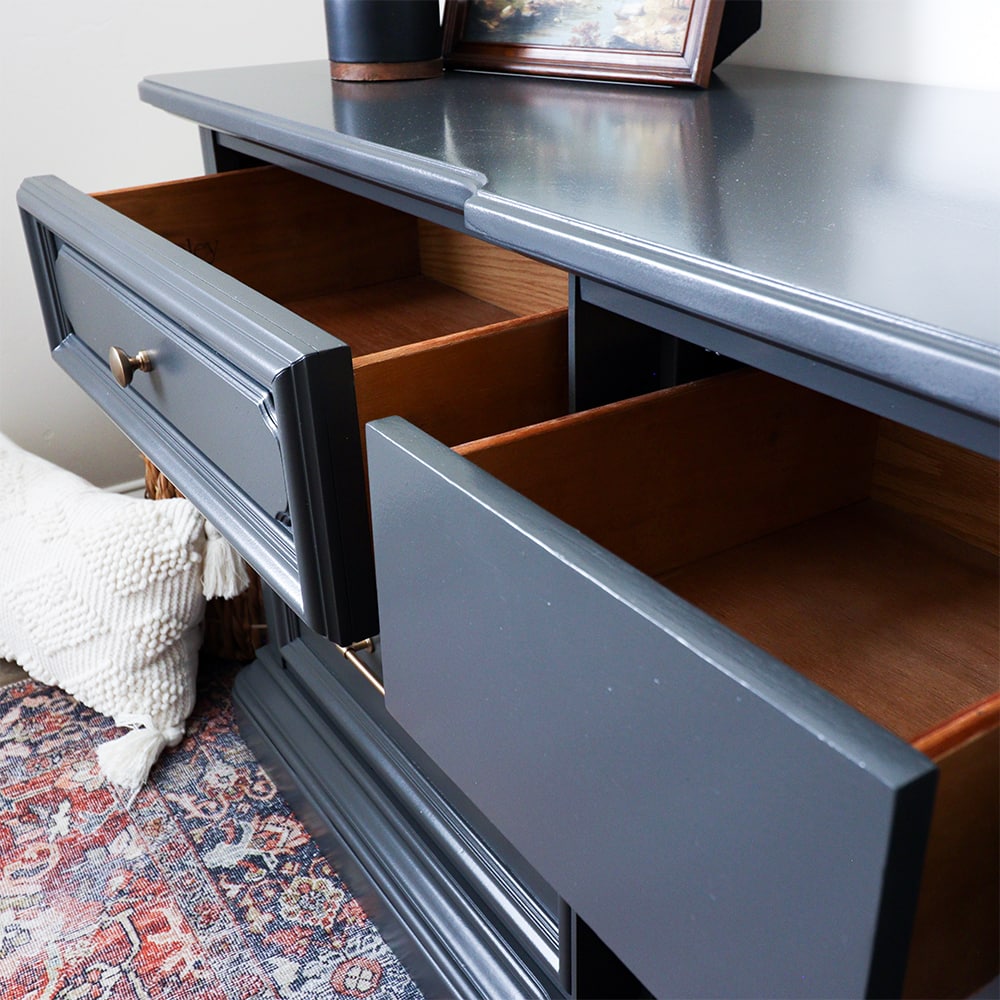
We also love how smooth and flawless the finish is, thanks to the Emerald Urethane Trim Enamel. And with its durability, we know this piece will last for years to come. If you want more modern dresser ideas and grey painted dresser ideas like this, check out the posts! Here are grey painted bedroom furniture ideas for more inspiration.
Check out this guide on how to repaint a dresser and these painting old dresser ideas for more tips on giving your piece a fresh new look. Here’s adding legs to a cedar chest if you want to add height to your piece. You can try out these furniture makeover ideas, too!
Don’t forget to check out these other awesome before and after furniture makeovers from my Furniture Flipping friends!! (Click the links below the photos!)
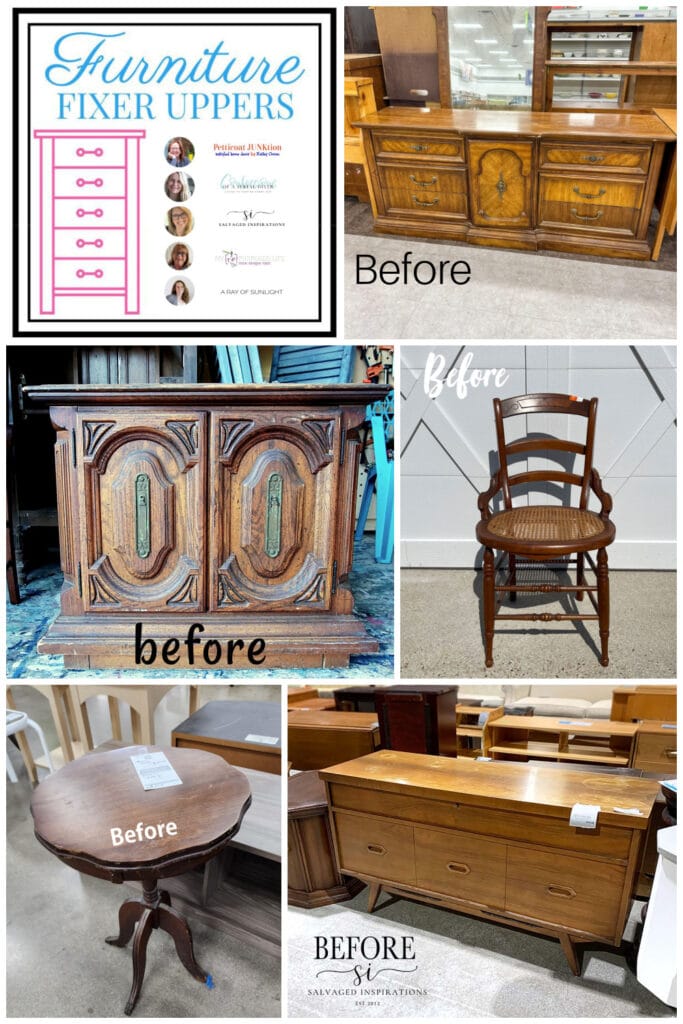
- Long Dresser Makeover (You are here)
- Super Easy Chair Makeover from Confessions of a Serial DIYer
- Faux Wood Cedar Chest from Salvaged Inspirations
- Side Table Makeover from Petticoat Junktion
- Antique Parlor Table from My Repurposed Life


DIY Modern Grey Dresser
Follow along this DIY modern grey dresser showing off the durability and smooth finish of Sherwin Williams Emerald Urethane Trim Enamel paint.
Materials
- Krud Kutter
- Clean Wet Rag
- 220 Grit Sandpaper (Use code RAY10 to get 10% off your order)
- Medium Grit Foam Sanding Pads (Use code RAY10 to get 10% off your order)
- Tack Cloth
- Pre Taped Plastic
- Black Aqua Lock Primer
- Plastic Wood Filler
- Sherwin Williams Emerald Urethane Trim Enamel Paint in Iron Ore
- Cardboard (for testing the spray)
- New Hardware
Tools
Instructions
- Remove the hardware on the dresser then thoroughly clean the dresser inside and out with Krud Kutter. Clean everything off after with a clean wet rag.
- Check for any loose screws and tighten them up.
- Thoroughly sand the dresser with 220 grit sandpaper and medium grit foam sanding pads. Vacuum out all the dust and debris from sanding and wipe everything down with a tack cloth to make sure it's dust-free.
- Tape off any areas you don’t want to get painted, like inside drawers or along edges.
- Prime the dresser with black aqua lock primer using a Wagner FLEXiO 5000 paint sprayer. Make sure to thin the primer with about 15% water before spraying it on.
- Fill in any scratches or dings with plastic wood filler and let it dry overnight. Sand it smooth the next day with 220 grit sandpaper. Vacuum and wipe down again with a tack cloth. Prime over the wood filler.
- Mix the Sherwin Williams Emerald Urethane Trim Enamel paint in the Iron Ore color and thin it with about 15% water. Make sure to mix it thoroughly. Test the spray on a piece of cardboard first to make sure it's spraying evenly and smoothly. Spray a few coats on the dresser using the detail finish nozzle for a smooth and flawless finish. Let each coat dry before applying another one.
- Replace any hardware on the dresser with your desired handles or knobs.
Recommended Products
As an Amazon Associate and member of other affiliate programs, I earn from qualifying purchases.


More Grey Painted Furniture Ideas
- Painted Hutch Makeover
- Grey Painted Dressers
- Painting a Cedar Chest
- Heirloom Traditions All In One Paint Review
- Painting a Dresser Gray
Follow us on YouTube to get more tips for painting furniture. Or share your project with us on our Facebook Group and be part of our community. See you there!
This turned out so beautiful, Natalie! And I love that you found an adjustable pull! XOXO
Thanks so much! I think I’ll be using these pulls more often!
You leveled up this dresser big time Natalie! It looks absolutely gorgeous now. I’ve used SW Emerald Urethane Trim Enamel on prior pieces and you’re so right, super durable!! Pinned! XOXO
Thank you Denise!! Everytime I use it I wonder why I don’t use it more. So easy to use and such a good paint! Thanks for the love!
Natalie,
Wow! I love the new color on the dresser. Thanks for the tip on the adjustable handle. I had no idea!
Pinned!
gail
Thank you so much Gail!
The color completely transformed it. Great job.
Thank you so much Lizzy!
Thank you so much Esme!