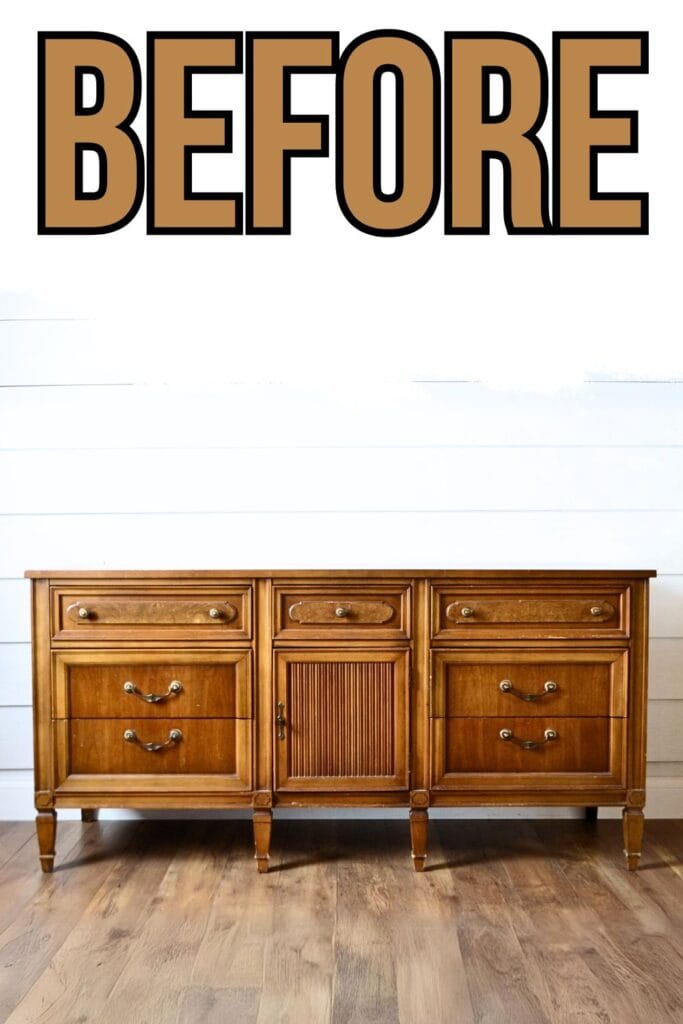
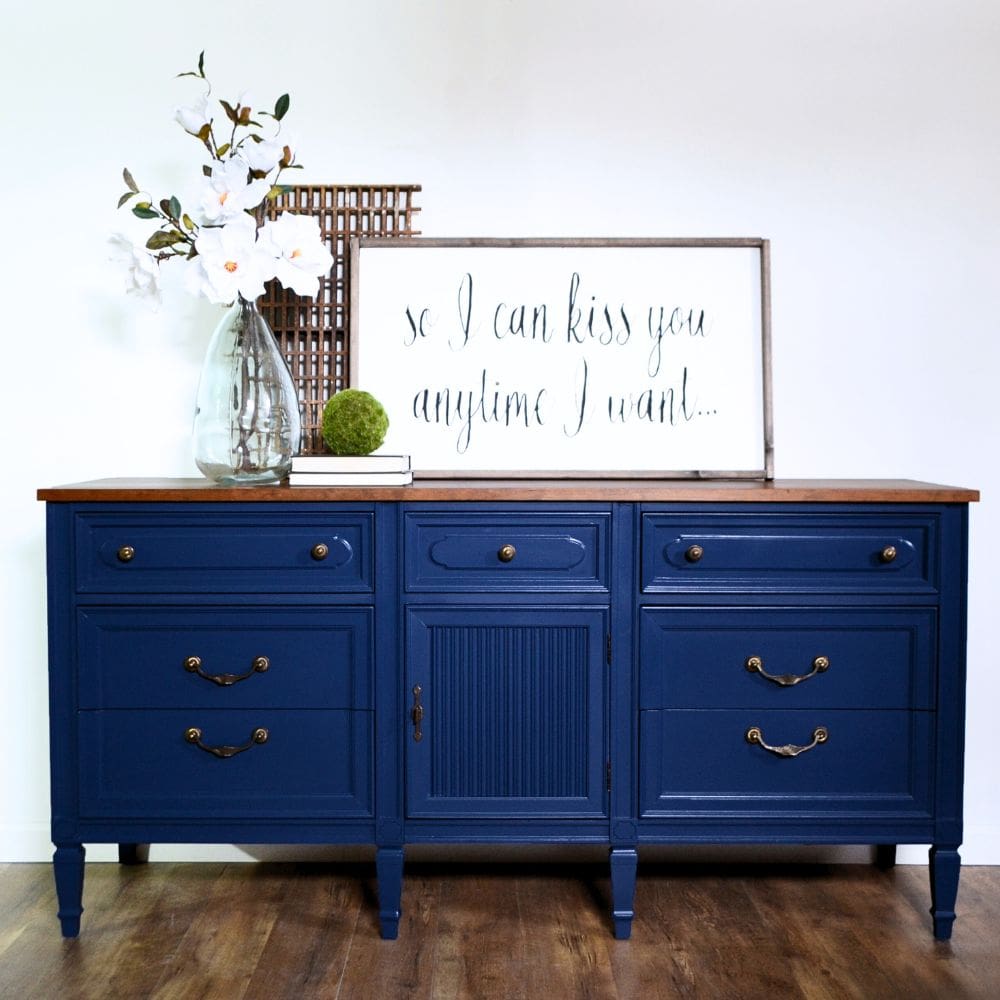
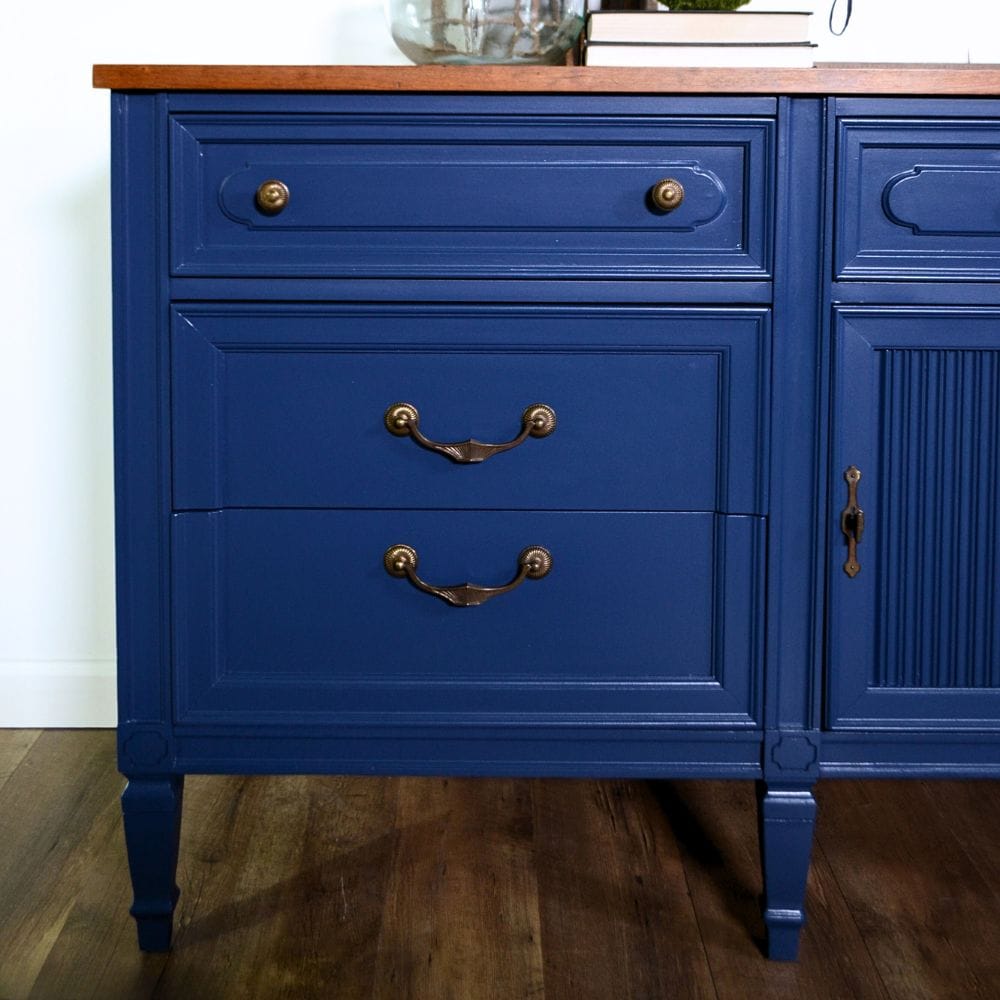
Painting a Dresser Blue
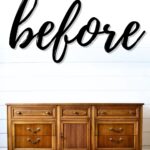
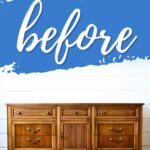


We have another one of these DIY dresser makeover ideas for you today, and this time we’re painting a dresser blue! If you’re tired of your old brown or white dresser and want to give it a fun and vibrant new look, then keep reading.
We’ll guide you through the steps of this simple and affordable project that will liven up your bedroom or any room in your house.
Welcome to Furniture Fixer Upper day, where we join 4 of our talented furniture friends and bring you brand new makeovers! I’ll link to my friend’s makeovers after our after photos at the bottom of this post! Don’t forget to check out their masterpieces for more inspiration!! Okay, back to our makeover!

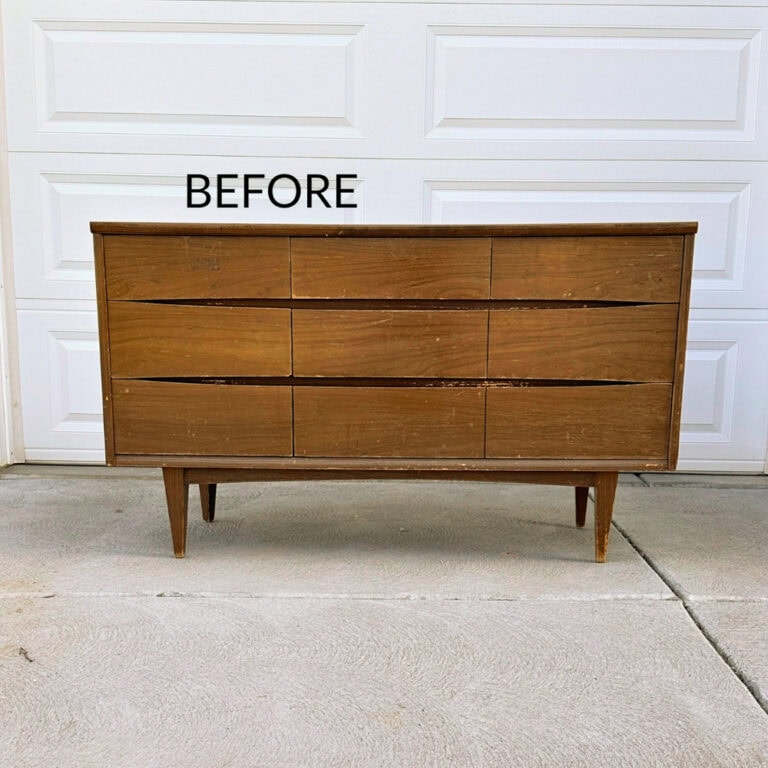
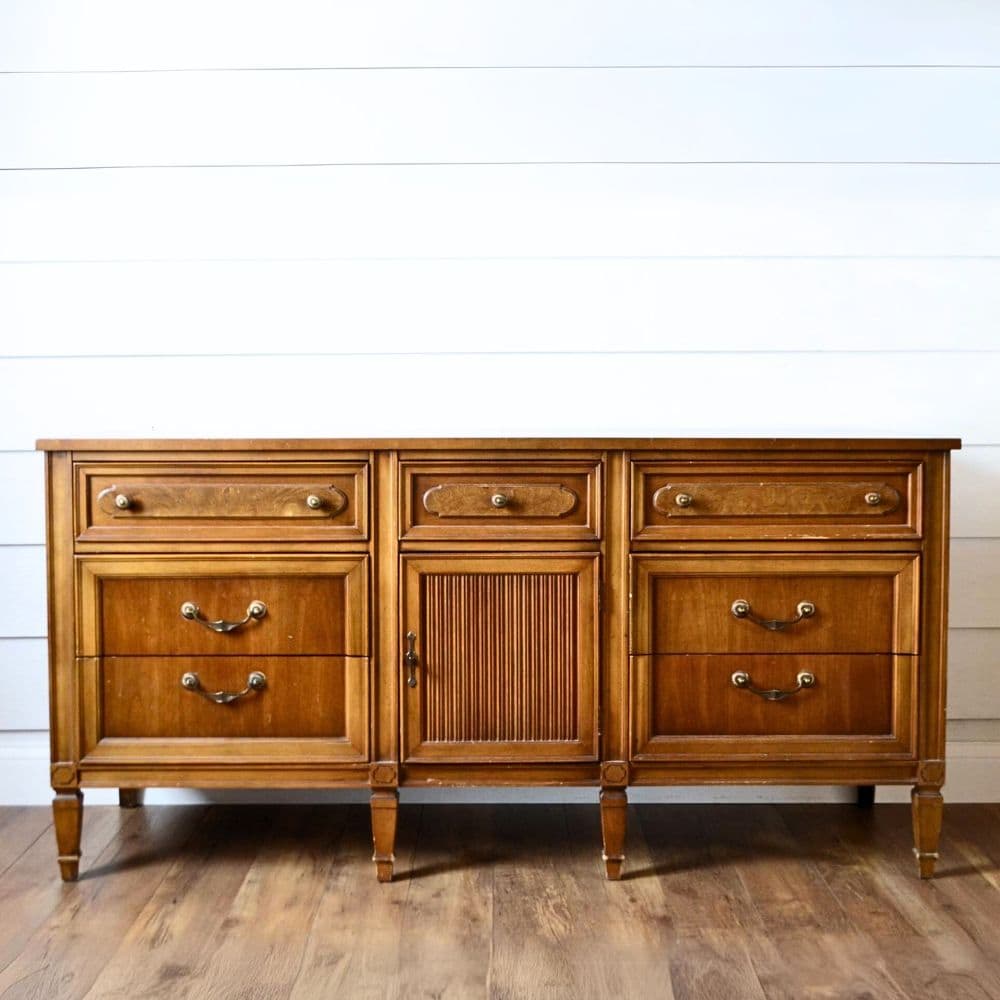
You may have an existing dresser that you’ve had for years and is still going strong, but the color just doesn’t excite you anymore. Or maybe you found a great deal on a secondhand dresser that needs some love. Whatever your reason may be, painting your dresser can completely transform its look!
Blue is such a versatile color that can bring both calmness and vibrancy to any room. You can choose a subtle light blue or go for a bold navy – either way, it will add a refreshing and unique touch to your dresser. So, let’s get started on this fun DIY project!

Supplies Used for Painting a Dresser Blue
As an Amazon Associate, I earn from qualifying purchases. I also may earn from other qualifying purchases with other companies or get free product to review and use. All opinions are my own.
- Screwdriver
- Krud Kutter
- Citristrip
- Plastic Scraper
- SurfPrep Sander (Use code RAY10 to get 10% off your order)
- 220 Grit Sandpaper
- Medium Grit Pro Foam Pads
- Shop Vacuum
- Tack Cloth
- Minwax Dark Walnut Stain
- Foam Brush or Cloth
- FrogTape Delicate Surface Tape
- Pre-Taped Plastic
- Clear Shellac Primer
- Behr Latex Paint in color Inked
- Calcium Carbonate Powder
- Fuji Q4 Paint Sprayer
- Varathane Water-based Polyurethane in Satin
Preparing Dresser for Blue Paint
First off, it’s important to properly do these steps on how to prepare furniture for painting. This is to make sure that the blue paint adheres well and lasts a long time. Start by removing any hardware, such as knobs or hinges. This will allow you to paint more evenly and avoid getting paint on them.
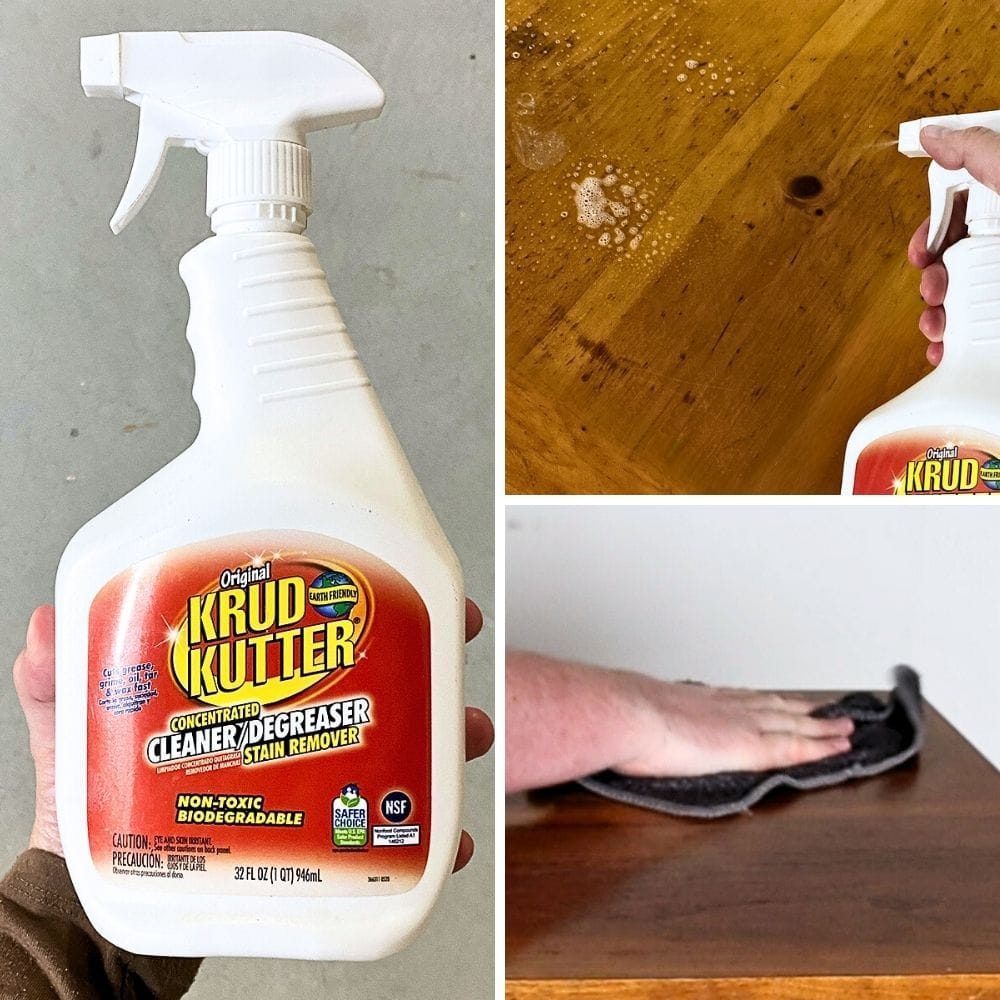
Next, give your dresser a good cleaning with Krud Kutter. This is a powerful cleaner that will remove any dirt, grime, or grease from the surface. Make sure to let it dry completely before moving on to the next step. Check out our cleaning furniture before painting guide for more tips.
We’re staining the top of the dresser, so we need to remove the existing finish first. Use Citristrip, a strong and safe paint stripper, to do this – it’s one of the best wood stain removers and one of the best tools for removing paint from wood.
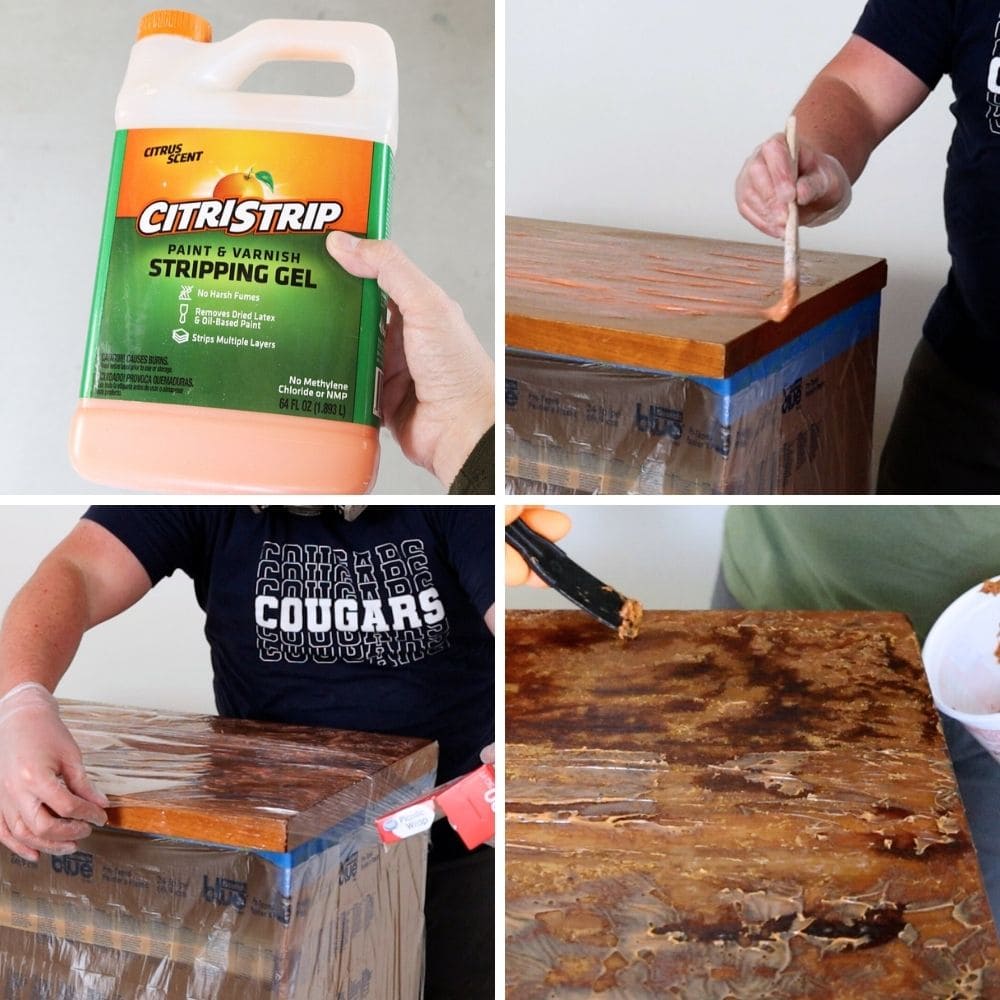
Let it sit for 30 minutes before scraping off with a plastic scraper. Learn more about how to remove stain from wood without sanding here!
Once the stripper is removed, let the surface dry completely before sanding lightly with SurfPrep sander and 220 grit sandpaper.
Now that you’ve stripped and sanded the top of your dresser, it’s time to sand up the rest of the dresser. Use the SurfPrep sander with medium grit foam pads to scuff up the surface. Sanding before painting furniture will help the blue paint adhere better to your dresser.
Afterward, remove the dust from sanding with a shop vacuum and tack cloth. You don’t want any dust particles to mix into the paint, as this will create a bumpy and uneven finish.

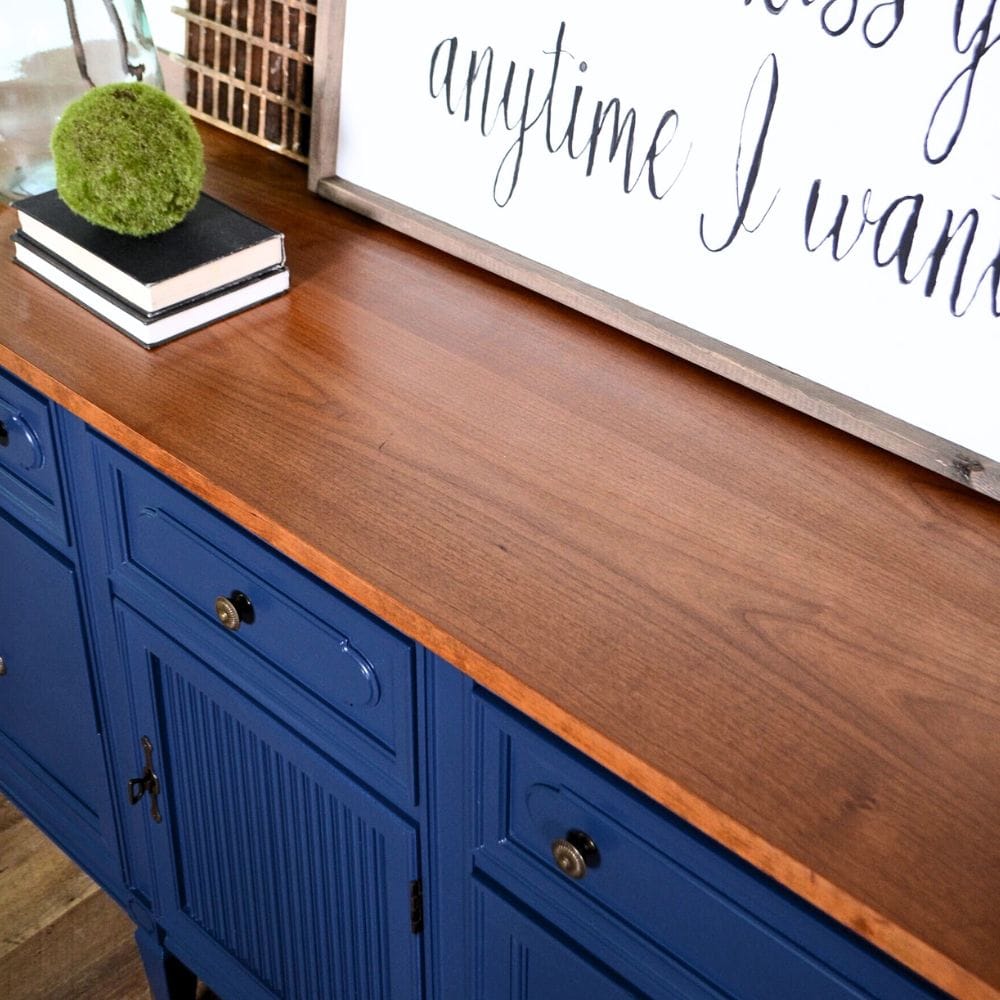
Staining Dresser Top
Now let’s stain the top of the dresser. This step adds a beautiful contrast to the blue paint and gives your dresser a touch of sophistication.
Stain the dresser top with Minwax Dark Walnut Stain, using a foam brush or cloth and following the direction of the wood grain. Let it dry for 48 hours. This wait time guarantees that the stain is completely dry.
Once the stain is dry, tape off the top with FrogTape Delicate Surface and pre-taped plastic. This will protect the stained area while we paint the base of the dresser.
FrogTape is the best painters tape that doesn’t bleed you can use. Make sure the tape is securely attached to avoid any bleeding of paint onto the stained area.
If you’ve never tried staining, you can learn how to stain wood furniture in detail here.
Priming Dresser Before Painting Blue
We now move to priming the dresser before painting it blue. Priming wood for painting is an important step in any furniture makeover project to make sure that the paint adheres even better and produces a smooth, even finish.
Would you like to save this?
Clear shellac is one of the best primers for painting furniture and one of the best primers to stop tannin bleed so you can trust it to do the job well. Two coats of clear shellac should do the trick to block bleedthrough and help the blue paint really stick to your dresser.
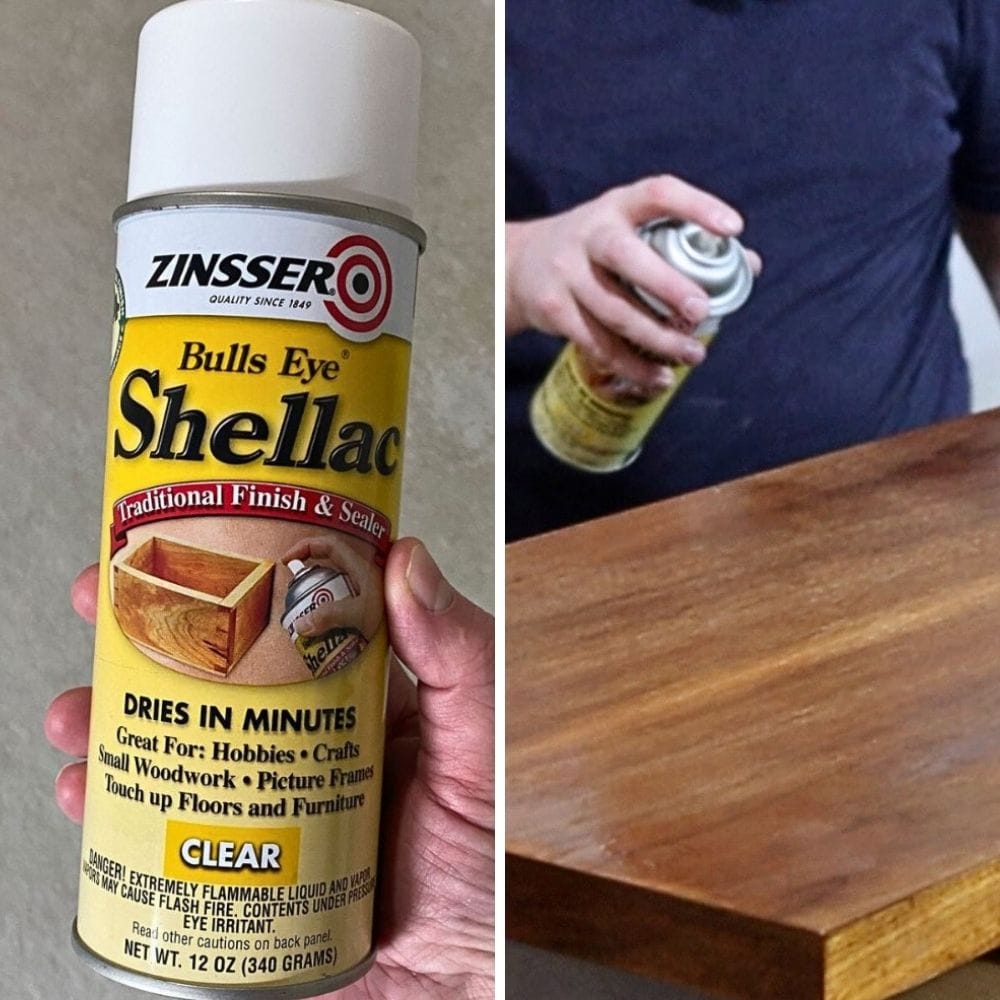
After spraying the clear shellac, let it dry overnight. This may seem like a long time, but trust us – it’s worth the wait for the best results!
Painting Dresser Blue
Time to bring out the blue paint! We’re using latex paint by Behr in the color Inked, and mixing it with calcium carbonate powder and water to create our own homemade chalk paint. Don’t worry if you’ve never made your own chalk paint before – it’s super easy and budget-friendly! You can follow our homemade chalk paint recipe here.
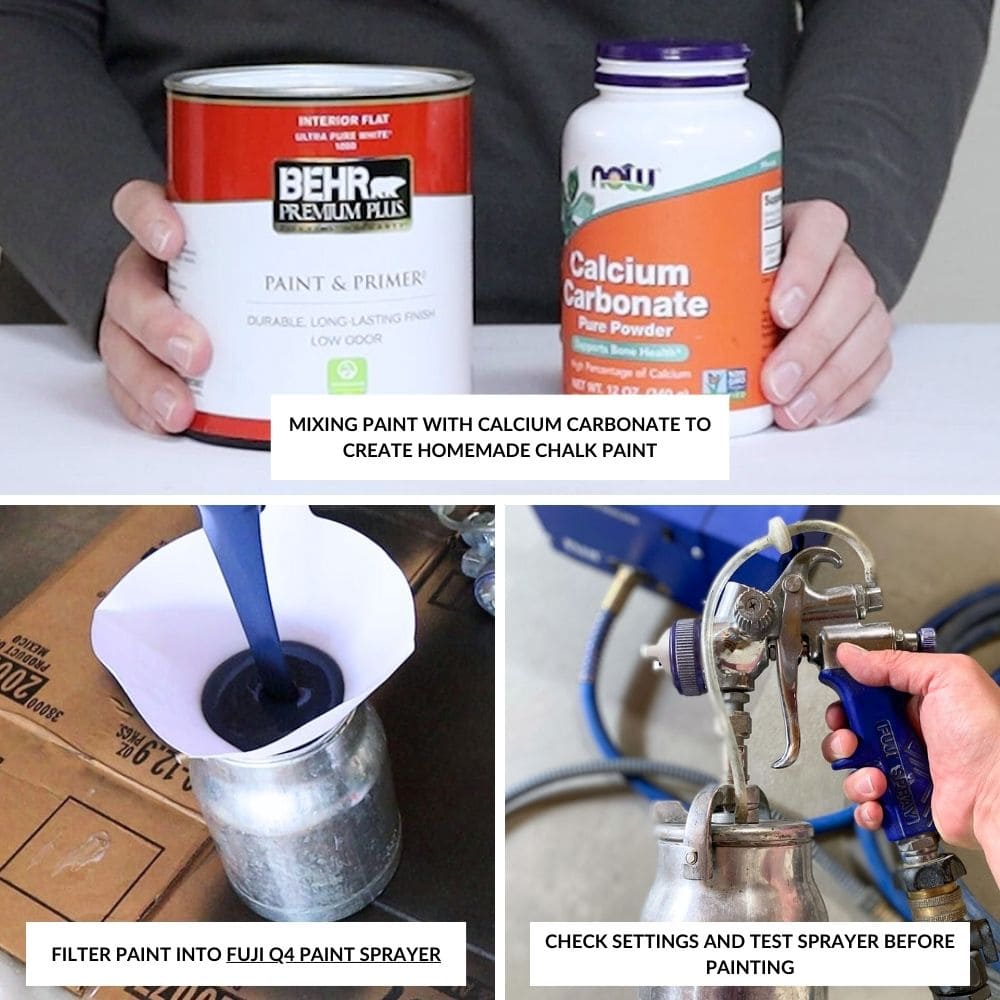
Once we made our chalk paint, we filtered it into our Fuji Q4 paint sprayer. Filtering it will eliminate any lumps or impurities, giving us a smooth and even finish.
Spray 2-3 coats on everything – the dresser base, drawers, and even the edges. Let each coat dry completely before applying the next one. Using a paint sprayer on furniture definitely gets you a smoother and more professional-looking finish.
Protect Blue Painted Dresser
Now that your dresser is beautifully painted in a vibrant blue, it’s important to protect that color and finish. To do this, we’ll be using Varathane water-based polyurethane in a satin finish.
This will not only protect the painted surfaces from scratches and wear, but it will also add a subtle shine that enhances the beauty of the blue paint.
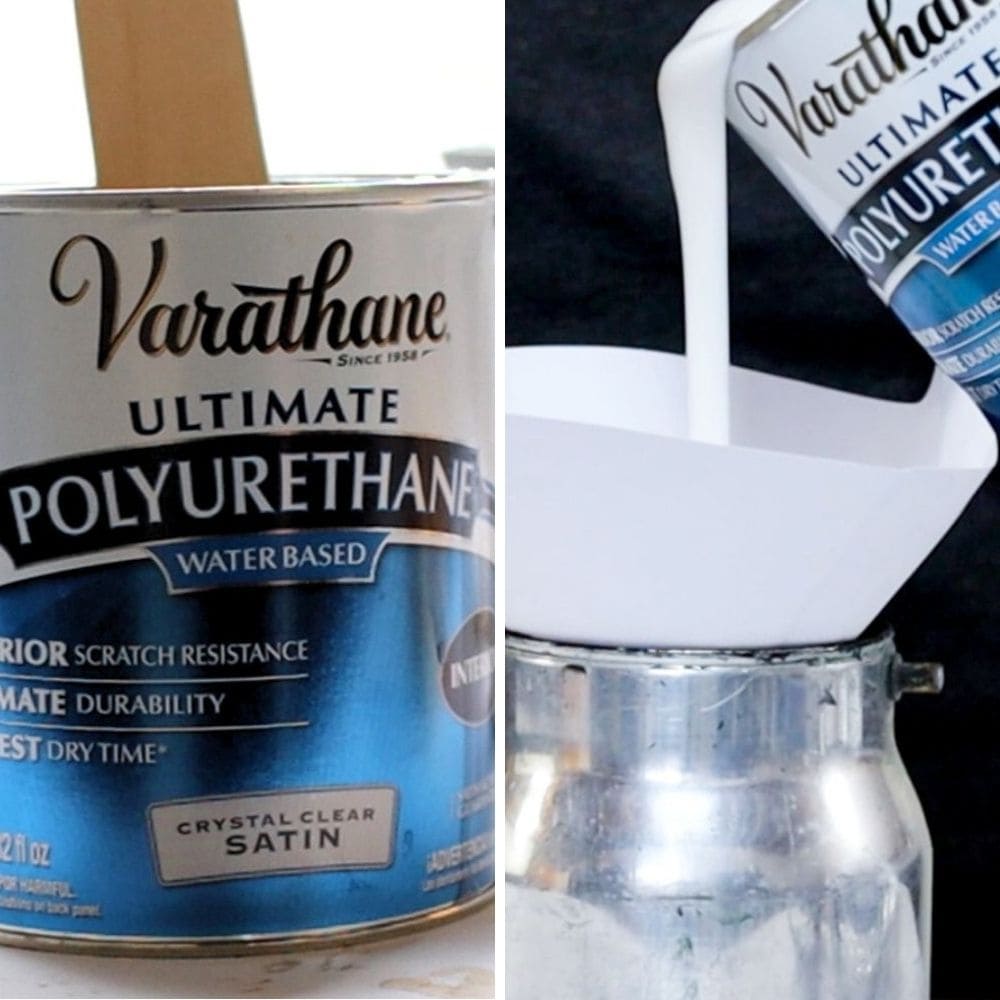
Spray 3 coats of the polyurethane on all surfaces of the dresser, including the top that we stained. Make sure to remove the pre-taped plastic from the top before spraying. Here’s our guide on how to spray polyurethane to help you get the best results.
Once all 3 coats are applied and dried, reattach any hardware that was removed earlier. And there you have it – your blue painted dresser is now not only eye-catching but also well-protected!
So you just transformed your dresser with a fresh coat of blue paint, and the best part is you did it yourself! Isn’t a blue dresser such a statement? And with the added touch of stained wood on top, you get a more sophisticated and unique piece.
For more blue dresser makeovers, check out our list of blue painted dresser ideas. If you are into colorful pieces, here’s our list of colorful dresser ideas. And if you want to upgrade your old dresser, check out these painting old dresser ideas!
More Before and After Makeovers
See All >
Click any of these “before” photos below to view the “after” of that makeover.


Don’t forget to check out these other awesome before and after furniture makeovers from my Furniture friends!! (Click the links below the photos!)
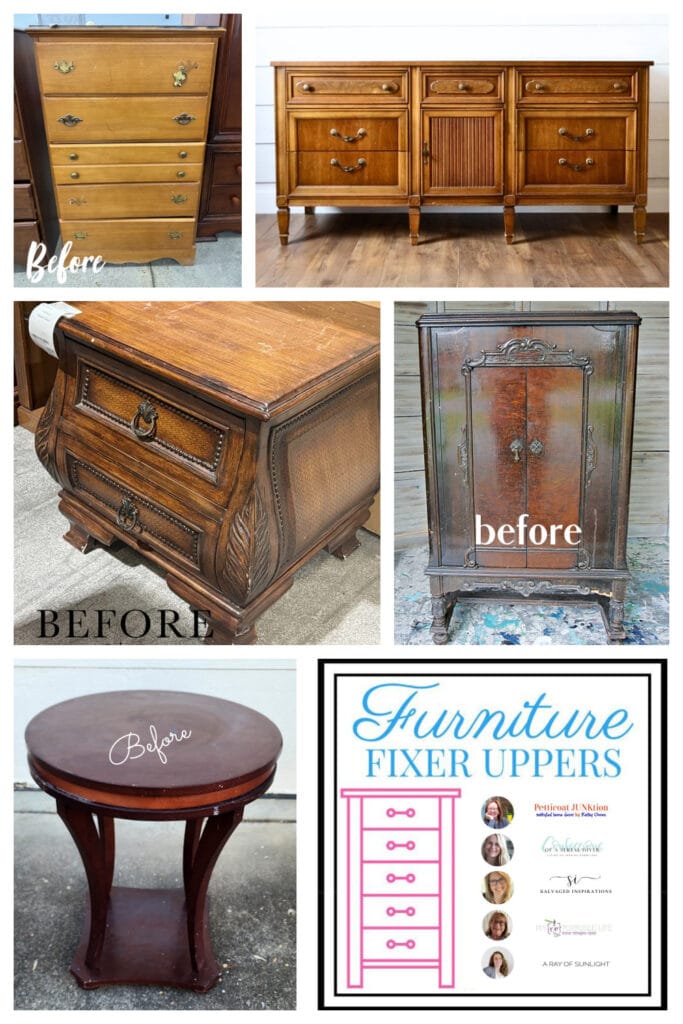
- $10 Thrifted Dresser from Confessions of a Serial DIYer
- Bombay Chest Makeover from Salvaged Inspirations
- Radio Cabinet Makeover from Petticoat Junktion
- Round Table Makeover from My Repurposed Life


Painting a Dresser Blue
We're painting a dresser blue to inspire you if you're tired of your old brown or white dresser and want to give it a fun and vibrant new look!
Materials
- Krud Kutter
- Citristrip
- 220 Grit Sandpaper
- Medium Grit Pro Foam Pads (Use code RAY10 to get 10% off your order)
- Tack Cloth
- Minwax Dark Walnut Stain
- FrogTape Delicate Surface Tape
- Pre-taped Plastic
- Clear Shellac Primer
- Behr Latex Paint in color Inked
- Calcium Carbonate Powder
- Varathane Water-based Polyurethane in Satin
Tools
Instructions
- Remove the hardware on your dresser before moving on to cleaning and sanding. This will make the process easier and guarantee an even finish for painting later.
- Clean dresser with Krud Kutter before sanding. This will remove any dirt or grease on the surface for better adhesion of the paint. Leave it to dry completely.
- For the dresser top, remove any old finish by using Citristrip. Let it sit for 30 minutes before scraping off with a plastic scraper. Once removed, let the surface dry completely before sanding lightly with SurfPrep sander and 220 grit sandpaper.
- Use the SurfPrep sander with medium grit foam pads to scuff up the rest of the dresser's surface. This will create a rough surface for the paint to adhere to. Remember to go with the wood grain, not against it.
- After sanding, remove all dust using a shop vacuum and tack cloth, so no dust particles mix into the paint.
- Stain the dresser top with Minwax Dark Walnut Stain, using a foam brush or cloth and following the direction of the wood grain. Let it dry for 48 hours.
- Once the stain is dry, tape off the top with FrogTape Delicate Surface and pre-taped plastic. This will protect it while painting the base of the dresser.
- Prime the dresser before painting with clear shellac to guarantee a smooth, even finish and prevent bleedthrough. Let it dry overnight for best results.
- Create your own homemade chalk paint by mixing latex paint with calcium carbonate powder and water. Filter the paint before spraying 2-3 coats onto your dresser. Let each coat dry completely.
- Protect your blue painted dresser with Varathane water-based polyurethane in satin finish, spraying 3 coats on all surfaces including the top (once pre-taped plastic is removed). Reattach hardware once everything is dry. Now admire your stunning and well-protected blue painted dresser!
More Painted Furniture Makeover Ideas
- Blue Nursery Dresser Makeover
- Midnight Blue Dresser Makeover
- Goodwill Dresser Makeover
- Light Blue French Provincial Dresser Makeover
- Painting a Hutch
Follow us on YouTube to get more tips for painting furniture. Or share your project with us on our Facebook Group and be part of our community. See you there!
this turned out gorgeous, for sure! I’m not a “blue” person unless it is more of a cobalt blue color…especially in glass, but this is nice and close. I have my old china cabinet base in a pecan type finish that I’ve had to use in a pinch for my new 57″flat screen tv to sit on. It needs a make over and I’m thinking a deep darkish green would be pretty in my color scheme. I just need to find the time to do it! Thank you for the inspiration!
Hey Sharon, I’m so glad you like it! Best of luck with your old china cabinet base!!
beautiful! but what if you can’t afford a serve pro sander
You can use any sander to sand flat surfaces, or they have foam pads to fit on any sander. Check out our SurfPrep Sander Alternative post to learn about a cheap alternative to the SurfPrep sander.
This is absolutely stunning now, Natalie! It would make an amazing buffet! XOXO
This blue paired with the stained top is gorgeous Natalie! PINNED! XOXO
Oh my goodness what an incredible piece of furniture. I love the blue as well.
Thank you so much for the love on our blue dresser Maria!
Thanks so much Michelle! So glad you love the blue dresser!