Painting a Buffet Cabinet


If you’re looking to give your dining room a fresh new look, you can start with your buffet cabinet. Painting a buffet cabinet is a simple and affordable way to update your furniture and create a more stylish space. Plus, it’s a fun DIY project that anyone can tackle!
Yes, you don’t have to be an expert in these painting furniture ideas – with this guide, we’ll show you the step by step process and some helpful tips to make your own buffet cabinet painting project a success. Keep reading to get inspired and learn how to transform your old buffet cabinet into a stunning new piece!

Buffet cabinets are not only functional as storage, but they also serve as a decorative element in your dining room. With their unique designs and intricate details, they’re full of character and charm. However, sometimes the original finish on a buffet cabinet can become worn or outdated, making it less appealing to display in your home.
And so by giving it a fresh coat of paint, you can make it more visually appealing and fitting to your current decor. You can even personalize the piece by using your favorite color or matching it to your room walls. Vintage, rustic, or modern – painting can give it a whole new look for any style you want.

Plus, it’s much more budget friendly compared to buying a new buffet cabinet! Not to mention, it’s an eco friendly option as well since you’re giving your piece a new life instead of throwing it away. So why not give your old piece some love and make it shine again with a simple paint job?
But before jumping into painting your buffet cabinet, there are a few things to consider. Follow along with these steps and tips!

Supplies Used for Painting a Buffet Cabinet
As an Amazon Associate, I earn from qualifying purchases. I also may earn from other qualifying purchases with other companies or get free product to review and use. All opinions are my own.
- Electric Screwdriver
- Krud Kutter
- Damp Rag
- KwikWood
- 220 Grit Sandpaper
- Vacuum
- Tack Cloth
- Pre-Taped Plastic and Painter’s Tape
- Citristrip
- Clear Shellac (in spray can)
- Respirator
- Country Chic Paint Jitterbug and Peacoat Blue
- Wagner FLEXiO 595 Sprayer
- Minwax Wood Stain in Dark Walnut
- Lint Free Cloth
- Waterbased Polyurethane in Satin
- New Hardware
Prepping Buffet Cabinet for Painting
First things first, you want to make sure your buffet cabinet is ready for painting. This means removing any hardware and shelves. We used an electric screwdriver to quickly unscrew and take them off from our buffet cabinet. Taking off the hardware will make it much easier to sand and paint your piece without any obstructions in the way.
Then you’ll want to give the cabinet a good cleaning. Use a product like Krud Kutter and a damp rag like we did to remove any dirt or grime that has built up over time. You can get more details on how to clean furniture before painting here.

After cleaning, we filled in the old hardware holes on the drawers with Kwikwood. I find using Kwikwood the best way of filling holes when replacing cabinet or furniture hardware! Filling the holes will allow us to replace the old knobs with new ones for a fresh look.
You’ll also want to check the condition of the drawers. Here’s how to fix a drawer bottom that falls out in case yours is falling out!
Sanding Buffet Cabinet
It’s time to move on to sanding. You can sand by hand with 220 grit sandpaper, or use a power sander like the Dewalt orbital sander with the foam SurfPrep 5″ pads in a medium grit (Use code RAY10 to get 10% off your SurfPrep foam pads order) especially on the curved surfaces of a buffet cabinet. For flat surfaces, regular Diablo 5″ sanding screens in 220 grit will do the job.

The goal of sanding before painting furniture is to lightly scuff up the surface of the wood to remove any shine and help the paint adhere better. Don’t forget to vacuum up all the dust and wipe with a tack cloth to leave the cabinet clean and ready for the next step.
During the sanding process, I did come across some loose wood veneers, so I took the time to glue them back on. Here’s how to repair chipped veneer to guide you on fixing any of these areas on your furniture. You should address this issue for a smooth surface and to prevent further damage.
Stripping Old Finish of Buffet Cabinet Top
For the top of the buffet cabinet, we stripped off the old finish using Citristrip stripper and then sanded it smooth with 220 grit sandpaper. Stripping is one of the effective ways to remove stain from wood without sanding. Then we covered the top with pre-taped plastic and painter’s tape so the paint wouldn’t get on it while we painted the rest of the cabinet.
Priming Buffet Cabinet before Painting
Our buffet cabinet is made of mahogany wood, which is prone to bleedthrough issues. To stop stains from coming through paint, we primed it with a stain blocking primer. We used one of these best primers to stop tannin bleed – the clear shellac in a spray can is very convenient and easy to use, though it can be stinky so make sure to wear a respirator and work in a well ventilated area.

Would you like to save this?
To really block those stains, I went for 2 coats of primer. This stuff dries fast, so it didn’t take too long to wait and proceed to the next one. Then we let the primed cabinet dry and cure overnight before we started painting it.
Painting Buffet Cabinet
After all the prep work, it was time to add some color and bring this piece back to life! We made our own chalk paint using a 1:1 mix of Country Chic Paint’s Jitterbug and Peacoat Blue. It turned out to be the perfect turquoise shade. You can check out our homemade chalk paint recipe and these chalk paint recipes for guides you can easily follow.
We applied 2-3 coats of the chalk paint for full coverage and we used a Wagner FLEXiO 595 sprayer for a flawless finish. This saved us time and effort compared to painting by hand, especially since our buffet cabinet has a lot of intricate details. If you’re considering using a paint sprayer on furniture, this is definitely the one to get – it’s budget friendly and works for multiple projects.

Once the painting was done, we moved back to the top of the cabinet and removed the painter’s tape and plastic. To add some contrast and depth to the piece, we stained the top with Minwax wood stain in dark walnut.
Apply it in the direction of the wood grain and let it stay for a few minutes – just remember that the longer you leave it on, the darker the stain will be. So make it as light or dark as you want, then use a clean, lint free cloth to wipe off excess stain.
We allowed the stain to dry for 48 hours before sealing the entire cabinet. You can learn all about how to stain wood furniture in this post, so you can do it confidently!

Topcoating Chalk Painted Buffet Cabinet
After all the hard work of sanding, priming, and painting our buffet cabinet, it was finally time to add the finishing touch – topcoating! Sealing painted furniture protects it from wear and tear and makes sure that your piece stays beautiful for years to come. For the right wood sealer for your project, here’s what to use to seal wood before painting!
We chose waterbased polyurethane in a satin finish among the many topcoats for painting furniture. Since we already had our Wagner FLEXiO 595 sprayer out from painting the cabinet, we used it again for an even application of the topcoat. Here’s our tutorial on how to spray polyurethane if you’re new to spraying poly.
With the topcoat dried, we attached new cup pulls and knobs to complete the look. Changing hardware may seem minor, but it does a lot in transforming the overall appearance of a piece. Here’s how to change hardware on furniture for a guide on this simple and affordable update.
And after letting everything dry for at least a week, we were finally able to put the shelves back in and use our newly updated buffet cabinet! It will take a month to fully cure, so remember to handle it with care during this time.
The combination of the turquoise chalk paint and the dark walnut stain on top gave it a unique and eye-catching look. If you’re thinking of painting an old piece, this project just goes to show how much of a difference it can make.
Now we have a beautiful buffet cabinet that looks brand new! For similar makeovers, here’s our list of chalk paint buffet ideas. Check out my favorite before and after buffet makeover here!


More Before and After Makeovers
See All >
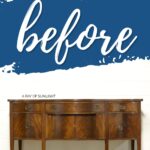
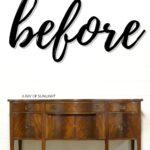
Click any of these “before” photos below to view the “after” of that makeover.


Painting a Buffet Cabinet
Painting a buffet cabinet is a simple and affordable way to update your furniture and create a more stylish kitchen space.
Materials
Instructions
- Remove all hardware and shelves from the buffet cabinet with an electric screwdriver. Taking them off will make it much easier to sand and paint your piece without any obstructions in the way. If you're going to use new hardware, fill in the old hardware holes with Kwikwood.
- Clean the cabinet thoroughly with Krud Kutter and a damp rag, making sure to get rid of any dirt or grime that has accumulated over time. Don't forget to clean inside and outside the cabinet, as well as any crevices or corners.
- Sand the entire cabinet with 220 grit sandpaper to roughen up the surface and help the primer adhere better. Focus on any shiny areas or scratches, making sure to smooth them out. After sanding, vacuum then wipe the entire piece down with a tack cloth to remove any leftover dust.
- For the top of the buffet cabinet, strip the old finish with Citristrip. Then cover it with pre-taped plastic and painter's tape so paint can't get on it while painting the rest of the cabinet.
- To stop stains from coming through paint, prime the cabinet with a stain blocking primer such as clear shellac in a spray can. Apply 2 coats of primer for maximum coverage and let it dry overnight before painting. Make sure to work in a well-ventilated area and wear protective gear such as a respirator when using shellac.
- Make your own chalk paint with a 1:1 mix of Country Chic Paint's Jitterbug and Peacoat Blue. Apply 2-3 coats for full coverage and use a sprayer like the Wagner FLEXiO 595 sprayer for an easy and flawless finish. Let dry overnight before moving on to the top of the cabinet.
- Stain the top with Minwax wood stain in dark walnut, wiping off excess stain with a clean cloth after a few minutes. Allow the stained top to dry for 48 hours.
- Seal the entire buffet cabinet with a topcoat such as waterbased polyurethane in a satin finish using the same sprayer. This will protect your painted buffet cabinet and give it a smooth and durable surface.
- Attach new hardware such as cup pulls and knobs to complete the look of your newly painted buffet cabinet. This small change can make a big impact on the overall appearance of your piece.
- Let everything dry for at least a week before handling or putting shelves back in. Handle your buffet cabinet with care during the curing process (which takes about a month). Once fully cured, you can enjoy your beautifully painted and updated buffet cabinet!
Recommended Products
As an Amazon Associate and member of other affiliate programs, I earn from qualifying purchases.


More Furniture Makeover Ideas
- Painting A Dresser Blue
- DIY Navy Blue Bedroom Dresser
- Box Store Bookcase Makeover
- DIY Light Blue Dining Room Buffet
- Midnight Blue Dresser Makeover
Follow us on YouTube to get more tips for painting furniture. Or share your project with us on our Facebook Group and be part of our community. See you there!
