DIY Merry Christmas Wood Sign
With the holiday season quickly approaching, it’s the perfect time to start thinking about Christmas decor ideas. You should add this DIY Merry Christmas wood sign to your list! It’s a fun and creative way to get into the holiday spirit, and it’s a great project to do with family or friends.
Follow along for step by step instructions on how to create this charming sign and make your home merry and bright for the holidays!

First of all, having a Merry Christmas sign is a great way to add some festive flair to your home during the holiday season. It’s a simple yet impactful decoration that can instantly bring joy and cheer to any room.

Plus, with so many options for personalization and design, you can make it truly unique to your own style. But purchasing a Merry Christmas sign can often be expensive, and not everyone wants to splurge on holiday decorations.
That’s where making your own comes in! Not only is it a budget friendly option, but it also allows you to create something that is one of a kind and special. You don’t have to be an expert crafter to create a beautiful Christmas sign – just follow these simple steps!
Supplies Used for DIY Merry Christmas Wood Sign
As an Amazon Associate, I earn from qualifying purchases. I also may earn from other qualifying purchases with other companies or get free product to review and use. All opinions are my own.
- 1/2″ Plywood
- Decoupage Rice Paper
- Saw
- 220 Grit Sandpaper
- Wood Furring Strips
- Tack Cloth
- Waverly Chalk Paint in the color Ink
- Zibra Fan Brush
- Lilly Moon Gel Stain in the color Old Fashioned
- Varathane Waterbased Polyurethane
- Tape
- Nailer or Wood Glue or Instant Super Glue
Cutting Plywood to Size
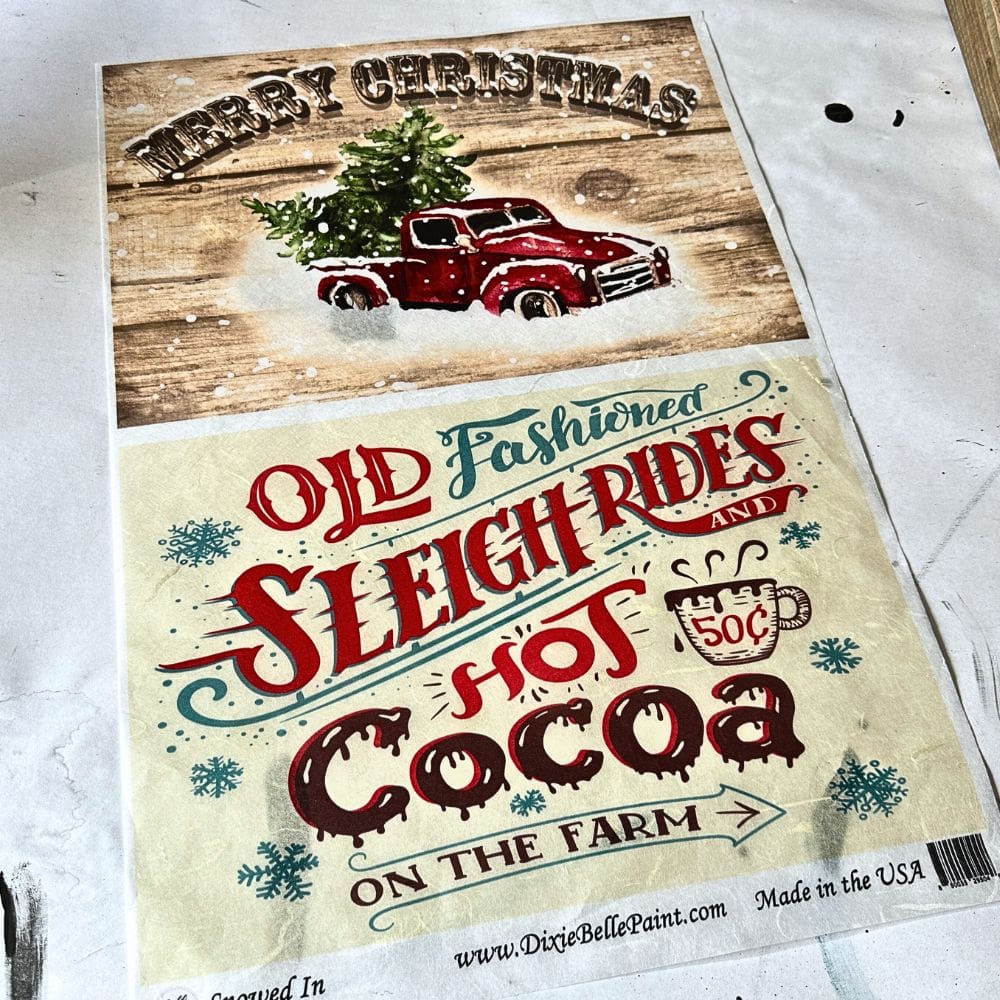
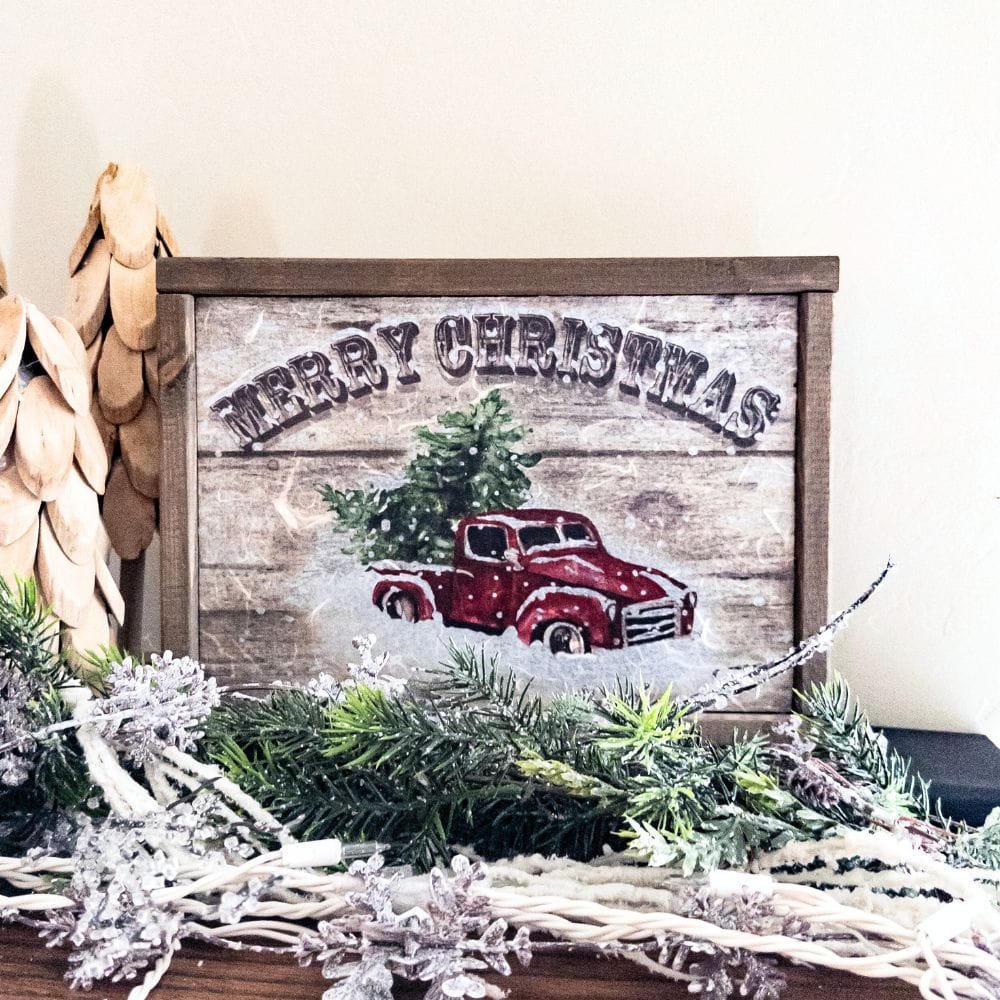
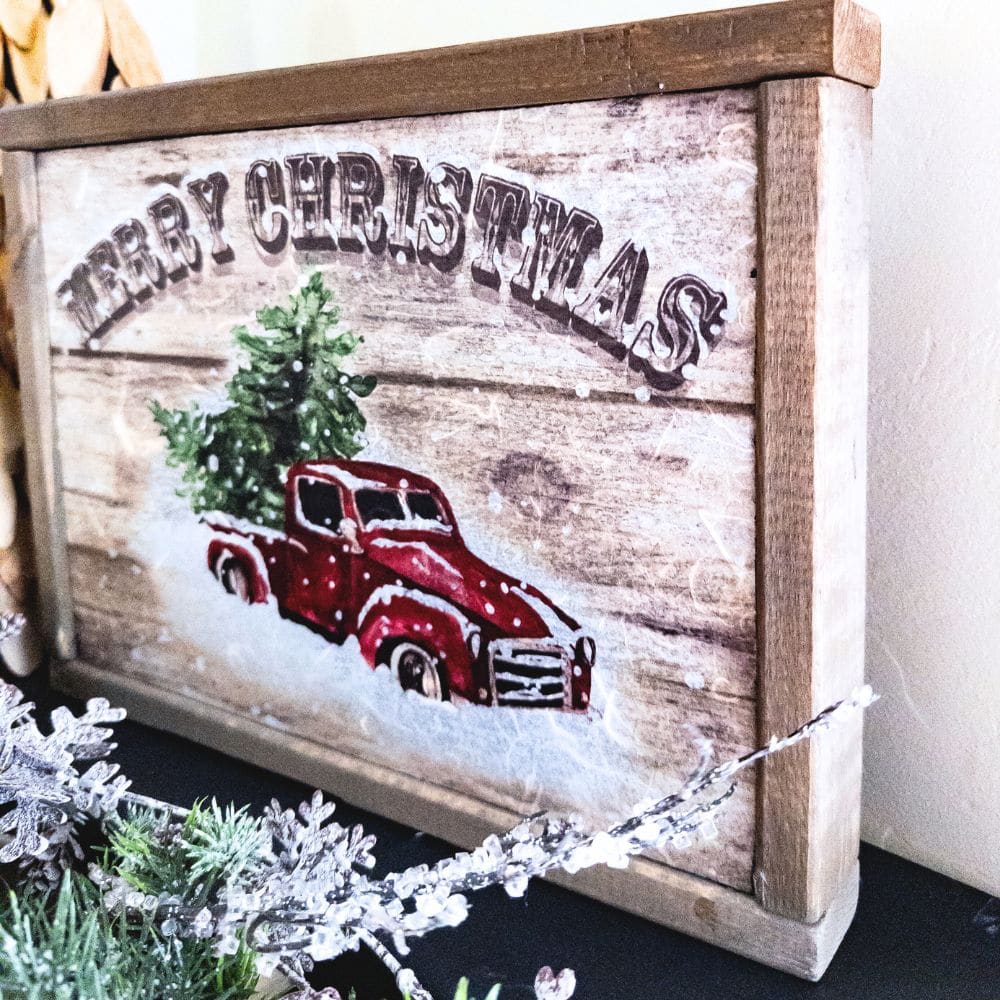
To start off your project, you will need to cut a piece of 1/2″ plywood to the size of the Belles and Whistles Dixie Belle Decoupage Rice Paper design called “Snowed In“, which measures 11.5″ x 8” tall. We used the top half of this decoupage paper design, while the other design was used for a different Christmas sign.
This is an important step as it sets the foundation for your sign. Make sure to measure carefully and use the correct tools for cutting. If you don’t have a saw, most hardware stores can cut the plywood for you.
Sanding Edges of Plywood
Once you have your plywood cut to size, it’s important to sand down any rough edges or splinters. This will not only make handling the sign safer, but it will also create a smoother surface for painting and applying the decoupage paper.
We recommend using sandpaper with a medium grit like 220 grit sandpaper for this step. Sand the edges until they are smooth to the touch.
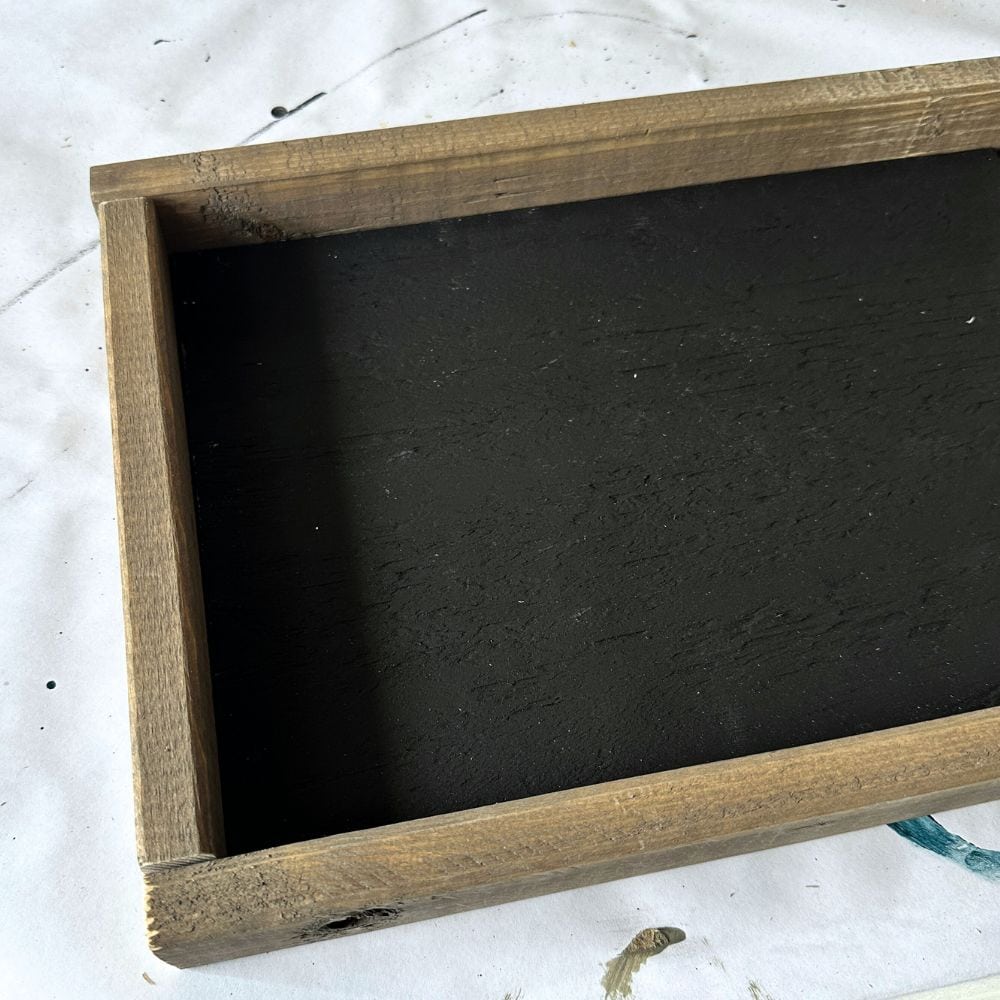
How To Make Wooden Sign Frame
Next, you will need to create a frame for your sign. We used wood furring strips and cut two pieces at 8″ long and the other two pieces at 13″ long using a miter saw. If you don’t have access to one, you can also use alternative methods such as a hand saw or having the hardware store cut them for you.
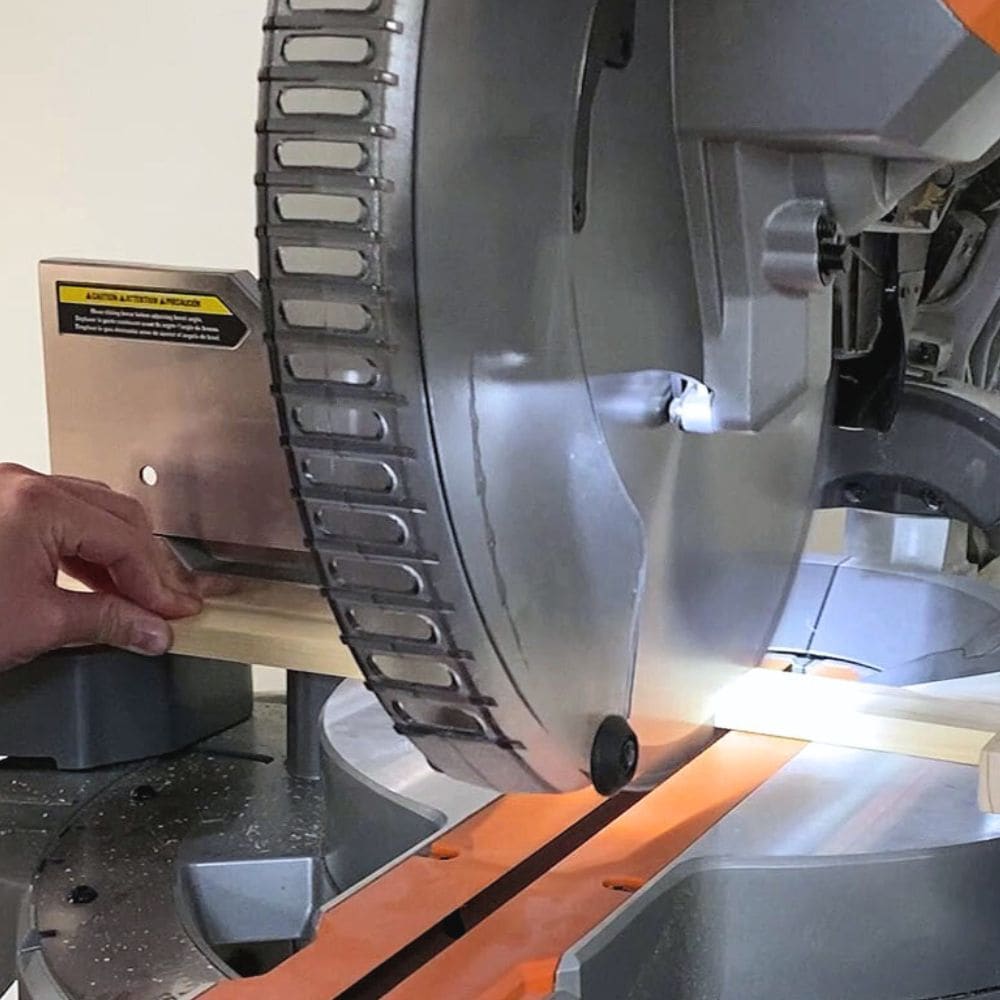
Just like the plywood, it’s important to sand down any rough edges or splinters on the frame. Use 220 grit sandpaper then clean up any dust with a tack cloth.
Painting Wooden Merry Christmas Sign
For our sign, we used black Waverly chalk paint in the color Ink and a Zibra fan brush to cover the plywood. This paint dries quickly, usually within 30 minutes, and provides full coverage.
If you’re new to this paint, here’s everything you need to know about Waverly chalk paint. You can also check out our Waverly chalk paint review for our honest thoughts and tips.
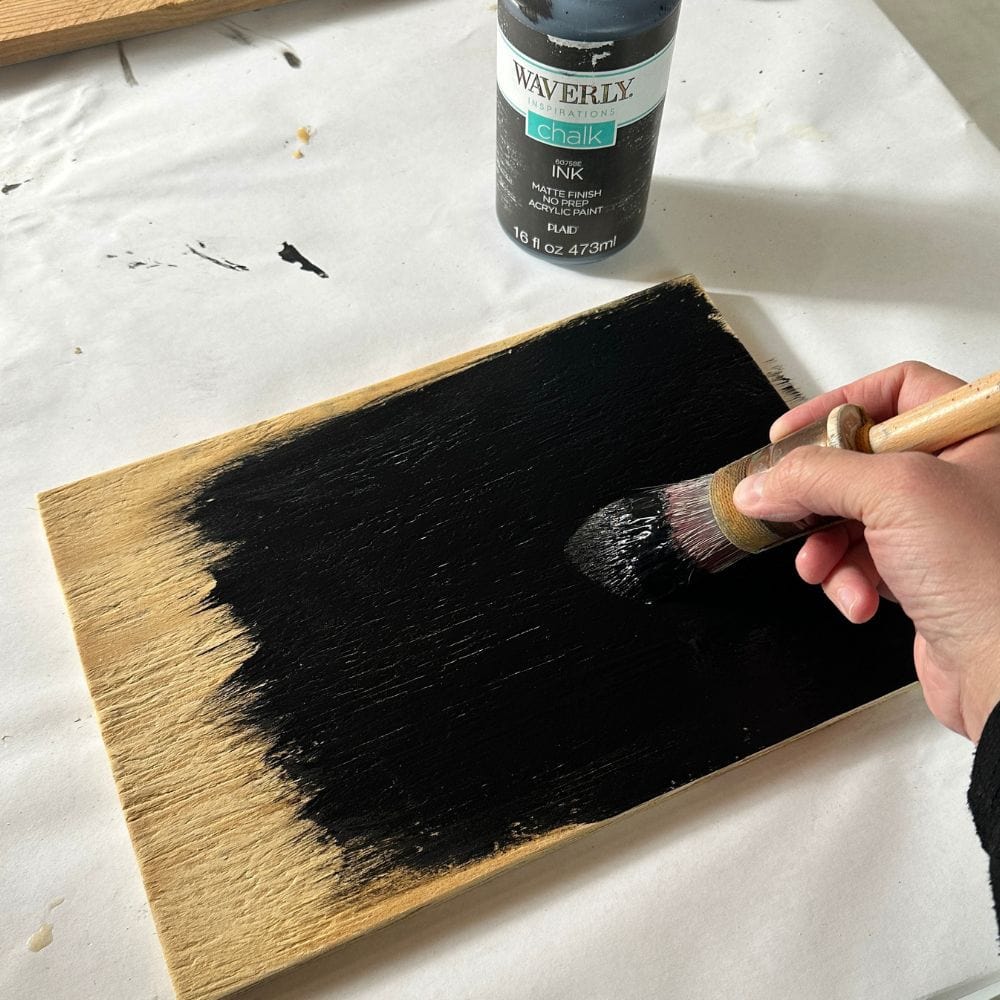
You can use any color you like – it’s all about personal preference! Let the paint dry completely before moving on to the next step.
Staining Wood Frame
For the staining process, we used Lilly Moon Smoky Gel Stains in the color Old Fashioned. We love this gel stain for its quick drying time and lack of strong odor, making it perfect for indoor projects.
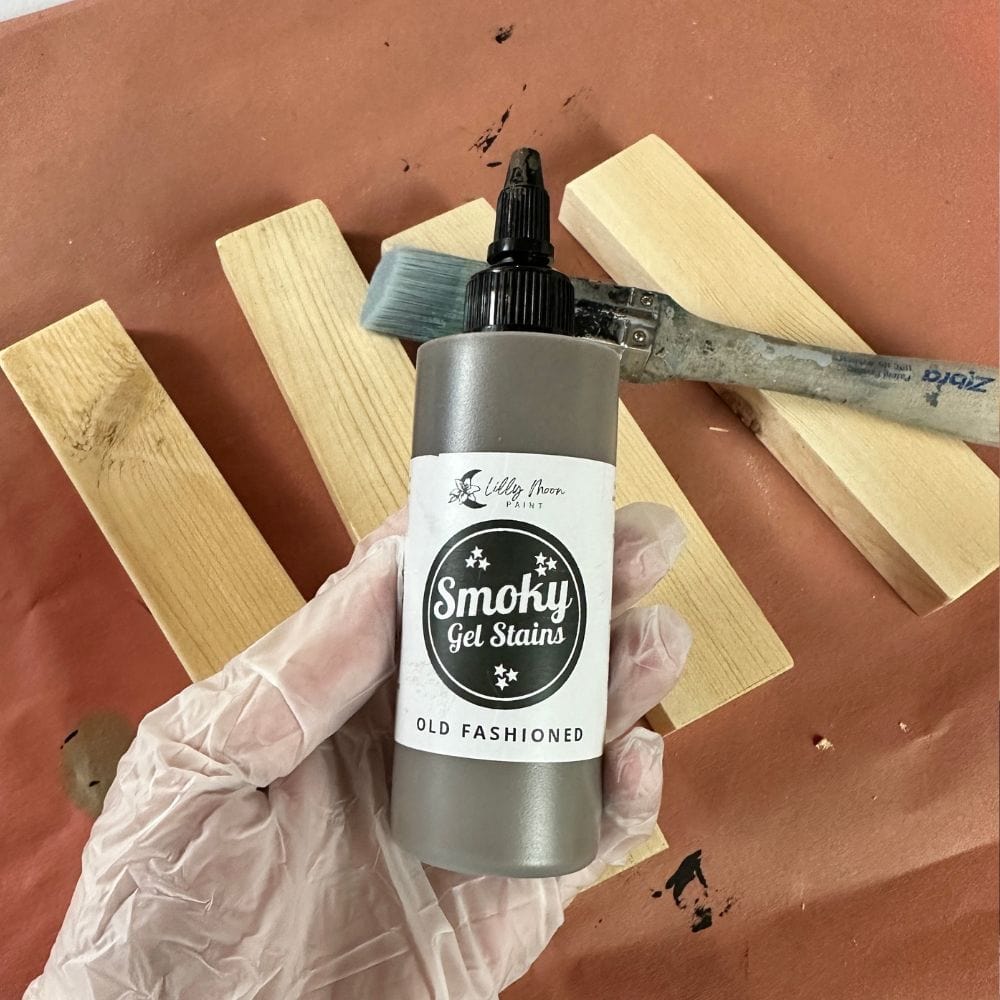
To get an even application and to make the stain stretch further, we sprayed a light mist of water onto the raw wood before brushing on the gel stain. This also helps slow down the drying time so you have more time to work with it.
Be sure to apply the gel stain evenly on every side of the wood pieces, and let them dry completely. If you’re not familiar with staining, here’s our tutorial on how to stain wood you can use as your guide.
How to Apply Decoupage Paper
To apply the decoupage paper to the plywood, line up the design and tape it in place on the top side of the sign. This will keep it in place while you work.
Would you like to save this?
Lift up the rice paper and use a paintbrush to apply a coat of Varathane water-based polyurethane to the black painted plywood, then carefully lay the decoupage rice paper onto the polyurethane. Smooth out any wrinkles or bubbles, making sure the design is straight and aligned with the edges of the plywood.
This polyurethane glues the decoupage paper to the plywood. Here’s how to decoupage furniture with rice paper to learn more about how to apply decoupage. Once it’s dry, you can move on to sealing the decoupage paper.
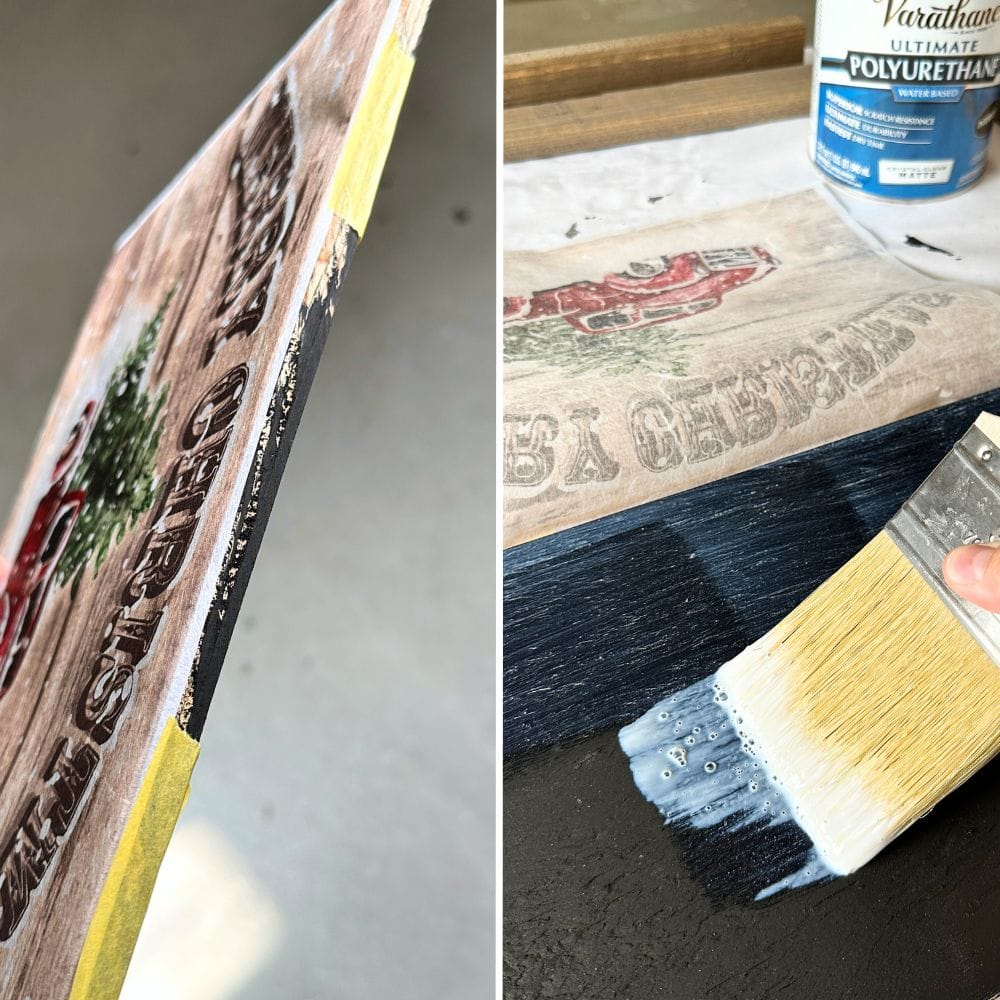
Sealing Decoupage Paper
Before doing so, you should cut the excess decoupage paper around the edges of the sign. We cut ours using sandpaper to also sand the edges down at the same time. With this way, you’ll have a clean and smooth edge.
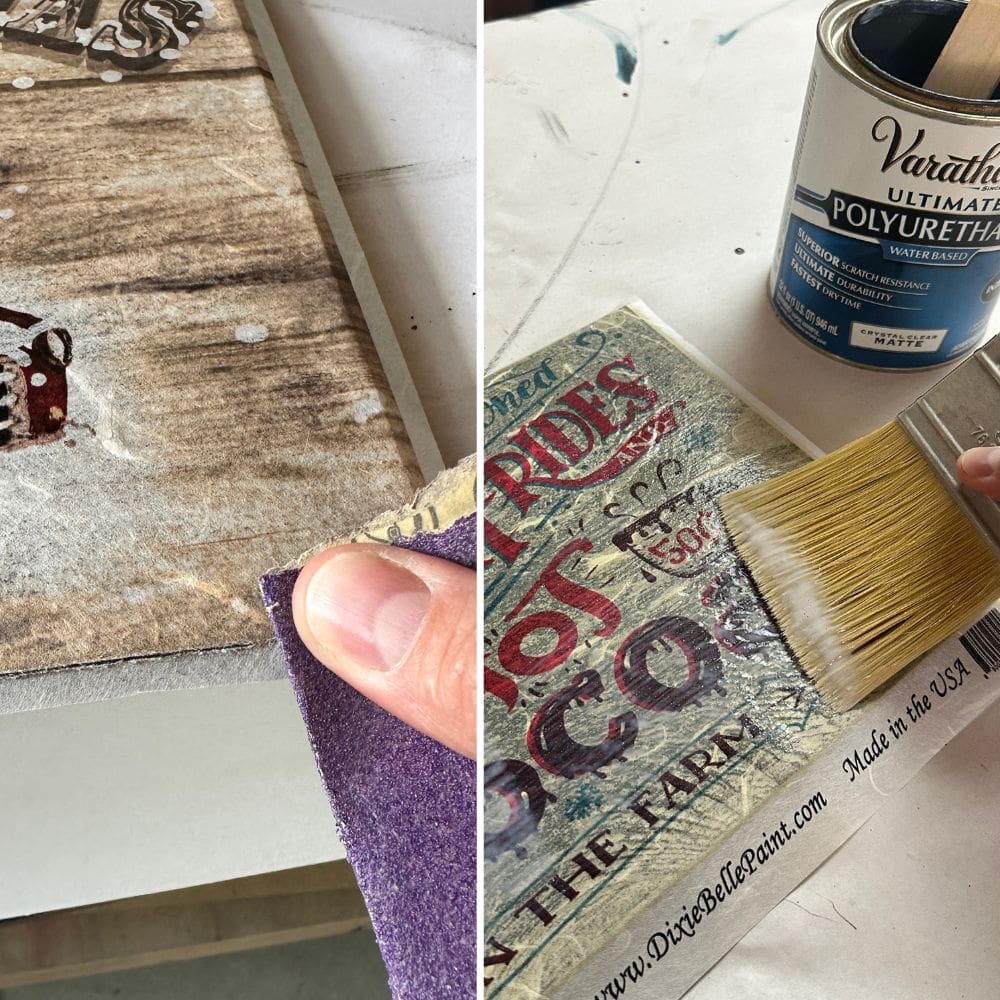
After trimming the excess, seal the decoupage paper with another coat of Varathane water-based polyurethane using a paintbrush. This will protect the design and make it more durable for long-term use.
We also recommend using a matte sheen for a non shiny finish. You can explore our list of topcoats for painting furniture if you prefer a different finish or for other options for sealing.
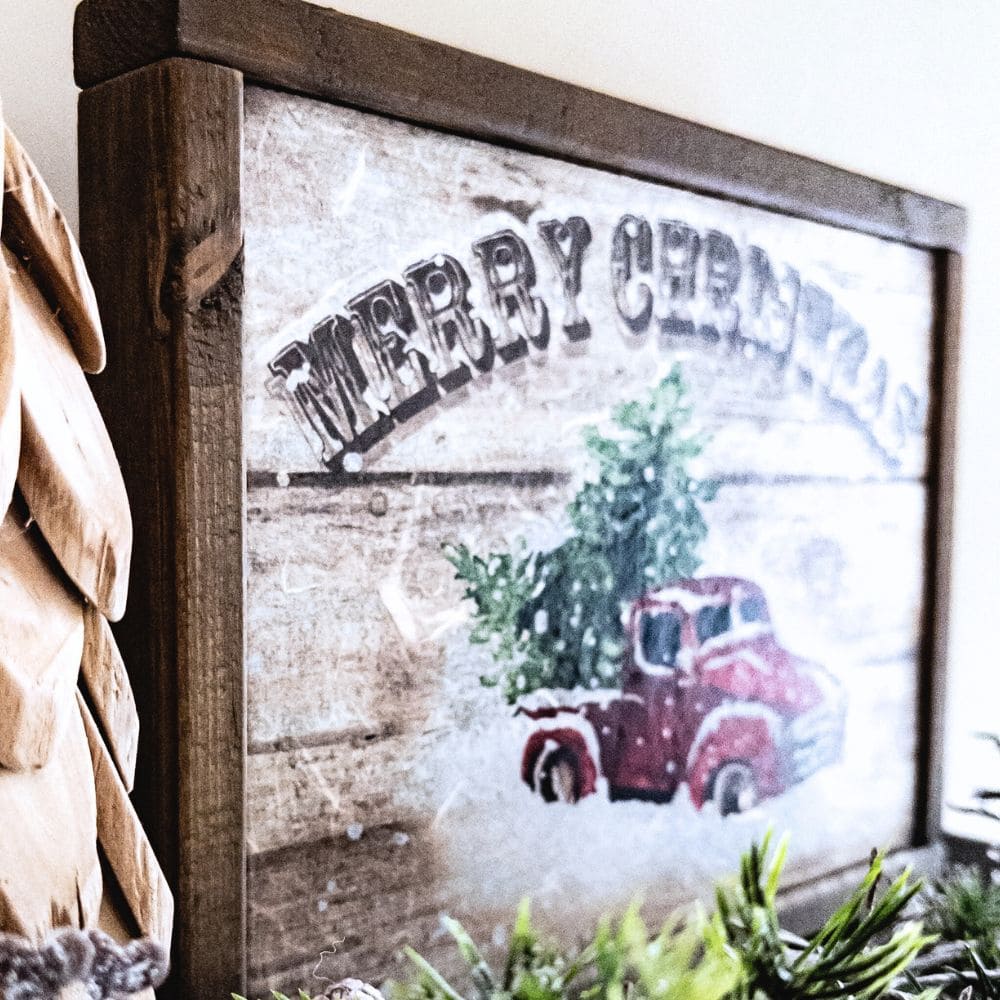
Attaching Frame To Merry Christmas Wood Sign
After the poly dries, and with the frame and plywood pieces now fully prepared, it’s time to attach them together. You can use a nailer or simply hammer in small nails to secure the frame onto the plywood sign.
If you prefer not to use nails, you can also use wood glue or even instant super glue. Just make sure to follow the instructions on the product for proper application.
For the frame excess, we carefully positioned most of it on the back of the sign so that it doesn’t stick out more than 1/4″ past the front, giving it a clean and finished look. You can also create a sign on the back side of this sign for a two-in-one decoration.
Check out this DIY Santa painting with decoupage rice paper as an inspiration for the back side. This works unless you are planning to hang the sign up from the back. Or go through my list of unique DIY Christmas signs to spark your creative ideas.
Now that your sign is complete, it’s time to display it proudly in your home! You can add additional embellishments such as ribbons, bows, or even lights for an extra festive touch. Get creative and have fun with it – after all, it’s your unique Merry Christmas sign that you can proudly say you made yourself!
Here’s another small Merry Christmas sign that’s simple enough for beginners but still allows room for creativity and personalization. You can try making this homemade wooden Christmas Tree sign, too!
Or, if you want something different, this Merry Christmas standing sign can be placed anywhere in your home. Here are wooden Christmas door signs that you can hang outside to welcome your guests this Christmas season.


Christmas Wooden Sign Ideas
If you still want more ideas on how to use wood for Christmas decorations, you can try these wooden Christmas sign ideas. The best part about these ideas is that they can be easily customized to fit your personal style and home decor. Plus, they make great gifts too!
- Use different decoupage paper designs to create a set of wooden Christmas signs. Pick designs that match your existing decor or go for a mix and match look.
- Personalize a wooden sign with your family name or a special message. You can use stencils, vinyl letters, or even hand paint the letters for a unique touch. This can be used as a wall hanging or even as a centerpiece for your dining table.
- Create a wooden sign and add classic Christmas phrases, like “Joy to the World” or “Merry and Bright”. You can follow our Merry and Bright wooden sign tutorial here! Adding some greenery or a small wreath to the sign can add a festive touch.
- Use wooden blocks of different sizes and paint them in Christmas colors. Arrange them to spell out “J-O-Y” or “P-E-A-C-E” for a simple yet impactful decoration. You can also use these wooden blocks as bookends or paperweights after the holidays.
Sprinkle your home with these homemade wooden Christmas decorations for a unique and personal touch. And most importantly, just have fun and enjoy the process of creating something with your own hands!

DIY Merry Christmas Wood Sign
Create this DIY Merry Christmas wood sign and make your home merry and bright for the holidays.
Materials
Tools
Instructions
- Measure and cut a piece of 1/2" plywood to the size of your chosen decoupage paper design. Make sure to use the correct tools for cutting, or have the hardware store cut it for you.
- Sand down any rough edges or splinters on the plywood with 220 grit sandpaper. This will create a smooth surface for painting and decoupage.
- Cut wood furring strips to create a frame for your sign using a miter saw or alternative methods like a hand saw. Make sure to sand down any rough edges on the frame as well.
- Paint the plywood with your desired color, such as black Waverly chalk paint in Ink. Let it dry completely.
- Stain the wood frame with your preferred stain, such as Lilly Moon Gel Stain in Old Fashioned. Apply evenly and let it dry completely.
- Line up and tape the decoupage paper onto the top side of the painted plywood. Use a paintbrush to apply Varathane water-based polyurethane to glue the paper onto the wood. Smooth out any wrinkles or bubbles.
- Cut the excess decoupage paper using sandpaper for a clean edge. Seal the paper with another coat of polyurethane for durability and protection.
- Attach the frame to the plywood sign using nails, wood glue, or super glue - whichever method you prefer. Make sure it is securely attached.
- Position most of the excess frame on the back of the sign for a clean and finished look. Add embellishments like ribbon or lights to make it your own unique creation.
Recommended Products
As an Amazon Associate and member of other affiliate programs, I earn from qualifying purchases.


More DIY Christmas Decor Ideas
- DIY Wood Christmas Signs
- Build Your Own Christmas Village
- Easy DIY Wooden Block Nativity Scene
- DIY Believe Sign from Dollar Tree
- DIY Simple Christmas Sign

Follow us on YouTube to get more tips for painting furniture. Or share your project with us on our Facebook Group and be part of our community. See you there!