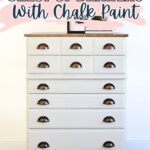
Painting a Chest of Drawers with Chalk Paint


Today, we’re painting a chest of drawers with chalk paint! If you’re on the hunt for chalk paint furniture ideas, think about adding a bold new top, fresh hardware, or even decorative trim. Combine your ideas and techniques to create something fresh and completely unique for your space.
We’ll show you how we did these few updates and creative touches, and how these can make a big difference. Let’s dive in!

This makeover wasn’t just about changing the color of this chest. The chalk paint made a big difference, but we went further to bring this piece back to life and make it unique. And you can do this, too!

You can swap out the old hardware for something new. This is an easy and affordable switch that instantly adds personality. Or even simply cleaning the ones you have can refresh their look and give the whole piece new life.
You can also add decorative trim or accents to give your chest of drawers more detail and charm. Want a more elevated look? Try adding legs to the bottom! They come in all kinds of styles and heights, so you can pick what works best for you.
Think about updating the top as well. You can leave it natural or stain it for a rustic two tone look. Or, you can paint it with another color for a fun pop of contrast. We’ll show you how these ideas can come to life, so keep reading!

Supplies Used to Paint a Chest of Drawers with Chalk Paint
As an Amazon Associate, I earn from qualifying purchases. I also may earn from other qualifying purchases with other companies or get free product to review and use. All opinions are my own.
- Screwdriver
- Hammer
- Circular Saw
- Clamp
- Nails
- Nail Gun
- Wood Filler
- Heavy Duty Metal Bases
- New Legs
- Krud Kutter
- 220 Grit Sandpaper
- Shop Vac
- Tack Cloth
- Clear Shellac
- Country Chic Paint in Vanilla Frosting
- Wagner Sprayer
- Minwax Oil Based Wood Stain in Dark Walnut
- Minwax Oil Based Polyurethane
- Varathane Waterbased Polyurethane in Satin
- New Cup Pulls
Removing Front Apron and Top
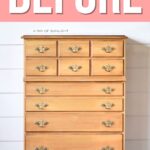
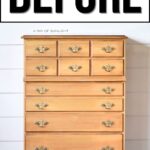
We started by taking off all the old hardware. And there’s this ugly front base I did not like, so I removed that too. I flipped it over, and I unscrewed the screws and then used a hammer to get the nails off and push off the apron.
For the sides of the chest that act like the legs, I needed to cut them exactly straight to where the front of the piece stopped. I lined up and clamped a piece of wood to help my circular saw cut straight in exactly the same place that I needed it.

I also removed the hollow laminate top to switch it to a new one. I removed the top drawers and found the screws that held the top onto the rest of the piece. You may need a flexible drill bit extender to reach them.
Adding New Trim
Since it’s now looking very basic, we added on this little trim just around the bottom to cover up the ugliness of the straight edge. I cut these little pieces of trim down to the right size, gave them 45 degree miter cuts on the front corners, and then straight edges on the back.

And then, I secured them in with little nails with our nail gun, and then filled those nail holes with wood filler. Check out your options for the best wood fillers for furniture here.
Adding New Legs
So it’s now a chest of drawers with no legs or no base at all. I flipped it over and attached these little heavy duty metal bases, lining them up in the right places and spacing them evenly for attaching the new legs.
Next, we screwed the legs onto the bases, and just like that, the piece got added height and style! Get more tips about this process from our posts on how to add legs to a cabinet and how to add legs to a buffet.

At this point, I also sanded down the wood filler from the nail holes in the new trim.
Prepping Chest of Drawers
Then, we proceeded to the prep work. We cleaned the piece off really well with Krud Kutter and a damp rag to remove grease, grime, and oils. We sanded everywhere with 220 grit sandpaper very lightly afterward to help with the adhesion of the new paint.

Would you like to save this?
I removed the dust with a shop vacuum and used a tack cloth to pick up any remaining dust. Here’s more on how to clean wood after sanding.
Then, I sprayed the chest with two coats of clear shellac to help with adhesion as well as help prevent bleedthrough issues from the wood. I let the shellac dry until the next day. This way, the stains will really lock in and won’t appear through the new finish. Learn more about how to stop stains from coming through paint with priming here.

Painting Chest of Drawers

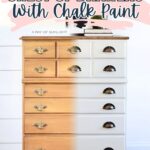
I sprayed three coats of this warm, creamy white color – Country Chic Paint in Vanilla Frosting. If you haven’t tried this brand, check out my Country Chic Paint review here.

I used our Wagner Double Duty – this sprayer is discontinued, so check out the Wagner 590 or 595 for alternatives. Learn how to use a paint sprayer with our detailed guide, and get Wagner paint sprayer tips here.
Next, we lightly distressed the new finish in spots where normal wear and tear would naturally happen with 220 grit sandpaper. Learn the best distressing furniture techniques here, aside from sanding. Then, we cleaned off all of the dust with our shop vacuum and a tack cloth.

Adding New Top
So, we bought walnut wood for our new top. But before adding it to the rest of the piece, I stained it first with Minwax oil based wood stain in Dark Walnut – here’s how to stain wood furniture to guide you with this step.
I topcoated the stained top with oil based Minwax Polyurethane. Learn all about how to use this oil based polyurethane spray in this post. Then we attached it with the same screws and holes. You can also check out how to make a plank top dresser here for another idea!


Topcoating Chalk Paint
I also topcoated the rest of the piece using Varathane waterbased polyurethane in Satin to protect the paint and make it easier to clean. I thinned it out by about 5 to 10% just to let it spray on with a smoother and nicer finish.

I applied 3 coats – here’s how to spray polyurethane and how to seal chalk paint in detail. After 24 hours of letting it dry, we screwed in these new cup pulls from Hobby Lobby. This hardware just covered up the old hardware holes, so I didn’t have to do any filling or drilling.
And this was how cute it turned out! We actually ended up doing the same look for a client – check it out in this DIY farmhouse dresser makeover.


More Before and After Makeovers
See All >
Click any of these “before” photos below to view the “after” of that makeover.


Painting a Chest of Drawers with Chalk Paint
We're painting a chest of drawers with chalk paint, and adding a new stained top, fresh hardware, and decorative trim.
Materials
- Nails
- Wood Filler
- Heavy Duty Metal Bases
- New Legs
- Krud Kutter
- 220 Grit Sandpaper
- Tack Cloth
- Clear Shellac
- Country Chic Paint in Vanilla Frosting
- Minwax Oil Based Wood Stain in Dark Walnut
- Minwax Oil Based Polyurethane
- Varathane Waterbased Polyurethane in Satin
- New Cup Pulls
Instructions
- Start by removing the old hardware and any undesired parts. Flip the chest over, use a screwdriver and hammer to take off screws or nails, and push off any front apron or base you don’t want.
- Cut the sides of the chest to create a clean, straight edge where needed. Use a piece of wood as a guide, clamp it into place, and run a circular saw along it to make a precise cut.
- Remove the old top to replace it with a new one later on. Unscrew the top, and if necessary, use a flexible drill bit extender to reach the screws hidden at the back.
- Add decorative trim around the bottom. Cut the trim pieces to size, make 45 degree miter cuts for the corners, attach them with nails, and fill the nail holes with wood filler.
- Attach new legs to give the piece height and style. Secure heavy duty metal bases evenly underneath, then screw in the legs, makeing sure they’re spaced correctly for balance.
- Prep the chest by giving it a thorough cleaning with Krud Kutter and a damp rag. Sand lightly with 220 grit sandpaper for better adhesion, vacuum off the dust, and wipe with a tack cloth to remove any remaining residue.
- Spray the chest with two coats of clear shellac to prevent bleedthrough from the wood. Allow it to fully dry so the stains stay locked in and don’t interfere with the final finish.
- Spray three coats of Country Chic Paint in Vanilla Frosting onto the chest of drawers. Then, lightly distress the edges with 220 grit sandpaper for a natural, worn in look.
- Stain the new wooden top with Minwax Dark Walnut, and seal it with the Minwax oil based polyurethane for added durability before attaching it to the chest.
- Add a waterbased polyurethane topcoat to the painted surfaces for protection and easy cleaning. Thin it slightly for a smoother application, spray three coats, and allow 24 hours for it to fully dry.
- Finish by screwing in new cup pulls as hardware.
Recommended Products
As an Amazon Associate and member of other affiliate programs, I earn from qualifying purchases.


More Painted Furniture Makeovers
- DIY White Dresser Makeover
- Painting Bedroom Furniture White
- Magnolia Dresser Makeover
- Painting a Cedar Chest
- Painted Hallway Cabinet Makeover
Follow us on YouTube to get more tips for painting furniture. Or share your project with us on our Facebook Group and be part of our community. See you there!