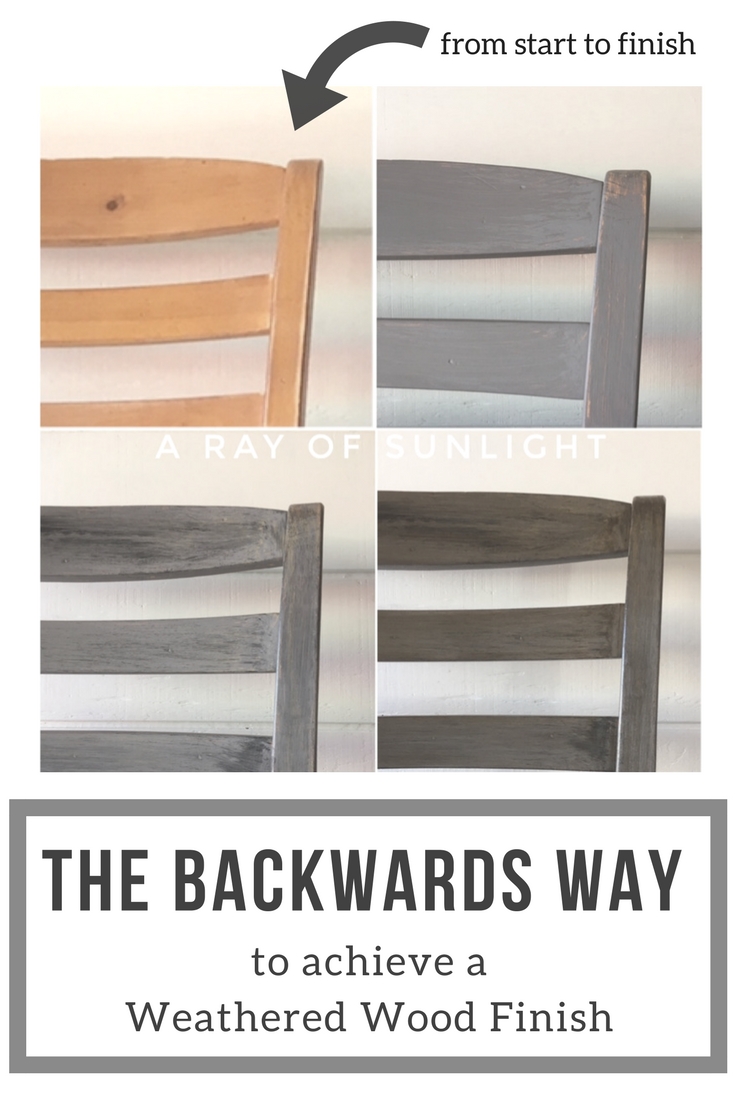
Restoration Hardware Weathered Finish with Paint
Now for the fun part! Creating a Restoration Hardware Finish with mostly paint. Since Bondo doesn’t stain well I couldn’t stain the wood and then dry brush a weathered wood look like most people do. So instead I reversed the technique.
Keep reading to learn the refinishing furniture techniques I used to get the weathered look with paint only! This project is perfect for those looking to add character and rustic charm to their furniture if you don’t have stain or it’s not possible to use stain. So, let’s dive in!

Are you looking to add some rustic charm and character to your furniture? One of the most popular ways is a weathered finish. This technique uses stain to create a distressed appearance on furniture, giving it a vintage and rustic feel.

However, not all furniture can be stained or it may not be possible for various reasons. Or you don’t have stain available. But don’t worry, there’s still a way to get that beautiful weathered finish without using stain.
Believe it or not, you can actually use paint to create a weathered finish on your wood furniture. And that’s what I’ll show you how to do in this tutorial! It’s an easy and affordable way to get the weathered look, so let’s get started on turning your furniture into a rustic masterpiece!

Supplies Used for Restoration Hardware Weathered Finish with Paint
As an Amazon Associate, I earn from qualifying purchases. I also may earn from other qualifying purchases with other companies or get free product to review and use. All opinions are my own.
- 220 Grit Sandpaper
- Slightly Damp Rag
- Dollar Store Paint Brush
- Behr Kindling (Base Coat)
- Behr Suede Gray (Base Coat)
- Sherwin Williams Scarecrow (Dry Brush)
- Behr Black (Dry Brush)
- Paper Towels
- Cut Up Old T Shirt or these Prepacked Lint Free T Shirt Rags
- Foam Brush
- Minwax Dark Walnut Wood Stain
- Minwax Wipe On Poly in Satin
You can also create this similar look from this post on how to create a weathered wood gray finish on the tops of your white farmhouse end tables. Or see how it looks on a painted coffee table!
Prepare Furniture for Weathered Wood Finish
To start I removed the fabric seats and set them aside. Then I lightly sanded the chairs down to help make sure the paint would adhere to the old finish. Next I wiped them down to remove any dirt and grime as well as the dust the sandpaper left behind.
Learn all about how to clean furniture before painting here and how to prepare furniture for painting here. These guides are full of helpful tips and tricks to get your furniture ready for a beautiful new finish!
How to get a weathered look with paint
To create the most layers at once I brushed on Kindling and Suede Gray for the base coat.


There was no rhyme or reason to when I used each paint, I just brushed one color on here and there and then the other color right over it and onto a new area; all the while using the same brush. (I made each of these paint colors into chalk paint with my homemade chalk paint recipe!)
Each time I would run the brush in long strokes to make the paint colors slightly blend, but also mimic a dry brush feel. We didn’t want the edges to be super noticeable as to where we stopped and started a new color.
It was so much faster to do both colors at once than to paint all one color, wait for it to dry, and then essentially dry brush the other color over it. I’m all for saving a bit of time!
How to Dry Brush Paint on Wood
Once the base coat was dry I got into the real dry brushing mode. Using Scarecrow and Black (both were leftover from different projects. If you have something similar already on hand, go ahead and use those!), I created long faint brush strokes on the base coat.
If you haven’t done dry brushing before, it’s super simple. Lightly dip your brush (I usually pour a little bit of paint onto the lid of the can, or onto a paper plate so I don’t get too much on my brush) into a small amount of paint. It should just barely have any paint on it.

Then dab the brush onto a clean paper towel to remove any excess paint. You basically want your brush almost dry (ahhhh that’s why they call it DRY brushing 😉 ).
When starting off, very very lightly start brushing paint on. As the brush loses it’s paint you can start brushing more and more hard to get that paint off of the brush.

Would you like to save this?
Continue to brush in long strokes. Once again, there was no rhyme or reason to this.
I dry brushed the whole chair in Scarecrow and then with a clean brush, dry brushed the Black on. I wanted the dry brushing to mimic wood grain with light (Scarecrow paint) and dark (Black) grains. Let all the paint completely dry.
Check out this rustic farmhouse end table makeover, where I also did this technique.
Stain and Topcoat Weathered Paint Finish
After everything was dry, we wiped on the dark walnut stain using a foam brush; making sure to get into all of the crevices with the brush.


With this coat, we wanted to get everywhere! After brushing the stain onto about half of the chair, we went back and wiped off the excess with a cut up old t shirt. Once again making sure to wipe everywhere. This coat takes the longest to dry. Leave it for a good day (or more if you can stand it.) If you’ve never tried this before, here’s how to stain furniture for beginners to guide you.
Finally, we made it to the top coat, the wipe on poly! I love this stuff, but since it is oil based, I only use it on pieces that are stained or meant to somewhat resemble wood. Simply wipe on the poly with a cut up t shirt in long even strokes. I like to apply at least 2 coats to make sure my finish is durable.
I couldn’t be happier with the finish! It is the perfect weathered wood made simple with paint and a bit of stain! You can also check out another method for the best stain for weathered wood look here.
The best part is that the chewed up holes in the legs were repaired AND I was still able to get the weathered wood look! Here’s how to repair damaged furniture to guide you with repairing your piece before starting your project.
To finish off the ever so popular look, I reupholstered the seats with black vinyl. Kid friendly & in style! Wahoo! I can just see them now with a beautiful white or black dining table. Mmmmm! For other similar makeovers, here’s our list of painted chair ideas and chalk painted chair ideas. For your dining pieces, check out these painted dining chairs ideas.


More Before and After Makeovers
See All >
Click any of these “before” photos below to view the “after” of that makeover.


How do you make wood look more weathered?
Aside from using stain and paint, there are other ways to make wood look more weathered. One popular method is distressing the wood, and there are many distressing furniture techniques here you can do!
You can distress wood by using sandpaper. You just have to sand the edges and corners of the wood piece to give it a more worn appearance. Be gentle and start slow, as you can always add more distressing, but it’s harder to fix if you go too far! I have more tips on how to distress furniture with sandpaper here.
Another technique is to apply antiquing glaze or wax to the wood. They come in various colors, so you can choose the one that fits your desired weathered look. Simply apply it with a brush or soft cloth and then wipe off the excess to create a more aged appearance.
Check out these distressed painted furniture ideas for even more inspiration on giving your wood pieces that weathered and rustic look. Here’s my DIY grey farmhouse dresser makeover, where I create this kind of restoration hardware finish. If you have any questions about this finish, be sure to comment below! I would love to help you out with your painting adventures!


Restoration Hardware Weathered Finish With Paint
Now for the fun part! Creating a weathered wood finish with mostly paint.
Materials
- 220 Grit Sandpaper
- Slightly Damp Rag
- Dollar Store Paint Brush
- Behr Kindling (Base Coat)
- Behr Suede Gray (Base Coat)
- Sherwin Williams Scarecrow (Dry Brush)
- Behr Black (Dry Brush)
- Paper Towels
- Cut Up Old T-shirt or
- Prepacked Lint Free T-Shirt Rags
- Foam Brush
- Minwax Dark Walnut Wood Stain
- Minwax Wipe On Poly in Satin
Instructions
- To start, remove the fabric seats and set them aside. Then lightly sand the chairs down to help ensure the paint would adhere to the old finish. Next wipe them down to remove any dirt and grime as well as the dust the sandpaper left behind.
- To create the most layers at once, brush on Kindling and Suede Gray for the base coat.
- Once the base coat is dry, create long faint brush strokes on the base coat using Scarecrow and Black. Lightly dip your brush into a small amount of paint. It should just barely have any paint on it. Then dab the brush onto a clean paper towel to remove any excess paint. Continue to brush in long strokes.
- Let all the paint completely dry.
- After everything dries, wipe on the dark walnut stain using a foam brush; making sure to get into all of the crevices with the brush. Go back and wipe off the excess stain with a cut up old t-shirt or lint free t-shirt rags. Leave it for a good day (or more if you can stand it.)
- Wipe on at least 2 coats of poly with a cut up t-shirt in long even strokes.
- To finish off, reupholster the seats with black vinyl.
Recommended Products
As an Amazon Associate and member of other affiliate programs, I earn from qualifying purchases.


More Refinishing Furniture Resources
- How to Stain Wood Furniture
- How To Whitewash Stained Wood
- How To Restain Furniture For Beginners
- Best Wood Stains
Follow us on YouTube to get more tips for painting furniture. Or share your project with us on our Facebook Group and be part of our community. See you there!