Painting A Kitchen Bench


I built this bench from raw wood, and now, I’ll show you the process of painting a kitchen bench! If you’ve got something similar or are thinking about building one, this guide will help you get it looking good in the color and finish you want.
There are plenty of chalk paint furniture ideas that can transform any piece. So, keep reading to see how I did it and how you can, too!

Again, I made this bench from raw wood using 4x4s and 2x4s, and I also used a 2×6 in there, too. You don’t have to make your own like we did. You could easily work on an existing wooden one!

So, I’m painting it to give it color and life, and I’ll show you how! I’ll also be staining the seat to add some beautiful contrast and extra character. If you’re wondering, is two-toned furniture in style? – you can get answers in this post!
If you’re thinking of painting a kitchen bench, take this as a guide. You can get creative and match it with your kitchen or dining room decor, but the steps are pretty much the same for any wooden seat. You can even use these tips for other similar pieces, like chairs or tables!

Supplies Used for Painting A Kitchen Bench
As an Amazon Associate, I earn from qualifying purchases. I also may earn from other qualifying purchases with other companies or get free product to review and use. All opinions are my own.
- Krud Kutter
- 220 Grit Sandpaper
- Dark Walnut Wood Stain
- Foam Brush
- Lint Free Rag
- Pre Taped Plastic
- Behr Latex Paint Pure White
- Calcium Carbonate Powder
- Wagner Sprayer
- Vacuum
- Tack Cloth
- Waterbased Polyurethane
Prep Before Painting A Kitchen Bench
Just like any other piece, I cleaned it with Krud Kutter, making sure to wipe away any dirt or debris. It was important to start with a clean surface before moving on to the next steps. Here’s how to clean furniture before painting for more tips.

Next, I sanded it to smooth out the surface, especially any rough edges. This helps give a smoother finish and also helps the new finish adhere better. The 220 grit sandpaper worked well for this step. You can learn more about the best sandpaper for furniture painting here, including what grit to use for your DIY project.

Stain Kitchen Bench
I stained the whole thing in Dark Walnut first. I used a foam brush to apply the stain, following the direction of the wood grain. Check out more of the best brushes for staining wood here. After letting it sit for 5 minutes, I wiped off the excess with a clean lint free rag.

Then, I let this layer dry for 48 hours to fully set in the wood. You can also see how we used a foam brush for this restoration hardware finish with paint. Get more tips on how to stain wood furniture in this post.
Paint and Distress Bench
Before moving on, I covered the top part with pre taped plastic, so I wouldn’t get any color on the stained portion. Then, for the base, I mixed up our homemade chalk paint recipe using Behr latex in Pure White, calcium carbonate powder, and water.

Check out more of the best chalk paint recipes here for other ingredients you can use. Mix everything together until smooth and free of lumps. And since I’ll be spraying it, I thinned it for easier application. Here’s how to thin paint for a Wagner sprayer for a more detailed guide.
I applied the white chalk paint with our Wagner sprayer, doing two to three thin coats and letting each coat dry before spraying the next coat. While spraying, I try to keep a consistent distance and move the sprayer back and forth steadily. For more tips, see can you use chalk paint in a sprayer?
Would you like to save this?
Then, I distressed the edges by hand with 220 grit sandpaper to show the stain from underneath the white finish. This adds more rustic charm to the piece, perfect for a farmhouse style space. You can learn more best distressing furniture techniques in this post, including sanding.

Topcoat After Painting A Kitchen Bench
Then, I cleaned off the dust from distressing using a vacuum and tack cloth. You want the piece to be nice and clean before adding the topcoat. You can get more tips on how to clean wood after sanding here.
With the same Wagner sprayer, I applied three coats of waterbased polyurethane all over. It’s great for protecting the finish and making it more durable. Spraying gives smoother results without any brush strokes – check out this more detailed guide on how to spray polyurethane.

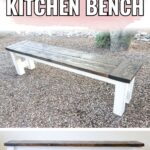
So, you’ve seen it before the makeover, and here it is after painting a kitchen bench! I absolutely love how the white and walnut combo turned out. It adds a nice contrast to the piece, and the distressed edges give it a charming farmhouse vibe that I just can’t get enough of.


More Before and After Makeovers
See All >
Click any of these “before” photos below to view the “after” of that makeover.


What color should I paint my bench?
For this two tone look, you don’t have to use the same white color on the base. If you still want to go light, you can use any of these neutral furniture paint colors, which would look great against the Dark Walnut.
But you can also go for these bold furniture paint colors to add a pop of color and make a statement in your kitchen. A bold blue or green would look amazing next to the rich brown stain, and a sunny yellow could add some fun, vibrant energy to the space.


You can use any of these best wood stains that come in different shades, from light to dark. You can also use a light one and build up the color gradually. This lets you have more control over the end result compared to starting off dark right away.
But you can definitely choose to update your piece with a single color. Check out these awesome painted bench ideas for inspiration! If you’re curious how to make your own, here’s how to make a bench from a headboard and footboard – it might just be your next DIY project!


Painting A Kitchen Bench
Materials
Tools
Instructions
- Clean the kitchen bench with Krud Kutter, making sure to remove any dirt or debris. It was important to start with a clean surface before moving on to the next steps.
- Sand the surface with 220 grit sandpaper, especially any rough edges. This helps give a smoother finish and also helps the new finish adhere better.
- Stain the whole bench with Dark Walnut using a foam brush, following the direction of the wood grain. Wipe off excess stain after 5 minutes and let it dry for 48 hours.
- Cover the top portion with pre taped plastic and mix up homemade chalk paint using Behr latex paint in your chosen color, calcium carbonate powder, and water. Thin out the mixture for easier application with a sprayer.
- Apply two to three thin coats of chalk paint using a consistent distance and steady back and forth motion with the sprayer.
- Distress the edges of the bench by hand with 220 grit sandpaper to reveal stained wood underneath the white finish. Clean off dust from distressing using a vacuum and tack cloth.
- Using the same sprayer, topcoat the bench with three coats of waterbased polyurethane for a smoother and more durable finish.
- And that's it, you now have a beautifully painted and finished kitchen bench!
Recommended Products
As an Amazon Associate and member of other affiliate programs, I earn from qualifying purchases.


More Painted Furniture Makeovers
- Painting a Wood Bench
- Painting a Dining Table White
- Kitchen Hutch Makeover
- Two Toned Painted and Stained Furniture
- Dining Table Makeover Ideas
Follow us on YouTube to get more tips for painting furniture. Or share your project with us on our Facebook Group and be part of our community. See you there!