Painting Wood Furniture
Wood furniture is a beautiful addition to any home, but over time, its color and finish might start to look a bit worn or outdated. Painting wood furniture is a fun and easy way to give your beloved pieces a new life and make them match your current decor.
You might think these painting furniture ideas are just for the pros, but with a little bit of know-how and practice, you can create professional looking results on your own. Keep reading for tips and tricks on how to paint wood furniture successfully!

As an Amazon Associate, I earn from qualifying purchases. I also may earn from other qualifying purchases with other companies or get free product to review and use. All opinions are my own.
See more AFTER photos below these printable instructions!

Painting Wood Furniture
Give your old furniture a fresh coat of paint with this step by step on painting wood furniture and let you add your own personal style to your home.
Materials
Tools
Instructions
- First, remove all hardware from your wood furniture piece for easier painting and to prevent any unwanted paint marks on them. Then, clean the surface with a mild cleaner like Krud Kutter to remove any dirt or grime.
- Lightly sand the wood surface with 220 grit sandpaper for better paint adhesion. Be sure to thoroughly clean off any dust or debris with a vacuum and tack cloth afterward. And to prevent overspray, cover any areas you don't want painted with painters tape.
- Prime wood furniture with 2 coats of clear shellac to block bleedthrough and help for better adhesion. The clear primer also lets the wood show through the paint easily, so it's perfect for distressing later on.
- Create your own chalk paint using our homemade recipe latex paint, calcium carbonate powder, and water. Then, filter and pour the chalk paint into a paint sprayer for easier application. Apply 4 coats of white chalk paint onto the wood piece, allowing each coat to fully dry before adding another one.
- Once the paint is fully dried, lightly sand the corners and edges of your painted wood furniture with 220 grit sandpaper to give it a distressed, vintage look. Clean up any dust with a tack cloth afterward.
- Topcoat your painted wood furniture with Varathane Polyurethane using a paint sprayer. Apply 3 coats evenly, making sure to cover all surfaces. This will provide a durable and protective finish for your furniture piece.
- Now, simply reattach the hardware back onto the wood furniture in its original or new position. And that's it - you now have a beautifully painted and topcoated wood furniture piece!
Recommended Products
As an Amazon Associate and member of other affiliate programs, I earn from qualifying purchases.


More Before and After Makeovers
See All >
Click any of these “before” photos below to view the “after” of that makeover.


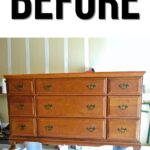
A friend of ours had this old dresser she wanted to keep but thought it could use a fresh new color. She talked me into doing a custom makeover for her, and I’m so glad she did! It was a pretty simple project overall, and I’m really happy with how it turned out!
If you’ve got wood furniture like this and want to paint it but feel like it’s too hard or don’t know where to start, look no further! We’ll go over the process step by step and provide some helpful tips along the way.

Give that old furniture a fresh coat of paint, and it’ll feel brand new in no time. It’s a great way to save money from buying new pieces and lets you add your own personal style to your home. So, let’s get started on transforming your wood furniture with paint!
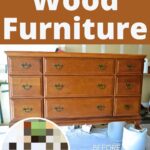
Supplies Used for Painting Wood Furniture
- Electric Screwdriver
- Krud Kutter
- 220 Grit Sandpaper
- Painters Tape
- Vacuum
- Tack Cloth
- Clear Shellac Primer
- Behr Pure White Latex Paint
- Calcium Carbonate Powder
- Paint Filter
- Vonforn Paint Sprayer
- Varathane Polyurethane
Preparing Wood Furniture
We started this makeover by removing all the hardware from the dresser using our handy little electric screwdriver. It’s way easier to paint without the hardware in the way, and there’s no risk of getting paint where it doesn’t belong. Then, we gave the wood a good cleaning with Krud Kutter to get rid of any dirt or grime that might mess with the paint sticking properly.

After cleaning, we lightly scuff sanded the entire surface with 220 grit sandpaper for even better paint adhesion, then cleaned off the dust with a vacuum and tack cloth. We also taped off the inside of the drawers to prevent any paint overspray from getting inside. Check out this post to learn what is the best painters tape to use.
Priming for Distressing and Blocking Bleedthrough
We wanted to distress the dresser after painting it, so for priming, we went with clear shellac. It’s perfect if you’re going for a distressed look, as it’s clear and lets the wood show through the paint easily.

Plus, it also serves as an excellent primer for better adhesion and blocking bleedthrough, which is important when painting wood furniture white, like what we’re going for with this piece. You don’t want any stains to appear through the white paint!
We sprayed 2 coats of clear shellac, letting each one dry in between. Learn more about the best spray paint primer for wood options here, including clear shellac.
Would you like to save this?
Spray Painting Wood Furniture with Homemade Chalk Paint
For this wood furniture makeover, we mixed up some chalk paint using our recipe. All it took was some Behr Pure White latex paint, a bit of calcium carbonate powder, and water. Check out our homemade chalk paint recipe post for more detailed steps on making it.
If you’re working with a laminated piece, here are the best chalk paint for laminate furniture options for this type of surface. Here’s Beyond Paint vs Chalk Paint for a comparison between these two.

Then, we filtered and poured our newly created chalk paint into the Vonforn Sprayer. The filter helps remove any clumps or lumps in the paint for a smooth and even spray. Here’s our honest Vonforn Paint Sprayer review for more helpful tips on using it.

We sprayed 4 coats of chalk paint on the dresser, letting each one dry before adding the next. Normally, we stick to 2-3 coats for furniture makeovers, but since we were painting white over wood, we wanted to make sure the coverage of the white paint was extra solid.
Here’s how to spray paint a dresser with chalk paint for another makeover and a guide on using a paint sprayer to apply this type of paint. You can also check out this post on what paint to use for wooden furniture for other paint options you can use.


Distressing Chalk Painted Wood Furniture
As we said before, we were planning to distress the painted dresser, so once the paint dried, we gave the corners and edges a light sanding with 220 grit sandpaper to get that worn, vintage vibe. You can go as heavy or light as you want with the distressing (or skip it altogether), but for this one, we kept it super light. Don’t forget to clean up the dust from sanding with a tack cloth.

Here’s more on how to distress chalk paint, and you can learn other distressing furniture techniques here aside from using sandpaper. You can check out these distressed dresser ideas for more inspiration on this style.
Topcoating After Painting Wood Furniture
We moved on to topcoating our painted wood furniture. We mixed up some Varathane Polyurethane and filtered it into our Vonforn Paint Sprayer. Varathane water based polyurethane is our go-to topcoat because it gives a beautiful and durable finish to our projects. Learn more about why it’s the best topcoat for chalk paint here!

We sprayed 3 coats of the poly all over the dresser, making sure to cover every surface evenly. Here’s how to spray polyurethane to learn more about applying this topcoat using a paint sprayer. Can you use a paint sprayer for polyurethane? – yes, and check out our post for more on spraying poly.
The final step was just putting the hardware back on. This was super easy because we just added the old hardware back into the existing holes. We didn’t have to fill or drill new holes or anything. If you want to switch to new hardware, here’s how to change hardware on a dresser to guide you.

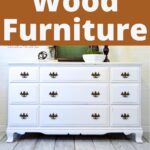
And that’s how we successfully painted this dresser and we’re so happy with how it turned out. Painting wood furniture like this was a really fun and easy project, and we hope our friend likes this transformed dresser as much as we do!
More Painted Furniture Makeovers
- Chalk Painted Coffee Table
- Painting Furniture With Chalk Paint
- Easy DIY Vintage Dresser Makeover
- White Chalk Painted Dresser
- Painting Over Stained Wood
Follow us on YouTube to get more tips for painting furniture. Or share your project with us on our Facebook Group and be part of our community. See you there!
