All in ONE Painted DIY Dresser Makeover
Check out this all in one painted DIY dresser makeover. I love the simplicity of the design, but it still packs a punch! These DIY dresser makeover ideas using all in one paint are perfect if you want to give your old piece a fresh look without too much effort.
It’s also a great option for those who are new to DIY projects or don’t have a lot of time to spend on a big furniture makeover. So, let’s dive into this easy and fun project together!
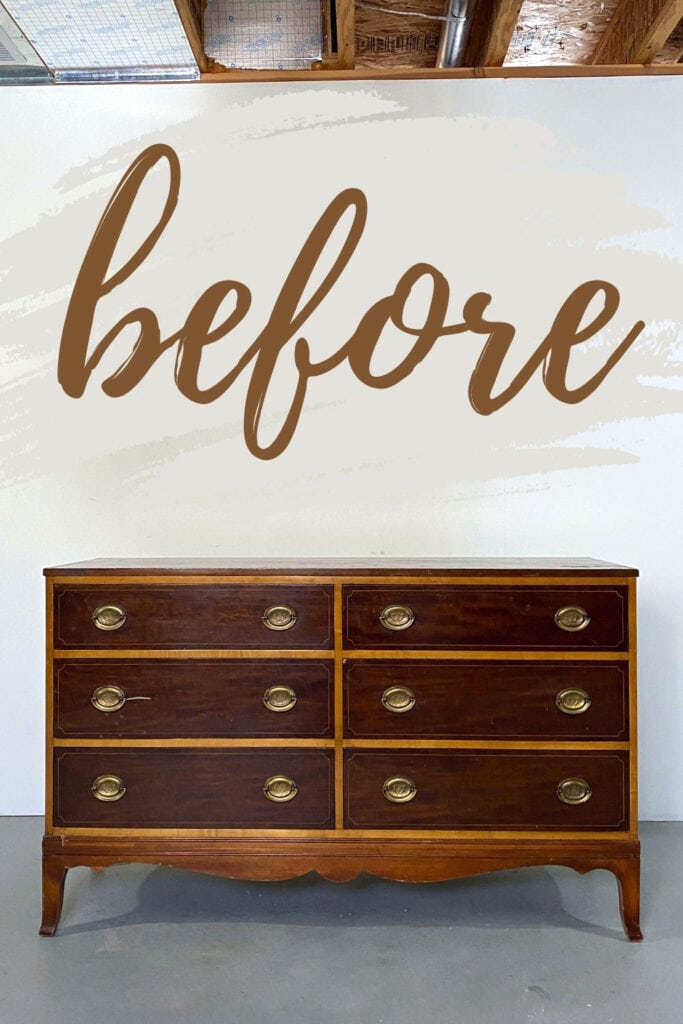
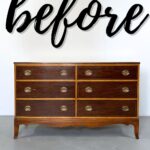
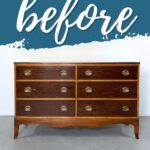
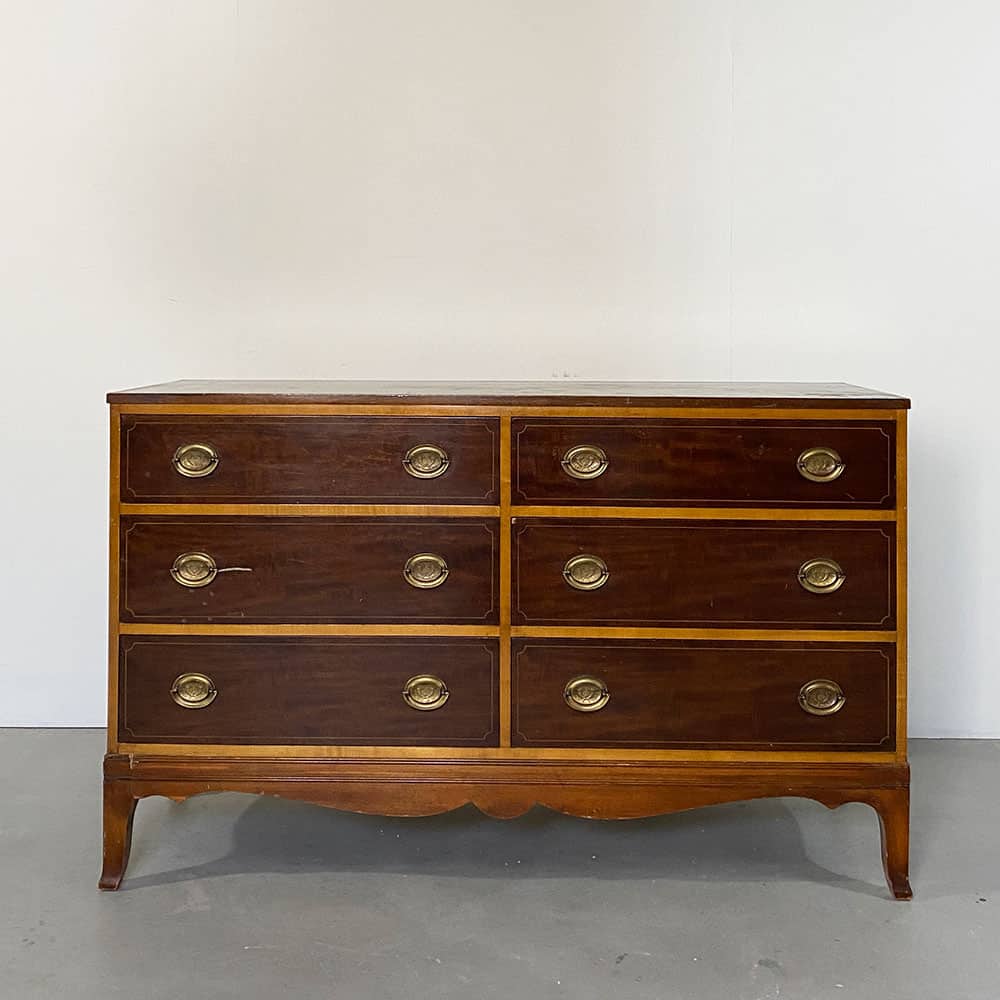
Let’s flip this dresser from the thrift store! It was originally $100, but they busted the base when they were loading it… so we ended up getting it for $80 instead. Either way, though, it was a steal of a deal. This piece is solid and of such good quality! Here’s more on why I still paint thrifted furniture after all these years.

If you’re feeling intimidated by the idea of painting, don’t worry! All in one paints are perfect for beginners because they have built in primer and top coat, making the process much simpler. However, you’ll want to apply a separate primer for a few reasons – we’ll get into that later!
They still come in a variety of colors and finishes to suit your personal style, so you don’t have to compromise on the look you want. So, keep reading to learn how to transform your old dresser into a gorgeous and unique piece!
Supplies Used for All In One DIY Dresser Makeover
As an Amazon Associate, I earn from qualifying purchases. I also may earn from other qualifying purchases with other companies or get free product to review and use. All opinions are my own.
- Mini Pocket Hole Jig
- Electric Screwdriver
- Krud Kutter
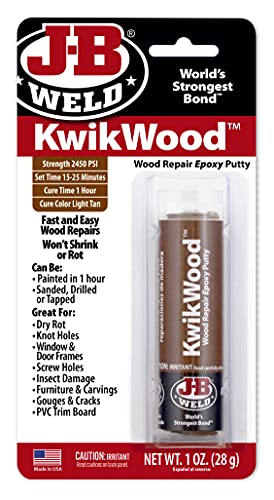
- KwikWood
- Sand Net Sandpaper 80 Grit to 220 Grit
- SurfPrep Sander (Use code RAY10 to get 10% off)
- Shop Vac
- Wood Filler
- Spackling
- Putty Knife
- Painters Tape and Pre Taped Plastic
- Tack Cloth
- BIN Shellac Primer in the Spray Can
- Paintable Caulking
- Melange ONE in Knapsack
- Wagner FLEXiO 3500/595
- Paint Filters
- Whitewash from Paint Couture
- Paint Brush
- Lint Free Rags
- Soft Wax from The Real Milk Paint
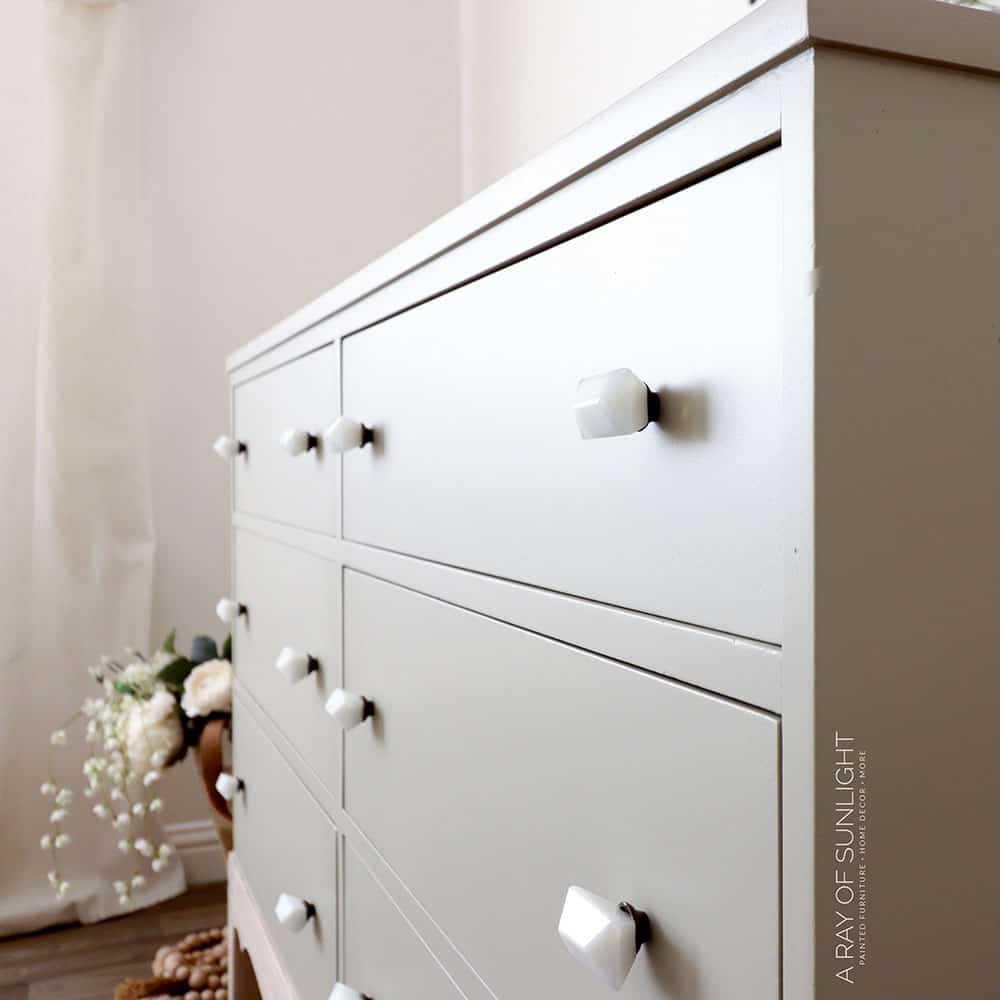
- White Knobs
Prep Before DIY Dresser Makeover
So before we could do anything else, we had to fix that base. I glued it and put it back together how it was. And then, I made it more durable by screwing the base into the dresser instead of relying on glue and wood braces that were holding it together before.
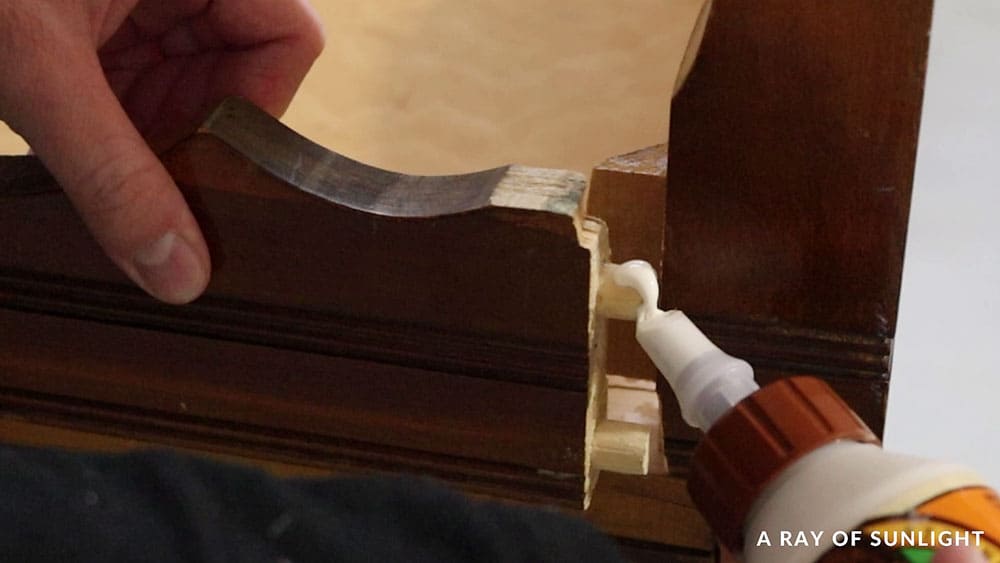
I used this mini pocket hole jig to drill new holes into the apron, and then I screwed in the pocket hole screws. Since the wood that I was drilling into was ¾” thick, I just clamped the jig up to the edge of it, set the drill bit to the right depth, and then drilled away.

Then I used the 1 ¼” screws to screw the base to the piece. Now the base is nice and sturdy!
Remove Hardware and Clean Dresser
Alright, then I got back to the normally scheduled programming. I removed the hardware with my handy dandy electric screwdriver. And cleaned the piece really well with Krud Kutter and an old rag. Learn more about how to clean furniture before painting here.
Fill in Damage and Hardware Holes
Then, I filled in the chipped veneer and one hole from each piece of hardware so I could put new ones on these drawers. Check out this post to learn about the best way of filling holes when replacing cabinet or furniture hardware.
Sand Top to Remove Damaged Finish
While that all dried, I got rid of the damaged finish on the top. I sanded it all down with 80 grit sandpaper, then 120 grit sandpaper… then 180 grit sandpaper, and finished it off with 220 grit sandpaper. Learn more about the best sandpaper for furniture painting here.
The wood was SO pretty! And I considered leaving it natural… But I already had a plan and that didn’t include having a wood top.
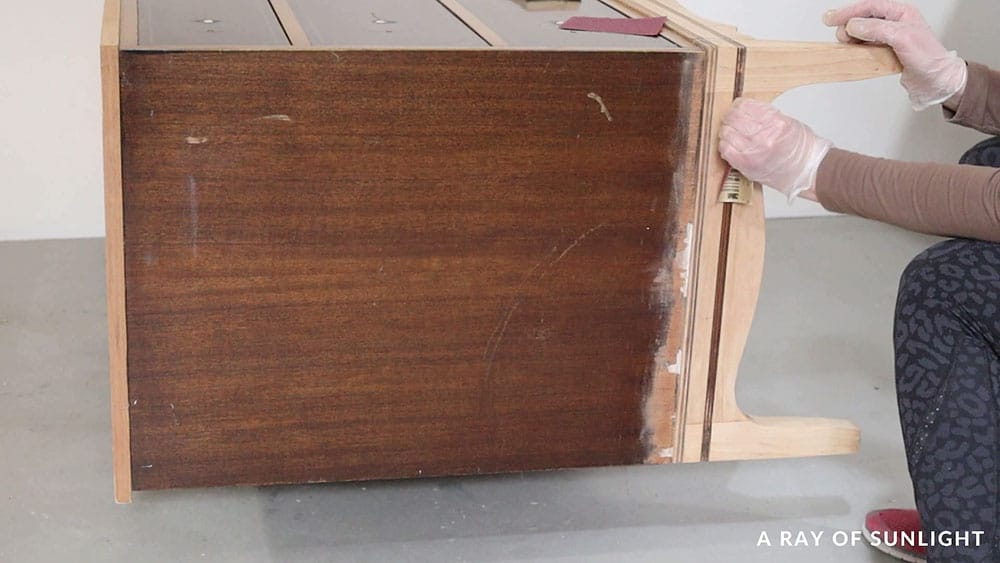
Sand KwikWood and Base
By the time I was done with the top, the KwikWood was dry, so I sanded that down. And then I sanded the base down to bare wood… I folded an 80 grit piece of sandpaper in half to get into the crevices by hand.
Fill Scratches and Hide Wood Grain
Then I started to scuff sand the rest of the piece with 220 grit sandpaper.. and realized that there were still some dings and scratches I needed to fill in. Learn more about the importance of sanding before painting furniture here.
So I filled those in… and while I was at it, I spread thinned out spackling over the areas that I had sanded down to bare wood so you wouldn’t be able to see all of the grain after I applied the new coating. Get more tips on how to hide wood grain when painting here.

While that dried, my husband traded me off and taped off the drawers. It’s one of the methods for how to prevent overspray when painting furniture. And then, he sanded basically everything again and cleaned it all up with the shop vac and a tack cloth.
Priming to Block Stains
Then he sprayed 2 coats of BIN shellac all over.
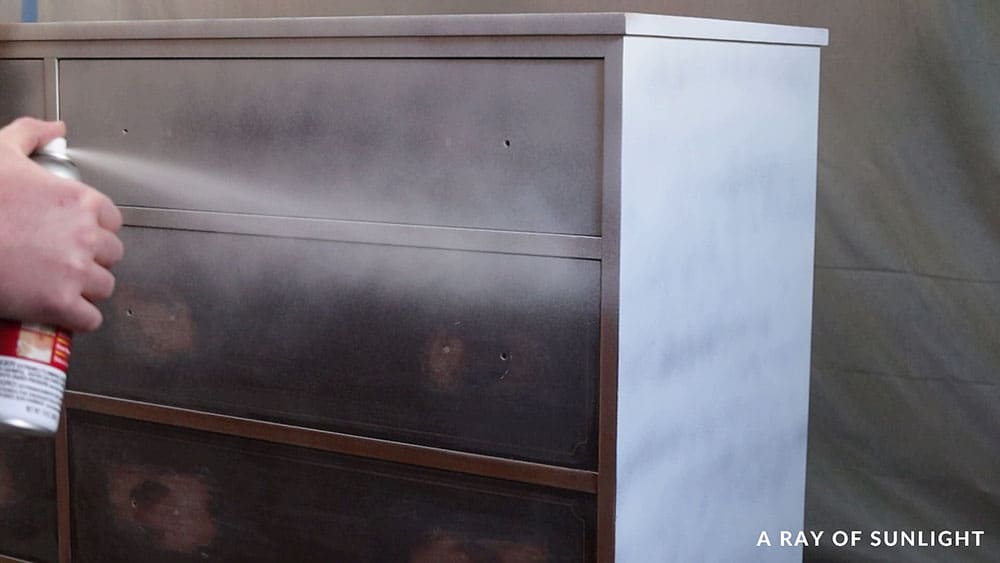
The spray can version is definitely not cost effective at all. It took 3 cans…. And there still wasn’t complete coverage… but we went with it anyway. Learn more about the best primers for painting furniture here.
And we let it dry overnight to give us the best stain blocking coverage that it could. (Yeah, even after scuff sanding, I still primed it so then I wouldn’t have bleedthrough issues where the wood tannins stain the finish. Here are more tips and tricks on how to stop stains from coming through paint.)
Shellac is the easiest way to prevent it.
Sand Primed Dresser and Caulk Necessary Areas
It was super rough when it was all dry, so we definitely had to sand it to knock it all down to a smooth surface. Then, I took this time to caulk some areas and fill some small dings that I couldn’t see before.
Would you like to save this?
Painting a Dresser with All in One Paint
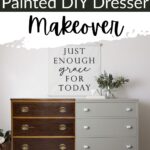
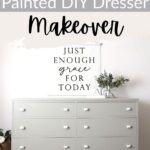
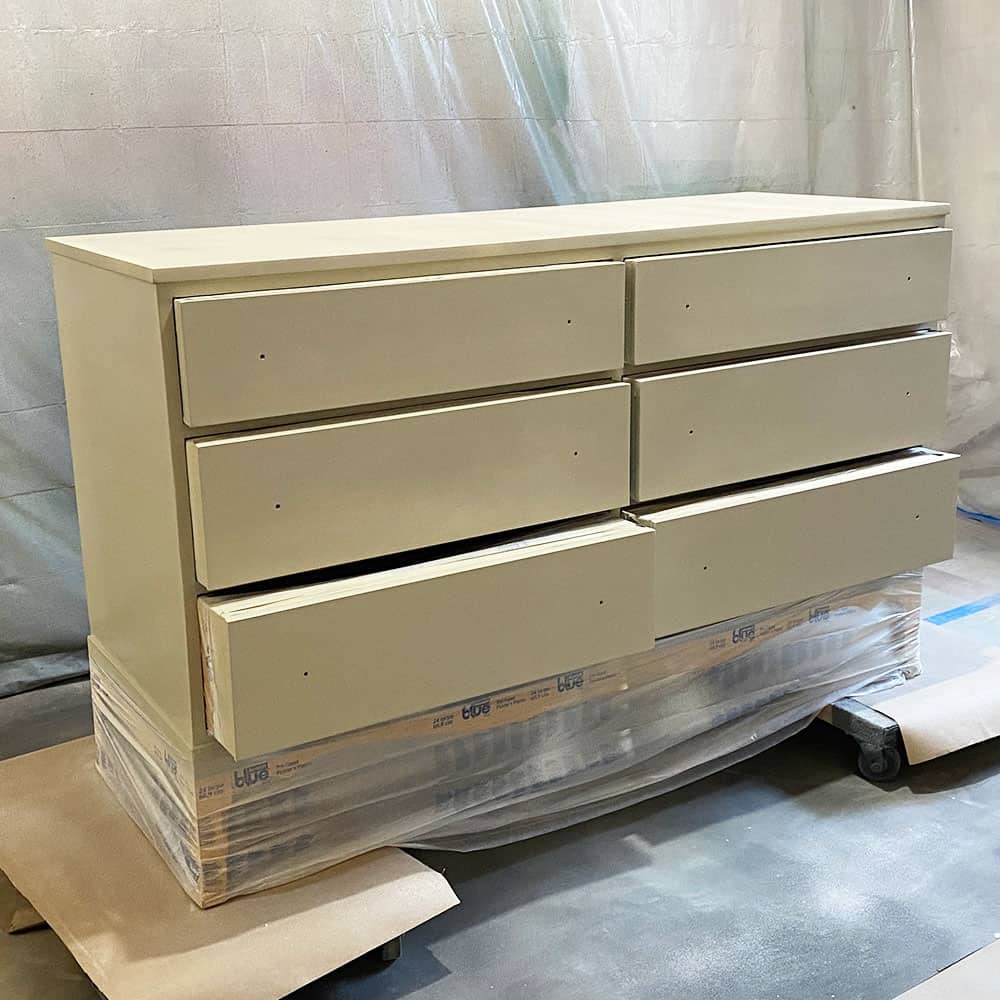
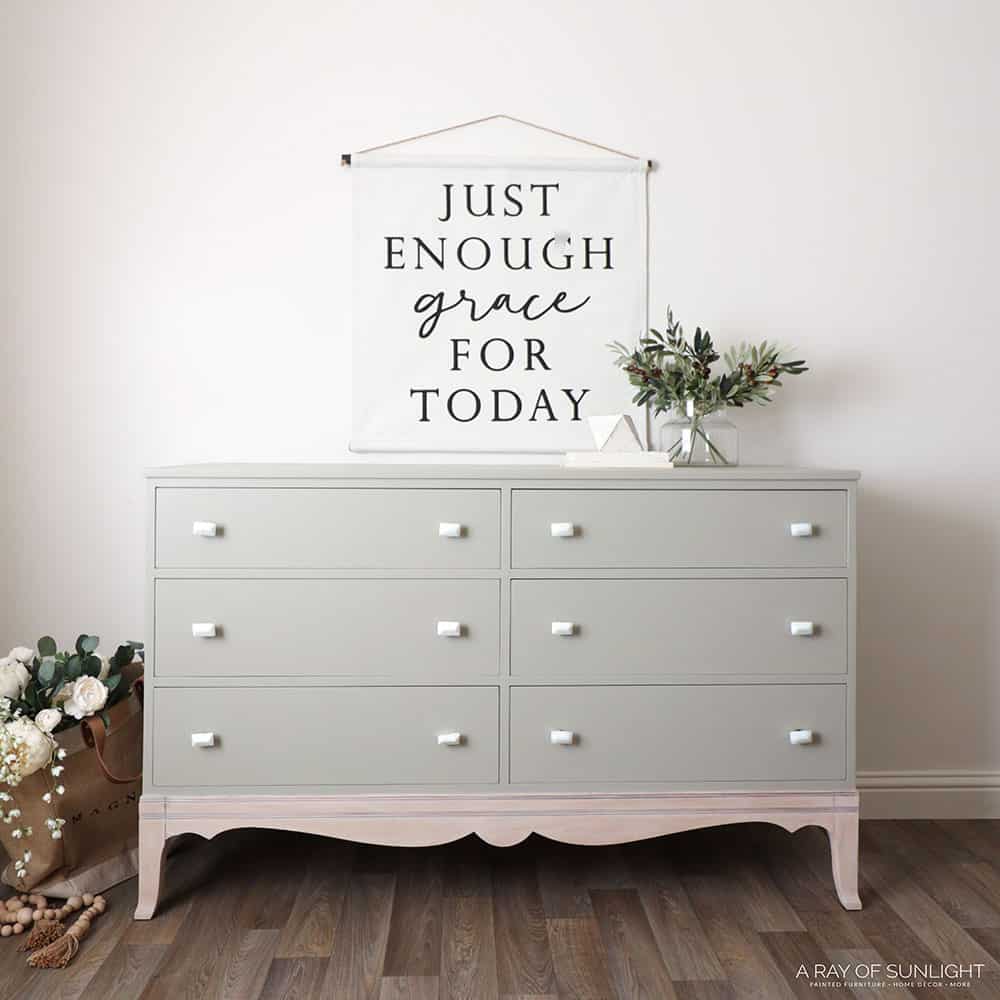
Alright, after all of that, it was time to actually paint. This time, I used Melange’s All in ONE in the color Knapsack. Is it green? Is it cream?…. It seems to be more of a light green.
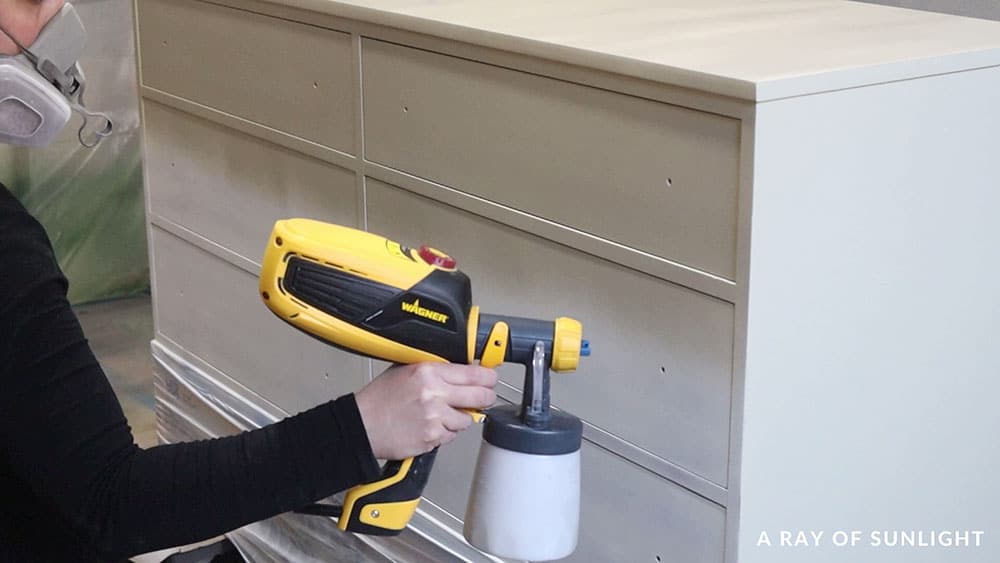
As always, I mixed some water into the coating, and then I sprayed on a coat. Learn more about how to thin paint for Wagner sprayer here and how to thin paint for Wagner FLEXiO Sprayer here.
I ended up with 3 coats. I probably could have gotten away with 2… But I like to make more work for myself, so I did 3 coats.
Then, I lightly sanded everything with a fine foam pad to make it feel nice and smooth, and then I sprayed the last coat. This product doesn’t need a top coat, though, so hey, I still saved a lot of time! Haha
And I actually really, really love this! Check out this how to fix damaged wood furniture before painting post where I used Melange ONE for this dark green piece! Here are the best all in one paints for furniture, and here’s our guide on how to use all in one paint.
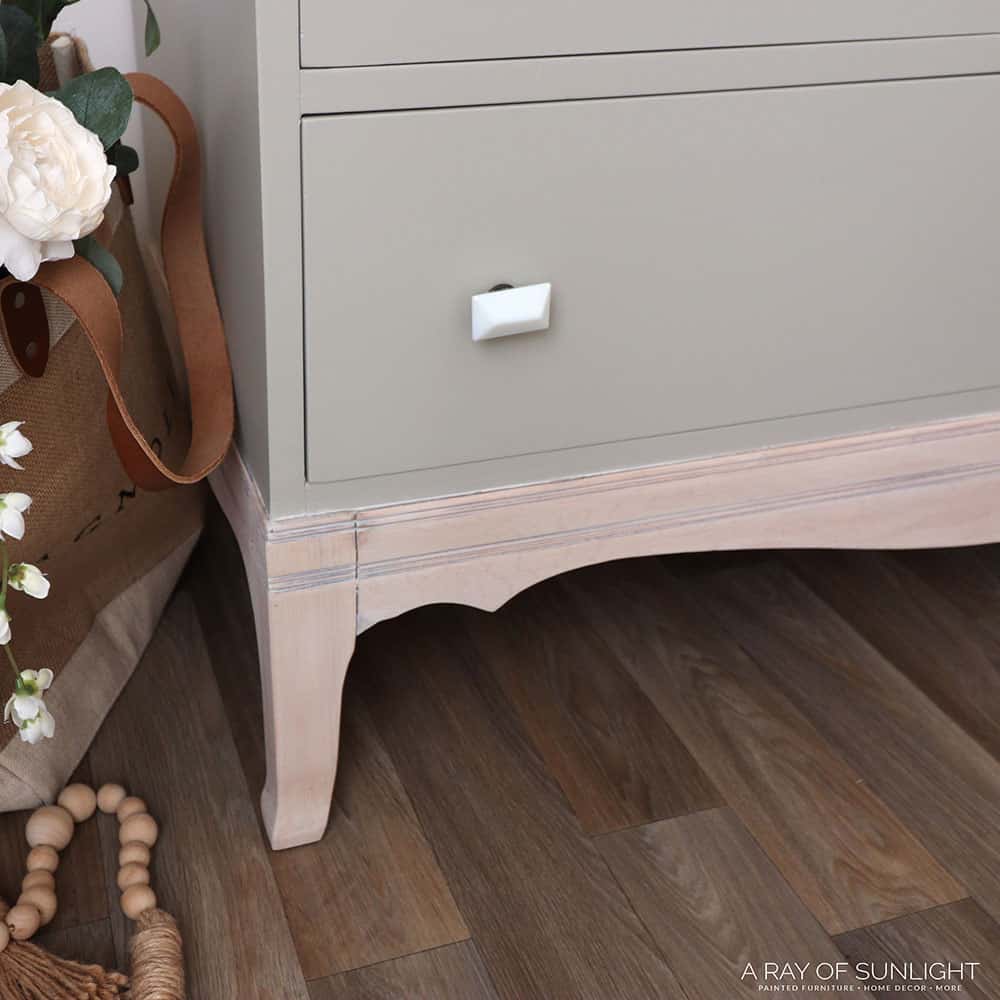
Whitewash Wood Base
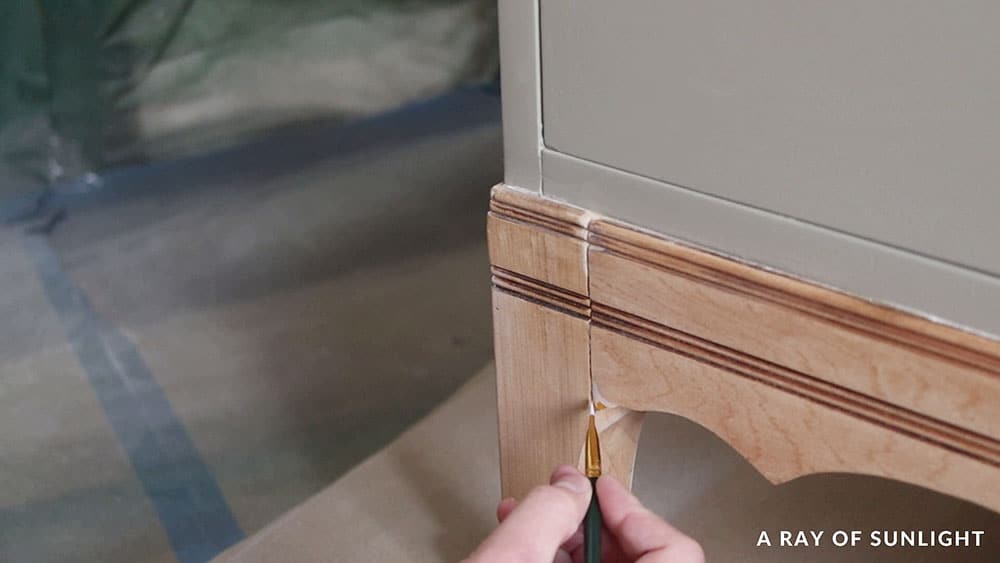
Then, I worked on the base. I wanted to whitewash it.
I still had to repair the chipped wood. So I filled those areas with Kwikwood, and then I shaped it with the putty knife so I wouldn’t have to do much sanding once it was dry. Head over here to learn more about repairing old furniture.
When it was dry, I smoothed it out, and then I put some thinned out orange coating and some brown on it to make it blend in better. It wasn’t perfect, but it was a lot better than it was before!
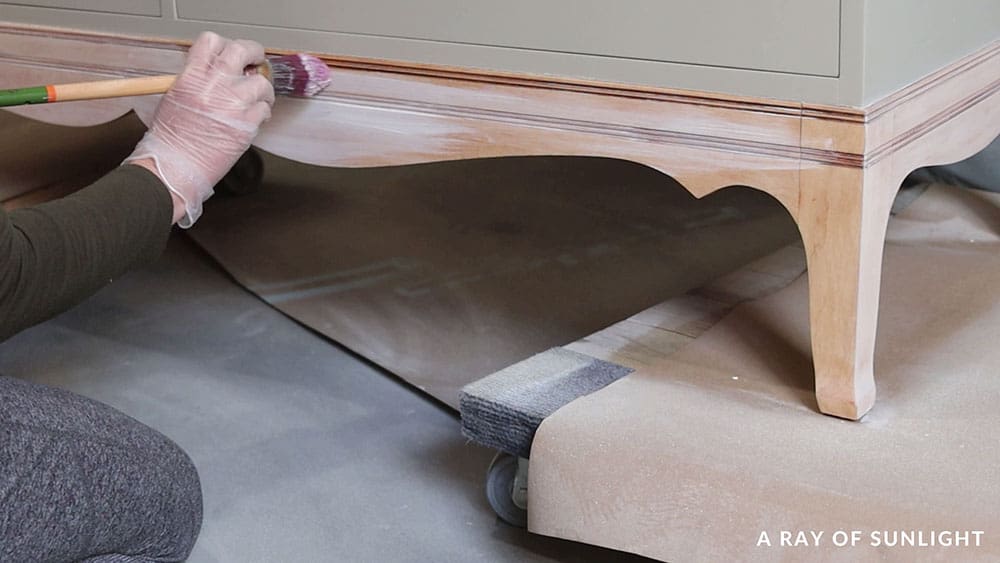
Then, I wiped some whitewash onto the base. Head over here to learn more about how to whitewash furniture. Or see how I tried to whitewash the laminate top in this painting a dresser project! Get more whitewashed furniture ideas here.
Seal Whitewashed Wood
When the whitewash was dry… like 10 minutes later…I experimented and mixed some of the Knapsack and some light grey coating into wax.
And then I brushed it on to help protect the wood… but I also wanted to see if it would add any more dimension to the whitewash… and maybe tone the orange surface down a little more, too. Check out this great tutorial on how to tone down orange wood furniture.
I don’t know if it really made much of a difference.. but I love the final look! And here’s what it looks like now! And you can watch our YouTube video for the whole process:
More Before and After Makeovers
See All >
Click any of these “before” photos below to view the “after” of that makeover.


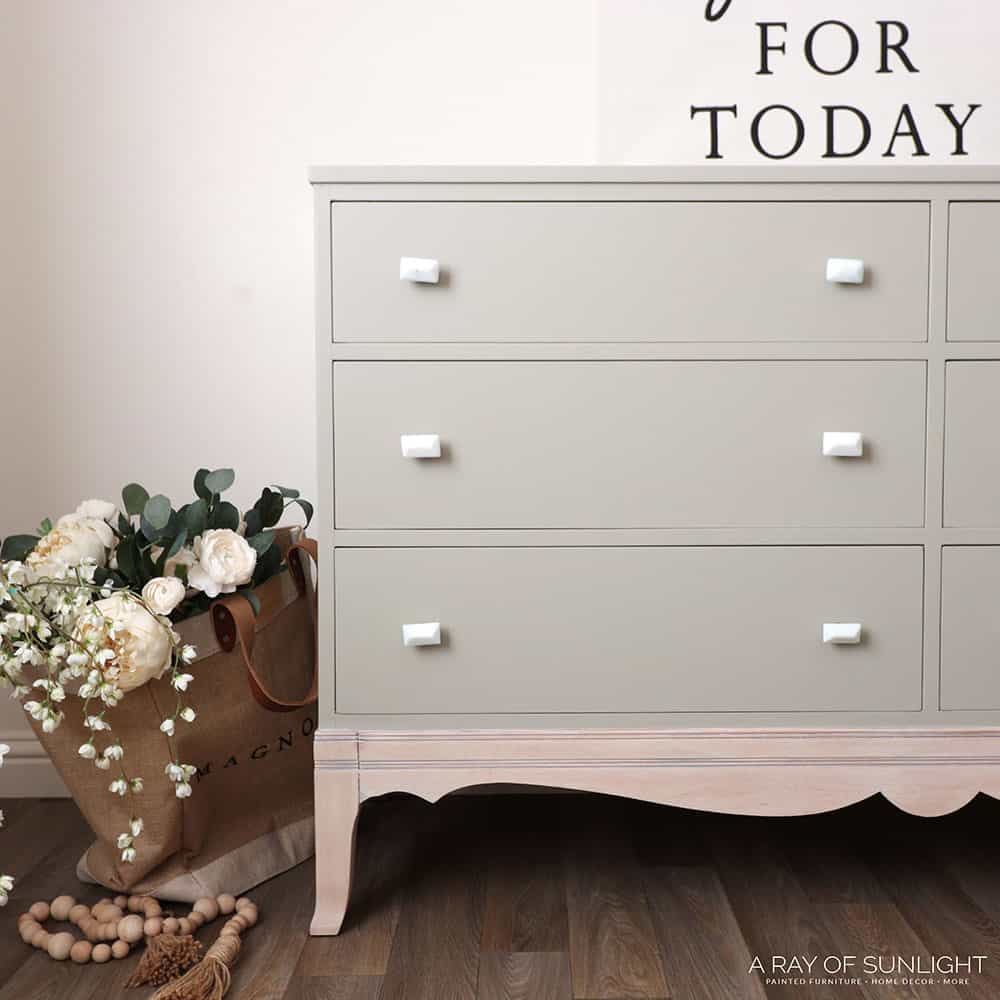
What do you think?? I love it!! It’s pretty close to what I envisioned in my head… though the color is a little more green than I imagined. But I love green, so I love it!
I thought about cutting the base and making it all straight… but I’m so glad that I left it in its original shape.
If you want more amazing furniture makeover ideas, check out this post for inspiration and step by step guides on how to transform your furniture into stunning pieces.


Melange Paint Review
If you’re curious about Melange ONE, here’s my Melange ONE Paint review. Again, it’s an all in one product, so you don’t have to use a separate primer or topcoat. Still, I recommend using a stain blocking primer for wood or bonding primer for laminate surfaces. Check out the best bonding primer for laminate furniture here.
It’s self leveling, so even if you use a brush, you won’t have brush marks! For smoother and more professional results, you can also use an HVLP gun, like we did here.
It doesn’t need a topcoat, but you can add it for extra durability and easier cleaning. The finish is also more of an eggshell, so topcoat with a satin or higher sheen. Here are your options for topcoats for painting furniture.
There are also 95 Melange Paint colors available, so you’ll have plenty of options to choose from for your project. So, if you’re looking for a product that will save you time and effort while also delivering a beautiful finish, this is definitely worth trying.


All In One Painted DIY Dresser Makeover
You can never go wrong with all-in-one paint. Here are the steps for this All In One painted DIY dresser makeover.
Materials
- Krud Kutter
- KwikWood
- Sand Net Sandpaper 80 Grit - 220 Grit
- Wood Filler
- Spackling
- Painters Tape
- Pre Taped Plastic
- Tack Cloth
- BIN Shellac Primer in the Spray Can
- Paintable Caulking
- Melange ONE in Knapsack
- Paint Filters
- Whitewash from Paint Couture Paint
- Lint Free Rags
- Soft Wax from The Real Milk Paint
- White Knobs
Tools
Instructions
- Start by making the base durable by screwing it into the dresser. Use the mini pocket hole jig to drill new holes for the screws.
- Proceed to prep the rest of the dresser for paint by removing hardware and cleaning the dresser really well with Krud Kutter. Fill in any damage and the hardware holes.
- Sand the dried wood filler and scuff sand the rest of the dresser with 220 grit sandpaper. For any wood scratches, fill those in as well and spread thinned out spackling over the areas that you had sanded down to bare wood. This is so you wouldn’t be able to see all of the wood grain after painting.
- Now, tape off the drawers to prevent overspray when painting. Sand everything again and clean up all the dust with the shop vac and a tack cloth.
- Prime the dresser with 2 coats of BIN shellac to block stains. Let primer dry overnight. When it dries and it's super rough, sand the dresser smooth again.
- Apply 2-3 coats of all-in-one paint onto the dresser. Lightly sand everything with a fine foam pad to make it feel nice and smooth.
- Wipe some whitewash and seal the whitewash with a mix of knapsack paint and some light grey paint into wax.
- Add dresser hardware.
Recommended Products
As an Amazon Associate and member of other affiliate programs, I earn from qualifying purchases.


More All in One Paint Resources
- All in One Paint for Furniture
- Heirloom Traditions Paint Review
- Types of Paint for Furniture
- How to Paint a Wooden Bench
Learn the Art of Updating Furniture!
If painting furniture feels overwhelming or your past attempts didn’t go as planned, this course will guide you step by step.

Follow us on YouTube to get more tips for painting furniture. Or share your project with us on our Facebook Group and be part of our community. See you there!
Love this! Great way to take such a traditional piece and give it a gorgeous update.