Painting Furniture for Beginners


Today, I’m taking you along for a quick and easy makeover that turns a mismatched pair of MCM end tables into something fabulous with no sanding, no priming, and no topcoat needed! Painting furniture for beginners can be intimidating, but this process will help you gain confidence and create stunning results.
This is one of our painting furniture ideas that is perfect for anyone just starting out with DIY projects. Stick around, and I’ll show you everything, step by step. I promise, you can totally do this.

Welcome to Furniture Fixer Upper day, where we join 4 of our talented furniture friends and bring you brand new makeovers! I’ll link to my friend’s makeovers after our after photos at the bottom of this post! Don’t forget to check out their masterpieces!! Okay, back to our makeover!

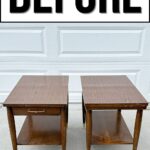
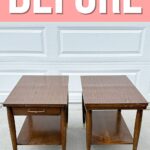
These end tables were quite the find. One came from Deseret Industries thrift store and the other from Goodwill a few weeks later, and while they aren’t identical, they’re both Mersman brand tables that match well enough to make a cute little pair. A little different? Sure. But hey, that makes them more interesting, right?
We’re painting laminate AND wood, and this process is perfect for beginners. I wanted this makeover to be simple and approachable, no crazy steps. I’m using all in one paint, which is the easiest to use. Trust me, this product does the heavy lifting!
If you’re new to painting furniture or just want a simple project, this is a great place to start. It’s quick, easy, and doesn’t need a bunch of fancy supplies or techniques. You’ll see just how fun and rewarding it can be to give an old piece a fresh, new look!

Supplies Used for Painting Furniture for Beginners
As an Amazon Associate, I earn from qualifying purchases. I also may earn from other qualifying purchases with other companies or get free product to review and use. All opinions are my own.
- Screwdriver
- Heirloom Traditions Paint Degreaser Surface Prep
- Zibra Round Brush
- 0000 Steel Wool
- Damp Rag
- Frog Tape
- Heirloom Traditions Paint in Cashmere
- Roller Tray
- Roller
- Rustoleum 2X Primer
Prepping Tables for Painting
First things first, I tackled the hardware on the one table with a single drawer. I simply unscrewed it from the inside. I took it off because it’s easier to work on the piece without the hardware, and it looks better in the end. I do plan to reuse it later, so I didn’t bother filling in the holes. After all, we’re going for simple and beginner friendly here.

Clean with Surface Prep
Next, I brushed on the Heirloom Traditions Paint Degreaser called Surface Prep. If you’re wondering what that is, it’s a degreaser and deglosser in one. Super handy. I used a Zibra round brush to apply it to both pieces, and I swear, this stuff works some kind of magic.

For example, there were what seemed to be Sharpie marks on one of the tables that I hadn’t even seen before, but as soon as the Surface Prep went on, bam! Purple marks came out of nowhere. Luckily, they washed away with the cleaner. Amazing, right?
Once that was done, I grabbed some 0000 steel wool. The instructions on the Surface Prep recommended an abrasive pad, but I didn’t have one on hand, so I improvised with steel wool. I’m sure it risks leaving behind rust, but it’s what I had…

I used it to lightly scuff the laminate to help the new coating stick better. I don’t actually know if this step is necessary, but it made me feel more confident about the final result. After scrubbing with the steel wool, I rinsed everything off with a damp rag.
If you’re wondering how well the Surface Prep cleaned these tables, I’ll tell you this, the rag got SO dirty. The water was so dark that each time I rinsed the rag out, I ended up rinsing the rag and the pieces multiple times until they felt really clean.
Tape Off with Frog Tape
Then, I taped off the little brass feet using green Frog Tape. This stuff is the best for creating crisp, clean lines. I didn’t want any paint going under the tape and seeping onto the metal, so I took the time to tape everything carefully. Learn more about what is the best painters tape that doesn’t bleed here.

Once the prep was done, it was time for the fun part!
Painting Tables White
I started by mixing Heirloom Traditions Paint in the color Cashmere, a nice, clean white. After stirring it for a couple of minutes, I poured it into a roller tray. For this project, I used a 4 inch mini roller with a premium 3/8 inch nap from Home Depot.

To get into tight areas, I used a Zibra round pointed brush, but honestly, these tables don’t have that much detail, so I used the roller most of the time, which was super handy. Check out the best rollers for painting furniture here.
When applying, I went a little heavier, not so much that it’d drip, but I wanted the coating to take a bit longer to dry. Why? Because Heirloom Traditions Paint claims to be self leveling, and my hope was that the slower drying time would help it flatten out for a smoother finish.
Check out our list of the best type of furniture paint for beginners here, including Heirloom Traditions Paint!

I personally prefer to spray this on for a flawless, smooth finish, but I wanted to show you that it’s also possible to do it without a paint sprayer! Here’s all about painting furniture with Heirloom Traditions Paint. For more about this product, check out my Heirloom Traditions All In One Paint review.
I put on one coat and let it dry. It dries to the touch pretty quickly, like 30 minutes. By the end of the day, I had a second coat on. The tables were already looking so much better!
My guess was that I’d need two more coats to get full coverage because white is just… finicky when it comes to covering dark wood. But that’s totally expected.
Would you like to save this?
The next day, I added another coat. To be honest, the texture was building up more and more with each one I added. For most people, it’s probably not a big deal since these pieces will still look awesome from even a foot away, but for me, I am super particular about no texture on the pieces in my home. Still, when I stepped back, I could already see how cute they were gonna be!
For another way to transform your piece, check out painting furniture with enamel paint.
Fixing Bleedthrough Issues
At this point in the makeover, I was tempted to wrap things up. But I wanted to be real about a problem I ran into. I had 3 coats on, and there was a problem, a spot of bleedthrough on both of the shelves.

What’s bleedthrough? It is typically like little spots that are orange, red, or yellow. It happens mostly if you apply water based paint over bare wood, and no amount of paint will cover it. The stain will just keep showing up!
The solution? Shellac or oil based primer. But not all products work! Learn more about how to stop stains from coming through paint here, including the best primers to use.
So I decided to spray the affected areas with one coat of multiple very thin, light sprays with this Rustoleum 2X spray can primer to block the stain, waited 24 hours for it to seal, and then gave it another 3 coats of color! Whites are the hardest to get full coverage with!

And yes, if you were counting, that was a total of 6 coats. Another vote for spraying because if I had applied it on with our beginner level, cheap sprayer, it would have taken 2, maybe 3 coats to get full coverage! And it would have taken a lot less time! Learn more about the best paint sprayers for beginners here!
Updating Old Hardware
With the painting done, I pulled off the tape around the little brass feet, and they looked perfect. Next up was the hardware. The original hardware was worn. It had a mix of gold and silver showing through, and boiling it in water and scrubbing it with Barkeeper’s Friend honestly didn’t do much. Here’s more on how to clean old furniture hardware.

I had two options: find some new hardware or spray paint the old ones gold to match the feet. Learn how to spray paint furniture for beginners here if you haven’t tried it before. Since I didn’t have any gold color on hand, I rummaged through my hardware stash for something gold with the same hole spacing.
I found two potential options and tested them out. One definitely didn’t match the style or color of the gold feet.
The other option was sleek, modern, and adjustable, meaning it would fit any size of original hardware holes from 2” to, like, 8”. So, I didn’t have to change the holes in the drawer to get this to fit. How cool is that?! It looked amazing with the MCM style of the tables.

So remember, these pieces looked like a mismatched pair of wood tables with laminate tops before. They were dark and boring.
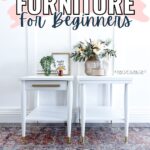
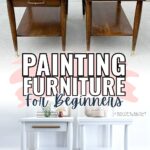
But the little gold feet stand out now against the white finish. I had these sitting around for over a year, and I was not inspired by them, they were just basic pieces that I didn’t think would be very cute painted.
Boy, was I wrong! They are adorable now!! But…if you are working on your very first project, I would recommend not using white. Make it easier on yourself and use a medium or darker color, so you only have to apply the normal 2 to 3 coats! But if you really are set on painting white, then check out this post about painting wood furniture white to get all the tips and tricks you need!


And there you have it, a quick, easy, and beginner friendly MCM end table makeover. No sanding, no priming (well, unless you have bleedthrough spots that need a quick spray), no topcoat, just gorgeous results! Learn 3 painting furniture hacks you’ll wish you knew sooner here.
When thinking about painting furniture for beginners, this is about as easy as you can get! They turned out beautifully, and I hope they inspire you to try a project like this yourself. Don’t forget to show off your finished pieces. I’d love to see them!
Watch the full makeover of these MCM tables on our YouTube video below, or scroll down to see the after photos.


More Before and After Makeovers
See All >
Click any of these “before” photos below to view the “after” of that makeover.


Don’t forget to check out these other awesome before and after furniture makeovers from my Furniture friends!! (Click the links below the photos!)

- Art Deco Vanity from My Repurposed Life
- Metal Table Makeover from Petticoat Junktion
- Accent Table Makeover from Confessions of a Serial DIYer
- Bookcase Makeover from Salvaged Inspirations


Painting Furniture for Beginners
Materials
Instructions
- Remove the hardware from the furniture. This makes painting easier and prevents any paint from getting on them.
- Clean your piece with a degreaser and deglosser in one like Heirloom Traditions Paint Degreaser - Surface Prep. This will help remove any dirt, grime, or marks that may prevent the paint from adhering properly.
- Apply Surface Prep using a brush then scrub the surface with an abrasive pad or steel wool to lightly scuff the surface. Rinse off everything with a damp rag.
- Tape off any areas you don't want to be painted using a high quality painters tape such as Frog Tape. This helps create clean lines and prevents any paint from seeping onto those areas.
- Mix your all in one paint well and pour it into a roller tray. Use a 4-inch mini roller with a Premium 3/8-inch nap, and use a round pointed brush for any tight or detailed areas.
- Apply 2-3 coats of paint, allowing each coat to dry before applying the next one. You'll need more coats if you're covering a dark wood with white or light colored paint.
- For bleedthrough issues, spray the affected areas with one coat of multiple very thin, light sprays of shellac or oil primer to block the stain, wait 24 hours for it to seal, and then apply another 2-3 coats of paint.
- Once the paint is fully dry, remove the tape carefully to reveal clean lines.
- Update hardware by either cleaning it or finding new hardware that fits the style of your newly painted furniture.
More Painting Furniture Tips
- Shabby Chic End Tables with Raised Stenciling
- Painting Wood End Tables
- MCM Step End Table Makeover
- Two Toned Painted and Stained Furniture
- Painting A Kitchen Bench
Follow us on YouTube to get more tips for painting furniture. Or share your project with us on our Facebook Group and be part of our community. See you there!
These turned out SOOO good! The white with the gold is amazing on this style and totally updated them! XOXO
Ahh thank you SO much Christy!!
Hello!! The tables turned out fantastic!!! They look beautiful!!! As a beginner, I really appreciate all of the helpful information you provided for your makeover. Thank you so much!!
Kathy W
Thank you so much! I’m so glad you found the tutorial helpful. Best of luck with your own makeover projects!
Ha, I thought they were a matching set until you said they weren’t…lol. I LOVE them in crisp white with the gold details. Awesome tutorial with great tips Natalie! PINNED! XOXO
Thank you SO much Denise!
It’s amazing what white paint can do. Thanks for the tutorial!
Right?? White paint can work wonders! So glad you enjoyed the tutorial Lizzy!
I didn’t realize they didn’t match Natalie. But they do now, and the white and gold combo is perfect for this set of tables.
I’ve used HTP for years and I love it. I usually do 2.5 coats. One ugly first coat, a second coat all over, and then a touch-up where needed. I love using Paula’s foam rollers.
Pinned!
gail
That’s so awesome and thank you so much Gail! I appreciate it all the kind words.