How To Spray Paint Furniture For Beginners


If you want to give your piece an update without the texture of a brush or roller, using spray paint for furniture is the way to go! We’ll walk you through how to spray paint furniture for beginners so you can easily get that flawless finish.
Even if you’ve never picked up a spray can before, don’t worry! We’re sharing all the tips and tricks you need to know in order to use it properly and create beautiful results. Let’s dive in!

When painting furniture, you’ll want it to look great with a nice, smooth finish, but traditional methods like brushing and rolling can leave behind visible brushstrokes or roller marks. So, why not try using spray paint?

It makes the process way faster than using a brush or roller. Plus, it’s already in the can, so you can use it as soon as you buy it, making it very convenient. Especially when you compare it to using a sprayer, which is a more advanced tool that takes some time and practice to get the hang of.
This is the perfect option for beginners who want to get a professional look for their pieces without the hassle. If you’re ready to give it a try, keep reading for our guide on spray painting furniture for beginners!
As an Amazon Associate, I earn from qualifying purchases. I also may earn from other qualifying purchases with other companies or get free product to review and use. All opinions are my own.
Removing the Hardware
First, you’ll need to take off the hardware on your piece. If your drawers have knobs, just open them up, and you’ll usually find a screw on the backside inside the drawer. Grab a flathead screwdriver and unscrew it from there.

This way, you can change out the hardware to something that fits your current style more. You can also still use the old ones – learn how to clean old furniture hardware to make them look as good as new. Plus, in the future, you can switch it up again without having to redo the whole piece.
Cleaning the Furniture
Next up, you’ll want to clean your piece. Make sure there’s no grease, oil, grime, or anything else on the surface. You don’t want these little specks of dirt or sticker residue to mess up your new finish. Grease, oil, and paint don’t mix well, too, so we need to make sure all of that’s cleaned off.
It’s super easy. I just grab some Krud Kutter and an old rag. I wet the rag, apply Krud Kutter all over, and wipe it all down. If it’s really dirty, I’ll rinse the rag and go over the piece again until it feels clean to me.

This stuff also works great around the house for any grime buildup you’ve got. Once you’re done cleaning, let the piece dry completely, making sure it’s not still wet before you start priming. Get more tips on how to clean furniture before painting here.
Preventing Paint Overspray
Now, the awesome thing is that you can also use spray can primers, meaning you’re not gonna have to brush or roll anything on! But before you can start spraying, you need to make sure you’re protecting your work area.
If you’re working in the garage, just hang some plastic on the wall. You can use nails, screws, or even painter’s tape to hold it up just so you don’t coat the wall behind the piece or anything else nearby or around. Spray paint is harder to get off of things, so take the time to cover everything.

Or better yet, just work outside. This product also has a super strong smell that doesn’t go away very fast, so if you can, it’s definitely better to do it outdoors. But if you live in a windy area, even with a light breeze, it’s harder to spray outside, so take that into consideration, too.
For working outside on the driveway, lay down some cardboard, plastic, a drop cloth, or even canvas – anything to keep the ground from getting coated. You can work in dirt or grass areas, too. Here’s a more detailed guide on how to prevent overspray when painting furniture.
It’s best to work in the shade with temperatures between 60 and 85 degrees. This way, the paint won’t dry too quickly or take forever to dry.
Scuff Sanding Furniture
For the best results, it’s a good idea to do the prep work so the new finish sticks better. If you want the very, very best results, you need to scuff sand your piece. This helps, especially for slick surfaces. It dulls the surface and gives the new coating something to hold on to.

You can just use a piece of 220 grit sandpaper that is about 3×4 inches, fold that in half, and just rub it lightly everywhere, and then you can remove the dust with a vacuum or a damp rag. I like to use a tack cloth – it’s sticky, and it helps pick up any remaining dust after vacuuming.
Filling In Damage
So right after you clean, if there are any scratches and dings, if you need to change your hardware to something else. Now is the time to fill those things in and get them figured out.

Would you like to save this?
At this point, it’s a good time to deal with any scratches or dings. Plastic wood filler, Bondo, Kwikwood – these are the best wood fillers for furniture you can use. Learn all about how to repair damaged furniture in this post.
If you’re thinking about swapping out your hardware for something new, here are the different ways of filling holes when replacing cabinet or furniture hardware.
Priming Before Spray Painting
Priming is another important step that helps with adhesion. Otherwise, the new finish will just scratch off so easily that any time you set anything on it, it will just come right off. So, if you want your piece to keep looking great for a long time, make sure to prep and prime.
If you want to skip sanding and priming, that’s totally fine. Just know the finish might not look as nice in the end. It’s up to you!
Spray paint usually sticks pretty well, but adding a primer makes it stick even better and helps block any bleed through stains. You can use whatever primer – some brands have their own primer options.
I love the clear shellac. It dries super fast, prevents bleedthrough, and really helps with adhesion. If you go with a white primer and add a dark color over dark wood, you’ll end up seeing that white layer if the final finish gets scratched. This can be quite noticeable and ruin the overall look of your piece.

That’s why clear shellac is my go-to! We feature it as one of the best spray paint primer for wood here. Learn more about how to stop stains from coming through paint here.
Spray Painting for Beginners
I actually did a little comparison with different brands to see how durable they were, how well they sprayed, etc. You can check out these best spray paint for wood furniture options in this post. But I definitely recommend Behr the most. I enjoyed using it and thought it gave the best results. Here’s our Behr spray paint review for more about this product.

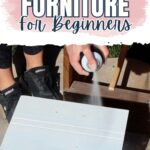
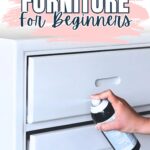
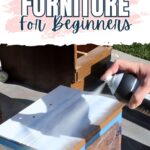
But they’re all basically the same. Just apply in very thin, light coats. Keep the can about 6 to 10 inches away from the surface. If you get too close, you’ll end up spraying on too much, which can cause drips and runs. But don’t go too far either, or you’re just literally getting a mist.
Just work back and forth, getting into the details. You’re gonna do 2 to 3 coats, so if you miss some spots, you can come back and hit those on the next coat. Overlap your sprays by about 50%. As you move down, keep overlapping, and this will help create an even, consistent sheen across everything.

Another thing is you’ll need to use it within 1 hour or wait 24 or 72 hours. So, you really need to get the whole piece painted within an hour of each coat. Apply the first one, wait about 30 minutes, then come back and add on another.
After another 30 minutes, check again to see if you need another one for full coverage. You can see it’s a very quick process. Get more tips on painting furniture for beginners here!
How to Fix Spray Drips
If you get drips or runs, grab a brush while they’re still wet and quickly smooth them out. But if they’re dry before you can fix them, you’ll need to sand them down. But sanding within the hour can be tricky because it’s still too wet and sticky, and your sandpaper will just clog up.

So, if you’ve got a lot of drips, you might need to wait 24 or 72 hours (or however long it takes) for them to fully dry. Because it’s oil based, it takes forever to dry.
Adding the Hardware
Let the final finish dry for 48 to 72 hours before you put the hardware on. This way, it won’t accidentally get scratched or dinged while you’re putting any knobs or pulls back on.

Then, you can use the piece when it has dried after 72 hours. Just be really careful with it for about 30 days until the finish completely cures and gets as hard as it’s gonna possibly get. After that, you’re good to use it like normal!
With these tips and tricks, you can easily give any old piece a quick makeover with spray paint. Whether you’re a beginner or an experienced DIYer, this is a great way to create a smooth and durable finish on your projects.
More Spray Painting Furniture Tips
- How to Spray Paint Indoors
- Refinishing Rattan Furniture
- How to Spray Paint Laminate Furniture
- Five Tips for Easy Spray Painting

Follow us on YouTube to get more tips for painting furniture. Or share your project with us on our Facebook Group and be part of our community. See you there!