Wood Christmas Tree DIY
With endless DIY farmhouse Christmas decor ideas out there, it can be overwhelming trying to choose the perfect one for your home. But why not try something different this year and create your own wood Christmas tree DIY? It’ll be a one of a kind piece that will add a rustic and charming touch to your holiday decor.
If you’re feeling crafty and want a special tree to display this Christmas, then follow our simple tutorial on how to make your own wood Christmas tree!

Christmas trees are a staple in holiday decorations, but have you ever thought of making your own unique version?

With DIY projects gaining popularity, creating your own Christmas tree is the perfect opportunity to showcase your creativity and personal style.
Plus, it’s a fun activity to do with friends and family – you can even make it one of your holiday traditions.
DIY-ing a wooden Christmas tree is not only budget-friendly but also environmentally friendly as you can reuse the tree for years to come.
This also means you can have a different design or theme for your tree each year without breaking the bank.
And let’s not forget the satisfaction of creating something with your own two hands – it’s truly a rewarding feeling!
So why not take a break from the traditional artificial Christmas trees and try this DIY wood Christmas tree?
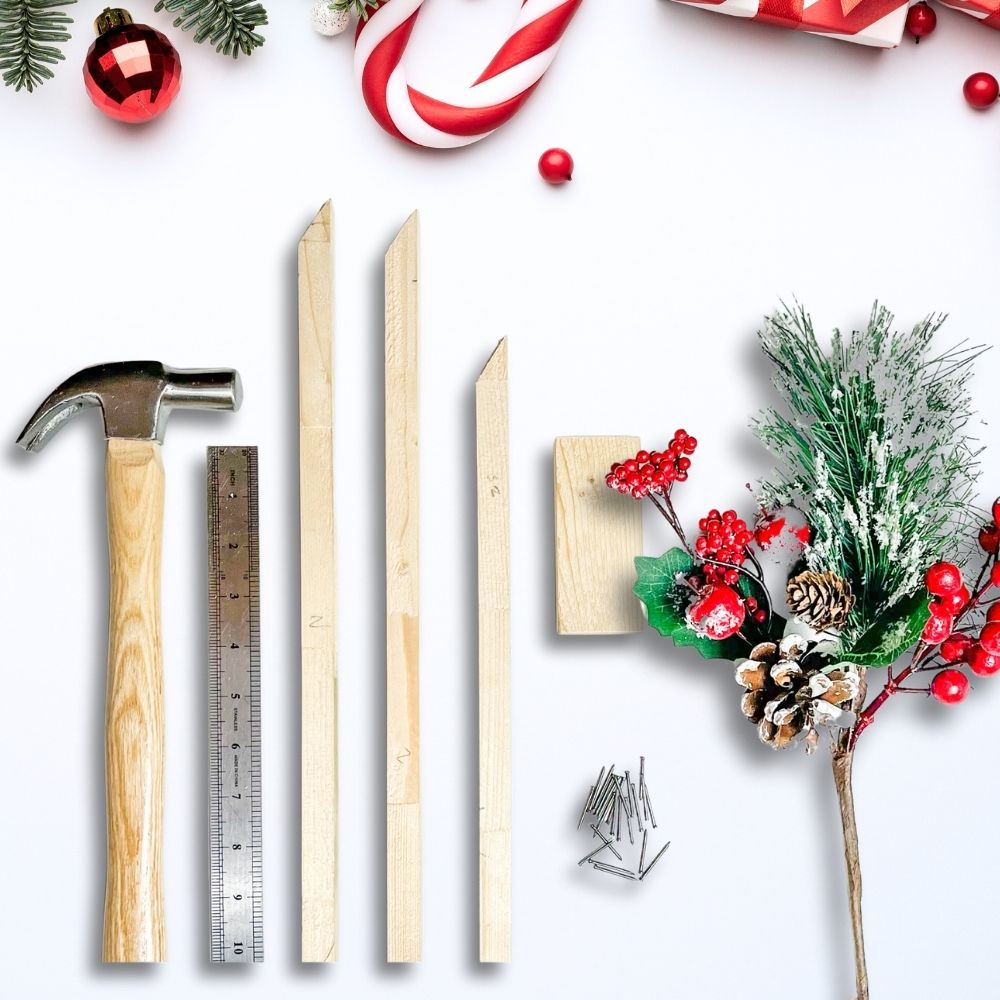
Supplies Used for Wood Christmas Tree DIY
As an Amazon Associate, I earn from qualifying purchases. I also may earn from other qualifying purchases with other companies or get free product to review and use. All opinions are my own.
- Two (2) 5/8 x 15.85 Inch Unfinished Pine Wood Sticks
- One (1) 5/8 x 10.2 Inch Unfinished Pine Wood Stick
- One (1) 2 x 4 Inch Unfinished Pine Wood Board
- 120 Grit Sandpaper (optional)
- Metal Ruler for measurements
- Wood Glue
- Hammer
- 1 Inch Nails
- Christmas Decorations/Accessories
- Glue Gun to attach the decor
Get all these ready and let’s get started! Don’t worry, the steps are easy to follow.
Measuring and Cutting Pine Wood Sticks
Get your pine wood sticks and cut them according to these measurements – 2 pieces measuring 15.85 inches and 1 piece measuring 10.2 inches.
Cut one of each end of the longer sticks with an angle of 19 degrees and the other end of each long stick at 35 degrees, while the shorter stick with both ends at a 35-degree angle.
For the base of your Christmas tree, cut 4 inches from the pine wood board. Once you have all your pieces, smooth out the edges using sandpaper. This will give your tree a polished and professional look.

Remember to measure twice before cutting to avoid mistakes. Use a metal ruler for more accurate measurements and always prioritize safety when handling sharp tools.
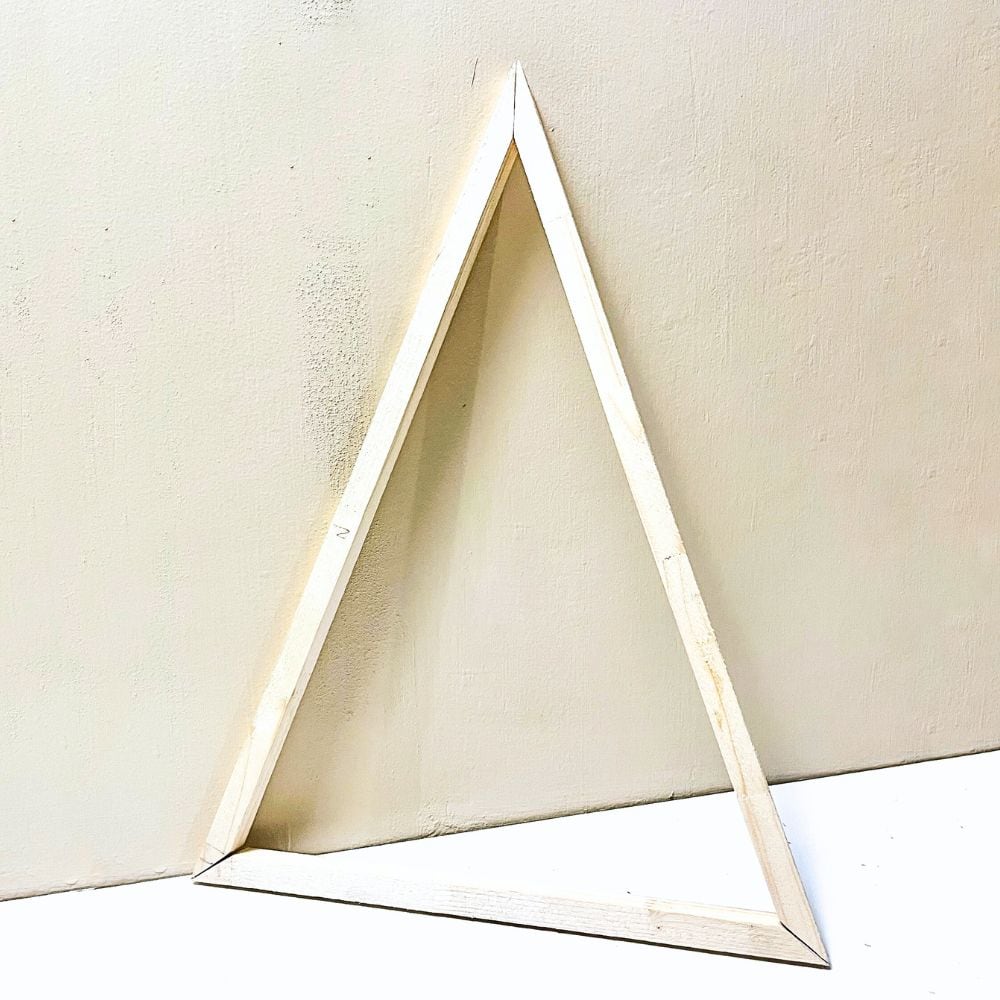
Then it’s time to assemble the wood pieces into a Christmas tree shape!
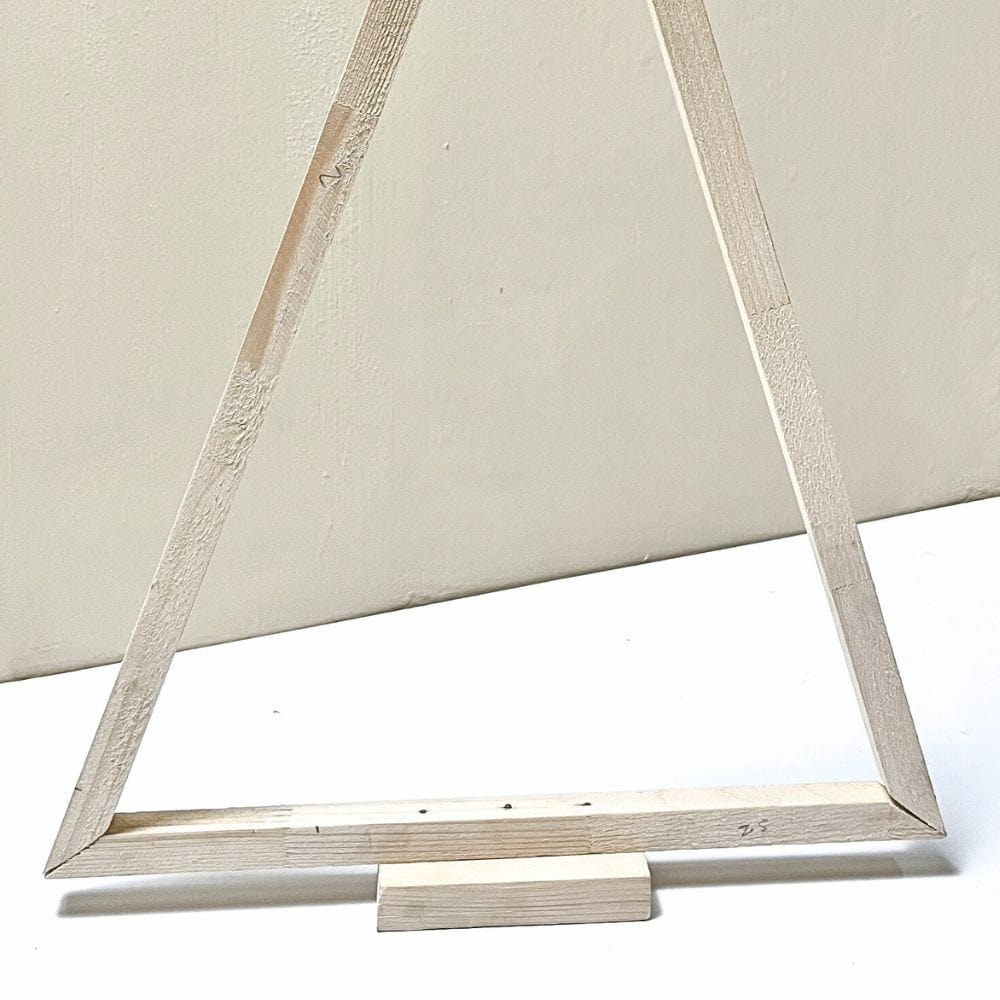
Assembling Wood Christmas Tree
Assembling your wood Christmas tree is the most exciting part! It’s where you see all your hard work come together.
Glue the ends of the wood sticks together with wood glue and hold them in place for a few minutes. This will create the triangle shape of your tree. Secure the pieces even more by nailing each end together.
The pine wood board serves as the base of your Christmas tree, so make sure to nail it to the bottom of the shortest side of the triangle securely.
This will provide stability to your tree and prevent it from toppling over. Once it’s all assembled, you can start decorating!
Don’t worry if your tree doesn’t look perfect at first, that’s part of the beauty of DIY projects. Every tree will have its own unique imperfections and that’s what makes it special.
Plus, these imperfections give off a rustic and charming vibe to your decoration. If you want more DIY Christmas tree ideas, here’s our DIY foam Christmas trees and DIY small wooden Christmas trees!
Decorating Your Wood Christmas Tree DIY
The best part about making your own wood Christmas tree is the decorating stage. Glue pine cones and berries for a traditional look, or opt for colorful ornaments and lights for a modern twist.
Would you like to save this?
You can even customize your tree to match your home decor or chosen theme for the year. Check out these rustic Christmas decor and farmhouse Christmas decor that you can pair with your wood Christmas tree!
With a DIY wood Christmas tree, there are no limits to your creativity. Add personal touches such as family photos, handmade decorations, or even small gifts wrapped in festive paper.
Make it a collaborative effort with your loved ones by having them help decorate the tree – it’s a great way to bond and create lasting memories. Add even more charm to your holiday setup with these wooden Christmas village houses.
One of the great things about a wood Christmas tree is that you can easily change up the decor each year. Simply remove and add new decorations as desired. You can also spruce it up with new paint or glitter for a fresh look.
Check out my friend’s blog post about Christmas decorating ideas using recycled items if you want a more budget friendly option for decorating your home this holiday.
How durable is this wood Christmas tree?
One of the great things about using pine wood for this DIY project is its durability. Pine wood is known for its strength and sturdiness, making it a perfect material for a Christmas tree that can last for years.
With proper care and storage, your wooden Christmas tree can withstand multiple holiday seasons without showing any signs of wear and tear.
In addition to being durable, pine wood also has a beautiful and natural texture that adds to the charm of your DIY tree.
Its rustic appearance gives off a warm and cozy vibe, making it a perfect centerpiece for your holiday decor.
And because you made it yourself, the sentimental value of this tree makes it even more special and durable in terms of memories that can last a lifetime.
What if I don’t have the tools to cut the wood?
You can ask your local hardware or craft store for assistance in cutting the wood pieces. Most stores have a cutting service available for their customers, and they can easily cut the wood to your desired measurements. This way, you won’t have to invest in expensive tools that you may only use once.
You can also use different types of wood, like this DIY dowel Christmas tree. If you have a friend or family member who has woodworking tools, consider asking for their help with cutting the wood pieces. It could also be a fun activity to do together and learn some new skills! Plus, it’s always great to have someone to share the DIY experience with.
Now that you have all the steps and tips, it’s time to get started on your own wood Christmas tree DIY! It’s a fun and creative project that will make your holiday decor stand out. Plus, it’s a great alternative to traditional Christmas trees and can be enjoyed for years to come.
Making wooden Christmas trees is a great way to switch up your holiday decor and make this moment with family special. If you’re looking for ready made options, here are painted wooden Christmas trees you can check out.
Sprinkle your home with more homemade wooden Christmas decorations for a unique and personal touch. To make this holiday more special, here are Christmas believe signs to display next to your tree!


Wood Christmas Tree DIY
Create your own wood Christmas tree DIY for a one of a kind piece that will add a rustic and charming touch to your holiday decor.
Materials
Instructions
- Measure and cut your pine wood sticks according to the provided measurements using a metal ruler for accuracy. Measure accurately and double-check your measurements before cutting to avoid any mistakes or unnecessary waste of materials. Use sandpaper to smooth out rough edges.
- Assemble the wood pieces into a triangle Christmas tree shape with wood glue and secure them in place with 1-inch nails.
- Attach the base of your Christmas tree, made from a piece of pine wood board, securely with nails to provide stability. Let the glue dry completely before moving on to the decorating stage.
- Get creative with your decorations and personalize your tree according to your taste and home decor. Use traditional elements like pine cones and berries or go for a more modern look with colorful ornaments and lights.
- Change up the decorations each year or add new touches for a fresh look.
Recommended Products
As an Amazon Associate and member of other affiliate programs, I earn from qualifying purchases.


More Christmas Decor Ideas
- DIY Painted Christmas Village
- DIY Believe In The Magic Of Christmas Sign
- DIY Farmhouse Christmas Wreath
- Christmas Tree Farm Signs
- DIY Reindeer Christmas Sign

Follow us on YouTube to get more tips for painting furniture. Or share your project with us on our Facebook Group and be part of our community. See you there!