Painting Old Furniture
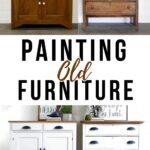

If you’re looking to give new life to your old, worn out furniture, painting is a great way to do it! Painting old furniture can be a fun and rewarding DIY project that will save you money and add a personal touch to your home decor.
Whether you have hand me down pieces from family or thrifted finds, with a little creativity and some of these painting furniture ideas, you can transform your old furniture into unique and stylish pieces you’ll love.

Old furniture often has a lot of character and charm, but it can also have scratches, dents, or outdated finishes. But instead of getting rid of these pieces, you can always give them a fresh new look with paint!

One of the best things about painting old furniture is that you can choose a color and style that suits your personal taste and current home decor. And if you change your mind later on, it’s easy to repaint or update the piece again.
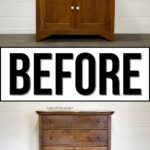
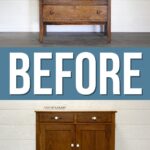
Onto the makeover – when we found this dresser and cabinet combo, we knew that they were similar but also different enough that we could turn them into a perfect mismatched pair, and that’s exactly what we did! We gave them a cohesive look while still keeping their individual charm.

Supplies Used for Painting Old Furniture
As an Amazon Associate, I earn from qualifying purchases. I also may earn from other qualifying purchases with other companies or get free product to review and use. All opinions are my own.
- Electric Screwdriver
- Krud Kutter
- Wood Filler
- 220 Grit Sandpaper
- Kwikwood
- Vacuum
- Tack Cloth
- Wise Owl Furniture Salve in Lemon Verbena
- Painter’s Tape
- Pre Taped Plastic
- Clear Shellac Spray
- Behr Latex Paint in Heavy Cream
- Calcium Carbonate Powder
- Paint Filter
- Vonforn Paint Sprayer
- Weathered Oak Stain
- Varathane Polyurethane
- New Cup Pulls
- New White Knobs
Preparing Old Furniture for Painting
We’re going to be replacing the old hardware with new ones, so we removed them. Getting them off also makes the painting process easier with no hardware to work around. Next, we gave the pieces a thorough clean with Krud Kutter to get rid of any dirt or grime, which could stop the paint from sticking properly.

We filled any scratches and dings with wood filler and the hardware holes with Kwikwood, since we’ll be measuring and drilling new holes that fit the new cup pulls and knobs. Check out my guide on how to repair deep scratches in wood furniture here.
After they dried, we sanded them down with 220 grit sandpaper until they were smooth and even with the rest of the furniture.

We also scuff sanded everything to give the paint a better surface to adhere to. Once we were happy with the prep work, we cleaned off all the dust and residue with a vacuum and tack cloth. This step is important because any leftover particles can cause imperfections in your paint job. Here’s how to prepare furniture for painting for a more detailed guide.
How to Make Furniture Smell Fresh
Old furniture can sometimes smell a bit musty or stale, but you can freshen it up easily with Wise Owl Furniture Salve in Lemon Verbena scent. We rubbed this furniture salve inside the cabinet to not only make it look shiny and clean but also to get rid of any lingering smells. For more helpful tips on making your furniture smell fresh, here’s how to get rid of smoke smell in furniture.

Priming Old Furniture
After we’ve got our furniture all prepped and smelling fresh, we moved on to priming. Primer is important because it creates a smooth and even base for your paint to go on, and it helps with bleedthrough that can happen with certain types of wood.
But before that, we taped off the tops of both furniture pieces with painter’s tape and pre-taped plastic, since we planned to stain them later. This step saves you time and hassle in the long run by preventing any paint overspray on surfaces that shouldn’t be painted.
For priming, we sprayed 2 coats of clear shellac in a spray can, letting it dry between coats. Shellac is one of the best spray paint primer for wood options because it dries quickly, seals in odors and stains, and creates a smooth surface for your paint to adhere to.

Painting Old Furniture with Chalk Paint
We chose to use chalk paint for this project, and we mixed up our own batch using Behr latex paint in Heavy Cream and calcium carbonate powder. To make this homemade chalk paint recipe, just add water to calcium carbonate powder, mix until it becomes like a glaze, and then mix it with latex paint.
Would you like to save this?
Check out Beyond Paint VS Chalk Paint for a comparison if you’re considering the two.

We poured the chalk paint into our Vonforn Paint Sprayer through a paint filter to prevent any clumps or impurities from causing any clogging. This also helps for a smooth and consistent spray.
We then apply 3-4 coats of paint over both the dresser and cabinet, letting each coat dry before spraying the next coat. It can take more coats if you’re painting old furniture with a light color, like white, over dark wood. Here’s painting wood furniture white for another makeover using white paint over wood.
Discover these 3 painting furniture hacks you’ll wish you knew sooner!
Staining Wood Tops
When the white chalk paint dried, we removed the tape and plastic from the tops and started staining them. We used a weathered oak stain to give the wood tops a rustic, aged look that would complement the white paint.

We applied the stain in even strokes, following the grain of the wood. After letting the stain sit for a few minutes, we wiped off any excess with a clean cloth. You can leave the stain darker for a more dramatic effect or wipe it off sooner for a lighter look.
Sealing Chalk Paint and Stain
And finally, we sealed the chalk paint and stain for protection from scratches, spills, and general wear and tear. We sprayed 3 coats of Varathane Polyurethane with our Vonforn Paint Sprayer all over the 2 pieces, including the tops.

Water based poly is a great choice for sealing chalk paint because it is durable and water resistant. Spraying it on gives a smooth and even finish – here’s how to spray polyurethane for more tips and tricks on applying it with a paint sprayer.

After the final coat of polyurethane was dry, we measured and drilled new hardware holes and installed the new cup pull hardware and the new white knobs on the doors of the cabinet. This step really completed the look and gave the furniture a fresh, modern update.

And just like that, our old furniture has been transformed into a beautiful, cohesive mismatched pair! This painting old furniture makeover was a fun and easy project that you can easily recreate at home, and you’ll have pieces that are not only stylish but also uniquely yours.


More Before and After Makeovers
See All >
Click any of these “before” photos below to view the “after” of that makeover.


Painting Old Furniture
Here’s painting old furniture if you want to transform your old furniture into unique and stylish pieces for your home.
Materials
- Krud Kutter
- Wood Filler
- 220 Grit Sandpaper
- Kwikwood
- Tack Cloth
- Wise Owl Furniture Salve in Lemon Verbena
- Painter's Tape
- Pre Taped Plastic
- Clear Shellac Spray
- Behr Latex Paint in Heavy Cream
- Calcium Carbonate Powder
- Paint Filter
- Weathered Oak Stain
- Varathane Polyurethane
- New Cup Pulls
- New White Knobs
Instructions
- To paint old furniture, start by removing any hardware to make way for a smooth painting process. This also allows you to replace the old hardware with new ones for a fresh look.
- Next, give your furniture a thorough clean with Krud Kutter to remove any dirt or grime that may prevent paint from sticking properly.
- Fill in any scratches and dings with wood filler, and the hardware holes with Kwikwood. Sand everything down to create a smooth surface for painting.
- Scuff sand the rest of furniture to help the paint adhere better. Be sure to clean off all dust and residue before painting with vacuum and tack cloth.
- Wipe on some Wise Owl Furniture Salve in your favorite scent to freshen up and clean the inside of drawers and cabinets.
- Prime the old furniture with 2 coats of clear shellac spray to create a smooth base for the paint and prevent bleedthrough.
- Make homemade chalk paint by mixing calcium carbonate powder with latex paint and water. Pour the paint into the sprayer through a filter to make sure it is smooth and consistent.
- Spray 3-4 coats of chalk paint onto the furniture, letting each coat dry before applying the next one. Use more coats if painting a light color over dark wood.
- Stain the wood tops for a rustic look. Apply in even strokes and wipe off excess after a few minutes. You can leave the stain on longer for a darker look or wipe it off sooner for a lighter effect.
- Seal the paint and stain by spraying 3 coats of waterbased polyurethane to protect against scratches and spills.
- After the final coat of poly is dry, drill new holes and replace the hardware for a complete and updated look.
Recommended Products
As an Amazon Associate and member of other affiliate programs, I earn from qualifying purchases.


More Painted Furniture Makeovers
- Painted Bed Frame Ideas
- Old Sideboard Makeover
- Pure White Chalk Paint | Buffet Makeover
- Major Patio Table Makeover
- Painting Wood Furniture
Follow us on YouTube to get more tips for painting furniture. Or share your project with us on our Facebook Group and be part of our community. See you there!

Those look so lovely!
Thank you so much Joanne!