DIY Tall Dresser Makeover


Does your dresser need a little refresh? This DIY tall dresser makeover is the perfect way to give it a new life while keeping things simple, fun, and budget friendly. It could be an old piece you have or a thrift find, but I got you covered with this easy transformation!
And hey, if you’re on the hunt for more inspiration, you’ll definitely want to browse my DIY dresser makeover ideas. There are so many different ways to update your old furniture!

This makeover was so fun for me! When I found this set, there was this tall one, and then there was a long dresser with it. (See the long dresser makeover here!) When I found it listed online for sale, the photo of the back of it had my maiden name on it!

So, of course, I could not pass it up. I had no idea that I had family who had a furniture store. Now, I’m not super closely related to them, but it was so cool to see. I now have to keep these dressers with me, because I think that is just such a fun little story that I never knew.

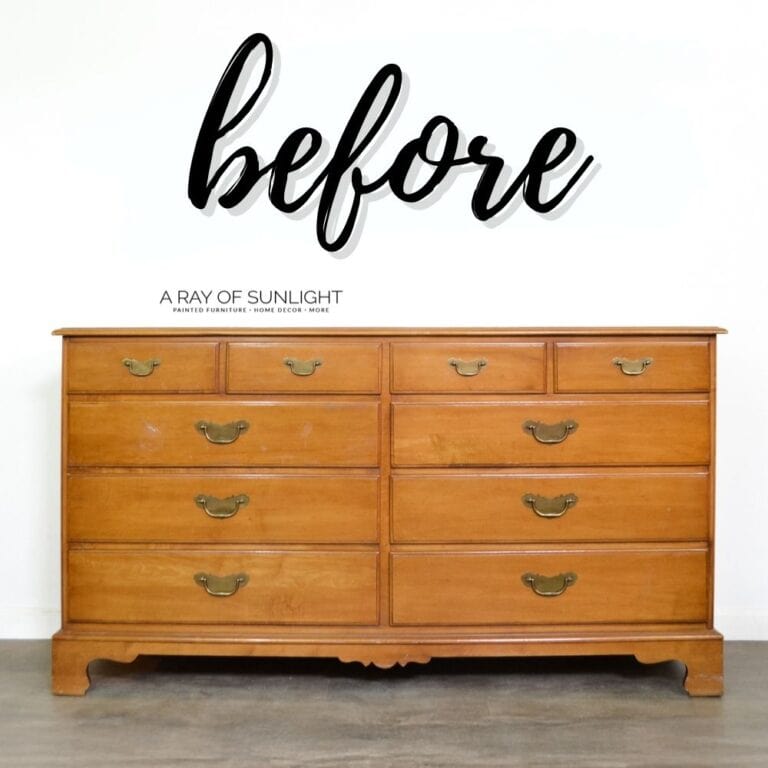
This tall dresser is a cute vintage piece. It actually only has 4 drawers, even though the top looks like 4 small drawers, it is just one big drawer right there. So let’s get into the makeover and see how it turned out!

Supplies Used for DIY Tall Dresser Makeover
As an Amazon Associate, I earn from qualifying purchases. I also may earn from other qualifying purchases with other companies or get free product to review and use. All opinions are my own.
- Screwdriver
- Krud Kutter
- Damp Rag
- Bondo
- 220 Grit Sandpaper
- Clear Shellac
- Paint Filters
- Respirator
- Paint Sprayer
- Behr Latex Paint
- Calcium Carbonate Powder
- Topcoat
- New Hardware
Prep for Makeover
So first, just like I always do, I removed the hardware. You just open up the drawers, and on the backside of the drawer fronts, there are usually a bunch of screws. Unscrew those with a screwdriver (I love using my super handy electric screwdriver, but any screwdriver will do), and the hardware comes right off. I didn’t like this hardware at all, so I just got rid of it.

Then I cleaned the piece with Krud Kutter and a damp rag to remove any grease and grime. With old furniture, you just never know where it’s been, so it needs a good cleaning. It needs all the dirt, dust, grease, and grime removed so that the paint will look good on it.
I also had filled in the hardware holes using Bondo. I filled in the inside hole on the bottom three drawers, making a total of six holes, so I could add larger hardware with wider spacing than the original ones.

That way, I only had to drill one hole for each new piece of hardware. For the top drawer, I filled all of its hardware holes and drilled new ones for 4 knobs. Here are my guides on how to change hardware on a dresser and how to drill new hardware holes to help you with this step.
After that, I lightly scuff sanded the piece. It’s just a really quick sanding, and this helps the paint stick. If you need more information on that, here’s sanding for paint prep. And if you’re curious what happens if you don’t sand before painting, you can learn about it here!
Then, I took the dresser outside and sprayed the entire thing with 2 coats of clear shellac, letting it dry in between coats, and then I let it sit overnight until the next day. I primed with clear shellac to help the paint stick and to prevent bleedthrough stains, especially because we’re using a really light color.
Bleedthrough issues are a bigger problem with lighter paint, and so we really needed to make sure to take care of that beforehand. I have more tips on how to stop stains from coming through paint in this post.
Paint Tall Dresser White
I used Behr latex paint in Heavy Cream, and I just mixed it with calcium carbonate powder and water to make this homemade chalk paint recipe on the cheap, but it still works really well. I spray it in my paint sprayer so that I get a really smooth, flawless finish that looks like it came from a manufacturer.

Would you like to save this?
I used my Fuji Q4, but if you’re interested in spraying, you can totally use the much less expensive VonForn sprayer or the Wagner 3500/595. These are some of the best paint sprayers for beginners on my list that do as good of a job as my expensive Fuji.


White paint, unfortunately, needs a lot of coats. It doesn’t matter what type you use. You’re still gonna need 4 to 5 coats. This is where using a paint sprayer comes in really handy because it goes so much faster.
If you brush or roll it on, it takes anywhere between about 1 hour and 1 and a half hours to apply one coat. But if you spray it on, it takes 5 to 10 minutes to add one coat, and then you walk away and come back about an hour later and do the next coat.

So yeah, it goes so much faster with a sprayer, plus it looks so much better without the brush marks. There are also fewer drips and runs when you spray it on, too. If you do come across this issue, learn how to fix spray paint drips here! See how spray paint vs brush paint furniture compares in detail here.
So after the final coat was dry, I lightly distressed the paint with 220 grit sandpaper on the edges. If this look is something that you want to do on your furniture, here’s how to distress chalk paint so you can give your piece that shabby chic finish.
Seal Chalk Painted Dresser
This time, I actually did something different for the topcoat. So chalk paint needs to be sealed, because otherwise, it’s a really matte finish that gets dirty really easily. It will stain easily when you set something on it, and it will just soak into the really porous finish.
I typically use waterbased polyurethane. I spray it on and it dries very quickly, and it’s just so easy to use. For some reason, I wanted to try out wax, and so that’s what I did on this one. And it worked well! Check out wax for chalk paint for more on how to apply wax.

Is it my favorite? No. Wax takes longer to dry before you can really use the piece, so I would recommend using the Varathane waterbased polyurethane. It doesn’t yellow over time, and I feel like it’s more durable.
And I know for sure that it dries faster, so you can start using your furniture faster. I have a comparison post on wax vs polyurethane if you want to learn more about the differences between these two finishes.

Then, I added the new hardware. Now look at how cute this dresser is! It’s perfect for a little girl’s room. If your piece needs some height first, learn how to add legs to a dresser here.


More Before and After Makeovers
See All >
Click any of these “before” photos below to view the “after” of that makeover.


DIY Tall Dresser Makeover
This DIY tall dresser makeover is the perfect way to give your piece a whole new life while keeping things simple, fun, and budget friendly.
Materials
- Krud Kutter
- Damp Rag
- Bondo
- 220 Grit Sandpaper
- Clear Shellac
- Behr Latex Paint
- Calcium Carbonate Powder
- Paint Filters
- Topcoat
- New Hardware
Instructions
- Start by unscrewing the hardware. If you're not a fan of the existing hardware, feel free to get rid of it, just like I did!
- Use Krud Kutter and a damp rag to remove all the grease, grime, and dirt from the dresser. With old furniture, you just never know where it’s been, so cleaning thoroughly is a must before painting.
- Fill in the old hardware holes using Bondo, then drill new holes for the updated hardware.
- Give the entire dresser a quick scuff sand. This step helps the paint stick better. Don't forget to clean up after.
- Spray two coats of clear shellac over the dresser, letting it dry between coats and overnight. This step is super important for adhesion, and also especially with light colored paint, to prevent any bleedthrough stains.
- Mix Behr latex paint in the color Heavy Cream with calcium carbonate powder to make homemade chalk paint. Use a paint sprayer to apply the paint for a smooth, even finish. White paint usually needs around 4-5 coats for full coverage.
- If you’re going for a shabby chic look, lightly distress the edges of the dresser with 220 grit sandpaper after the final coat of paint is dry.
- Seal your chalk paint with waterbased polyurethane or wax to protect the finish. And once everything is dry, attach your fresh hardware.
Recommended Products
As an Amazon Associate and member of other affiliate programs, I earn from qualifying purchases.


More Painted Furniture Makeovers
- DIY Sideboard Buffet
- Painting Furniture With Wall Paint
- Quick Painted and Stained Dresser Makeover
- Transforming a Thrift Store Dresser
- Simple DIY Dresser Makeover
Learn the Art of Updating Furniture!
If painting furniture feels overwhelming or your past attempts didn’t go as planned, this course will guide you step by step.

Follow us on YouTube to get more tips for painting furniture. Or share your project with us on our Facebook Group and be part of our community. See you there!