DIY TV Stand


In our basement, we have an 85” TV that is too big for our current stand. With a big TV, it isn’t gonna work anymore. And I’ve got one of the best furniture makeover ideas to create a budget friendly DIY TV stand that will fit under it!
We’re gonna take a few cube storage shelves, put them together, and add some extra details to make them look like a high end piece for a fraction of the cost. Keep reading to see how we did it!

We painted our old stand a few months ago, but now that we’ve got a new TV, it doesn’t fit anymore. Instead of buying a brand new one, we decided to get creative and make our own!

Upstairs, we have 2 modular consoles that make a really nice stand. I LOVE these cabinets, but I don’t want to spend $900 for 3 more of these for our basement setup. So, I figured out a way to make something similar for about $450!
So, follow along as we show you how to make your own DIY TV stand that is not only budget friendly but also functional and stylish! And it’ll be so cool to be able to say, “I made this!” Let’s get started!

Supplies Used for DIY TV Stand
As an Amazon Associate, I earn from qualifying purchases. I also may earn from other qualifying purchases with other companies or get free product to review and use. All opinions are my own.
- 6 Cube Storage Shelf from Target
- (2) 4 Cube Storage Shelves from Target
- 2x4x8 Ft Boards
- Baseboard
- Table Saw
- Miter Saw
- 220 Grit Sandpaper (Use code RAY10 to get 10% off your order)
- SurfPrep Sander (Use code RAY10 to get 10% off your order)
- KREG Jig
- Drill
- Square
- Clamps
- 2″ KREG Screws
- Air Compressor
- Pneumatic Nail Gun
- Zibra Round Paintbrush
- Mohair Roller
- Behr Dynasty Paint
- General Finishes in Seagull Gray
- Tack Cloth
- Painter’s Tape
- Behr Waterbased Wood Stain in Special Walnut
- Wood Filler
- Fusion Mineral Paint in Bayberry
- Clear Paintable Caulking
- Foam Sponge
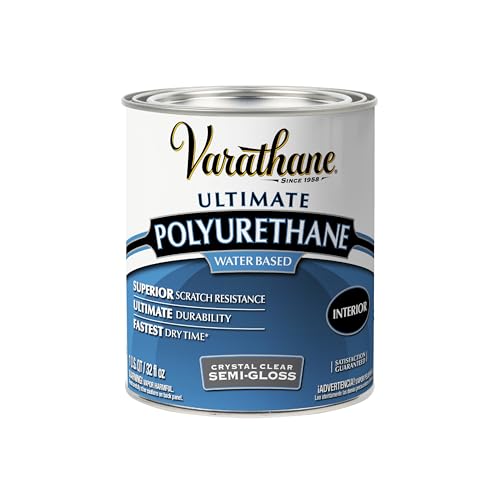
- Waterbased Polyurethane in Semi Gloss
- Mini Zibra Paintbrush
- Woven Baskets
Assemble Shelves as TV Stand
For this project, we used a 6-cube and two 4-cube storage shelves from Target as the body of the stand. I love the amount of storage these provide, especially since the basement is the playroom for the kids! I’m going to put baskets on these to help organize all of the kid’s toys and hide the consoles!

Assembling them wasn’t hard at all. It took maybe an hour for both of us, and we got to enjoy a friendly little race to see who would beat! Haha. Of course, I won! We didn’t really follow the instructions and didn’t want the outside cubes to have 4 cube slots, so we only attached the pieces that would make them have 1 shelf.
And then, for the moment of truth, we moved the three newly built shelves together in front of the existing TV setup, with the longer 6 cube in the middle and the two smaller ones flanking the sides to catch a vision of what it was going to look like…

And we realized that we rushed the assembly process too quickly while racing each other and ended up putting the shelf the wrong way (going vertical) in the 4 cube shelves, so we had to partially take them back apart and fix our mistake to get them in properly (horizontally). Whoopsie!
Set Shelves on Wood Boards
With the TV and the green dresser out of the way, we set the cubes on top of some 2X4 pieces we planned to make a base with. We wanted to mock things up a bit before moving forward to make sure we liked the look. We also placed some baseboard around the 2×4 base to get a feel for the new look… and we liked it!

Not to mention, we used our kid’s little building blocks to set under the trim, which gave us a good idea of how much we needed to rip the 2×4 boards for the base and the baseboard to line up correctly. Haha it was actually the perfect size!
Cut DIY TV Stand Base
And then, it was time to start the build. We used the table saw to rip the 2x4s down about an inch and an eighth. We wanted the baseboard to cover the 2x4s and most of the bottom of the shelves when all was said and done.

Then, we used our miter saw to cut those same 2x4s into the right lengths for the base. We made 4 boxes that were the same size as the shelves.
Cut Wood Top
Before we put the base together and while the saws were still out, we worked on the new top. We wanted to give this TV stand a little bit of a rustic look with this old wood that a friend in Minnesota ripped off their basement walls.
So we ripped them down to the right width on the table saw. But after cutting this old wood down and trying to lay it out on the top of the dresser, we realized it was wayyyy too warped and was going to be a pain to deal with, so we scratched that idea and went with plan B.

Plan B was to use these pine wood boards from the local hardware store. We ripped them down to about 7” for the front and 8” for the back boards. That’s just how it worked out, so we didn’t have to buy more expensive wider boards for the whole top.
I don’t mind the back boards being a little wider than the front. We wanted to have about a 3/4” overhang on the front and the sides and have them flush with the back of the shelves.
Cut Boards with Overhang
After ripping the pine boards, we laid them on top to see where and in which direction we wanted the boards to be. And then, we measured how much we needed to to keep a 3/4” overhang on both sides. I didn’t want the seams the line up, so similar to creating a wood floor pattern, I cut the back boards into 3 pieces and the front into only 2 pieces.
We made one cut at a time, putting the boards back on the top each time and measuring for the next cut to make sure we got everything lined up just right. It kind of felt like putting a puzzle piece together.
When we got everything to the right length, and our puzzle was complete, I gave them a good sanding with 220 grit sandpaper and my SurfPrep Sander to smooth out any rough areas and slightly round the edges. Then, we set the top boards aside and moved on to putting the base together.

Drill Holes and Attach Bases
We drilled pocket holes into the 2x4s with our KREG Jig. These holes will make it possible to attach the base to the bottom of the shelves without any nails or screws showing. We also pre drilled holes on the end of the longer pieces that go on the back and front. Then we put the bases together using a square to keep things well… square, and used screws to attach them together in the corners.

We flipped the first section of the TV stand upside down and placed our newly built base onto it. Then we used clamps to hold it where we wanted it to be and drilled the 2″ Kreg screws into the pocket holes to attach it to the bottom of the cube shelves.

We repeated this process to attach the remaining two bases to the other cube shelves. We flipped them back over onto the base to make sure they worked, and then Taylor moved them back downstairs for the next step of putting everything together.
Connect the Bases
We laid the three pieces on their backs and lined up the bases as much as possible. We even used a few clamps to try and keep the seam between the two shelves as tight as we could while we connected them together.

We used 2.5″ screws to attach them to each other and turn these 3 separate pieces into one giant TV stand! We also put a couple of screws into the MDF to try and attach the pieces together, but there really isn’t much material there for the screws to grab, so it’s a good thing we attached them really well into the 2×4 bases!
And then we lifted everything back upright very carefully since it was only connected well from the base. We removed the clamps at the bottom and moved them closer to the top to try and pull the pieces together as tightly as we could.
Attach Wood Top
Then we laid the wood boards how we wanted them on the top. We moved the pieces around a few times until we got them right where we wanted them and used a scrap ¾ inch piece to get the edges flush with an overhang of ¾ inches on the front and the sides.
There was a gap in some areas where the boards rested on the top, so I used some popsicle sticks as shims to try and fill in the gaps before we nailed the boards on. Let’s be honest, that didn’t work, but oh well.
Then, I used my air compressor and pneumatic nail gun to attach the boards to the top.

Cut New Bottom Trim
Our DIY project was really starting to take shape, and we were starting to get excited about it, but we still had quite a few finishing touches to work on. So, we got back to work by cutting this baseboard that we wanted to use as a nice trim around the bottom to cover up the ugly 2×4 base.
Mitering trim at the right angles is always a little tricky at first, and it took us a minute to make sure we had the saw blade at the right 45 degree angle and going in the right direction. But eventually, we got it all figured out and made the first cut.

We ran back downstairs to check our cut, measure for the next one, and then ran back to the garage to cut the other end at the right length and the right angle. We did this process several times until we had all the baseboards made to the angles and the length that we needed.
Paint Trim White
The nice thing about this baseboard is that it came already primed from the store, so at least we didn’t have to prime it. But we did need to paint it and I wanted it to match the same white color as the rest of the piece.
Would you like to save this?
So I took one of the white cubes to Home Depot and asked them to color match it in this Behr Dynasty paint. I used one of my favorite brushes, this Zibra Round paintbrush to get the coating onto the baseboards and then used a mohair roller to roll out the brush marks. Here are more tips on how to paint furniture without brush marks.

But when it was dry, and I was excited to attach them, I put a board up next to the shelves and was sorely disappointed. The color matched paint was a much too bright white, compared to the rest of the piece that looked like it was slightly gray.
So, I did what first came to mind and mixed up a little bit of this General Finishes Seagull Gray with it. And thankfully, when the stir stick was dry, the new color was much better! So, I applied it on and let it dry.

While I was painting the baseboard, Taylor quickly sanded a few spots on the top where the wood planks were a little uneven. Then he wiped off all the sanding dust with a tack cloth and got the top ready for me to stain it.
Stain DIY TV Stand Top
I taped off the edges of the piece under the top to prevent the stain from getting onto the white part and brushed this Behr Waterbased Wood Stain in Special Walnut onto the top.

I love being able to use waterbased stain inside! It dries so fast, and it doesn’t stink like oil based ones! Win win here!! For a more detailed guide, here’s how to stain wood furniture. But as it dried, I started to worry that the color wasn’t exactly right for this room… yet. I’ll get back to that in the next coat.
Attach Trim to Base
By now, the white coating was dry on the trim, so we went ahead and attached it around the base with the nail gun. Annnd let’s just say this was an aggravating process! It was such a pain getting the baseboard to be level while also trying to line them up well with each piece.

But after some frustration, we worked through it and just did the best we could… and I think it actually looks pretty good!
Fill Nail Holes and Paint Trim Gray
So, I quickly filled the nail holes in on the baseboard with some wood filler, and taped off the edges above it to prevent the next few steps from getting on the stand. I sanded the excess filler down with 220 grit sandpaper, and while I was at it, I also lightly sanded on the rest of the baseboards to smooth out the finish.

I wiped off the dust with a tack cloth and then brushed and rolled the gray all over, except the very top lip of the baseboard, which I never patched or sanded. I didn’t want to accidentally get this paint on the stand.
Some (including my husband) might say I was a little bit excessive in repainting them for just that slight color difference, but to me, it was totally worth the hassle! It looks soooo much better to me now!!
Restain Wood Top
Alright, so remember how I didn’t care for the color of the wood stain on the top? Well… it couldn’t have been easy, of course, and when I came back to look at the top, it was still just not the right color for me.
There was too much of an orange/red hue to it that did not go well with the baskets I planned to use with this piece. So I mixed in a little bit of green Fusion Mineral Paint called Bayberry into the stain. Actually, it ended up being about a 25/75 mix of a little green coating to stain.

I wiped the new mixture onto one wood plank first to make sure I liked it… and I loved it!!! It was sooo much better!! The green knocked out the red tone from the wood and made the stain much darker. It was EXACTLY what I was looking for in this room! Check out our blog post about restaining furniture for more helpful tips.
Hiding the Gap Between the Top and the Stand
With the stain all figured out for the top, we could move on to our next issue… that nice big gap between the top and the bottom part of the piece. But luckily, we had a pretty easy fix for this.
We found this small piece of trim that fits right under the overhang of the wood top and was the perfect shape to hide the gap and give the top a very nice finishing touch!

So, Taylor measured the length of the sides and the front and went out to the garage to make the cuts. (And to practice getting the miter angle right for the corners).
Taylor decided he needed a little help making sure he cut the trim at the right angle… and since we didn’t have much excess wood to spare on this piece, I figured I should come supervise him a little. Haha! But we ended up doing it at 45 degree mitered angles.
Stain and Attach Trim Under the Top
We wiped some stain onto the trim pieces using the same green stain mixture that we had used on the top. When it was dry, we got out our handy dandy nail gun and attached the small trim pieces under the top.

We did have to run back up and make one more small cut for one of the pieces that was still a little too long, but in the end, we got them all attached, and it looked great!
Fill Gap Between Base and Bottom Trim
Now, it was time to fix the other gap. See this down here between the baseboard and the stand? I used this clear paintable caulking and filled in the gap as much as I could. When the caulking was dry enough, I removed the painter’s tape and let it dry all the way.

Topcoat DIY TV Stand
We’re almost there, but I had to protect the stain and paint from getting damaged! Using a foam sponge, I wiped on 3 coats of waterbased polyurethane in a semi gloss sheen over the wood top and over the gray baseboard.
I also used this mini Zibra brush to apply the poly on the tiny trim under the top. This little brush is so handy to get the poly in tight spaces like this without getting it on the shelves.


Okay, so we are finally almost done with this massive project, I promise!!! We just have one more finishing touch to add with these little white stickers. There were a bunch of screw holes in the laminate shelves that we wanted to cover up. So we just stuck these little stickers over all the holes, and now we can finally consider this project done!!!

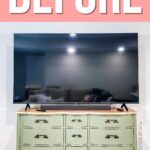
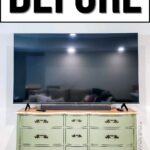
Alright, remember, here’s what it looked like before. This big TV sitting on a much too small dresser. And then just the cubes alone were boring and cheap looking.

Watch the full makeover of this project on our YouTube video below!
And here’s what it looks like now!! Ahhhh doesn’t it look so good??? Wow, that was a big project!!! But I am so happy with how well it turned out in the end, and I LOVVVVVEEE that it didn’t cost an arm and a leg, either! For more TV stand or cabinet ideas, here’s our list of TV cabinet makeover ideas.


More Before and After Makeovers
See All >
Click any of these “before” photos below to view the “after” of that makeover.


DIY TV Stand
We show you how to make your own DIY TV stand that's not only budget friendly but also functional and stylish!
Materials
- 6 Cube Storage Shelf from Target
- 2 4 Cube Storage Shelves from Target
- 2x4x8 Ft Boards
- Baseboard
- 220 Grit Sandpaper
- 2" Kreg Screws
- Behr Dynasty Paint
- General Finishes in Seagull Gray
- Tack Cloth
- Painter's Tape
- Behr Waterbased Wood Stain in Special Walnut
- Wood Filler
- Fusion Mineral Paint in Bayberry
- Clear Paintable Caulking
- Waterbased Polyurethane in Semi Gloss
Tools
Instructions
- Assemble cube storage shelves to create the body of your DIY TV stand. Then, set cube shelves on top of 2x4 boards to create a sturdy base.
- Rip the 2x4 boards about an inch and an eighth with a table saw. Cut them into 4 boxes the same size as the shelves using a miter saw.
- Cut pine wood boards for the top, ripping them down to about 7" for the front and 8" for the back. Make sure the boards have a 3/4 inch overhang on the front and sides.
- Sand wood boards with 220 grit sandpaper and SurfPrep Sander to smooth out any rough areas and slightly round the edges.
- Drill pocket holes into 2x4s with a Kreg Jig for attaching the base without any visible screws. Pre drill holes on the ends of longer pieces that go on the back and front.
- Attach the base together with screws, using a square to make sure everything is aligned. Flip the first section of the TV stand upside down and clamp the newly built base onto it before drilling in 2" Kreg screws to attach the base to the bottom of the cube shelves. Repeat this process for the remaining two bases to the other cube shelves.
- Lay the three pieces on their backs and line up the bases as much as possible. Use clamps to keep the seam between the two shelves tight while attaching the bases together with 2.5" screws.
- Carefully lift everything back upright, removing the bottom clamps and moving them closer to the top for a tighter fit.
- Lay the wood boards on top of the stand, adjusting them until they are in the desired position with a 3/4 inch overhang on all sides. Attach them using an air compressor and pneumatic nail gun.
- To cover up the 2x4 base, cut and miter baseboards to fit around the bottom as a nice trim.
- Paint trim with the same color as the cube shelves or body of the TV stand and let it dry.
- Sand any uneven spots on the wood top with sandpaper and wipe off dust with a tack cloth. Then, tape off the edges of the piece under the top and apply wood stain on it using a brush.
- Attach the painted trim to the base using a nail gun, making sure it is level and lined up well with each piece.
- If there's any gap between the top and body of the TV stand, cut a small piece of trim that fits right under the overhang of the wood top. Stain this trim and attach it under the top using a nail gun.
- For any gaps between the bottom trim and the body, fill them in with clear paintable caulking and let it dry.
- Protect the wood and paint with 3 coats of waterbased polyurethane, using a foam sponge for larger areas and a mini Zibra paint brush for tight spaces.
- Use small white stickers to cover up any screw holes.
- Finally, set your TV on top of your newly built DIY TV stand and enjoy!
Recommended Products
As an Amazon Associate and member of other affiliate programs, I earn from qualifying purchases.


More Painted Furniture Makeovers
- Modern Dresser TV Stand Makeover
- How to Turn a Dresser Into a TV Stand
- TV Cabinet Makeover
- How To Turn a Dresser Into Shelves
- DIY Grey Farmhouse Dresser Makeover
Follow us on YouTube to get more tips for painting furniture. Or share your project with us on our Facebook Group and be part of our community. See you there!