Antique Dresser Makeover
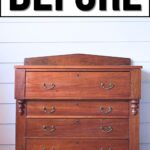


Antique dressers have such character and charm, but sometimes they can use a little sprucing up. That’s where this antique dresser makeover comes in! Not only will these updated dressers add visual interest to your space, but it’s also environmentally friendly since you’re giving an old piece of furniture a new life.
If you’re looking for DIY dresser makeover ideas for your antique dresser, then keep reading! We’ll show you how to transform your old dresser into a beautiful and unique piece of furniture that you’ll be proud to display in your home.

Antique dressers are not just functional furniture; they are beautiful pieces that often feature intricate details and craftsmanship that you just don’t see in new pieces. Plus, they add a touch of nostalgia and character to any space.

However, over time, these beautiful dressers can start to show their age. Scratches, chips, and fading paint can make them look tired and worn out. Instead of replacing them with something new, why not give your dresser a fresh makeover?
This dresser makeover will feature an antique dresser refreshed with furniture polish and clean hardware. The end result will be a modern yet vintage piece that will fit seamlessly into any home decor style.

Supplies Used for Antique Dresser Makeover
As an Amazon Associate, I earn from qualifying purchases. I also may earn from other qualifying purchases with other companies or get free product to review and use. All opinions are my own.
- Krud Kutter
- SurfPrep Sander (Use code RAY10 to get 10% off your order)
- 220 Grit Sanding Screens (Use code RAY10 to get 10% off your order)
- Medium Grit Foam Sanding Pad (Use code RAY10 to get 10% off your order)
- Minwax Polyurethane
- Pliers
- Vacuum
- Tack Cloth
- Furniture Salve
- Old English
- Wax
- Rub n Buff
- Bar Keeper’s Friend
Cleaning Antique Dresser
First things first, before we can give this antique dresser a makeover, we need to clean it up. It’s common for these old dressers to have accumulated years of dirt and grime. We did remove the top backsplash piece first, but if your dresser doesn’t have one, you can skip this step.
We removed the hardware from the drawers as well to make it easier to clean and work on the dresser. The hardware was a little tricky to remove at first so we used pliers to loosen the nuts on the back of the hardware and pulled them out. Then we wiped the antique dresser off with Krud Kutter.


We made sure to vacuum and wipe down the inside of the drawers and the inside of the dresser as well. You want your newly updated dresser to not only look beautiful on the outside but also be clean on the inside. For a more detailed guide here’s how to clean furniture before painting.
Sanding Top of Dresser
After cleaning the dresser, we moved on to sanding the top backsplash of the dresser with our SurfPrep Sander, 220 grit sanding screens, and medium grit foam sanding pad to give it a smooth finish. For more on the importance of sanding here’s sanding before painting furniture.

The sanded backsplash piece was our sample to see what the rest of the dresser would look like if we sanded it down and refinished it. We also sprayed a coat of Minwax Polyurethane onto the backsplash to test out the final look. After testing out the backsplash piece, we decided to keep this one a little more simple with a refresh using some Old English.
Polishing Antique Dresser
To refresh the antique dresser, we used a combination of furniture salve, Old English, and wax. We brushed furniture salve inside the drawers to nourish the wood and give it a beautiful shine. Then we applied a coat of Old English to the exterior of the dresser and drawers with a rag, bringing out the natural color and highlighting any intricate details.

For the drawers to glide smoothly, we waxed the drawer tracks and bottoms before putting them back into the dresser. This helps prevent any sticking or jamming in the future. Here’s how to fix broken dresser drawer tracks if yours needs to be repaired.
When we moved the polished dresser back inside, we noticed the second to bottom drawer was lighter than the others. So what we did was wipe another coat of Old English on it to even out the color and blend it in with the rest of the dresser. Now all of the drawers look consistent and beautiful! You can check out this painted sewing machine where we also used Old English.
Would you like to save this?
Updating Antique Dresser Hardware
The update didn’t end there! We also wanted to give the hardware on this antique dresser a fresh new look. One of the hardware pieces was broken, so we had to measure the hardware size and search for a new handle that matched the style of the existing ones.
For the existing hardware we had, we freshened them up with some Rub N Buff, but we weren’t completely satisfied with the outcome. So we decided to boil the hardware and scrub them with Bar Keeper’s Friend, which ended up giving them a cleaner and more polished look. You can learn more on how to clean old furniture hardware here if you plan to use the same old hardware on your dresser.

When the new hardware handle arrived, we compared it to our freshly cleaned up old hardware and decided that we liked the look of the cleaned up old ones better than the Rub N Buffed ones. So we installed the cleaned up hardware back onto the dresser and just used the new handle to replace the broken one.

Our antique dresser makeover is complete, and we couldn’t be happier with the results. The dresser has just been refreshed, polished, and updated with newly cleaned hardware. This just goes to show that you don’t always need to buy something new to update your space! You can also try these antique dresser refinishing ideas!
Watch the full makeover of this antique dresser on our YouTube video below, or scroll down the see the final result!


More Before and After Makeovers
See All >
Click any of these “before” photos below to view the “after” of that makeover.


What not to do to antique furniture?
If you’re thinking about giving your antique dresser a makeover like this, there are a few things you should avoid doing. First up, never use harsh chemicals or abrasive cleaners on antique furniture as they can damage the wood and delicate finishes.
Be careful when sanding as well because sanding too aggressively can also cause damage. You can learn all about the best sandpaper for refinishing furniture here to help you choose the right one for your project. These sanding furniture tips should also come in handy!
We hope this guide has inspired you to give your own old furniture a fresh new look! You don’t even need expensive tools or materials to do so – just some simple cleaning and polishing techniques can make a huge difference.


Antique Dresser Makeover
Give your antique dresser a fresh new look with this simple makeover! In this guide, you'll learn how to upgrade your old dresser while preserving its vintage charm.
Materials
Instructions
- Remove any backsplash pieces and hardware from the dresser before cleaning to make the process easier.
- Clean the antique dresser thoroughly with Krud Kutter to remove years of dirt and grime, making sure to vacuum and wipe down the inside as well.
- Sand the top backsplash piece with Surfprep Sander, 220 grit sanding screens, and a medium grit foam sanding pad for a smooth finish. Spray a coat of Minwax Polyurethane on the sanded piece to test out the final look.
- Polish the antique dresser with a combination of furniture salve and Old English. Brush furniture salve on the inside of the drawers and apply Old English to the exterior and the rest of the dresser with a rag.
- To make sure the drawers glide smoothly, wax the drawer tracks and bottoms before putting them back into the dresser. This also helps prevent any sticking or jamming in the future.
- If one of the drawers appears lighter than the others, wipe another coat of Old English on it to even out the color and blend it in with the rest of the dresser.
- To update the hardware, you can rub them with Rub n Buff. You can also boil and scrub with Bar Keeper's Friend for a cleaner and more polished look.
- Attach the freshly cleaned hardware back onto the antique dresser or replace with new ones if desired, and your antique dresser makeover is complete!
Recommended Products
As an Amazon Associate and member of other affiliate programs, I earn from qualifying purchases.


More Painted Furniture Makeovers
- Painting a Dresser Gray
- Old Sideboard Makeover
- Painted Antique Oak Dresser
- Chalk Painting A Dresser
- Waterfall Cedar Chest Makeover
Follow us on YouTube to get more tips for painting furniture. Or share your project with us on our Facebook Group and be part of our community. See you there!

So nicee to see someone treating an antique, like an antique. Paint is great for pieces with destroyed veneer. I come from a long line of antiquers and can remember my mom restoring a rosewood desk with some concoction and the finest steel wool…so carefully used with the grain to get the years of gunk and polish off the piece. Great project and directions. Sandi
Thanks! Glad you like the project as well as the directions!
That is beautiful!
Thank you so much Joanne!