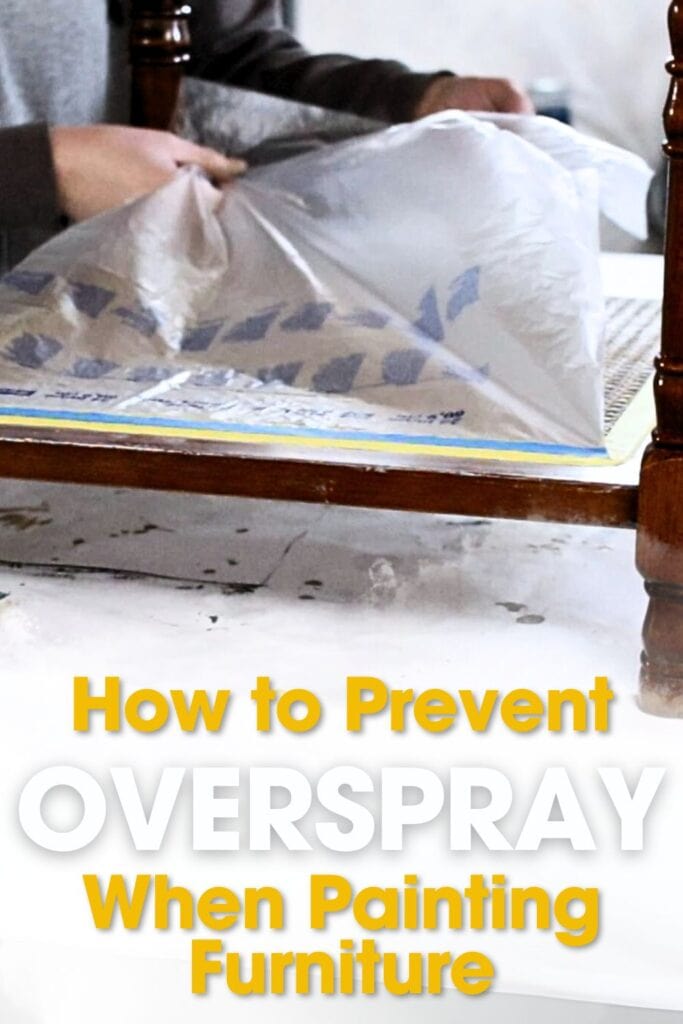
How to Prevent Overspray When Painting Furniture
Using a paint sprayer can be messy if you don’t protect the surroundings, and furniture from overspray. So here’s how to prevent overspray when painting furniture with the right furniture painting tools and supplies.
This step-by-step tutorial uses the Wagner Double Duty paint sprayer. But no matter what type of paint sprayer you have, these tips will help you avoid overspray and keep your furniture looking flawless.
We’ve received so many questions about our Wagner paint sprayer that we decided we needed to dedicate a series of posts on how to use a paint sprayer to refinish furniture. Learn all about how to use a Wagner Double Duty paint sprayer here!
I could never go back to brushing our paint on all of the pieces we refinish. Not only does spraying make painting easier and faster, but it also creates that smooth even finish you see in stores.
Today we’re giving you all the super secret details of how to protect all of your surfaces, both inside and outside as well as the area where you’re spraying.
This is such an important step to making sure each piece looks clean and crisp, inside and out; as well as making sure your work area stays unpainted. Learn more about spray paint tools you need when painting furniture here.
Supplies Used to Prevent Overspray When Painting Furniture
As an Amazon Associate, I earn from qualifying purchases. I also may earn from other qualifying purchases with other companies or get free product to review and use. All opinions are my own.
How to Protect the Floor
No matter what piece you’re working on, it’s always best to have some sort of barrier on the ground. If you’re spray painting indoors, we’ve laid out the essential steps here that you should follow.
Not only do we usually want to protect the ground from overspray, if you’re spraying outside, you really NEED to protect the finish from getting dirt and debris all over in it.
This is especially important since the paint sprayer can easily blow up dirt that will stick to the fresh wet paint.
We typically use plastic or cheap shower curtains from the dollar tree for just this. You really can’t beat that price especially when they need to be thrown away after a few uses.
Then we place a few scrap pieces of wood around the border to keep the shower curtain from flying away in the wind. Super simple and easy!
UPDATE: Cardboard boxes or this thin cardboard roll is really great to lay on the ground when spraying!
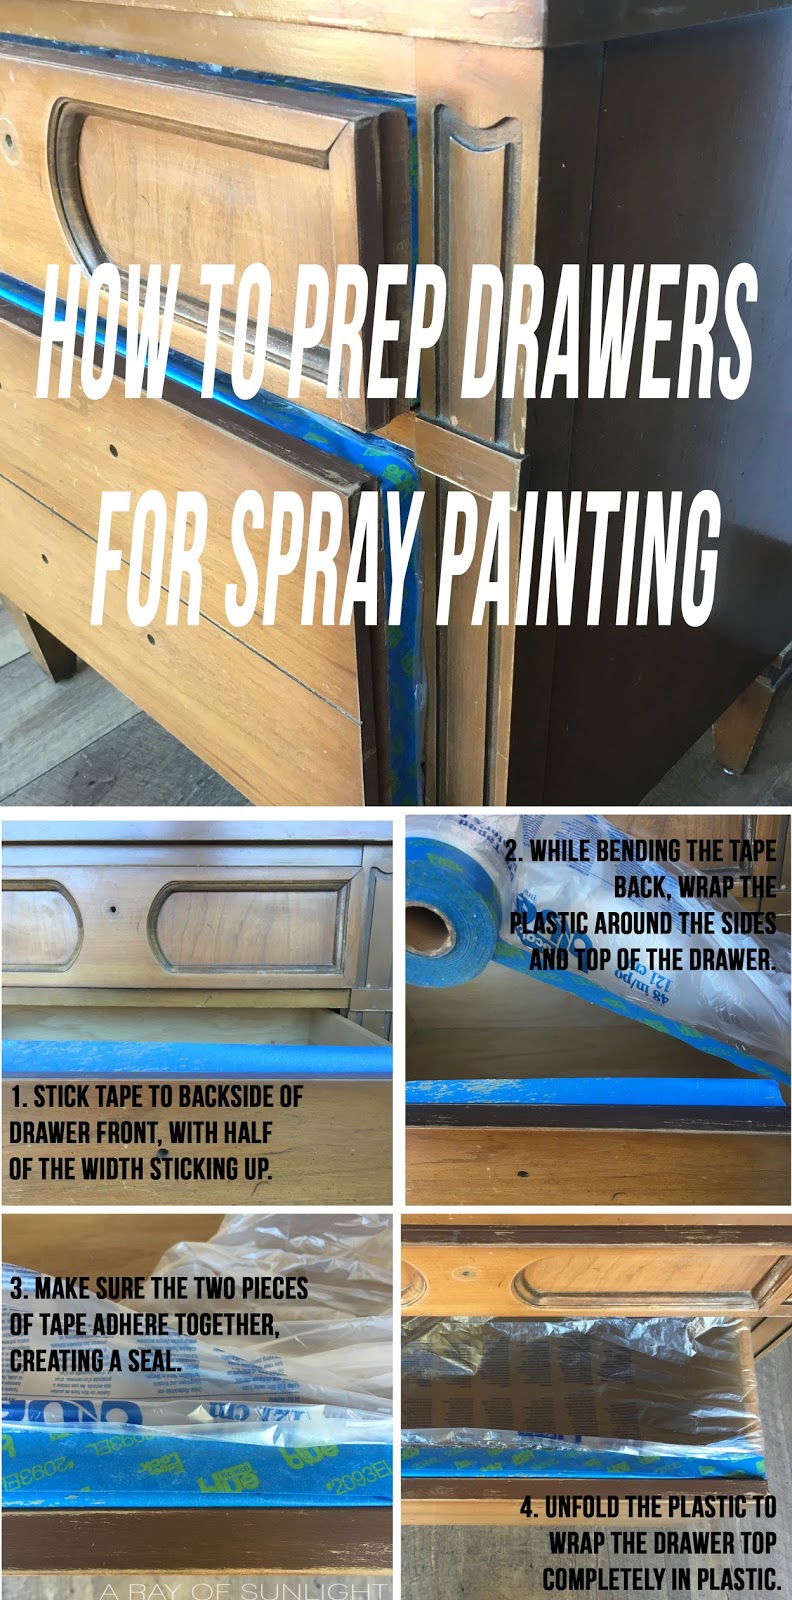
How to Protect Drawers When Spraying
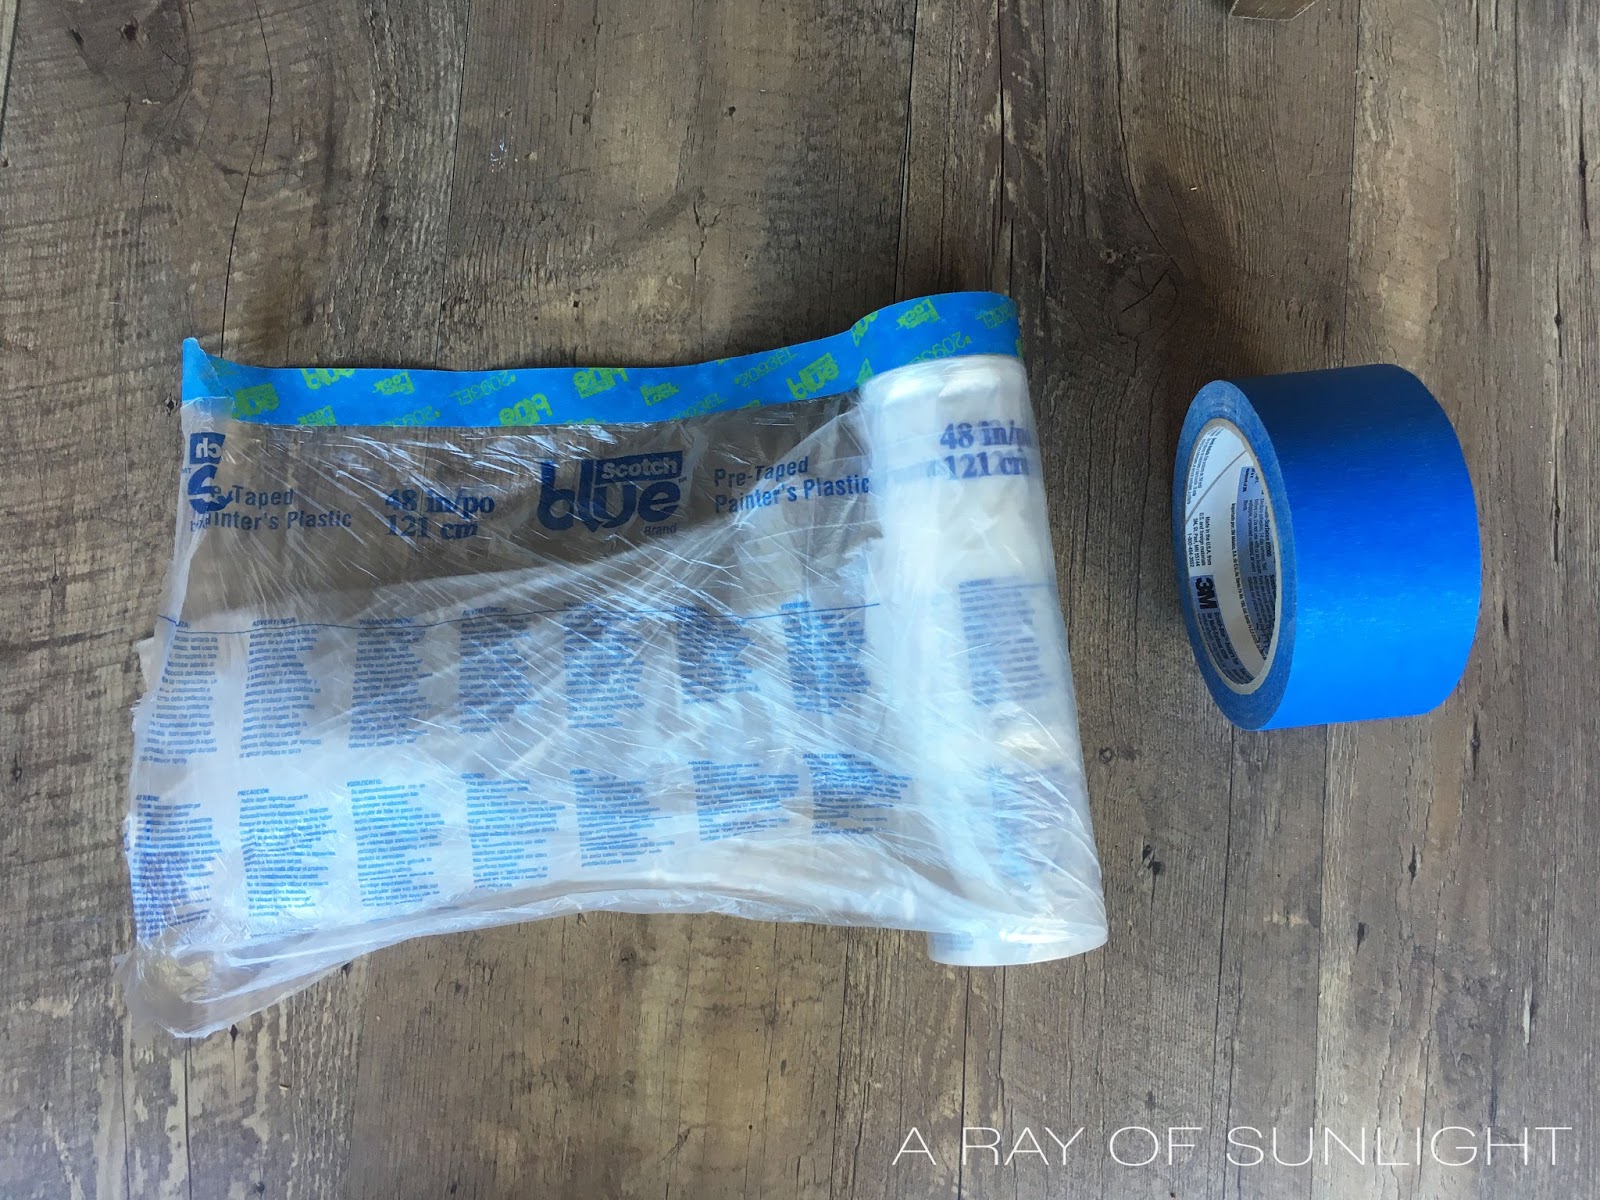
After a bit of trial and error we found the best way to protect the inside from over spray. All it takes is a bit of painters tape and either pre-taped plastic (brown paper or newspaper works okay too.)
 |
First, make sure all hardware is removed, including the door hinges.
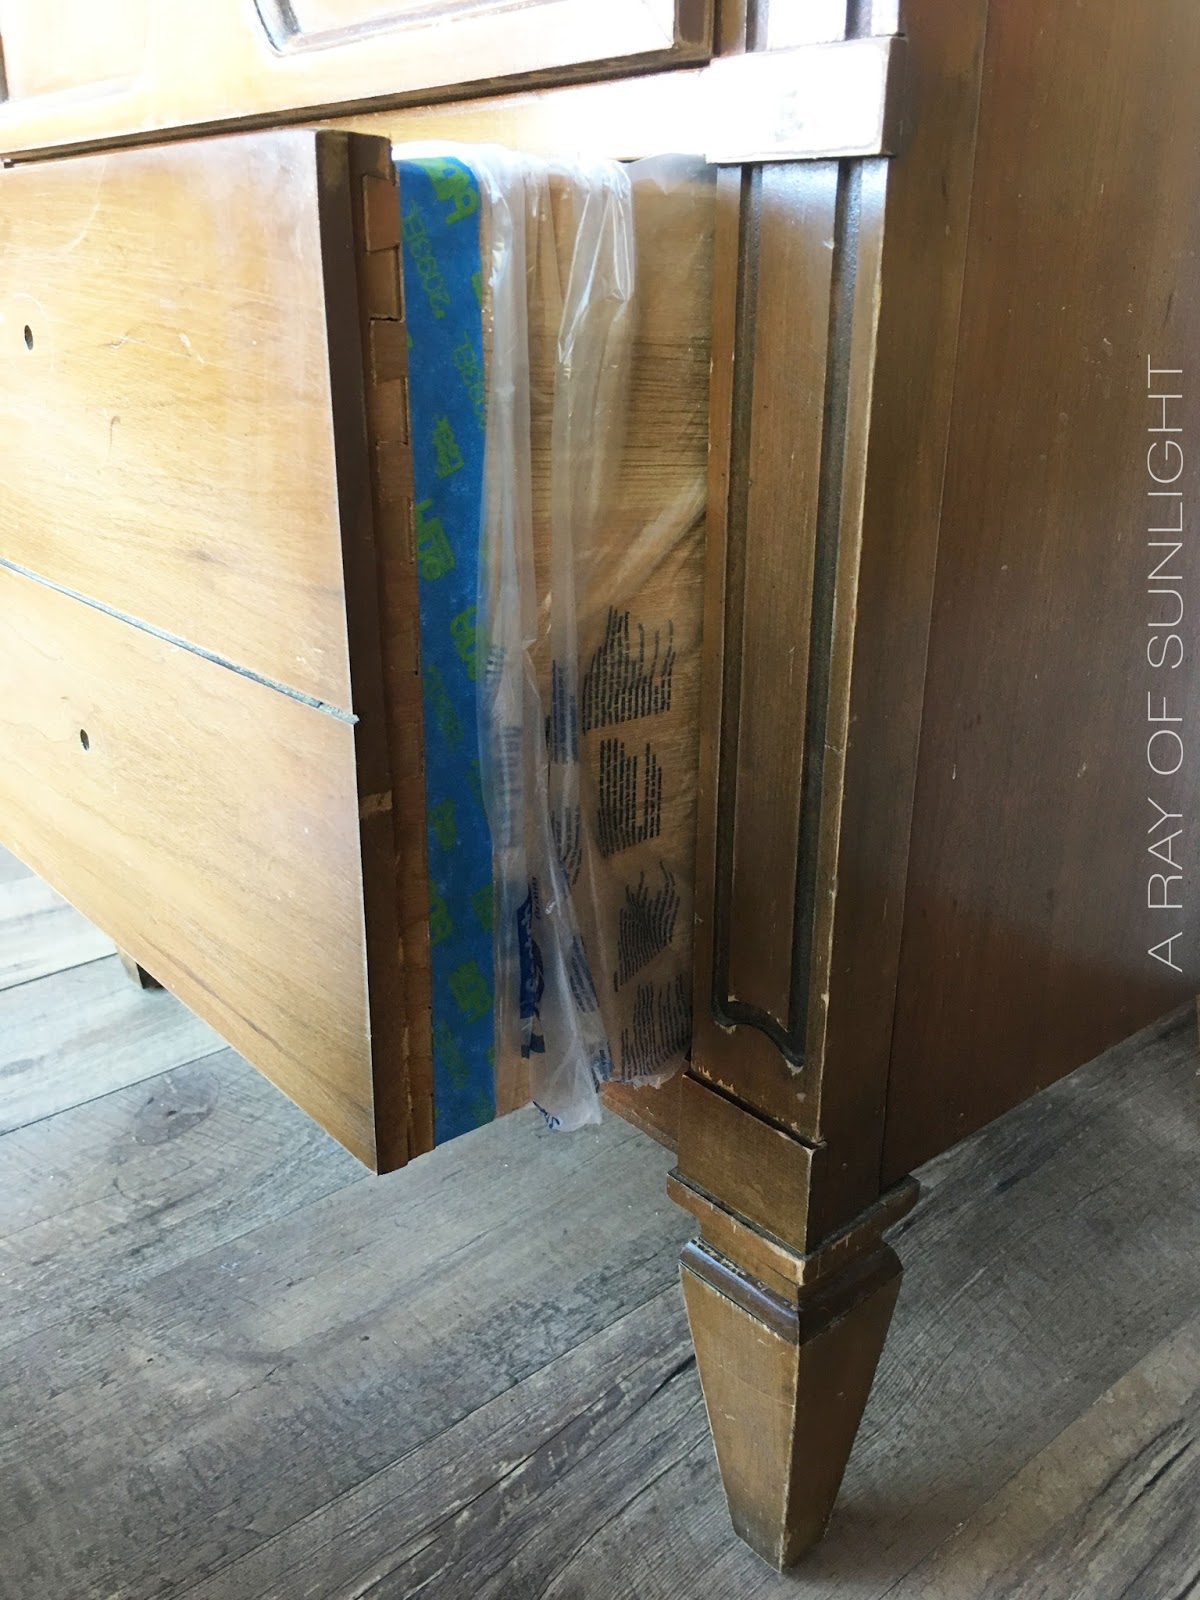
1) Grab a piece of painters tape that is the same width of the drawer and stick it onto the backside of the drawer front. It needs to go from one side of the drawer to the other and stick up above the drawer at least a half inch.
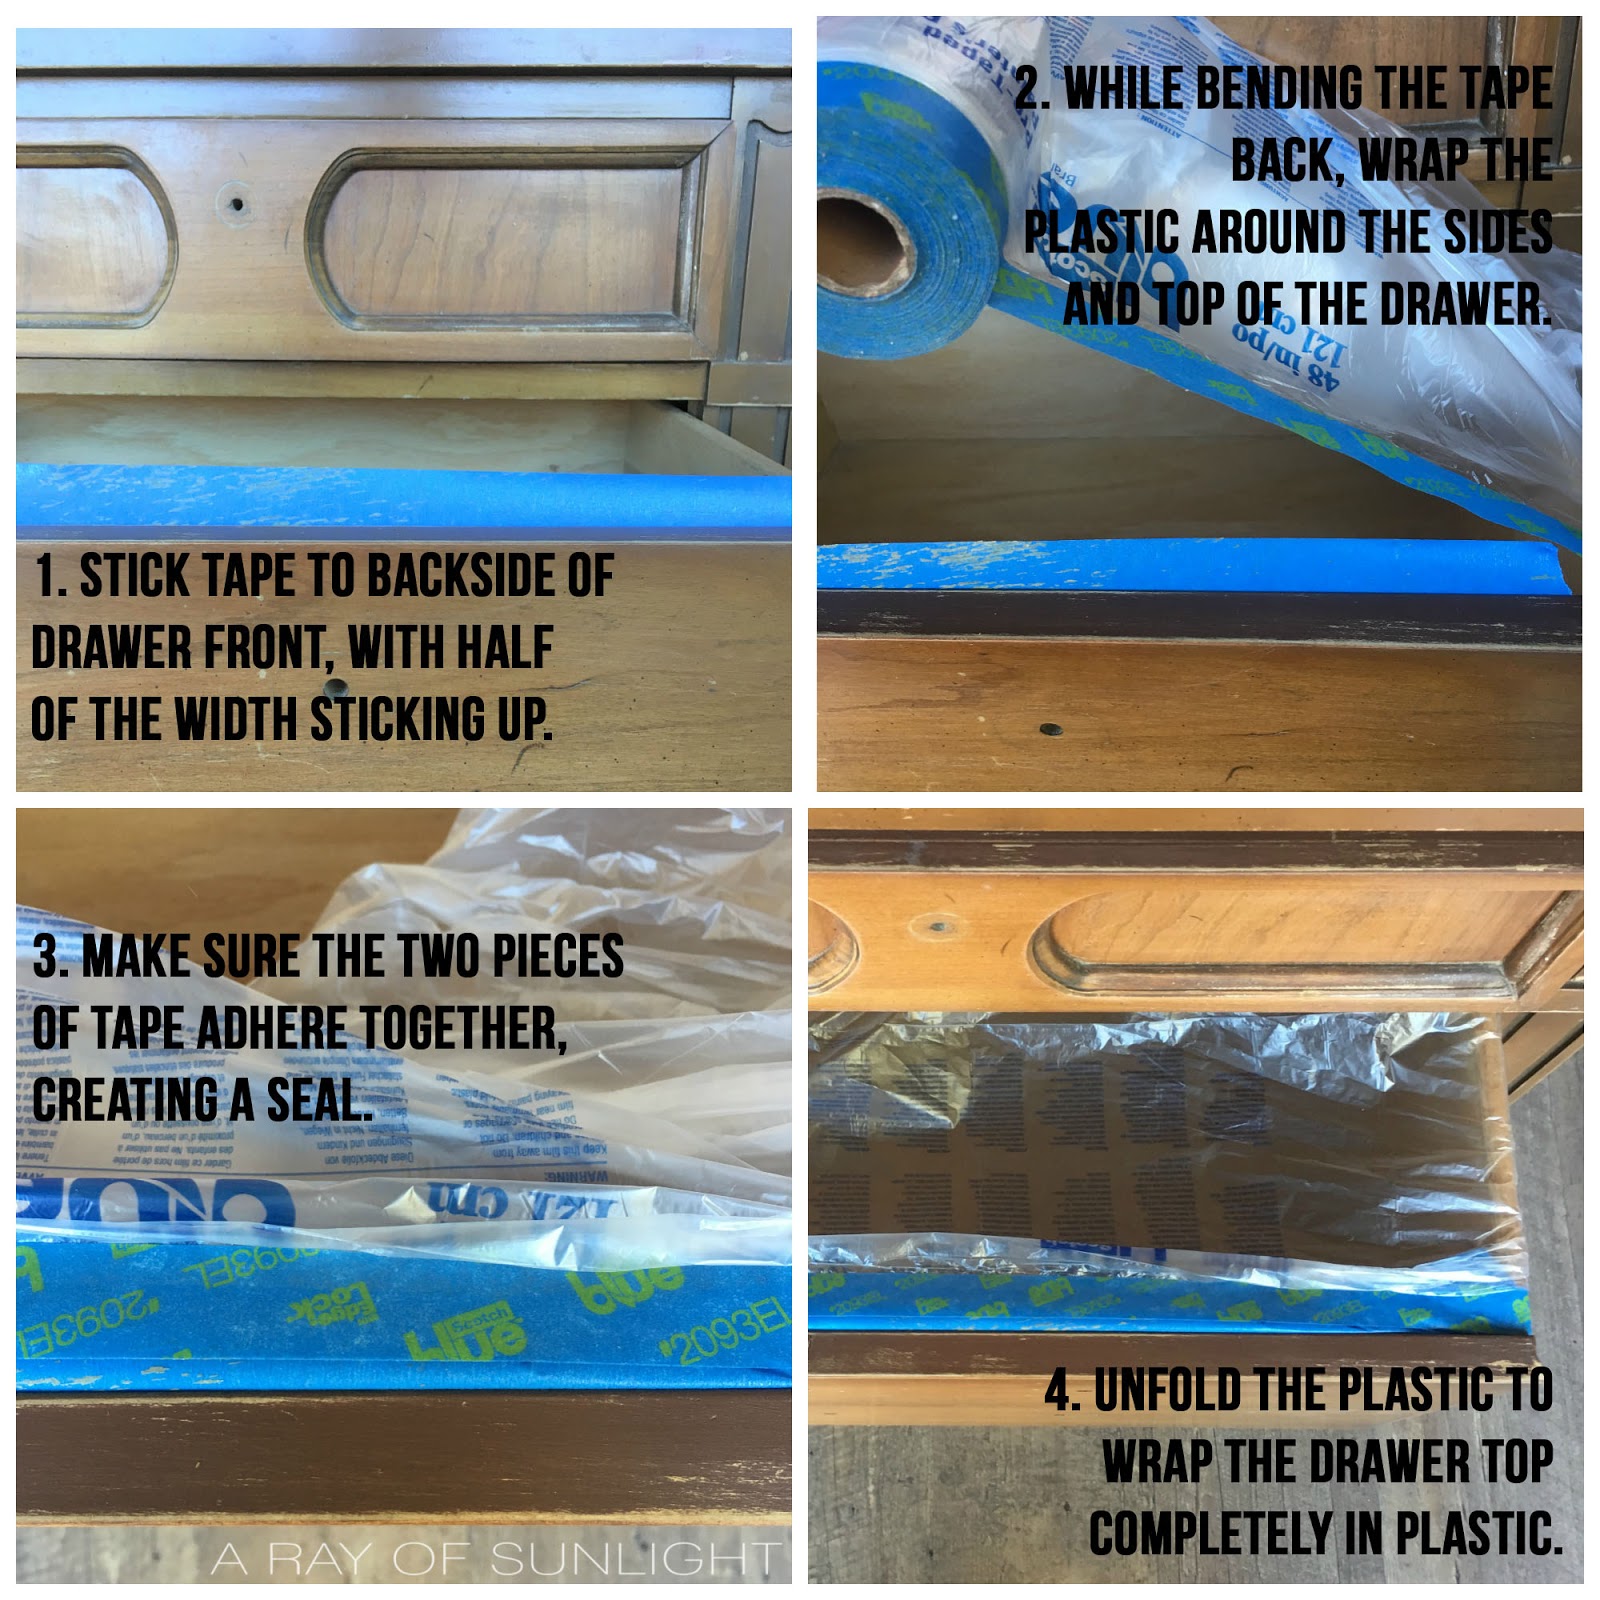
2) Then using the pre-taped plastic, wrap the sides and top of each drawer while bending that first piece of tape back so the sticky sides of both tapes come together.
3) This creates a seal so the paint can’t overspray inside of the dresser.
4) We then unfold the plastic, and let it drape down each side and the backside. Completely cover the top and sides of the drawer with the plastic.
Here’s our more detailed guide on how to tape off drawers for painting with a paint sprayer.
Can you Spray Paint with the Drawers in the Furniture?
Once each drawer is completely wrapped up, we push the drawers back into the furniture and get ready to paint.
For us this is the best option because it leaves the inside of the dresser paint free (as it should be) and it saves on space.
Would you like to save this?
When we didn’t put the drawers back into the furniture we would then have to use more plastic on the ground, more backyard space and it would kill my back to bend over to paint each and every drawer.
We tried setting the drawers up on buckets or boxes, but then we had to drag out even more supplies each time we needed to paint, and it was just a huge pain.
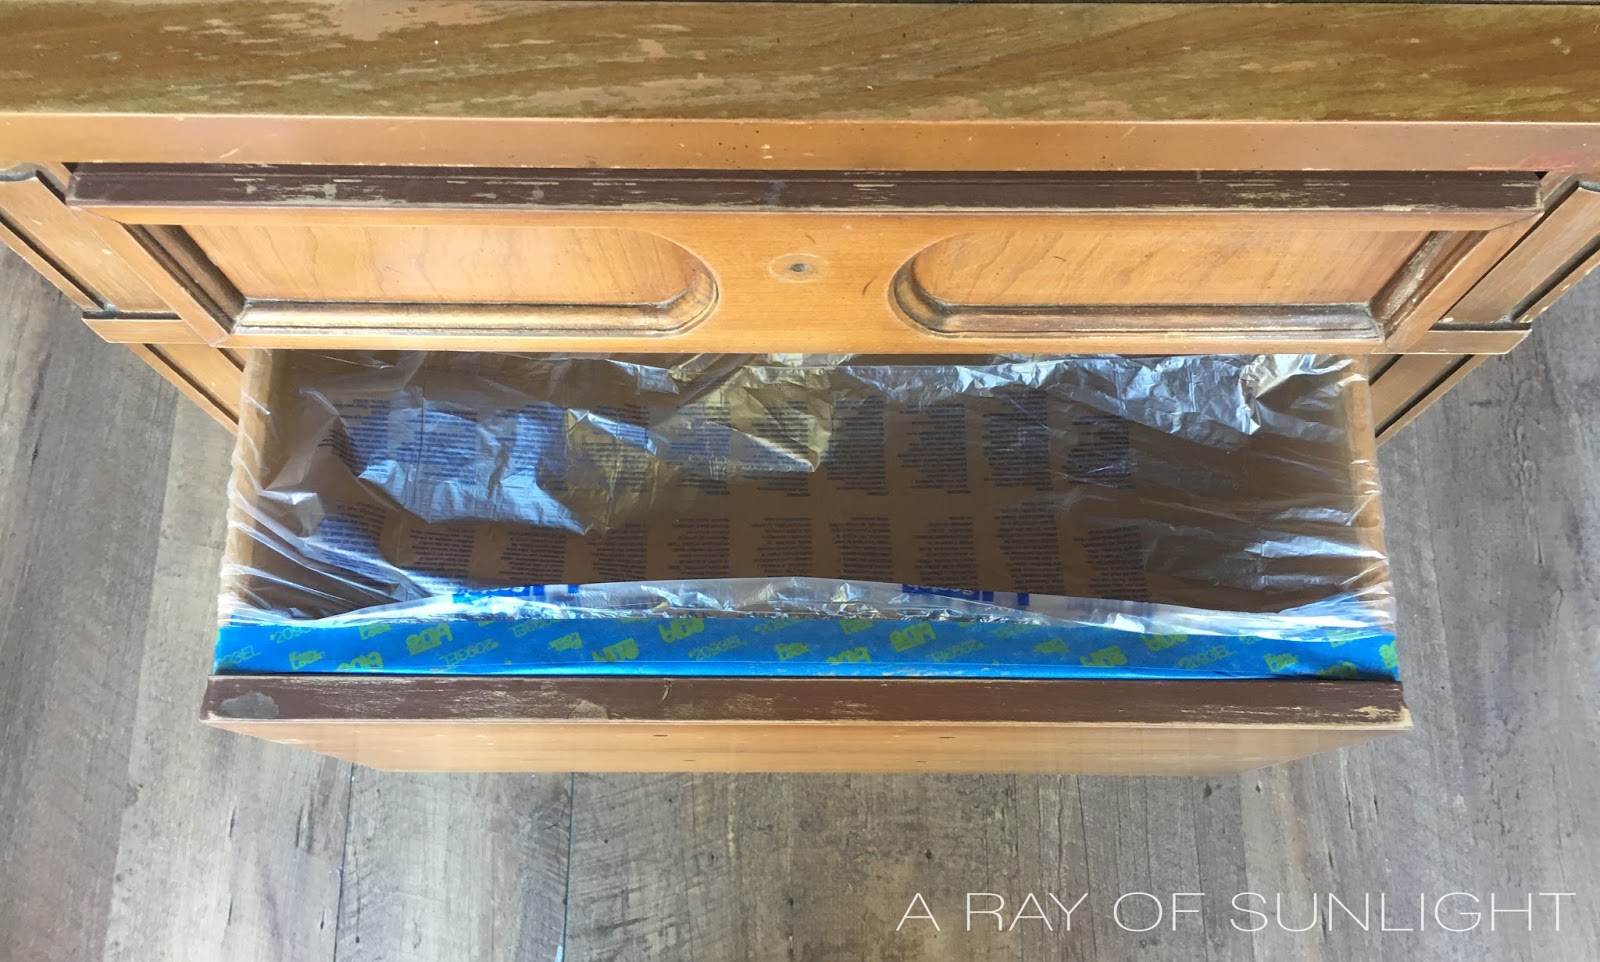
When each drawer is taped like this we are able to open the drawers up just enough to reach the top and sides (or right around the drawer openings on the furniture body) while spraying.
A lot of times we leave all the drawers closed until we have full coverage everywhere else, and then open up the drawers just enough to get the places that were missed.
Depending on the style, the drawer fronts either slide in completely, blocking the top and sides of the drawer fronts from paint; or the drawer fronts hit the furniture, blocking the area right behind the drawer fronts from paint. We have to make sure those areas get full coverage.
If you haven’t taped like the pictures above then the paint sprayer will overspray the paint into the drawer by slipping in between the tape and drawer front.
That’s why the first piece of tape is so important!
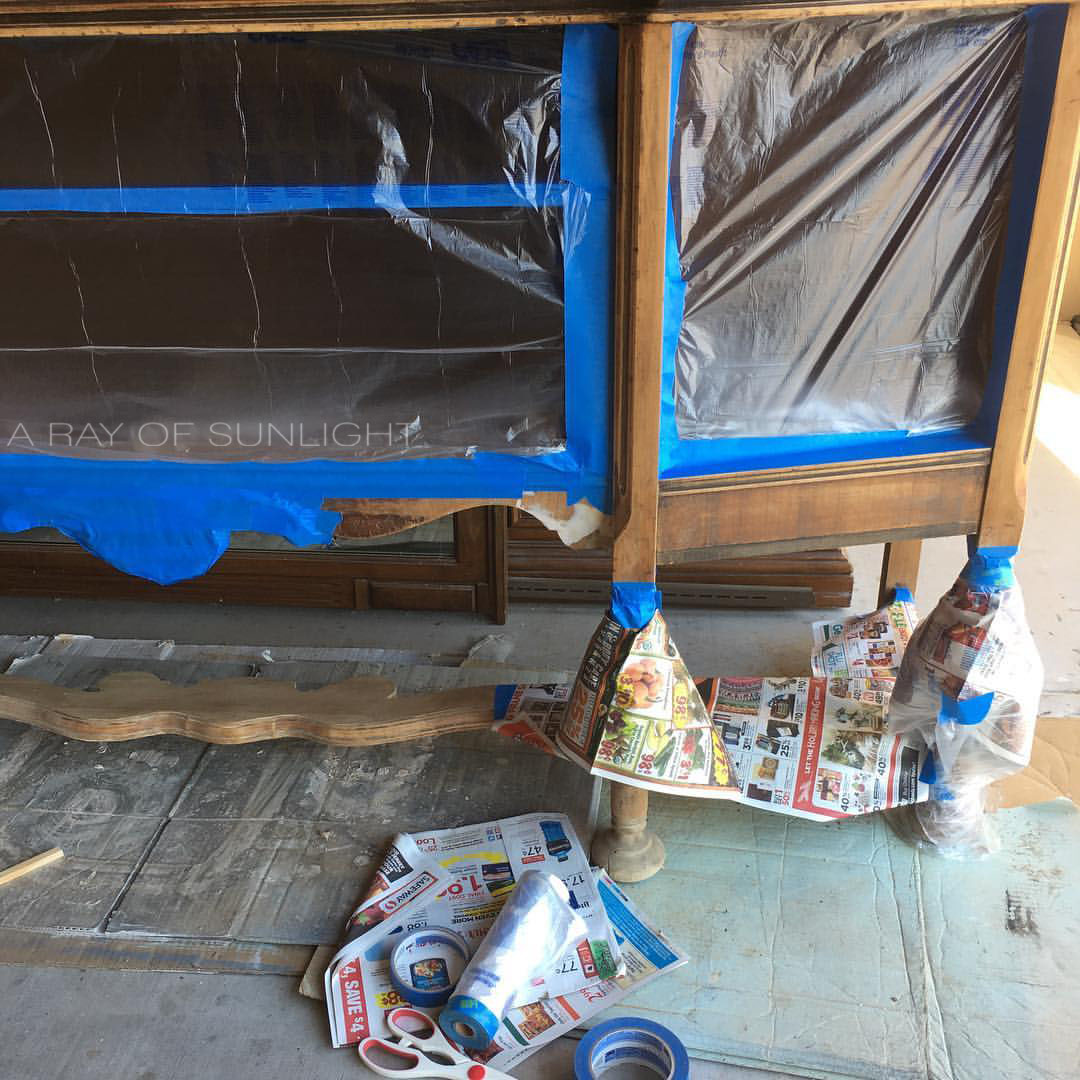
How to Protect Cabinets from Overspray
When working with cabinet spaces that we don’t want to paint, we tape off all the edges with plastic or paper and make sure that there aren’t any holes or cracks where the over spray can get through.
Most of the time though, we end up painting the inside of the cabinets to match the outside finish.
You’ll be so glad you took a little bit of extra time to make sure you protect your finish and furniture to make your sprayed finish look even more professional.
If you wonder what paint sprayer we use and why we LOVE it, check out our honest Wagner Double Duty paint sprayer review here. Learn how to thin paint for a Wagner sprayer here.
Note: The Double Duty sprayer has been discontinued, and here is the new model: the Wagner Control Spray 250 sprayer. It’s very similar to the Double Duty, except it does not come with 2 containers or the viscosity cup anymore.


Can I use regular tape instead of painter’s tape to protect surfaces from overspray?
Well, you can use regular tape to protect surfaces from overspray, but we don’t recommend it. Regular tape may not adhere as well as painter’s tape and could potentially allow overspray to seep through.
You can learn more on how to prevent paint bleed through painter’s tape here so you can avoid this issue.
It may not provide the same level of protection and could even potentially damage the surface being painted if left on for too long. It is always best to use painter’s tape specifically designed for this purpose.
Painter’s tape is designed to easily adhere to surfaces, create a seal, and can be easily removed without leaving any residue or damaging the surface. It also allows for clean, sharp lines when painting.
So while it may be tempting to use regular tape because it’s cheaper or more readily available, using painter’s tape will save you time and effort in the long run by providing better protection and results.
Now you know all the tips and tricks for protecting your furniture and surfaces from overspray when using a paint sprayer.
To sum it up, be sure to properly prepare your work area by using painter’s tape and pre-taped plastic, and securely taping off any areas you don’t want painted. Also, make sure to use painter’s tape instead of regular tape for the best results!

How to Prevent Overspray When Painting Furniture
Using a paint sprayer can be messy if you don’t protect the surroundings, and furniture from overspray. So here’s how to prevent overspray when painting furniture.
Materials
Tools
Instructions
- To protect the floor from overspray and/or to protect the finish from getting dirt and debris all over it, lay cardboard on the ground.
- Make sure all furniture hardware is removed, including the door hinges.
- Grab a piece of painters tape that is the same width of the drawer and stick it onto the backside of the drawer front. It needs to go from one side of the drawer to the other and stick up above the drawer at least a half inch.
- Then using the pre-taped plastic, wrap the sides and top of each drawer while bending that first piece of tape back so the sticky sides of both tapes come together. This creates a seal so the paint can’t overspray inside of the dresser.
- Unfold the plastic, and let it drape down each side and the backside. Completely cover the top and sides of the drawer with the plastic.
- Once each drawer is completely wrapped up, we push the drawers back into the furniture and get ready to spray paint!
Recommended Products
As an Amazon Associate and member of other affiliate programs, I earn from qualifying purchases.


More Paint Sprayer Resources
- Painting Furniture with a Sprayer
- How to Clean a Wagner Paint Sprayer
- How to Spray Polyurethane
- Best HVLP Paint Sprayers for Furniture
- Wagner VS HomeRight Paint Sprayers
Follow us on YouTube to get more tips for painting furniture. Or share your project with us on our Facebook Group and be part of our community. See you there!
A very good blog. You’ll be so glad you took a little bit of extra time to make sure you protect your finish and furniture to make your sprayed finish look even more professional.
Do you not paint the sides of the drawers? Trying to figure out what does and doesn’t get painted? Paint the inside of the cabinets? I’m painting an unfinished built-in desk/entertainment area with cabinets and drawers! Thanks in advance for any assistance!
Hey Kim!
I personally usually only paint where the existing finish was. So typically I paint the drawer fronts, and the outside of the furniture. I usually don’t paint the back of a piece unless it was already finished off (like a desk that was meant to be in the middle of the room instead of against the wall.)
If the drawers are stained on the inside from a spill or something, then I will paint the inside to make it look nice. Same thing with the sides of the drawers.
As for cabinets, if the cabinets have stains, or deep scratches, then I paint them. If they are really well kept inside then I keep them stained and just freshen them up.
In your case, since it sounds like you’re working with a brand new piece, I would still paint inside the cabinets since I’m assuming it hasn’t been finished off with a stain and poly. I wouldn’t paint the sides or insides of the drawers though.
Best of luck!
This was so helpful! I have 3 IKEA dressers I want to paint and I had planned on painting everything before I put it together. Reading about how you paint with the drawers in (and why) made me rethink my plan.