How to Clean Wagner Stain Sprayer
If you have invested in a Wagner stain sprayer, you know that it’s one of the best tools for stain jobs. However, after using your trusty Wagner stain sprayer, you need to give it some TLC. So you should know how to clean Wagner stain sprayer!
Using a sprayer on furniture makes staining more efficient, and making sure the tool stays in top condition keeps it ready to tackle your next staining projects.

Aside from painting, staining is another popular way to add color to wood, whether it’s for furniture, decks, or other wooden structures. Staining allows you to enhance the natural beauty of the wood while still protecting it from wear and tear. It also requires less upkeep compared to paint jobs.
Using a stain sprayer like Wagner’s can make the process easier and quicker. Instead of tediously brushing on each layer, the sprayer lets you apply it smoothly and evenly.
Plus, with a stain sprayer, you have more control over the amount of stain being applied, resulting in less waste and better coverage.
Importance of Cleaning A Stain Sprayer
After every use of your stain sprayer, it’s important to clean it thoroughly. Not only does it keep the sprayer in good condition, but also makes sure that your next projects will go smoothly.
If you’ve used a spray gun before, you know how easily they can get clogged. Stains and other debris can build up in the nozzle and hose, causing uneven spray patterns or even completely blocking the flow.
Regularly cleaning your sprayer after each use prevents clogging, saving you time and frustration during your next staining project.
A clean stain sprayer is a well functioning one! Proper maintenance and cleaning can extend its lifespan. This prevents any potential damage that may occur if debris is left inside the sprayer for a long time. It also helps prevent rusting, which can greatly affect the sprayer’s performance.
And of course, a well maintained stain sprayer lasts longer, meaning you won’t have to replace it as often. It’s definitely worth the extra bit of time and effort to clean your Wagner stain sprayer after each use – saves you money in the long run!
Supplies Used for Cleaning Wagner Stain Sprayer
As an Amazon Associate, I earn from qualifying purchases. I also may earn from other qualifying purchases with other companies or get free product to review and use. All opinions are my own.
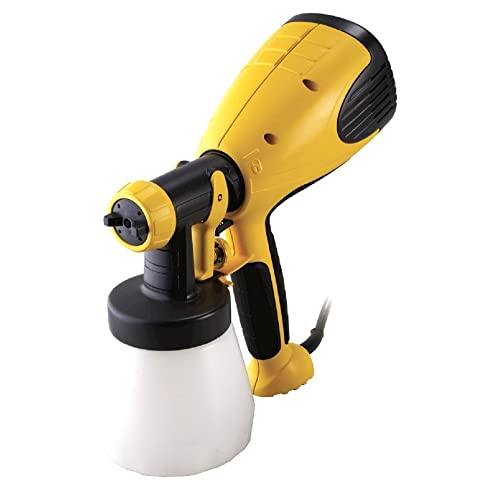
- Wagner Stain Sprayer
- Cleaning Solution (Warm Soapy Water or Mineral Spirits)
- Empty Container for stain disposal
- Cleaning Brush
- Soft Cloth
Steps for Cleaning Wagner Stain Sprayer
Now let’s get into the simple steps and tips on how to clean Wagner stain sprayer.
Empty and Rinse Stain Container
Start by turning off the turbine before you remove the container. We don’t want any accidents happening! Once you’ve double checked that the sprayer is totally off, then you can continue.
Next, empty any remaining stain in the container. Transfer it back to its original container if you plan to use it again. Otherwise, dispose of them properly.

After emptying the container, rinse it with a cleaning solution. Use warm, soapy water, unless you used oil based materials. In that case, use mineral spirits instead. Make sure to thoroughly clean the container both inside and out!
Here’s what to use to clean paint sprayer to learn more about the right products to use to clean a paint or stain sprayer!
Disassemble and Clean Sprayer Parts
Let’s take apart the different parts of your Wagner stain sprayer. Remove the material nozzle, pickup tube, and spray attachment.
After disassembling these detachable parts, give each of them a good cleaning with warm soapy water (or mineral spirits) to remove any remaining stain or debris.

Would you like to save this?
Don’t forget the air vent on the suction tube! A soft bristled cleaning brush can effectively clean this hard to reach spot.
Now let’s separate the turbine from the nozzle. Clean the rear of the nozzle with the same cleaning solution.
Make sure you give each part a good, deep clean. If not, the stain can dry up and may affect your Wagner stain sprayer’s performance in the future. Don’t rush and take your time in cleaning! For thorough cleaning, here’s how to take apart a Wagner paint sprayer.
Check out our blog post about Wagner paint sprayer spitting to learn more about the reason and how to fix this issue!


Quick Cleaning Stain Sprayer
If you’re just switching colors on your stain sprayer, a quick clean will do! Quick cleaning also comes in handy after each use, especially if you’re working on a project that uses multiple colors.
Simply fill the container with the cleaning solution and run it through the gun until the old stain is completely flushed out. This helps prevent any leftover stain from mixing with the new one, resulting in an uneven color.

But remember, quick cleaning is not meant to replace the deep cleaning process. You should still do a thorough cleaning after everything is done.
Let Dry and Reassemble Clean Stain Sprayer
After cleaning your Wagner stain sprayer, it’s important to let it dry completely. This may seem like an unnecessary step, but any remaining moisture can cause rusting or damage to the sprayer.
Leave it to air dry, or you can go ahead and use a soft cloth to wipe down the parts to speed up the drying process. And when your Wagner stain sprayer is completely clean and dry, it’s time to put everything back together. Make sure all parts are reassembled correctly and securely.

If you are using a Wagner paint sprayer here’s how to clean a Wagner paint sprayer!
Can you use a stain sprayer for paint or finishes besides stains?
You may wonder, “Can you use paint in a Wagner stain sprayer?” The answer is yes but with a few considerations. While stain sprayers are specifically designed for stains, they may be used for other finishes such as paint.
However, it’s important to keep in mind that these sprayers are not meant to handle thick paints and may require thinning out the paint before use.
You also need to make sure that the type of paint for furniture you use is suitable for a stain sprayer and won’t be affected by thinning. If your paint is too thick, you need to thin it out a little, so here’s how to thin paint for Wagner sprayer.
But the same thing applies – you must clean your Wagner stain sprayer after using it with paint or other finishes, to avoid any issues in the future.
Remember, a clean stain sprayer means a smoother staining process and a longer lifespan for your tool. So next time you’re done staining, don’t leave your sprayer dirty and neglected! Take the time to clean your Wagner stain sprayer properly and enjoy beautiful results each time.

How to Clean Wagner Stain Sprayer
You should know how to clean Wagner stain sprayer to keep it ready and in top condition to tackle your next staining projects.
Materials
- Wagner Stain Sprayer
- Cleaning Solution (Warm Soapy Water)
- Mineral Spirits
- Empty Container for Stain Disposal
- Soft Cloth
Tools
Instructions
- Start by turning off the stain sprayer to prevent any accidents. Then, empty the remaining stain from the container and rinse it with warm soapy water or mineral spirits (for oil based materials).
- Disassemble the detachable parts of the sprayer, such as the material nozzle and spray attachment, and clean them thoroughly with the same cleaning solution. Don't forget to also clean the air vent on the suction tube with a soft bristled brush.
- Separate the turbine from the nozzle and clean the rear of the nozzle with the cleaning solution. Take your time in cleaning to make sure all parts are free from stain or debris.
- For a quick clean, simply run the cleaning solution through the sprayer until old stain is flushed out. But remember, this does not replace a thorough cleaning after use.
- Let the sprayer dry completely before reassembling all parts. You can speed up the drying process by using a soft cloth to wipe down the sprayer.
- Reassemble all parts correctly and securely before using the Wagner stain sprayer again.
Recommended Products
As an Amazon Associate and member of other affiliate programs, I earn from qualifying purchases.


More Paint Sprayer Tips
- Wagner Paint Sprayer Troubleshooting
- How To Use A Paint Sprayer
- Using a Paint Sprayer for Outdoor Projects
- Wagner Paint Sprayer Tips
- Spraying Fusion Mineral Paint
Follow us on YouTube to get more tips for painting furniture. Or share your project with us on our Facebook Group and be part of our community. See you there!